Dunster House Log Cabin Build
Discussion


There a plenty of videos on this topic, but I thought I'd post a written build experience. The cabin I have bought is this slightly ludicrously named one: https://dunsterhouse.co.uk/log-cabins/log-cabin-ga...
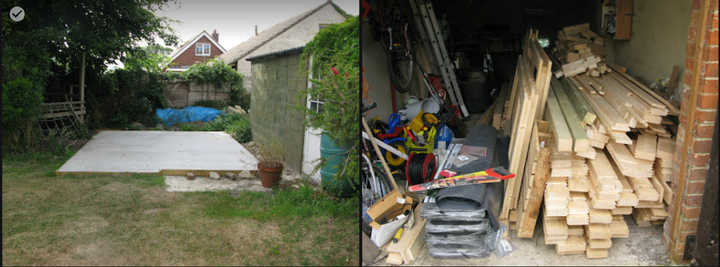
Ordering and delivery were easy. I paid my money and 3 weeks later I ended up with about 3 cubic meters of wood on the driveway.
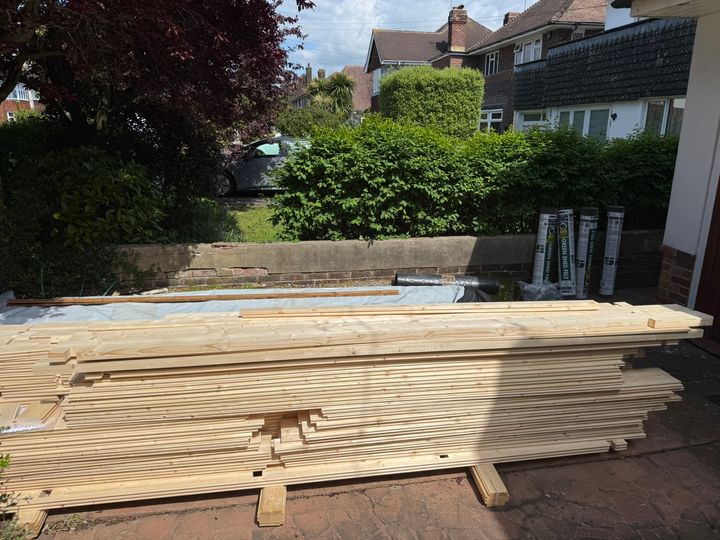
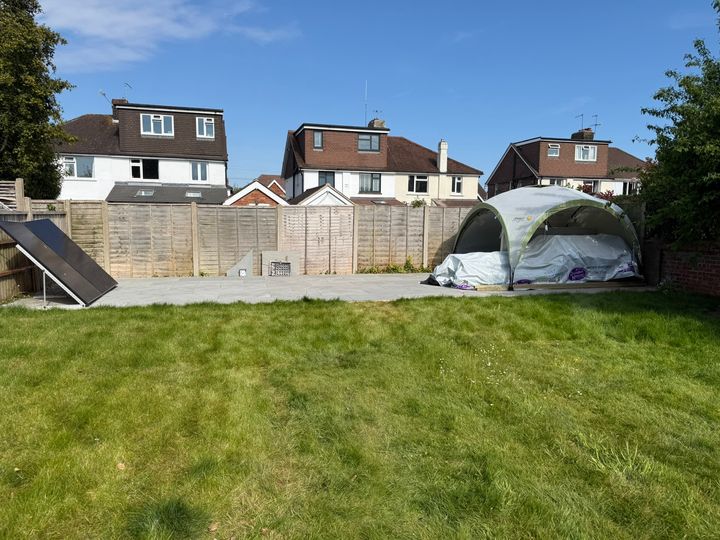
The first job was to move it all to the work site which is a patio at the foot of my garden. Just moving and restacking everything took me half a day. But it did give me the opportunity to check the inventory and stack it in the order I would need the parts. All the screws and fixings come with the kit.
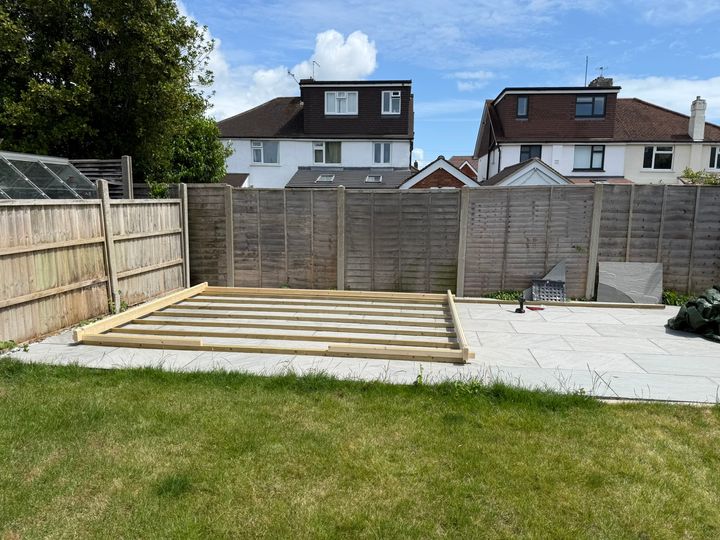
Session 1 took a couple of hours and was spent laying out the bearers, which are the pressure treated bits of wood that the cabin will rest on. On top of these you screw the bottom logs and it's really important to make sure everything is square and level at this point. As well as making sure both diagonals were the same distance apart I used a set square to check the corners too.
Tools used:
Cordless drill/driver with an extra long (160mm x3mm) drill bit.
Set square and spirit level
Tape measure and pencil
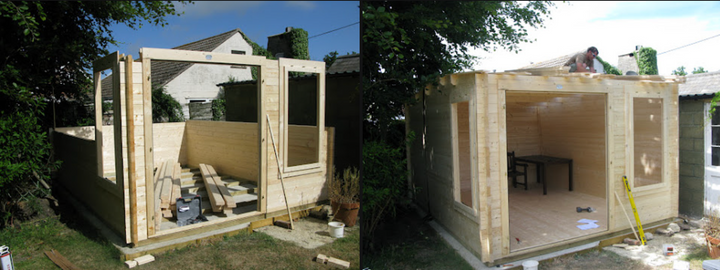
Session 2 was a full day's work spent stacking the logs of the main cabin.
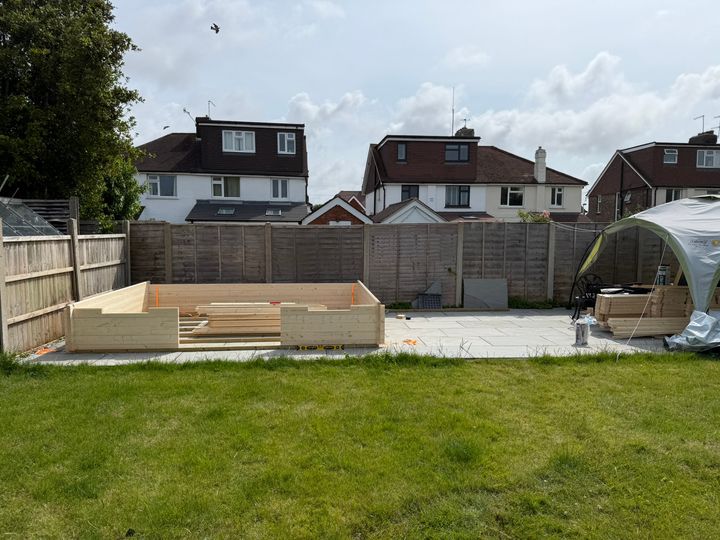
One of the difficulties was keeping the logs straight and level when they have developed a bit of a bow. The logs are kiln dried spruce, and had been left out under cover for a month so had absorbed some water but not too bad. My solution to this problem was the orange rachet straps you can see in some of the photos. This stopped seesawing of the logs as you hammer them into place with a rubber mallet and an offcut block of log. Also if the bow is horizontal you can bash the logs sideways under the tension of the straps which allows them to drop into place.
About a third of the way up you assemble the door frame and fit that and the windows.
As I neared the top, the logs at the top right had developed a distinct lean outwards. I could push them in easily enough but knew it would be an issue when I needed to tie it all together with the first full width log above the door and window frames which were about 2" out.
Rachet straps again to the rescue, this time with 3 of them in series around the outside circumference of the cabin. With them holding the outer walls vertical it was then just a matter of aligning the door and window frames till it all could be teased into place with the mallet and block.
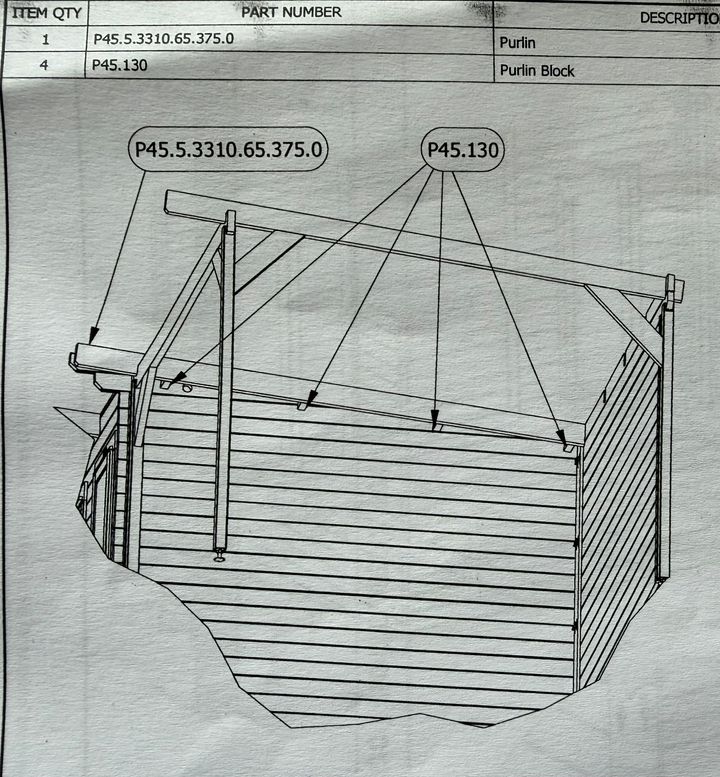
At the end of Session 2 the main cabin walls were up and the purlins (roof beams) were installed and screwed into place. I left a rachet strap in place holding each corner together to encourage it to settle.
Tools used:
Set square and spirit level
Rubber Mallet
8x 5m endless rachet straps
Cordless drill/driver with an extra long (160mm x3mm) drill bit
Step ladder
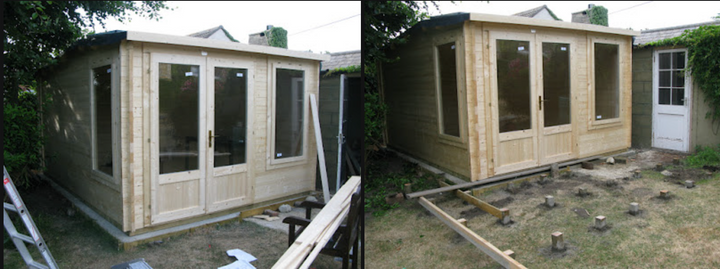
That's it so far. Next steps are the gazebo extension walls and pillars, then it's the roof and floor.
Ordering and delivery were easy. I paid my money and 3 weeks later I ended up with about 3 cubic meters of wood on the driveway.
The first job was to move it all to the work site which is a patio at the foot of my garden. Just moving and restacking everything took me half a day. But it did give me the opportunity to check the inventory and stack it in the order I would need the parts. All the screws and fixings come with the kit.
Session 1 took a couple of hours and was spent laying out the bearers, which are the pressure treated bits of wood that the cabin will rest on. On top of these you screw the bottom logs and it's really important to make sure everything is square and level at this point. As well as making sure both diagonals were the same distance apart I used a set square to check the corners too.
Tools used:
Cordless drill/driver with an extra long (160mm x3mm) drill bit.
Set square and spirit level
Tape measure and pencil
Session 2 was a full day's work spent stacking the logs of the main cabin.
One of the difficulties was keeping the logs straight and level when they have developed a bit of a bow. The logs are kiln dried spruce, and had been left out under cover for a month so had absorbed some water but not too bad. My solution to this problem was the orange rachet straps you can see in some of the photos. This stopped seesawing of the logs as you hammer them into place with a rubber mallet and an offcut block of log. Also if the bow is horizontal you can bash the logs sideways under the tension of the straps which allows them to drop into place.
About a third of the way up you assemble the door frame and fit that and the windows.
As I neared the top, the logs at the top right had developed a distinct lean outwards. I could push them in easily enough but knew it would be an issue when I needed to tie it all together with the first full width log above the door and window frames which were about 2" out.
Rachet straps again to the rescue, this time with 3 of them in series around the outside circumference of the cabin. With them holding the outer walls vertical it was then just a matter of aligning the door and window frames till it all could be teased into place with the mallet and block.
At the end of Session 2 the main cabin walls were up and the purlins (roof beams) were installed and screwed into place. I left a rachet strap in place holding each corner together to encourage it to settle.
Tools used:
Set square and spirit level
Rubber Mallet
8x 5m endless rachet straps
Cordless drill/driver with an extra long (160mm x3mm) drill bit
Step ladder
That's it so far. Next steps are the gazebo extension walls and pillars, then it's the roof and floor.
Murph7355 said:
I have one in a pile of parts in my drive 
Will be much slower progress than yours (already has been)...base bearers are laid. Decided to put rodent proof mesh on the bottom, and an putting insultation into the floor (and ultimately on the roof).
Watching with interest
Long time no see! I also have the floor insulation which looks like a pain to fit. Now the untreated timber is out in the open it's a race to get it finished, treated and painted.Will be much slower progress than yours (already has been)...base bearers are laid. Decided to put rodent proof mesh on the bottom, and an putting insultation into the floor (and ultimately on the roof).
Watching with interest
I got one of these type of buildings as a double garage a few years ago. Mine was like all of them soft wood but has a set of hardwood stripes around the bottom edge to try and prevent, stop or delay any creeping rot. I didn't think this would suffient on the concrete base I'd had constructed so I did a little research and found some EPDM rubber with what I hoped would be sufficient hardness to support the load of the garage. I bought enough rolls of it to be laid underneath the hardwood base all around the structure including the garage door thresholds and asked the team constructing the garage to lay it as I directed.
They did and they were sufficiently impressed as they built and completed the structure to recommend it to one of their managers as a suggestion for all builds. I found that due to concrete base small defects there was a small amount of leakage in certain areas so I went round with some Sika-Flex sealant and six years on I still have a bone dry garage with no leaks in or out and no rot or deterioration of any of the wood.
The one defect I found was some longditudinal bending of one or two of the long almost 5.5m side lengths of the garage - this should have been prevented by the inserted meta thread rods in the corners of the building but again some cheapskate somewhere had specified normal nuts instead of nylocks so the nuts unwound themselves after time due to pressure/expansion and contraction. I managed to notice and re-tighten the nuts in time to halt the deformation and replaced the nuts I could get to with nylocs.
TLDR; rubber base strips to prevent rot from standing water and nylocs on the threaded bars if they are fitted.
chopper602 said:
This is a Dunster House 'summer house'. Straight forward enough to erect with my mate 'Big Dave', but definitely some warped wood in the pile of bits. The roof was the hardest to construct as all the shingles had to be cut by hand. Three years on it's still dry inside . . .
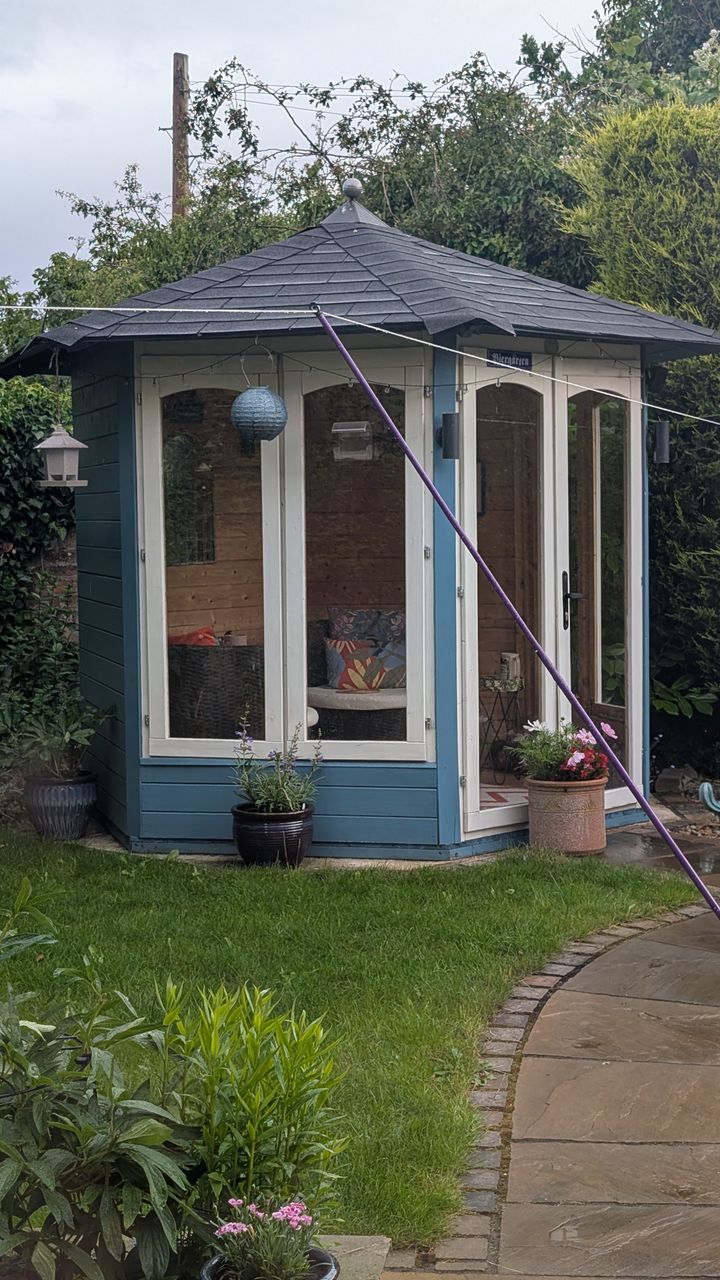
our shingles on our 5mx3m cabin came pre-cut - on strips of several together so quick and easy to fit.Caruso said:
hairy vx said:
Good work OP, is this a 2 man job?
I m doing it solo so far.
We have got a Dunster House in the back garden, I think it might be a Terminator, 4.5m x 2.5m, I had two mates help out with that.
I could not have done it by myself.
That said, I didn't use ratchet straps, that would have helped a lot.
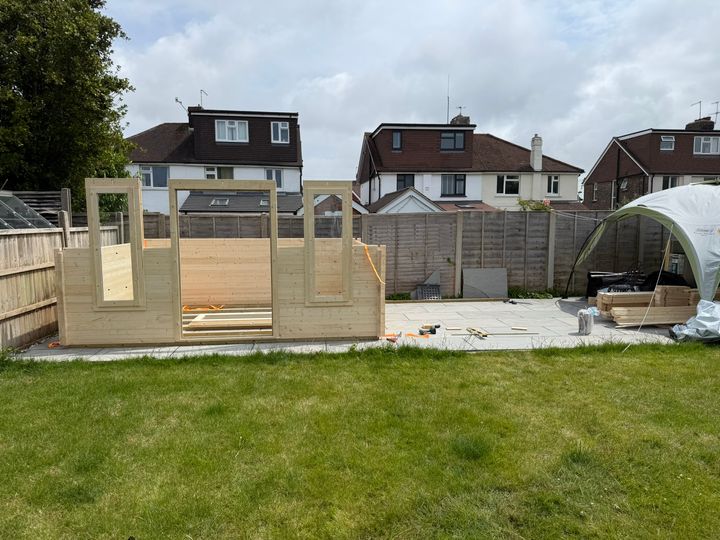
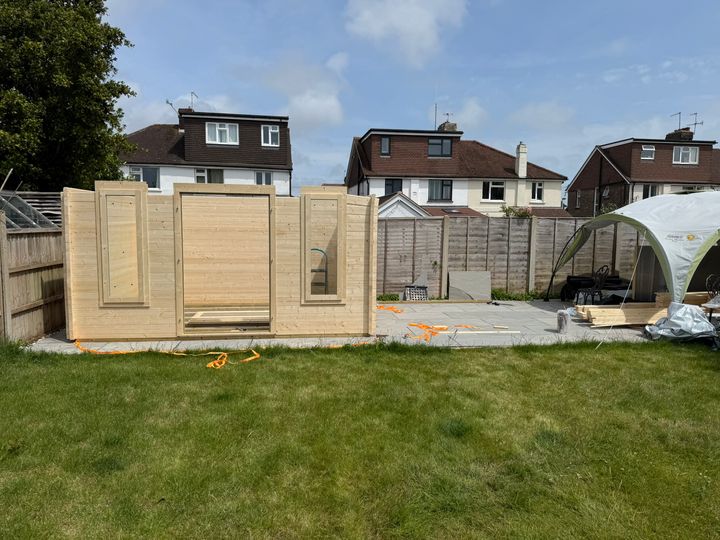
Session 3

This was a shortish 2hr session starting on the back wall of the gazebo extension.
It was mostly spent working out how it all fits together, the instructions are very brief and some of the illustrations would do Escher proud!
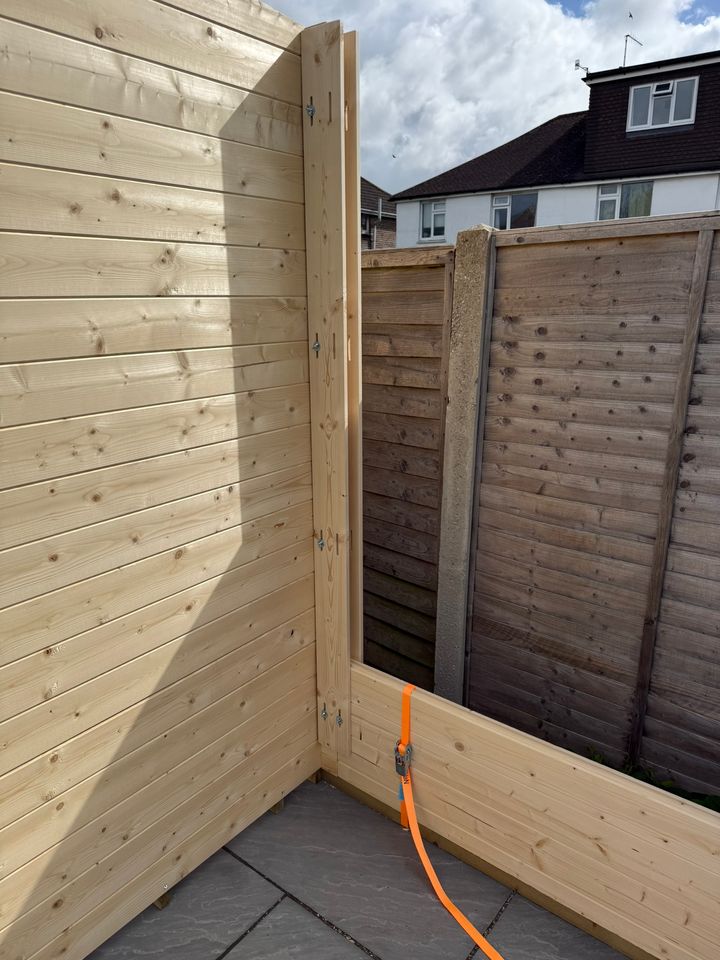
There was a bit of drilling and screwing to pre-assemble some of the wooden components such as this bit which will hold the back walls of the cabin and extension together.
I didn't go too high with the wall as I didn't want to leave it unsupported overnight, and I didn't have enough time to finish rest of the frame.
This was a shortish 2hr session starting on the back wall of the gazebo extension.
It was mostly spent working out how it all fits together, the instructions are very brief and some of the illustrations would do Escher proud!
There was a bit of drilling and screwing to pre-assemble some of the wooden components such as this bit which will hold the back walls of the cabin and extension together.
I didn't go too high with the wall as I didn't want to leave it unsupported overnight, and I didn't have enough time to finish rest of the frame.
Edited by Caruso on Tuesday 9th June 20:34
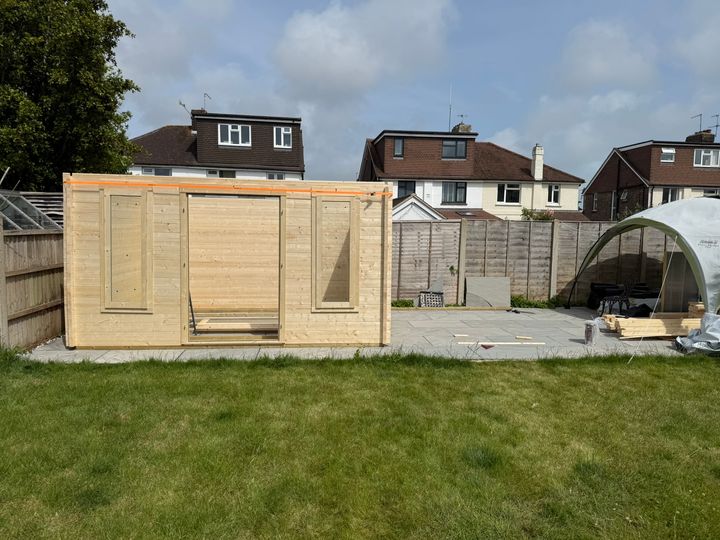
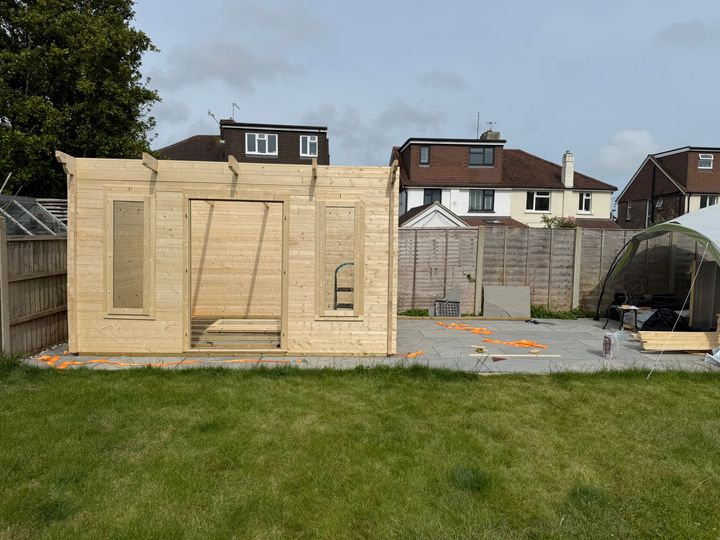
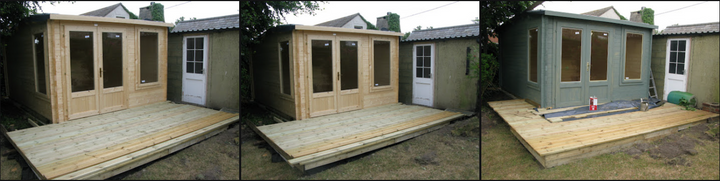
Session 4 was a 4 hour session finishing up the rear wall of the extension and putting the frame in place. I did need a 2nd pair of hands for this at one point for about 30mins.
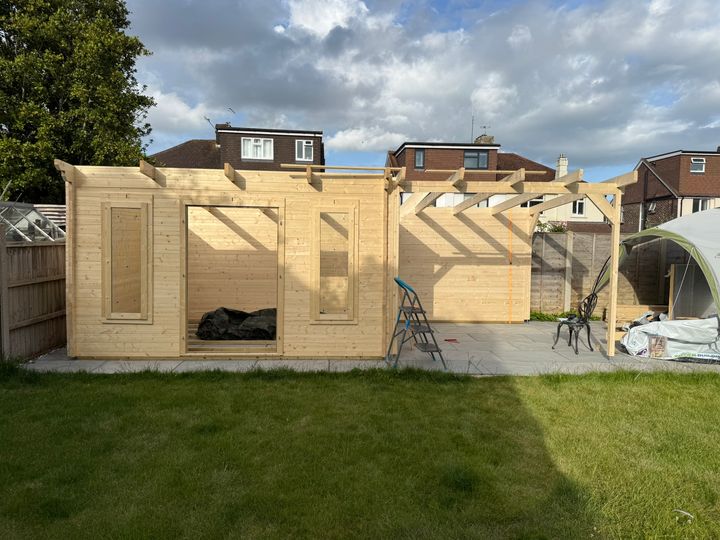
I should have taken more photos but needed to get on while I still had the light as I'd started after work. The instructions say to build the front posts and cross beam and then put it up, but measurements weren't provided about how much overlap to leave where the beam goes through the posts. So instead I attached the posts to wall logs front and back then had my assistant hold the unsupported post while I laid the beams on top so I could get the correct overlap and no gap between the wall logs and the beam. I was slightly hampered by the wind pushing the rear wall backwards which meant I had to remove and reposition one of the corner braces to make sure it was all straight.
As you might be able to see in the photos, 2 of the roof beams are quite twisted, and given how thick the wood was I had no way of bending them straight. I placed some of the roof boards on top to make sure the centre beam was in the right position where I'll need to nail 2 boards to 1 beam. I also made sure I used a non twisted beam for this centre one.
I did also have my first damaged log. The grooved bottom was damaged in 3 sections - looking like it had been stacked on 3 beams with an excessive load on top of it. Fortunately 1 spare of each of the largest logs in each kit is provided. This make sense as I guess you can cut it down to replace any of the smaller logs if needed. Thankfully there's only 1 size of log in the extension kit, so it fitted straight in.
Edited by Caruso on Tuesday 9th June 20:33
Nice work on a solo assemble!
We got one 16 years ago.....think it is 3.5m x 4.5m.
The arrival of the timber caused a 30 minute shutdown of the road and made local radio
Build took a few days with 3 of us:
Also involved a deck (which is now rather shonky & needs attention or replacing with a patio
I think the end result was nice:
Re-painted it a couple of months ago - outside looks good, although I had to reassemble a window that had rotted & adjust teh door which was dropping
I chose to screw the side window to the wall 'cos we never opened it & it would prevent future issues:


Also: despite giving it a good wood rot treatment after building, we do have something having burrowed into an internal rear corner, & I found some wood-boring holes (now 'treated').
No idea how to 'treat' the inside, which shows signs of fading and fatigue....welcome any ideas!
Not bad for 16 years in...
We got one 16 years ago.....think it is 3.5m x 4.5m.
The arrival of the timber caused a 30 minute shutdown of the road and made local radio
Build took a few days with 3 of us:
Also involved a deck (which is now rather shonky & needs attention or replacing with a patio
I think the end result was nice:
Re-painted it a couple of months ago - outside looks good, although I had to reassemble a window that had rotted & adjust teh door which was dropping
I chose to screw the side window to the wall 'cos we never opened it & it would prevent future issues:
Also: despite giving it a good wood rot treatment after building, we do have something having burrowed into an internal rear corner, & I found some wood-boring holes (now 'treated').
No idea how to 'treat' the inside, which shows signs of fading and fatigue....welcome any ideas!
Not bad for 16 years in...
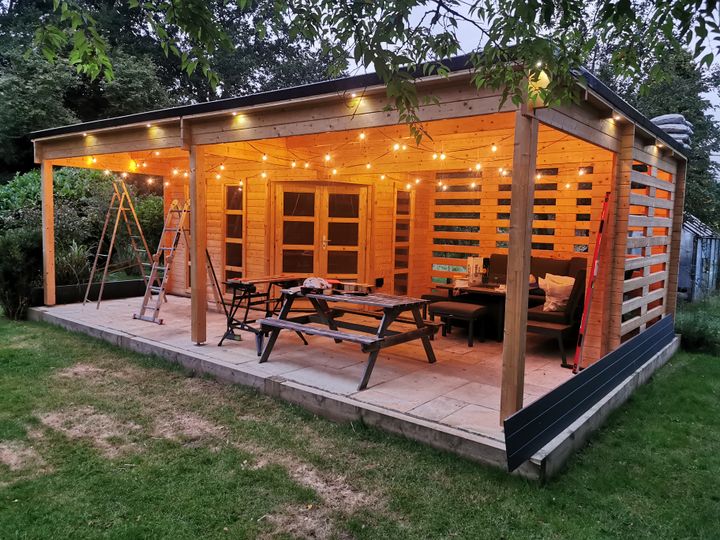
Not Dunster House, but did this Tuin version about 5 years ago. Was a very satisfying build. Pretty much went by the plan but did tweak it a little, including a double boarders and EPDM roof rather than single skin and felt. Had plenty of oil on it at the time but have been very lax in maintaining it so could now really do with a repaint. We went for the plastic/ABS bearers which was an upgrade but keeps the wood off the slabs. Don't use it as much as we thought we would but still a very worthwhile build.
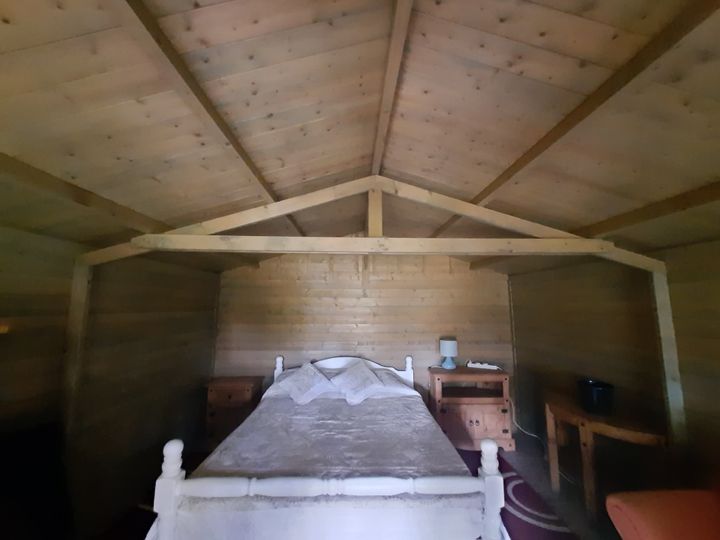
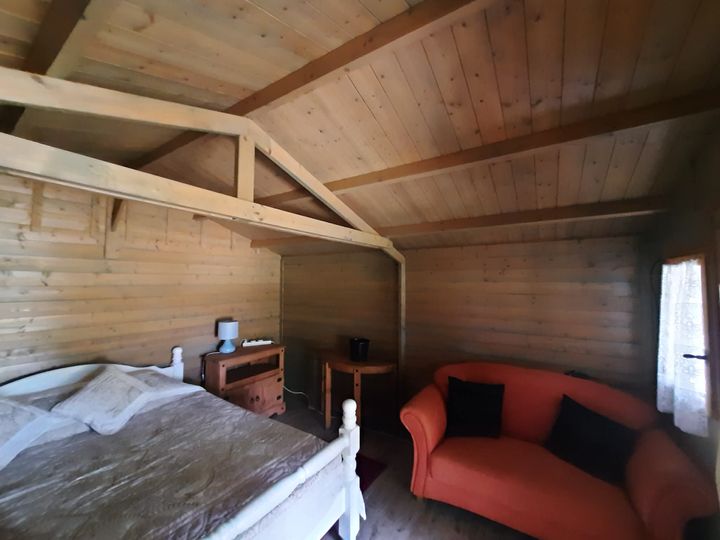
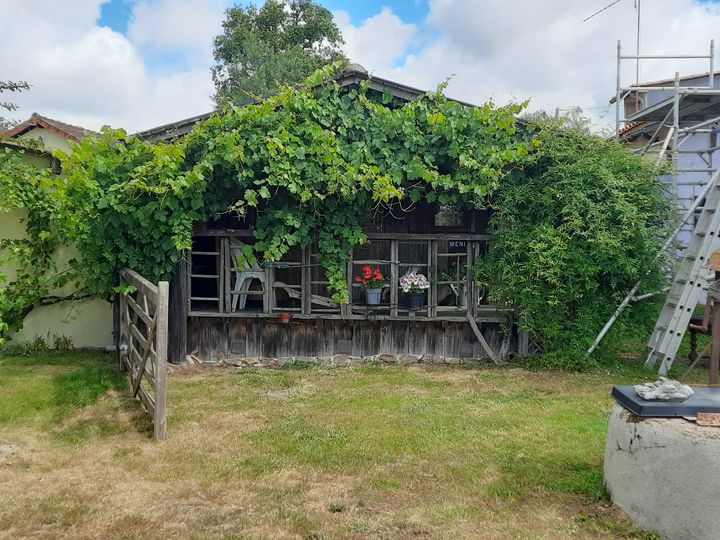
I’ve built a similar chalet here in France. Someone had bought one but never assembled it so sold it on to me.
I built it on a raised floor about 18 inches higher than the garden. I also added a covered terrace area using reclaimed oak beams and boards.
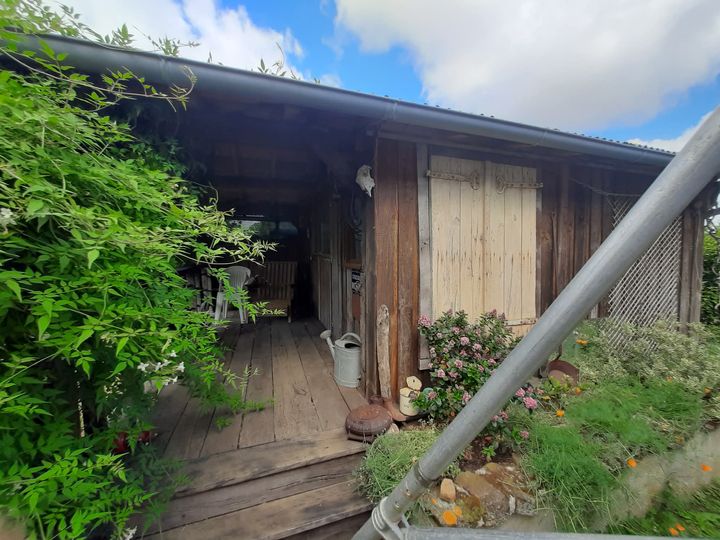
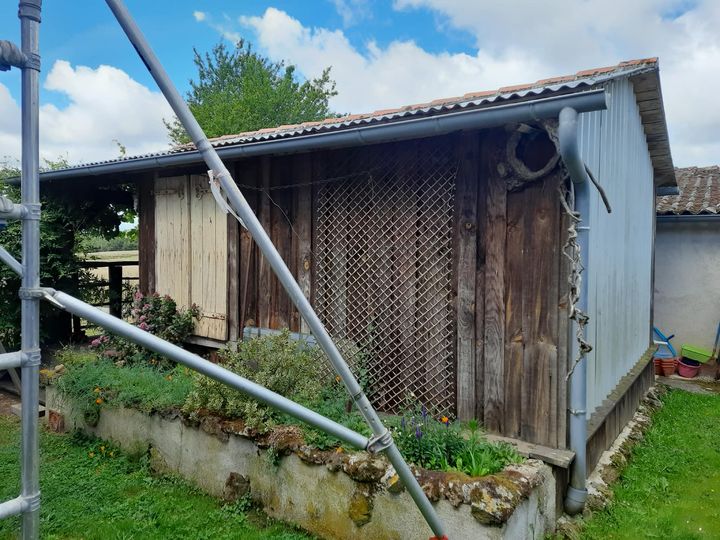
Once built I didn’t like the new look so went about cladding the exterior with insulation then vertical rough sawn boards and some profile tin at the back. Also insulated the roof externally, applied a membrane and put corrugated tin on top.
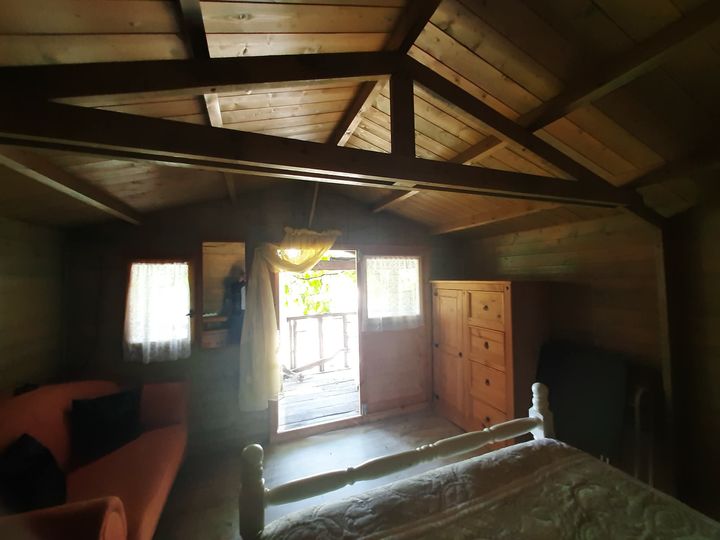
The inside is like a chalet and I’ve put a green tint on the wood and installed a centre A frame.
Not to everyone’s taste, but I’m happy with it.


I built it on a raised floor about 18 inches higher than the garden. I also added a covered terrace area using reclaimed oak beams and boards.
Once built I didn’t like the new look so went about cladding the exterior with insulation then vertical rough sawn boards and some profile tin at the back. Also insulated the roof externally, applied a membrane and put corrugated tin on top.
The inside is like a chalet and I’ve put a green tint on the wood and installed a centre A frame.
Not to everyone’s taste, but I’m happy with it.
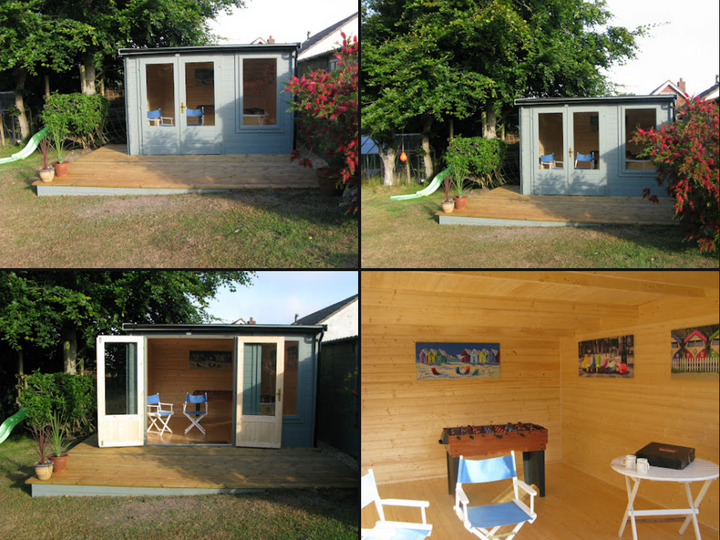
I think we did ours around 2010, 3 x 5, built for a kids 'den' with power, heater, a sofa, beanbags, TV and wifi, they used it a lot. My son especially as we had his X-Box in there and it was easy to regulate his time.
It lasted well as we treated it on assembly and was still in use when we sold the place in 2018.
EA pic when we sold in 2018
It lasted well as we treated it on assembly and was still in use when we sold the place in 2018.
EA pic when we sold in 2018
Gassing Station | Homes, Gardens and DIY | Top of Page | What's New | My Stuff