Broken Exhaust / Heat exchange ???
Discussion


Hello all
I've just driven out of the garage and it felt like I'd driven over something so I stopped and found this... Ouch.

I don't like the look of this much and am thinking about the £££ for a torn rubber pipe already, not to mention it looks like the metal piece it connects to may also have broken. It must have come loose during the last drive...
First question - if I remove these pieces, is it driveable for now as I needed to use the car tomorrow? I'm just wondering if this is something to do with feeding the hot air for heating the interior (although I'm happy to be told I'm miles off the mark - just a bit in shock at this right now).
Any advice gratefully received as always.
I've just driven out of the garage and it felt like I'd driven over something so I stopped and found this... Ouch.
I don't like the look of this much and am thinking about the £££ for a torn rubber pipe already, not to mention it looks like the metal piece it connects to may also have broken. It must have come loose during the last drive...
First question - if I remove these pieces, is it driveable for now as I needed to use the car tomorrow? I'm just wondering if this is something to do with feeding the hot air for heating the interior (although I'm happy to be told I'm miles off the mark - just a bit in shock at this right now).
Any advice gratefully received as always.
OK so I've put the car up on stands and taken off the broken bits. Here's the a stock picture of the affected parts:

The rectangular metal piece (I'm going to call it the flapper) is a little bent at the "slot exit", possibly fixable and has a small piece broken off where one of the orange rubber pipes attaches. The flap inside seems unaffected. Possibly not the end of the world until I can find a suitable replacement. The orange pipes are clearly FUBAR at both ends. so I've cut them back. I think my understanding was not a million miles off in that this feeds the exhaust gasses into the heat exchanger which heats the cabin when required. The heat exchanger then passes these gasses through the back boxes. So in my case the exhaust gases will exit from the torn/cut orange pipe rather than the exhaust tip. And I won't have any interior heating for a while. Did I miss anything?
Will it be OK to drive it like this tomorrow? 30 miles each way, mainly motorway.
Edit: I just started it briefly, exhaust tips seem to have gases exiting the same on both sides, so perhaps there is only exhaust gases going down this "bypass route" when you want heating? Confused.com
Also - improved terminology for the parts would be useful in sourcing replacements please! I'm online now trying to source the rubber pipes and they're coming in at over £200 each - for rubber bits! There must be an alternative but my googling has failed so far...
Edited by Ocho on Friday 5th September 17:16
Edited by Ocho on Friday 5th September 17:53
Edited by Ocho on Friday 5th September 18:00
Yep, safe to run in that "modified" configuration.
Your heating and screen de-misting may be compromised, but no exhaust fumes will enter the system or the car.
The heat exchanger is effectively "around" the exhaust manifold itself, the only part you've compromised is the fresh air side of the heat exchanger connections, not the hot exhaust gas part of the system.
The flapper valves are either the intakes or exhausts for the fresh air/ventilation/heating system. Judging by the one way flapper valves, I suspect they're outlets for hot and/or cold unused air.
Edited by Slippydiff on Friday 5th September 20:43
You do get into some scrapes.....
https://www.design911.co.uk/diagrams/d/40645/0
993 572 785 01 or 993 572 786 01
Someone might have removed all the heating for racing/weight/something so worth asking on the usual forums.
Ocho said:
Also - improved terminology for the parts would be useful in sourcing replacements please! I'm online now trying to source the rubber pipes and they're coming in at over £200 each - for rubber bits! There must be an alternative but my googling has failed so far...
https://www.rosepassion.com/en/diagrams-porsche-993-1996-eu-993-carrera-2-coupe-manual-gearbox-6-speed/heating-and-air-conditioning-system-385/heating-air-supply-1035/99357278501-p55653-connecting-hose-left-99357278500-55653https://www.design911.co.uk/diagrams/d/40645/0
993 572 785 01 or 993 572 786 01
Someone might have removed all the heating for racing/weight/something so worth asking on the usual forums.
Orangecurry said:
You do get into some scrapes.....
 - I guess that's something to do with the regular use as a daily / massive mileage...
Many thanks for the links. As the flappy box thing is about £600 (maybe more I forget) and effectively just a component for directing airflow and other than the flap (which is fine) I'm going to have a pop at getting this back into shape and fix up with some non specific hoses of the same thickness and diameter that I've sourced. Hopefully it will all do the job for £50 and a bit of graft rather than £1k...
Quick update
So I ve had a minor oil leak for a long time now, but it s just now become severe (could that be anything to do with the damage to and temporary removal of the heater flap control box?) so I thought I’d kill two birds with one stone…
I’ve made a start to replacement of the Lower cam cover gasket, which I’m pretty sure is the source of the leak, and have removed the exhaust to give access to the cover, however the bolts are beyond me. They re 5mm Allen bolts and even the most easily accessible one has defeated me. They re probably the original items and have corroded enough to make getting the Allen key in really difficult. I tried to clean it out as best as I could with all sorts of chemicals plus a physical pick at it but sill can t get enough purchase as it s stuck solid.
A little further research suggests a torx bit hammered in, but I m a little nervous to try this and it wouldn t work for the less accessible ones anyway.
Any ideas or thoughts please?
Edited by Ocho on Sunday 14th September 17:13
I love spending your money.
Irwin. They are legendary. These worked on my lower cover bolts.
https://www.powertoolsdirect.com/irwin-bolt-grip-f...
I chose to replace with stainless steel. One hundred engineers will now chime-in to tell me my engine has been ruined, the different metals will cause the bolts to fall out, or explode. But it's what I chose to do, as I know I'll have to remove them again one day.
Orangecurry said:
I love spending your money.
Irwin. They are legendary. These worked on my lower cover bolts.
https://www.powertoolsdirect.com/irwin-bolt-grip-f...
I chose to replace with stainless steel. One hundred engineers will now chime-in to tell me my engine has been ruined, the different metals will cause the bolts to fall out, or explode. But it's what I chose to do, as I know I'll have to remove them again one day.
🤣Irwin. They are legendary. These worked on my lower cover bolts.
https://www.powertoolsdirect.com/irwin-bolt-grip-f...
I chose to replace with stainless steel. One hundred engineers will now chime-in to tell me my engine has been ruined, the different metals will cause the bolts to fall out, or explode. But it's what I chose to do, as I know I'll have to remove them again one day.
So something like this then…
I think I bought these after you mentioned them in a post a couple of years ago but didn’t know what they were for… I thought they were for hex shaped nuts or bolts. So they’ll work on these round ones too? What’s the technique???
P.S. sorry that I’ve already spent it. I’m sure you’ll come up with some other gadget I need (can never have too many tools, right?)
Orangecurry said:
They work on anything - they cut into the exposed head of whatever it is. Read the instructions man!
OK so I've done that and watched umpteen you tube videos. Every one I watched they either just put the extractor on and gave it a couple of gentle taps with a hammer or if it was a hex didn't even need the hammer. With these (and I have the exact set you linked) the smallest one won't go on enough to grab onto the bolt (so too small) and the next size up just goes all the way on and slips round without being close to biting.Did you definitely use this set, OC, or do you have a larger set of the same things with interim sizes? There is another Irwin set available, but would like to check before I go and spend more money (or you spend it - you ARE good at it!)
Thanks
...bugger.... it seems as if there are two 5x Irwin sets.
I have 8mm 10mm and so on.. I just test-fitted the 10mm on the lower panel on the side of the car with the original bolts, and it fits perfectly, as you would expect (being inbetween the 9mm and 11mm that you have).
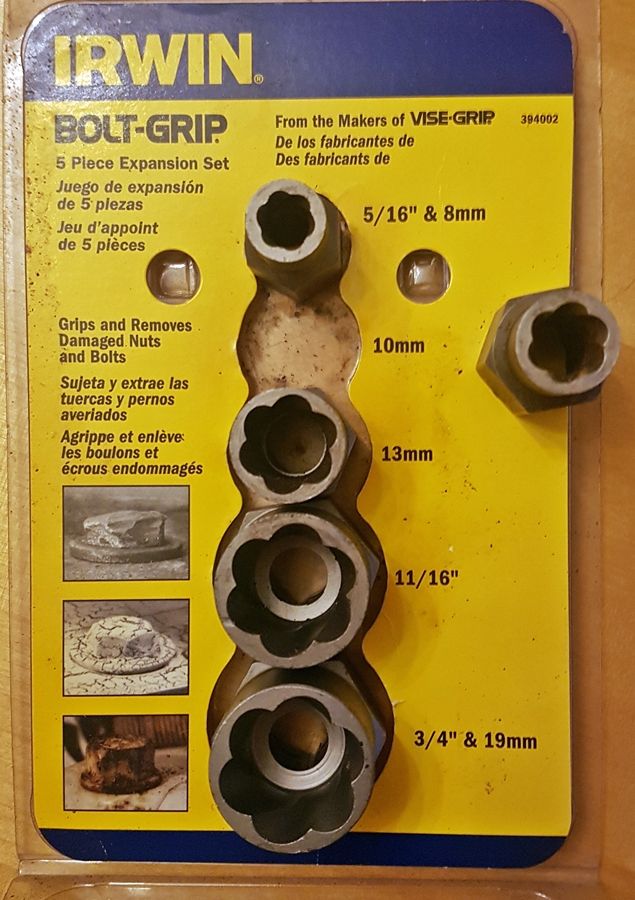
I have 8mm 10mm and so on.. I just test-fitted the 10mm on the lower panel on the side of the car with the original bolts, and it fits perfectly, as you would expect (being inbetween the 9mm and 11mm that you have).
Edited by Orangecurry on Monday 15th September 20:02
Ocho said:
OK so I've done that and watched umpteen you tube videos. Every one I watched they either just put the extractor on and gave it a couple of gentle taps with a hammer or if it was a hex didn't even need the hammer. With these (and I have the exact set you linked) the smallest one won't go on enough to grab onto the bolt (so too small) and the next size up just goes all the way on and slips round without being close to biting.
Did you definitely use this set, OC, or do you have a larger set of the same things with interim sizes? There is another Irwin set available, but would like to check before I go and spend more money (or you spend it - you ARE good at it!)
Thanks
You stand a better chance of finding a socket that will fit the head in this set. Did you definitely use this set, OC, or do you have a larger set of the same things with interim sizes? There is another Irwin set available, but would like to check before I go and spend more money (or you spend it - you ARE good at it!)
Thanks
My guess is the bolt itself won't be hugely tight, the issue you have is the hex drive in the head is fubarr'ed to the degree you can't get any torque on the head.
The Irwin stuff is good stuff, but pricey, but if you use the tightest fitting socket out of this kit, yuu should be able to extract the bolt :
https://www.amazon.co.uk/Extractor-Remover-Rounded...
Orangecurry said:
...bugger.... it seems as if there are two 5x Irwin sets.
I have 8mm 10mm and so on.. I just test-fitted the 10mm on the lower panel on the side of the car with the original bolts, and it fits perfectly, as you would expect (being inbetween the 9mm and 11mm that you have).
Ok so now, I'm getting a little frustrated and also puzzled. The set I had (check my photo) has 10mm and then 11mm, (not 9 then 11). So the 10mm you have out of your packet should be exactly the same as the smallest in my Irwin set. This one I cannot get over the bolt heads for love nor money - is there a technique that you used rather than placing over the top and then tapping with a hammer (which will be very tricky anyway for the ones hidden behind the heat exchanger intake.I have 8mm 10mm and so on.. I just test-fitted the 10mm on the lower panel on the side of the car with the original bolts, and it fits perfectly, as you would expect (being inbetween the 9mm and 11mm that you have).
Edited by Orangecurry on Monday 15th September 20:02
The set I just bought and tried this morning has 9mm & 10mm - the 10mm in this set just slips round, whilst the 9mm is similar to the 10mm in the Irwin set as in I can't get it on enough to get a proper grip.
In the hope that there is a difference in the production process of each of these different sets which leads to the sizes "given" being different to the "actual" sizes, I've just ordered the set that SD linked to in the vague hope that one of these just might do the trick, but I'll be honest in that my expectations are now pretty low and (heart on sleeve here) I'm somewhat concerned that I've put myself in a pretty sticky position by starting something that I can't finish.
Any suggestions or help offered will be more gratefully received than ever right now!
Edited by Ocho on Thursday 18th September 09:10
Ocho said:
Here's a couple of them (there are 11 in total).
Here's the a picture of the oily cover showing some of the others
If it's just the one, I'd be tempted to use a pair of Mole grips on it (but not an old pair of Mole grips of which the jaws no longer have any "teeth" and the rivets holding the handles together are worn and loose....)
How hard are you trying to tap the removal tool onto the cap head ? Gently tapping or full on brute force and ignorance ?
Gassing Station | Porsche Classics | Top of Page | What's New | My Stuff