Small garden office build - SIP kit from Poland
Discussion


I've enjoyed following a few build threads on here over the years, so I thought it might be nice to share one of my own projects.
I started this build in the spring, and it's now close to completion, save for a few finishing touches. It'll take me a little while to bring things up to date, hopefully, by then, the inside will be complete.
I've worked from home since before it was fashionable and then frowned upon, and so has my wife. We both work for American companies and often end up doing unusual hours, which doesn't always align very well with having two young children making noise in the house. We've also ended up dedicating two different rooms to office space, which makes a reasonably sized house feel a lot smaller than it should. Having a separate dedicated building that either of us could go to to join calls in peace has been a pipedream for a while.
I started looking into garden rooms some years ago, and ended up liking the idea of a SIPs building. I was originally looking at using a UK-based SIPs company to supply the panels and then sourcing everything else I'd need elsewhere. I spotted a business on eBay, based in Poland, that provides a complete kit including doors, windows, cladding and a finished roof for a price that was comparable to piecing together all the elements myself locally. I've never built anything like this before, so letting someone else figure it all out had some appeal. In the end, the house extension took priority and required a lot of saving and my time, so I put the idea on the back burner for a few years.
Roll on to this year, and with the extension completed, we're in dire need of a new patio. Before that can happen, we need to complete all the projects that will alter the shape of the eventual patio, which includes the office. The project was back on, and the Polish eBay still existed with an ever-increasing number of positive reviews.
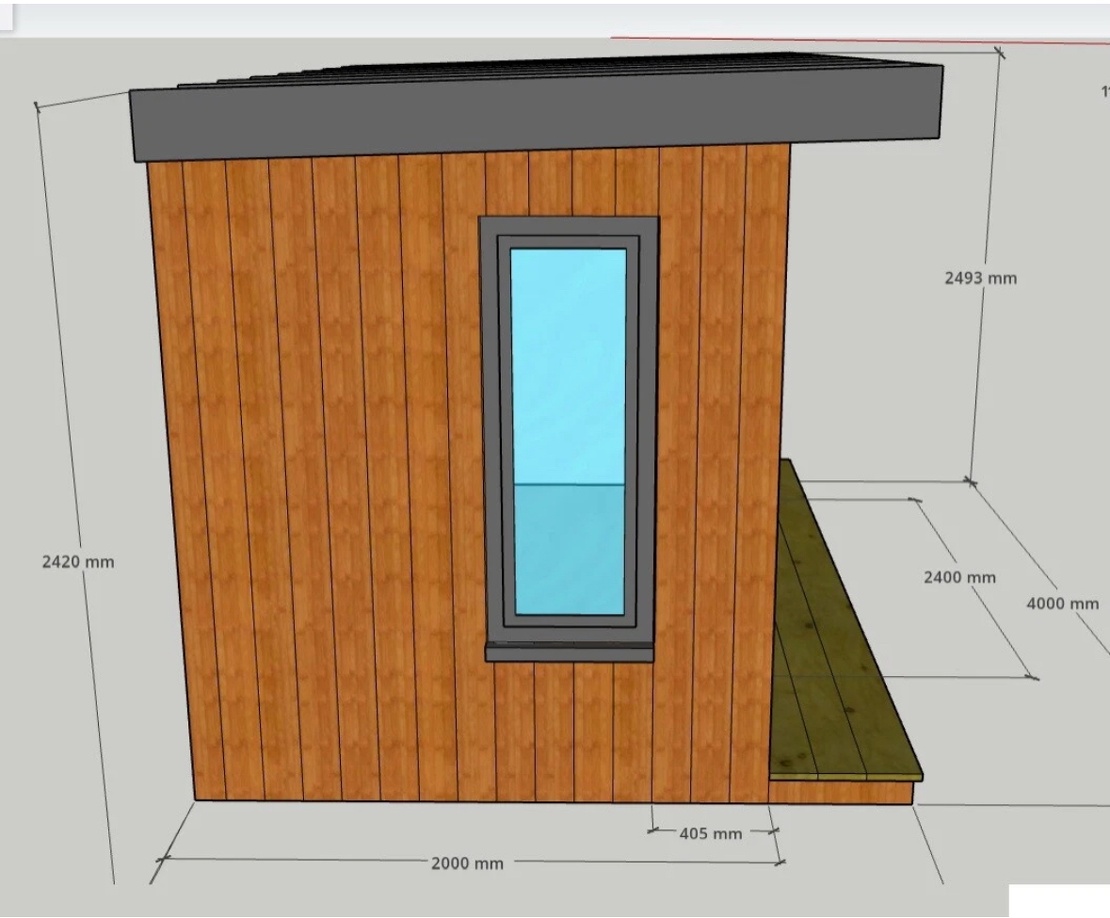
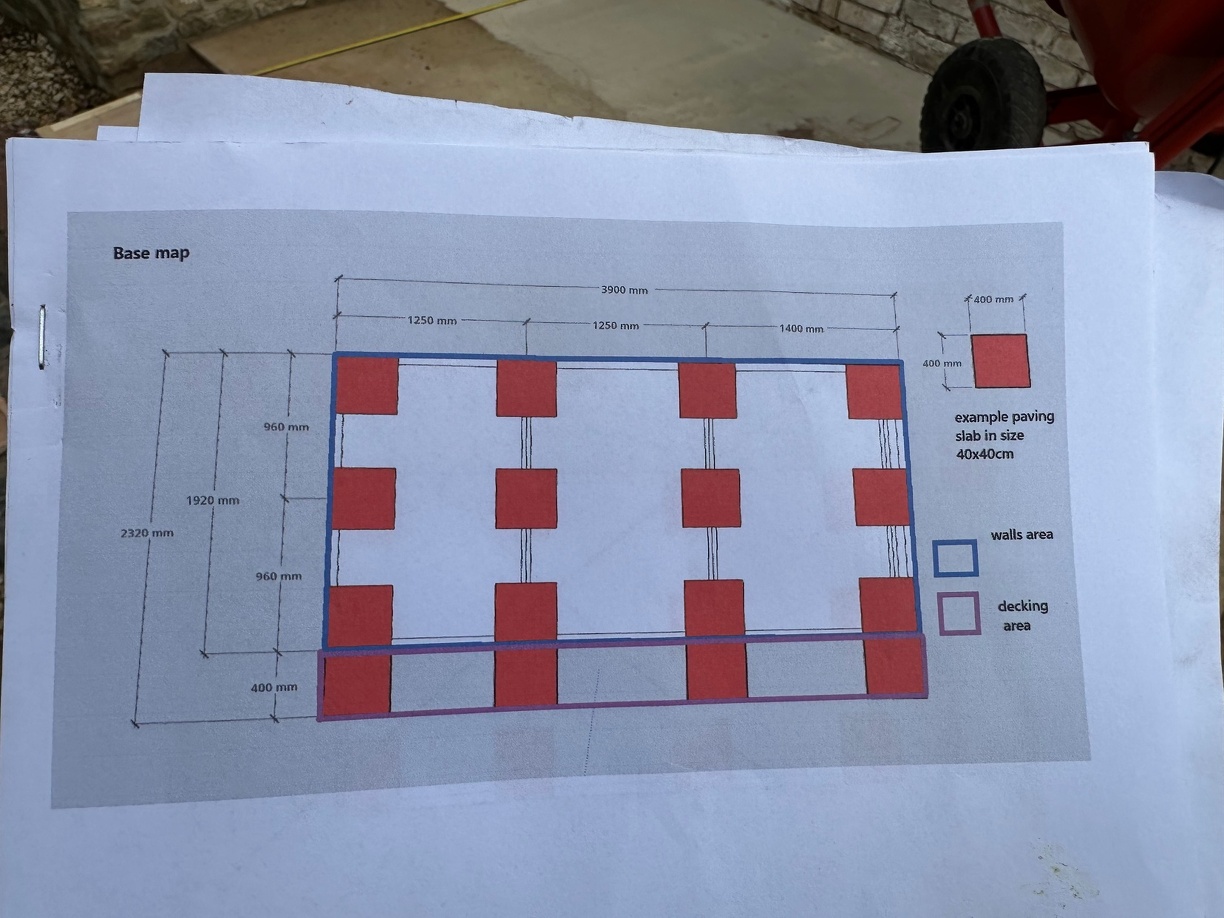
The office will be going at the side of our house, it's on an unusual plot with a reasonably generous triangle of land to the side. The previous owner had built a large raised koi pond and a greenhouse for all the pump equipment there. Both were no longer required. As a result of using the land at the side of the house, I didn't have a huge amount of depth to play with. On the plus side, using that space takes nothing away from the main garden, and there was already power and a bit of a concrete base. After some conversations with the seller, he was happy to adapt one of his standard 4x3m designs to be 4x2m. He even sent me some nice renderings...
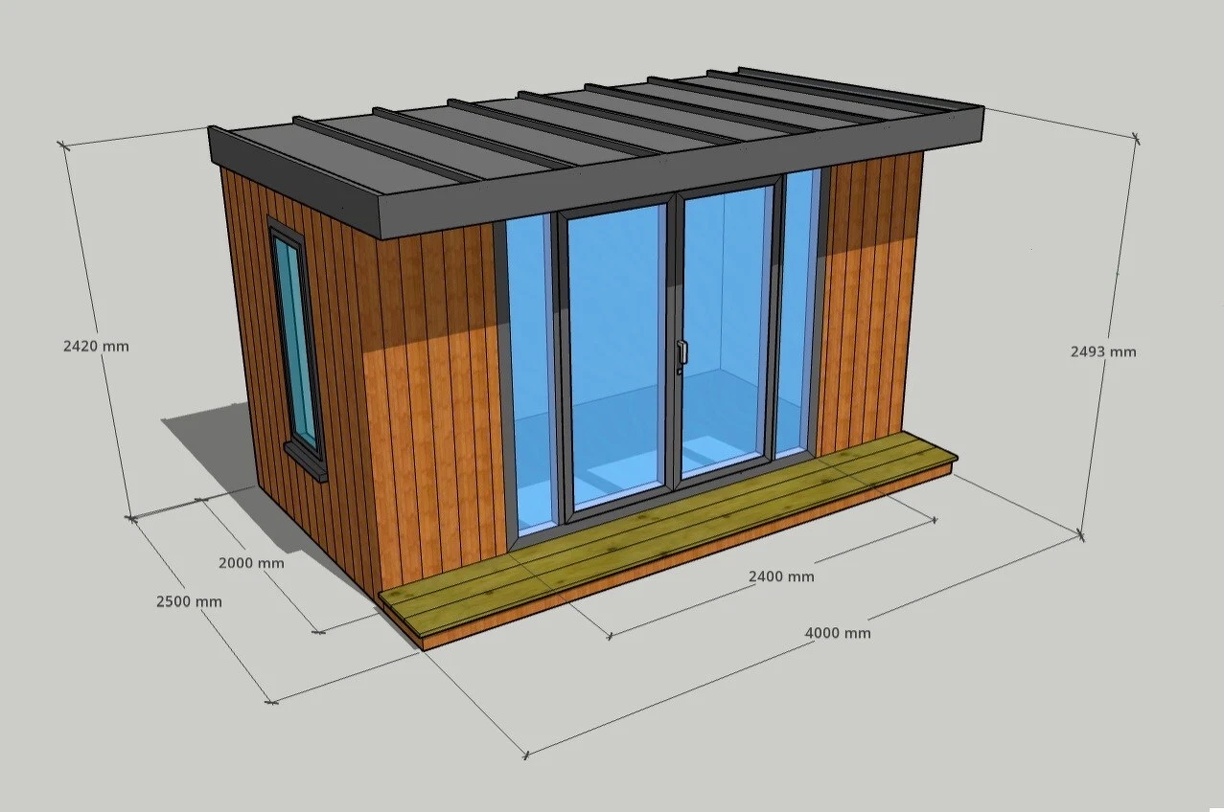
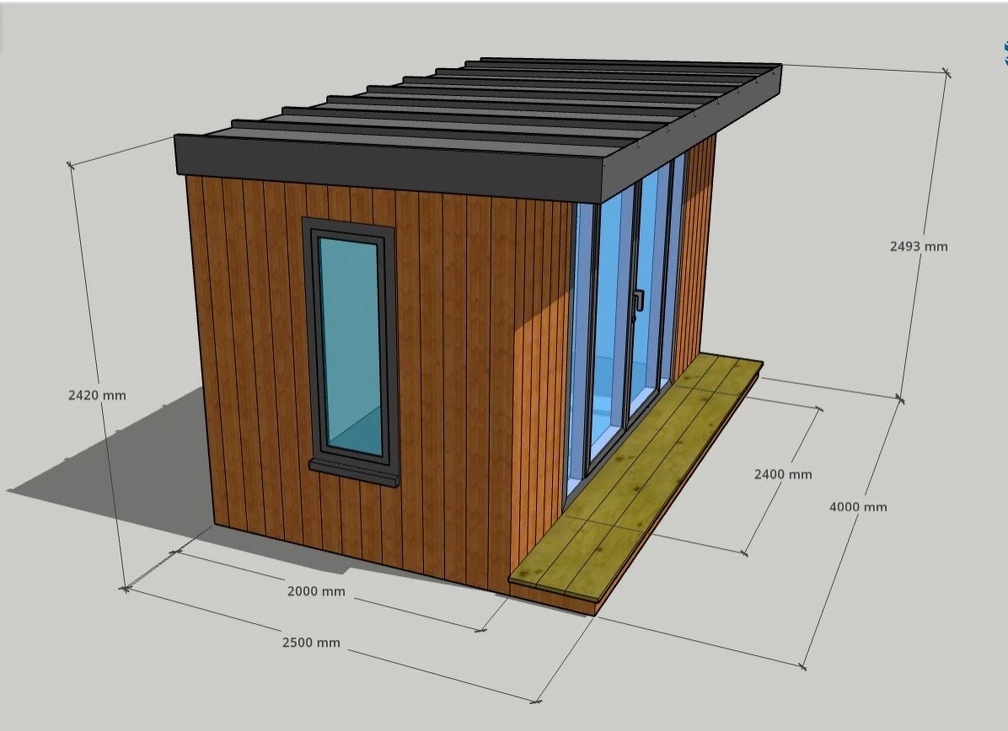
I added a window on one side, and then moved it forward a bit as the boundary is angled, and this will provide a view towards the garden. I was impressed that they accommodated these changes, with most garden building companies, the price jumps up if you want anything custom.
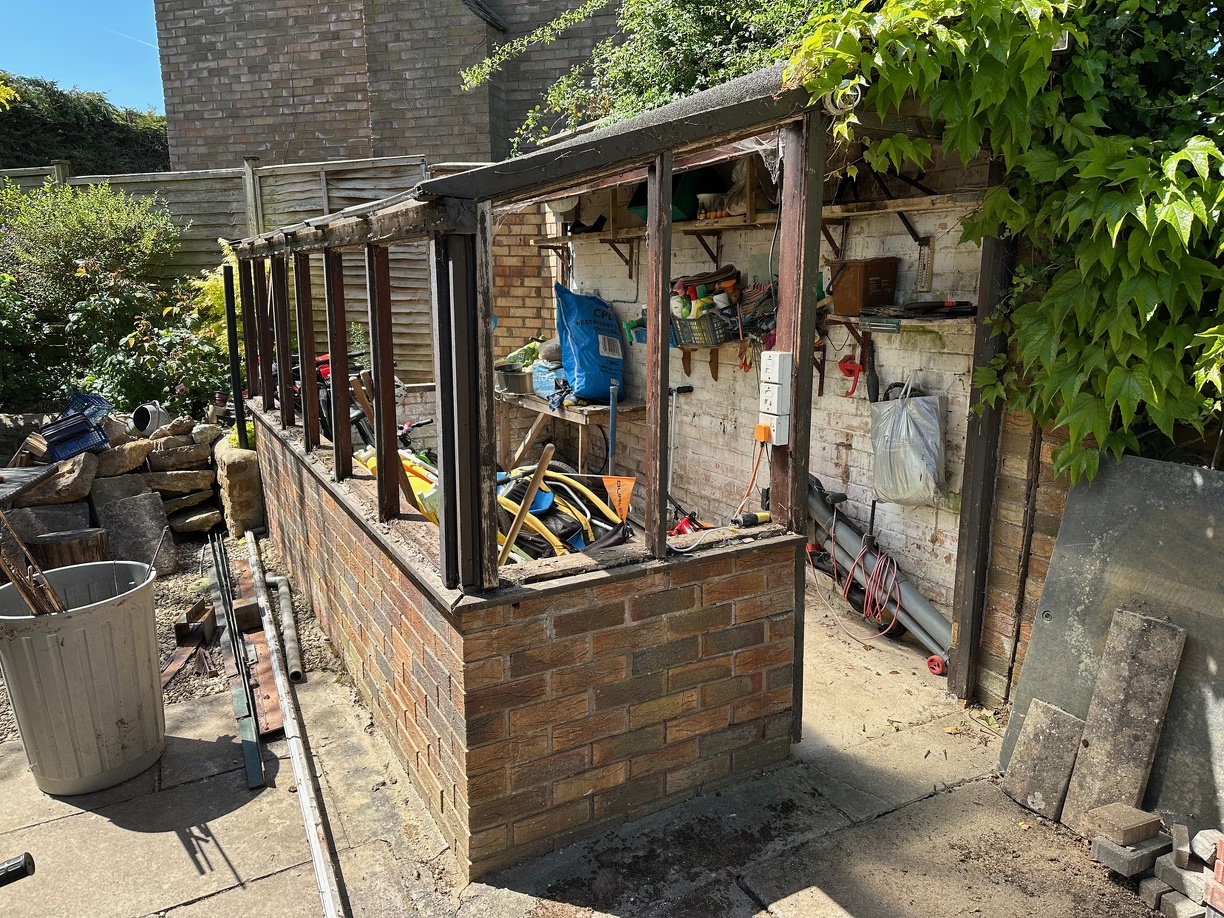
With that ordered my attention turned to the greenhouse. Here are some photos from when we moved in in 2016...

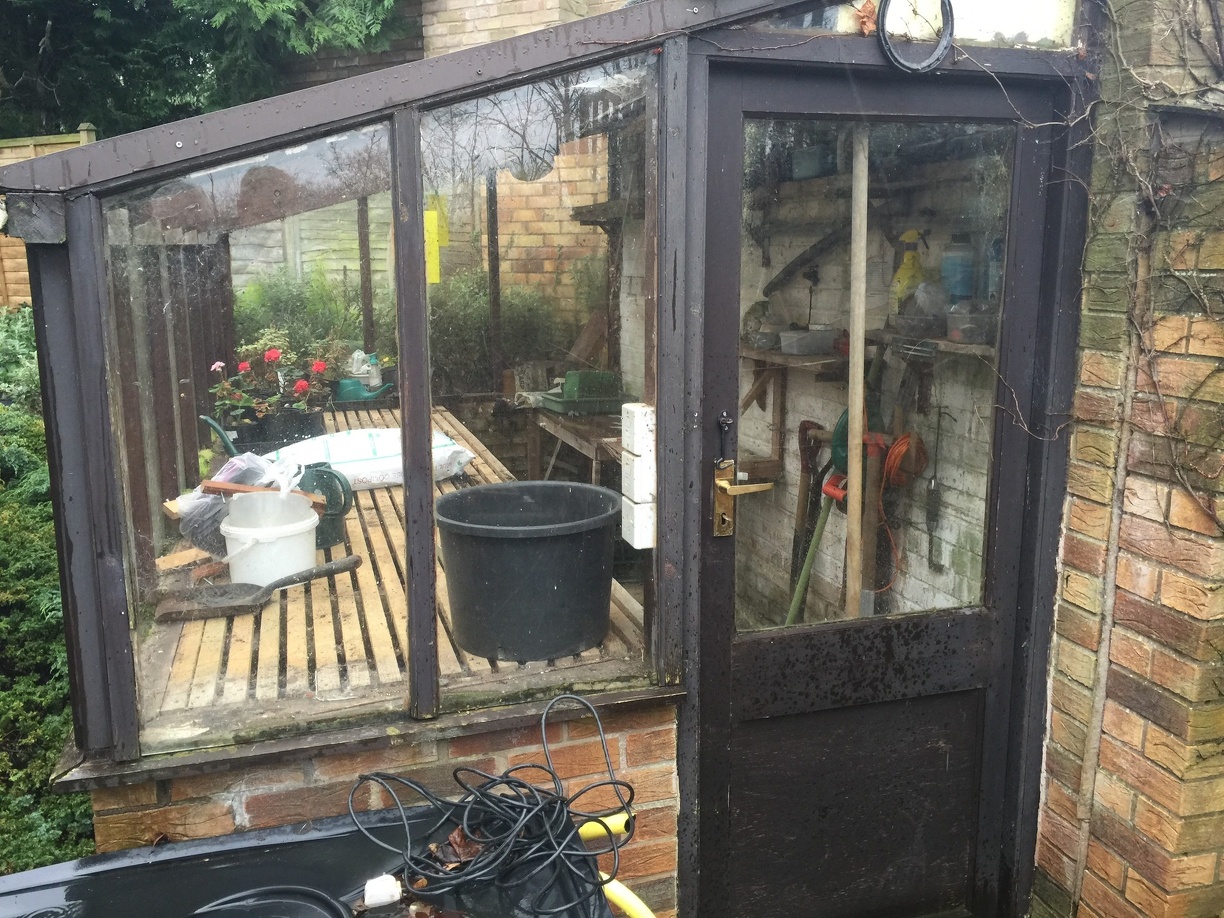
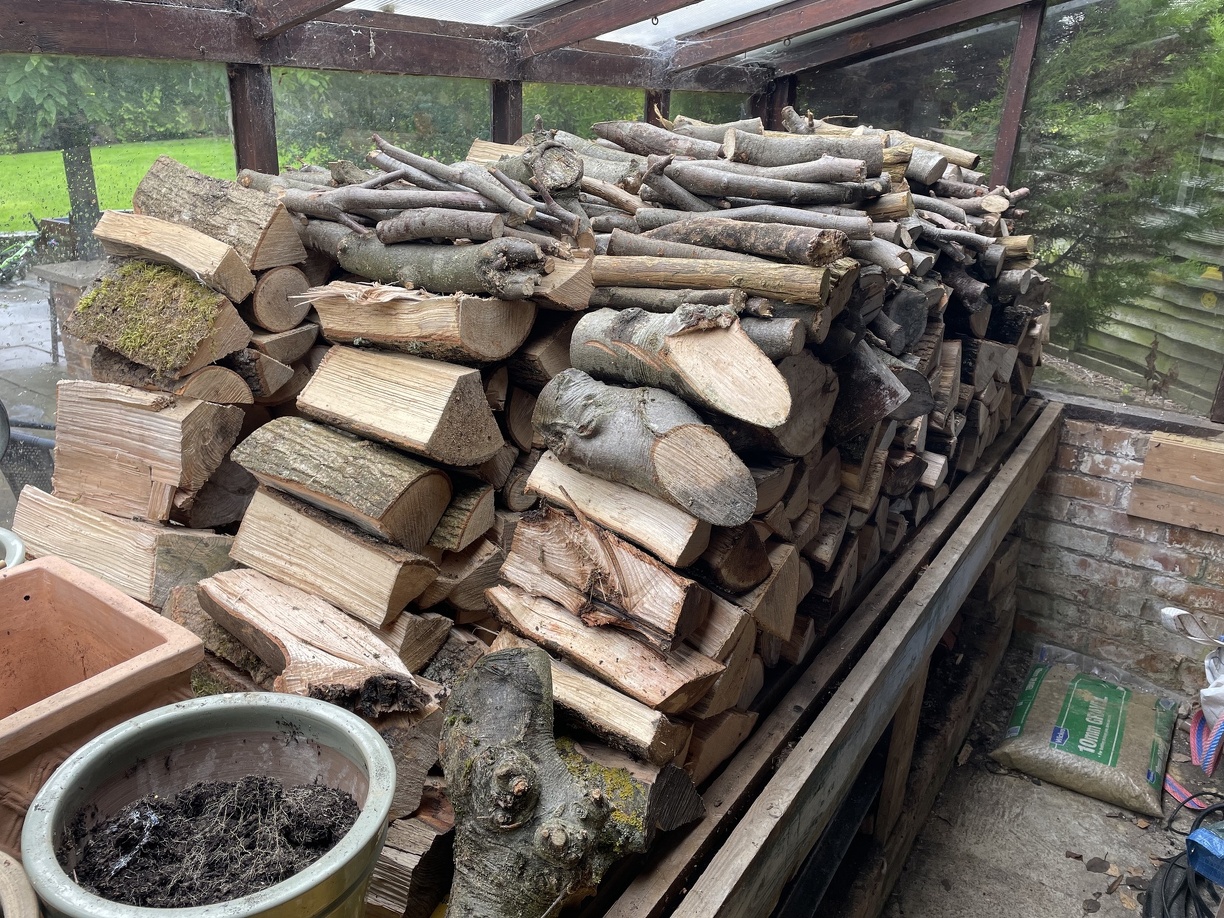
We got rid of the pond not long after we moved in. Neither of us are particularly keen gardeners, so the greenhouse ended up being mostly used as overflow log storage.
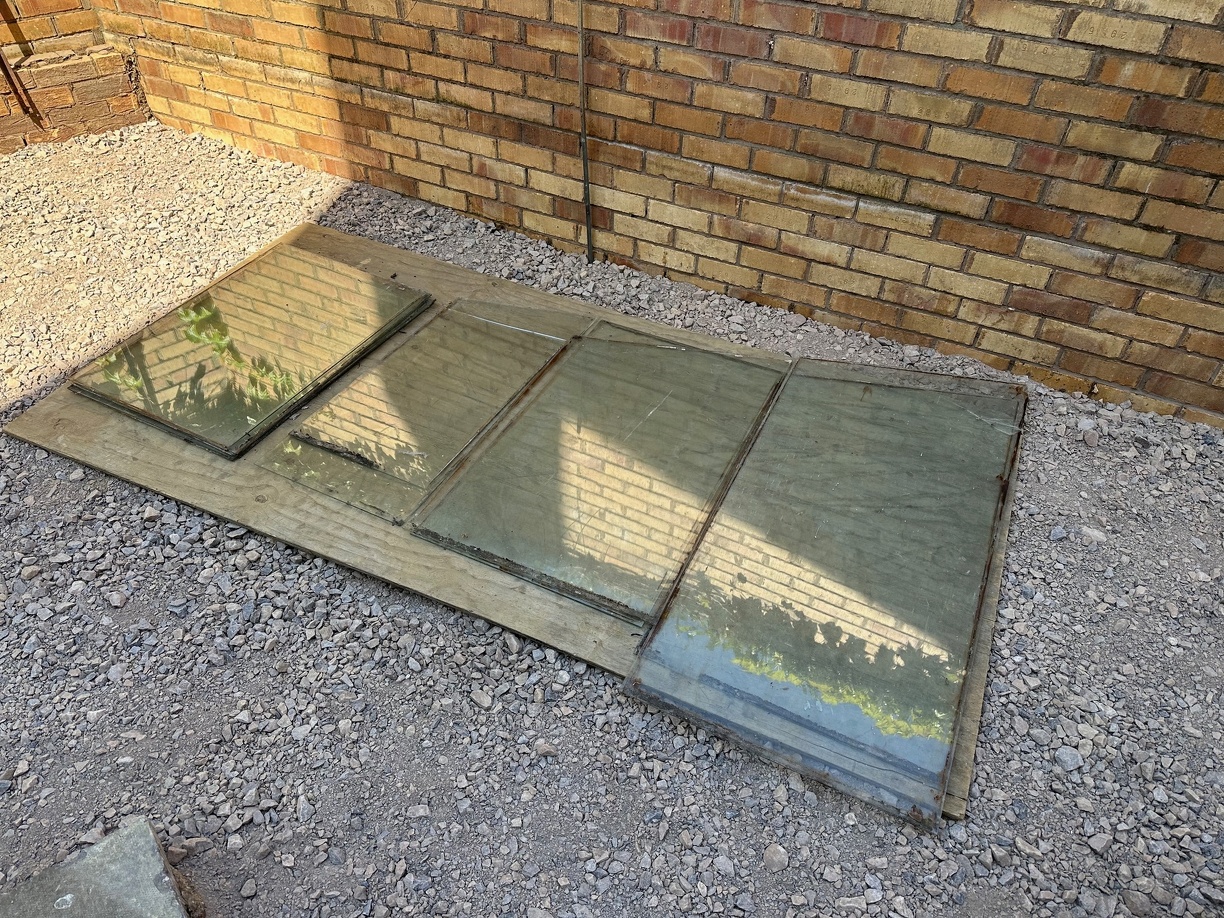
The wooden frame was quite rotten in places. I patched it up in a few places to stop the glazing from falling out over the years. I was never particularly keen on having that much single-pane glass in the garden near the kids.
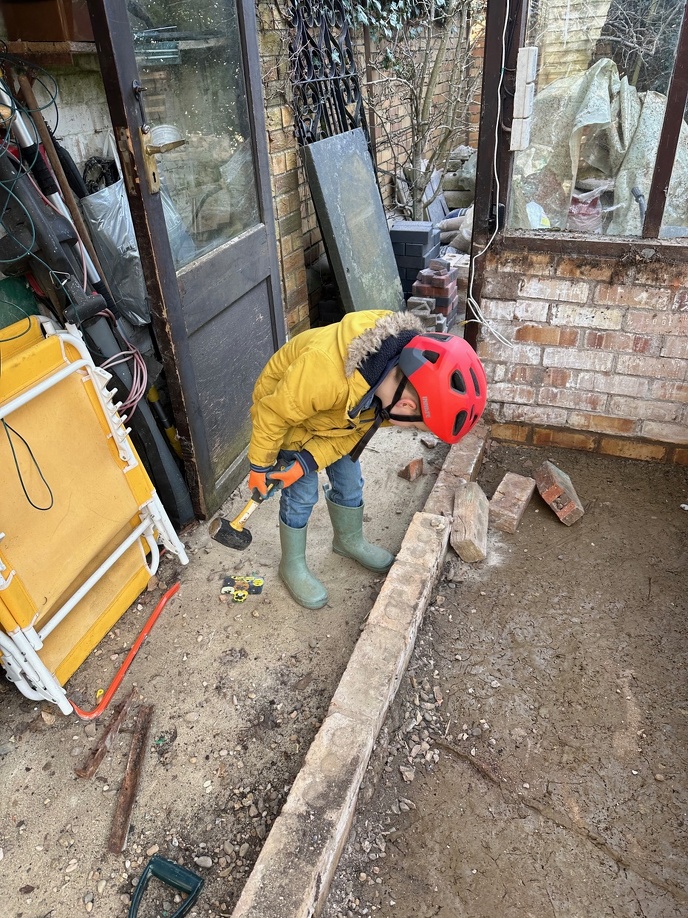
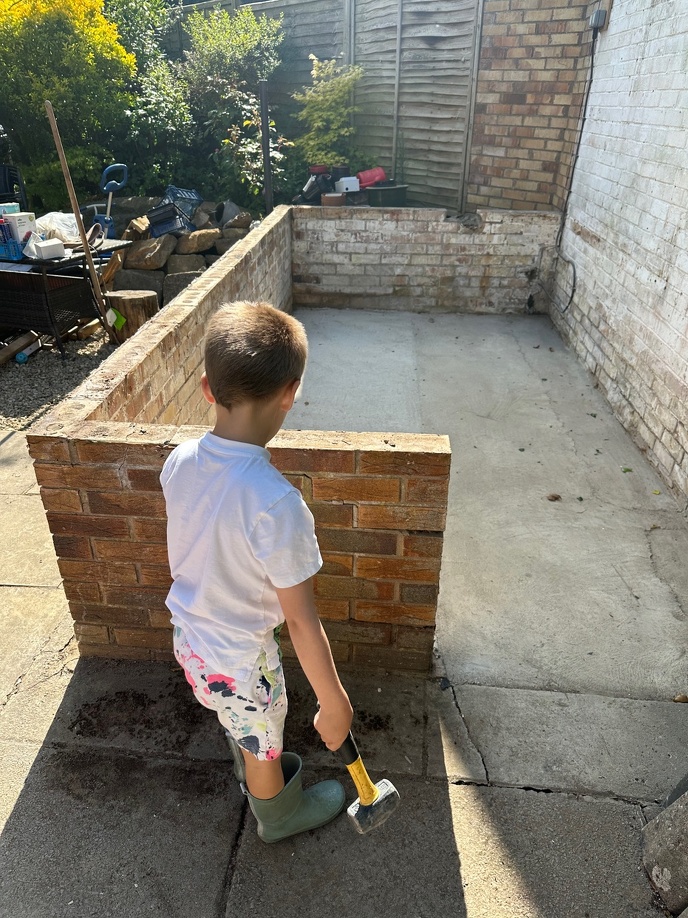
Earlier in the year, I made and installed a pair of gates. I over-ordered ballast and cement, so I decided to use what was left to fill in the area where the wooden staging in the greenhouse was. The biggest child seemed to enjoy smashing and digging with me.
I drilled into the existing slab and foundation, then chem-fixed bits of rebar in to tie the new slab into the existing.

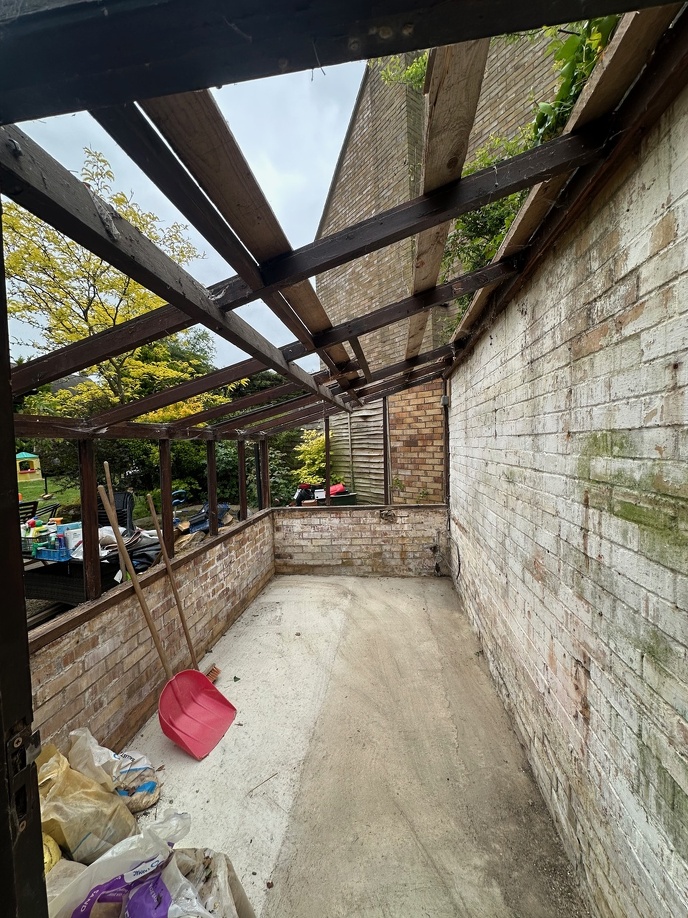
Jump forward a couple of months and with the office ordered I started dismantling the greenhouse. I started by removing the glass carefully, keen to not send shards around the garden.
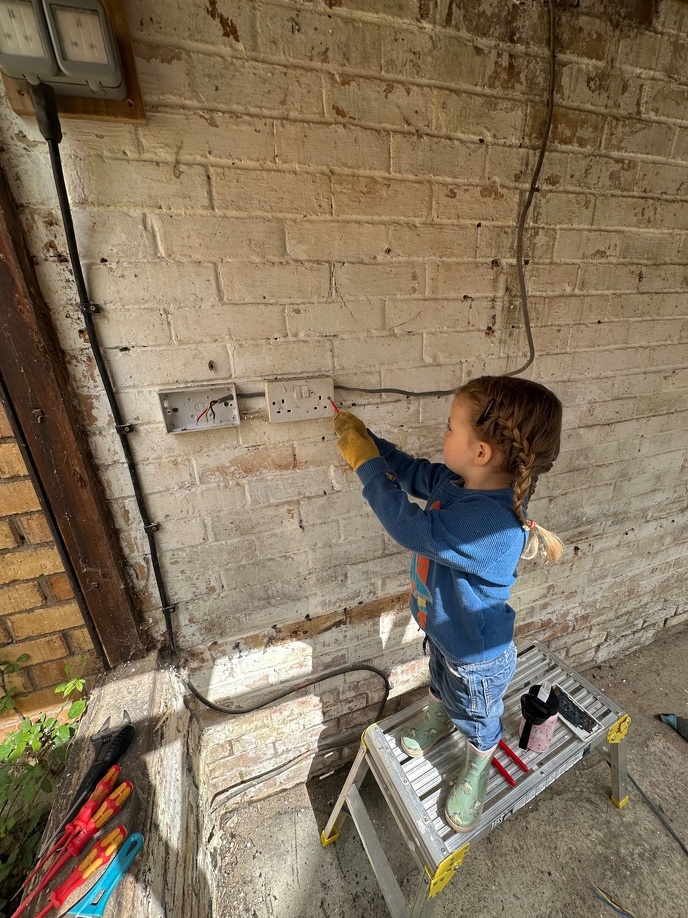
My smallest assistant sorted out the old wiring...
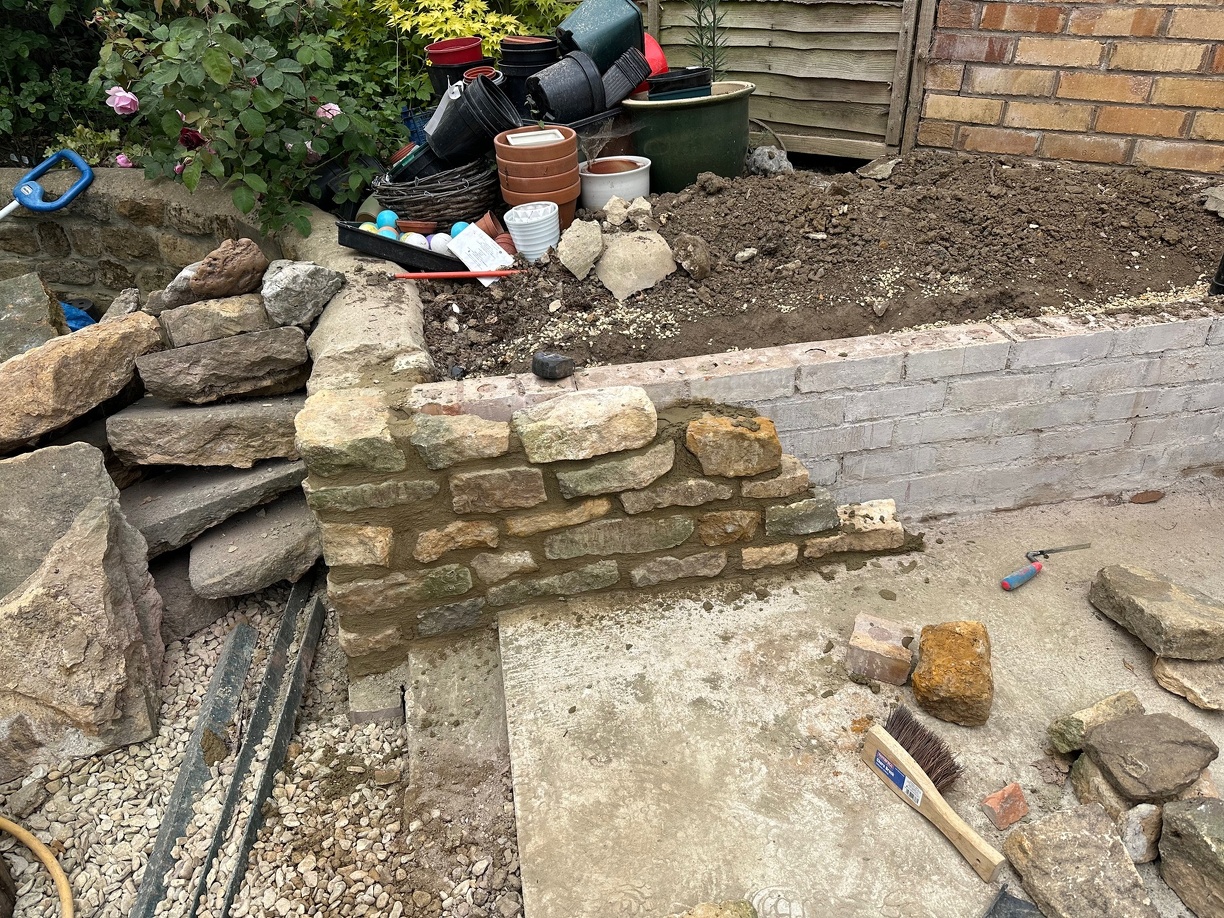
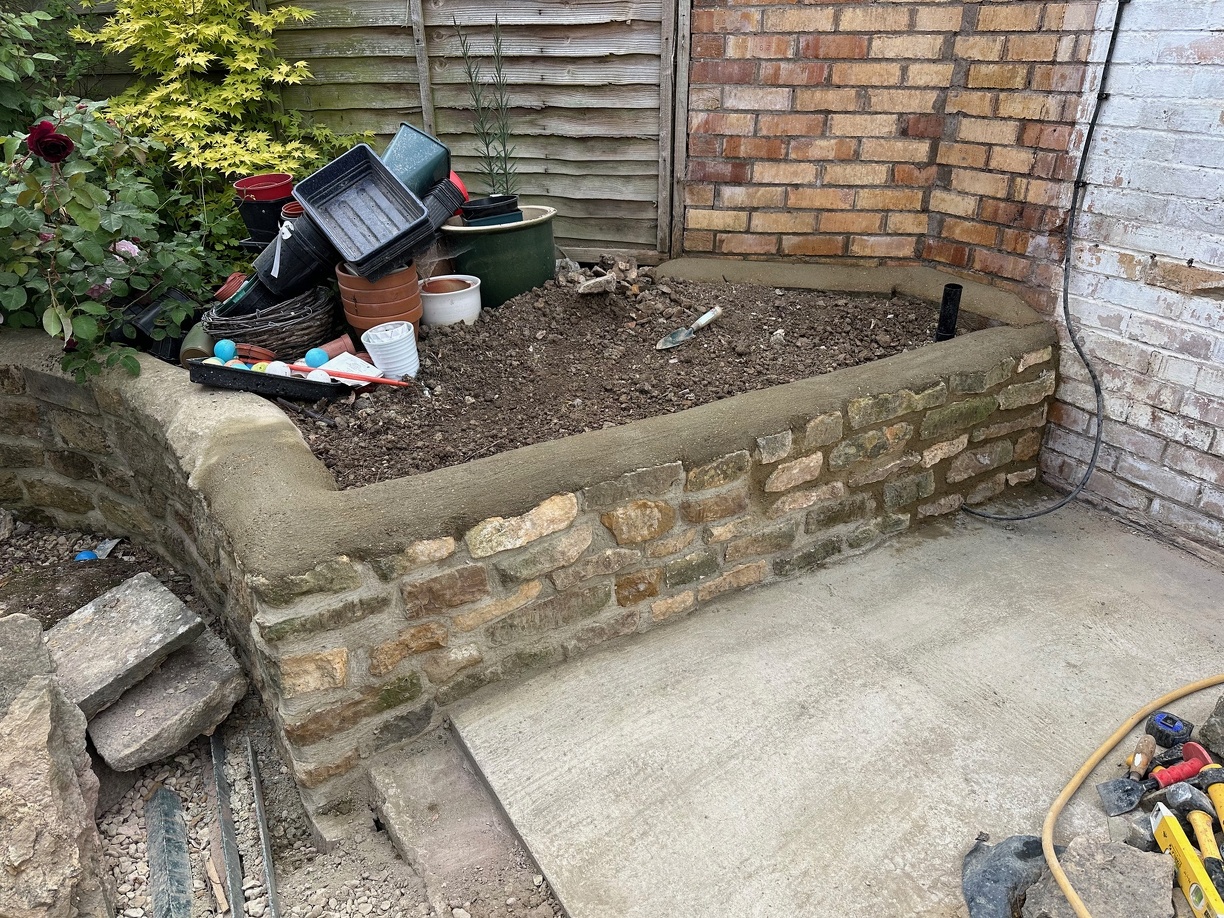
The greenhouse was being used to retain soil on one side (making it very damp). I left part of the brick base in place and faced it with some stone that had been lingering in a corner of the garden since we moved in. I'd never built anything like this before, which is probably very evident to anyone who knows what they're doing, but it resolved my soil retention issues.
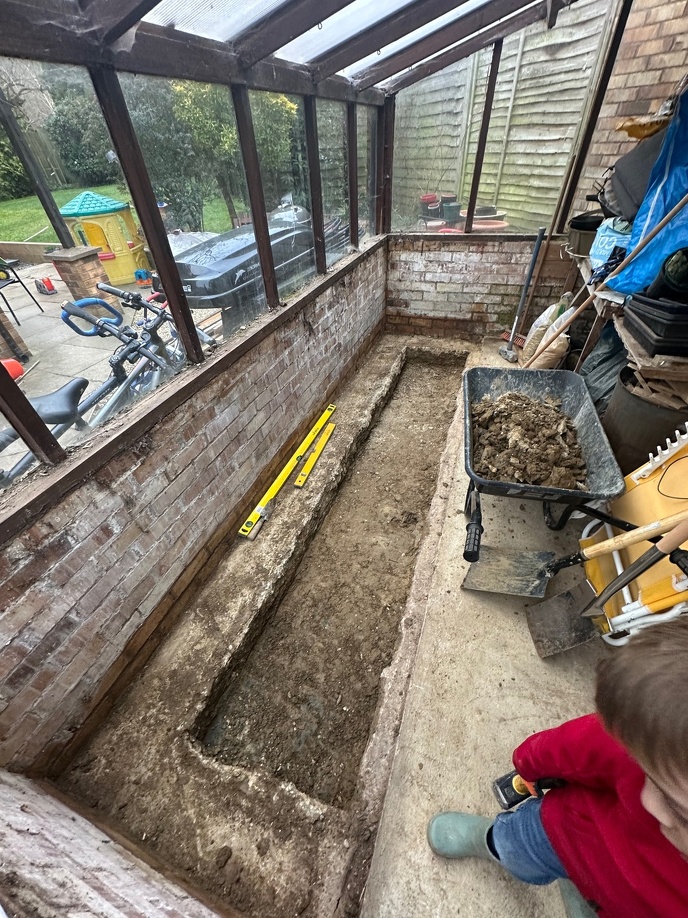
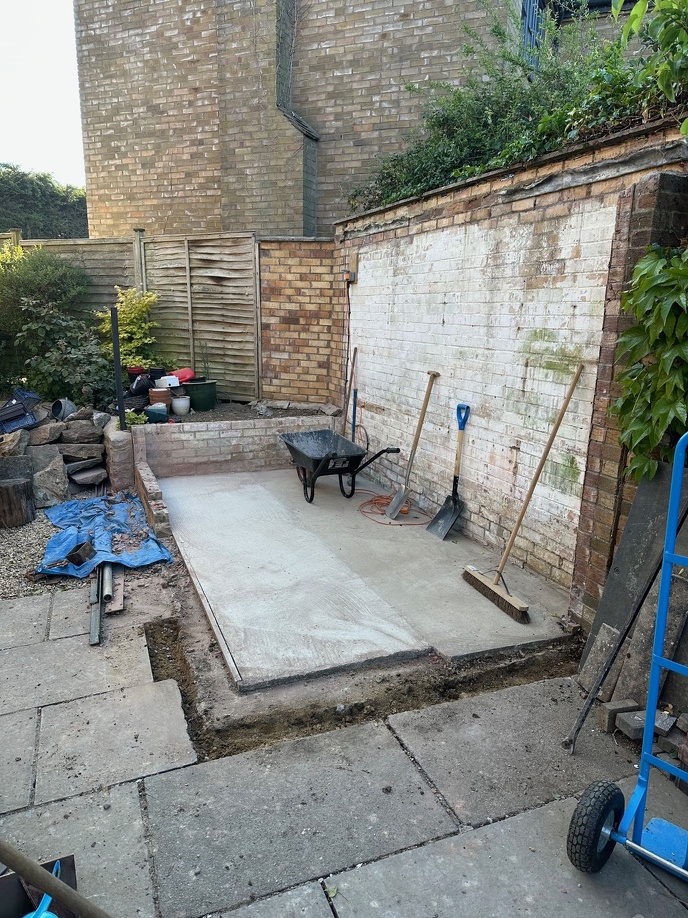
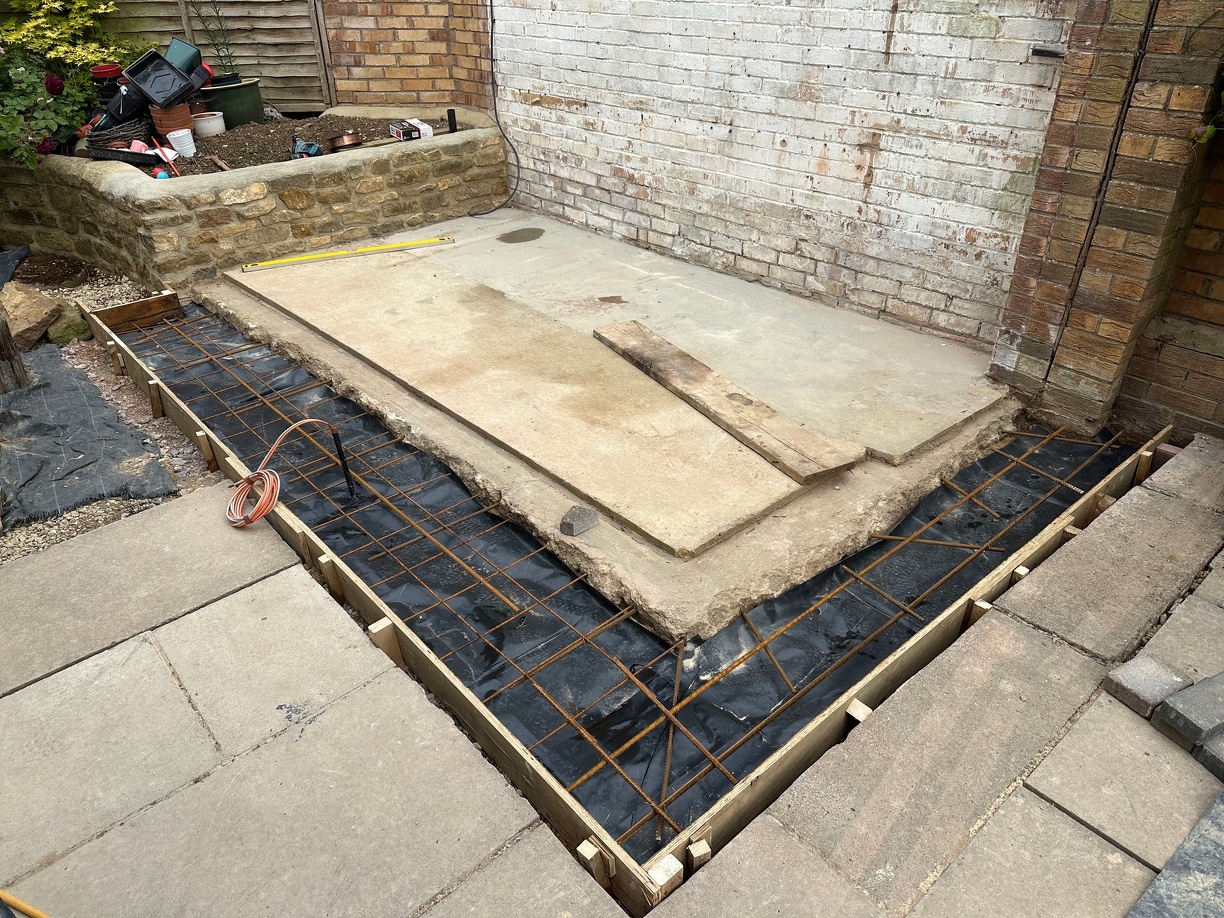
The new building is essentially the same 4x2m that the old greenhouse was, but once spaced away from my new retaining wall a little and with the small 'porch' area on the front, I needed to extend the concrete slab a bit further.
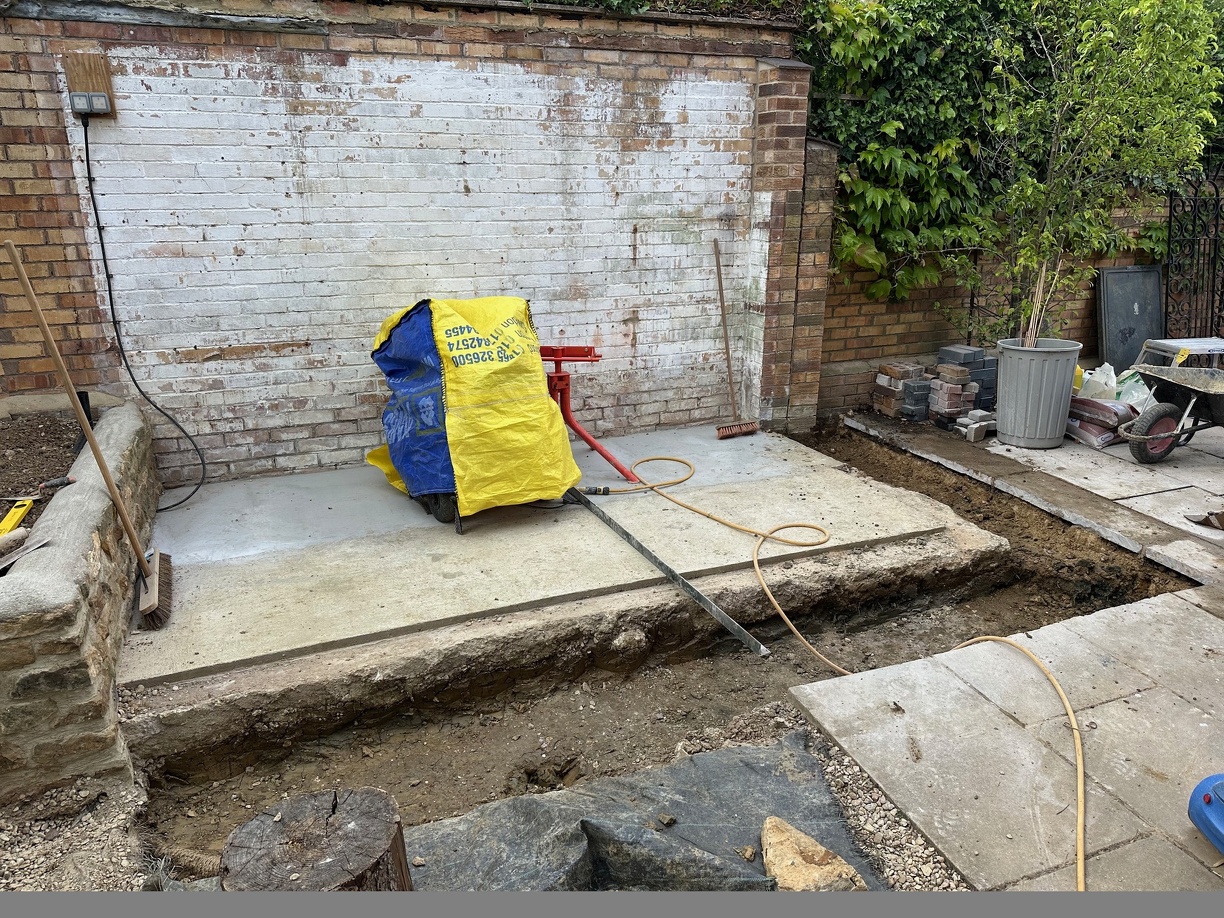
I think I went with 150mm hardcore and a 150mm slab. We're on horrible clay soil so everything has a habit of moving.
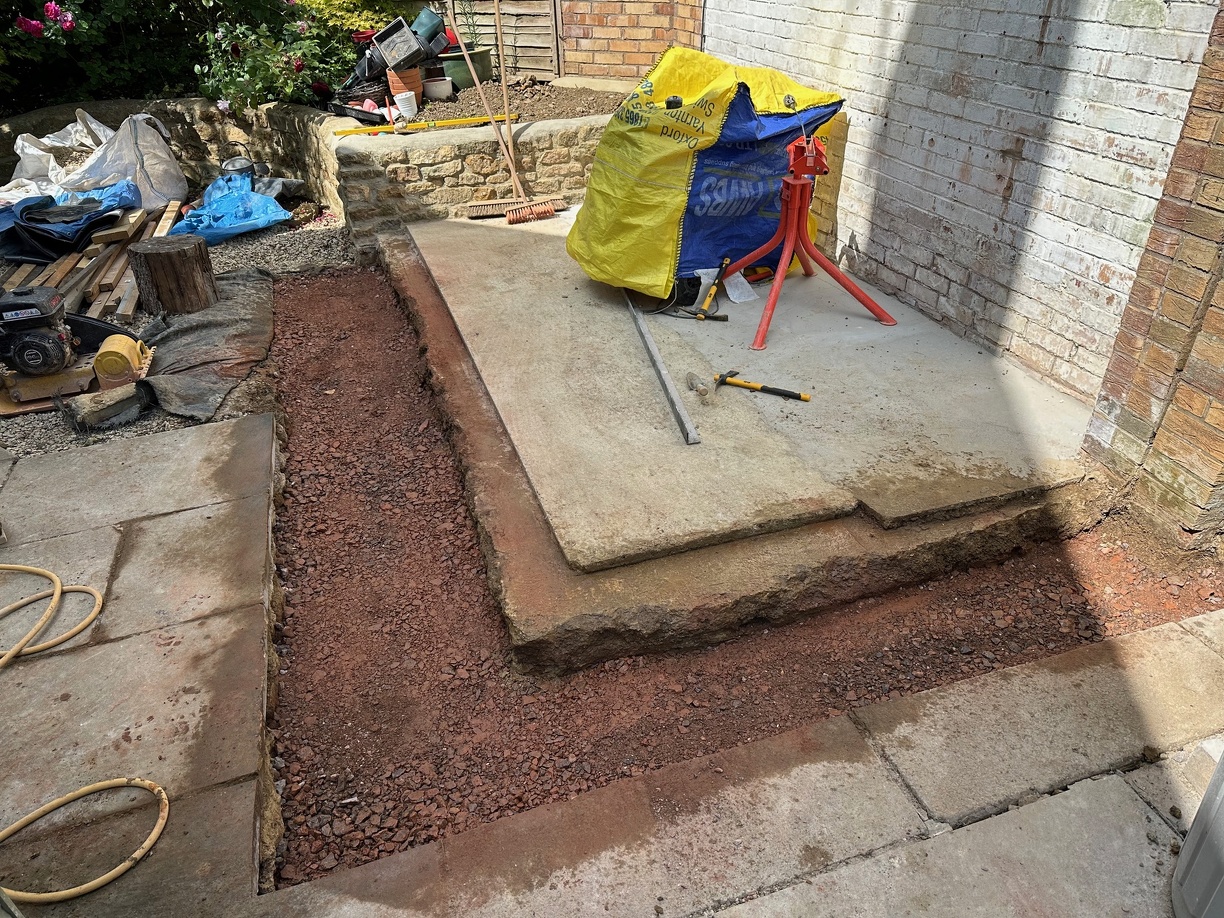
With hindsight, I should have ripped out the existing slab and started again. It slopes down towards the retaining wall and I had to put quite a bit of effort into getting my building base level. I had a couple of reasons for leaving what was there in place - the boundary walls are single skin and a lot less sturdy than I'd like, I suspect I might have disturbed them smashing out the old slab. Pouring small extensions to the slab in phases also allowed me to complete the job on my own with a mixer, which was obviously a lot cheaper than getting a concrete delivery.
Speaking of the wobbly boundary wall, whoever built the greenhouse had badly added two courses of bricks to achieve their desired roof pitch and add flashing. The extra height was doing it no structural favours, so I removed the addition.
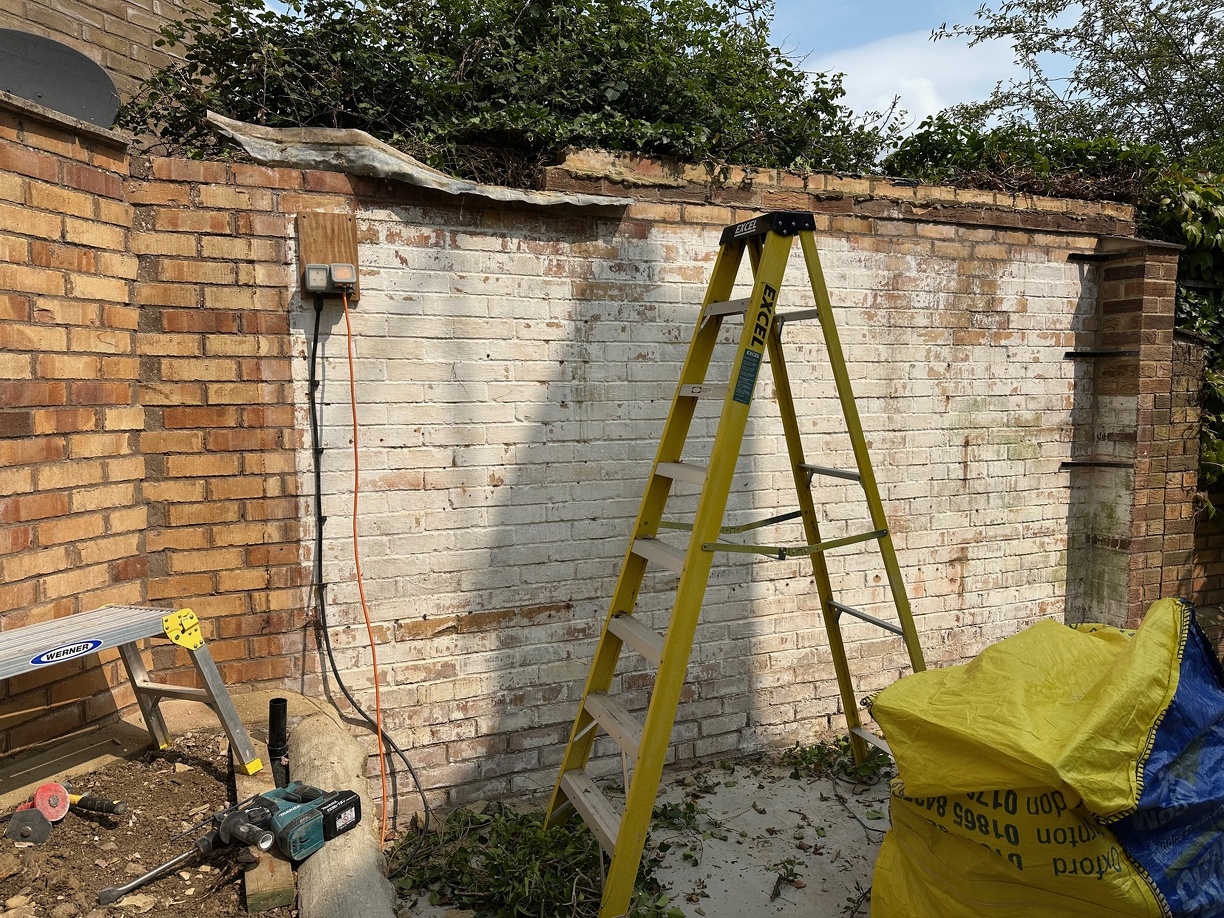
The buttress/pier that had been added later wasn't tied into the original wall at all. I repurposed some angle iron shelf brackets from the greenhouse to make some braces. They're ugly, but will be hidden behind the new building.
Another cost saving to doing the groundwork in phases was that I managed to avoid any waste disposal costs by pressing my ageing Volvo into action for many weighty tip runs. Having a car you're not too precious about has some perks.

The closest room in the house to that area of the garden is the lounge. Some years ago, whilst having the lounge replastered, I'd run a couple of ethernet cables from the garage on the other side of the house to behind the lounge TV. There's an in-wall access point there, but it was only using one of the two cables. I unmounted the access point and drilled through the backbox it was attached to outside. There was enough length on the spare cable to poke through the wall. I lifted some slabs and dug a small trench from the house to the office.
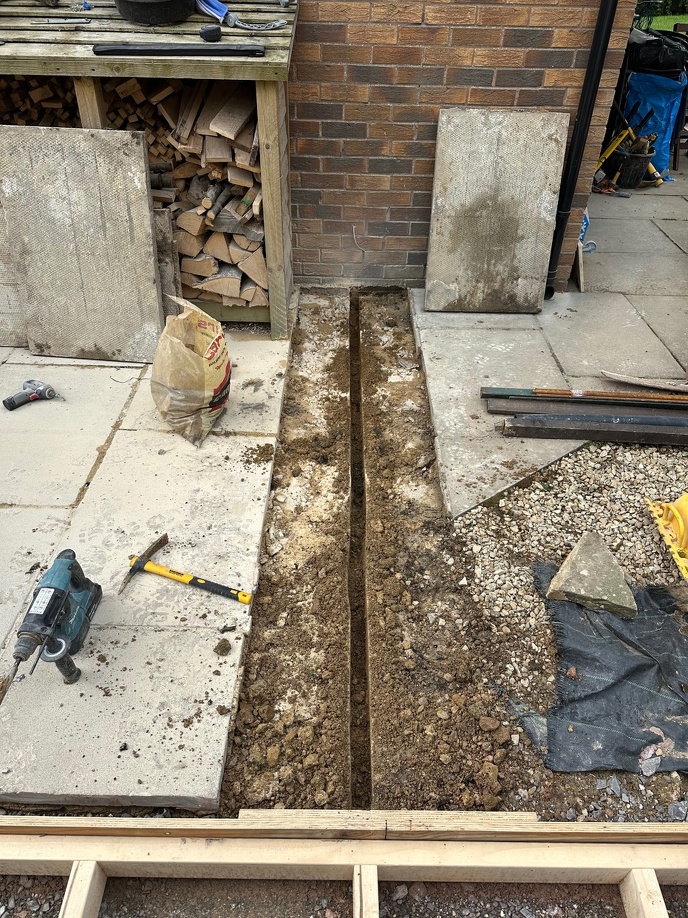
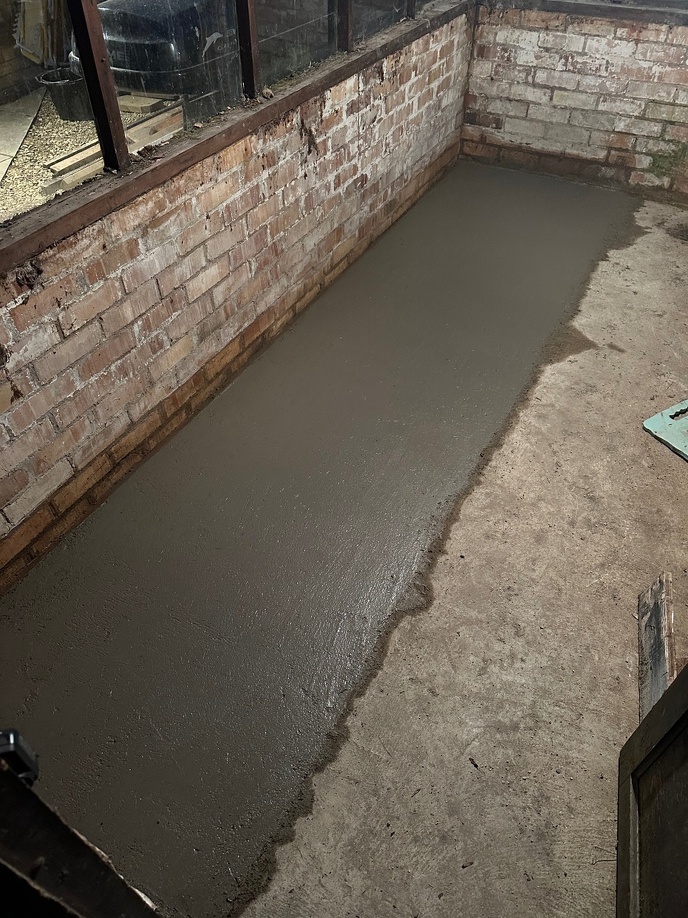
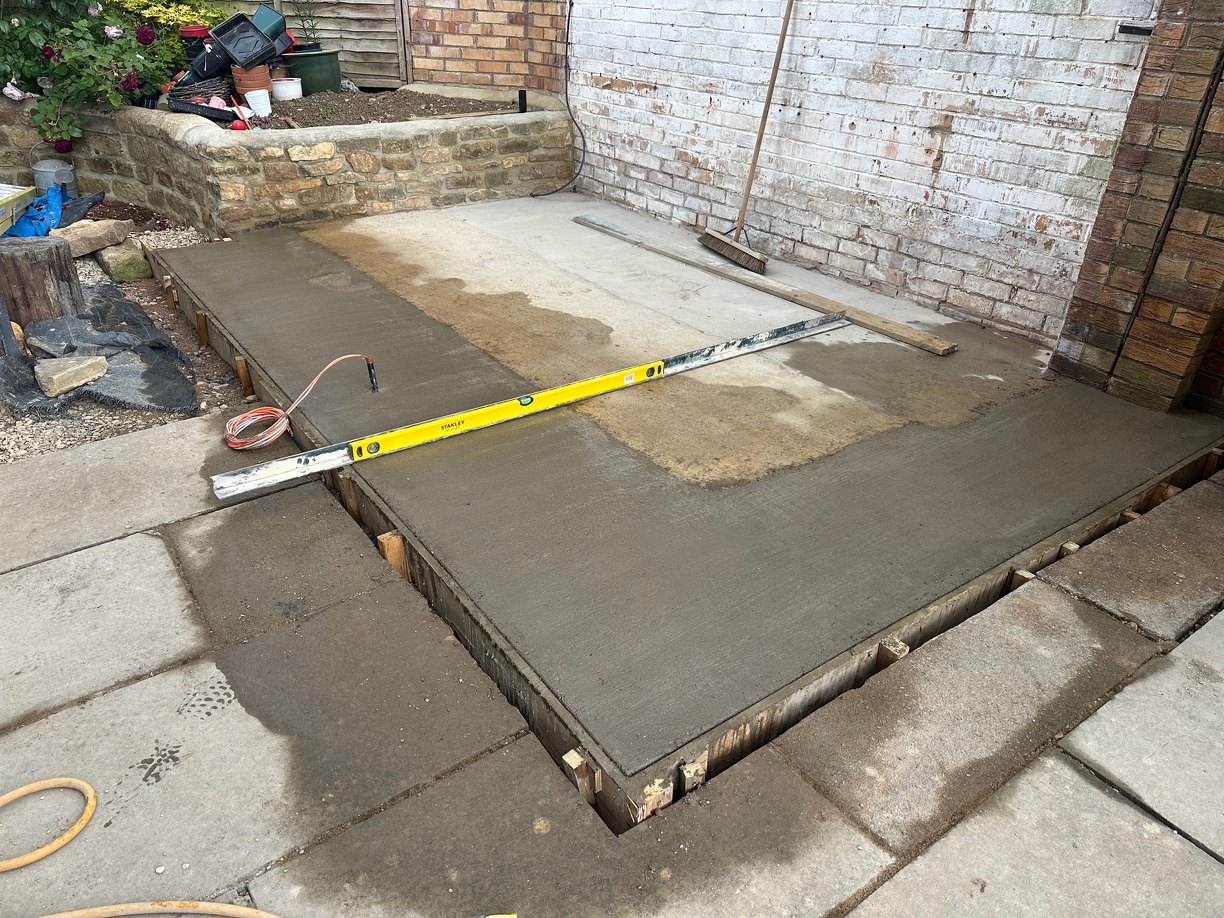
I ran a couple of CAT6 cables in conduit, one will be coupled to the existing cable, the other is a spare. I ripped down some of the plywood that used to form the greenhouse roof to make the shuttering for the next slab extension.
Next pour done. I tried to edge it, but didn't get my timing right and left it a bit long. I seem to learn a lot every time I attempt concrete.
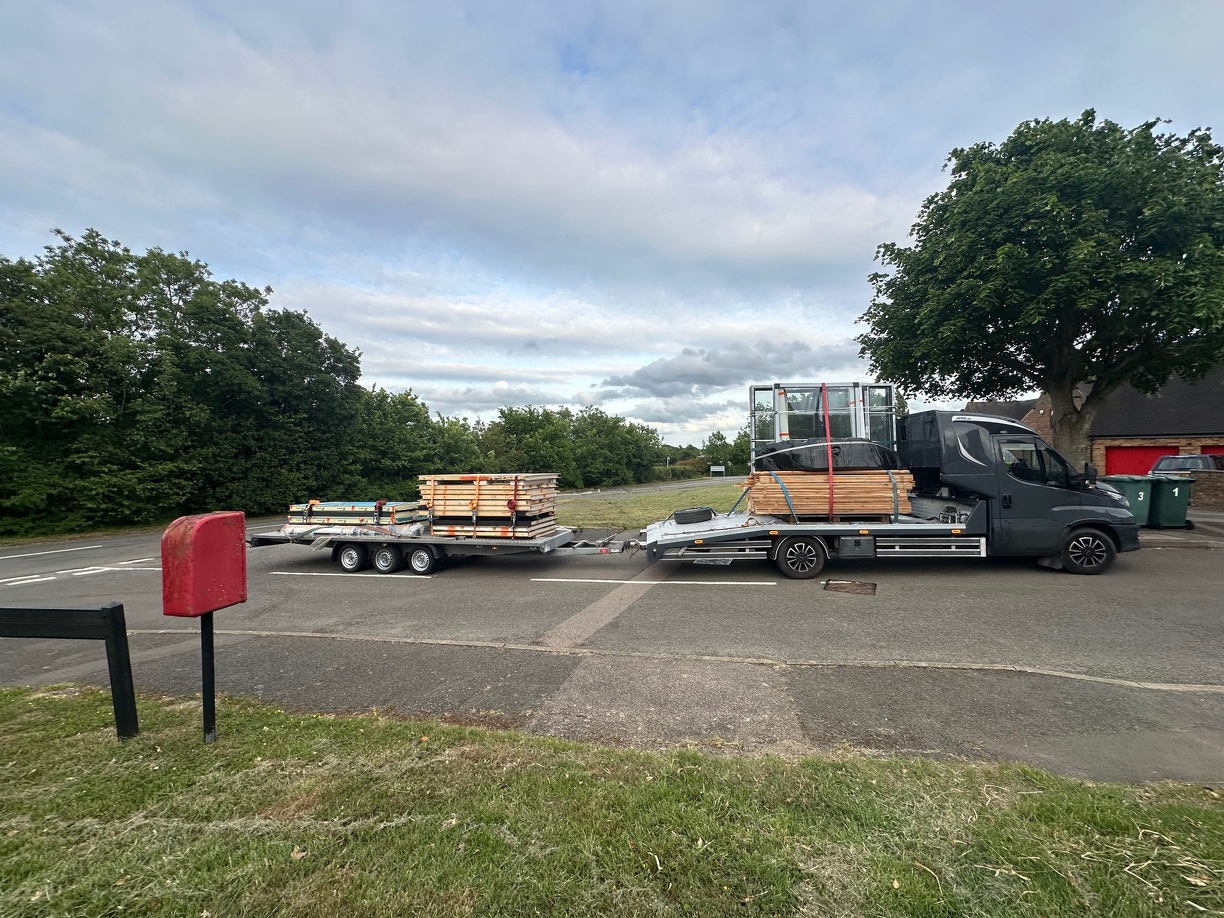
A little over three weeks after ordering, I was given the contact details of a Polish delivery driver. He made it clear that 'two strong men' would be required to help with unloading. When I suggested that my wife was quite strong, he had a good laugh and said something Polish that I didn't understand.
Finding a strong friend willing to hang around throughout a fairly broad delivery window on a working day at short notice was a little challenging.
Eventually, a beavertail complete with trailer turned up, driven all the way from Jarocin, a good 1000 miles from Oxfordshire.
The SIPs panels need to be kept dry.
The reason for the strong friend requirement soon became clear. The French doors came fully glazed - they were incredibly heavy. Getting them off the back of the van and up my driveway without flexing them too much was very much a three-man job. I used the available muscle and got them as close to where they needed to be as I could.
Many things, and some very detailed instructions and base plans...
To be continued
I started this build in the spring, and it's now close to completion, save for a few finishing touches. It'll take me a little while to bring things up to date, hopefully, by then, the inside will be complete.
I've worked from home since before it was fashionable and then frowned upon, and so has my wife. We both work for American companies and often end up doing unusual hours, which doesn't always align very well with having two young children making noise in the house. We've also ended up dedicating two different rooms to office space, which makes a reasonably sized house feel a lot smaller than it should. Having a separate dedicated building that either of us could go to to join calls in peace has been a pipedream for a while.
I started looking into garden rooms some years ago, and ended up liking the idea of a SIPs building. I was originally looking at using a UK-based SIPs company to supply the panels and then sourcing everything else I'd need elsewhere. I spotted a business on eBay, based in Poland, that provides a complete kit including doors, windows, cladding and a finished roof for a price that was comparable to piecing together all the elements myself locally. I've never built anything like this before, so letting someone else figure it all out had some appeal. In the end, the house extension took priority and required a lot of saving and my time, so I put the idea on the back burner for a few years.
Roll on to this year, and with the extension completed, we're in dire need of a new patio. Before that can happen, we need to complete all the projects that will alter the shape of the eventual patio, which includes the office. The project was back on, and the Polish eBay still existed with an ever-increasing number of positive reviews.
The office will be going at the side of our house, it's on an unusual plot with a reasonably generous triangle of land to the side. The previous owner had built a large raised koi pond and a greenhouse for all the pump equipment there. Both were no longer required. As a result of using the land at the side of the house, I didn't have a huge amount of depth to play with. On the plus side, using that space takes nothing away from the main garden, and there was already power and a bit of a concrete base. After some conversations with the seller, he was happy to adapt one of his standard 4x3m designs to be 4x2m. He even sent me some nice renderings...
I added a window on one side, and then moved it forward a bit as the boundary is angled, and this will provide a view towards the garden. I was impressed that they accommodated these changes, with most garden building companies, the price jumps up if you want anything custom.
With that ordered my attention turned to the greenhouse. Here are some photos from when we moved in in 2016...
We got rid of the pond not long after we moved in. Neither of us are particularly keen gardeners, so the greenhouse ended up being mostly used as overflow log storage.
The wooden frame was quite rotten in places. I patched it up in a few places to stop the glazing from falling out over the years. I was never particularly keen on having that much single-pane glass in the garden near the kids.
Earlier in the year, I made and installed a pair of gates. I over-ordered ballast and cement, so I decided to use what was left to fill in the area where the wooden staging in the greenhouse was. The biggest child seemed to enjoy smashing and digging with me.
I drilled into the existing slab and foundation, then chem-fixed bits of rebar in to tie the new slab into the existing.
Jump forward a couple of months and with the office ordered I started dismantling the greenhouse. I started by removing the glass carefully, keen to not send shards around the garden.
My smallest assistant sorted out the old wiring...
The greenhouse was being used to retain soil on one side (making it very damp). I left part of the brick base in place and faced it with some stone that had been lingering in a corner of the garden since we moved in. I'd never built anything like this before, which is probably very evident to anyone who knows what they're doing, but it resolved my soil retention issues.
The new building is essentially the same 4x2m that the old greenhouse was, but once spaced away from my new retaining wall a little and with the small 'porch' area on the front, I needed to extend the concrete slab a bit further.
I think I went with 150mm hardcore and a 150mm slab. We're on horrible clay soil so everything has a habit of moving.
With hindsight, I should have ripped out the existing slab and started again. It slopes down towards the retaining wall and I had to put quite a bit of effort into getting my building base level. I had a couple of reasons for leaving what was there in place - the boundary walls are single skin and a lot less sturdy than I'd like, I suspect I might have disturbed them smashing out the old slab. Pouring small extensions to the slab in phases also allowed me to complete the job on my own with a mixer, which was obviously a lot cheaper than getting a concrete delivery.
Speaking of the wobbly boundary wall, whoever built the greenhouse had badly added two courses of bricks to achieve their desired roof pitch and add flashing. The extra height was doing it no structural favours, so I removed the addition.
The buttress/pier that had been added later wasn't tied into the original wall at all. I repurposed some angle iron shelf brackets from the greenhouse to make some braces. They're ugly, but will be hidden behind the new building.
Another cost saving to doing the groundwork in phases was that I managed to avoid any waste disposal costs by pressing my ageing Volvo into action for many weighty tip runs. Having a car you're not too precious about has some perks.
The closest room in the house to that area of the garden is the lounge. Some years ago, whilst having the lounge replastered, I'd run a couple of ethernet cables from the garage on the other side of the house to behind the lounge TV. There's an in-wall access point there, but it was only using one of the two cables. I unmounted the access point and drilled through the backbox it was attached to outside. There was enough length on the spare cable to poke through the wall. I lifted some slabs and dug a small trench from the house to the office.
I ran a couple of CAT6 cables in conduit, one will be coupled to the existing cable, the other is a spare. I ripped down some of the plywood that used to form the greenhouse roof to make the shuttering for the next slab extension.
Next pour done. I tried to edge it, but didn't get my timing right and left it a bit long. I seem to learn a lot every time I attempt concrete.
A little over three weeks after ordering, I was given the contact details of a Polish delivery driver. He made it clear that 'two strong men' would be required to help with unloading. When I suggested that my wife was quite strong, he had a good laugh and said something Polish that I didn't understand.
Finding a strong friend willing to hang around throughout a fairly broad delivery window on a working day at short notice was a little challenging.
Eventually, a beavertail complete with trailer turned up, driven all the way from Jarocin, a good 1000 miles from Oxfordshire.
The SIPs panels need to be kept dry.
The reason for the strong friend requirement soon became clear. The French doors came fully glazed - they were incredibly heavy. Getting them off the back of the van and up my driveway without flexing them too much was very much a three-man job. I used the available muscle and got them as close to where they needed to be as I could.
Many things, and some very detailed instructions and base plans...
To be continued
Edited by Accelebrate on Thursday 4th September 18:41
Thanks all - I'm pleased this is of interest to others
rix said:
What's the budget looking like?
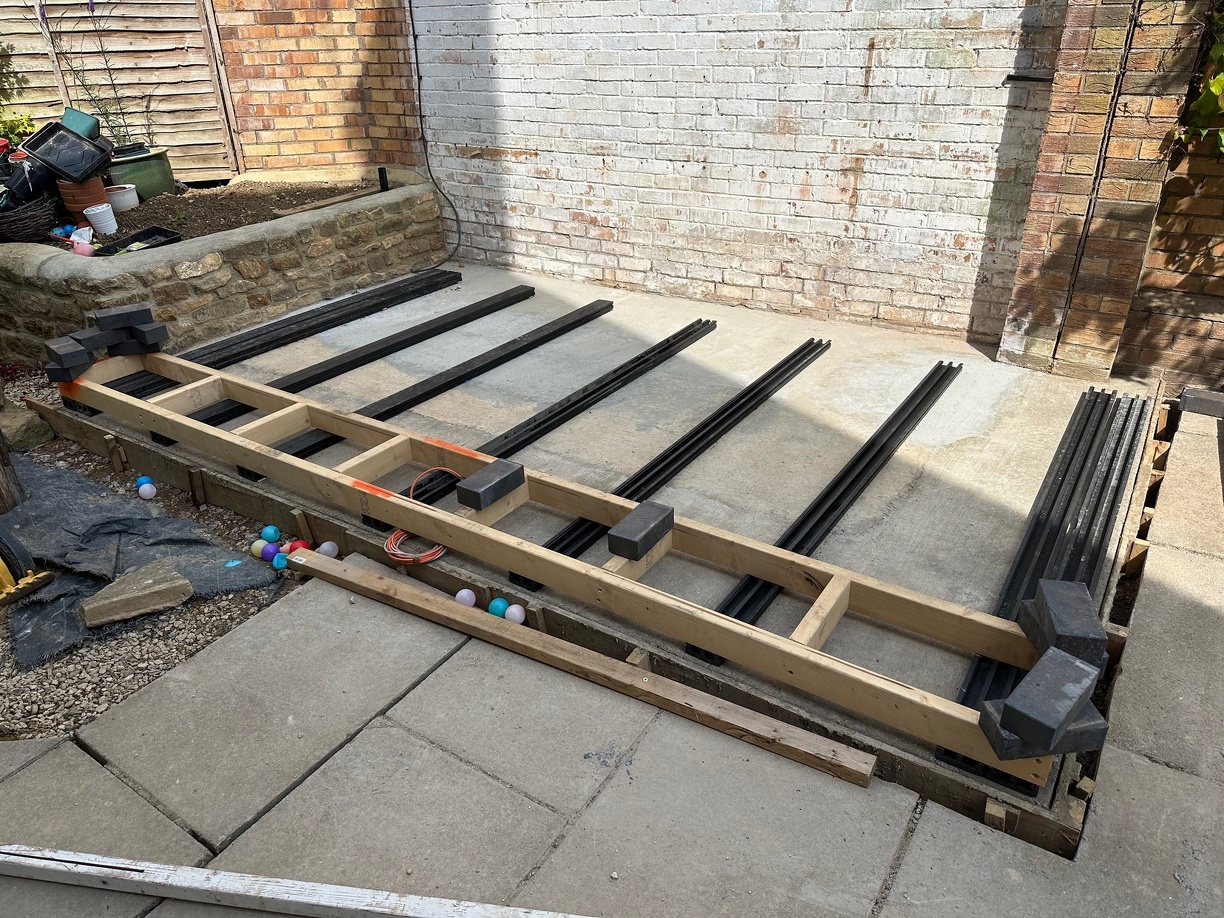
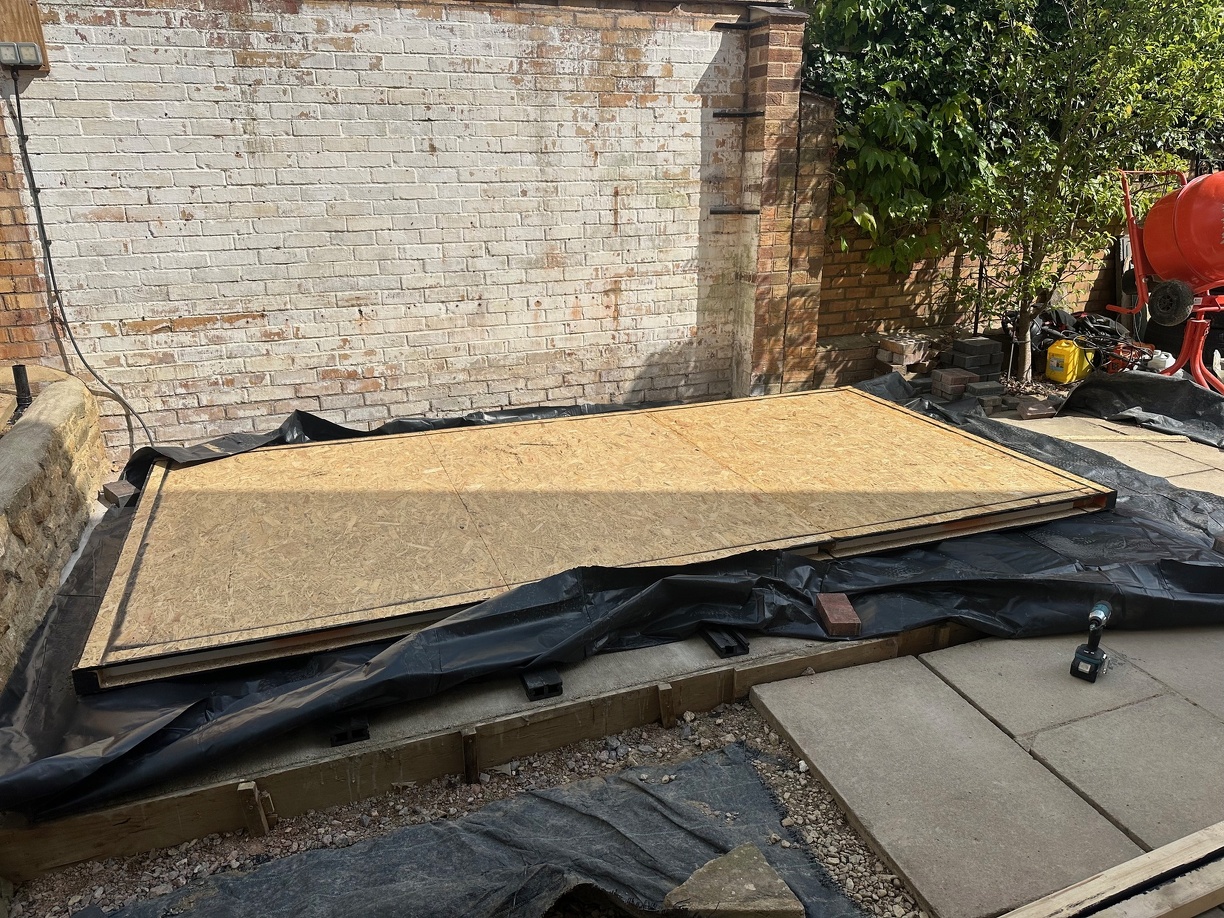
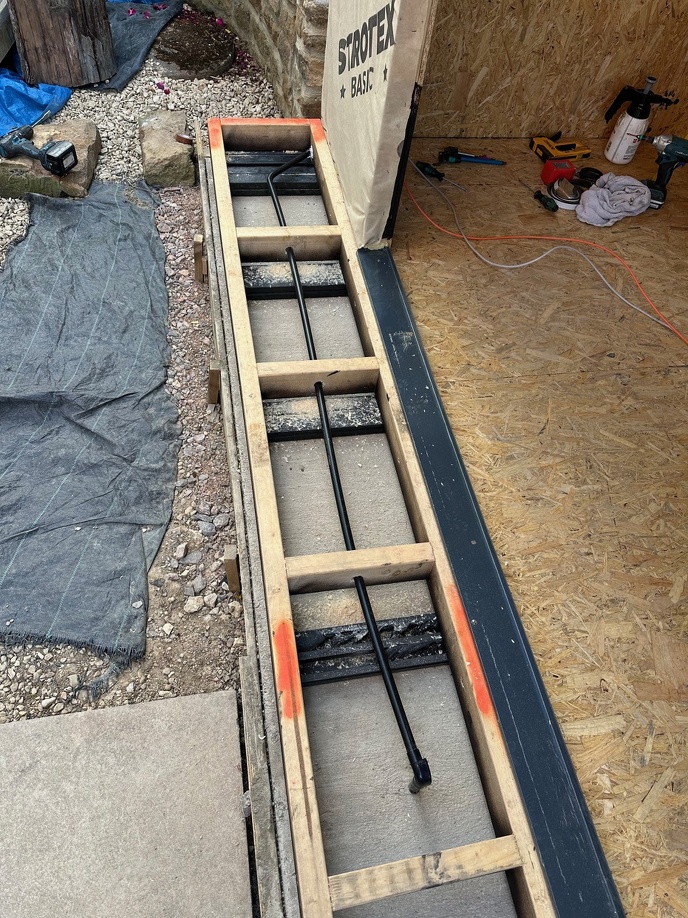
The kit was £6600 delivered. The company involved has their own website, and it would have been cheaper if I'd gone direct, but there was a certain amount of reassurance using eBay. I'll share costs for all the other stuff once I've written it up.The floor of the building is a SIP. It needed to be raised off the concrete pad for ventilation. The instructions suggested using paving slabs, I opted to use composite joists, normally used for decking. They seemed like a good option as they won't rot, and I could alter the height of each joist to level out my sloping slab.
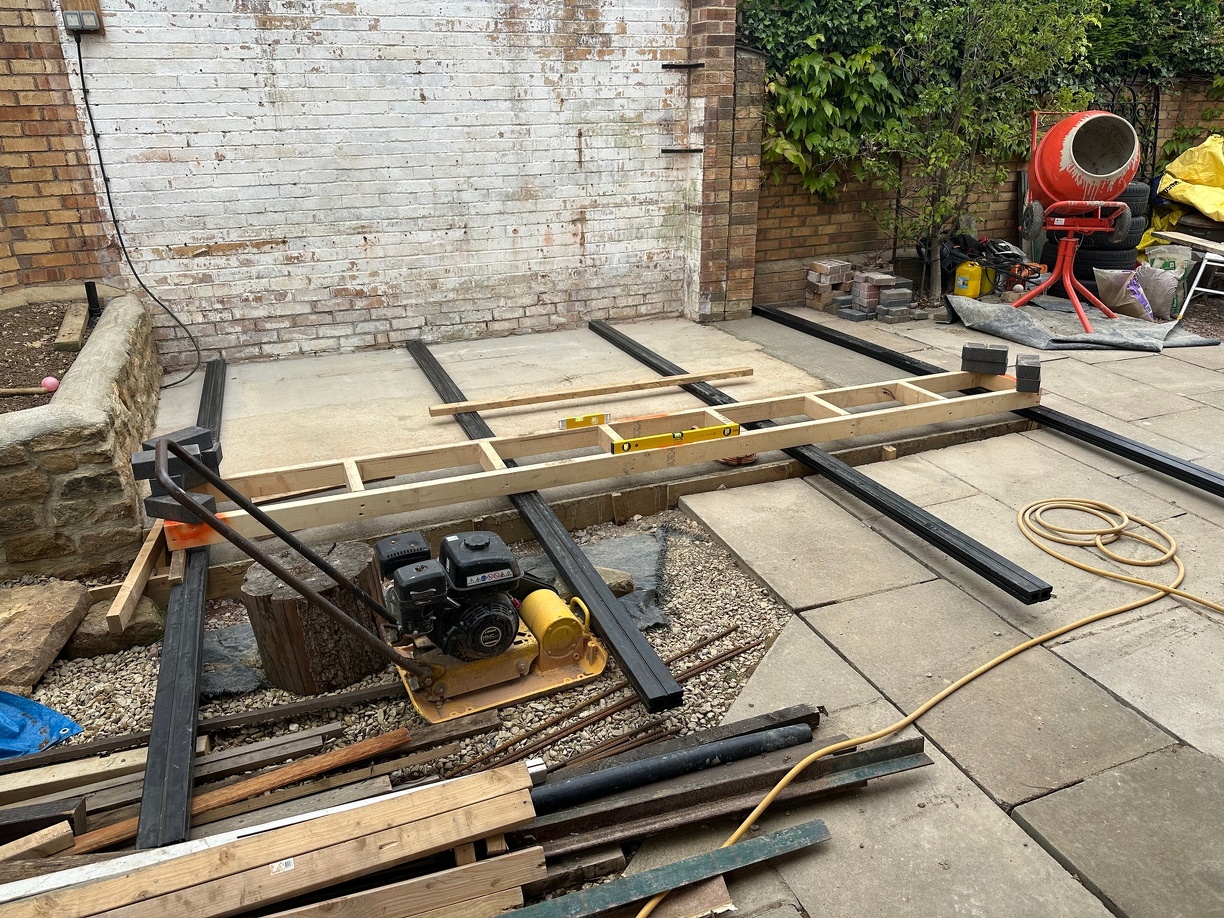
I calculated that the slab was 20mm higher on the right and ripped down each joist to accommodate that fall. This was a bit of a torture test for my table saw, and it made an impressive mess.
Any discrepancies front to back I resolved with shims. I then bedded the joists on PU glue, adding a few concrete anchors to keep them in place whilst that cured.
Before the joists went down, I levelled out a few dips in the original pad with exterior self-levelling compound.
The floor is made up of three panels, the one on the right is skinny, so I doubled up the joists there to support it. It seemed to make sense to do the same on the left-hand side too. The rest of the joists were placed based on the provided plan, with additional joists in between as I'd bought plenty.
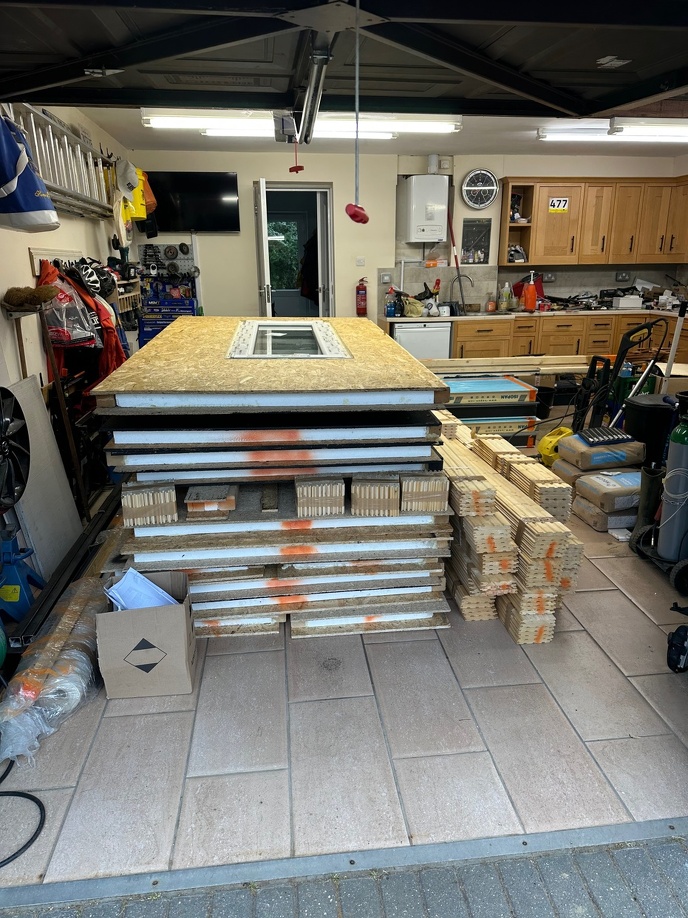
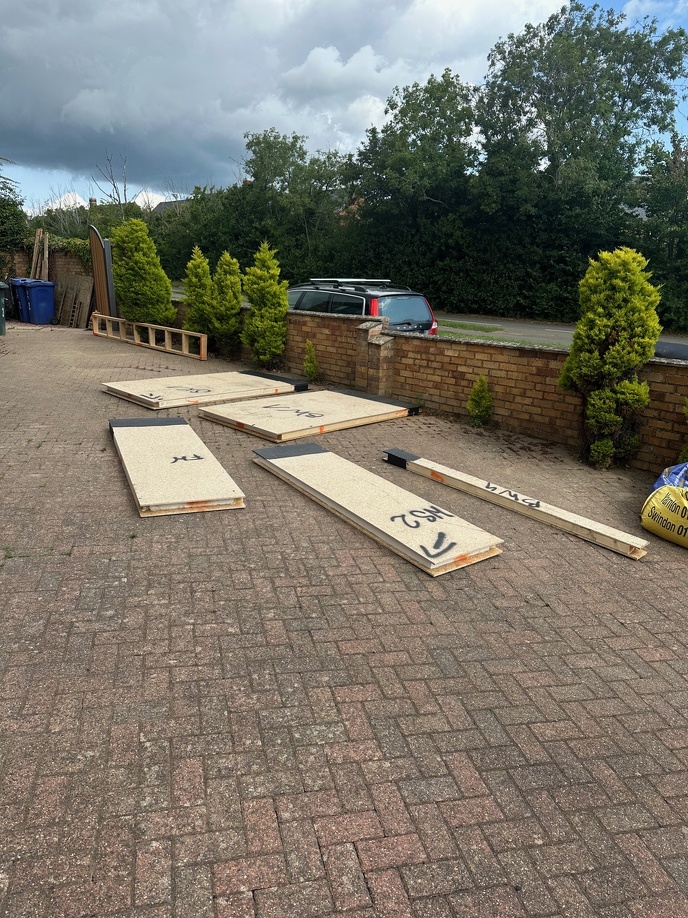
The following weekend a friend had offered to give me a hand with the panels. You need quite a bit of space to lay them all out, but they were usefully all labelled and there was a corresponding CAD model with matching labels in the included instructions. All very fool-proof.
They aren't particularly heavy (apart from the one panel with the glazed window installed), but they're awkward in size and the OSB edges would be easily damaged if knocked. Having another pair of hands was welcome.
The floor panels and bottom sections of the walls were painted with a thick bitumen paint, something I haven't seen UK SIP companies do, but it doesn't seem like a bad idea for longevity. The floor panels were placed on some provided DPM that was later wrapped up the sides and trimmed to form a plastic nappy.
Notice the black spray paint on the top - all of the panels had been previously assembled, and they'd helpfully marked where the walls should be placed on the floor.
We started with a corner and worked our way around. A big set square and spirit level was useful to ensure everything was plumb and true.
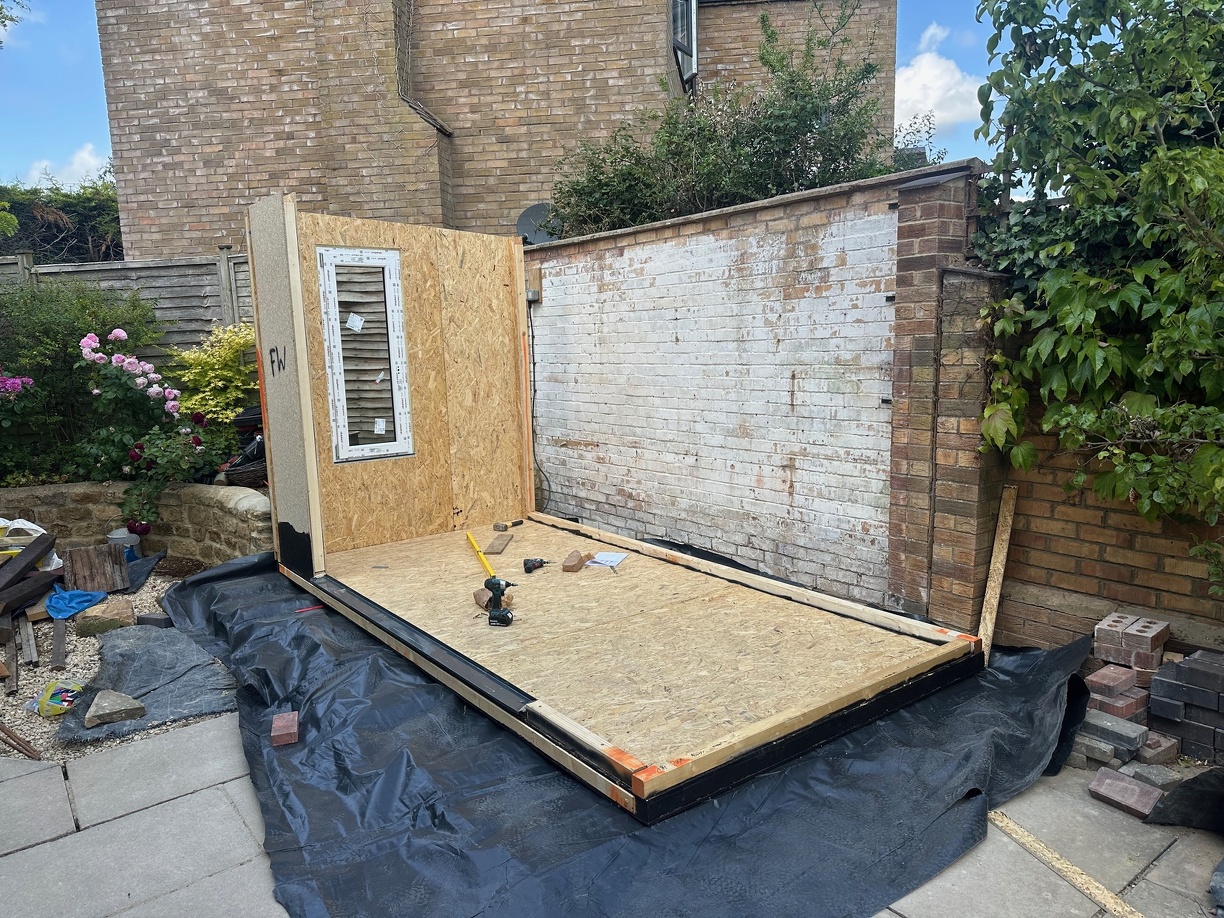
It only took a morning to get the floor and the walls in place. The speed with which a basic SIP structure can go up is impressive. I used the provided screws; they were good quality.
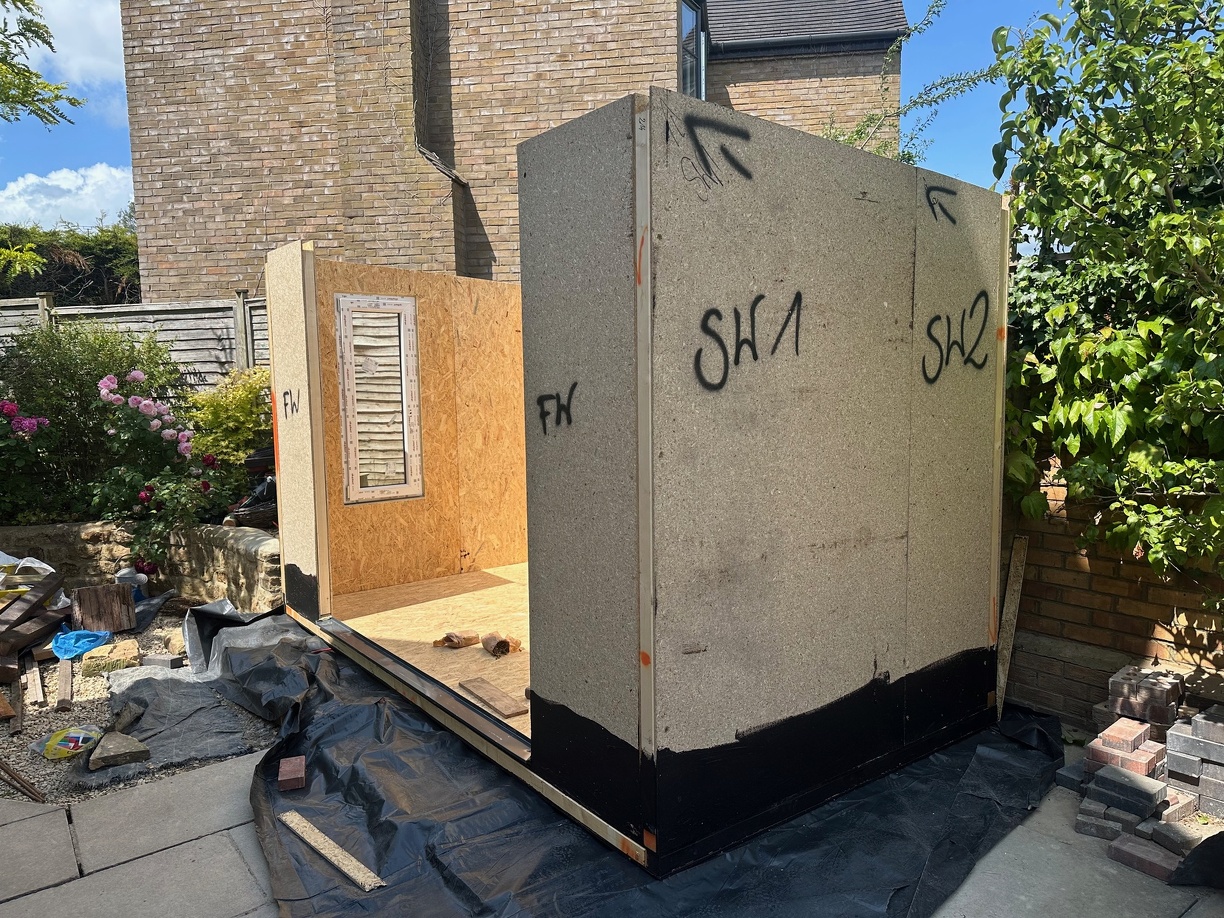
We had an extended lunch break involving a fete at my son's school; if we'd had a full day on it we probably would have got the roof panels on too.
That afternoon, the breathable membrane went on...
The provided structure for the porch area was just untreated CLS, I decided that copying their treatment of the SIPs couldn't hurt and sprayed it with an old can of Waxoyl I had in the garage.
The next day was Father's Day. I met up with my Dad and Brother at a nearby pub. After lunch, I persuaded them to give me a hand lifting the roof panels into place. Happy Father's Day Dad!
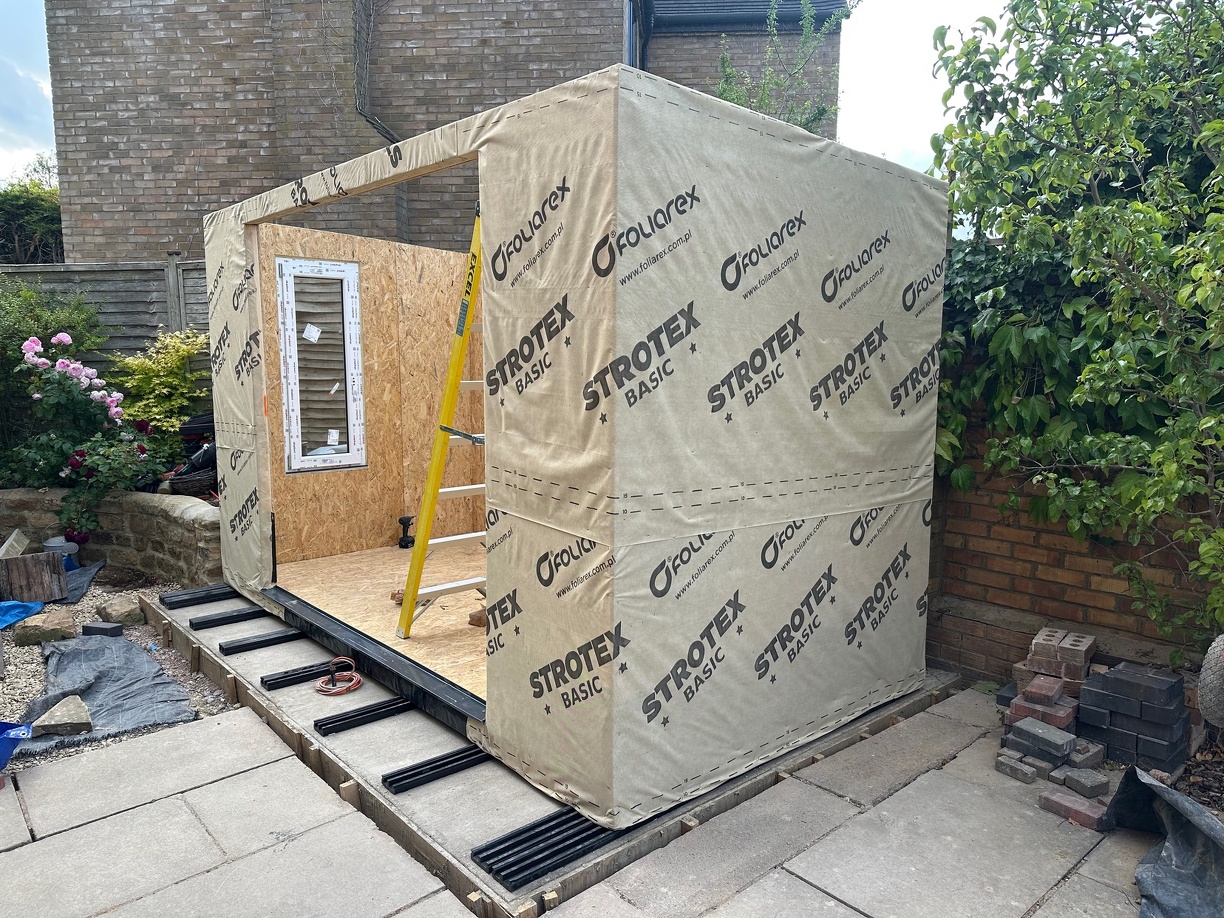
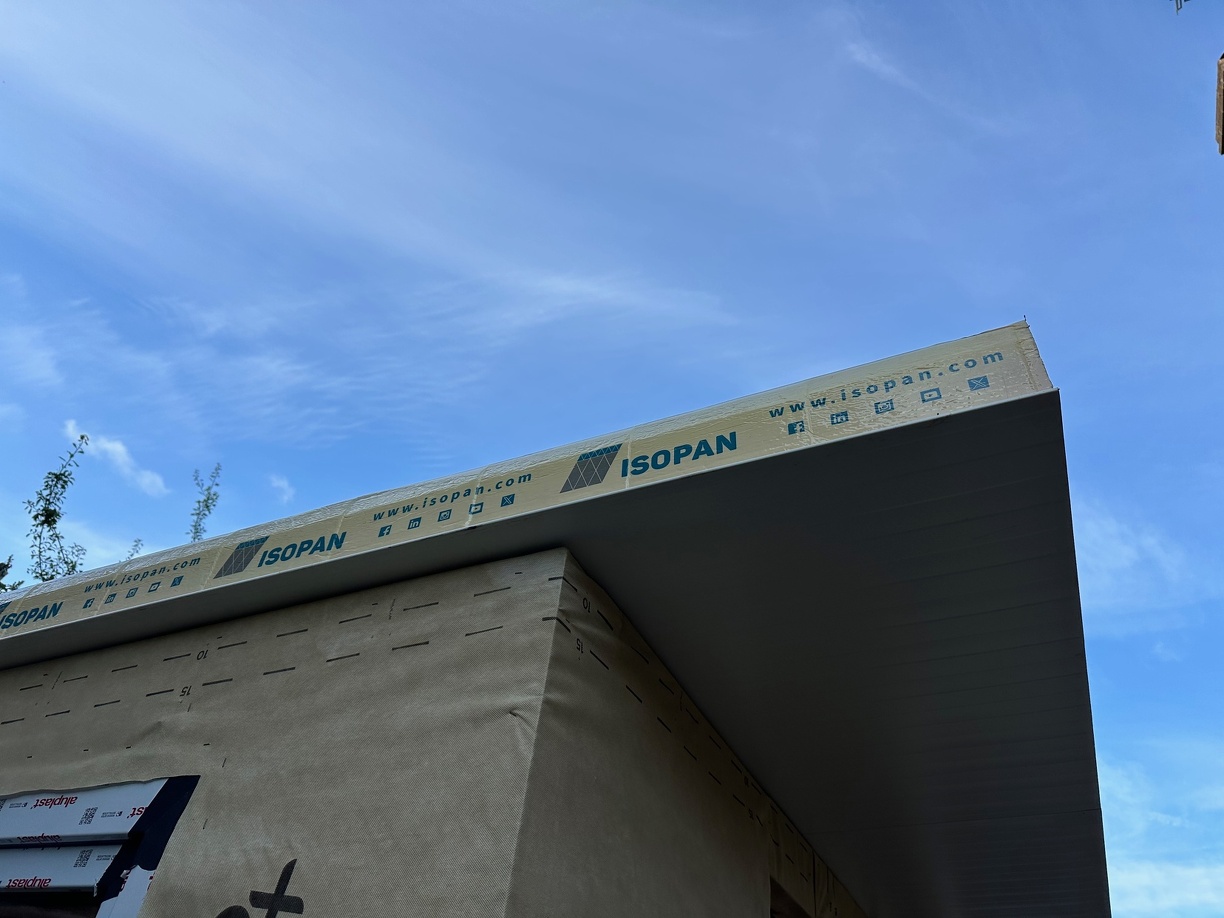
The roof uses insulated panels, the sort of thing that's usually only found on commercial buildings and warehouses in this country. They're essentially a sandwich of steel and PIR foam. The underside is white, so it can just be left as a finished ceiling if you don't want ceiling lights. They were quite light, but bulky and razor sharp where they'd been trimmed to accommodate our smaller building.
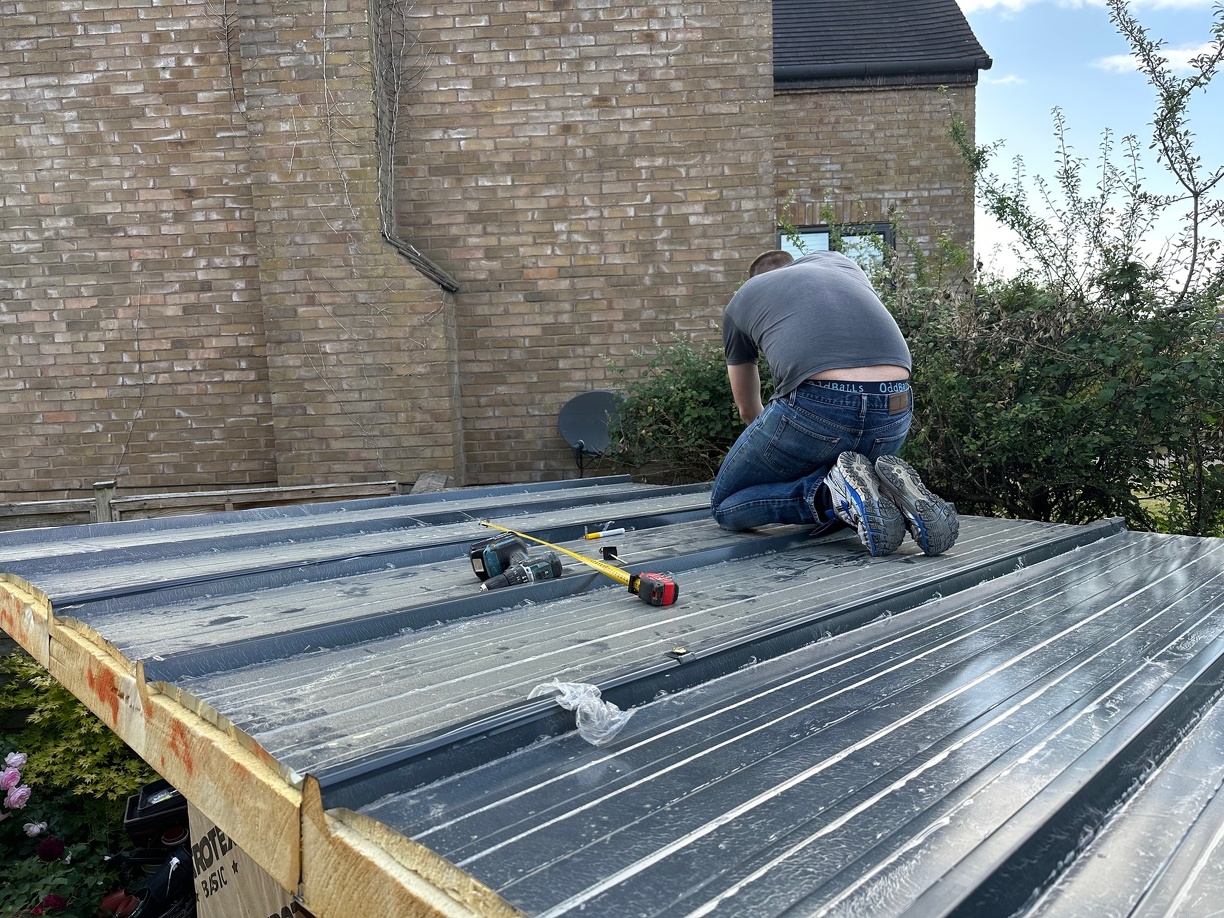

The panels went up quickly, but it took a while to check they were sitting in the right place before committing to screwing them down. There were three different types of screws used to attach them to each other and the building.
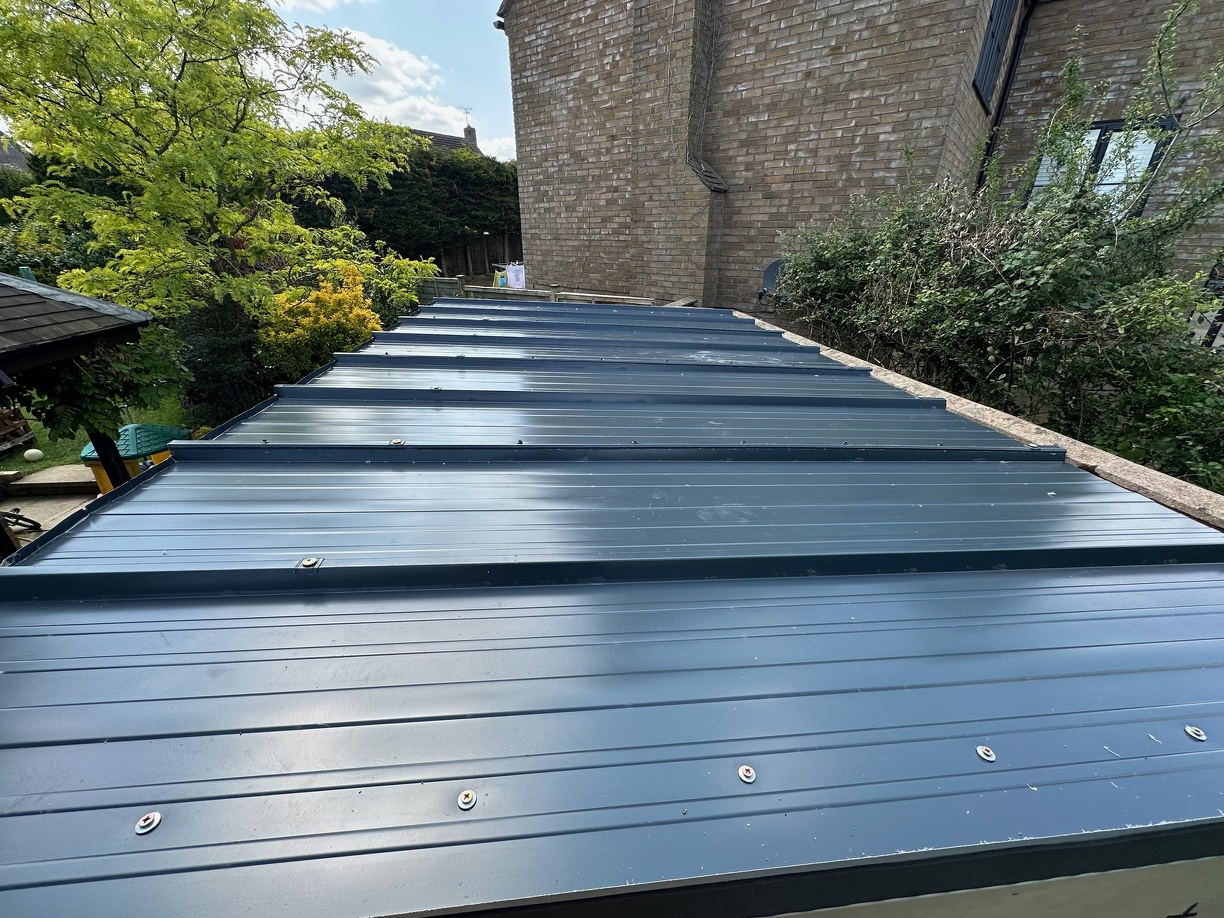
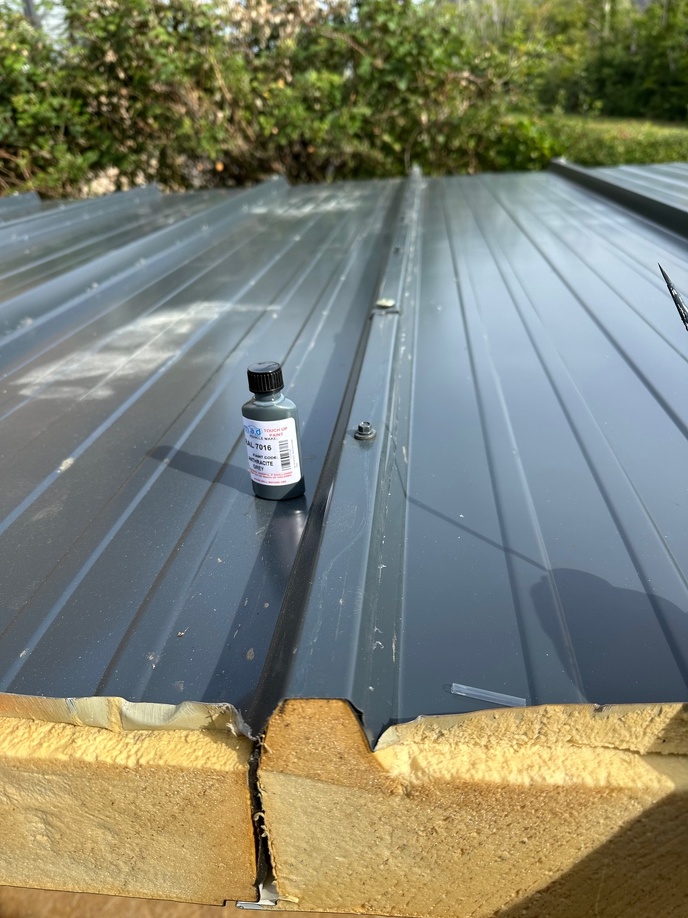
There were a few scratches from delivery. I'll never see the roof unless standing on a ladder, but RAL 7016 touch-up paint was a perfect match.
I installed the porch structure and extended the conduit to carry the ethernet cables into the building.
I stripped the forms from the concrete (I painted them with some used oil from my MX5 so they came off easily) and tidied up the gravel. The gravel area is where the pond used to be, it'll all be a new patio, eventually.
Not bad for a weekend of on-and-off work. Weather-wise, it's been a great year for getting outside projects done, but I was pleased to have a shower-proof structure before any rain appeared.
I calculated that the slab was 20mm higher on the right and ripped down each joist to accommodate that fall. This was a bit of a torture test for my table saw, and it made an impressive mess.
Any discrepancies front to back I resolved with shims. I then bedded the joists on PU glue, adding a few concrete anchors to keep them in place whilst that cured.
Before the joists went down, I levelled out a few dips in the original pad with exterior self-levelling compound.
The floor is made up of three panels, the one on the right is skinny, so I doubled up the joists there to support it. It seemed to make sense to do the same on the left-hand side too. The rest of the joists were placed based on the provided plan, with additional joists in between as I'd bought plenty.
The following weekend a friend had offered to give me a hand with the panels. You need quite a bit of space to lay them all out, but they were usefully all labelled and there was a corresponding CAD model with matching labels in the included instructions. All very fool-proof.
They aren't particularly heavy (apart from the one panel with the glazed window installed), but they're awkward in size and the OSB edges would be easily damaged if knocked. Having another pair of hands was welcome.
The floor panels and bottom sections of the walls were painted with a thick bitumen paint, something I haven't seen UK SIP companies do, but it doesn't seem like a bad idea for longevity. The floor panels were placed on some provided DPM that was later wrapped up the sides and trimmed to form a plastic nappy.
Notice the black spray paint on the top - all of the panels had been previously assembled, and they'd helpfully marked where the walls should be placed on the floor.
We started with a corner and worked our way around. A big set square and spirit level was useful to ensure everything was plumb and true.
It only took a morning to get the floor and the walls in place. The speed with which a basic SIP structure can go up is impressive. I used the provided screws; they were good quality.
We had an extended lunch break involving a fete at my son's school; if we'd had a full day on it we probably would have got the roof panels on too.
That afternoon, the breathable membrane went on...
The provided structure for the porch area was just untreated CLS, I decided that copying their treatment of the SIPs couldn't hurt and sprayed it with an old can of Waxoyl I had in the garage.
The next day was Father's Day. I met up with my Dad and Brother at a nearby pub. After lunch, I persuaded them to give me a hand lifting the roof panels into place. Happy Father's Day Dad!
The roof uses insulated panels, the sort of thing that's usually only found on commercial buildings and warehouses in this country. They're essentially a sandwich of steel and PIR foam. The underside is white, so it can just be left as a finished ceiling if you don't want ceiling lights. They were quite light, but bulky and razor sharp where they'd been trimmed to accommodate our smaller building.
The panels went up quickly, but it took a while to check they were sitting in the right place before committing to screwing them down. There were three different types of screws used to attach them to each other and the building.
There were a few scratches from delivery. I'll never see the roof unless standing on a ladder, but RAL 7016 touch-up paint was a perfect match.
I installed the porch structure and extended the conduit to carry the ethernet cables into the building.
I stripped the forms from the concrete (I painted them with some used oil from my MX5 so they came off easily) and tidied up the gravel. The gravel area is where the pond used to be, it'll all be a new patio, eventually.
Not bad for a weekend of on-and-off work. Weather-wise, it's been a great year for getting outside projects done, but I was pleased to have a shower-proof structure before any rain appeared.
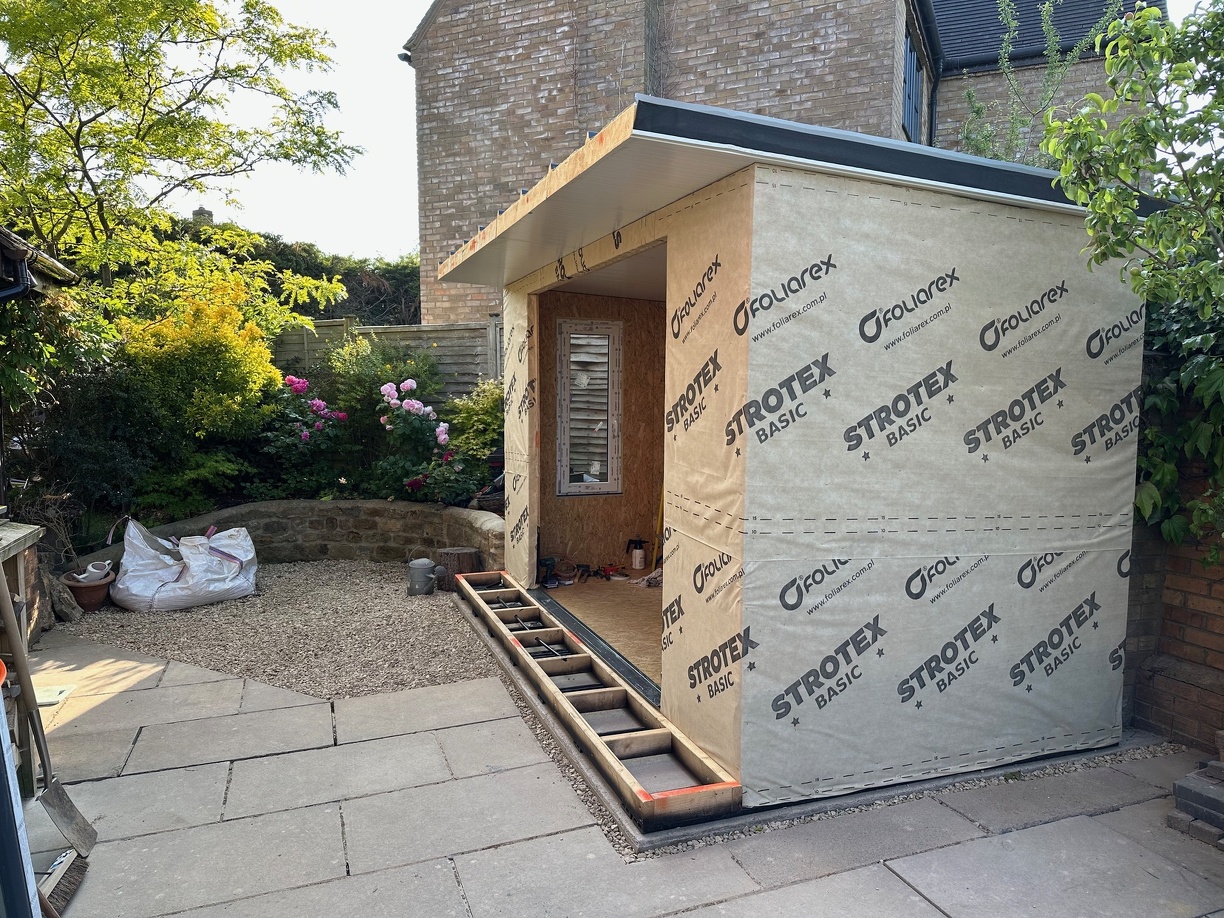
I then moved on to attaching the battens that will receive the cladding. This was the first time I'd had to measure and cut anything for the structure.
I couldn't do the areas above the door yet, as it used external brackets to mount that would then be covered by the battens. I had a bit of a lull at this point whilst I waited for a friend to be available to help lift the door into place.
I moved on to some other tasks...
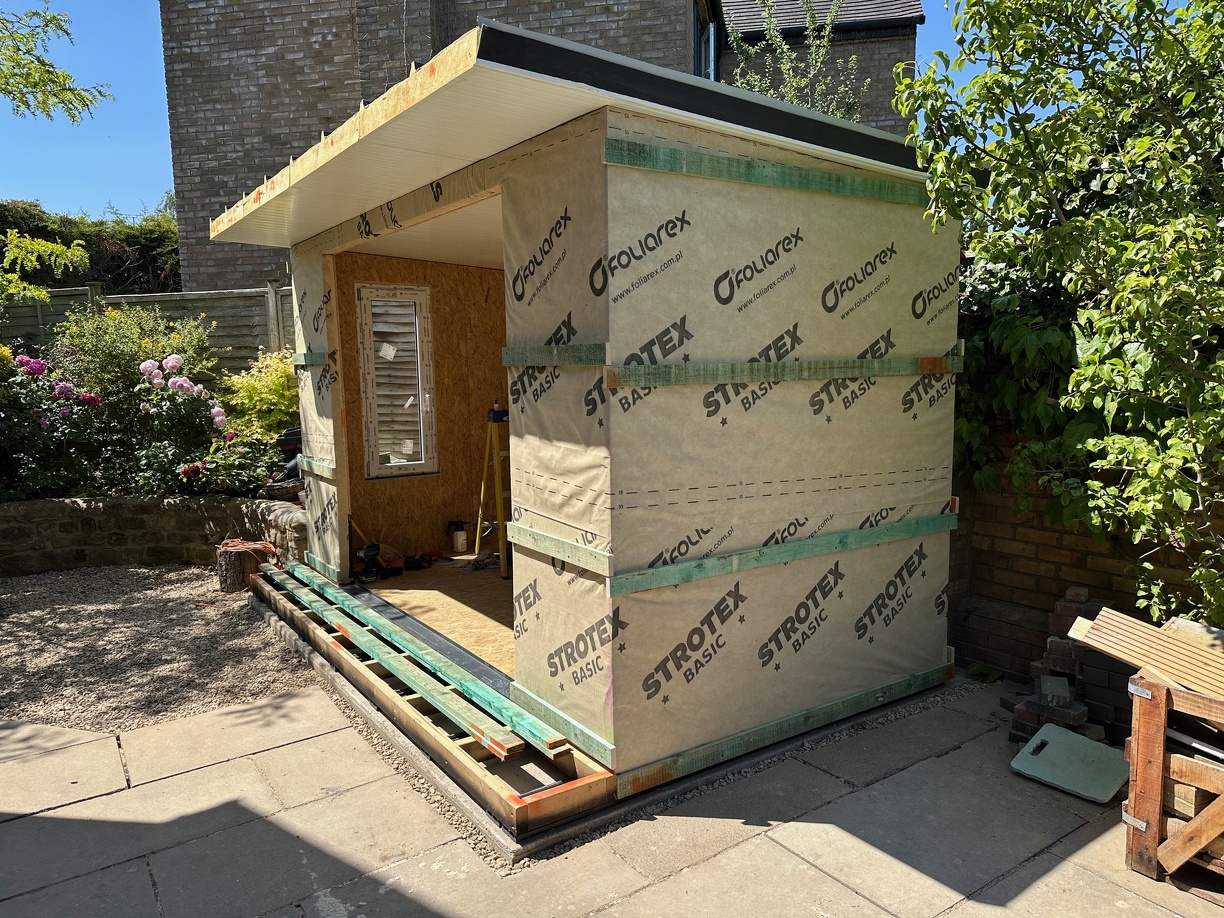
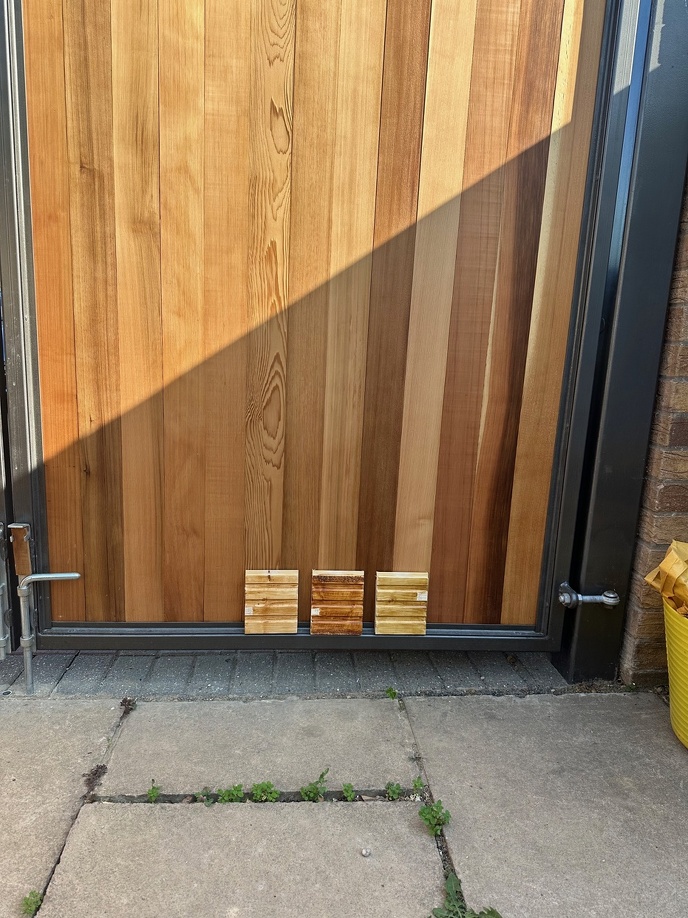
The office came with spruce cladding, but I wanted to stain it to be a similar hue to some cedar gates I built recently. I've used Osmo oil to treat wood on other projects, it seems ok, so I ordered some samples of various tints.

These were the closest contenders alongside the gates, we settled on the darkest option "428 Red Cedar".
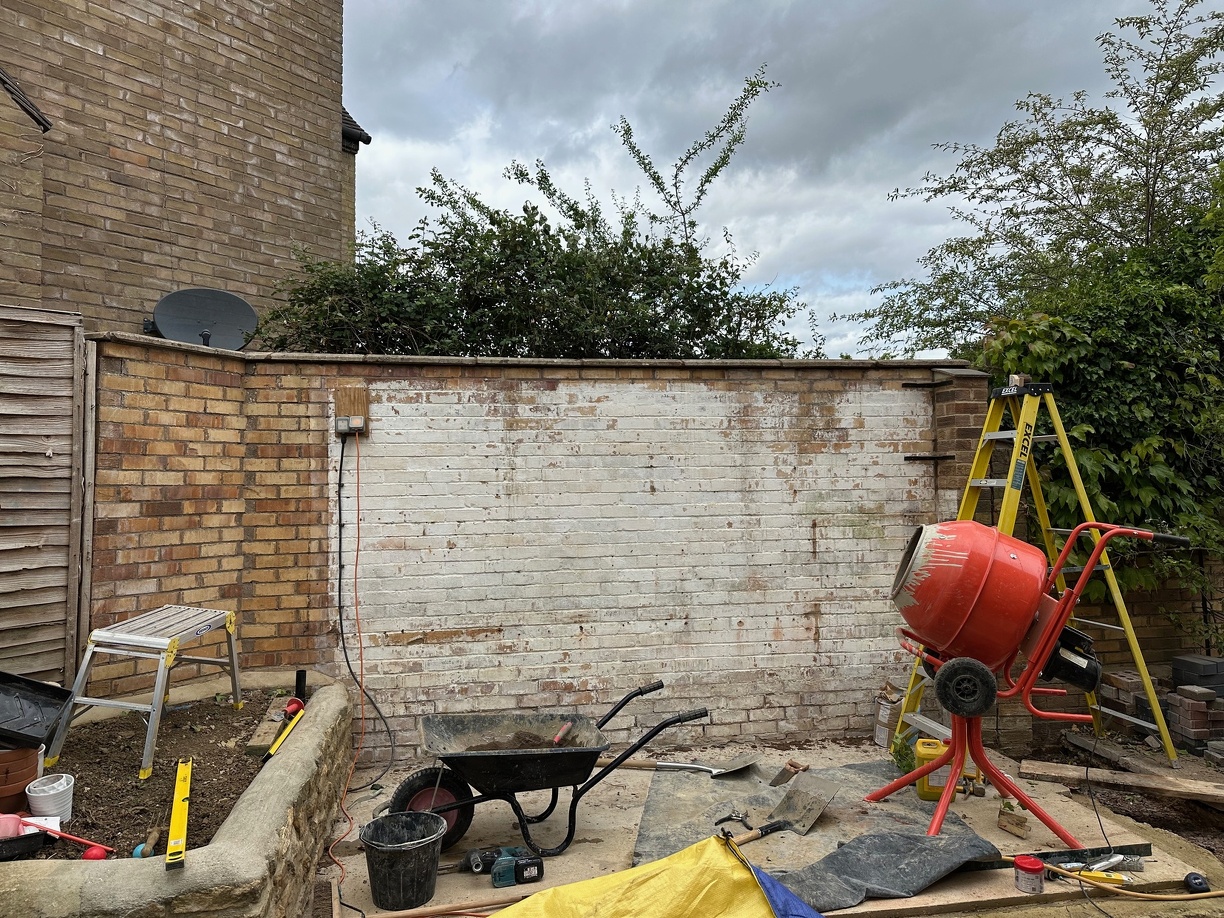
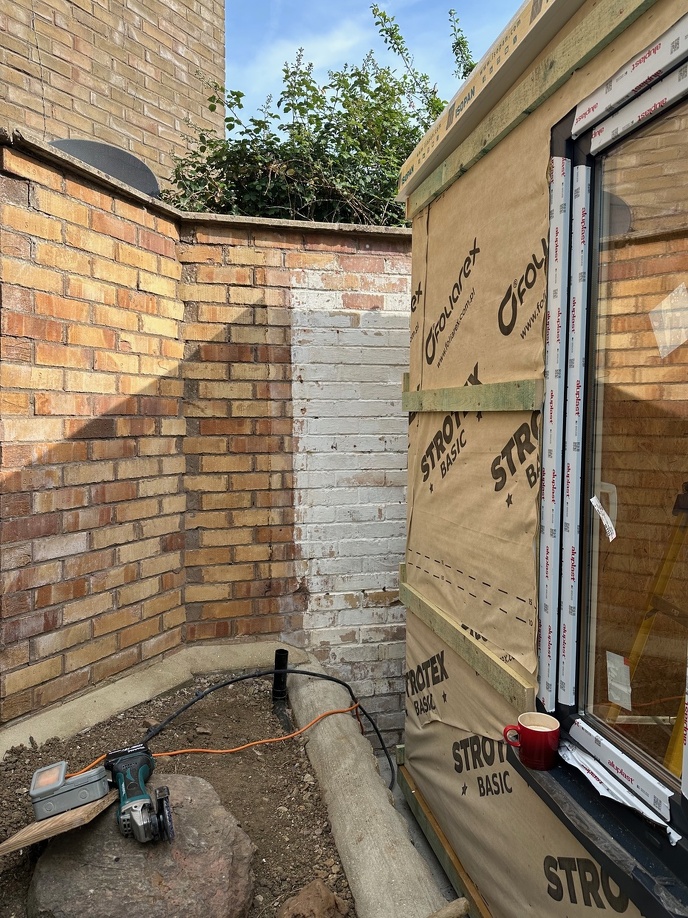
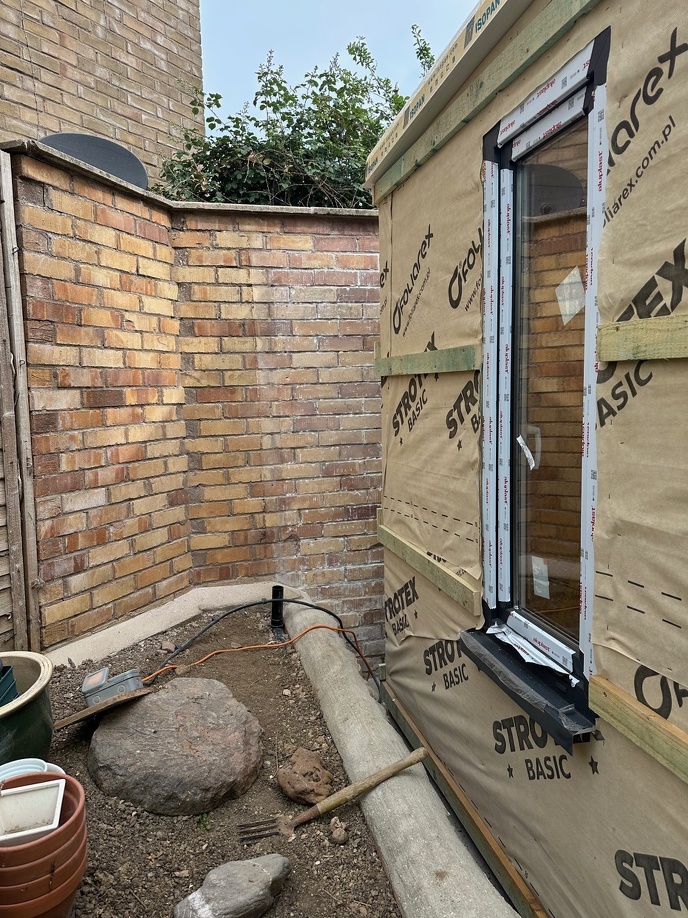
A bit of the wall that had been painted inside the greenhouse would be visible at the side of the building.
I'd heard that the 'strip discs' you can get for angle grinders work well on painted brickwork, removing the paint without being aggressive enough to damage the brick. I already had some from another project, so I gave them a go.
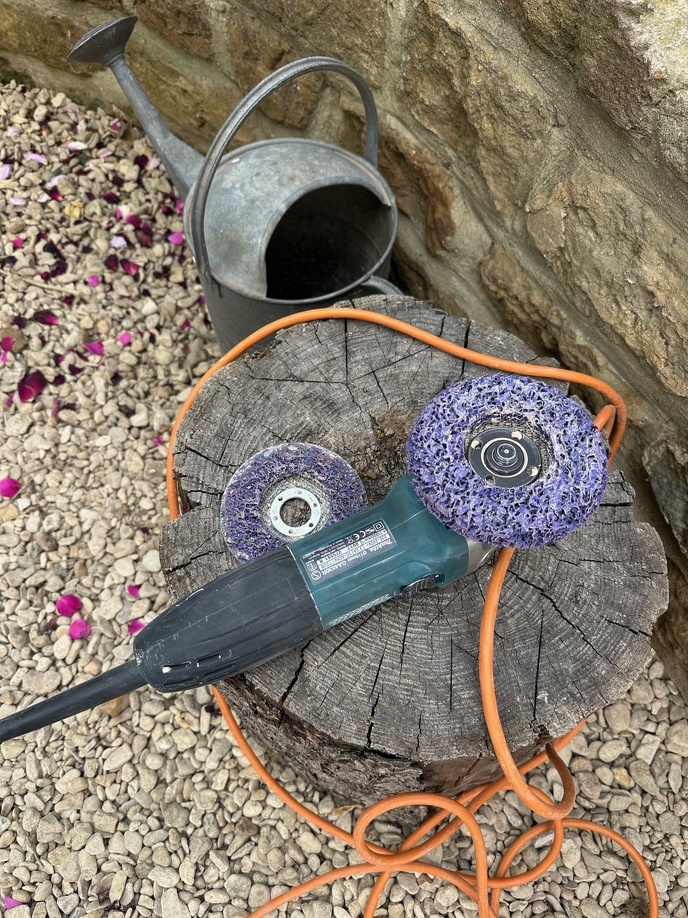
They worked quite well. Although they don't last long in this application, I think I used three just on this area, and they're relatively pricey. I've heard a needle scaler can be quite good on the paint left behind in the smaller crevices. I might drag my compressor out here at some point and see if that's true.
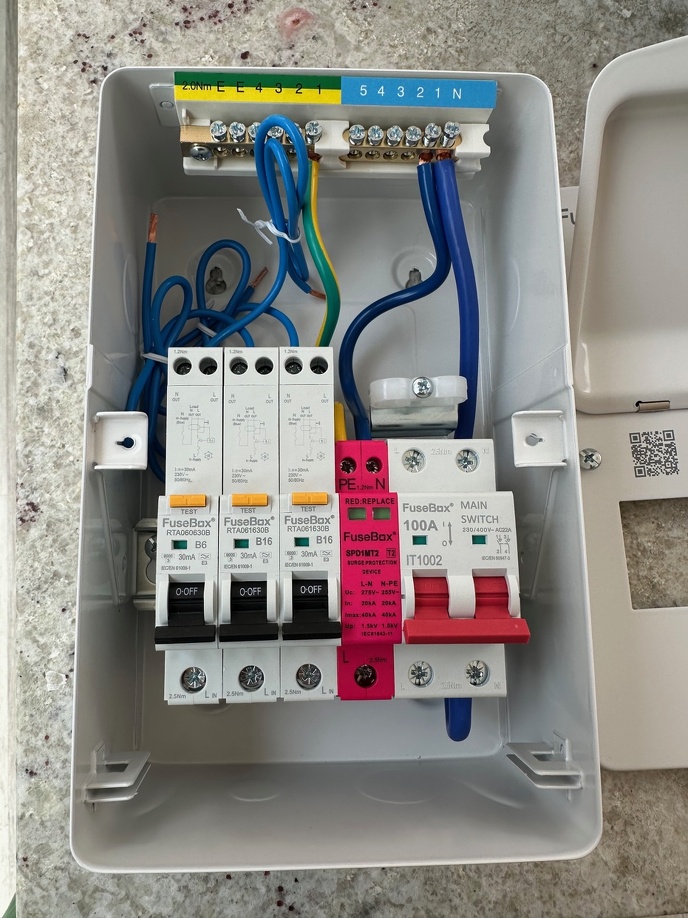
I work in IT, but appear to have gone into the wrong profession as I spend a lot of my free time watching videos of electricians working. When we extended our kitchen, I did the wiring myself and then used the NAPIT TPC scheme (Third Party Certification) to find a local electrician to inspect, test and issue the relevant paperwork for Building Control. It's the above-board/formalised version of getting a mate to sign things off, it worked really well and I saved about £7000 based on the quote that our builder's electrician provided. I did the same thing here. Building Control isn't involved, but I'll still need an EIC as I'll be installing a new consumer unit and circuits within the office.
Fusebox have recently introduced an SPD that doesn't require a separate MCB, this seemed perfect as I could get SPD protection and three RCBOs for lighting, sockets and AC in a nice small 4 way enclosure.
If you're a little blasé about CAT6 bend radii, you can fit a coupler into the smallest enclosure that Wiska sell.
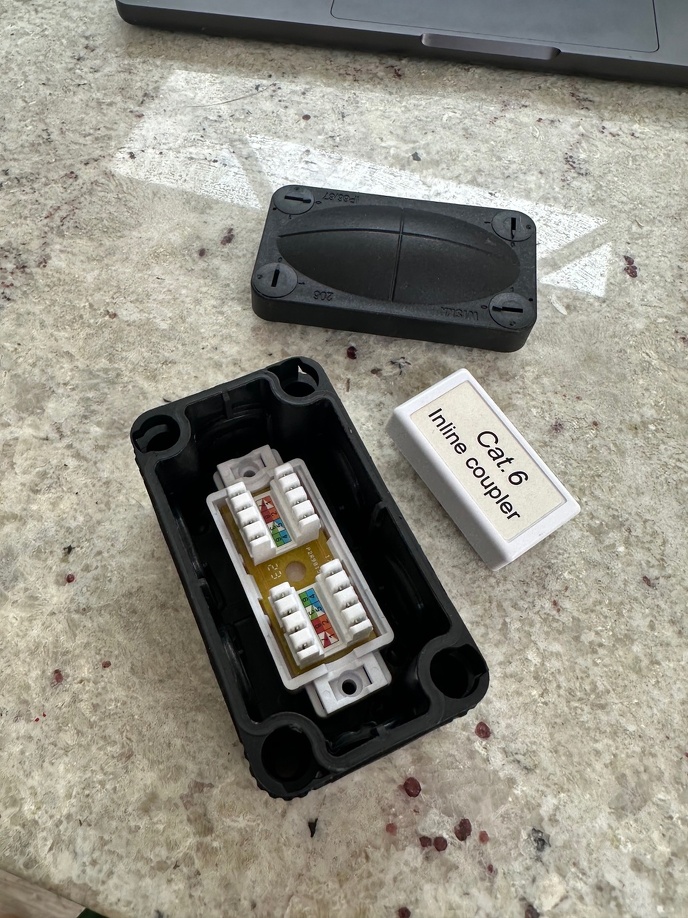
This was a fairly neat way to connect the ethernet to the existing cable from the lounge.

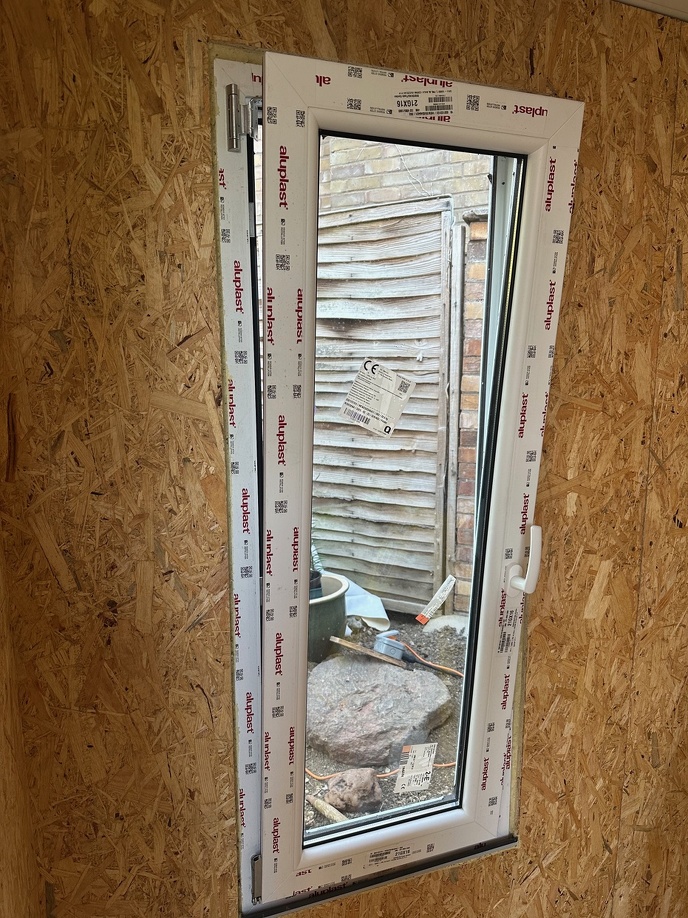
I hadn't clocked that the window I'd added to the side would open inwards. Thinking about it, most of Europe seems to have inward-opening windows, I guess possibly due to the popularity of external shutters? I plan to put a desk across this wall, which will prevent it from opening. I assumed it was going to be a fixed window so that's no great loss, it does also tilt and that will still work with a desk across it so that's a bonus. The whole front door can be tilted as well, I won't be short of fresh air.
I couldn't do the areas above the door yet, as it used external brackets to mount that would then be covered by the battens. I had a bit of a lull at this point whilst I waited for a friend to be available to help lift the door into place.
I moved on to some other tasks...
The office came with spruce cladding, but I wanted to stain it to be a similar hue to some cedar gates I built recently. I've used Osmo oil to treat wood on other projects, it seems ok, so I ordered some samples of various tints.
These were the closest contenders alongside the gates, we settled on the darkest option "428 Red Cedar".
A bit of the wall that had been painted inside the greenhouse would be visible at the side of the building.
I'd heard that the 'strip discs' you can get for angle grinders work well on painted brickwork, removing the paint without being aggressive enough to damage the brick. I already had some from another project, so I gave them a go.
They worked quite well. Although they don't last long in this application, I think I used three just on this area, and they're relatively pricey. I've heard a needle scaler can be quite good on the paint left behind in the smaller crevices. I might drag my compressor out here at some point and see if that's true.
I work in IT, but appear to have gone into the wrong profession as I spend a lot of my free time watching videos of electricians working. When we extended our kitchen, I did the wiring myself and then used the NAPIT TPC scheme (Third Party Certification) to find a local electrician to inspect, test and issue the relevant paperwork for Building Control. It's the above-board/formalised version of getting a mate to sign things off, it worked really well and I saved about £7000 based on the quote that our builder's electrician provided. I did the same thing here. Building Control isn't involved, but I'll still need an EIC as I'll be installing a new consumer unit and circuits within the office.
Fusebox have recently introduced an SPD that doesn't require a separate MCB, this seemed perfect as I could get SPD protection and three RCBOs for lighting, sockets and AC in a nice small 4 way enclosure.
If you're a little blasé about CAT6 bend radii, you can fit a coupler into the smallest enclosure that Wiska sell.
This was a fairly neat way to connect the ethernet to the existing cable from the lounge.
I hadn't clocked that the window I'd added to the side would open inwards. Thinking about it, most of Europe seems to have inward-opening windows, I guess possibly due to the popularity of external shutters? I plan to put a desk across this wall, which will prevent it from opening. I assumed it was going to be a fixed window so that's no great loss, it does also tilt and that will still work with a desk across it so that's a bonus. The whole front door can be tilted as well, I won't be short of fresh air.
Edited by Accelebrate on Friday 5th September 13:50
That's interesting stuff, thank you!
The panels look like about 75mm of polystyrene with timber frame, sandwiched between 18mm OSB?
Is that about right?
I'm guessing the window/door will be the majority of the heat loss?
What are your thoughts on ventilation? does the kit come with any vents?
The panels look like about 75mm of polystyrene with timber frame, sandwiched between 18mm OSB?
Is that about right?
I'm guessing the window/door will be the majority of the heat loss?
What are your thoughts on ventilation? does the kit come with any vents?
They're on the slimmer side of SIPs panels, there are some specs in the product listing:
80 mm SIPs panels made from 1x10 mm MFP board - 60mm tough EPS100 Polystyrene core- 1x12mm OSB3 board
Along with U Values:
Roof-0,22 W/(m²K)
Walls-0,29 W/(m²K)
Floor -0,3 W/(m²K)
Door/window-1,4 W/(m²K)
Which are good, much better than most insulated wooden cabins you can buy as garden rooms, but you can obviously achieve a lot better with SIPs construction if you go thicker and move to PIR.
For the space I had availiable keeping the walls slim was appealing, I had a particular width of desk in mind which I've managed to fit in. It will be interesting to see how it feels in the depths of winter, so far it keeps a much more consistent temperature than our early 80s house. I've fitted a mini split AC unit that will heat or cool, I'm hoping that scheduling it to heat the room whilst our electricity is cheap in the early hours of the morning will see me through most of a working day, I'll report back later in the year.
There’s no permanent ventilation at the moment, another thing I’ll monitor, I guess I could add trickle vents if needed.
Edited by Accelebrate on Friday 5th September 14:58
On the window front, ours open inwards in the house, it was done this way by the previous owners so they could tilt them open without the dogs escaping and being a bungalow its adds a tiny bit of security too for sleeping with windows open in the summer. Once you have got used to it you'll wonder why all windows arent like this!
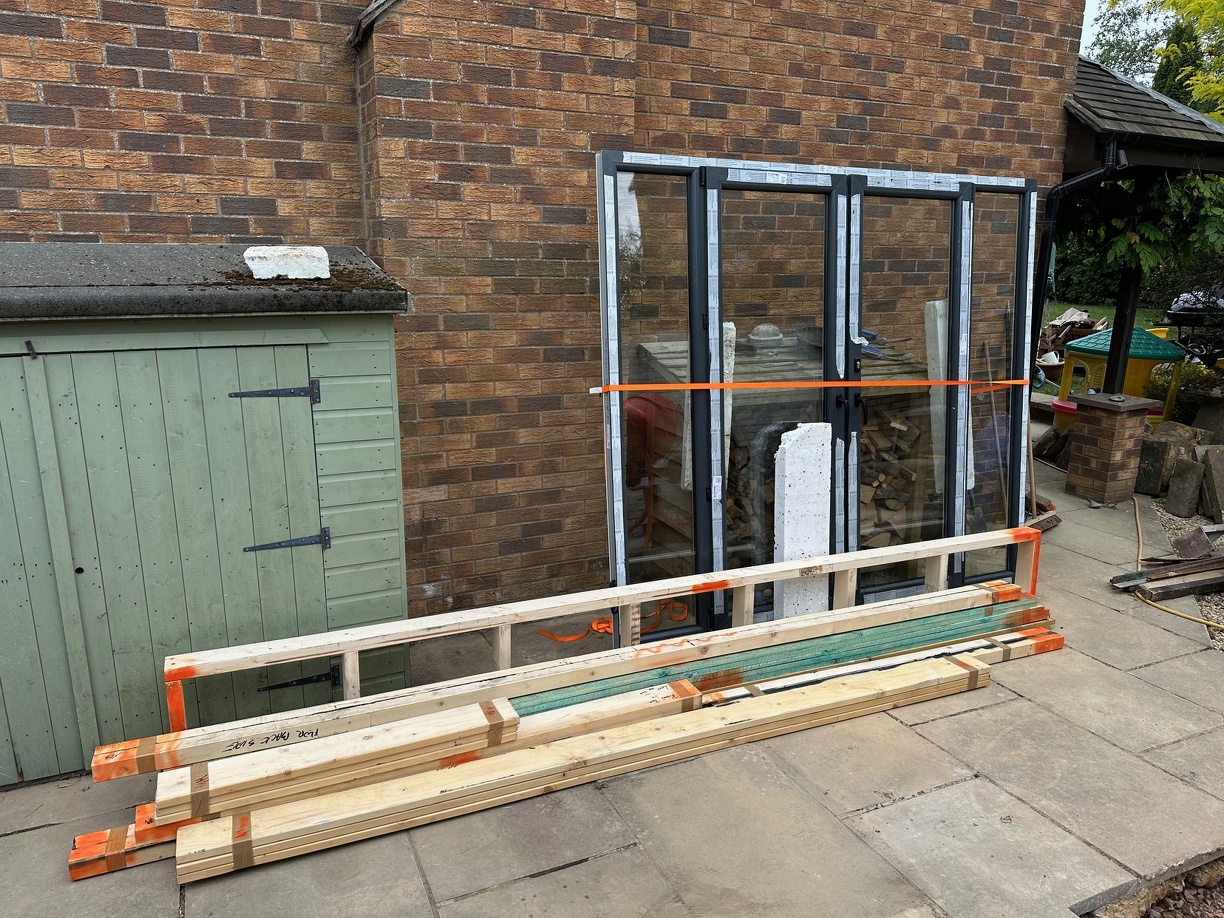
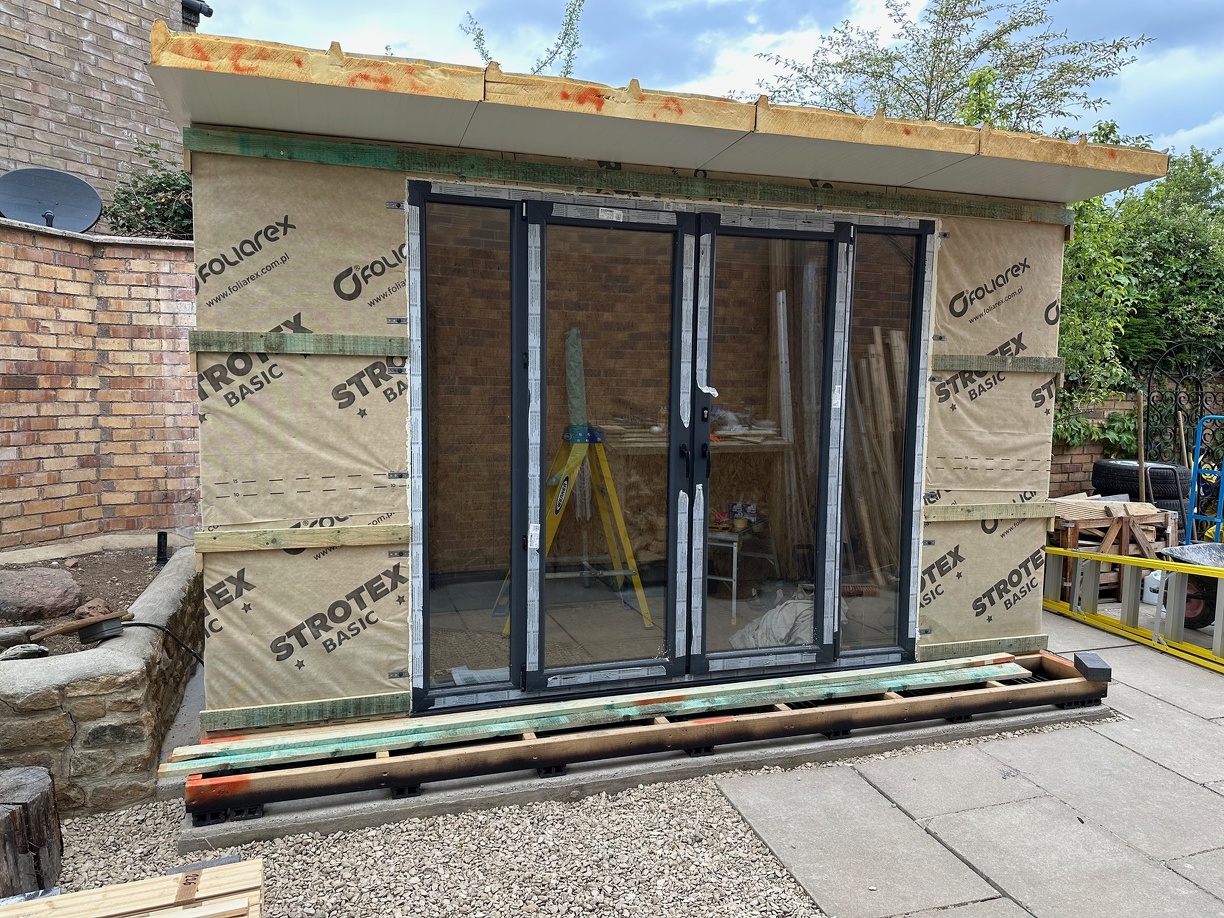
The friend who helped with the walls returned to give me a hand with the French doors. The doors came with a sacrificial plastic transport strip attached to the bottom that could be used to slide them around before fitting. This was attached with screws to the base, so the whole thing needed to be laid flat to remove the transport strip before we could fit it. Usefully, the delivery driver had arrived with plenty of polystyrene to lay it down on.

The lift into position wasn't particularly pleasant. I guess you're less likely to have to deal with breakages when shipping glazed units, but I prefer the UK system of installing the frame and then adding the glazing.
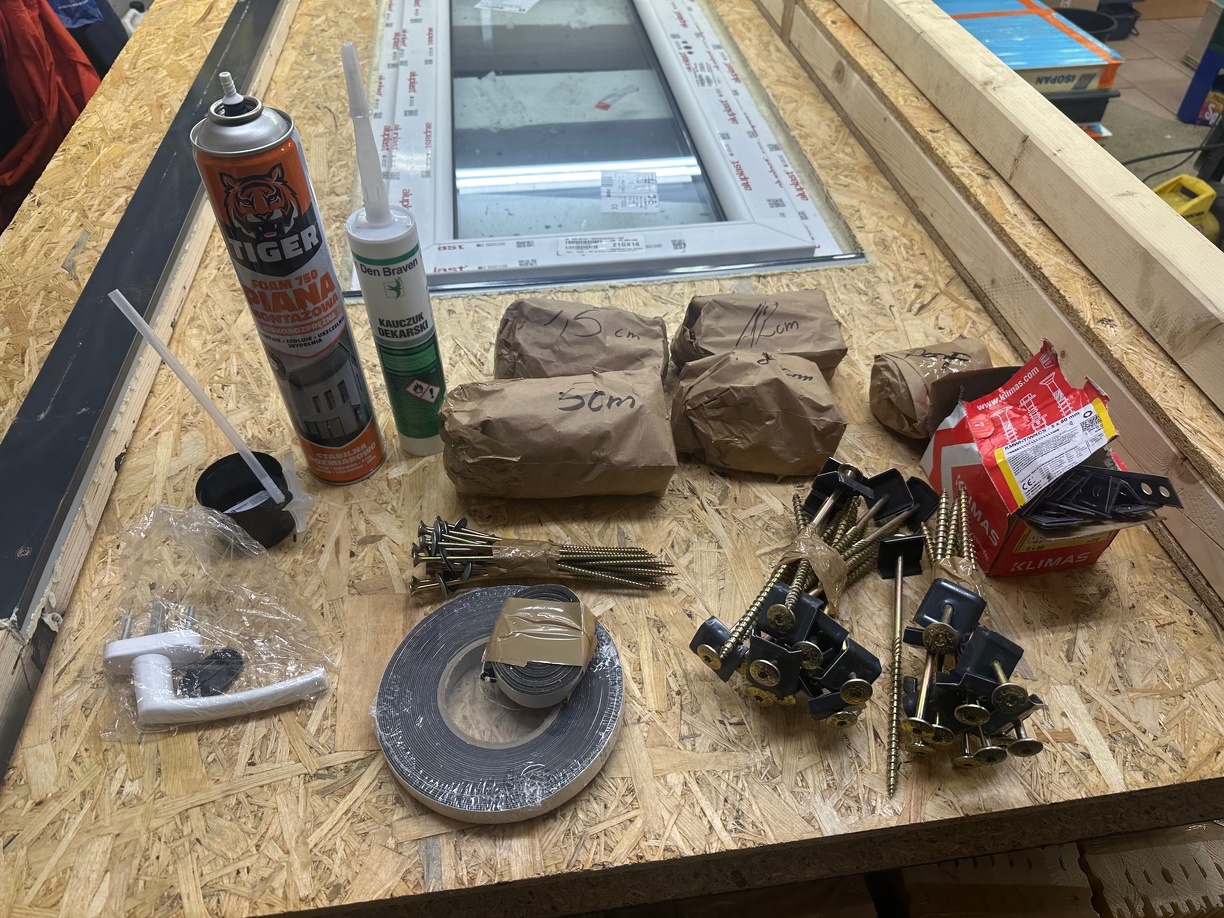
The door was attached using metal brackets that lock into the frame and then get bent over to be screwed to the outer walls. I then used the supplied 'Tiger' foam to fill any gaps. A couple of large screws were added through the frame in the middle at the top and bottom; these can apparently be used to tweak the fit of the doors if the frame is bowing. It didn't seem to be required for my install though.
The door assembly is different to other listing and customer photos, they seem to have moved from Aluplast who supplied the window to a Polish company called Sonarol who make windows and farm equipment
https://sonarol.pl/en/oferta/okna-i-drzwi
It has a separate handle for the second door rather than a catch on the inside of the frame. My friend also pointed out that unlike the French doors on our house the doors open 180 degrees rather than 90, it's quite nice being able to pin them completely back.
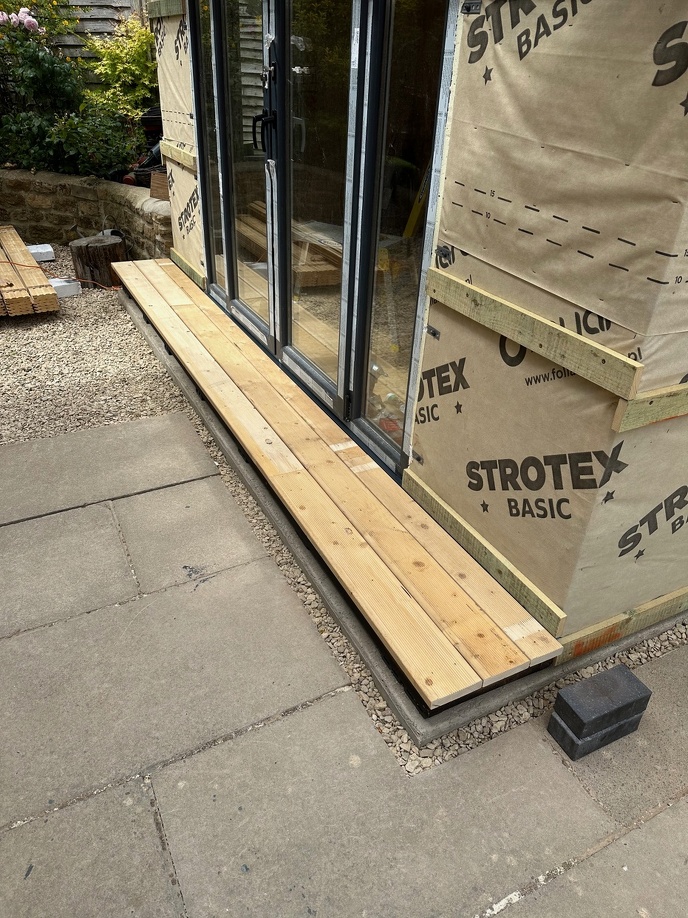
I moved onto the decking for the porch. The instructions just showed the three lengths being screwed down, but laying them out there wasn't enough room for the third plank so it needed to be ripped down.
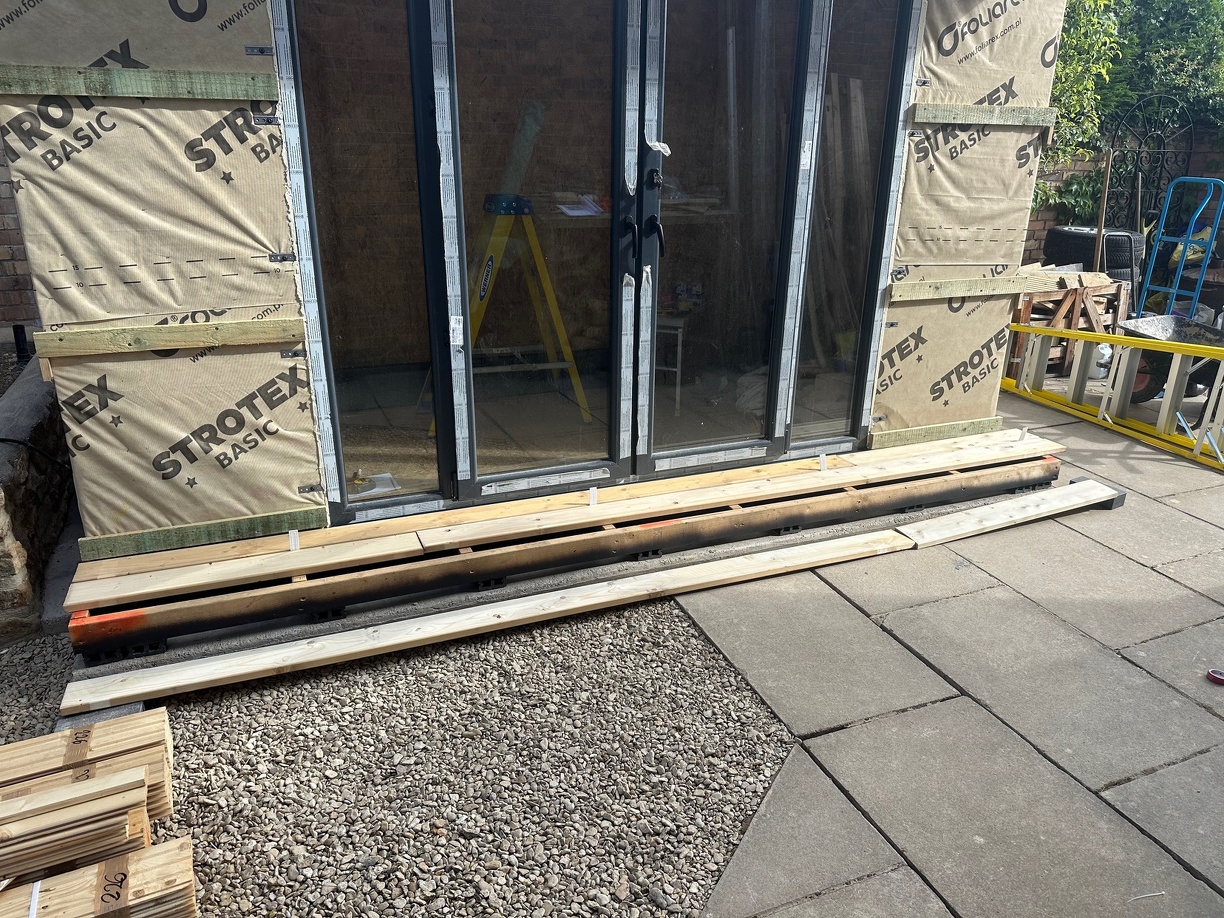
Once chopped down, I ran a router over the sharp edges to try and make the profile look more like the others.
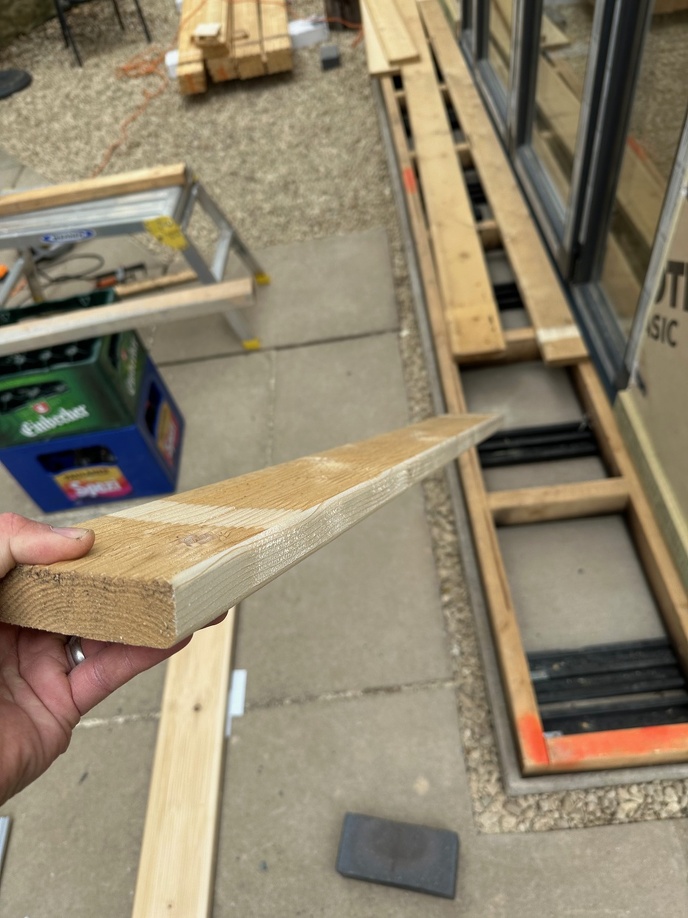
I swapped the supplied zinc-coated screws for stainless decking screws.
The lift into position wasn't particularly pleasant. I guess you're less likely to have to deal with breakages when shipping glazed units, but I prefer the UK system of installing the frame and then adding the glazing.
The door was attached using metal brackets that lock into the frame and then get bent over to be screwed to the outer walls. I then used the supplied 'Tiger' foam to fill any gaps. A couple of large screws were added through the frame in the middle at the top and bottom; these can apparently be used to tweak the fit of the doors if the frame is bowing. It didn't seem to be required for my install though.
The door assembly is different to other listing and customer photos, they seem to have moved from Aluplast who supplied the window to a Polish company called Sonarol who make windows and farm equipment
https://sonarol.pl/en/oferta/okna-i-drzwi
It has a separate handle for the second door rather than a catch on the inside of the frame. My friend also pointed out that unlike the French doors on our house the doors open 180 degrees rather than 90, it's quite nice being able to pin them completely back.
I moved onto the decking for the porch. The instructions just showed the three lengths being screwed down, but laying them out there wasn't enough room for the third plank so it needed to be ripped down.
Once chopped down, I ran a router over the sharp edges to try and make the profile look more like the others.
I swapped the supplied zinc-coated screws for stainless decking screws.
Accelebrate said:
I hadn't clocked that the window I'd added to the side would open inwards. Thinking about it, most of Europe seems to have inward-opening windows, I guess possibly due to the popularity of external shutters? I plan to put a desk across this wall, which will prevent it from opening. I assumed it was going to be a fixed window so that's no great loss, it does also tilt and that will still work with a desk across it so that's a bonus. The whole front door can be tilted as well, I won't be short of fresh air.
In Central Europe they tend to have blinds on the inside rather than outside.Edited by RustyMX5 on Friday 5th September 16:36
Gassing Station | Homes, Gardens and DIY | Top of Page | What's New | My Stuff