Rear tail light condensation, latest fix?
Discussion


There's lots of threads about fixing the rear tail light condensation, but thought I'd check what's the latest/greatestvway to sort as unfortunately my passenger side light has got condensation in it. Don't want to start drilling and putting things in ovens until I know what's the best solution. More worried about the circuit boards getting knackered and needing to replace the whole light.
leerandle said:
Very poor quality if its a known issue and service bulletins written to fix it. I cant see any obvious areas of water to get in other than a 'rusty' thread. Will blow it out this week and then try and blow it out and reseal.
I saw an American guy on you tube look at why his were leaking, the top edge towards the centre of the car seemed to have a hairline crack where the lens meets the lamp body, he dried out and sealed right around the lens and cured it.One tip, don't over tighten them when you put them back on the car if you do replace the seal. I did and after a few weeks it started to pull apart on one of mine and condensation was back. I took it back off and heated it up before leaving it with some weight on it overnight, refitted and only hand tightened them after aligning them up.
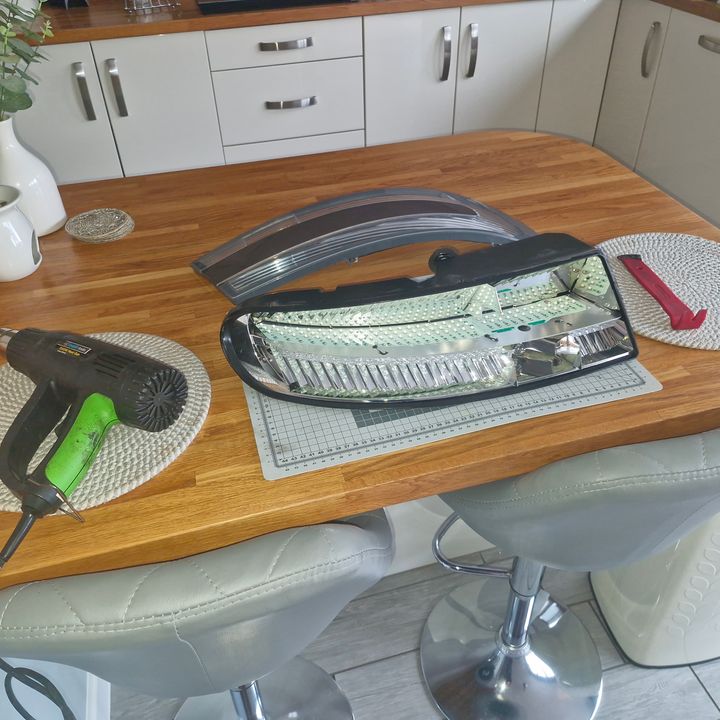
I split mine open last night, see photo.
I did notice that when using the heat gun around the edges, a little bit of water came through between the inner and outer parts.
I'm going to add sealant and put back together later.
Although the RH side light is currently ok, I might as well just run some additional sealer around the edge.
I did notice that when using the heat gun around the edges, a little bit of water came through between the inner and outer parts.
I'm going to add sealant and put back together later.
Although the RH side light is currently ok, I might as well just run some additional sealer around the edge.
For info, I used some CT1 black adhesive/sealant (Its about £13,50 a tube, but good quality) and squeezed it between the lips on the lens and all around the main body to ensure I got a water tight seal between the 2 parts.
Gore-tex patch used on the original hole I drilled.
All fitted and lets wait and see if any condensation comes back (Fingers crossed).
Main worry was electrical, but so far everything working as should.
Gore-tex patch used on the original hole I drilled.
All fitted and lets wait and see if any condensation comes back (Fingers crossed).
Main worry was electrical, but so far everything working as should.
My car has been plagued with this ever since I bought it. I've tried everything I can think of. Last time I made it absolutely waterproof with the proper black sealant everywhere, and more black sealant over that, and made holes and put it in the oven, and put more sealant over those, and put silica gel bags in...
On Sunday after a day in the sun I saw the dreaded droplets back yet again. My unit is currently back in the oven (30mins at 50C), after which I shall put more silica gel bags in and reseal it yet again. I've come to regard it as a regular task, like mowing the lawn. I simply cannot understand how the f king water gets in. Even after examining it after removal today it looked 100% watertight.
ETA On the plus side I'm getting good at refitting the unit now. It actually took 90 mins to dispel the droplets - but you have to do it or the lights will eventually fail. Hopefully OK for a few months now.
On Sunday after a day in the sun I saw the dreaded droplets back yet again. My unit is currently back in the oven (30mins at 50C), after which I shall put more silica gel bags in and reseal it yet again. I've come to regard it as a regular task, like mowing the lawn. I simply cannot understand how the f
king water gets in. Even after examining it after removal today it looked 100% watertight.ETA On the plus side I'm getting good at refitting the unit now. It actually took 90 mins to dispel the droplets - but you have to do it or the lights will eventually fail. Hopefully OK for a few months now.
Edited by Simpo Two on Friday 15th August 21:38
leerandle said:
Although you need to dry them out, any residual heat left inside (from oven or heat gun) after you seal will eventually cool down and form condensation again. Make sure you leave them to 'acclimatise' before resealing. Just a thought ?!?
Well, my logic was that hot air holds less moisture than cold air, so I was keen to get mine sealed asap before it cooled and pulled cooler damper air in through the hole.All I know is - it will fail again eventually

Simpo Two said:
Do you put the hole on the top, back or underneath?
Here’s the service bulletin 
https://www.6speedonline.com/forums/attachment.php...
Gassing Station | Aston Martin | Top of Page | What's New | My Stuff