1/8 Pocher Pagani Utopia
Discussion


Its been awhile since building a model kit, so busy but have been scrimping away and finally getting in the mood to make something.
So i bought a Pocher model which is heavy, very well made, good castings, nice paintwork, colour is a bit "marmite does look different to the eye, slight greenish hue so looks different to the photos ive seen but i cant stand the thought of putting it together using cross head screws.
The colour build manual is available to download on Pochers/Hornby,s website.
I have a couple of CMC cars which have great detail , look very nice till you see the exposed screws, then to my eyes look more like a toy than a scale model.
Im not going to go mad on detail but am changing a few things especially in the visible areas using small Torx bolts, nuts and washers, adding missing parts not in the build manual and a lot of carbon fibre decals to represent Pagani,s way of using carbon fibre in vee form.
Trust this thread grabs some interest and any comments Pos or neg welcomed.
Some photos and explanations.
 .
.
 .
.
 .
.
 .
.
 .
.
 .
.
 .
.
 .
.
 .
.
 .
.
 .
.
 .
.
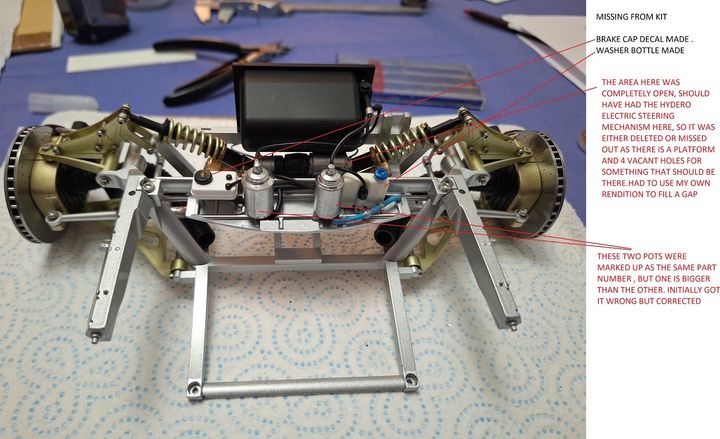
Real car showing the steering motor/pump i think is a ZF unit and windscreen washer tank
 .
.
Cheers for now.
So i bought a Pocher model which is heavy, very well made, good castings, nice paintwork, colour is a bit "marmite does look different to the eye, slight greenish hue so looks different to the photos ive seen but i cant stand the thought of putting it together using cross head screws.
The colour build manual is available to download on Pochers/Hornby,s website.
I have a couple of CMC cars which have great detail , look very nice till you see the exposed screws, then to my eyes look more like a toy than a scale model.
Im not going to go mad on detail but am changing a few things especially in the visible areas using small Torx bolts, nuts and washers, adding missing parts not in the build manual and a lot of carbon fibre decals to represent Pagani,s way of using carbon fibre in vee form.
Trust this thread grabs some interest and any comments Pos or neg welcomed.
Some photos and explanations.
Real car showing the steering motor/pump i think is a ZF unit and windscreen washer tank
Cheers for now.
For Pocher kits I would normally recommend getting P J Koo’s supplemental instructions, but I suspect this one is too new for him to have made one yet.
https://www.ebay.com/str/pocherphilesforum?mkcid=1...
I’ve built the Pocher Aventador, with minor upgrades, and the Pocher Ducati with a lot of upgrades including replacing almost all of the visible cross head screws, build threads on here if your interested.
https://www.ebay.com/str/pocherphilesforum?mkcid=1...
I’ve built the Pocher Aventador, with minor upgrades, and the Pocher Ducati with a lot of upgrades including replacing almost all of the visible cross head screws, build threads on here if your interested.
Super Sonic said:
Looks epic, hope you have fun building it. How long do you think it will take?
Thanks it is fun so far and i hope i don't come up against a major problem with it especially when the body, bonnet and boot goes onThey say its about a 30 hour build as standard but i think it might end up being double than that.
MBBlat said:
For Pocher kits I would normally recommend getting P J Koo’s supplemental instructions, but I suspect this one is too new for him to have made one yet.
https://www.ebay.com/str/pocherphilesforum?mkcid=1...
I’ve built the Pocher Aventador, with minor upgrades, and the Pocher Ducati with a lot of upgrades including replacing almost all of the visible cross head screws, build threads on here if your interested.
Yes even though ive been absent building on here, ive still looked in from time to time to see how the other builders are doing, your builds are fabulous pieces and im sure they take pride and place.https://www.ebay.com/str/pocherphilesforum?mkcid=1...
I’ve built the Pocher Aventador, with minor upgrades, and the Pocher Ducati with a lot of upgrades including replacing almost all of the visible cross head screws, build threads on here if your interested.
I bought PJ,s upgraded decals and info for the Aventador as i purchased one in March.Pocher did a good deal so its stored for a rainy day.
Thanks
henryk001 said:
Yes even though ive been absent building on here, ive still looked in from time to time to see how the other builders are doing, your builds are fabulous pieces and im sure they take pride and place.
I bought PJ,s upgraded decals and info for the Aventador as i purchased one in March.Pocher did a good deal so its stored for a rainy day.
Thanks
Two top tipsI bought PJ,s upgraded decals and info for the Aventador as i purchased one in March.Pocher did a good deal so its stored for a rainy day.
Thanks
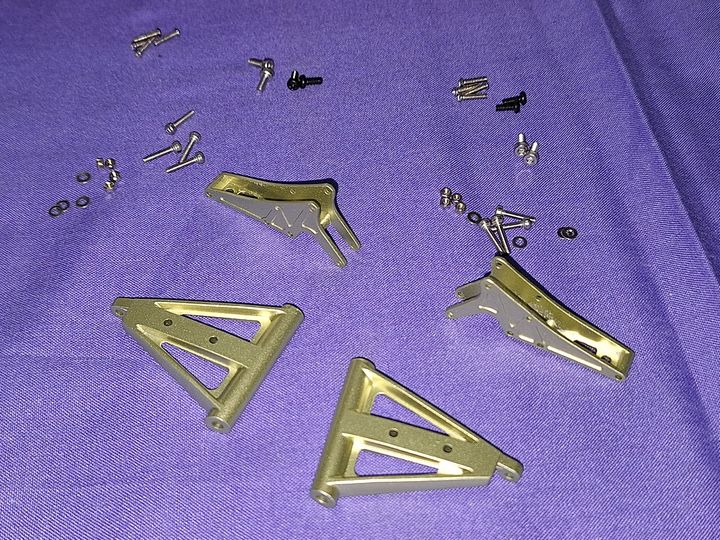
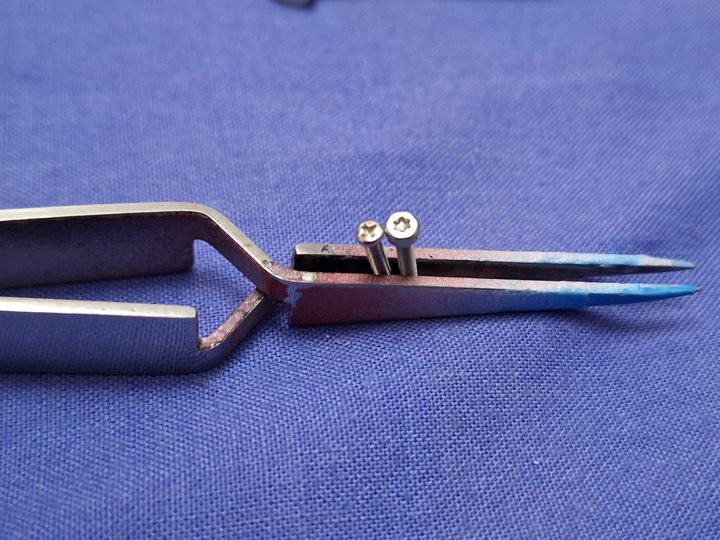
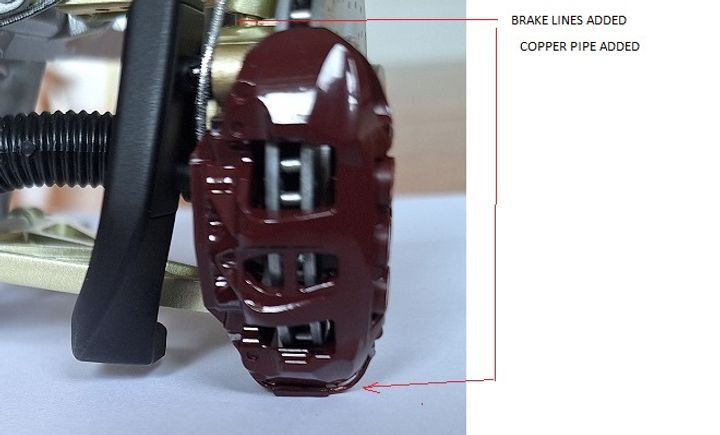
1, get a miniature tap set, a cheap one off Amazon will do, and tap all the screw holes in the metal parts. Some people will say use oil, ignore them and do it properly. Looking at the instructions you will need a 1.5, 2.0 and 2.3mm taps + whatever size you need for your replacement screws.
2 if you are going to use the Pocher vinyl tube get some solder wire and insert it first, this will enable you to shape the tubing to the correct path.
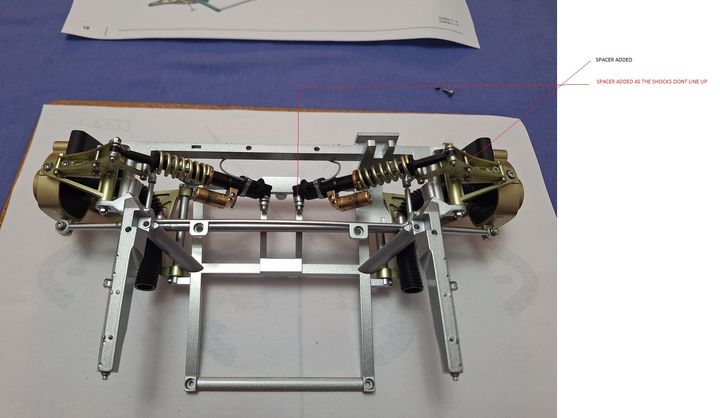
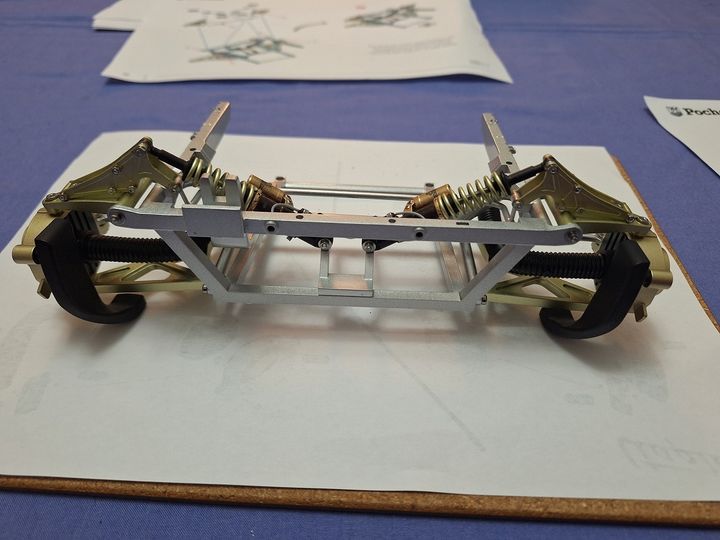
Heres some photos in this stage.
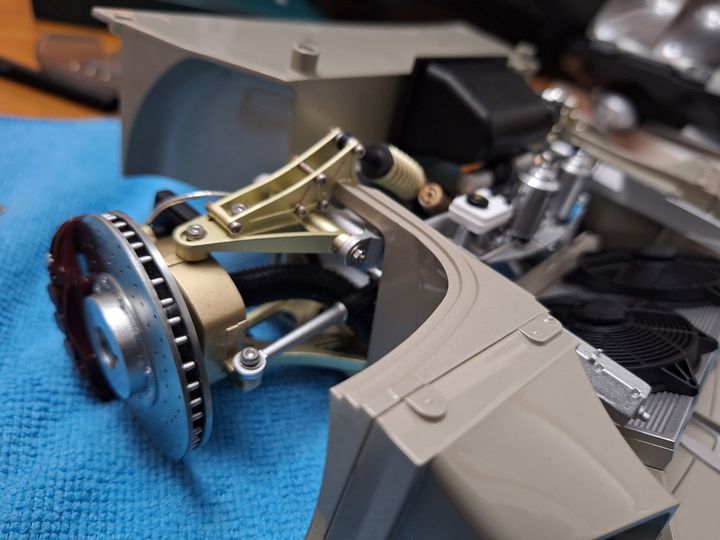
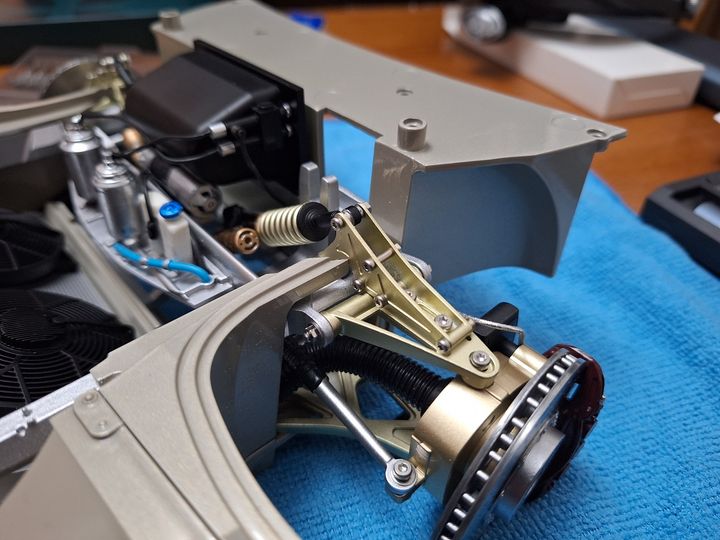
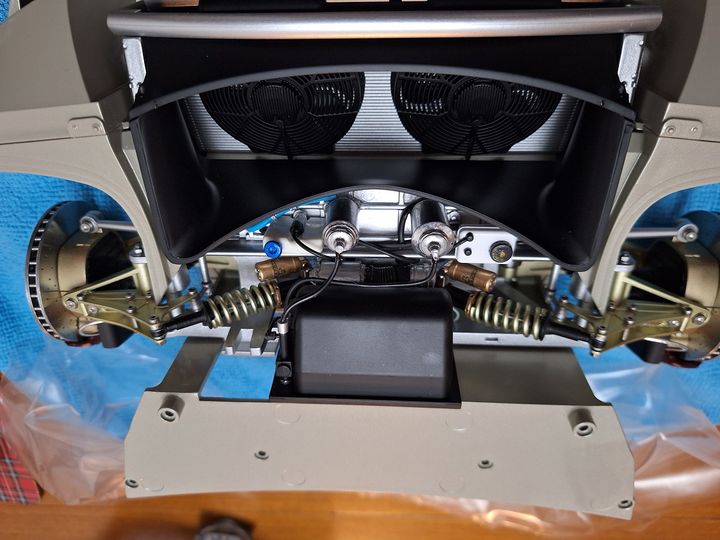
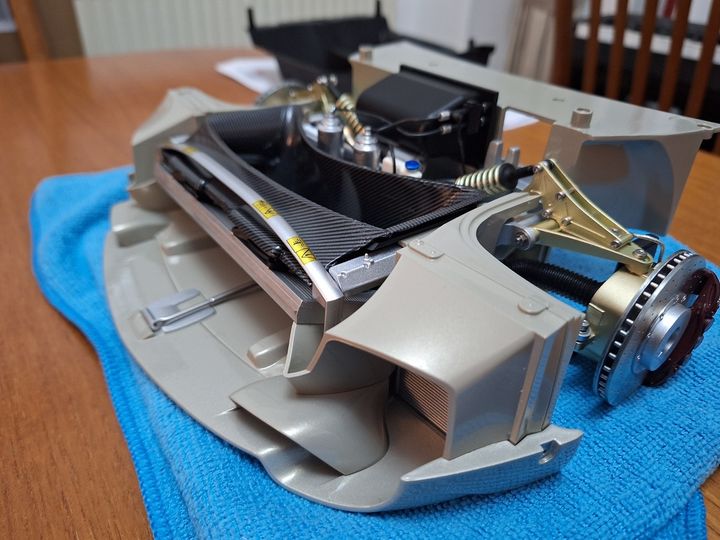
Ive added Carbon decals to the black fan shroud , also as much of the plastic trims will have them on .
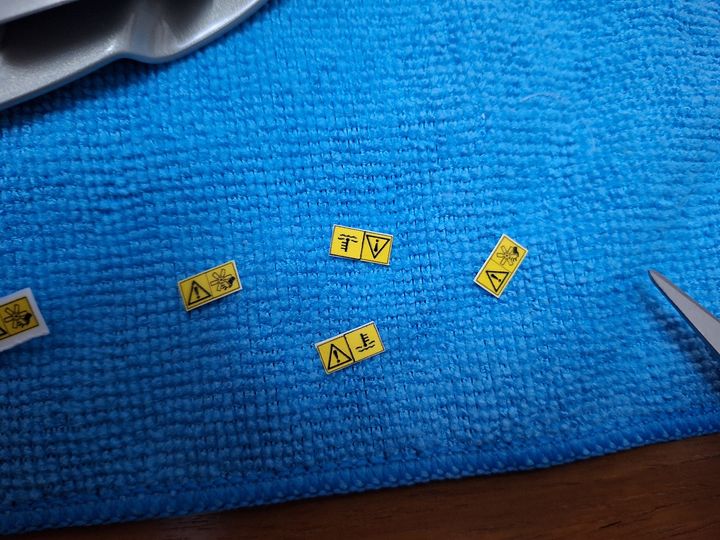
Decals made up for the hot warning and risk of hand being trapped .
 .
.
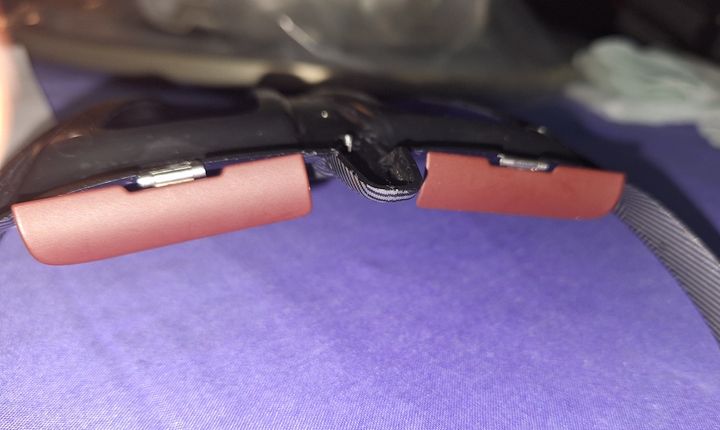
The bonnet stay i a two piece ready assembled part piece
 .
.
 .
.
 .
.
 .
.
Decals made
 .
.
 .
.
Thank you for looking, Cheers
Ive added Carbon decals to the black fan shroud , also as much of the plastic trims will have them on .
Decals made up for the hot warning and risk of hand being trapped .
The bonnet stay i a two piece ready assembled part piece
Decals made
Thank you for looking, Cheers
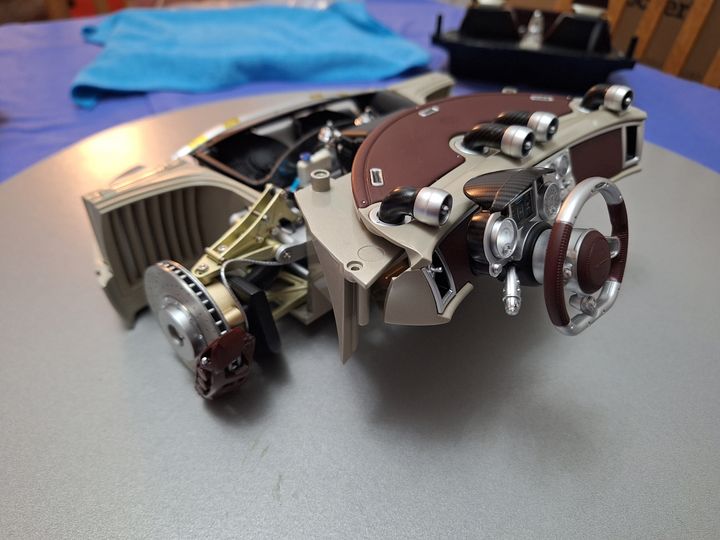
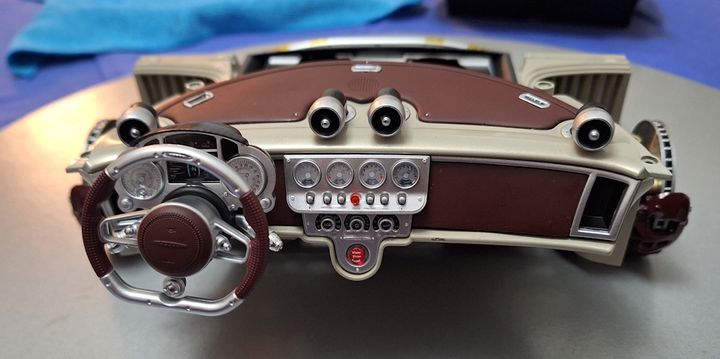
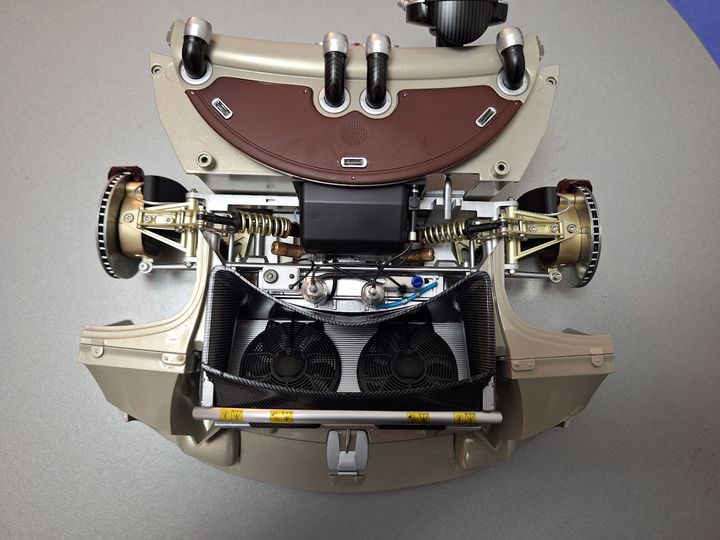
Heres some photos of the build so far.
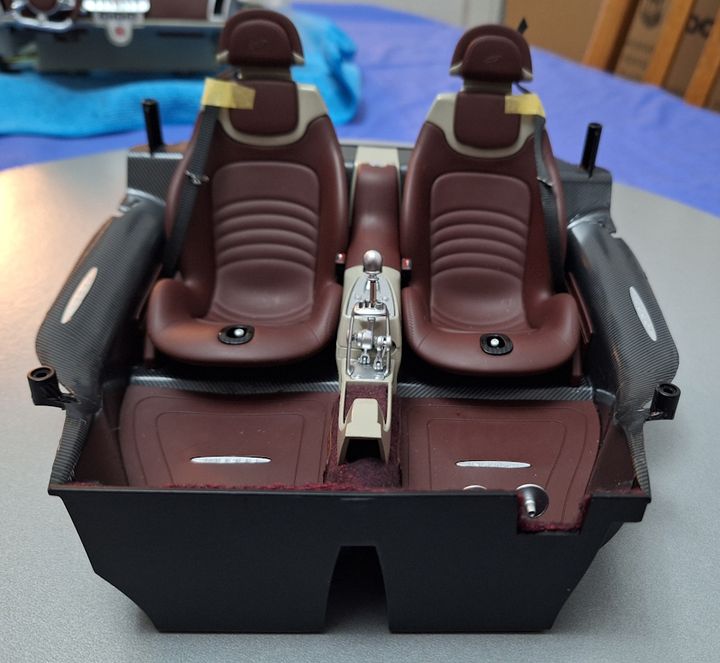
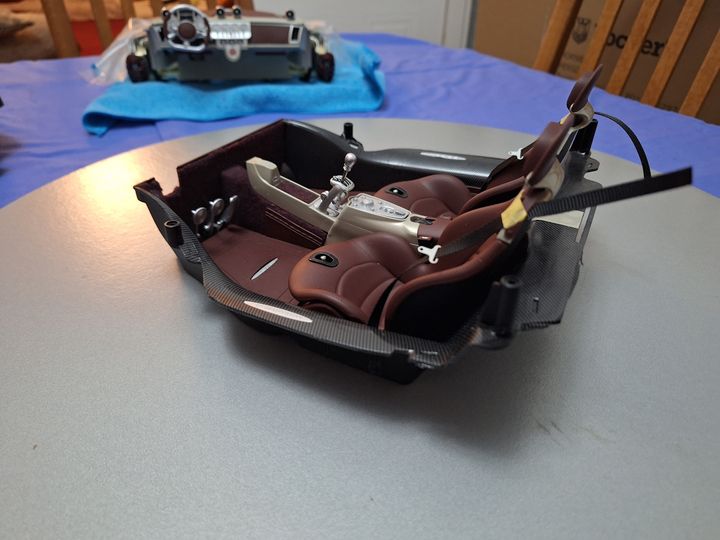
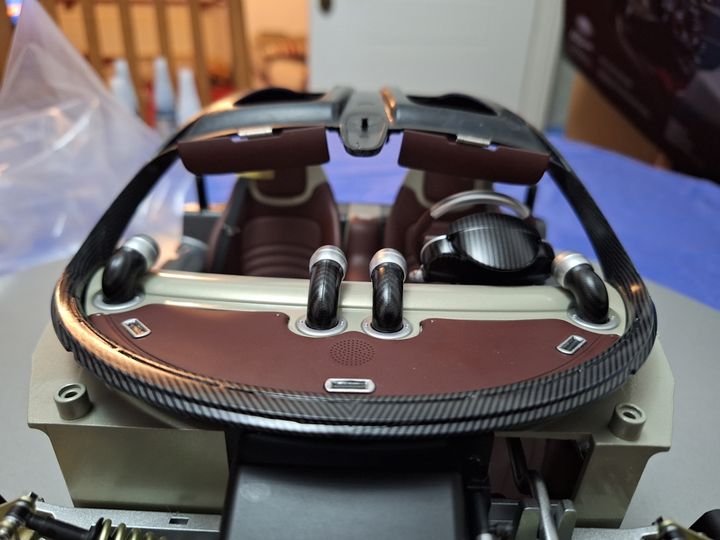
Ive added carpet to the interior, carbon fibre decals to the tub.
The seats, floor mats and side panels are made of a soft rubber/silicone material
The foot peddles move and are sprung.
The gearstick assembly instructions show to glue everything together, but you can if your careful have all parts moving as ive done
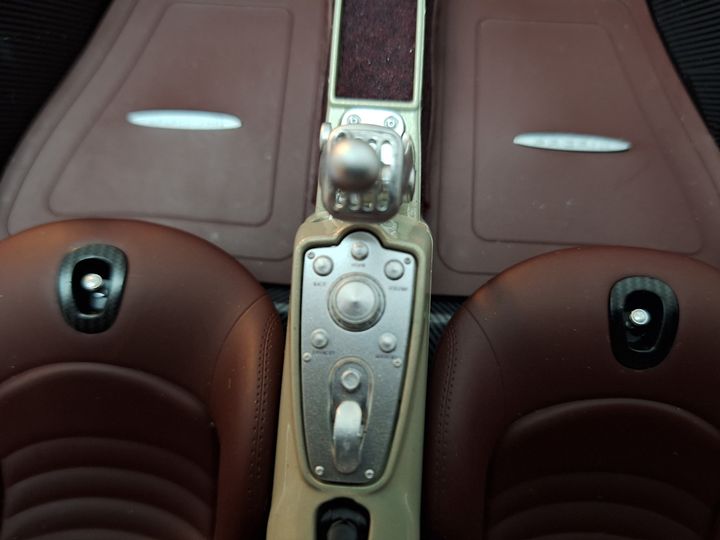
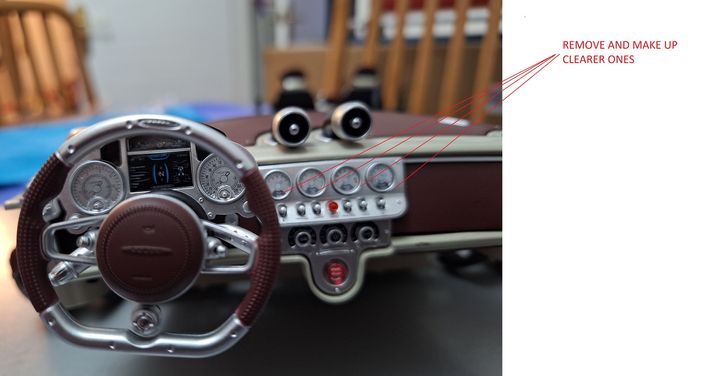
The decals supplied are limited, the center console had tiny script decals to fix but not for the dashboard so i made some, also for the control knobs and the start/stop button.
Not happy with the gauges though, so im going to remove them and make up new ones before the centre body assembly goes on.
The two sub assemblies are ready to fix
 .
.
 .
.
 .
.
 .
.
 .
.
 .
.
 .
.
 .
.
 .
.
Roof liner to cover with Carbon decal next . Cheers
Ive added carpet to the interior, carbon fibre decals to the tub.
The seats, floor mats and side panels are made of a soft rubber/silicone material
The foot peddles move and are sprung.
The gearstick assembly instructions show to glue everything together, but you can if your careful have all parts moving as ive done
The decals supplied are limited, the center console had tiny script decals to fix but not for the dashboard so i made some, also for the control knobs and the start/stop button.
Not happy with the gauges though, so im going to remove them and make up new ones before the centre body assembly goes on.
The two sub assemblies are ready to fix
Roof liner to cover with Carbon decal next . Cheers
Thankyou SPORKY,TGCOTE,TERRY
For your kind comments.
Normally this kit could be built up nicely using the instructions as standard, but unfortunately for me i have a eye for detail and knowledge of automotive practices.
So anything missing as i see it pushes me to add the details.
Cheers
For your kind comments.
Normally this kit could be built up nicely using the instructions as standard, but unfortunately for me i have a eye for detail and knowledge of automotive practices.
So anything missing as i see it pushes me to add the details.
Cheers
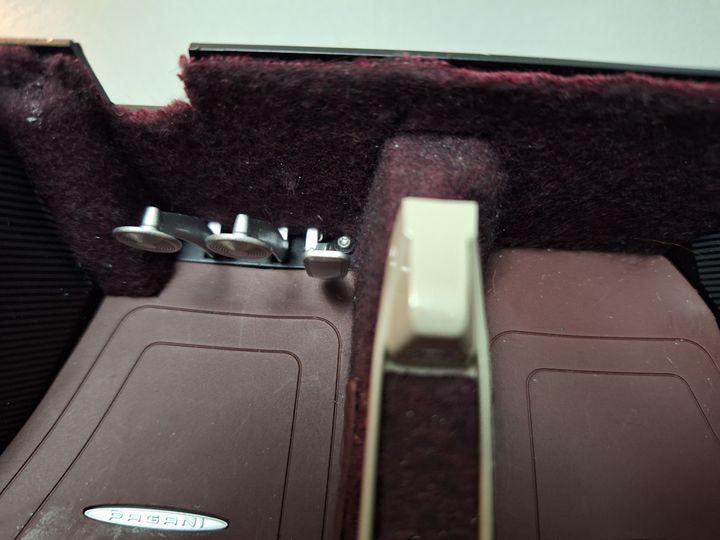
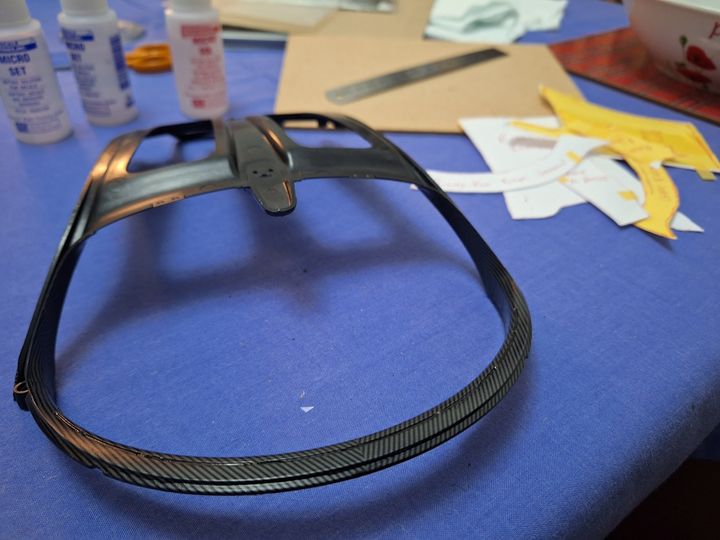
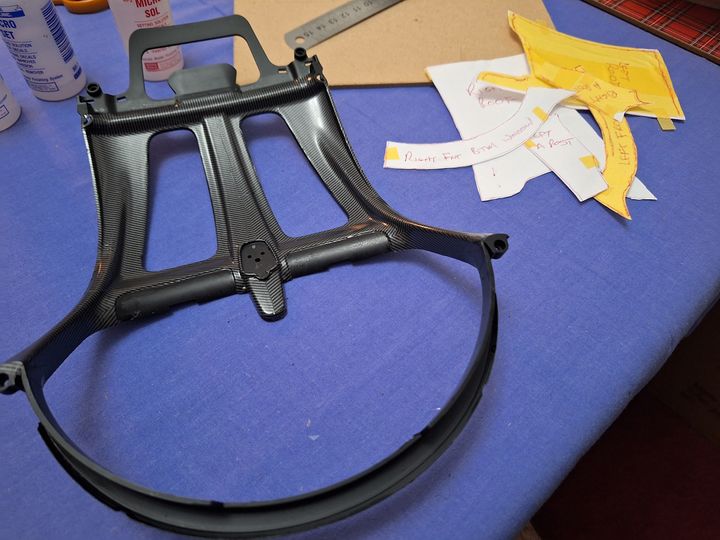
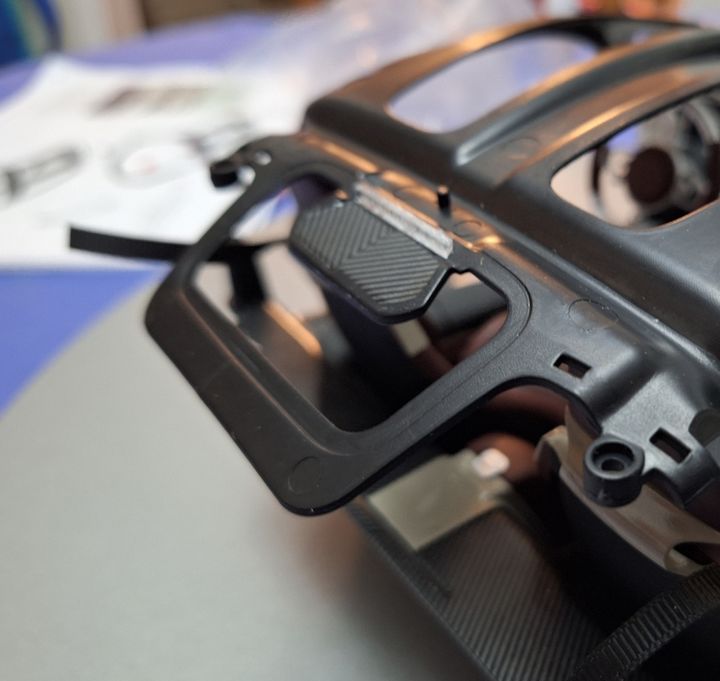
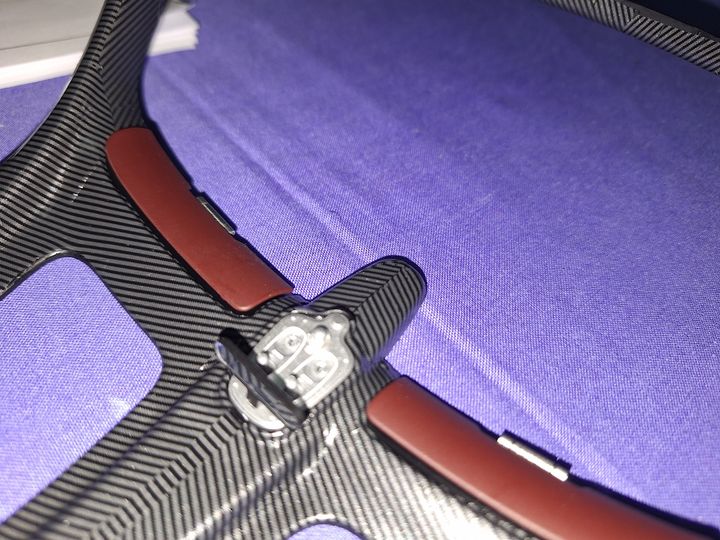
Moving on now the black plastic roof liner.
Ive used a lot of decal here, as they were cut at approx 45 degrees to create the mirror effect as showing on the real Pagani car.
4 sheets used so far,and a lot of waste which im sure i can use on other projects. Not cheap either but a important addition
patterns made up using masking tape,drawn around then peeled off, transferred to Paper and cut +2mm for the front dash area, a posts, inner roof and door edges. Micro set a, Micro sol to soften the decals is a life saver along with careful use of a hair drier being careful not to damage the decal. Patience is key here. A couple of wrinkles should come out but im made up with the result that IMO has enhanced the bare black plastic areas.Quite a lot of it wont be visible but i wanted to make sure nothing will show up bare when assembled.
 .
.
 .
.
Onto assembling Cheers.
Ive used a lot of decal here, as they were cut at approx 45 degrees to create the mirror effect as showing on the real Pagani car.
4 sheets used so far,and a lot of waste which im sure i can use on other projects. Not cheap either but a important addition
patterns made up using masking tape,drawn around then peeled off, transferred to Paper and cut +2mm for the front dash area, a posts, inner roof and door edges. Micro set a, Micro sol to soften the decals is a life saver along with careful use of a hair drier being careful not to damage the decal. Patience is key here. A couple of wrinkles should come out but im made up with the result that IMO has enhanced the bare black plastic areas.Quite a lot of it wont be visible but i wanted to make sure nothing will show up bare when assembled.
Onto assembling Cheers.
I went round the factory 20 odd years ago and was intrigued by the old seamstress they had working on the carbon. Soooo much time was spent matching the weave and making it all perfect, and the results were incredible. As this will be 
Never especially yearned for a Pagani, but the craftsmanship was incredible.
Never especially yearned for a Pagani, but the craftsmanship was incredible.
Murph7355 said:
I went round the factory 20 odd years ago and was intrigued by the old seamstress they had working on the carbon. Soooo much time was spent matching the weave and making it all perfect, and the results were incredible. As this will be
Never especially yearned for a Pagani, but the craftsmanship was incredible.
I bet that was a day out and a half. ive never yearned for a car like this either but the subject matter intrigued me to have a go at building this model which when finished should look nice on dispay. thanks for your comments.Never especially yearned for a Pagani, but the craftsmanship was incredible.
Did some more last night. More carbon on the rear window,brake light added some silver foil on the back of the clear part,finished of the interior light panel and added 2 clear crystals where the lights would be.The sun visors have hinges which can be moved
 .
.
 .
.
 .
.
 .
.
Putting this to one side .Windows to fit in the main bodywork next
Thats it for now. Gin oclock.Cheers
Putting this to one side .Windows to fit in the main bodywork next
Thats it for now. Gin oclock.Cheers
Gassing Station | Scale Models | Top of Page | What's New | My Stuff