Toylander Series 3 build thread
Discussion


Having being inspired by other build threads on here I thought that it was only right to create one for my build.
Nearly three years in now and nearing completion this Toylander has been based on my full size series 3.
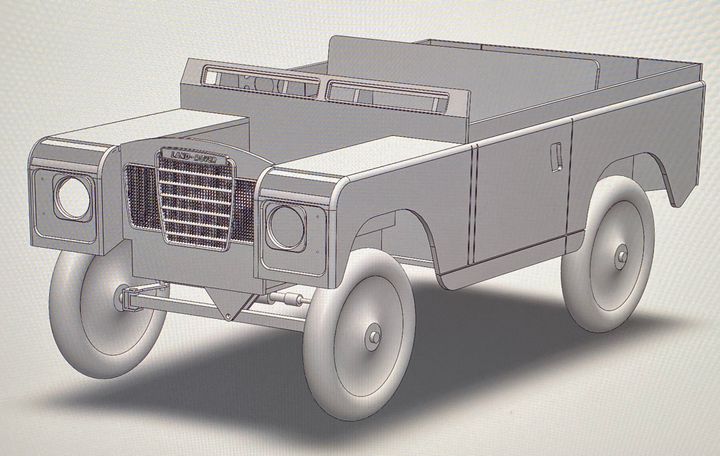
I started with the Toylander plans but made a few tweaks to get to a true 1:2 scale.....+185 mm on length and +160 mm on width over standard Toylander. I drew up every 12mm panel in solidworks and started assembling virtually. At this stage a few tweaks were made to profiles to get closer to the real thing, the bulkhead was stepped rather than being vertical, a transmission tunnel added and the dashboard shape improved.
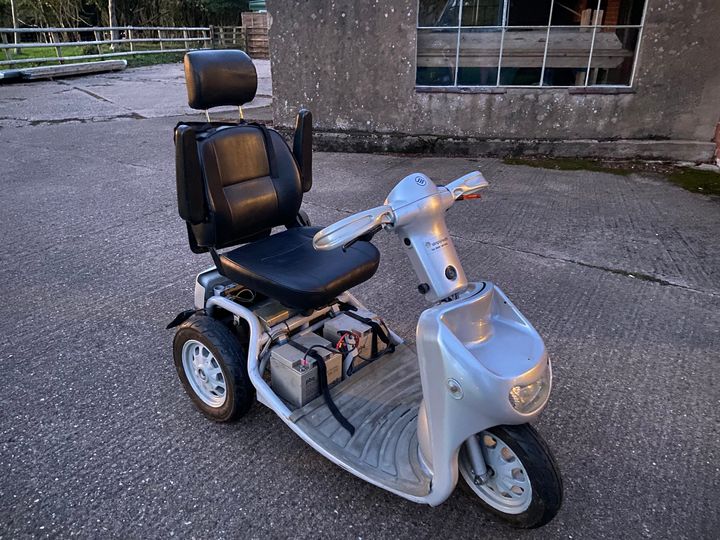
I decided fairly early on to go mobility scooter axle power.....
Standard Toylander is 12V 180W or 24V 360W. I found a TGA breeze, 24V 1300W and more crucially the wheel size is very similar to that of the Toylander, allowing direct drive. This also frees up a lot of space in the rear tub, where the motors are usually housed.
Final change was to move the batteries from under bonnet to under seat, freeing up room for a proper steering rack setup.

Nearly three years in now and nearing completion this Toylander has been based on my full size series 3.
I started with the Toylander plans but made a few tweaks to get to a true 1:2 scale.....+185 mm on length and +160 mm on width over standard Toylander. I drew up every 12mm panel in solidworks and started assembling virtually. At this stage a few tweaks were made to profiles to get closer to the real thing, the bulkhead was stepped rather than being vertical, a transmission tunnel added and the dashboard shape improved.
I decided fairly early on to go mobility scooter axle power.....
Standard Toylander is 12V 180W or 24V 360W. I found a TGA breeze, 24V 1300W and more crucially the wheel size is very similar to that of the Toylander, allowing direct drive. This also frees up a lot of space in the rear tub, where the motors are usually housed.
Final change was to move the batteries from under bonnet to under seat, freeing up room for a proper steering rack setup.
Driver is three years old now…..I started when they were born so it’s been a steady job! Nice to be able to do the odd hour here or there on an evening. I enjoy the challenge of making it work and look right.
Driver training has been taking place in a peg perego gator…..hoping to get the crashes out of the way first!
Driver training has been taking place in a peg perego gator…..hoping to get the crashes out of the way first!
Once the CAD was complete a series of drawings for creating the cut files was created. Luckily a mate and ex JLR colleague was setting up a business doing CNC routing. This meant far more detail and accuracy than I could ever achieve cutting the panels by hand. All panels are cut from 12mm moisture resistant MDF.
It did give me a bit of spare time whilst he got his CNC machine set up so I carried on sourcing parts for some of the details:
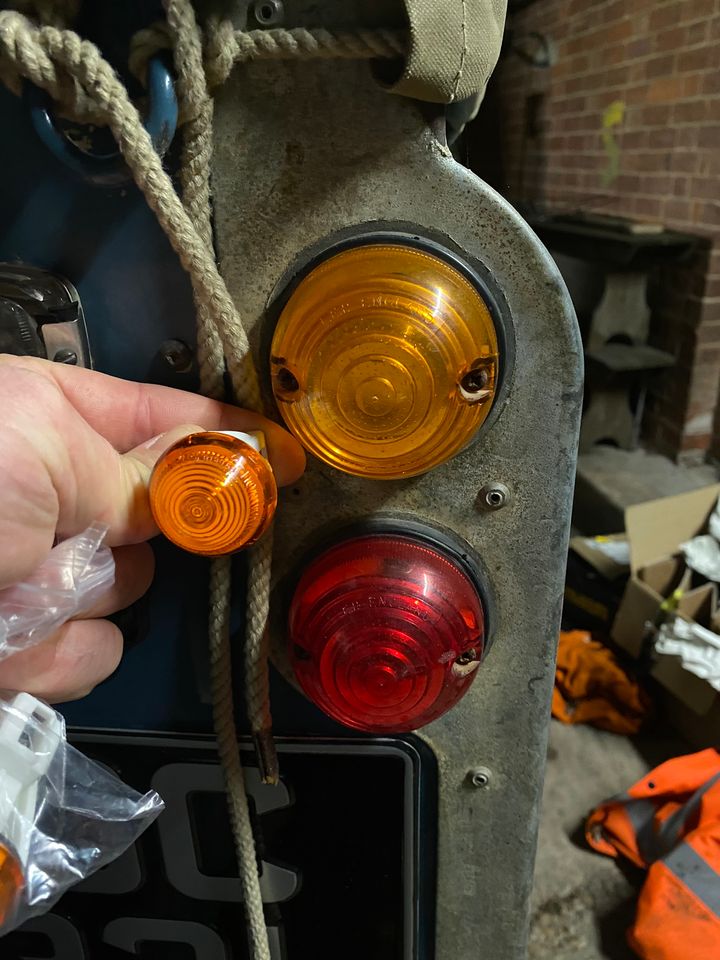
Fiat Seicento side repeaters make a good half scale Lucas lamp:
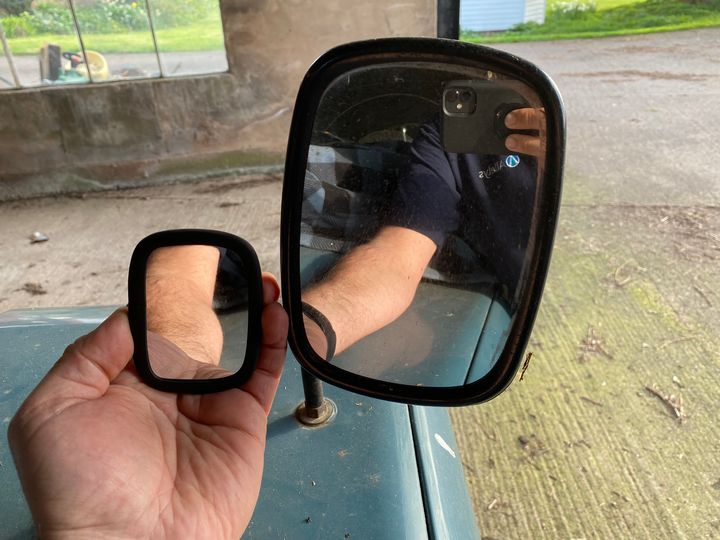
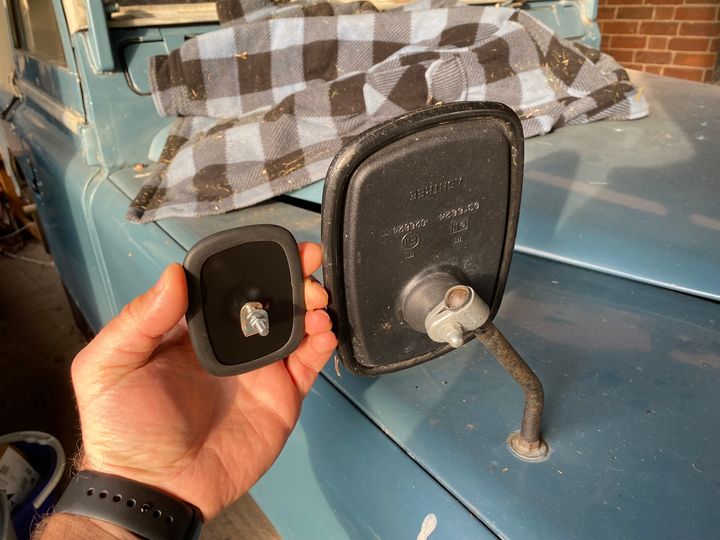
1/2 size mirrors, laser cut back, mirrored plastic and rubber trim:
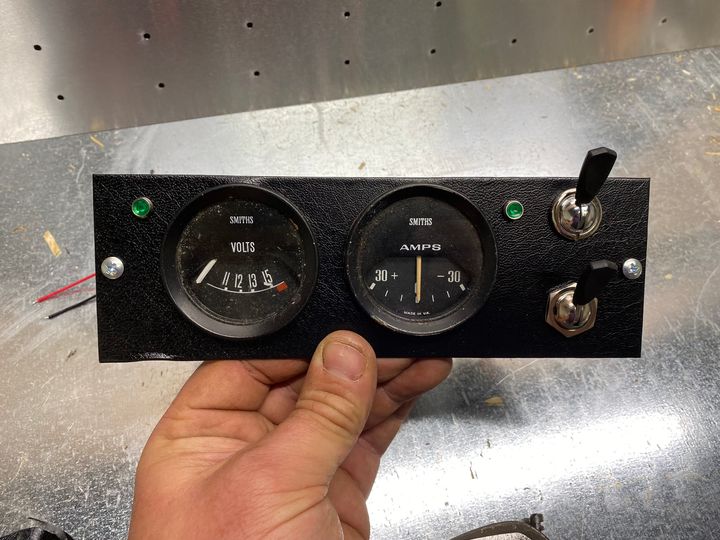
Proper working dash, Toylander usually use a sticker. This has working indicator repeaters, switches and 2" gauges. Laser cut steel wrapped in sticky back vinyl:
I probably did get a bit carried away, it is the small details that have taken the time. Having a full size to measure and copy was a big help.
It did give me a bit of spare time whilst he got his CNC machine set up so I carried on sourcing parts for some of the details:
Fiat Seicento side repeaters make a good half scale Lucas lamp:
1/2 size mirrors, laser cut back, mirrored plastic and rubber trim:
Proper working dash, Toylander usually use a sticker. This has working indicator repeaters, switches and 2" gauges. Laser cut steel wrapped in sticky back vinyl:
I probably did get a bit carried away, it is the small details that have taken the time. Having a full size to measure and copy was a big help.
cobain said:
Once the CAD was complete a series of drawings for creating the cut files was created. Luckily a mate and ex JLR colleague was setting up a business doing CNC routing. This meant far more detail and accuracy than I could ever achieve cutting the panels by hand. All panels are cut from 12mm moisture resistant MDF.
Fiat Seicento side repeaters make a good half scale Lucas lamp:
I absolutely love it. Keep the content coming!!Fiat Seicento side repeaters make a good half scale Lucas lamp:
cobain said:
Driver is three years old now…......
Driver training has been taking place in a peg perego gator…..hoping to get the crashes out of the way first!
Oh nice, fair play. We also have 3yo and while I have a transaxle and motor controller from a golfcart/mobilitycart but that's as far as we have got so far.Driver training has been taking place in a peg perego gator…..hoping to get the crashes out of the way first!
How have you found the Peg Perego, i'm tempted by one of those or the two seat 24v quad bikes they do.
To avoid derailing this thread, I have just started another here: https://www.pistonheads.com/gassing/topic.asp?h=0&...
Next on the list was getting some of the detailed parts 3D printed, found a great company called Midlands 3D. You upload the file, choose the material, get an instant quote and it arrives in the post! All the 3D printed parts are in Nylon which seems to be really tough.
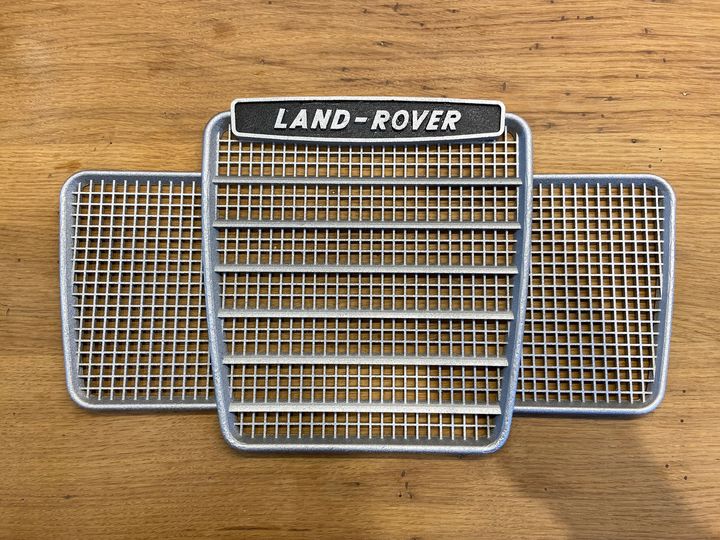
Authentic looking grille:
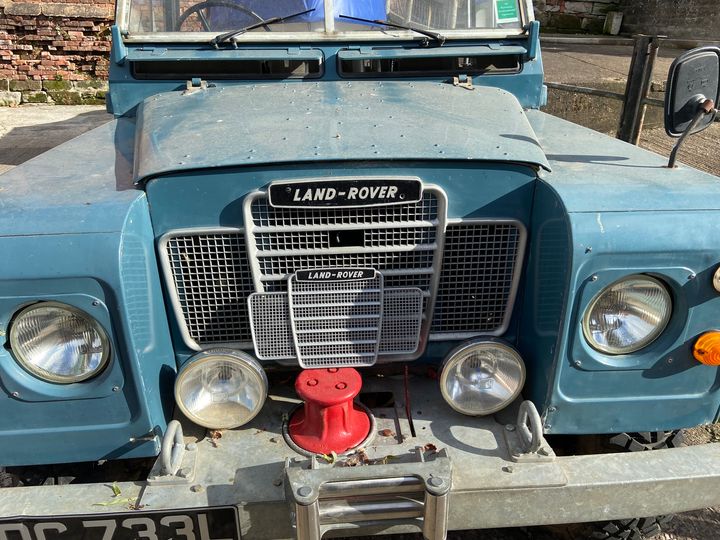
Vs the full size:
Then the real excitement started with the MR MDF panels being cut. You could cut them by hand but would never achieve the accuracy of CNC panels, it also allowed for pockets to be cut and radii applied to the edges where required. Toylander do sell the CNC cut panels but with my modifications to the dimensions I had to get my own done.

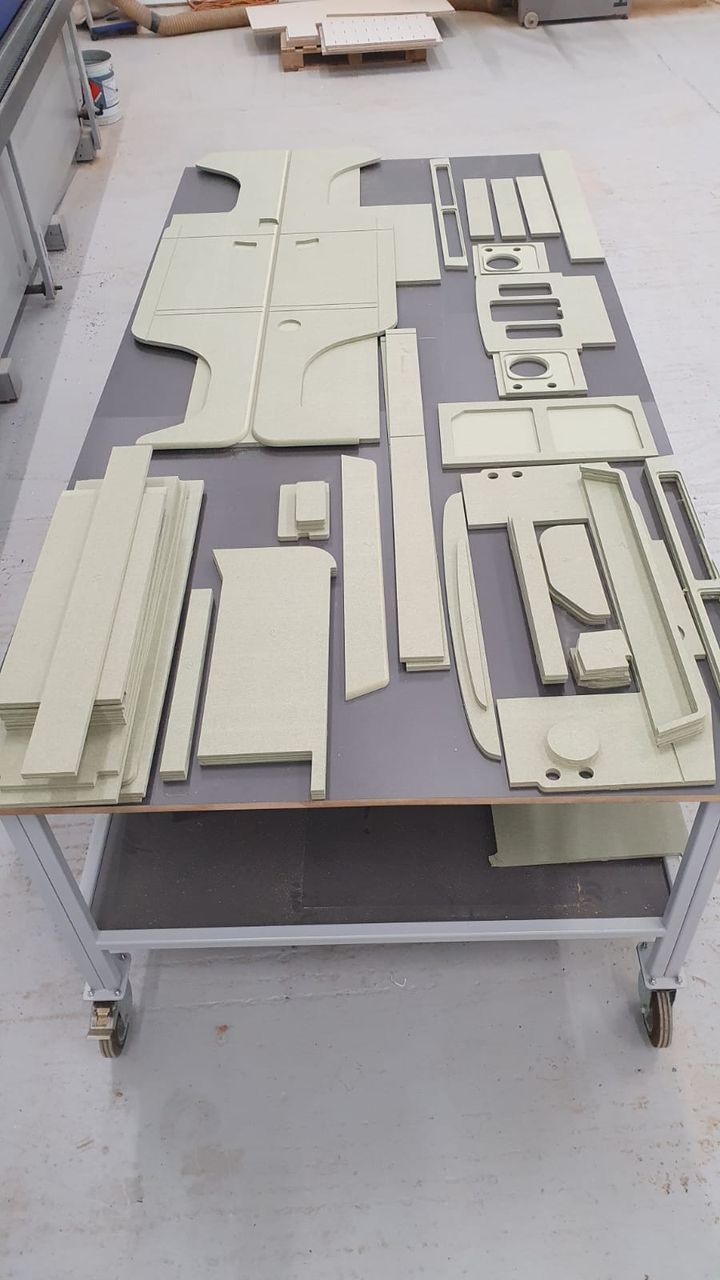
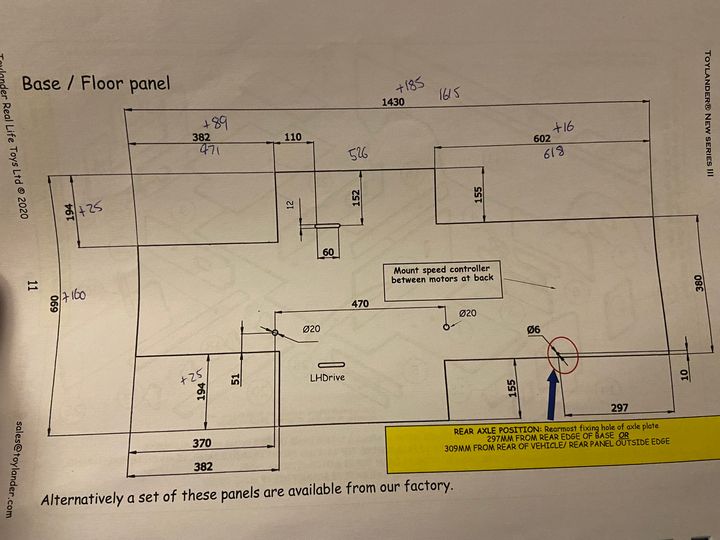
Sample of the panel drawings that you get from Toylander, their manual is very good. I think a standard Toylander should come out of two 8x4 sheets of MDF, mine was done from two large sheets (3m x 1.5m I think).
Authentic looking grille:
Vs the full size:
Then the real excitement started with the MR MDF panels being cut. You could cut them by hand but would never achieve the accuracy of CNC panels, it also allowed for pockets to be cut and radii applied to the edges where required. Toylander do sell the CNC cut panels but with my modifications to the dimensions I had to get my own done.
Sample of the panel drawings that you get from Toylander, their manual is very good. I think a standard Toylander should come out of two 8x4 sheets of MDF, mine was done from two large sheets (3m x 1.5m I think).
Looking excellent. 3d printing is a game changer for getting the final details that turn something from very good to perfection.
My girls loved their toylanders. Hours of fun for years. They used to run the recycling bins down to the end of the drive, which was always amusing to watch.
My girls loved their toylanders. Hours of fun for years. They used to run the recycling bins down to the end of the drive, which was always amusing to watch.
RECr said:
Looking good. Good solution with the direct drive, I didn't know there were scooters with similar sized wheels to the toylander.
Thanks all! Yes made life a lot easier, no chains to jump off and freed up a lot of room inside. Went with Toylander for the wheels and tyres, they do look the part.
Nice work OP!
Has anyone else been on this site long enough to remember the bloke who was building one of these about 15-20 years ago?
He had a thread about the construction but as I recall had a bizarre accident - managed to set fire to himself or something and ended up in hospital?
Several forum members volunteered their time & money to finish the project so his son could have it as a Xmas present - amazing effort which demonstrated the very best of PH back in the day.
Second only to when a long-time poster spilt his guts about being on the verge of losing everything after his business folded. Think it was due to non-payment by other parties & he had maxed all financial avenues but had got to a state where outgoing was substantially more then incoming & he owed a large six-figure amount.
An anonymous PH member contacted him & spoke on the phone, the result being that the anonymous party paid off the OP's debt in full thus allowing them and their family to make a fresh start.
No-one saw it coming before the OP posted up his thanks - an absurdly generous gesture to someone you've never met but a total life-changer for the recipient.
The party who provided the funds wished to remain anonymous at the time, but many long-term posters know who it was.
Not sure if they are still here, but if so - hat's off to you again J.
Mercury00 said:
Have you got a link to those threads? They sound like a good read.
The Toylander one:https://www.pistonheads.com/gassing/topic.asp?h=0&...
Bit fragmented due to deleted posts but the result is on the last few pages.
The "Losing it all" one:
https://www.pistonheads.com/gassing/topic.asp?h=0&...
PH member steps in on a post from the OP dated 7 August 2019.
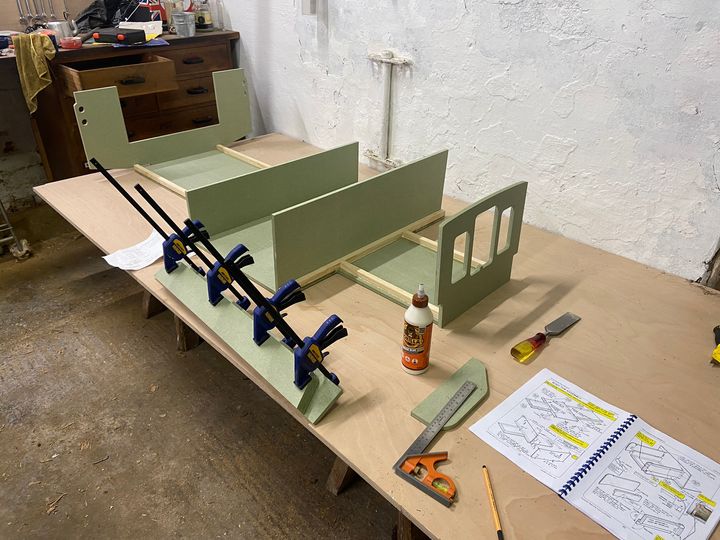
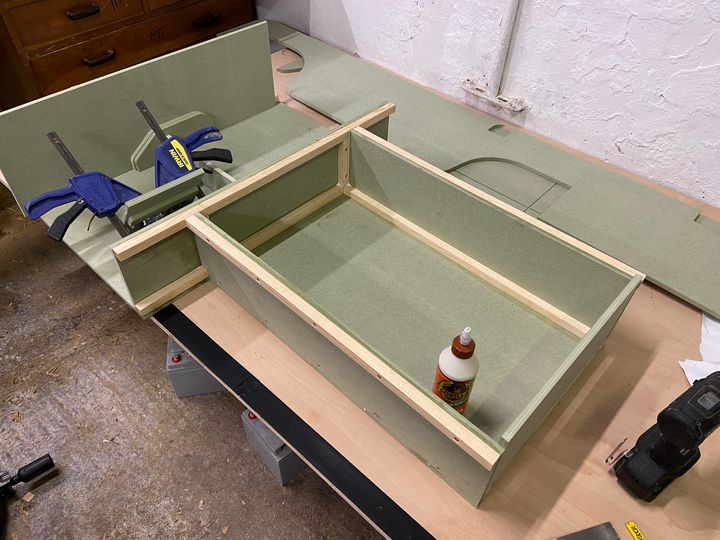
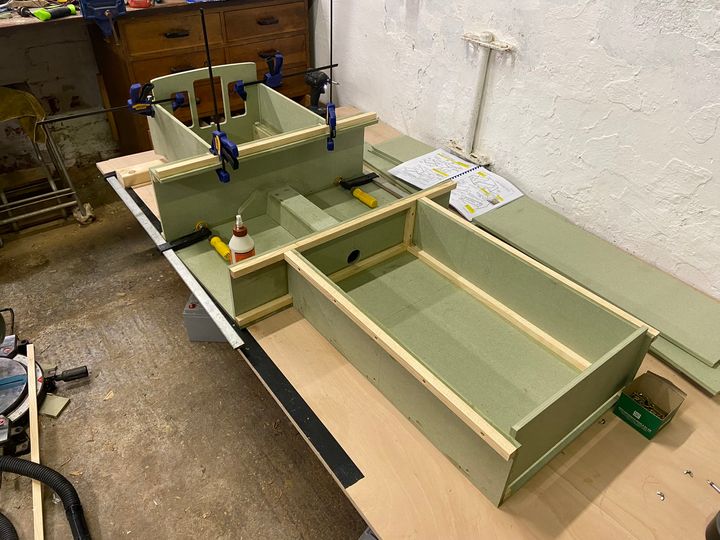
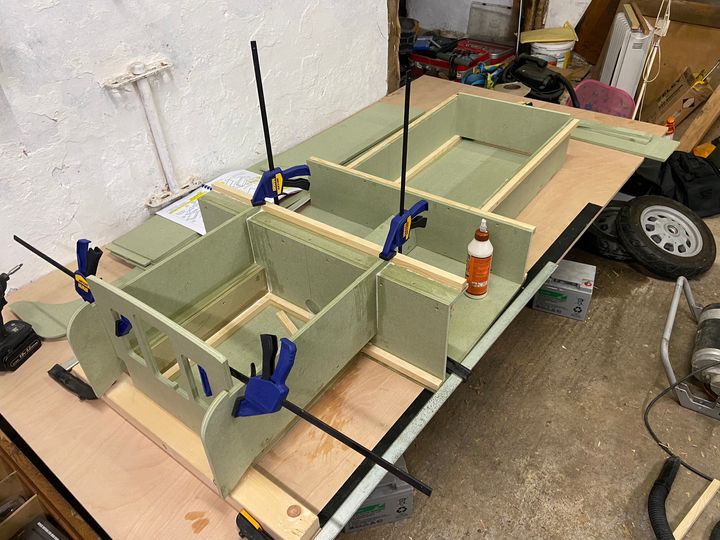
Once the panels had arrived it was time for a lot of wood glue, screws and clamping, you never can have enough quick clamps!
Made much easier by the panels being CNC cut, they were all bang on dimensionally and square. The 12mm MR MDF is screwed through to the 20mm x 20mm batten, except where the screws would be on show it was done the other way around. To be honest I think once the glue is dry the screws aren't doing very much, I wouldn't want to have to remove a panel if something was done wrong.
I made a jig to make sure that the holes were centred on the 20mm batten and marked out the drilling positions equally, even if the screw heads would never be seen.
The workshop was a lot tidier at this point! As I had started with the Toylander plans and modified the design I still stuck with their assembly order and methods.
Happy days.
Our 12v Peg Perego RZR arrived at the weekend, slightly nervous at first, but the following day and she's already jumping on it herself and driving, all be it very clunky on the steering, Seems a well made unit, both rear wheels driven, only slight shame is the hard plastic wheels.
I can see her growing out of it, but we shall see.
Gassing Station | Homes, Gardens and DIY | Top of Page | What's New | My Stuff