Leaking shower tray, troubleshooting steps
Discussion


My second thread of the day in here - anyone would think I lived in Faulty Towers (deliberate spelling mistake intended).
At the weekend, the Mrs noticed a water mark on the ceiling in the kitchen, directly below where our bathroom is...
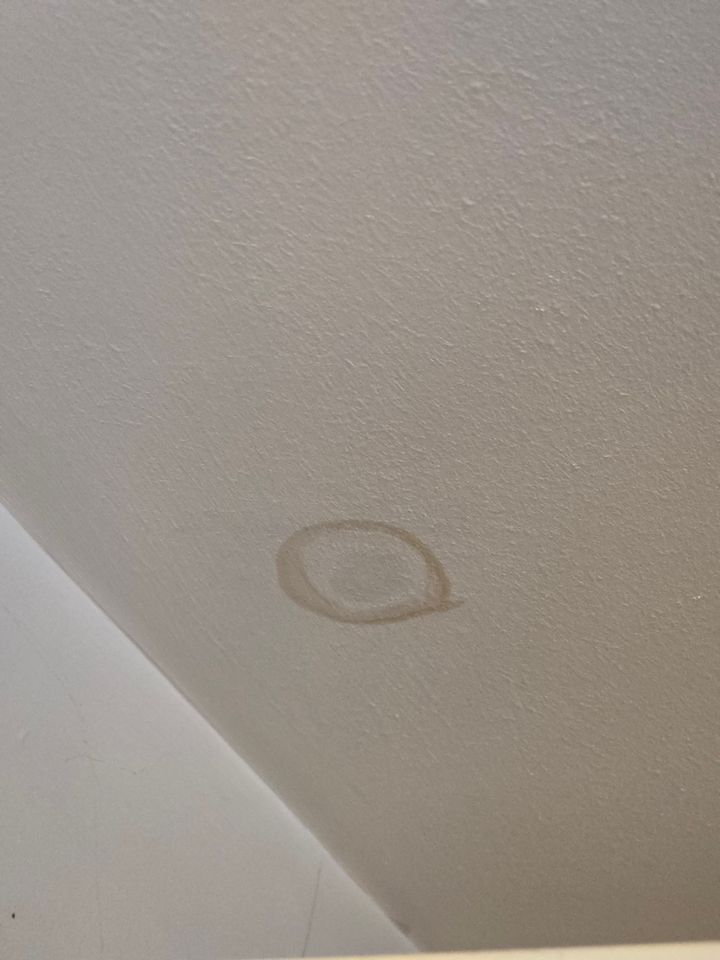
This morning, I've measured the distance of the mark from the front and side wall of the house to try and get an idea of the exact location of the leak, and it appears to roughly coincidide with where the plug hole is on the shower tray.
We are pretty sure it's occurring during showering as we had a shower yesterday then checked downstairs and found that area to be damp.
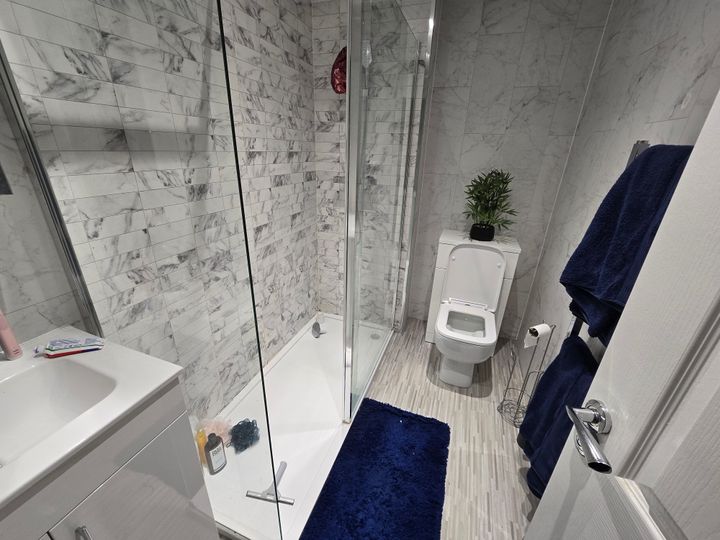
The bathroom was installed just over 2 years ago and so any 'warranty' expired a while back now, so I either have to try and sort this myself or seek help, but from searching on the internet, these things are a minefield. The bathroom presently looks like this:
Ironically we had the bathroom replaced originally because it leaked but it had a bath before so at least I could get underneath to have a look but I can't see a way of doing this here without pulling up the shower tray or cutting a hole in the ceiling (and that would not go down well with the Mrs given my famous lack of DIY skills).
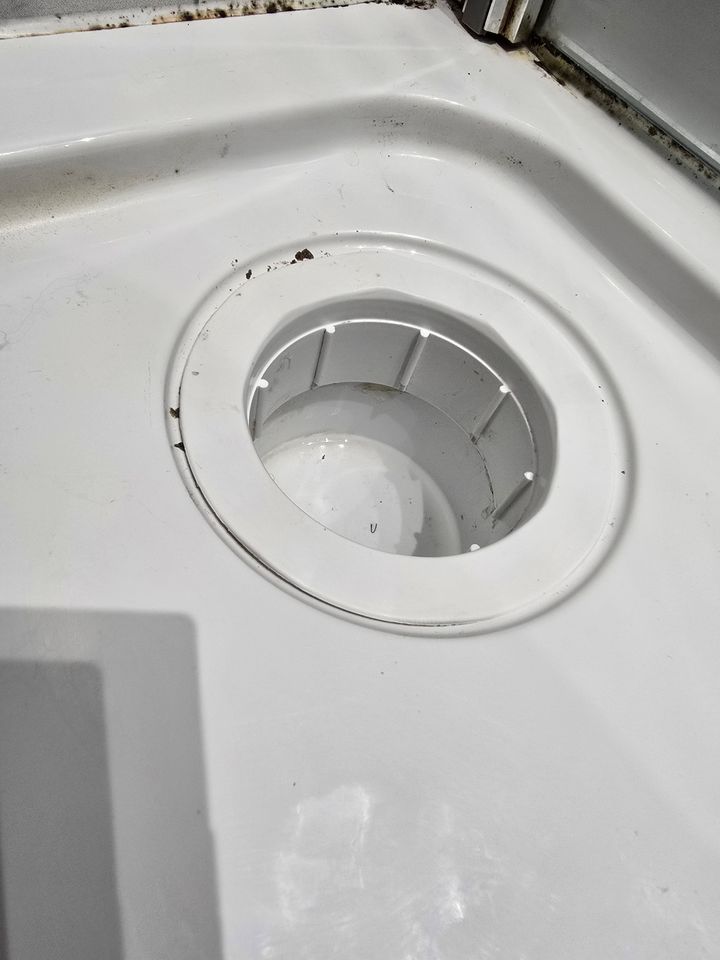
Anyway, the only theories I have at the moment are that its either leaking where the drainhole is, for example, this plastic 'trim' turns, but I can't seem to easily remove it - I think it is glued in somehow as there were little bits of sealant type stuff coming off underneath - so I'm not sure if water is getting in there or not?
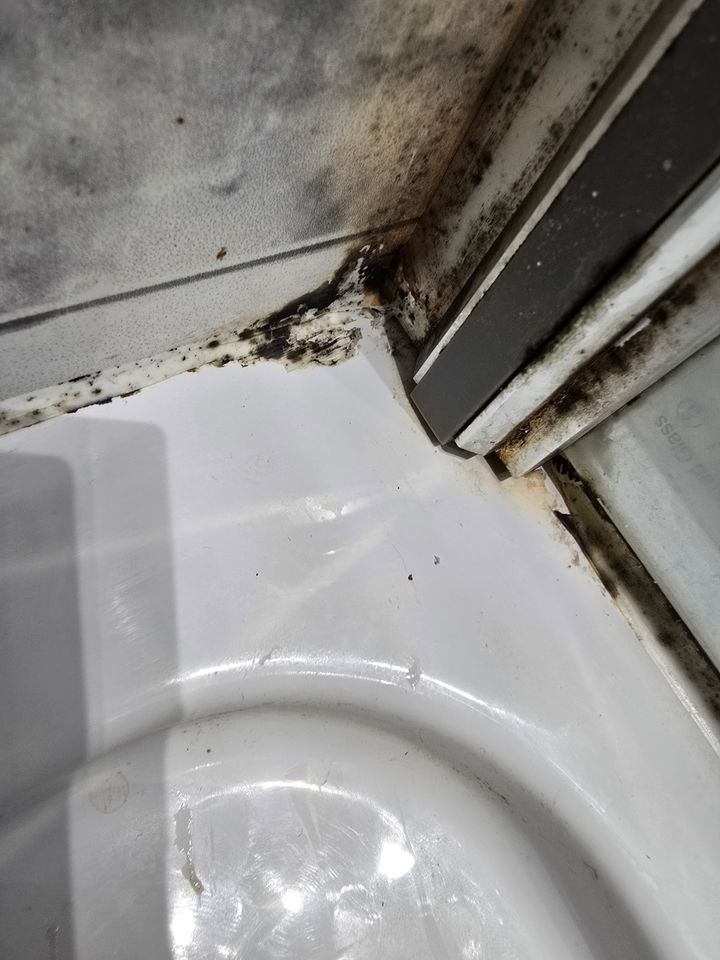
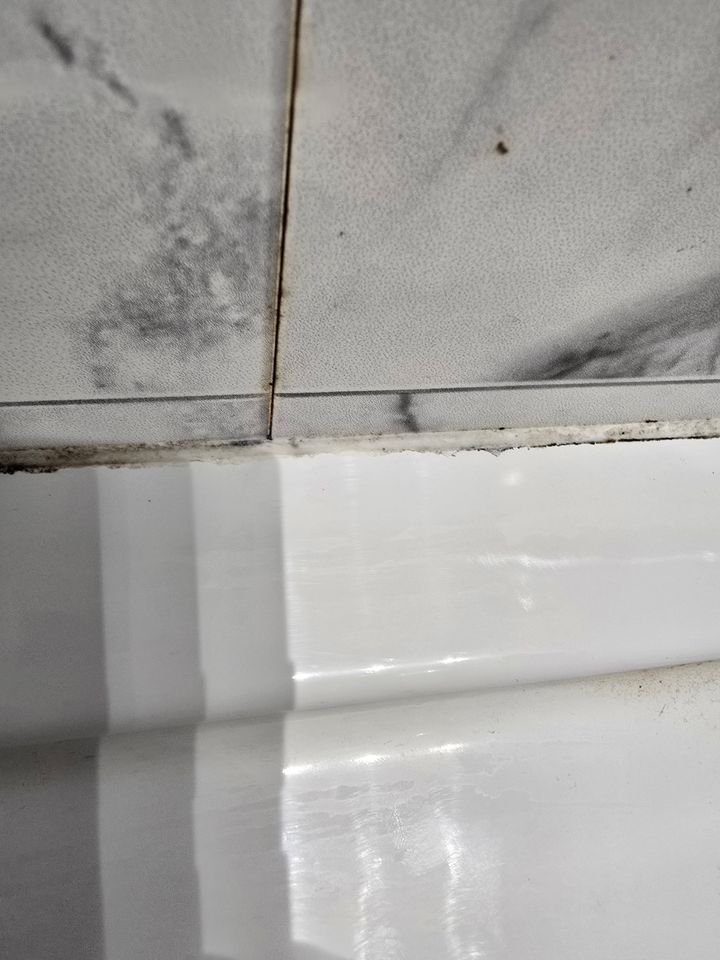
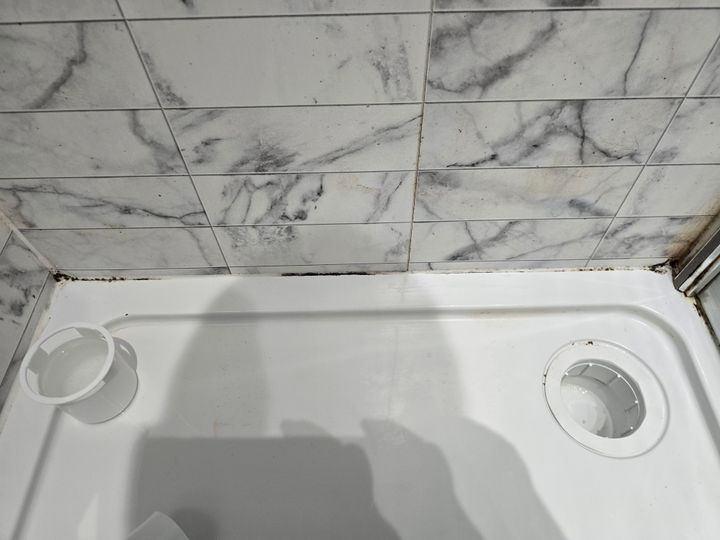
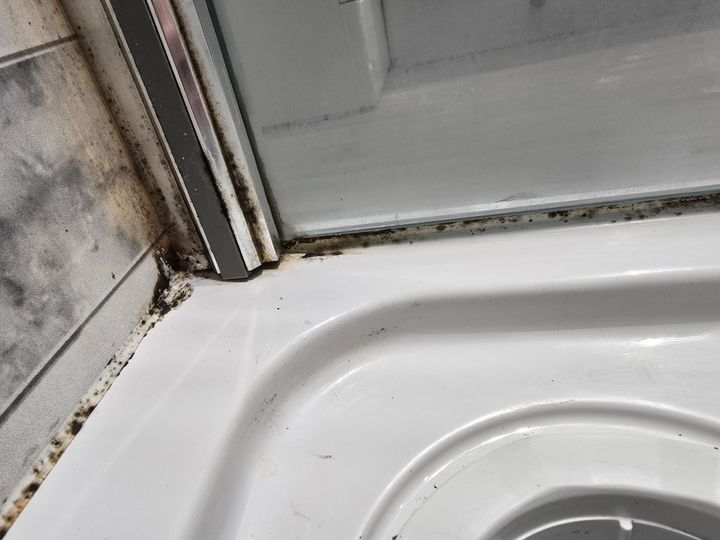
Also the sealant is degraded, as can be seen in these pictures. I could be wrong but I'm still not entirely sure water could easily get through this, even though it has seen better days. I'm also aware that there is a very small gap between the claddding panels, which I guess could be another entry point. Hopefully the pictures illustrate this:
Looking at the photos, yes I am ashamed of the condition of that now, so no need to comment on it
Obviously it would be nice to get this sorted ASAP as we have no way of showering or bathing, so I guess its survival in this respect until it's sorted. Thanks in advance for any advice.
At the weekend, the Mrs noticed a water mark on the ceiling in the kitchen, directly below where our bathroom is...
This morning, I've measured the distance of the mark from the front and side wall of the house to try and get an idea of the exact location of the leak, and it appears to roughly coincidide with where the plug hole is on the shower tray.
We are pretty sure it's occurring during showering as we had a shower yesterday then checked downstairs and found that area to be damp.
The bathroom was installed just over 2 years ago and so any 'warranty' expired a while back now, so I either have to try and sort this myself or seek help, but from searching on the internet, these things are a minefield. The bathroom presently looks like this:
Ironically we had the bathroom replaced originally because it leaked but it had a bath before so at least I could get underneath to have a look but I can't see a way of doing this here without pulling up the shower tray or cutting a hole in the ceiling (and that would not go down well with the Mrs given my famous lack of DIY skills).
Anyway, the only theories I have at the moment are that its either leaking where the drainhole is, for example, this plastic 'trim' turns, but I can't seem to easily remove it - I think it is glued in somehow as there were little bits of sealant type stuff coming off underneath - so I'm not sure if water is getting in there or not?
Also the sealant is degraded, as can be seen in these pictures. I could be wrong but I'm still not entirely sure water could easily get through this, even though it has seen better days. I'm also aware that there is a very small gap between the claddding panels, which I guess could be another entry point. Hopefully the pictures illustrate this:
Looking at the photos, yes I am ashamed of the condition of that now, so no need to comment on it
Obviously it would be nice to get this sorted ASAP as we have no way of showering or bathing, so I guess its survival in this respect until it's sorted. Thanks in advance for any advice.
If there's no removable plinth on the side of the tray I would think the easiest way to check the trap etc would be through the ceiling below. It's going to need some decorating work at minimum to hide the stain so cutting and patching a hole isn't really the end of the world
If you do re-do the sealant, I would make sure you remove all traces of the old stuff, ideally put a few weights in the tray so that it flexes as much as it's ever likely too and then reseal.
If you do re-do the sealant, I would make sure you remove all traces of the old stuff, ideally put a few weights in the tray so that it flexes as much as it's ever likely too and then reseal.
Edited by JimM169 on Monday 13th January 16:38
Easiest way to test the drain is to point the shower directly into ther drain (so no water is in the tray itself). If it leaks its likely the pipe or joint.
If it doesn't put the shower into the tray making sure water does not go anwhere else, so all water directly passes over that surround. If that leaks then that is your culprit.
Tbh It looks like the whole thing so do with the sealant ripping out and doing again regardless.
If it doesn't put the shower into the tray making sure water does not go anwhere else, so all water directly passes over that surround. If that leaks then that is your culprit.
Tbh It looks like the whole thing so do with the sealant ripping out and doing again regardless.
SteBrown91 said:
Easiest way to test the drain is to point the shower directly into ther drain (so no water is in the tray itself). If it leaks its likely the pipe or joint.
If it doesn't put the shower into the tray making sure water does not go anwhere else, so all water directly passes over that surround. If that leaks then that is your culprit.
Tbh It looks like the whole thing so do with the sealant ripping out and doing again regardless.
That's a good idea to narrow it down a bit, I'm currently spraying water directly into the drain right now, and will give it 10 minutes or so, then will try and do it over the surround on the plug hole after, will report back...If it doesn't put the shower into the tray making sure water does not go anwhere else, so all water directly passes over that surround. If that leaks then that is your culprit.
Tbh It looks like the whole thing so do with the sealant ripping out and doing again regardless.
Cant say for sure but certain traps that top plastic ring is tightened and it pulls a seal up against the tray underneath, could be that type.
You could cut an inspection panel in underneath and fit something similar to this which is the easiest way really, not to everyones taste but minimum of fuss and less making good.
https://www.screwfix.com/p/manthorpe-access-panel-...
You could cut an inspection panel in underneath and fit something similar to this which is the easiest way really, not to everyones taste but minimum of fuss and less making good.
https://www.screwfix.com/p/manthorpe-access-panel-...
That's almost the same layout as my en suite, however we had the same issue in the family bathroom, got the guy round who installed the shower cubicle and he said and proved it was the acrylic walls we'd chosen flexing and allowing the water to run between the tray edge and the wall, he resealed and advised the family not to lean against the walls when showering, cured the issue immediately. Next time I'm going with tiles they don't flex!
TameRacingDriver said:
My second thread of the day in here - anyone would think I lived in Faulty Towers (deliberate spelling mistake intended).
At the weekend, the Mrs noticed a water mark on the ceiling in the kitchen, directly below where our bathroom is...
We had exactly the same over Christmas - it turned out that the external pipe from the bathroom down to the drain in the garden was blocked. I unclogged it and the grey water was able to drain freely. The water must have been building up in the pipe and eventually leaked out of the trap seals due to the pressure. Fixed it for us so worth a look perhaps?At the weekend, the Mrs noticed a water mark on the ceiling in the kitchen, directly below where our bathroom is...
Pretty clear video of how a typical shower waste trap goes together
Undoing yours may damage the seals, requiring either a seal kit, or another trap.
Manthorpe access hatch is the way to go.
Also, the joint between the shower panels should have been installed with a cover / bead strip, to prevent moisture ingress between the two panels. Appea s to be absent on your installation.
Lastly, to remove mould in a trice, use HG mould spray https://www.wickes.co.uk/HG-Self-Acting-Mould-Spra...
Regbuser said:
TameRacingDriver said:
Aluminati said:
Unscrew trap ring, spread plumbers mate as gasket, do ring back up and clear excess plumbers mate off.
Mastic also looks like it’s due for renewal.
Spread the stuff on the thread?Mastic also looks like it’s due for renewal.

 honestly mate, I cannot emphasise just how poor I am at anything DIY!!
TameRacingDriver said:
Aluminati said:
Unscrew trap ring, spread plumbers mate as gasket, do ring back up and clear excess plumbers mate off.
Mastic also looks like it’s due for renewal.
Spread the stuff on the thread?Mastic also looks like it’s due for renewal.
Gassing Station | Homes, Gardens and DIY | Top of Page | What's New | My Stuff