DB9 Home DIY Engine Removal
Discussion


Hi,
As you might know my early 2004 DB9 at the beginning of the year started making the "Dreaded DB9 tick" !!!! This was hugely disappointing and very upsetting for me as I knew this involved spending huge amounts of money that I don't have.
I'm good with cars so after having a think and looking at the size of my garage I decided to take the engine out at home.
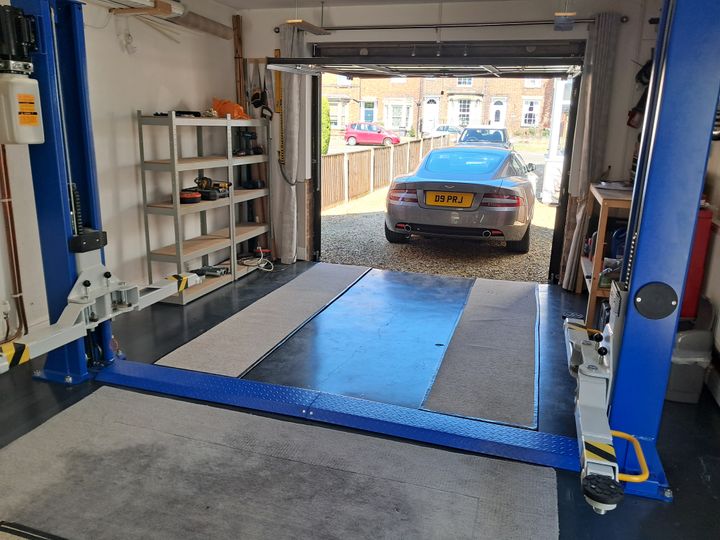
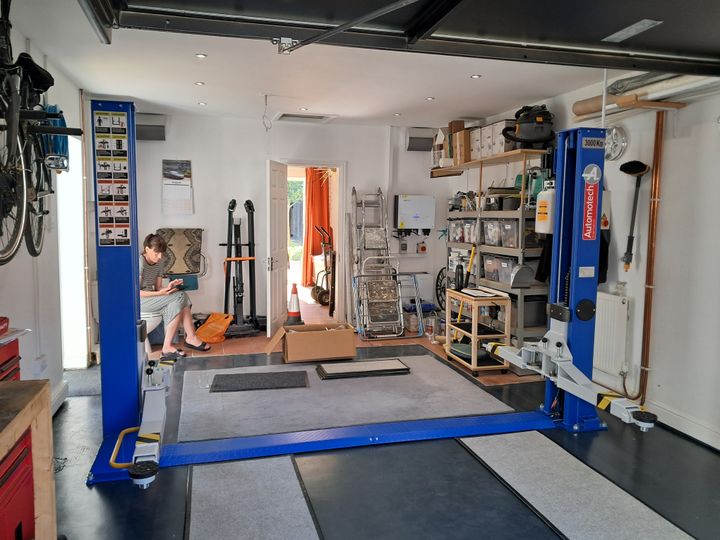
First thing was to sort out the garage, paint the floor then install a professional 2 post
I was able to follow the AM workshop manual, this didn't take ages, some steps were harder than others, I bought an A4 writing pad and started to write down where everything went, I purchased some cable ties with a label on so I identified all the cables/connectors/pipes and wrote down where they connect to etc, I also took plenty of photos.
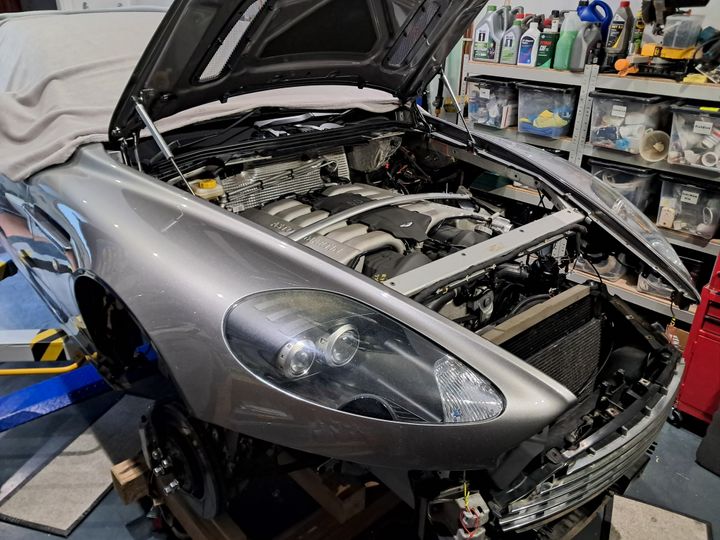
Once the car was up on the ramp alot of stuff came off, I put most of the parts up in the garage loft.
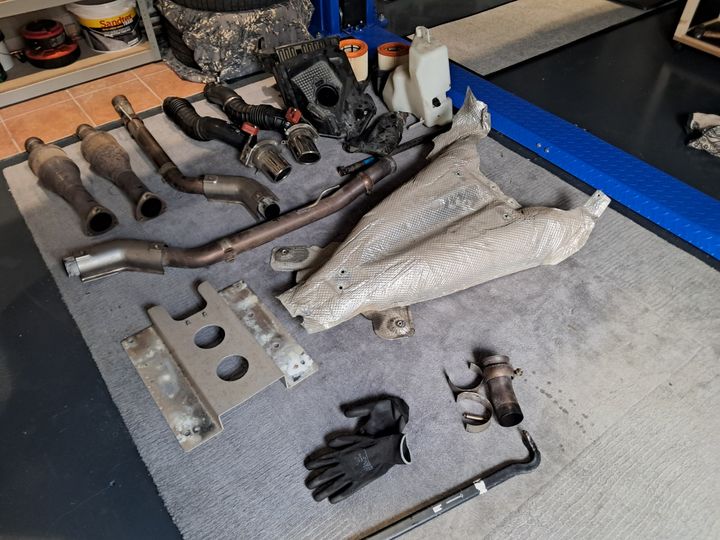
I removed the inlet manifolds, that gave me better access at the top, dropped the engine oil and coolant, disconnected the transmission lines, fuel lines, all brake lines at all 4 corners and put blanks on them to avoid fluid loss.
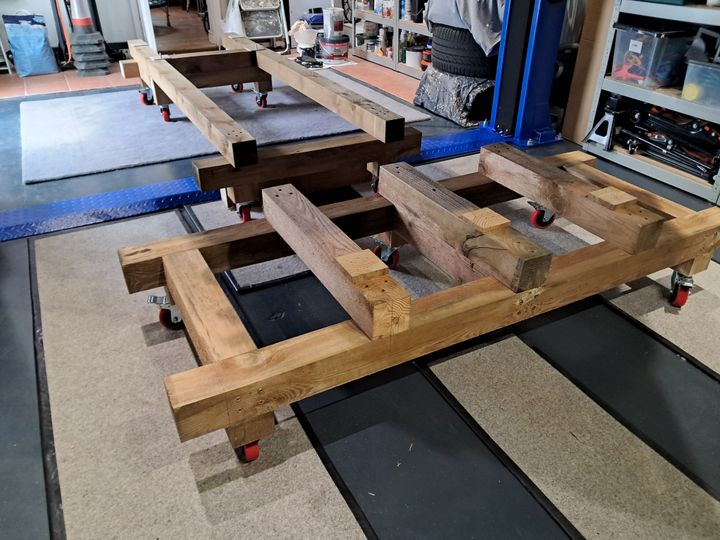
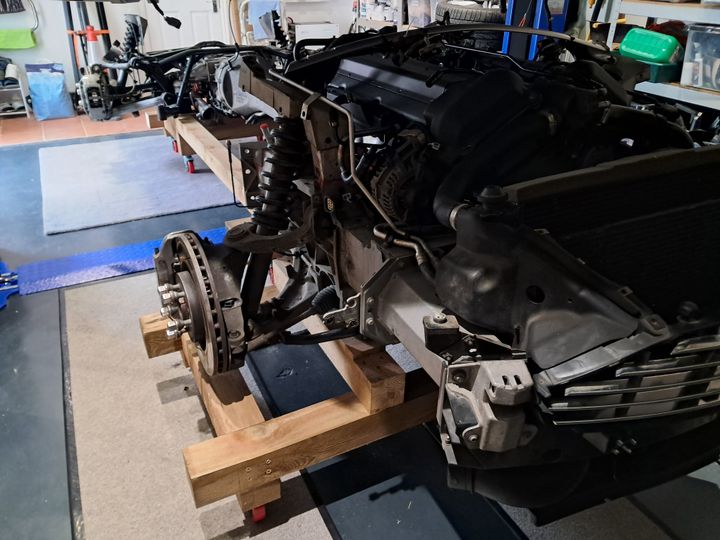
I had to make a couple of trolleys, these are for the engine/transmission to rest on while the body is raised up on the 2 post lift, I used some fence posts and heavy duty castors from Amazon -
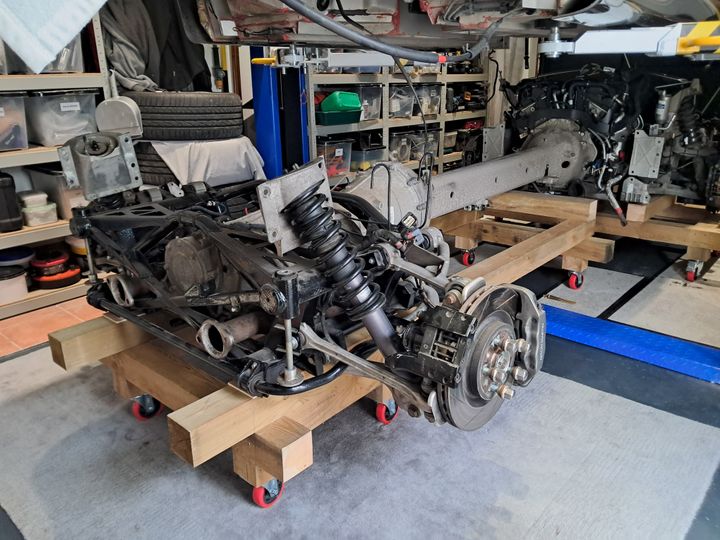
Then came the day I separated the body from the drivetrain, I was super nervous, I found a few things still attached that were not in the AM workshop manual, but I got my wife to very slowly raise the car whilst I looked around it and eventually the body was raised off -
So next job was to separate the torque tube to the engine bell housing, this turned out to be easy, I made the 2 trolleys so everything was inline as best as I could.
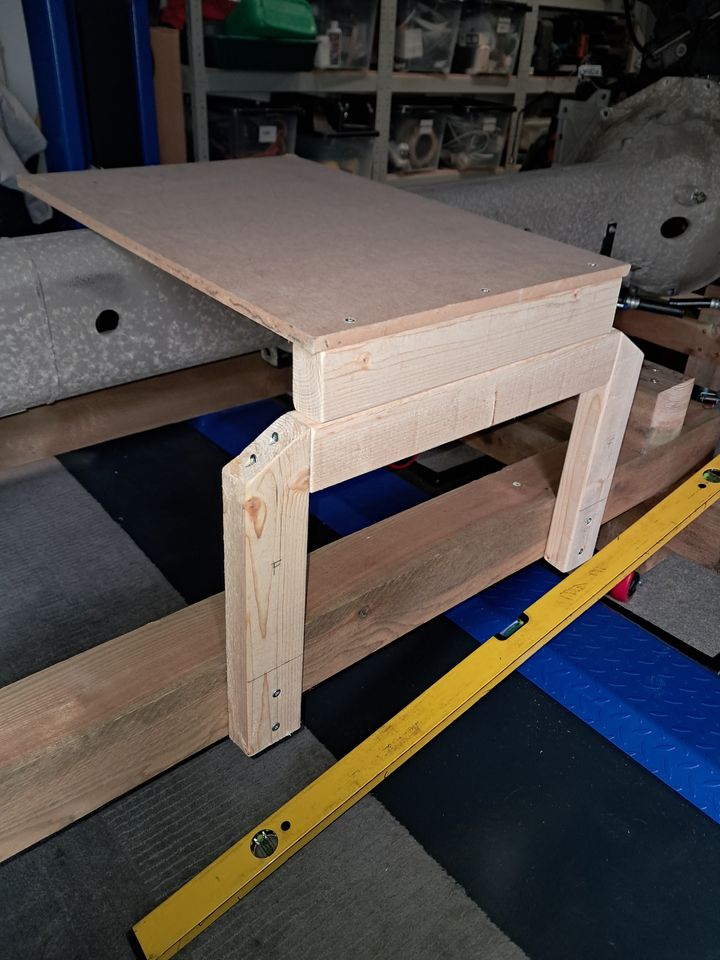
Next step was the engine harness and some other pipework, I made a wooden stand for the engine harness so it wouldn't strain any cables -
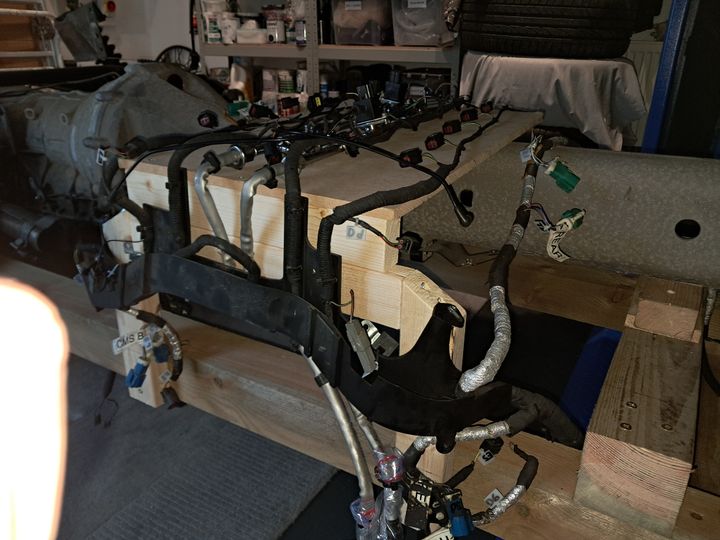
After that some further cables and pipework to disconnect and we get to the next stage to remove the engine from the front subframe.
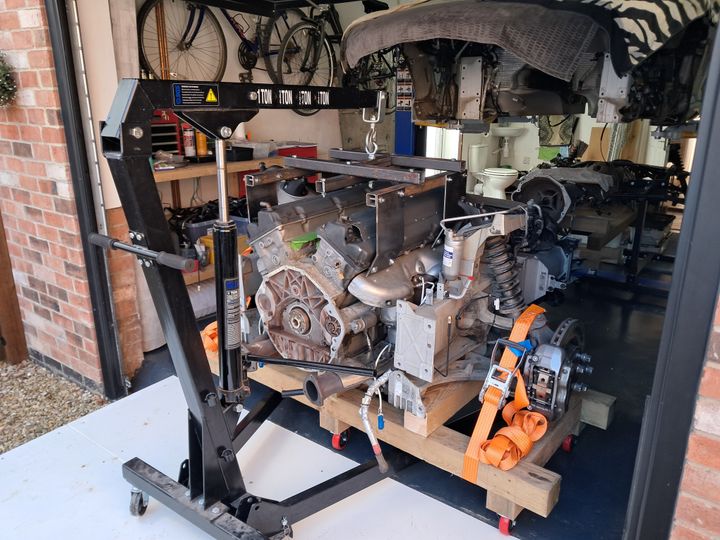
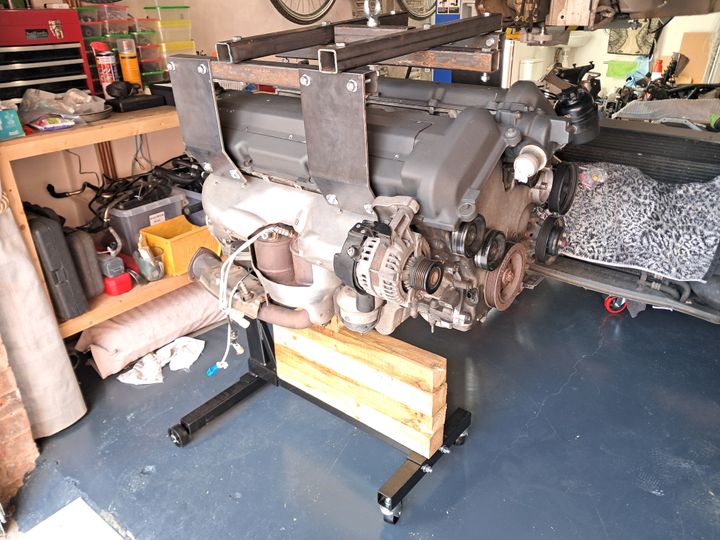
I didn't want to just put some slings around it, this just seems abit cowboy ish to me so I looked at some videos from Gaydon, looking at how the engine is lifted into position in the factory I decided to make an engine lifting jig myself, this jig bolts into the same holes in the engine AM use at Gaydon.
So using my engine hoist the engine came out -
So the engine is now out, still don't know what to do next, If I keep this engine I will have to take it get it reconditioned, or maybe get a replacement from a breakers yard... I'll update as things go on.
As you might know my early 2004 DB9 at the beginning of the year started making the "Dreaded DB9 tick" !!!! This was hugely disappointing and very upsetting for me as I knew this involved spending huge amounts of money that I don't have.
I'm good with cars so after having a think and looking at the size of my garage I decided to take the engine out at home.
First thing was to sort out the garage, paint the floor then install a professional 2 post
I was able to follow the AM workshop manual, this didn't take ages, some steps were harder than others, I bought an A4 writing pad and started to write down where everything went, I purchased some cable ties with a label on so I identified all the cables/connectors/pipes and wrote down where they connect to etc, I also took plenty of photos.
Once the car was up on the ramp alot of stuff came off, I put most of the parts up in the garage loft.
I removed the inlet manifolds, that gave me better access at the top, dropped the engine oil and coolant, disconnected the transmission lines, fuel lines, all brake lines at all 4 corners and put blanks on them to avoid fluid loss.
I had to make a couple of trolleys, these are for the engine/transmission to rest on while the body is raised up on the 2 post lift, I used some fence posts and heavy duty castors from Amazon -
Then came the day I separated the body from the drivetrain, I was super nervous, I found a few things still attached that were not in the AM workshop manual, but I got my wife to very slowly raise the car whilst I looked around it and eventually the body was raised off -
So next job was to separate the torque tube to the engine bell housing, this turned out to be easy, I made the 2 trolleys so everything was inline as best as I could.
Next step was the engine harness and some other pipework, I made a wooden stand for the engine harness so it wouldn't strain any cables -
After that some further cables and pipework to disconnect and we get to the next stage to remove the engine from the front subframe.
I didn't want to just put some slings around it, this just seems abit cowboy ish to me so I looked at some videos from Gaydon, looking at how the engine is lifted into position in the factory I decided to make an engine lifting jig myself, this jig bolts into the same holes in the engine AM use at Gaydon.
So using my engine hoist the engine came out -
So the engine is now out, still don't know what to do next, If I keep this engine I will have to take it get it reconditioned, or maybe get a replacement from a breakers yard... I'll update as things go on.
Edited by paulrog1 on Friday 20th December 19:28

paulrog1 said:
Hi,
As you might know my early 2004 DB9 at the beginning of the year started making the "Dreaded DB9 tick" !!!! This was hugely disappointing and very upsetting for me as I knew this involved spending huge amounts of money that I don't have.
I'm good with cars so after having a think and looking at the size of my garage I decided to take the engine out at home.
First thing was to sort out the garage, paint the floor then install a professional 2 post lift -
I was able to follow the AM workshop manual, this didn't take ages, some steps were harder than others, I bought an A4 writing pad and started to write down where everything went, I purchased some cable ties with a label on so I identified all the cables/connectors/pipes and wrote down where they connect to etc, I also took plenty of photos.
Once the car was up on the ramp alot of stuff came off, I put most of the parts up in the garage loft.
I removed the inlet manifolds, that gave me better access at the top, dropped the engine oil and coolant, disconnected the transmission lines, fuel lines, all brake lines at all 4 corners and put blanks on them to avoid fluid loss.
I had to make a couple of trolleys, these are for the engine/transmission to rest on while the body is raised up on the 2 post lift, I used some fence posts and heavy duty castors from Amazon -
Then came the day I separated the body from the drivetrain, I was super nervous, I found a few things still attached that were not in the AM workshop manual, but I got my wife to very slowly raise the car whilst I looked around it and eventually the body was raised off -
So next job was to separate the torque tube to the engine bell housing, this turned out to be easy, I made the 2 trolleys so everything was inline as best as I could.
Next step was the engine harness and some other pipework, I made a wooden stand for the engine harness so it wouldn't strain any cables -
After that some further cables and pipework to disconnect and we get to the next stage to remove the engine from the front subframe.
I didn't want to just put some slings around it, this just seems abit cowboy ish to me so I looked at some videos from Gaydon, looking at how the engine is lifted into position in the factory I decided to make an engine lifting jig myself, this jig bolts into the same holes in the engine AM use at Gaydon.
So using my engine hoist the engine came out -
So the engine is now out, still don't know what to do next, If I keep this engine I will have to take it get it reconditioned, or maybe get a replacement from a breakers yard... I'll update as things go on.
Very admirable level of work and effort thus far!As you might know my early 2004 DB9 at the beginning of the year started making the "Dreaded DB9 tick" !!!! This was hugely disappointing and very upsetting for me as I knew this involved spending huge amounts of money that I don't have.
I'm good with cars so after having a think and looking at the size of my garage I decided to take the engine out at home.
First thing was to sort out the garage, paint the floor then install a professional 2 post lift -
I was able to follow the AM workshop manual, this didn't take ages, some steps were harder than others, I bought an A4 writing pad and started to write down where everything went, I purchased some cable ties with a label on so I identified all the cables/connectors/pipes and wrote down where they connect to etc, I also took plenty of photos.
Once the car was up on the ramp alot of stuff came off, I put most of the parts up in the garage loft.
I removed the inlet manifolds, that gave me better access at the top, dropped the engine oil and coolant, disconnected the transmission lines, fuel lines, all brake lines at all 4 corners and put blanks on them to avoid fluid loss.
I had to make a couple of trolleys, these are for the engine/transmission to rest on while the body is raised up on the 2 post lift, I used some fence posts and heavy duty castors from Amazon -
Then came the day I separated the body from the drivetrain, I was super nervous, I found a few things still attached that were not in the AM workshop manual, but I got my wife to very slowly raise the car whilst I looked around it and eventually the body was raised off -
So next job was to separate the torque tube to the engine bell housing, this turned out to be easy, I made the 2 trolleys so everything was inline as best as I could.
Next step was the engine harness and some other pipework, I made a wooden stand for the engine harness so it wouldn't strain any cables -
After that some further cables and pipework to disconnect and we get to the next stage to remove the engine from the front subframe.
I didn't want to just put some slings around it, this just seems abit cowboy ish to me so I looked at some videos from Gaydon, looking at how the engine is lifted into position in the factory I decided to make an engine lifting jig myself, this jig bolts into the same holes in the engine AM use at Gaydon.
So using my engine hoist the engine came out -
So the engine is now out, still don't know what to do next, If I keep this engine I will have to take it get it reconditioned, or maybe get a replacement from a breakers yard... I'll update as things go on.
Edited by paulrog1 on Tuesday 17th September 16:13
I always wanted a two poster, but was not sure what it would be like with the Hight restriction, although it looks like your garage is similar to mine and seems like you get good ground clearance still with the car not hitting the ceiling.
I do not know much on the tick, other that it is caused by oil starvation of the cams that wear out the bearing i think, but where you are now and the skills you obtained through getting the engine out, i would say might be worth having a go at taking cams out and replacing the baring, and while you there having the engine refresh.
Equally as it is a known engine to you you could send it out and get it done professionally too, quite few options really!
well done on the effort and success thus far!
I would be almost cheeky and say you should start taking time-lapse videos of all the work you done and post on social medial like youtube or instagram, not for views but purely for recognition of own effort!


I think you are such a planner and so methodical you should whip that head off and check the oval bores, then maybe you can get slightly oversized pistons and liners and rebuild - adding oil feeds? I think the little ends that get a bit mashed too don't they? So you need to go further to get to the little ends replaced. I reckon you'd nail it - or at least get the stripped engine to a reboring outfit. Bravo.
When I pulled mine out the longest "struggle session" was finding where the wiring harness came through the firewall and then were the connectors were located. Eventually it yielded to persistent attention... Everything else was engine repair 101...
Great job on getting it out! Fortunately it is a pretty simple engine (no variable valve timing), and while the pistons have to come out the top the main & rod bearings are right out of the Ford parts bin. The more modern Ford connecting rods have a slightly different small end bearing. I assume that is the reason for the tick.
Might be worth getting some bore measurement gauges and see how "Oval" they have become, with particular attention to the back pair... That will guide you to your next step.
Repairing yours will be less expensive and give you a better product.
Again, great job!
Larry
Update -
I spent alot of time wondering what to do, either refurbish my old engine or put a different one in, I decided to ditch my old AM04 engine and fit an updated AM09 engine, these engines are in the glass key 2008 onwards DB9's.
I've been told that the AM09 engines do not suffer from the DB9 tick as they have updated internals and have 20bhp more power due to increased compression ratio and an improved inlet fuel ports.
I found a AM09 engine on ebay from a salvage yard with only 12K miles, I went to the salvage yard and spent half a day there removing the inlet manifolds/coils/plugs and I looked at all pistons with an inspection camera rotating the crankshaft, all looked good, no damage at all, no oil leaks, the engine was still in the crashed car.
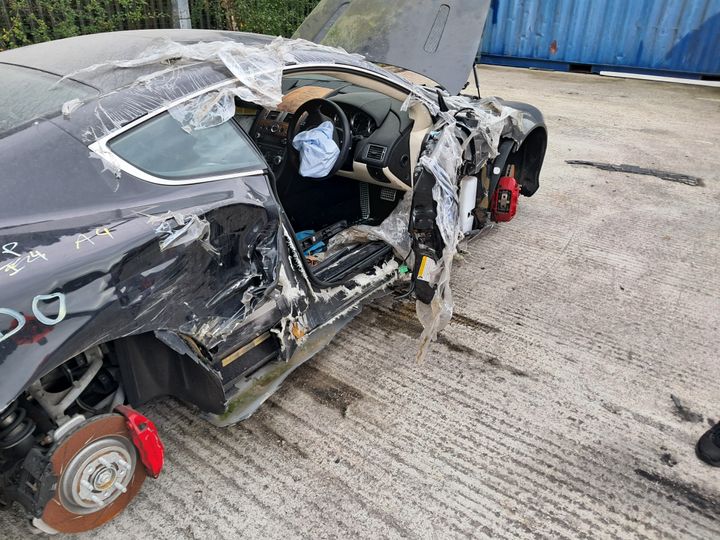
I did some background checks and a car vertical check, they both came back ok (obviously written off) I also managed to track down the owner and driver of the car when the crash happened, apparently it seems that an elderly man fell asleep at the wheel and collided into the side of the DB9 writing it off. All this info convinced me that the engine was good so after some haggling I got a good deal for the engine.
I had to wait a week for them to remove the engine from the car -
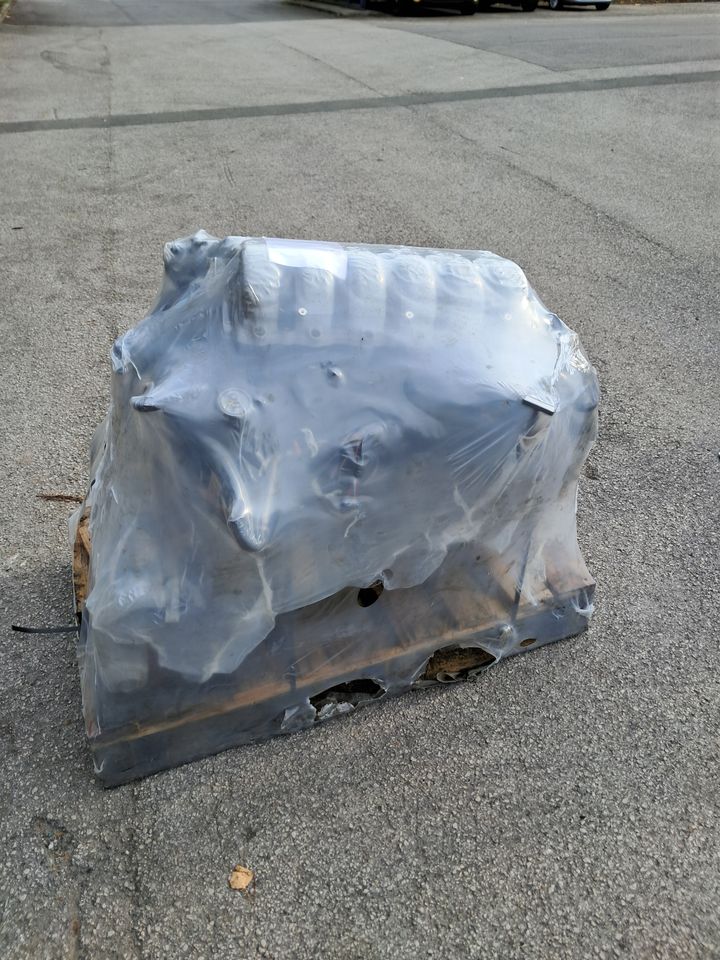
I collected it in my van -
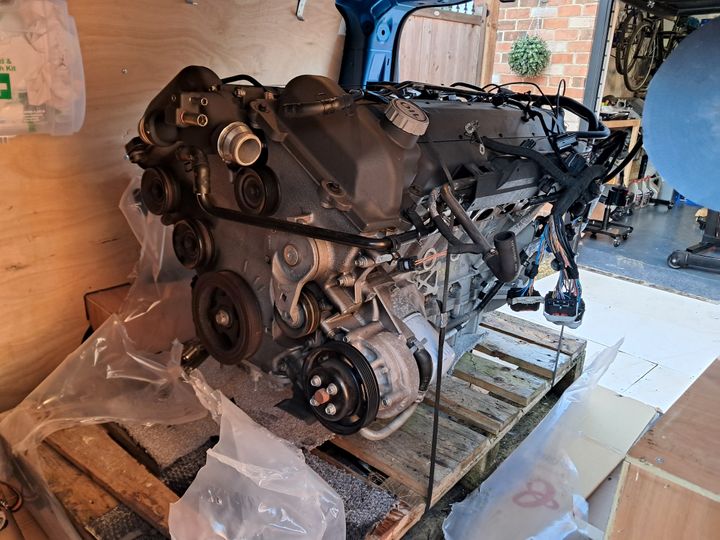
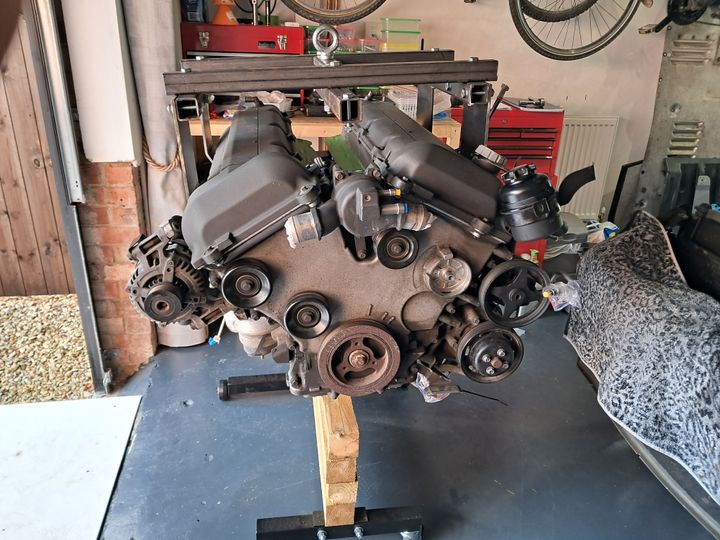
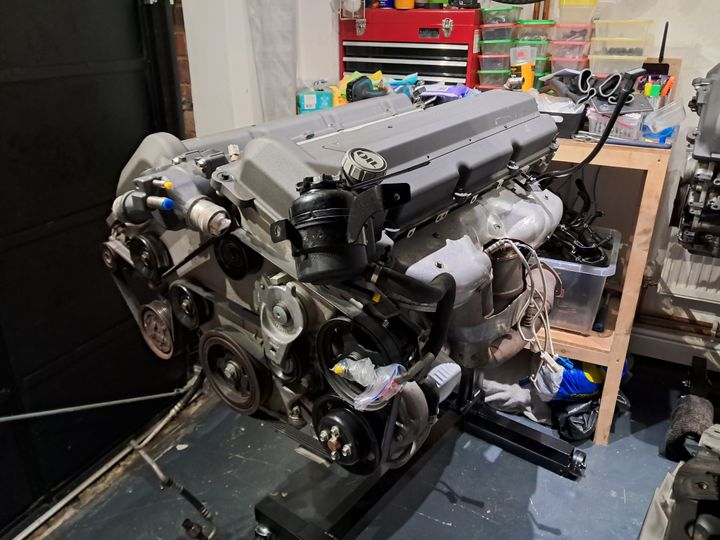
I got it in my garage on an engine stand and started to build it up -
Then proceeded to install it into the car -
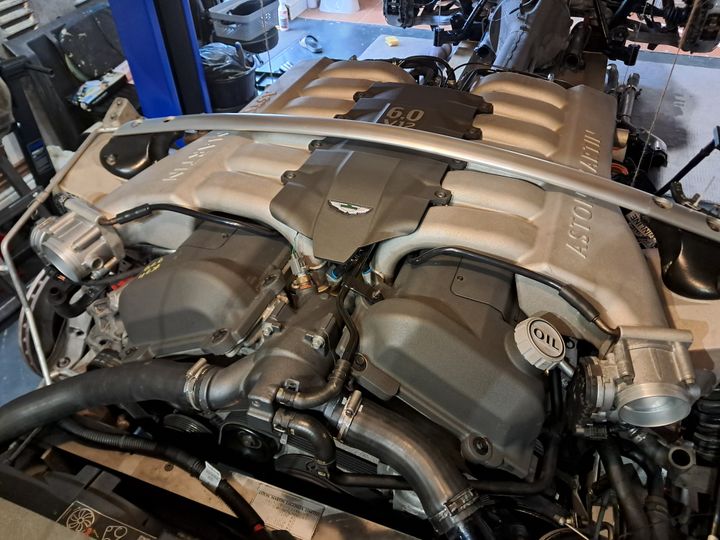
One thing I decided to do is to install an Oil temperature gauge as the engine takes quite alot of time getting the oil upto temperature, I don't want to boot the engine until warmed up, so I fitted a sensor into the rear of the secondary cylinder head, I will fit the gauge into the dash somewhere discreet, but thats for over the winter -

The day came to lower the body back to the drivetrain -
I reconnected all the electrical connectors, pipes etc and last weekend started the car for the first time, and the engine runs great!!! I'm so happy everything has turned out so well.
I've still got quite alot to do to get it on the road, but i'm not going to drive her until the nice weather next year so i've got plenty of time.
Not much difference between my old engine and the new one, even though the new engine came with it's own engine wiring harness I decided to use the old one as I thought my PCM's would work better, the crankshaft/camshaft sensors are all the same, fuel injectors are different but again decided to use my old ones.
So all looking good now to get it on the road and more adventures to come.................
I spent alot of time wondering what to do, either refurbish my old engine or put a different one in, I decided to ditch my old AM04 engine and fit an updated AM09 engine, these engines are in the glass key 2008 onwards DB9's.
I've been told that the AM09 engines do not suffer from the DB9 tick as they have updated internals and have 20bhp more power due to increased compression ratio and an improved inlet fuel ports.
I found a AM09 engine on ebay from a salvage yard with only 12K miles, I went to the salvage yard and spent half a day there removing the inlet manifolds/coils/plugs and I looked at all pistons with an inspection camera rotating the crankshaft, all looked good, no damage at all, no oil leaks, the engine was still in the crashed car.
I did some background checks and a car vertical check, they both came back ok (obviously written off) I also managed to track down the owner and driver of the car when the crash happened, apparently it seems that an elderly man fell asleep at the wheel and collided into the side of the DB9 writing it off. All this info convinced me that the engine was good so after some haggling I got a good deal for the engine.
I had to wait a week for them to remove the engine from the car -
I collected it in my van -
I got it in my garage on an engine stand and started to build it up -
Then proceeded to install it into the car -
One thing I decided to do is to install an Oil temperature gauge as the engine takes quite alot of time getting the oil upto temperature, I don't want to boot the engine until warmed up, so I fitted a sensor into the rear of the secondary cylinder head, I will fit the gauge into the dash somewhere discreet, but thats for over the winter -
The day came to lower the body back to the drivetrain -
I reconnected all the electrical connectors, pipes etc and last weekend started the car for the first time, and the engine runs great!!! I'm so happy everything has turned out so well.
I've still got quite alot to do to get it on the road, but i'm not going to drive her until the nice weather next year so i've got plenty of time.
Not much difference between my old engine and the new one, even though the new engine came with it's own engine wiring harness I decided to use the old one as I thought my PCM's would work better, the crankshaft/camshaft sensors are all the same, fuel injectors are different but again decided to use my old ones.
So all looking good now to get it on the road and more adventures to come.................
Gassing Station | Aston Martin | Top of Page | What's New | My Stuff