Slow Wiper Fix
Discussion


Having always suffered from slow (stuck) wipers and the old motor essentially cooked - I decided to fit the uprated motor. Upon first try, the wipers still ground to a halt and the motor 'lunched' the worm wheel in the wiper gearbox :-(
So - complete overhaul of the system and what I found was the whole problem lies within the wiper assembly housing (drive cable, guide tubes and wheel boxes), and really not much to do with the motor (unless it's already cooked). It's all to do with alignment and getting things moving with least resistance.
So -
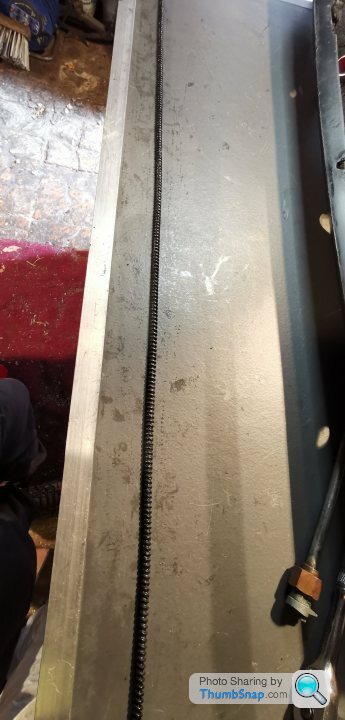
First, take everything apart. Wheel boxes, drive cable, guide tubes and clean off any old grease. Start by straightening the drive cable. As straight as possible. No curves or kinks - especially over the 5cm ranges that run through the wheel boxes. Check for any damage within those areas. Any burrs or snags on the spiral on the drive cable.
Now check the middle and end guide tubes. They should be as straight as possible. Clean out any gunk from the inside. Make sure there are no burrs that might catch the cable, then slide the drive cable through them (one at a time) and make sure there are no sticky points.
Move on to the driver side wheel box. With the base removed - thread the drive cable past the wheel. Move the cable back and forward making sure that the wheel box spindle rotates freely with no snags. When you're happy that it's moving freely - take the wheel box off the cable, slide the long middle guide tube onto the drive cable, then the wheel box again, and finally the end guide tube. Not bothered with the first guide tube at this point. With the base plate of the wheel box still removed - check the drive cable moves freely through the tubes and wheel box (I clamped the guide tubes to the edge of a bench for this, to hold everything in place). There should be no increase in resistance at this point.
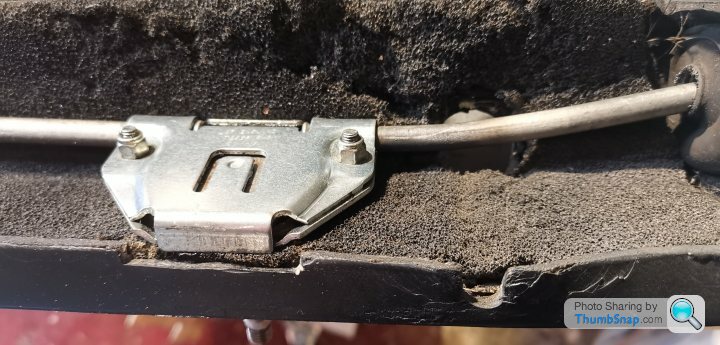
Now fix on the base plate of the wheel box and check movement again. I found significant increase in resistance here. The base plate clamps the guide tubes and that clamping effect squashes the drive cable against the wheel box mechanism. You need to slightly bend out the clamping tabs on the base plate so that they are still holding the guide tubes in position but not exerting any pressure on the drive cable.
Take it all apart again and move on to the passenger side wheel box. Repeat the same set up procedure. When you're happy it's running ok - add on the driver side wheel box and end guide tube. You should now have both wheel boxes with base plates attached, and the middle and end guide tubes (Not the first guide tube). Check drive cable movement is free with no increase in resistance.
The reason for doing this in such small steps is so you can identify which component is causing any increase in resistance - and eliminate/fix it.
The first guide tube (closest to the wiper motor). When I first took my assembly apart, this tube went straight from the grommet in the housing to the wheel box. The base plate of the wheel box could not be tightened because of the angle this created, and consequently the drive cable was changing direction within the wheel box. This is totally wrong and can only lead to problems. The first guide tube needs to be curved outside the wheel box so that the drive cable can run straight passed the wheel. I used a butane torch to add some heat to the tube and then slowly created a bend beyond the wheel box clamping area. Be careful not to crimp the guide tube.
When you're happy with the bend, assemble all parts from the first guide tube out - checking movement and resistance as you add each component. If you've been methodical with this the drive cable should move with little effort. There will be some increase in resistance because of the bend in the first guide tube. Note - you only need to move the cable in and out by about 5cms. That's about the throw of the gear in the wiper motor gearbox.
A word on greasing the components. I used a light grease over the drive cable and oiled the spindles of the wheel boxes before final assembly. I've found that excess grease can go hard (with heat) and eventually gum up the works. Less is more.
Now the final part that even if you don't do anything else - makes all the difference. . .
The spindles of the wheel boxes were never aligned to the plane of the windscreen. They are off by approx. 11 degrees - resulting in the wiper arms having to climb a hill as they move across the screen. If your wipers are anything like mine were - they grind to a halt half way over.
The solution is really simple - a couple of angled spacers inside and outside the housing.
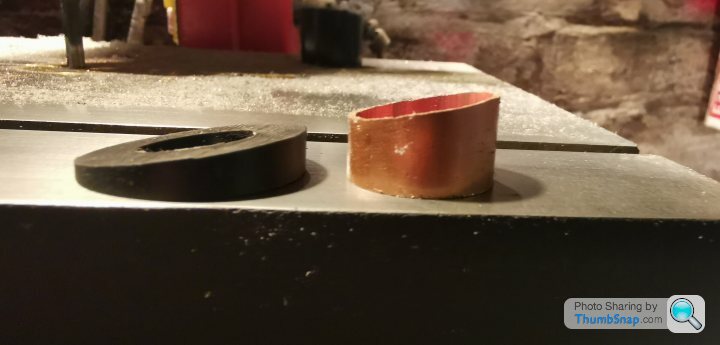
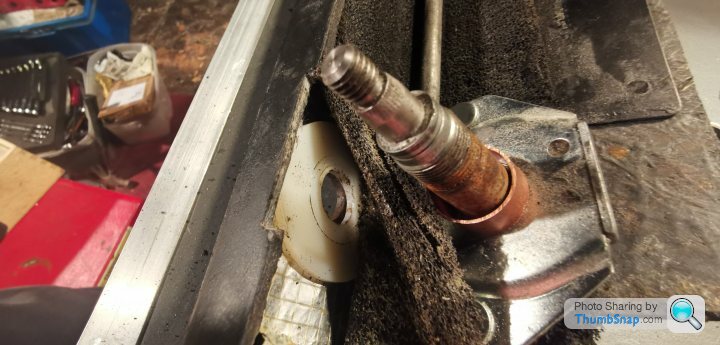
I used what I had to hand, and for the inside spacer I cut a piece of 22mm copper pipe at 11 degrees (short side 10mm high). Then a 3mm thick, large nylon washer to add support on the underside of the housing, and finally a piece of Delrin rod (30mm diameter) with a 16 mm hole drilled through it - cut to 11 degrees. The whole assembly looks like . . .
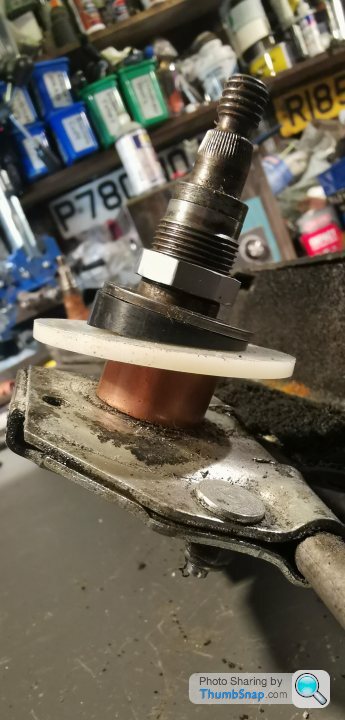
The nylon washer goes inside the housing, above the copper pipe.
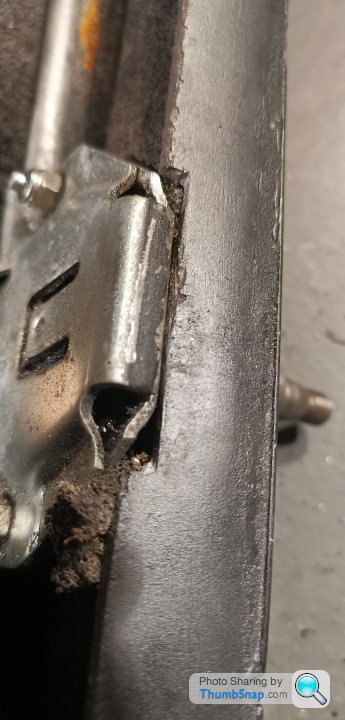
You need to notch the back of the housing to allow for the new angle of the wheel boxes
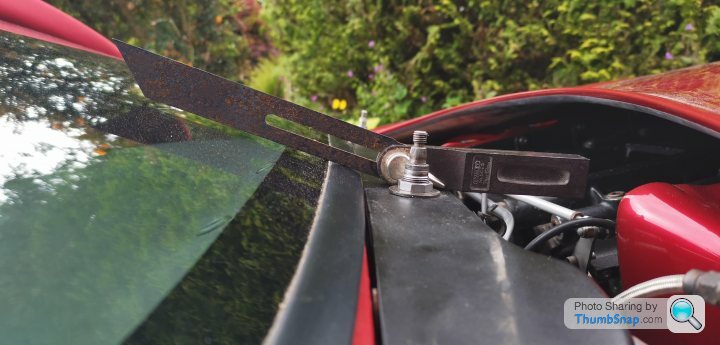
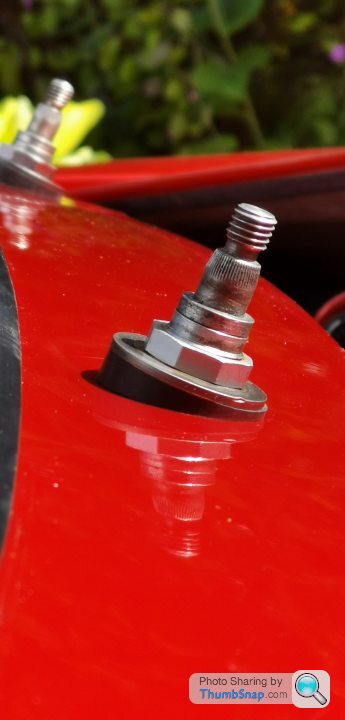
And back on the car with the finish trim attached. The spindles should now be pretty much 90 degrees to the plane of the windscreen. . .
It might take a couple of days to get it all apart and then back together again, but time well spent - and I'm pretty sure the standard motor would work just as good as the uprated one.
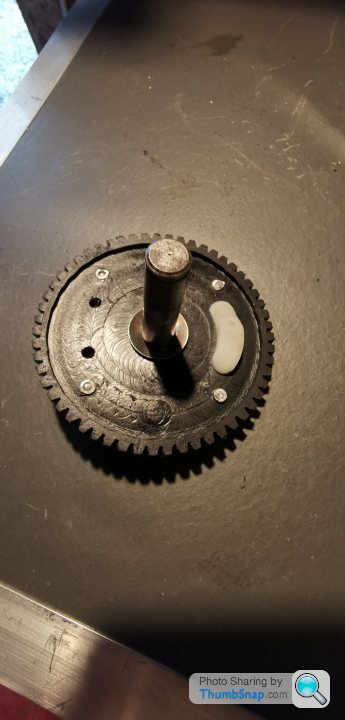
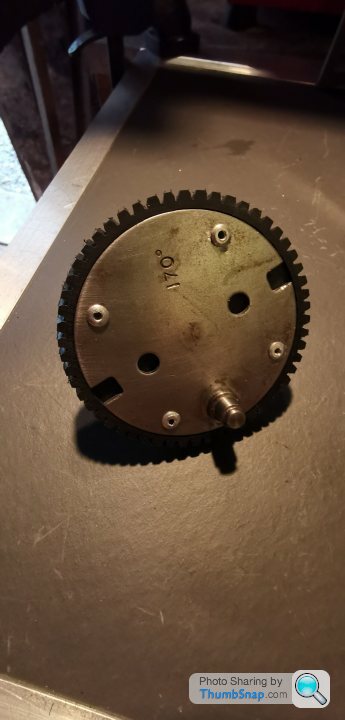
Shot of the gearbox running with cover removed. . .
https://youtu.be/2O0PNc00UvM
Wipers moving over a dry windscreen . . .
https://youtu.be/IKPrHXrfRGc
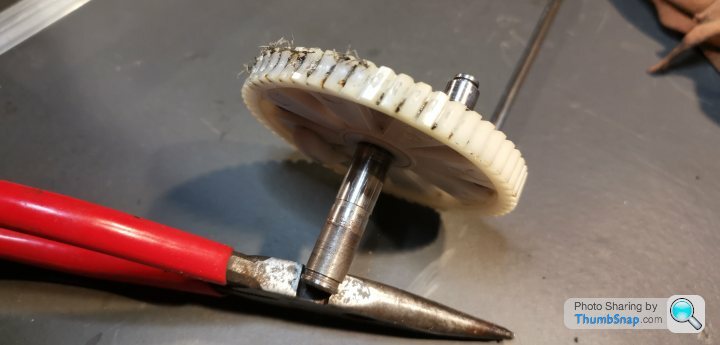
Oh - I did say I'd lunched the old worm wheel in the gearbox.
I made a new one from Delrin. But that's another story.
So - complete overhaul of the system and what I found was the whole problem lies within the wiper assembly housing (drive cable, guide tubes and wheel boxes), and really not much to do with the motor (unless it's already cooked). It's all to do with alignment and getting things moving with least resistance.
So -
First, take everything apart. Wheel boxes, drive cable, guide tubes and clean off any old grease. Start by straightening the drive cable. As straight as possible. No curves or kinks - especially over the 5cm ranges that run through the wheel boxes. Check for any damage within those areas. Any burrs or snags on the spiral on the drive cable.
Now check the middle and end guide tubes. They should be as straight as possible. Clean out any gunk from the inside. Make sure there are no burrs that might catch the cable, then slide the drive cable through them (one at a time) and make sure there are no sticky points.
Move on to the driver side wheel box. With the base removed - thread the drive cable past the wheel. Move the cable back and forward making sure that the wheel box spindle rotates freely with no snags. When you're happy that it's moving freely - take the wheel box off the cable, slide the long middle guide tube onto the drive cable, then the wheel box again, and finally the end guide tube. Not bothered with the first guide tube at this point. With the base plate of the wheel box still removed - check the drive cable moves freely through the tubes and wheel box (I clamped the guide tubes to the edge of a bench for this, to hold everything in place). There should be no increase in resistance at this point.
Now fix on the base plate of the wheel box and check movement again. I found significant increase in resistance here. The base plate clamps the guide tubes and that clamping effect squashes the drive cable against the wheel box mechanism. You need to slightly bend out the clamping tabs on the base plate so that they are still holding the guide tubes in position but not exerting any pressure on the drive cable.
Take it all apart again and move on to the passenger side wheel box. Repeat the same set up procedure. When you're happy it's running ok - add on the driver side wheel box and end guide tube. You should now have both wheel boxes with base plates attached, and the middle and end guide tubes (Not the first guide tube). Check drive cable movement is free with no increase in resistance.
The reason for doing this in such small steps is so you can identify which component is causing any increase in resistance - and eliminate/fix it.
The first guide tube (closest to the wiper motor). When I first took my assembly apart, this tube went straight from the grommet in the housing to the wheel box. The base plate of the wheel box could not be tightened because of the angle this created, and consequently the drive cable was changing direction within the wheel box. This is totally wrong and can only lead to problems. The first guide tube needs to be curved outside the wheel box so that the drive cable can run straight passed the wheel. I used a butane torch to add some heat to the tube and then slowly created a bend beyond the wheel box clamping area. Be careful not to crimp the guide tube.
When you're happy with the bend, assemble all parts from the first guide tube out - checking movement and resistance as you add each component. If you've been methodical with this the drive cable should move with little effort. There will be some increase in resistance because of the bend in the first guide tube. Note - you only need to move the cable in and out by about 5cms. That's about the throw of the gear in the wiper motor gearbox.
A word on greasing the components. I used a light grease over the drive cable and oiled the spindles of the wheel boxes before final assembly. I've found that excess grease can go hard (with heat) and eventually gum up the works. Less is more.
Now the final part that even if you don't do anything else - makes all the difference. . .
The spindles of the wheel boxes were never aligned to the plane of the windscreen. They are off by approx. 11 degrees - resulting in the wiper arms having to climb a hill as they move across the screen. If your wipers are anything like mine were - they grind to a halt half way over.
The solution is really simple - a couple of angled spacers inside and outside the housing.
I used what I had to hand, and for the inside spacer I cut a piece of 22mm copper pipe at 11 degrees (short side 10mm high). Then a 3mm thick, large nylon washer to add support on the underside of the housing, and finally a piece of Delrin rod (30mm diameter) with a 16 mm hole drilled through it - cut to 11 degrees. The whole assembly looks like . . .
The nylon washer goes inside the housing, above the copper pipe.
You need to notch the back of the housing to allow for the new angle of the wheel boxes
And back on the car with the finish trim attached. The spindles should now be pretty much 90 degrees to the plane of the windscreen. . .
It might take a couple of days to get it all apart and then back together again, but time well spent - and I'm pretty sure the standard motor would work just as good as the uprated one.
Shot of the gearbox running with cover removed. . .
https://youtu.be/2O0PNc00UvM
Wipers moving over a dry windscreen . . .
https://youtu.be/IKPrHXrfRGc
Oh - I did say I'd lunched the old worm wheel in the gearbox.
I made a new one from Delrin. But that's another story.
ATM FYI, in your Utube video the motor is running backwards (running in reverse the gear will fail OR a standard one will), the park switch ramp is not working as designed and eventually the park switch pin will be broken off the park switch.
I have the gears and still offer TVR owners to fit a new gear FOC (not including cost of shipping) to the upgrade magnet housing and armature unit (it is not a new 'motor') assuming the gearbox parts are all serviceable.
A@
I have the gears and still offer TVR owners to fit a new gear FOC (not including cost of shipping) to the upgrade magnet housing and armature unit (it is not a new 'motor') assuming the gearbox parts are all serviceable.
A@
Edited by Adrian@ on Wednesday 7th June 17:35
Adrian,
Thanks for that. I'll have a look at the pinouts on the connector block. I take photos of all bits before dismantling so I know its put together the same way. It now makes me suspect that the motor might always have been turning in the wrong direction. And now that you've pointed it out - I totally agree. The slope on the park switch actuator is oriented for a clockwise rotation. Thanks.
G.
Cool, the wiring connection for the park switch is blue on the end, yellow then red....if these are correct you will need to remove the yoke (magnet housing and brush plate holder) and rotate it (as there are no marks for it being rotationally correct) and replace the screws and make a guess-timate as to the centre points of the magnets (that will rotate the wiring too, but I have never known them to be too short anyway). A@
Adrian, Thanks for the tip. The wiring was correct, but yoke was 180 out. Gear now rotating clockwise.
https://youtu.be/GFm7uZbNxO4
Thanks
https://youtu.be/GFm7uZbNxO4
Thanks
Sad as I am, and sorry to be a pain...Now, that new video shows that the wiper rack has been changed for a mini version and not the double coiled version that is fitted to the large blade TVR system (not that any of the traders sell the correct one!!, I fit the correct ones on my builds)...the load fed back from the arm causes the first 2 inches to convolute (or attempt on each start up) which will feed back through the gear, (and negate all the hard work of aligning etc.) here is a picture of both next to each other (TVR OE on the right, generic on the left).
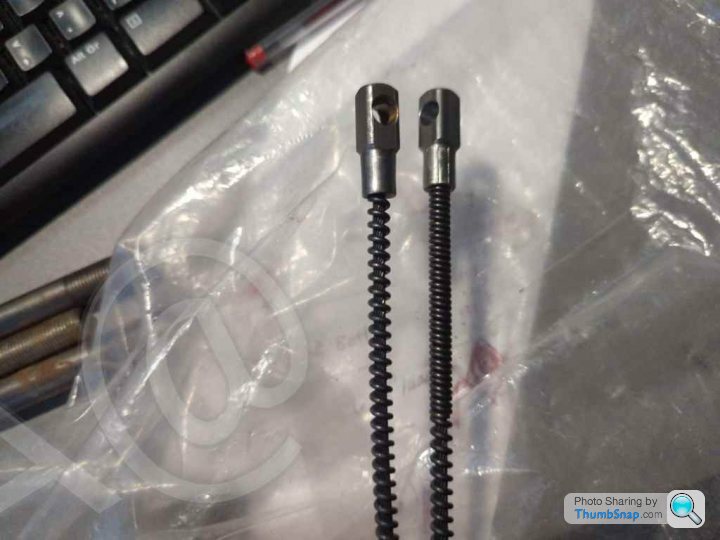
A@
A@
Edited by Adrian@ on Thursday 8th June 08:39
Absolutely superb, the exact sort of thread that makes PH irreplaceable in my opinion.
The spindle angle alteration is so F'ing cool, I will definitely be attempting it in the future.
Edited to add:
I fitted an LRW110 and a 140deg sweep gear to my car last year, got me through the mot, and parts available on ebay.
The spindle angle alteration is so F'ing cool, I will definitely be attempting it in the future.
Edited to add:
I fitted an LRW110 and a 140deg sweep gear to my car last year, got me through the mot, and parts available on ebay.
Edited by DuncanM on Tuesday 13th June 20:54


So, my wiper mechanism is reported to be toast, and Motaclan aren’t doing any parts, except the rack and the motor. I just got the last rack. Can the landrover parts above substitute for everything else? Including the spindles. It would be difficult to keep the cars going without these parts! 🌧️🌧️
Gassing Station | Cerbera | Top of Page | What's New | My Stuff