Brake lights no power
Discussion


As title, fuse 38 OK. Haven't probed yet but I know there is no power to the brake light switch and the reversing lights also don't work. Ran a live from the old fag butt lighter socket to the switch to finish last leg of return from Le Mans, so we know no power to switch. Any ideas? guessing I will be jacking the car up 3 foot in the air so I can twist my shoulders into the footwell or just risking getting stuck upside down in there... have dropped the fuse box before...B@@st**d job.
So despite only 25 miles since rebuild of top end with long duration cams it didn't miss a beat all the way there and back, no oil or water used, yet the faithful old brake lights go and let me down.
J
So despite only 25 miles since rebuild of top end with long duration cams it didn't miss a beat all the way there and back, no oil or water used, yet the faithful old brake lights go and let me down.
J


Thanks for the steer. I have an old lap top with all the wiring diagrams/software/info on... need some coal to fire it up, bit like starting a Griff... splutters into life and lots of smoke.. reckon I need my IT clued up pal to help me out and stick it on a new machine.
I know the weekend will be painful and frustrating. Guess this is a relay switched supply?? Must be more on the "key" but not common to this.
will update with findings..
J
I know the weekend will be painful and frustrating. Guess this is a relay switched supply?? Must be more on the "key" but not common to this.
will update with findings..
J
So I got an hour on this today... then it rained, fuse box out.... cleaned terminals and put ALL connectors back on... wiggle etc. Does it work... nahhh. so I need to understand the fuse box wiring, looks like there is no relay for this so straight from ign sw.... umhh yet other bits on ign work. Guess either a link not connecting (need to do more homework on the links) or the fuse box has a faulty internal connection.
Drat drat and effin' double drat.
Have wiring diagrams but the fuse box is a black hole on the drawing, no layout for it shown... just a heap of connectors going into it.
Drat drat and effin' double drat.
Have wiring diagrams but the fuse box is a black hole on the drawing, no layout for it shown... just a heap of connectors going into it.
If needs must, fusebox is built in layers and will dismantle
The man over here https://www.pistonheads.com/gassing/topic.asp?h=0&...
dismantled his when attempting to find a proper pain of a fault
Yes, could well be corrosion at link joints
There is a good chance that fuse 38 is supplied from main ignition relay
The man over here https://www.pistonheads.com/gassing/topic.asp?h=0&...
dismantled his when attempting to find a proper pain of a fault
Yes, could well be corrosion at link joints
There is a good chance that fuse 38 is supplied from main ignition relay
So far.... fuse 38 has power, green wire from plug M to brake light switch has continuity, other greens (G) on the fuse board liven up when ign on.... Whites live also so I conclude a dying fuse box. Nice. Have given wiggling and whacking a go, pulled all plugs and refitted, same will all fuses just because.... anyway tomorrow the box comes out again but for real. A complete strip down and rebuild, bit like the Haynes manuals.... Will report.
Drat drat and double effin' drat with extra drats on top this going to be a barn door of a job
Drat drat and double effin' drat with extra drats on top this going to be a barn door of a job
Result...fixed.
Not so good with tech and its late so allow me a day or so to post up pics but.... remove fuse in passenger foot well, then if you manage to remove the fuse box without calling the fire brigade to extricate yourself from the drivers footwell then do not fear the dismantling of the box..... series of clips and prise away layer after layer. I photographed the layers but in fact the positioning of the brass parts is intuitive and pretty much fool proof, consider though that the definition of fool is subjective as demonstrated by the fact that my wife regards me as being very foolish... perhaps to the untrained eye I may be but we all know TVRs are a sound financial investment for the future so clearly I am not a fool as I own a TVR....
Back to the task, I kept each plastic dividing layer with its relevant brass parts, there was not a lot of corrosion evident but I cleaned each terminal. taking care that each layer was complete and positioned correctly I sprayed with ACF then built the next layer. Given that the brake light/reverse light feed was dead I expected to find loads of fuzz and corrosion but it looked quite good bar a couple of areas.
Awkward and time consuming, patience required but no special tools needed.
J
Sagi Badger said:
Result...fixed.
Not so good with tech and its late so allow me a day or so to post up pics but.... remove fuse in passenger foot well, then if you manage to remove the fuse box without calling the fire brigade to extricate yourself from the drivers footwell then do not fear the dismantling of the box..... series of clips and prise away layer after layer. I photographed the layers but in fact the positioning of the brass parts is intuitive and pretty much fool proof, consider though that the definition of fool is subjective as demonstrated by the fact that my wife regards me as being very foolish... perhaps to the untrained eye I may be but we all know TVRs are a sound financial investment for the future so clearly I am not a fool as I own a TVR....
Back to the task, I kept each plastic dividing layer with its relevant brass parts, there was not a lot of corrosion evident but I cleaned each terminal. taking care that each layer was complete and positioned correctly I sprayed with ACF then built the next layer. Given that the brake light/reverse light feed was dead I expected to find loads of fuzz and corrosion but it looked quite good bar a couple of areas.
Awkward and time consuming, patience required but no special tools needed.
J
That's helpful!Not so good with tech and its late so allow me a day or so to post up pics but.... remove fuse in passenger foot well, then if you manage to remove the fuse box without calling the fire brigade to extricate yourself from the drivers footwell then do not fear the dismantling of the box..... series of clips and prise away layer after layer. I photographed the layers but in fact the positioning of the brass parts is intuitive and pretty much fool proof, consider though that the definition of fool is subjective as demonstrated by the fact that my wife regards me as being very foolish... perhaps to the untrained eye I may be but we all know TVRs are a sound financial investment for the future so clearly I am not a fool as I own a TVR....
Back to the task, I kept each plastic dividing layer with its relevant brass parts, there was not a lot of corrosion evident but I cleaned each terminal. taking care that each layer was complete and positioned correctly I sprayed with ACF then built the next layer. Given that the brake light/reverse light feed was dead I expected to find loads of fuzz and corrosion but it looked quite good bar a couple of areas.
Awkward and time consuming, patience required but no special tools needed.
J
Sagi Badger said:
Result...fixed.
Not so good with tech and its late so allow me a day or so to post up pics but.... remove fuse in passenger foot well, then if you manage to remove the fuse box without calling the fire brigade to extricate yourself from the drivers footwell then do not fear the dismantling of the box..... series of clips and prise away layer after layer. I photographed the layers but in fact the positioning of the brass parts is intuitive and pretty much fool proof, consider though that the definition of fool is subjective as demonstrated by the fact that my wife regards me as being very foolish... perhaps to the untrained eye I may be but we all know TVRs are a sound financial investment for the future so clearly I am not a fool as I own a TVR....
Back to the task, I kept each plastic dividing layer with its relevant brass parts, there was not a lot of corrosion evident but I cleaned each terminal. taking care that each layer was complete and positioned correctly I sprayed with ACF then built the next layer. Given that the brake light/reverse light feed was dead I expected to find loads of fuzz and corrosion but it looked quite good bar a couple of areas.
Awkward and time consuming, patience required but no special tools needed.
J
Great resultNot so good with tech and its late so allow me a day or so to post up pics but.... remove fuse in passenger foot well, then if you manage to remove the fuse box without calling the fire brigade to extricate yourself from the drivers footwell then do not fear the dismantling of the box..... series of clips and prise away layer after layer. I photographed the layers but in fact the positioning of the brass parts is intuitive and pretty much fool proof, consider though that the definition of fool is subjective as demonstrated by the fact that my wife regards me as being very foolish... perhaps to the untrained eye I may be but we all know TVRs are a sound financial investment for the future so clearly I am not a fool as I own a TVR....
Back to the task, I kept each plastic dividing layer with its relevant brass parts, there was not a lot of corrosion evident but I cleaned each terminal. taking care that each layer was complete and positioned correctly I sprayed with ACF then built the next layer. Given that the brake light/reverse light feed was dead I expected to find loads of fuzz and corrosion but it looked quite good bar a couple of areas.
Awkward and time consuming, patience required but no special tools needed.
J
You are now a Porsche fusebox specialist with a bad back
Really am looking forward to seeing the pics
So passenger footwell, drag fuse out and nip terminals back on so wires cannot touch and zap. Phone a friend and instruct them to remove you when you get get stuck in the footwell under the steering wheel... OMG this is such a naffy location for a fuse box. Allen key/hex key to remove pedal box cover, you can flop the throttle pedal forwards easily by removing the spring pingy clips from the ball n sockets on the linkage, they will fall down and get lost..., they need a lube up anyway....19milly on the door release cable, box has a bracket that mounts here, mine has been cut by the look of things so you may need to remove the cable complete from the inside of the door... nasty... if the ring is complete.. mine isn't so it lifts off when the clamp nut is loose... result. 10milly 1/4 drive ratchet or ratchet spanner for the two that bolt in the inner wing... drop bolts into pedal box... curse... last one is a 13mm that is masked by the steering column, you can't get a good drive on this so once cracked with a spanner get a wiggly or flex drive 1/4 drive 13milly socket and whizz off, it is a nyloc so it drags... the box may drop so be ready. I pulled all the relays first, just saves getting caught.
With the box hanging satisfy yourself it is dead/no power and record plug location. To remove the plugs there is a clip on the side of each one and a long locking bar that runs centrally, pull this back so it clicks and the plugs will come out. Two bolts for the power and cable ties for the air box pressure sensor.

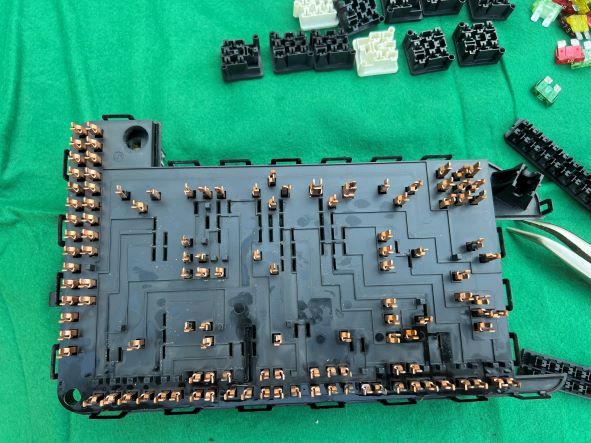
fuse box with plugs, note colours are duplicated so photo before you unplug, the fuse box does have legends, A/B etc that relate to the wiring diagram plug prefix, check colours of cables/size of cable and pin ref vs wiring diagram to be sure correct. The colour coded plugs are indexed so only fit the respective sockets but you have two choices for each...

Relays out, we all know where they go but make a note anyway... don't look at my fuses... yep most are wrong, not now.

Cover is a snap on/off jobbie, what you will find inside and the inside of the cover below


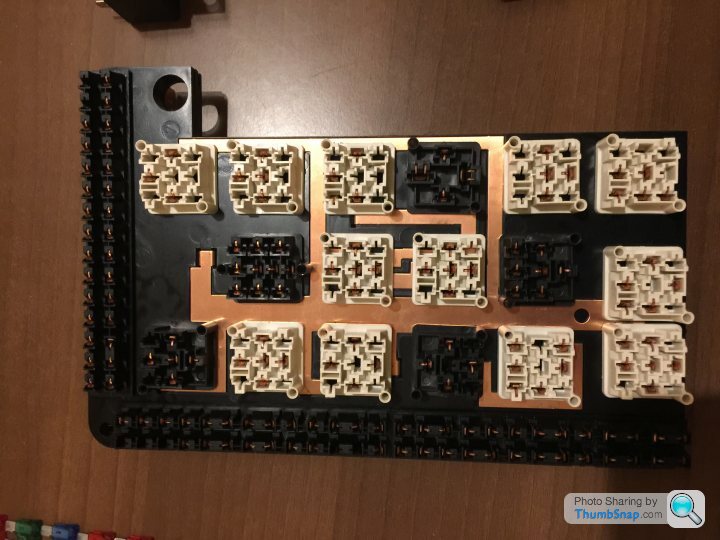
Terminal guides lift off, careful the brass parts bend easily, take a pic!!! The relay terminal guides are different, there are five different types, study the pics you will see.
Terminal guides off and you will find this, brass parts on a plastic sheet with indents to locate.... take a pic and start lifting, stack each set with the relevant plastic interlayer.

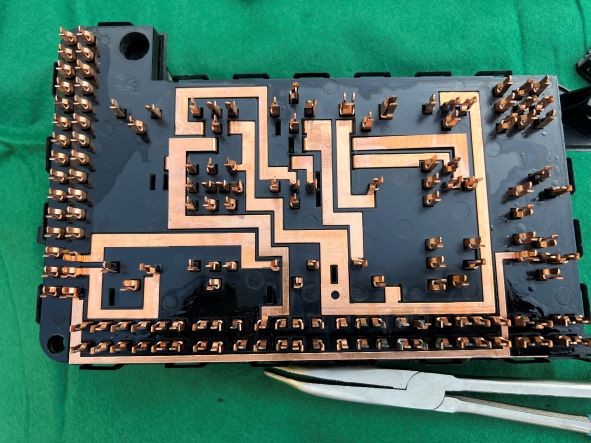
More of the same, on the plastic sheet in the corner next to the big hole a number is moulded in, this is the sheet stacking number. the brass parts are different heights as well, the further into the fuse box you get the taller they get.

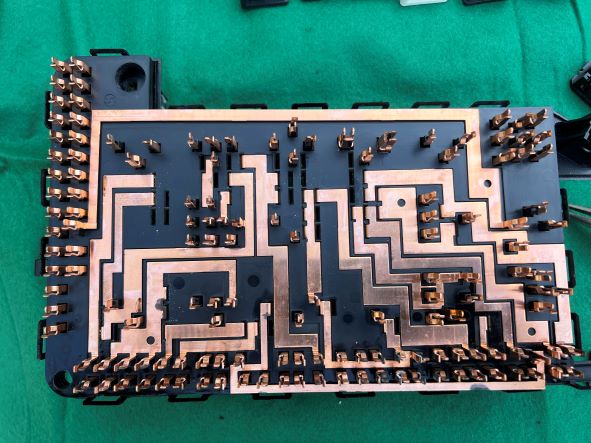


Nearly at the end, this is one layer above, frankly once you have got this far you either have records of what goes where or not, if not you will be up all night and day figuring out where the bits go.... like the Haynes manual says, 'reassembly is a reversal of dismantling'... apparently this changed in 2003 but this is an early Tusky so we will use the original Haynes quote.
I cleaned up with a blade/1000 wet n dry and applied ACF50. Only a few looked fuzzy, the rest were good but I gave each one a tweak n clean up.
So if you are mad enough to followed me this far, then have a brew and head back to the car, get all bolted up, clean out all the junk around the pedals cos we all know it make it go faster and look at what you stand on to stop these things.... anyway before you liven up fully consider using a length of fuse wire in the passenger footwell, like 20 Amp from your nans fuse box rather than the fuse that would start Frankenstein, just in case one of the brass parts has left it's track/place and is shorting out, TBH unlikely as the thing seems quite well made but safety first and of course I have never made an error.... ummh cough cough moving on... hope it works.
J
With the box hanging satisfy yourself it is dead/no power and record plug location. To remove the plugs there is a clip on the side of each one and a long locking bar that runs centrally, pull this back so it clicks and the plugs will come out. Two bolts for the power and cable ties for the air box pressure sensor.
fuse box with plugs, note colours are duplicated so photo before you unplug, the fuse box does have legends, A/B etc that relate to the wiring diagram plug prefix, check colours of cables/size of cable and pin ref vs wiring diagram to be sure correct. The colour coded plugs are indexed so only fit the respective sockets but you have two choices for each...
Relays out, we all know where they go but make a note anyway... don't look at my fuses... yep most are wrong, not now.
Cover is a snap on/off jobbie, what you will find inside and the inside of the cover below
Terminal guides lift off, careful the brass parts bend easily, take a pic!!! The relay terminal guides are different, there are five different types, study the pics you will see.
Terminal guides off and you will find this, brass parts on a plastic sheet with indents to locate.... take a pic and start lifting, stack each set with the relevant plastic interlayer.
More of the same, on the plastic sheet in the corner next to the big hole a number is moulded in, this is the sheet stacking number. the brass parts are different heights as well, the further into the fuse box you get the taller they get.
Nearly at the end, this is one layer above, frankly once you have got this far you either have records of what goes where or not, if not you will be up all night and day figuring out where the bits go.... like the Haynes manual says, 'reassembly is a reversal of dismantling'... apparently this changed in 2003 but this is an early Tusky so we will use the original Haynes quote.
I cleaned up with a blade/1000 wet n dry and applied ACF50. Only a few looked fuzzy, the rest were good but I gave each one a tweak n clean up.
So if you are mad enough to followed me this far, then have a brew and head back to the car, get all bolted up, clean out all the junk around the pedals cos we all know it make it go faster and look at what you stand on to stop these things.... anyway before you liven up fully consider using a length of fuse wire in the passenger footwell, like 20 Amp from your nans fuse box rather than the fuse that would start Frankenstein, just in case one of the brass parts has left it's track/place and is shorting out, TBH unlikely as the thing seems quite well made but safety first and of course I have never made an error.... ummh cough cough moving on... hope it works.
J
I have had a similar problem but easier fix. No break or reverse but the fuse was popping. Id sting a new one in and all was well then it would randomly pop again. It wasn't random though. If I stuck it in reverse the fuse would pop ergo the the gearbox reverse switch had shorted to the switch case > space frame. An enjoyable fix unlike yours ; )
Gassing Station | Tuscan | Top of Page | What's New | My Stuff