Horstmann heating timer - how to remove?
Discussion


Our house experiences brief power outages from time to time. The heating controller's "life-long" battery must be dead (9 years old) because it regularly displays the incorrect time, leading to cold water at bath/shower time.
Although it says "not user serviceable" I thought I'd have a looksee anyway - I'm not without some skills in the repair and replacement of PCB components - however I can't get the bloody thing off the wall. There's a baseplate which is fixed to the wall/hole in the wall onto which the controller should plug, and is secured with two screws on the top.
Removal *should* be simply the removal of the screws and a firm pull of the unit to unplug it from the baseplate, however even pulling with all my 100Kg, I'm not shifting it.
Any clues? I'd prefer not to break it as a replacement is some 90 quid, not to mention the loss of any hot water for the days it takes to turn up.
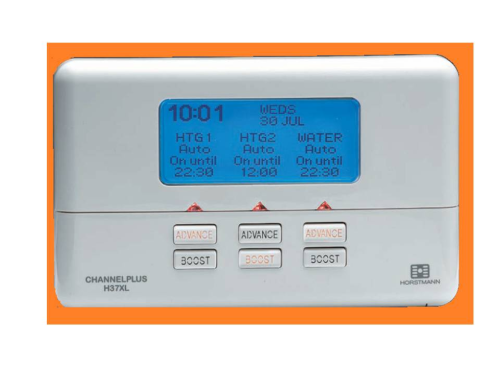
It's a Horstmann h37xl - triple "zone" - earlier type like this:
Thanks,
Although it says "not user serviceable" I thought I'd have a looksee anyway - I'm not without some skills in the repair and replacement of PCB components - however I can't get the bloody thing off the wall. There's a baseplate which is fixed to the wall/hole in the wall onto which the controller should plug, and is secured with two screws on the top.
Removal *should* be simply the removal of the screws and a firm pull of the unit to unplug it from the baseplate, however even pulling with all my 100Kg, I'm not shifting it.
Any clues? I'd prefer not to break it as a replacement is some 90 quid, not to mention the loss of any hot water for the days it takes to turn up.
It's a Horstmann h37xl - triple "zone" - earlier type like this:
Thanks,
Try pivoting it from the top rather than pulling it straight forward.
http://www.horstmann.co.uk/files/1713/9867/2108/in...
http://www.horstmann.co.uk/files/1713/9867/2108/in...
Thanks - I read that earlier but even trying that suggestion feels like I'm pulling the baseplate off the wall too.
There must be something snagging. It's never been removed before. I had to remove plaster from the groove/slot of the two screws from when the house was built (9 years ago).
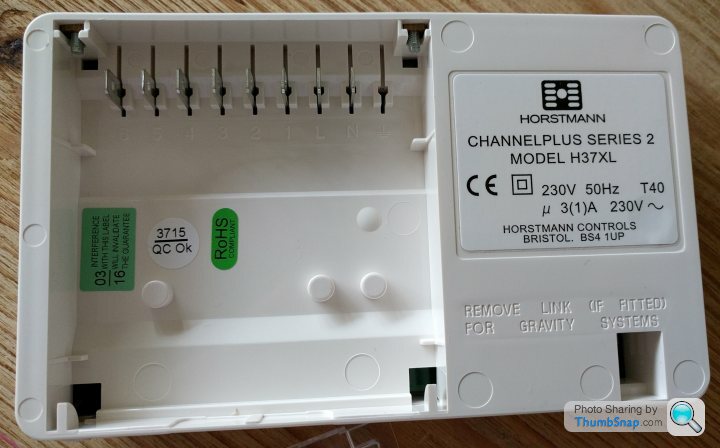
If I could see how the two parts go together, I might work out where it's snagging. I couldn't find a suitable diagram or picture of the parts though.
There must be something snagging. It's never been removed before. I had to remove plaster from the groove/slot of the two screws from when the house was built (9 years ago).
If I could see how the two parts go together, I might work out where it's snagging. I couldn't find a suitable diagram or picture of the parts though.
Hi all - no I haven't managed to remove it. Gave up after failing last time but it's more urgent now because the timer needs resetting almost daily now.
Will have another go when the need for heating diminishes in a month or so. Wife wouldn't be happy if I broke it at the moment.
I can see how and have previously removed the screws but is stuck fast.
Will have another go when the need for heating diminishes in a month or so. Wife wouldn't be happy if I broke it at the moment.
I can see how and have previously removed the screws but is stuck fast.
Should just release at the top edge once the two screws are loosened. Maybe it's stuck with tile adhesive/silicone? I'd have a look on ebay for used timers before using too much force - the backplate should be standard to all Horstmanns, maybe other manufacturers as well, so a single channel backplate should be ok as a replacement for example.
andy43 said:
Should just release at the top edge once the two screws are loosened. Maybe it's stuck with tile adhesive/silicone? I'd have a look on ebay for used timers before using too much force - the backplate should be standard to all Horstmanns, maybe other manufacturers as well, so a single channel backplate should be ok as a replacement for example.
You're spot-on with trying to mitigate any breakages during removal.There's nothing visible stopping its removal. I've tried levering it away to no avail. If I pull hard, the box it's attached to in the wall starts to move too, and that's only fixed within a partition wall so it may not be as firmly implanted as need for the amount of force required.
I'll have another look. Thanks.
andy43 said:
Another option if you do bugger it would be a single channel timer in it's place to run the hot water, then control the two heating circuits from prog room stats on each floor if possible. 3 channel timer is a weird one - I know Honeywell don't do one anyway.
Honeywell used to do programmers up to 4 or 5 zones, I think - now they seem to go with wireless room stats as you suggest. I know I have a (broken!) 4 channel Honeywell programmer sitting in the garage somewhere. Handy for some circumstances, but as you say, room stats are really the way forward these days for lack of complexity and wiring.What I really want to do is to install a NEST in place of the two thermostats, and a single timer for the water but I don't yet understand what wiring my system employs and how I might convert that for NEST.
For instance, I *hope* the cabling to each thermostat allows for me to install the NEST power supply (supplies?) in the hot tank cupboard (where the timer currently lives) and power each thermostat (remotely) that way.
I also don't really understand how each of the two-way valves operate - whether the timer "job shares" between the two zones and whether two NEST thermostats can replace that functionality. Or if each thermostat demands heat and the timer is on for each zone, both valves just open and they get served with hot water equally.
I'm sure it's not that complex but I like to know how things work in my head before I spend the cash. I know that a new 2 zone Horstmann is only £90-ish but I would rather throw that into a NEST solution really. Or repair the existing timer. It's only likely to require a soldered-in battery of some sort, I'd have thought.
Anyway, I'll have another look this weekend. Thanks again.
I'm at a loss.
There seems to be 3 parts:

By pulling outward and generally downward I can clearly see the single wall box because I am dragging that towards me too. It is not separating from the main unit or the stand-off.
I can get a screwdriver between the wall box and the stand-off but there's no way they are going to separate without my breaking one of them.
I am wondering if the stand-off comes away from the main unit. I can pull the main unit away from the stand-off enough to get a screwdriver into the gap but it's not coming away consistently - only where I exert pressure so much that the plastic deforms.
The clock is now not running at all. It allows me to set it for current time but it doesn't move on any more.
I think I should order a new unit, see how it's supposed to work, then break the old one off the wall.
There seems to be 3 parts:
- The main unit
- A piece of plastic which may act as some sort of stand-off or interface - it's the piece that has the 2 screws in the top (not any more though). I suspect this is integral to the main unit - I only mention it because it is a separate moulding
- A single wall box, of the drywall or plasterboard variety
By pulling outward and generally downward I can clearly see the single wall box because I am dragging that towards me too. It is not separating from the main unit or the stand-off.
I can get a screwdriver between the wall box and the stand-off but there's no way they are going to separate without my breaking one of them.
I am wondering if the stand-off comes away from the main unit. I can pull the main unit away from the stand-off enough to get a screwdriver into the gap but it's not coming away consistently - only where I exert pressure so much that the plastic deforms.
The clock is now not running at all. It allows me to set it for current time but it doesn't move on any more.
I think I should order a new unit, see how it's supposed to work, then break the old one off the wall.
As others have said, the front is located on two lugs at the bottom of the backplate and hinges down from the top - you'd normally just pull the top towards you. I suppose it wouldn't tale much for a bit of plaster to run in there and stick it.
The programmer is one piece - there's no stand-off.
If you are poking around with a screwdriver, make sure the system is isolated - there are live terminals near the top edge.
The programmer is one piece - there's no stand-off.
If you are poking around with a screwdriver, make sure the system is isolated - there are live terminals near the top edge.


Dogwatch said:
Even if you had been able to access the back of the old one it doesn't look as if you would have been able to access the battery without 'serious leverage' anyway.
No - there's definitely no elegant way in. I'll get the new one working then see if I can make an entry-point somehow with the old one... in the name of science, of course.Dogwatch said:
The reluctance of the old unit to come off the backplate just doesn't make sense. Please keep us posted!
Agreed. Weirdness abounds. I'll get my son to video the "break in". I expect the timer/controller will remain in place while my house falls down around my ears. 
Sheepshanks said:
You can see why I said be careful where you're sticking the screwdriver!
Yes, LOL. I have replaced a timer in my old house but it didn't have one of these removable backs. Nice to see where the dangerous/live bits are.Regardless, I've had my mains-shock already this month (replaced some light fittings in the hall and landing, and new light switches in the garage), so I'm back to being careful again. The power will be off when I rip this mofo off.
Sheepshanks said:
I'd be interested to know the outcome, too. I wonder if it's simply that the wiring box isn't firmly fixed, so is moving and not allowing the programmer to "snap" away from the backplate.
The amount of effort I've put into it is just shy of breaking the plastic itself - I can hardly imagine how the builders installed it. The wall box that the "plate" screws to is in danger of being pulled through the plasterboard. If the "plate" were slightly out of alignment and just hooked on the main unit, it should have come away by now.Curious, eh? I'll report back.
Sorted it.
Turned off the leccy, stuck a "bladed" lever into the top (it's a wide pry-bar I'd previously ground to a flat edge) and woofed it off the wall. No more damage to anything although I did need to fill and strengthen the partitioning wall around where my previous attempts had ruined the structure.
The heating controller was held in place by nothing more than the electrical blade connectors. But it need that leverage - very surprising.
Fitted new one and was slightly irked that the LCD screen on the new one is damaged - faded in places making it hard to read. However the supplier has already accepted the fault and will swap it for me.
So there you go. It's given me some confidence to look at the Heatmiser wifi-connected thermostats next.
Thanks all.
Gassing Station | Homes, Gardens and DIY | Top of Page | What's New | My Stuff