Good 3D printing companies
Discussion
Can anyone recommend good 3D printing providers?
I am designing a case for my Raspberry Pi, to fit a certain screen and there are so many options for getting online quotes and having the model printed, that I don't know which to pick.
Would be looking at FDM or maybe SLS. I don't mind optimising the design for a particular process to minimise supports etc.
I use 3dpeople. Never really thought about optimizing the model and I’ve had some very tightly tolerances odd shaped bits made. Just tick the options send em the file and the bits are with you a week or so later. Deffo go for the vibro finish, you’d not know it has been printed wfrom the resultant surface.
I'd buy a cheap PLA printer, if you're playing with simple CAD software to do a case then there's bound to be other stuff you might want to print, and it won't take many bits to make it cheaper than using a printing company.
Also bear in mind it's unlikely to be right first time, you'll find bits you want to change the design on. Printing your own stuff is fun.
Also bear in mind it's unlikely to be right first time, you'll find bits you want to change the design on. Printing your own stuff is fun.
Hammersia said:
I'd buy a cheap PLA printer, if you're playing with simple CAD software to do a case then there's bound to be other stuff you might want to print, and it won't take many bits to make it cheaper than using a printing company.
Also bear in mind it's unlikely to be right first time, you'll find bits you want to change the design on. Printing your own stuff is fun.
Disagree on buying a cheapie, the results are, well, cheapy difference compared to a pro print with finishing is immense. Prices from 3dpeople aren’t that high and is a better way imo to get started toward buying your own setup. Also bear in mind it's unlikely to be right first time, you'll find bits you want to change the design on. Printing your own stuff is fun.
shirt said:
I use 3dpeople. Never really thought about optimizing the model and I’ve had some very tightly tolerances odd shaped bits made. Just tick the options send em the file and the bits are with you a week or so later. Deffo go for the vibro finish, you’d not know it has been printed wfrom the resultant surface.
Out of interest how would you rate their costs? you can get a quote easily on their website, upload the file and check the options and quantities. the cost for the parts i had printed were less than those from lotus themselves, only stronger. was about 50-60quid for everything i needed, including some tightly toleranced ball/socket joints, so was very pleased on price.
So this is my current design...
It's a 5" touchscreen, the Raspberry Pi screws to standoffs on the screen, and in turn there are standoffs that mount the assembly to the base. There is a 0.5mm gap between the cover and the touchscreen. Not sure if that is only required for resistive rather than capacitive touchscreens.
The case and cover have a shadow line, and the cover is attached to the base with (currently) self tapping screws... But I might see if I can design an insert in.
I have gone a bit mad with the iso grid for ventilation, might reduce that.
All walls are 2mm to 3.5mm. there is one area by the usb-c and hdmi ports that is 1.5mm. The overhang on the shadow line is 0.5mm but I was thinking of changing that to 1mm incase it is hard to make a 0.5mm feature.
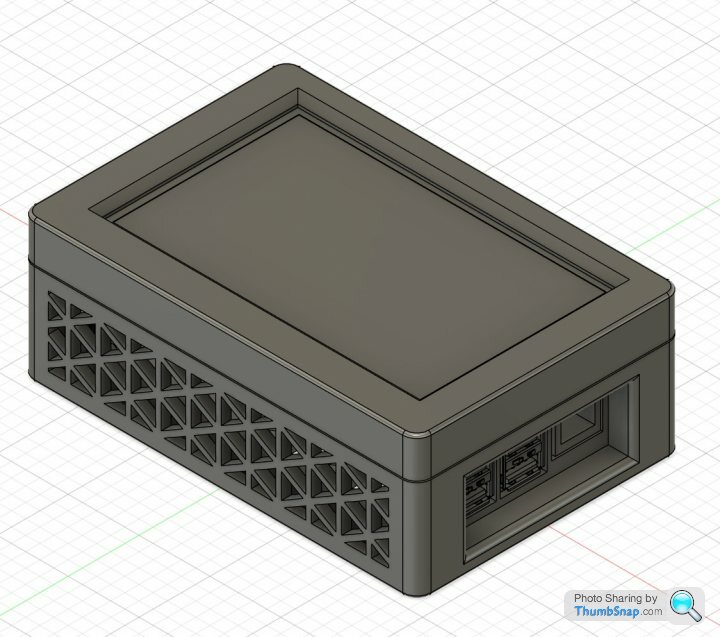
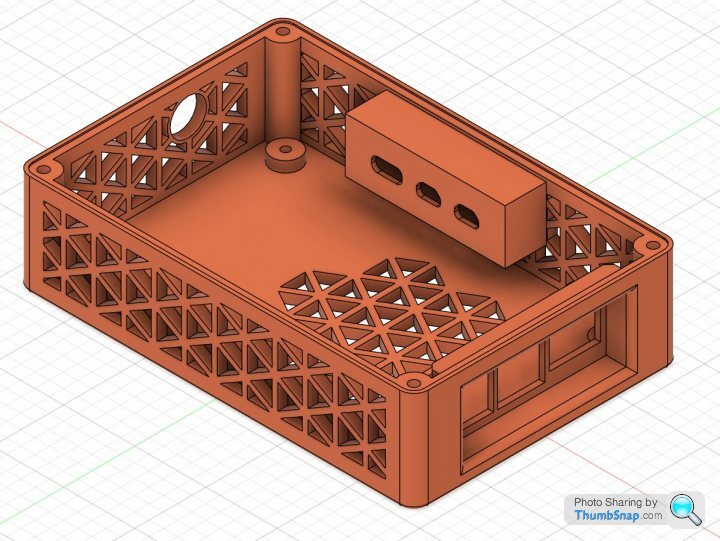


One thing to bear in mind when designing something to be 3d printed, even though you're always going to want what you want, is to try and make the design as sympathetic to the way it's being made as you can. You have a lot of overhangs there. I'm not suggesting it's not possible by any means but the less overhangs/unsupported elements you have and the less supports are required the better the quality will be.
If you could make the vented areas on the flat faces it would turn out much better, for example, because the case could be printed on it's back face, and the top cover printed flat too.
If you could make the vented areas on the flat faces it would turn out much better, for example, because the case could be printed on it's back face, and the top cover printed flat too.
Edited by Yazza54 on Monday 19th February 21:54
Yeah I did run it through a slicer and the grids on the side and the usb-c and hdmi recess all need supports.
I could make the base have the holes across the full surface and the sides solid. I could then put some feature under the usb-c / hdmi socket recess so that doesn't need supports. Maybe some large radius inside the recess so it appears pill shaped but also doesn't need internal supports there.
For the Ethernet and usb-A ports I think that will just need supports.
To be fair I probably won't be pushing the pi 5 so overheating won't be a problem... It's total overkill for my project (running a simple python script to display bus departure board for the stops at either end of my my street), but I will basically have a full computer in a box that I can do something with.
I can see me getting a Pi Zero next to run this project and finding other uses for the Pi 5!! Then having to make another custom case for the Pi Zero and screen / battery combo.
I guess if I splash for SLS printing I don't need to think about it.
Shirt - Interesting to hear about the vibro polishing 3Dpeople offer. Did you use the grey material or dye it black? Any pics of finished products?
Edited by Glade on Monday 19th February 22:17
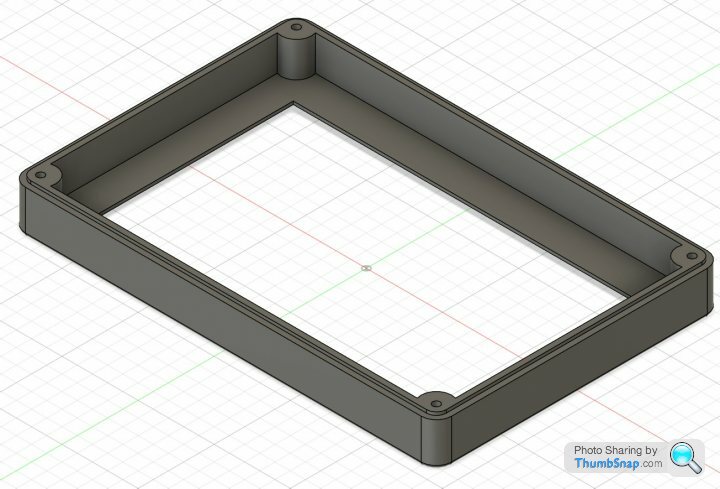
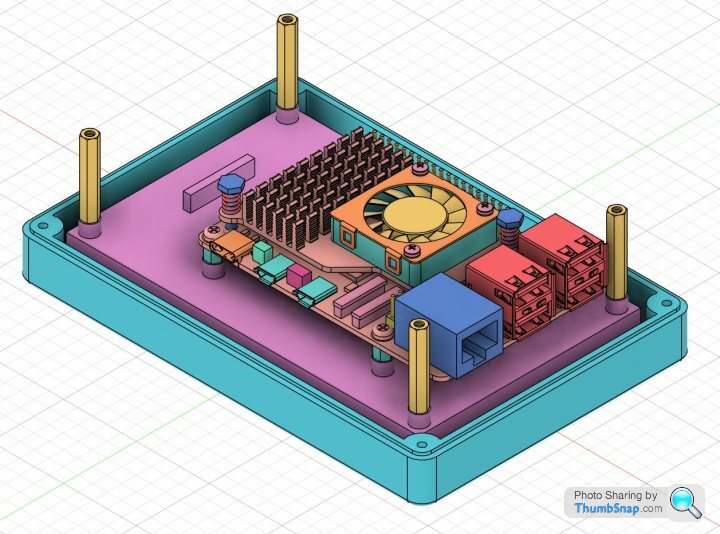
This is the cover:
With the screen and Pi assy:
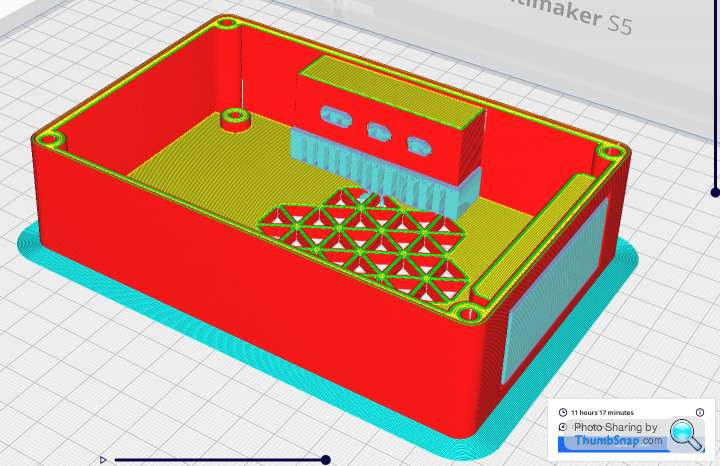
With side ventilation removed supports look like this:
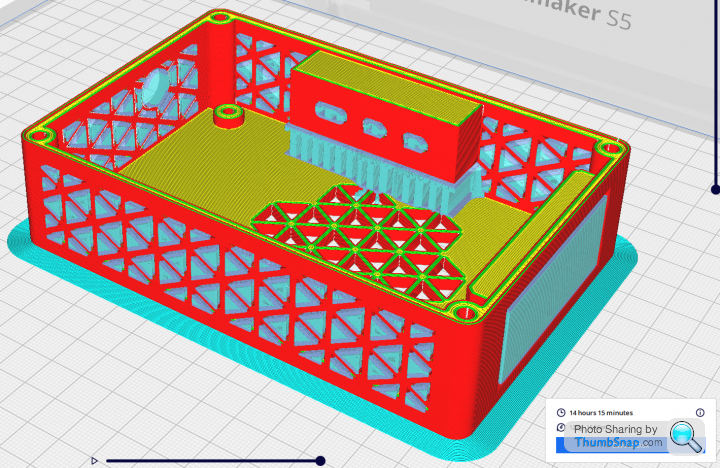
Previously it did need all of this support:
This is cool, I like playing about with it!!
I just picked a random 3D printer for the slicer to work with - is 11 hours typical for a print. Sounds like a long time where something could go wrong!!

With the screen and Pi assy:

With side ventilation removed supports look like this:

Previously it did need all of this support:

This is cool, I like playing about with it!!
I just picked a random 3D printer for the slicer to work with - is 11 hours typical for a print. Sounds like a long time where something could go wrong!!
Glade said:
This is the cover:

With the screen and Pi assy:

With side ventilation removed supports look like this:

Previously it did need all of this support:

This is cool, I like playing about with it!!
I just picked a random 3D printer for the slicer to work with - is 11 hours typical for a print. Sounds like a long time where something could go wrong!!
Cool, does depend a bit on the slicer settings, it's quite surprising the overhangs you can get away with in reality, easily 60 degrees on my Kobra Max printer.
With the screen and Pi assy:

With side ventilation removed supports look like this:

Previously it did need all of this support:

This is cool, I like playing about with it!!
I just picked a random 3D printer for the slicer to work with - is 11 hours typical for a print. Sounds like a long time where something could go wrong!!
But this is why I say to get your own cheap printer, at least for prototyping purposes, even if you want a perfect surface finished case later. Instant gratification, you can stop the print after an hour if it's not turning out how you want it.
Just more fun than waiting a week for something that for unforeseeable reasons might turn out a bit meh.
Gassing Station | Computers, Gadgets & Stuff | Top of Page | What's New | My Stuff


