CAN-Bus / Hall effect motor control queries
Discussion


Hello,
I’m building a Toylander (electric toy Land Rover) and have scavenged some motors, batteries and a motor speed controller box (a PG Drives VR2) from an electric wheelchair. The chair’s joystick, buttons and charging socket all communicate with the VR2 unit via a 4-pin CAN-Bus. AIUI, the outer pins are Ground and +24V, and the inner two pins are TX/RX.
What I’d like to do is have an accelerator pedal where deflection controls the speed, a forward/reverse switch, and a speed limiter of some sort as the inputs. Maybe a remote kill switch as well if that’s not too much extra complexity. I have some A-level electronics which might still be in my brain somewhere after all these years, a multimeter, and a Raspberry Pi 2 which is pretty much unused - can I do what I want to do? I’m not quite sure where to start if so. Are there companies who could do this kind of thing for me without adding thousands to the build cost?
Any experience that can shed any light on this idea would be gratefully received, thanks
I'd say a raspberry PI probably wouldn't be my first choice as CAN uses interrupt service routines, whereas the PI will be running an operating system and won't be able to service the interrupts in a timely manner. You can get devices that you can I2C or SPI to from your PI such as the piCAN2 module which should work, but as you are using a PI to control it, and not a microcontroller I would say this is going about it in the wrong way as it's highly likely that the message priority will be out (set by the CAN-ID). In the electronics world, it's quite common for people to use an 8051, or more recently for projects like yours, arduino microcontrollers seem better.
There are various arduino can shields (eg lookup sparkfun) that you can either purchase or build yourself if you are keen. You will need to figure out baud rates for the bus etc, but that should be straightforward. The main difficulties I have faced have been around encryption of some CAN systems, and this has made it impossible to read out data in some circumstances. (much easier if you are running the TX / RX yourself for all of the CAN nodes, and generally fairly easy on older systems). The Arduinos seem to be a good approach, and there is a large amount of information and libraries (open source) when compared to the PI. Remember neither the PI or the arduino are particularly ruggedised electronics, and can be sensitive to vibration etc in a vehicle. You'll probably be fine, but do use AV mounts, and do ensure they are well protected (I have used both on vehicles in the past, but they are really not designed for say the harshness of motorsport)
Another thing is can networks can be very sensitive to the wiring used, number of twists per meter of wire, sheathing and type of wire, and also termination of the can bus wires. For instance, if you are splicing off, distances may need to be short, or if you are extending from the end, then don't forget termination resistors. (taking twisted pairs out of ethernet cables is usually a decent back of the garage option)
PS. what's a toylander? That sounds like an impressive bit of kit to need CAN-Bus in a toy car !
Also CAN bus by definition I think runs on TTL so 5V. (make sure you get the 24V pins correct to save damage, and also ensure the GND's are common between each node, I've had my fair share of earth problems before)
Edited by LeftLake on Friday 21st May 01:43
So there is already a working CAN system in operation between all these components?
You have a few options.
1) To replace the CAN joystick unit with a CAN pedal you will need to spy on how the joystick CAN comms works in a working system.
Record and analyse the CAN data as you operate the controls etc etc Is it bidirectional? Is it encrypted? Quite tricky but doable.
Then build your own CAN gadget to replicate the comms/functions as required.
2) Investigate inside the joystick unit and possibly hack into the forward control pot/buttons of the joystick.
If it's a simple linear resistive pot then have a change over piggyback switch to your pedal with the same pot value etc.
3) Buy a simple chinese electric bike/gokart type motor controller setup from flebay
Post some decent pics of the units and their innards for some more sneaky ideas.
Personally I would quickly sniff the CAN bus in case it is really simple, if not then move to option 2 or 3.
LeftLake: Thanks for such a detailed response, there’s loads of helpful stuff there for me to dig into. A Toylander is a small wooden/MDF model of an early Land Rover: www.toylander.com . It isn’t massively sophisticated - the CAN aspect comes from the drivetrain I’m trying to use for it. The factory build manual is quite a simple setup, but the drivetrain from them costs ~£1000, whereas the wheelchair I’ve bought cost me £350.
The “saving money” aspect runs aground slightly at this point, where I don’t really have the first clue how to control the wheelchair’s speed controller in the way I want to, because it uses CAN, and I have no idea what I’m doing on that front! Hence asking on here to try and gauge how big a hole I’m trying to dig for myself...
I think I thought that because the control pad has faster/slower buttons, and a forward/reverse switch (I.e. the joystick), that I’d be able to wire in different components to achieve what I wanted. When I actually got the thing and saw how few connections there were, and how much microelectronics were involved, I realised that I had been a bit naive. If there’s something a lot more obvious that I may be completely ignoring, then do suggest it - I’d be really grateful for having my life made simpler.
Peterperkins: Again, thanks for the reply and ideas. I don’t have a long enough Torx T10 to open up the controller, but once that arrives I’ll post some pictures.
I forgot to say, but the motors have electro-mechanical/electro-magnetic brakes fitted to them, which might complicate things still further. I think they can be removed, and I could then use the traditional friction braking system from the plans, but if I can hang onto them it probably saves me a job/ some welding.
The “saving money” aspect runs aground slightly at this point, where I don’t really have the first clue how to control the wheelchair’s speed controller in the way I want to, because it uses CAN, and I have no idea what I’m doing on that front! Hence asking on here to try and gauge how big a hole I’m trying to dig for myself...
thebraketester said:
Looks like a complicated solution to an ‘easy’ problem.
I’m sure you’re right - I’m just trying to work out if I can work with what I’ve already purchased, or if I’m going to end up going down a rabbit hole that I will wish I hadn’t in the future.I think I thought that because the control pad has faster/slower buttons, and a forward/reverse switch (I.e. the joystick), that I’d be able to wire in different components to achieve what I wanted. When I actually got the thing and saw how few connections there were, and how much microelectronics were involved, I realised that I had been a bit naive. If there’s something a lot more obvious that I may be completely ignoring, then do suggest it - I’d be really grateful for having my life made simpler.
Peterperkins: Again, thanks for the reply and ideas. I don’t have a long enough Torx T10 to open up the controller, but once that arrives I’ll post some pictures.
I forgot to say, but the motors have electro-mechanical/electro-magnetic brakes fitted to them, which might complicate things still further. I think they can be removed, and I could then use the traditional friction braking system from the plans, but if I can hang onto them it probably saves me a job/ some welding.
https://www.csselectronics.com/screen/page/simple-...
Your best bet is to use a decoder to decrypt the signals and see how your motor unit works.
It's unlikely to be that complex.
In the short term though, just buying something that already works will probably save you a lot of time and effort.
Your best bet is to use a decoder to decrypt the signals and see how your motor unit works.
It's unlikely to be that complex.
In the short term though, just buying something that already works will probably save you a lot of time and effort.
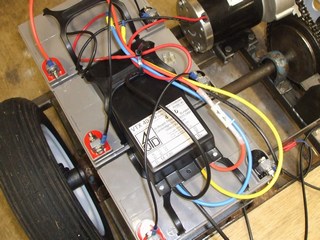
Well, my long thin Torx screwdrivers arrived and I finally got around to cracking the joystick unit open. I don't have a bench power supply or any test connectors so I'm limited to poking about inside and doing continuity tests on the connectors at the moment.

This is what it looks like inside. What I've discovered is that the signal to the motor control unit only seems to be done using the white wire in the picture. There are four pins on the plug which connects to the motor box. One (yellow) seems to be to do with battery charging since it isn't connected to the joystick unit at all, one is the white wire, and the other two are the +ve (red) and gnd (black) wires. The purple and green wires are only used for the lighting circuit.
The joystick itself has an eight wire ribbon cable connecting it to the PCB. I had hoped that this would be a simple case of switches for detecting forward, back, left, right movements - eight wires and therefore four "switches". Deflecting the stick does not generate any continuity across any of the pins on the PCB though, so I have to assume it's a more complicated system. I can't seem open it up to investigate further without worrying about destroying it.
I'm struggling to understand how one signal wire could provide information for driving two motors. I'm sure it's possible, but it seems a sophisticated way of doing something quite basic. There's some component connected in line on the white wire, which is neatly heat-shrinked, and I have no idea what it might be for.


Any ideas?
This is what it looks like inside. What I've discovered is that the signal to the motor control unit only seems to be done using the white wire in the picture. There are four pins on the plug which connects to the motor box. One (yellow) seems to be to do with battery charging since it isn't connected to the joystick unit at all, one is the white wire, and the other two are the +ve (red) and gnd (black) wires. The purple and green wires are only used for the lighting circuit.
The joystick itself has an eight wire ribbon cable connecting it to the PCB. I had hoped that this would be a simple case of switches for detecting forward, back, left, right movements - eight wires and therefore four "switches". Deflecting the stick does not generate any continuity across any of the pins on the PCB though, so I have to assume it's a more complicated system. I can't seem open it up to investigate further without worrying about destroying it.
I'm struggling to understand how one signal wire could provide information for driving two motors. I'm sure it's possible, but it seems a sophisticated way of doing something quite basic. There's some component connected in line on the white wire, which is neatly heat-shrinked, and I have no idea what it might be for.
Any ideas?
Prawo Jazdy said:
I'm struggling to understand how one signal wire could provide information for driving two motors. I'm sure it's possible, but it seems a sophisticated way of doing something quite basic.
My understanding is that this is exactly the benefit of CANBUS - minimising the number of physical wires between components and therefore saving weight etc. The signal to drive one motor will be different from the signal to drive the other and so is "ignored" by the motor it doesn't apply to. I'm very likely wrong btw....
Probably not CANBUS as that uses differential signalling over a two wire 120 ohm bus.
Might be serial, you will need to scope/logic analyse/capture the signal if you go down that route.
The joystick has a barcode, have you scanned that/searched on the numbers for similar setups.
You can probably find the specs for it.
Might be serial, you will need to scope/logic analyse/capture the signal if you go down that route.
The joystick has a barcode, have you scanned that/searched on the numbers for similar setups.
You can probably find the specs for it.
It’s got a code number (D51422.1), which apparently is a MAID II joystick.
https://refreshmobility.com/product/maid-ii-j-stic...
On sale for £340! I paid that for the whole wheelchair. I’m trying to find a bit more info on it.
https://refreshmobility.com/product/maid-ii-j-stic...
On sale for £340! I paid that for the whole wheelchair. I’m trying to find a bit more info on it.
Prawo Jazdy said:
..
The joystick itself has an eight wire ribbon cable connecting it to the PCB. I had hoped that this would be a simple case of switches for detecting forward, back, left, right movements - eight wires and therefore four "switches". Deflecting the stick does not generate any continuity across any of the pins on the PCB though, so I have to assume it's a more complicated system. I can't seem open it up to investigate further without worrying about destroying it.
..
The PCB-interface from the joystick is where you can get a quick result: the joystick might as well have potentiometers or rotary encoders instead of switches. Both are easy to replace to create an accelerator pedal.The joystick itself has an eight wire ribbon cable connecting it to the PCB. I had hoped that this would be a simple case of switches for detecting forward, back, left, right movements - eight wires and therefore four "switches". Deflecting the stick does not generate any continuity across any of the pins on the PCB though, so I have to assume it's a more complicated system. I can't seem open it up to investigate further without worrying about destroying it.
..
I've managed to discover a bit more about this topic, but am still left scratching my head. I wanted to try and ignore the whole CAN/other communication side of things, and try to just change the input at the joystick to achieve what I want (rather than trying to communicate with the motor speed controller, just mimic the joystick inputs at the joystick control unit, as the poster above suggested). Ideally this would mean plugging a pedal into the joystick cable, and carry on, but it's obviously not going to be as simple as that, because the joystick moves in more axes than a pedal.
The person in the video below took the same joystick apart (saving me the bother - I tried and was worried I was going to destroy it) and was left none the wiser about how it operates. It appears to be Hall effect, presumably registering a change in the direction of the magnetic field to monitor the stick movement.
https://youtu.be/fC17vArXfLo?t=944
I bought some connectors so that I could add another plug to the ribbon cable from the joystick to the PCB, and then was able to plug some jumper wires from that into a breadboard, so that I could see what voltages were registering from the joystick as it was being moved.


The joystick part of the circuit runs on 5V. This is quite confusing, but the voltage from four pins seems to vary from a neutral value of 2.5V, to anywhere between 3.9V and 1.1V with full deflection of the stick. So, in one case, full forward stick = 3.9V, and full reverse = 1.1V. For another pin, full left = 3.9V, full right = 1.1V, and so on. So the "peak" voltage seems to move by 90 degrees depending on which pin you're monitoring.
How I would provide this signal I'm not sure. Using bits from an Arduino starter kit I tried rigging up a voltage divider so that I was getting 3.9V out, and then feeding that into one of the pins to see what happened, but as soon as I wire it up, the voltage changes because I'm changing the resistance in the circuit by adding more stuff. I managed to get one of the motors moving very slowly using a potentiometer in this bridge, but the controller detected an error when I tried to speed the thing up. If I remove the joystick to prevent that contributing confusing signals, the controller won't turn on because it detects an error.
I think my next step is to make a circuit that takes power from the ribbon cable rather than the breadboard, and see if I can get the controller turned on without the joystick attached, and then I can try feeding in different inputs from there.
...or I could just buy a controller from these people https://www.4qd.co.uk/product/dno/ . But then I lose the lighting controls, variable top speed control, charging port, battery state display etc which are all part of the joystick control pad, which seems a shame given I've paid money for them and they're all designed to work together.
The person in the video below took the same joystick apart (saving me the bother - I tried and was worried I was going to destroy it) and was left none the wiser about how it operates. It appears to be Hall effect, presumably registering a change in the direction of the magnetic field to monitor the stick movement.
https://youtu.be/fC17vArXfLo?t=944
I bought some connectors so that I could add another plug to the ribbon cable from the joystick to the PCB, and then was able to plug some jumper wires from that into a breadboard, so that I could see what voltages were registering from the joystick as it was being moved.
The joystick part of the circuit runs on 5V. This is quite confusing, but the voltage from four pins seems to vary from a neutral value of 2.5V, to anywhere between 3.9V and 1.1V with full deflection of the stick. So, in one case, full forward stick = 3.9V, and full reverse = 1.1V. For another pin, full left = 3.9V, full right = 1.1V, and so on. So the "peak" voltage seems to move by 90 degrees depending on which pin you're monitoring.
How I would provide this signal I'm not sure. Using bits from an Arduino starter kit I tried rigging up a voltage divider so that I was getting 3.9V out, and then feeding that into one of the pins to see what happened, but as soon as I wire it up, the voltage changes because I'm changing the resistance in the circuit by adding more stuff. I managed to get one of the motors moving very slowly using a potentiometer in this bridge, but the controller detected an error when I tried to speed the thing up. If I remove the joystick to prevent that contributing confusing signals, the controller won't turn on because it detects an error.
I think my next step is to make a circuit that takes power from the ribbon cable rather than the breadboard, and see if I can get the controller turned on without the joystick attached, and then I can try feeding in different inputs from there.
...or I could just buy a controller from these people https://www.4qd.co.uk/product/dno/ . But then I lose the lighting controls, variable top speed control, charging port, battery state display etc which are all part of the joystick control pad, which seems a shame given I've paid money for them and they're all designed to work together.
Edited by Prawo Jazdy on Monday 2nd August 16:22

You could possibly try one of these cheap little scopes, although I'm not sure if the bandwidth would be sufficient to 'see' the PWM (if present).
https://www.amazon.co.uk/DSO-Shell-Oscilloscope-DS...
https://www.amazon.co.uk/DSO-Shell-Oscilloscope-DS...
Gassing Station | Computers, Gadgets & Stuff | Top of Page | What's New | My Stuff