Depressurise fuel system on X250 3.0Dv6
Discussion


Hi, I'm about to embark on changing the inlet manifolds on my 3.0d 2012 XF, but I'm struggling at the first hurdle. I've removed F25 in the rear fuse box to depressurise the fuel system, but it's been idling for 15 minutes, with no sign of stopping. Engine codes read that the fuel lift pump is not responding, so I think I've got the right fuse. Is there some other process I'm missing.

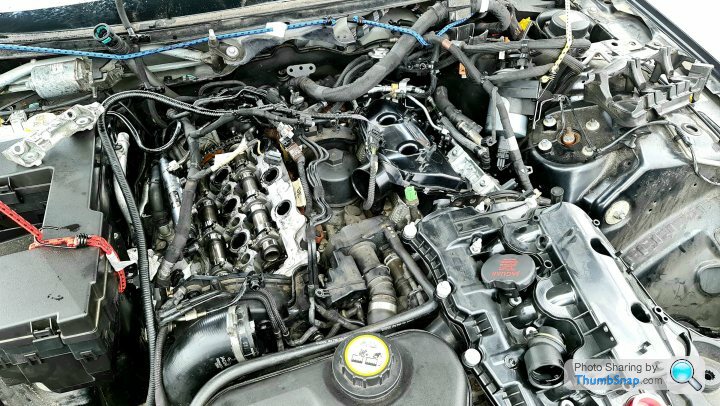
I originally planned 2 days, and ended spending 4 days on it. A lot of time lost to staring into the engine bay, and thinking that surely I didn't need to take off the such and such, rather than just getting on and pulling the engine apart.
Most of the quotes were between £2,200 to £2,500, and most garages didn't even want to quote. Think I spent around £500 on parts, and another £80 on tooling. The new inlet manifolds were pattern parts from ebay with new bolts and gaskets. The fuel injectors kits were official, but off ebay. The throttle body seals were from dealer spares, as was the replacement oil separator breather pipe, which fragmented during disassembly.
Tools I purchased was a slide hammer injector removal kit, and flat ring ratchets, some smaller deep sockets (8 and 10mm for the large part), and a digital torque meter.
Reassembly is easier than disassembly, and the drivers side was easier than the passenger side. You will probably need to remove the drivers side bulkhead under the fusebox, coolant system partially emptied to allow removal of top pipes. EGR valves, timing cover and fuel rails just need loosening just enough for access.
I followed the sandwich bag route of photographing everything I took off, and placing bolts in a labelled sandwich bag. I ended up with around 40 sandwich bags of various fittings, I would never have been able to keep track of disassembly without them. Then I followed the photographs and sandwich bags in reverse for assembly.
Lots of cleaning along the way, another £30 on EGR cleaner, airbox cleaner, electrical contact cleaner, ultrasonic batch detergent, and fuel system cleaner for after. So much carbon and oil throughout. The EGR tubes going into the throttle body needed a stanley knife to clean up before the 4 holes were visible, then clean up with EGR cleaner. The fuel injectors needed the slide hammer to release, but just slid out once lifted. Again, label the injectors as you take them out, write the middle section of the serial number on the bag. Looking into the engine, 1,2,3 on the left, 4,5,6 on the right. I gave them an ultrasonic bath with cleaner to open up the injectors again.
It took around a minute and a half of turning over before the fuel came back in, but straight back to normal running. Better even, some of the tractor sound on tick over gone, and throttle response seemed significantly better. Gave it some grief straight away. Found a layby and accelerated hard from standing to fast enough. Inlet manifold up to 23.7psi with no issues or codes. first and second turbo kick in was clear.
Highly recommend the Autel service tool and app. I carried out a forced EGR regen, as the DPF had been upset by running in RP for a while. Happily reduced down to 4gm.
It is at 119k currently, and it had been on my mind to replace it, due to concern over the inlets. Now it has had the timing belt done and both inlet manifolds, I am probably going to keep for quite a while. The service book is full now, so I will probably move to servicing myself with the official spares now. It was an experience, but it did run on the otherside. There was a moment, when I was surrounded by 3 metric ton of plastic mouldings and the top half of the engine, where I was thinking it was going to cost me £5k to have someone put right what I had done to it, but it all came good.
slimmct said:
I originally planned 2 days, and ended spending 4 days on it. A lot of time lost to staring into the engine bay, and thinking that surely I didn't need to take off the such and such, rather than just getting on and pulling the engine apart.
Most of the quotes were between £2,200 to £2,500, and most garages didn't even want to quote. Think I spent around £500 on parts, and another £80 on tooling. The new inlet manifolds were pattern parts from ebay with new bolts and gaskets. The fuel injectors kits were official, but off ebay. The throttle body seals were from dealer spares, as was the replacement oil separator breather pipe, which fragmented during disassembly.
Tools I purchased was a slide hammer injector removal kit, and flat ring ratchets, some smaller deep sockets (8 and 10mm for the large part), and a digital torque meter.
Reassembly is easier than disassembly, and the drivers side was easier than the passenger side. You will probably need to remove the drivers side bulkhead under the fusebox, coolant system partially emptied to allow removal of top pipes. EGR valves, timing cover and fuel rails just need loosening just enough for access.
I followed the sandwich bag route of photographing everything I took off, and placing bolts in a labelled sandwich bag. I ended up with around 40 sandwich bags of various fittings, I would never have been able to keep track of disassembly without them. Then I followed the photographs and sandwich bags in reverse for assembly.
Lots of cleaning along the way, another £30 on EGR cleaner, airbox cleaner, electrical contact cleaner, ultrasonic batch detergent, and fuel system cleaner for after. So much carbon and oil throughout. The EGR tubes going into the throttle body needed a stanley knife to clean up before the 4 holes were visible, then clean up with EGR cleaner. The fuel injectors needed the slide hammer to release, but just slid out once lifted. Again, label the injectors as you take them out, write the middle section of the serial number on the bag. Looking into the engine, 1,2,3 on the left, 4,5,6 on the right. I gave them an ultrasonic bath with cleaner to open up the injectors again.
It took around a minute and a half of turning over before the fuel came back in, but straight back to normal running. Better even, some of the tractor sound on tick over gone, and throttle response seemed significantly better. Gave it some grief straight away. Found a layby and accelerated hard from standing to fast enough. Inlet manifold up to 23.7psi with no issues or codes. first and second turbo kick in was clear.
Highly recommend the Autel service tool and app. I carried out a forced EGR regen, as the DPF had been upset by running in RP for a while. Happily reduced down to 4gm.
It is at 119k currently, and it had been on my mind to replace it, due to concern over the inlets. Now it has had the timing belt done and both inlet manifolds, I am probably going to keep for quite a while. The service book is full now, so I will probably move to servicing myself with the official spares now. It was an experience, but it did run on the otherside. There was a moment, when I was surrounded by 3 metric ton of plastic mouldings and the top half of the engine, where I was thinking it was going to cost me £5k to have someone put right what I had done to it, but it all came good.
Holy Moly. I think I'll start saving up the two grand, that looks far beyond me.Most of the quotes were between £2,200 to £2,500, and most garages didn't even want to quote. Think I spent around £500 on parts, and another £80 on tooling. The new inlet manifolds were pattern parts from ebay with new bolts and gaskets. The fuel injectors kits were official, but off ebay. The throttle body seals were from dealer spares, as was the replacement oil separator breather pipe, which fragmented during disassembly.
Tools I purchased was a slide hammer injector removal kit, and flat ring ratchets, some smaller deep sockets (8 and 10mm for the large part), and a digital torque meter.
Reassembly is easier than disassembly, and the drivers side was easier than the passenger side. You will probably need to remove the drivers side bulkhead under the fusebox, coolant system partially emptied to allow removal of top pipes. EGR valves, timing cover and fuel rails just need loosening just enough for access.
I followed the sandwich bag route of photographing everything I took off, and placing bolts in a labelled sandwich bag. I ended up with around 40 sandwich bags of various fittings, I would never have been able to keep track of disassembly without them. Then I followed the photographs and sandwich bags in reverse for assembly.
Lots of cleaning along the way, another £30 on EGR cleaner, airbox cleaner, electrical contact cleaner, ultrasonic batch detergent, and fuel system cleaner for after. So much carbon and oil throughout. The EGR tubes going into the throttle body needed a stanley knife to clean up before the 4 holes were visible, then clean up with EGR cleaner. The fuel injectors needed the slide hammer to release, but just slid out once lifted. Again, label the injectors as you take them out, write the middle section of the serial number on the bag. Looking into the engine, 1,2,3 on the left, 4,5,6 on the right. I gave them an ultrasonic bath with cleaner to open up the injectors again.
It took around a minute and a half of turning over before the fuel came back in, but straight back to normal running. Better even, some of the tractor sound on tick over gone, and throttle response seemed significantly better. Gave it some grief straight away. Found a layby and accelerated hard from standing to fast enough. Inlet manifold up to 23.7psi with no issues or codes. first and second turbo kick in was clear.
Highly recommend the Autel service tool and app. I carried out a forced EGR regen, as the DPF had been upset by running in RP for a while. Happily reduced down to 4gm.
It is at 119k currently, and it had been on my mind to replace it, due to concern over the inlets. Now it has had the timing belt done and both inlet manifolds, I am probably going to keep for quite a while. The service book is full now, so I will probably move to servicing myself with the official spares now. It was an experience, but it did run on the otherside. There was a moment, when I was surrounded by 3 metric ton of plastic mouldings and the top half of the engine, where I was thinking it was going to cost me £5k to have someone put right what I had done to it, but it all came good.
Hats off for the work you've done though, bet you felt accomplished when you nailed it out of that layby & it just set off like it had been stung!
Gassing Station | Jaguar | Top of Page | What's New | My Stuff