Prosport Radical Dash
Discussion


Could be a bit of a long shot this one >
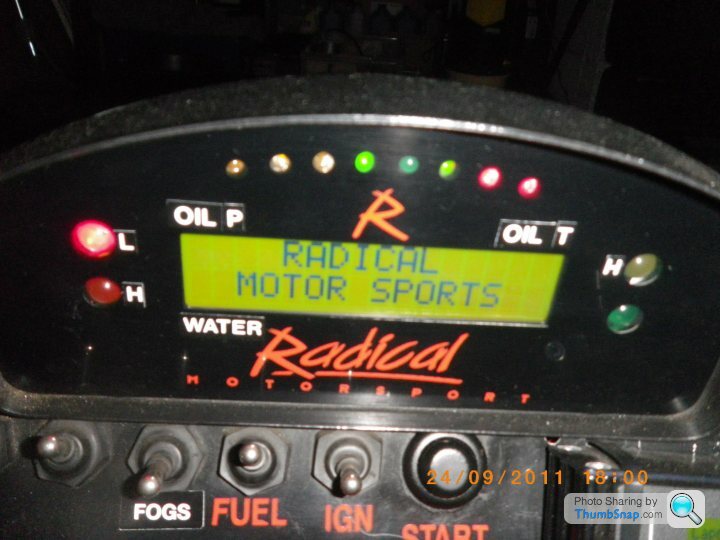
As you may be able to see, the second green (8K) sequential rev light has gone AWOL. Otherwise, the dash is 100%.
Not illuminating on the 'countdown' or (as this pic), 'all show' before extinguishing.
Presumably, either a loose connection onto that light or that bulb gone?
Has anyone ever pulled a Radical Dash apart?
How does one go about it/anything to watch out for/can or can't be done by a DIYer? Don't want to waste my time if it's very specialist clever electrical stuff.
Cheers
BTW, the labels with such as 'OIL T' have been stuck on by me - in case I forget what's where when glancing. Crikey, I have enough trouble remembering where I live
If this post falls on barren ground, perhaps RadicalTechnical could input come Monday?
I have had one apart, nothing special in there I can assure you!
From memory you have to undo the small nuts on the back and push the studs through so the screen comes out of the front, you might have to pry the screen from the outer case but all the gubbins are attaced to the screen anyway (printed circuit board etc). The cable going in terminates in chock block type screw clamps so be careful they don't pull out although they are numbered/cpoloured wire so the relevant wiring diagram should make it easy to reconnect in the right place. I took mine apart when I changed to fuel injection/ecu from carbs and needed to connect the ecu tacho output to the dash. I didn't go into it any further but it looks pretty basic to me.
From memory you have to undo the small nuts on the back and push the studs through so the screen comes out of the front, you might have to pry the screen from the outer case but all the gubbins are attaced to the screen anyway (printed circuit board etc). The cable going in terminates in chock block type screw clamps so be careful they don't pull out although they are numbered/cpoloured wire so the relevant wiring diagram should make it easy to reconnect in the right place. I took mine apart when I changed to fuel injection/ecu from carbs and needed to connect the ecu tacho output to the dash. I didn't go into it any further but it looks pretty basic to me.
Edited by Martin B on Saturday 24th September 20:17
I just took my spare one apart so hope these help:
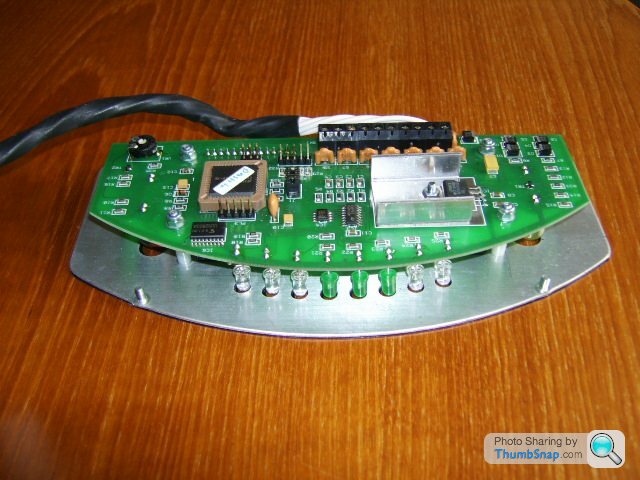

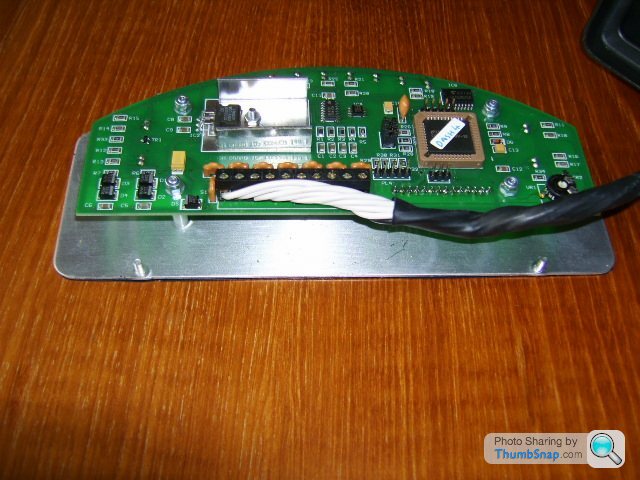
They appear just to be individual LEDs soldered into the printed circuit board.
To take it out of the case, undo the four very small nylock nuts then gently push the studs through, also helps if you push the cable through once the screen bit moves. This one came apart very easily and didn't need any prying at all.
Edited by Martin B on Sunday 25th September 09:07
Martin
That's brilliant, thank you very much indeed for taking so much time and trouble, really appreciated.
Are those 3 or 5mm LEDs? No writing/ID info on them I suppose?
When opportunity permits, I'll take ours carefully apart and see whether there's anything obvious staring back at me; like the LED has 'blown' inside; it actually looks a nicely set out bit of kit - the problem for an amateur like me is always pinning it (what's amiss) down; like just the bulb or is it the resistor or is it the circuit board? So it'll be a case of careful and nervous fingers crossed, hopefully something obvious like the bulb having gone or maybe a foreign body temporarily 'shorting out' a section of the printed circuit board. If it isn't obvious, no point me poking around willy-nilly, I'll have to find a specialist 'what does'.
Again, brilliant and many thanks.
Trev
Martin B said:
No probs Trev, it could be something as simple as a slightly dodgy soldered joint on the LED, personally I would re-do the soldered joints on that LED first and see if that helps.
I didn't measure the LEDs, sorry (and I have put it back together now!)
No probs; yep, that's one of the things I'd be looking for and the first thing I'd do if nothing apparent; afterall, just the one (of a very long life LED component - especially a green one as it was the red ones that were unreliable - generally, not specific to Radical - when LEDs first came into fashion) suggests it's a very localised problem.I didn't measure the LEDs, sorry (and I have put it back together now!)
The way that particular one doesn't work is in a very progressive fashion; like the countdown, right to left; very regular 'beat', last red goes out, first red goes out, last green goes out, regular pause equivalent to when it - the middle one - would go out (except it is already!), first green goes out and so on.
I should say the actual LED or even better as you suggest, dodgy soldered joint onto it's pins. Apparently, LEDs are very picky about their total integrity of supply.
Many thanks again!
Gassing Station | Radical | Top of Page | What's New | My Stuff