Suddenly ... a waterfall of coolant everywhere under my ZS.
Discussion


Suddenly ... a waterfall of coolant everywhere under my MG ZS 120 ... Oh no!....
Here is a story of mixed fortunes ~ both bad and good luck.
Anyone following my thread over on the R600 Forum maybe aware that my MG ZS, bought new in 2003, gave me a few worries suddenly last Thursday evening just as it was getting dark. This thread ~
http://forums.mg-rover.org/showthread.php?t=357965
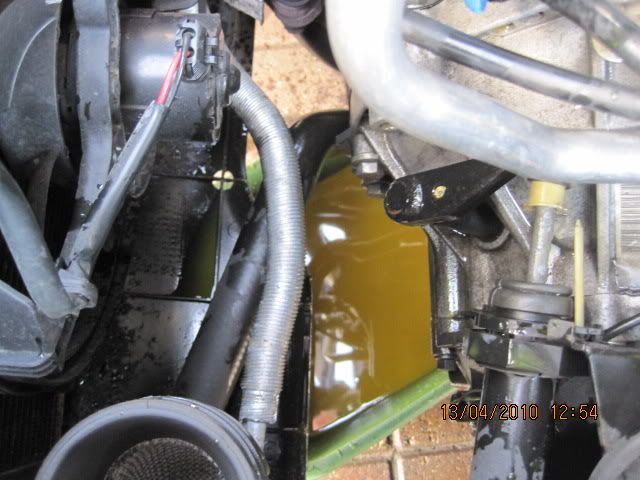
I was just washing up after working for a few hours on the Silver Rover 620ti when my wife pulled up in the ZS. I immediately noticed the fan was running strongly and continued to do so when my wife switched the engine off. Nothing unusual if she had AirCon on as that can run on a few seconds after switch off. However, thirty seconds later the fan was still running powerfully. I lifted the bonnet and was horrified to see a completely empty coolant expansion bottle ! How can that be ~ it was perfect when I checked the level only two days before ...
Got my "wind-up" torch and had a look around under the bonnet ~ engine off now ~ gave the top hose a squeeze .... empty ....
Then, now the engine had been switched off, the latent heat still in the hot engine must have pushed up the cooling system pressure further as in the torch light, I spotted a small waterfall of brightly coloured coolant dripping from all along the bottom of the plastic Timing Belt cover... I immediately suspected a worn out Water Pump ~ hoping it was only that ~ Never known a K-Series pump wear out so suddenly ~ have seen it happen on O, S, and T-series engined cars in my family but, never a K~Series.
Too dark to check or do anything so parked up the ZS and Friday morning, via Ebay, ordered a K16 Water Pump which arrived within 24 hours on Saturday Morning. £24.41 ~ saves time and driving round and picking one up locally.
A few weeks ago, I purchased a Timing Belt, Polyvee Power Steering and Alternator belts from my local MG-R/XPart supplier as the car still had it original belts on it, all now seven years old. So, not so bad after, fit the three belts after replacing the worn water pump ~ all those belts have to come off anyway to access the water pump on the K-Series...
Made a start ~ up on two Axle Stands. Chocked the rear wheels too ~ belt and braces man me ... .. :~
.. :~
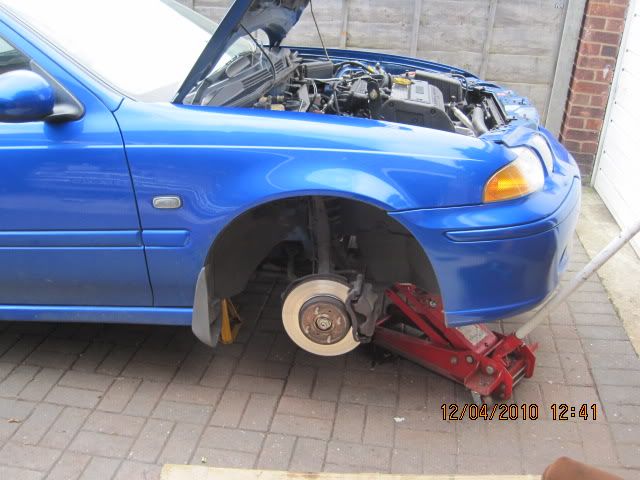
Removed the right hand engine mount after supporting weight of engine with a trolley jack.
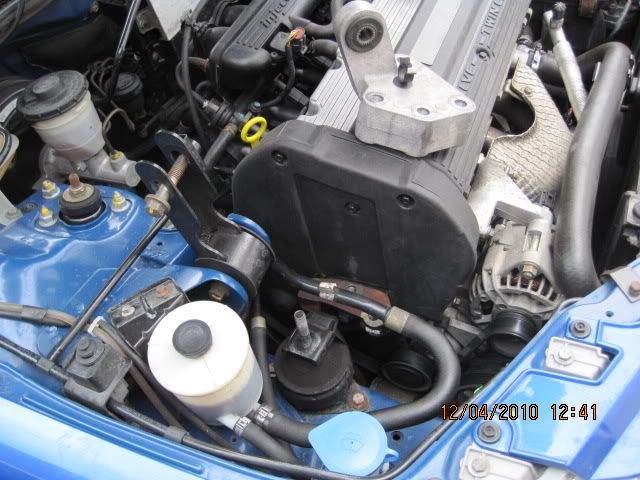
Undid the few bolts and removed the top timing belt cover.
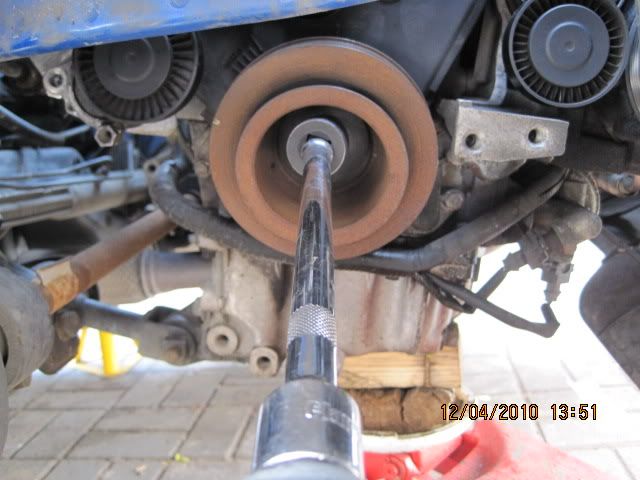
Then, tackled the 22mm CRANKshaft Pulley Bolt. All the previous K-Series engines I've worked on have this bolt so tight, it defied my 15 stone and 3/4" Breaker bar.... every one so I had to resort in using the engine to undo that bolt ~ by switching starter quickly on and immediately off ~ with a long 22mm Ring spanner placed carefully.
Ever the optimist, I used my 24 Volt Impact Driver and 22mm Hex-Socket after charging the battery up fully. It loosened it within a second... I was delighted ... Used the Trolley Jack under the engine to lower it to provide better access to the 22mm bolt :~
Good tool that!
I then used two good quality ring spanners to remove the PAS Belt tensioner as this component covers one of the less accessible 8mm Bolts securing the lower timing Belt Cover ~ impossible to access with the tensioner in the way ~ I used a length of wood to act as a third hand ~ it worked as I was working alone. Be careful ~ that tensioner spring is very strong :~
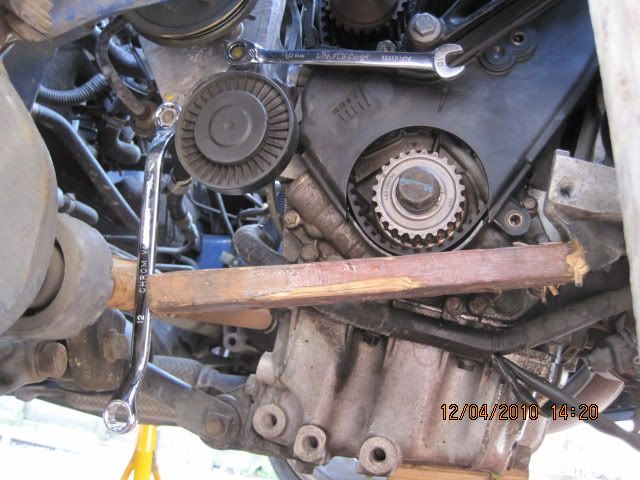
Now I could access those remaining 8mm bolts and the lower cover was then removed with that tensioner swung clear ...
I then removed the Timing Belt tensioner :~
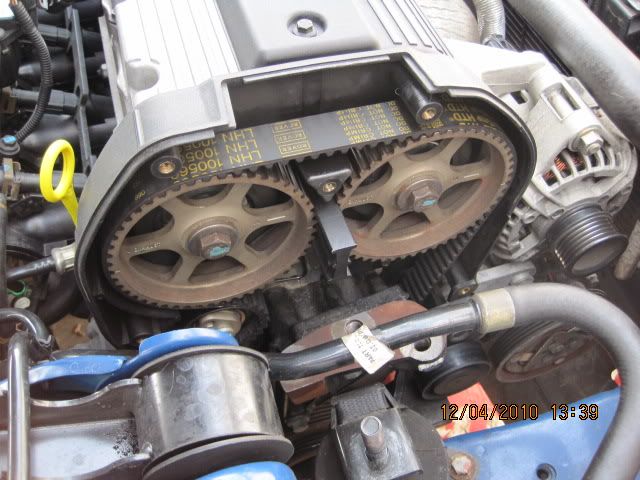
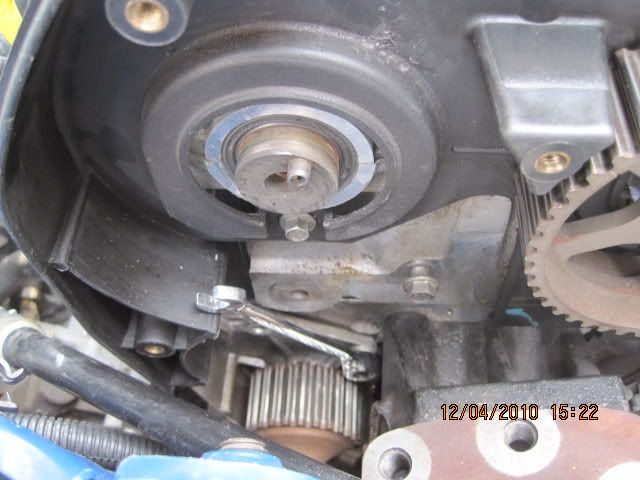
This allowed removal of the timing belt ~ by the way ~ all three old belts looked like new ~ not bad after seven years. I then had access to those 8mm Bolts securing the Water Pump. The area is very restricted and with little room to swing even a short length 8mm ring spanner( built in ratchet ) it was taking well over five minutes to undo one bolt! I therefore removed the Inlet Camshaft Pulley which gave a little more access and spanner room but it took best part of an hour to remove all the 8mm Bolts securing the Pump to the block.
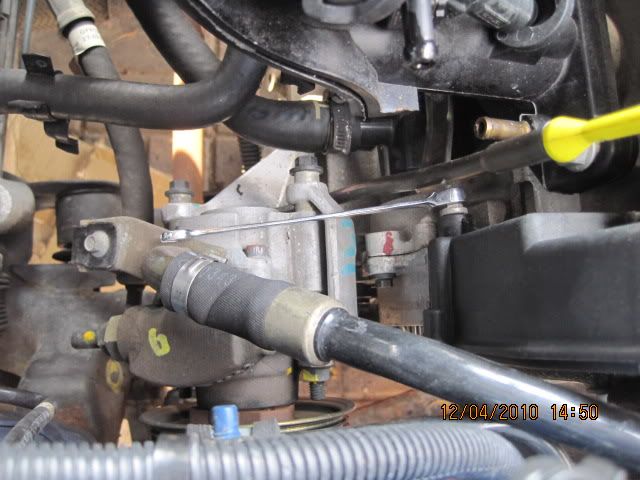
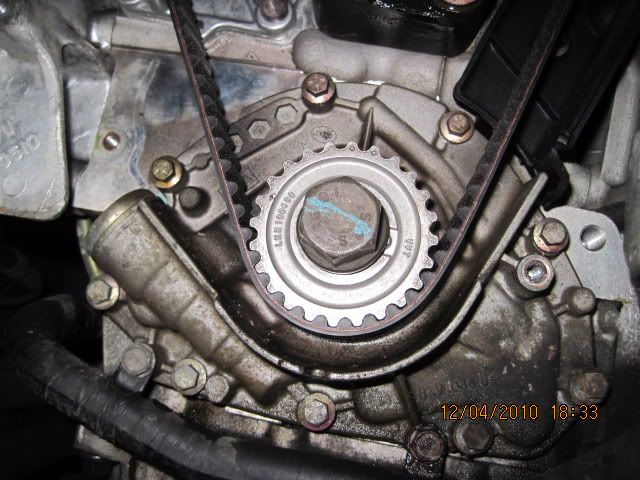
IMPORTANT ~ there's a silver 8mm Bolt on the reverse side of the pump which is even more difficult to access being cobvered by the Dip Stick Tube, Jiggle Valve hose and Fuel regulator return hose. I disconnected the two hoses and pushe the dip stick tube to one side which gave better but still far from ideal access to this Silver 8mm bolt ~ those bolts on the other side of the pump are all Black. You can see my ring spanner on this silver bolt in this shot showing its location :~
With the Inlet CAMshaft Pulley removed, the Black 8mm bolts were all removed. Here's the spanner on one of them :~
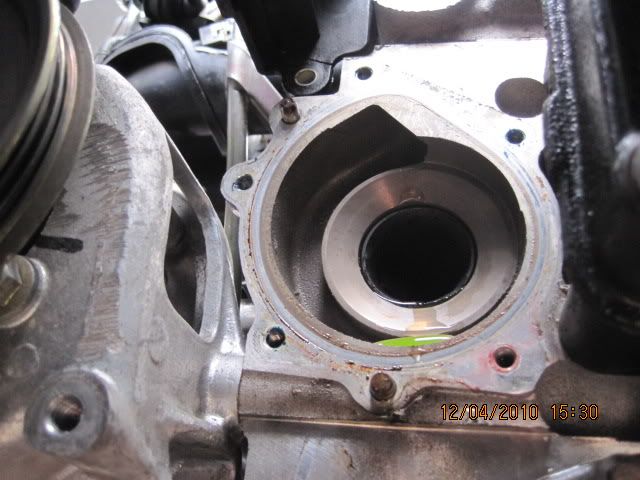
Once all bolts were removed, the old pump pulled off easily. No sealant had been used. I was pleased to see how clean and completely corrosion free the Pump Housing and coolant passageway was. Testament to the use of correct antifreeze mixture and changing it every 2 or three years as I always do with my new cars. Even the remaining drops of coolant were clear and clean ~ all good signs :~
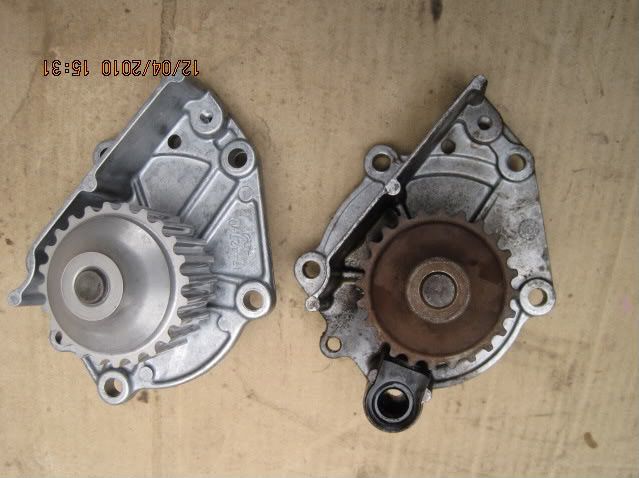
I placed the Old Pump alongside the New one ... They were different ... :doh:
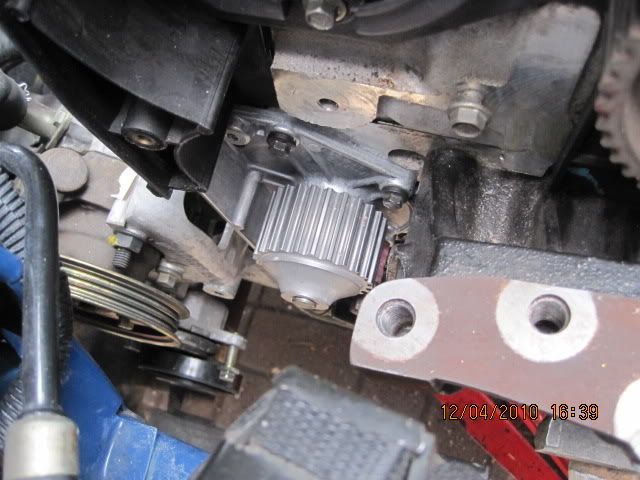
However, I fitted the new pump after carefully replacing it with the seal and put all the 8mm bolts back ~ again best part of an hour of restricted spanner fettling. In close on fifty years of fettling my own cars, because of that very restricted access to the water pump with the engine still in the car, that was one of the most frustrating jobs I've ever done on my cars. With engine out of the car, job is a leisurely five minutes tops ... ... and no skinning knuckles even when using laytex gloves ...
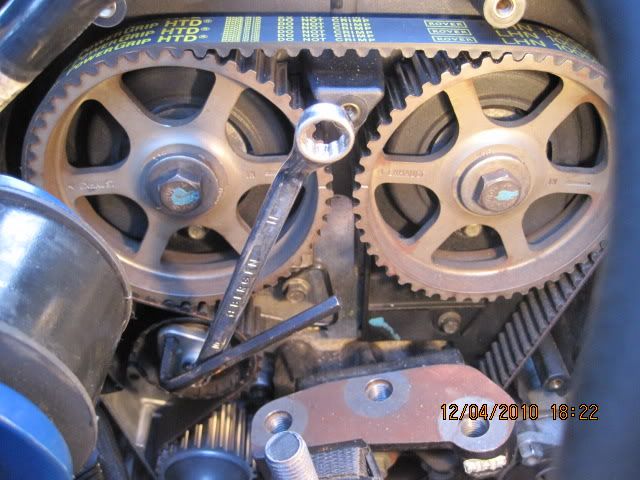
Then started to reassemble all the parts and fitted the new Timing Belt... all this ran smoothly and here's some of the pictures covering that including adjusting the Timing Belt Tensioner using a 10mm Spanner and Allen Key to set the tensioner ... at the correct tension .. The pictures I hope are self explanatory :~
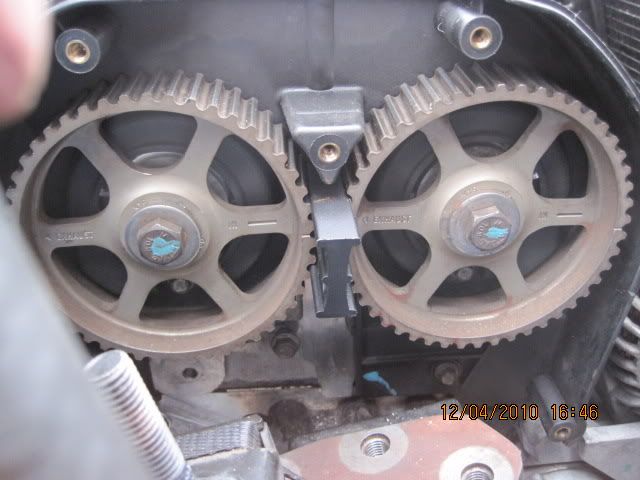
New Belt over CRANKshaft sprocket ~ note two 'dimples' to index correctly "safe" Crank position :~
Using the 10mm ring Spanner and allen Key to set the tension ~ look closely and you can see the Tensioner wire index correctly aligned to that notch :~
Finall Check of the CAMshaft Indexes and the CRANKshaft indexes and then turning over the engine manually with a socket on the 22mm CRANKshaft Pulley Bolt at least three or four times to get the 'all clear' ... that is, no nasty metal to metal contact noises. Then systematically refit the remaining covers and PolyVee Belts for the Power Steering Pump and Alternator.
I then drained the remaining old coolant ~ looked fine ~ and with the coolant hoses disconnected, used the garden hose to flush the radiator, engine block and heater... need not have bothered ~ it all ran clean ~ no crud or rusty stained coolant ~ again confirmation that good quality 50-50 dilute OAT AntiFreeze really does look after your engine's cooling system :~
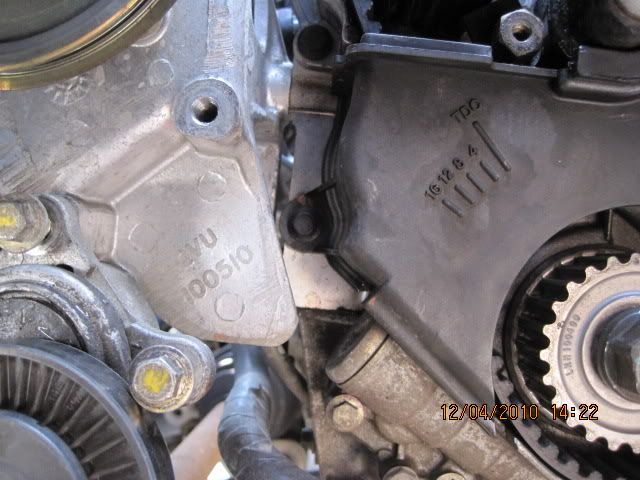
One of the reasons these K-Series appear to have 'repeat' so called head gasket failures soon after repair is simply because the cooling system is not bled properly. When introducing fresh coolant into the system, it is essential to bleed the cooling system on the K-Series properly. This 8mm bleed bolt on my ZS was removed and refitted as soon as coolant appeared when topping up the system :~
Keeping an eye on the level of the coolant in the Expansion bottle, much squeezing of all the hoses with the bottle cap off with the engine running helps bleed out any trapped air in the system. I must have squeezed all the hoses about fifty times in total with the engine running until that coolant level in the bottle settled on MAX index. Then replaced the Bottle Cap firmly. I did this bleeding with the heater control on fully hot. I was pleased to observe hot air from the heater in the car once the engine was fully warm. Watching the temperature gauge, I was pleased to see the needle settle and remain just below the midway point. If air is trapped in the cylinder head, that needle will climb so a re-bleed will be necessary to expel the air in the healthy cooling system...
I then took the car for a gentle ten mile run with one eye on that temperature gauge needle most of the time. It stayed exactly where it normally is when the engine is fully warmed up ~ just a tad below the midway mark. So far so good.
Since completing the job, my wife and I have driven the car for about sixty miles yesterday and today. Whilst repairing the ZS, always in the back of my mind the possibility that the engine became damaged by an excess of heat when it lost its coolant via the worn pump. My wife was not aware of the problem at the time and had no idea there was a problem. She thinks she would have noticed if the needle had gone above normal. Anyway, it looks like we've been both unlucky and lucky ... so far. Even so, I asked my wife to keep a watchful eye on that gauge for the next couple of weeks, just incase damage may show up later.
I post this account here as it may give confidence to other owners when faced with a similar problem with their cars. Except for access problems like these fiddly 'in car' renewals, the K-Series is one of the easiest Double Overhead Camshaft [ DOHC } 16 Valve engines to work on....
...
...
Here is a story of mixed fortunes ~ both bad and good luck.
Anyone following my thread over on the R600 Forum maybe aware that my MG ZS, bought new in 2003, gave me a few worries suddenly last Thursday evening just as it was getting dark. This thread ~
http://forums.mg-rover.org/showthread.php?t=357965
I was just washing up after working for a few hours on the Silver Rover 620ti when my wife pulled up in the ZS. I immediately noticed the fan was running strongly and continued to do so when my wife switched the engine off. Nothing unusual if she had AirCon on as that can run on a few seconds after switch off. However, thirty seconds later the fan was still running powerfully. I lifted the bonnet and was horrified to see a completely empty coolant expansion bottle !
How can that be ~ it was perfect when I checked the level only two days before ... Got my "wind-up" torch and had a look around under the bonnet ~ engine off now ~ gave the top hose a squeeze .... empty ....
Then, now the engine had been switched off, the latent heat still in the hot engine must have pushed up the cooling system pressure further as in the torch light, I spotted a small waterfall of brightly coloured coolant dripping from all along the bottom of the plastic Timing Belt cover... I immediately suspected a worn out Water Pump ~ hoping it was only that ~ Never known a K-Series pump wear out so suddenly ~ have seen it happen on O, S, and T-series engined cars in my family but, never a K~Series.
Too dark to check or do anything so parked up the ZS and Friday morning, via Ebay, ordered a K16 Water Pump which arrived within 24 hours on Saturday Morning. £24.41 ~ saves time and driving round and picking one up locally.
A few weeks ago, I purchased a Timing Belt, Polyvee Power Steering and Alternator belts from my local MG-R/XPart supplier as the car still had it original belts on it, all now seven years old. So, not so bad after, fit the three belts after replacing the worn water pump ~ all those belts have to come off anyway to access the water pump on the K-Series...
Made a start ~ up on two Axle Stands. Chocked the rear wheels too ~ belt and braces man me ...
.. :~Removed the right hand engine mount after supporting weight of engine with a trolley jack.
Undid the few bolts and removed the top timing belt cover.
Then, tackled the 22mm CRANKshaft Pulley Bolt. All the previous K-Series engines I've worked on have this bolt so tight, it defied my 15 stone and 3/4" Breaker bar.... every one so I had to resort in using the engine to undo that bolt ~ by switching starter quickly on and immediately off ~ with a long 22mm Ring spanner placed carefully.
Ever the optimist, I used my 24 Volt Impact Driver and 22mm Hex-Socket after charging the battery up fully. It loosened it within a second... I was delighted ... Used the Trolley Jack under the engine to lower it to provide better access to the 22mm bolt :~
Good tool that!
I then used two good quality ring spanners to remove the PAS Belt tensioner as this component covers one of the less accessible 8mm Bolts securing the lower timing Belt Cover ~ impossible to access with the tensioner in the way ~ I used a length of wood to act as a third hand ~ it worked as I was working alone. Be careful ~ that tensioner spring is very strong :~
Now I could access those remaining 8mm bolts and the lower cover was then removed with that tensioner swung clear ...
I then removed the Timing Belt tensioner :~
This allowed removal of the timing belt ~ by the way ~ all three old belts looked like new ~ not bad after seven years. I then had access to those 8mm Bolts securing the Water Pump. The area is very restricted and with little room to swing even a short length 8mm ring spanner( built in ratchet ) it was taking well over five minutes to undo one bolt! I therefore removed the Inlet Camshaft Pulley which gave a little more access and spanner room but it took best part of an hour to remove all the 8mm Bolts securing the Pump to the block.
IMPORTANT ~ there's a silver 8mm Bolt on the reverse side of the pump which is even more difficult to access being cobvered by the Dip Stick Tube, Jiggle Valve hose and Fuel regulator return hose. I disconnected the two hoses and pushe the dip stick tube to one side which gave better but still far from ideal access to this Silver 8mm bolt ~ those bolts on the other side of the pump are all Black. You can see my ring spanner on this silver bolt in this shot showing its location :~
With the Inlet CAMshaft Pulley removed, the Black 8mm bolts were all removed. Here's the spanner on one of them :~
Once all bolts were removed, the old pump pulled off easily. No sealant had been used. I was pleased to see how clean and completely corrosion free the Pump Housing and coolant passageway was. Testament to the use of correct antifreeze mixture and changing it every 2 or three years as I always do with my new cars. Even the remaining drops of coolant were clear and clean ~ all good signs :~
I placed the Old Pump alongside the New one ... They were different ... :doh:
However, I fitted the new pump after carefully replacing it with the seal and put all the 8mm bolts back ~ again best part of an hour of restricted spanner fettling. In close on fifty years of fettling my own cars, because of that very restricted access to the water pump with the engine still in the car, that was one of the most frustrating jobs I've ever done on my cars. With engine out of the car, job is a leisurely five minutes tops ...
... and no skinning knuckles even when using laytex gloves ... Then started to reassemble all the parts and fitted the new Timing Belt... all this ran smoothly and here's some of the pictures covering that including adjusting the Timing Belt Tensioner using a 10mm Spanner and Allen Key to set the tensioner ... at the correct tension ..
The pictures I hope are self explanatory :~New Belt over CRANKshaft sprocket ~ note two 'dimples' to index correctly "safe" Crank position :~
Using the 10mm ring Spanner and allen Key to set the tension ~ look closely and you can see the Tensioner wire index correctly aligned to that notch :~
Finall Check of the CAMshaft Indexes and the CRANKshaft indexes and then turning over the engine manually with a socket on the 22mm CRANKshaft Pulley Bolt at least three or four times to get the 'all clear' ... that is, no nasty metal to metal contact noises. Then systematically refit the remaining covers and PolyVee Belts for the Power Steering Pump and Alternator.
I then drained the remaining old coolant ~ looked fine ~ and with the coolant hoses disconnected, used the garden hose to flush the radiator, engine block and heater... need not have bothered ~ it all ran clean ~ no crud or rusty stained coolant ~ again confirmation that good quality 50-50 dilute OAT AntiFreeze really does look after your engine's cooling system :~
One of the reasons these K-Series appear to have 'repeat' so called head gasket failures soon after repair is simply because the cooling system is not bled properly. When introducing fresh coolant into the system, it is essential to bleed the cooling system on the K-Series properly. This 8mm bleed bolt on my ZS was removed and refitted as soon as coolant appeared when topping up the system :~
Keeping an eye on the level of the coolant in the Expansion bottle, much squeezing of all the hoses with the bottle cap off with the engine running helps bleed out any trapped air in the system. I must have squeezed all the hoses about fifty times in total with the engine running until that coolant level in the bottle settled on MAX index. Then replaced the Bottle Cap firmly. I did this bleeding with the heater control on fully hot. I was pleased to observe hot air from the heater in the car once the engine was fully warm. Watching the temperature gauge, I was pleased to see the needle settle and remain just below the midway point. If air is trapped in the cylinder head, that needle will climb so a re-bleed will be necessary to expel the air in the healthy cooling system...
I then took the car for a gentle ten mile run with one eye on that temperature gauge needle most of the time. It stayed exactly where it normally is when the engine is fully warmed up ~ just a tad below the midway mark. So far so good.
Since completing the job, my wife and I have driven the car for about sixty miles yesterday and today. Whilst repairing the ZS, always in the back of my mind the possibility that the engine became damaged by an excess of heat when it lost its coolant via the worn pump. My wife was not aware of the problem at the time and had no idea there was a problem. She thinks she would have noticed if the needle had gone above normal. Anyway, it looks like we've been both unlucky and lucky ... so far. Even so, I asked my wife to keep a watchful eye on that gauge for the next couple of weeks, just incase damage may show up later.
I post this account here as it may give confidence to other owners when faced with a similar problem with their cars. Except for access problems like these fiddly 'in car' renewals, the K-Series is one of the easiest Double Overhead Camshaft [ DOHC } 16 Valve engines to work on....
...
...
 Any chance of the same for a ZS180 ? Mine's gonna need doing soon.
Gassing Station | MG | Top of Page | What's New | My Stuff