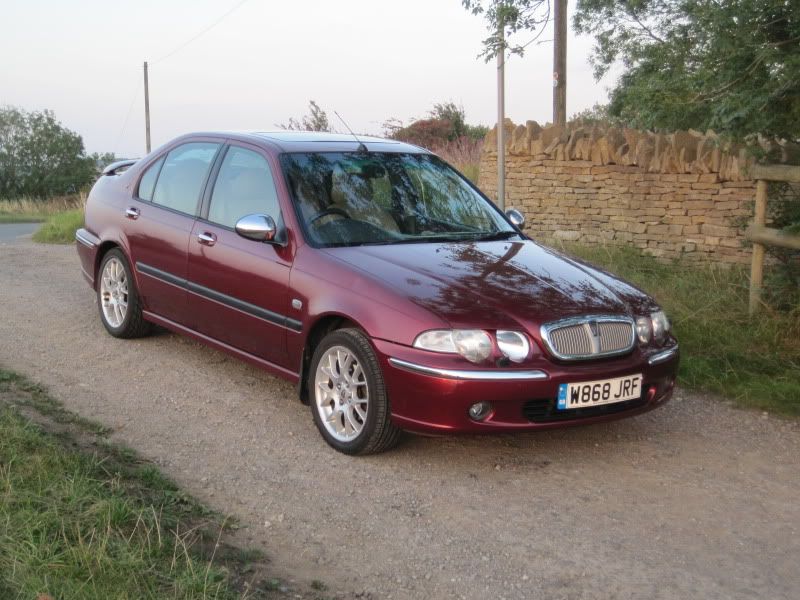
MGZR 120 HGF - FAO MGJohn!
Discussion


Hi all (especially the oracle that is MGJohn!).
So it would appear the head gasket is going on the ZR. Symptoms so far include...
lumpy idle (runs ok higher up rev range), intermittent coolant loss, more steam than usual in the exhaust and a small amount of water in the oil.
So I've had a quote from a garage nearby who have a decent reputation for dealing with K series lumps and they want circa £800 to do the job.
Being the fool that I am I've decided to have a go at the job, which will (hopefully save some money) having previously only helped changed one on a 106 about 4 years ago...
John, I've been looking through your guide on the ZS 120 and it looks very similar to mine. Do you know if there are any differences I should be aware of? Plan is to use your guide in conjunction with Haynes and hopefully cover all the bases!
Finally, is it worth putting some blocks of wood under the sump while the head bolts are out just in case it decides to fall off?
Thanks!
Hi,
The job will be virtually identical to a ZS120. You can find MGJohn on http://forums.mg-rover.org/ as well...and plenty of advice on HGF!!!
OneJag
The job will be virtually identical to a ZS120. You can find MGJohn on http://forums.mg-rover.org/ as well...and plenty of advice on HGF!!!
OneJag
Things to do..
i) check the head has not annealed/softened, do a hardness test on the fire face on the exhaust side, it it is less than 95 brinell it is scrap. If the fire ring has tunneled into the head, it is scrap.
ii) peen the fire ring area of the head to eradicate porosity and then have it skimmed to remove the peening marks (Wiki on seloc.org)
iii) ensure the liners are 4 thou (0.1mm) proud of the block
iv) use a genuine Payen BW750 gasket
v) use genuine OE bolts with steel dowels.
vi) consider fitting a PRRT.
Dave
Cyder said:
Hi all (especially the oracle that is MGJohn!).
So it would appear the head gasket is going on the ZR. Symptoms so far include...
lumpy idle (runs ok higher up rev range), intermittent coolant loss, more steam than usual in the exhaust and a small amount of water in the oil.
So I've had a quote from a garage nearby who have a decent reputation for dealing with K series lumps and they want circa £800 to do the job.
Being the fool that I am I've decided to have a go at the job, which will (hopefully save some money) having previously only helped changed one on a 106 about 4 years ago...
John, I've been looking through your guide on the ZS 120 and it looks very similar to mine. Do you know if there are any differences I should be aware of? Plan is to use your guide in conjunction with Haynes and hopefully cover all the bases!
Finally, is it worth putting some blocks of wood under the sump while the head bolts are out just in case it decides to fall off?
Thanks!
PM to Jon Norris?So it would appear the head gasket is going on the ZR. Symptoms so far include...
lumpy idle (runs ok higher up rev range), intermittent coolant loss, more steam than usual in the exhaust and a small amount of water in the oil.
So I've had a quote from a garage nearby who have a decent reputation for dealing with K series lumps and they want circa £800 to do the job.
Being the fool that I am I've decided to have a go at the job, which will (hopefully save some money) having previously only helped changed one on a 106 about 4 years ago...
John, I've been looking through your guide on the ZS 120 and it looks very similar to mine. Do you know if there are any differences I should be aware of? Plan is to use your guide in conjunction with Haynes and hopefully cover all the bases!
Finally, is it worth putting some blocks of wood under the sump while the head bolts are out just in case it decides to fall off?
Thanks!
onyx39 said:
PM to Jon Norris?
Is he the same bloke, or a different MGR/K Series man? MGR forums are a wealth of knowledge have spent a lot of time reading them.Thanks for the other bits of advice, will take them all on board and take my time while doing it.
One of the beauties of working where I do is that there are plenty of folks who have done this before so I have a bit of technical knowledge to tap into.
Job starts tomorrow!
Cyder said:
onyx39 said:
PM to Jon Norris?
Is he the same bloke, or a different MGR/K Series man? MGR forums are a wealth of knowledge have spent a lot of time reading them.Thanks for the other bits of advice, will take them all on board and take my time while doing it.
One of the beauties of working where I do is that there are plenty of folks who have done this before so I have a bit of technical knowledge to tap into.
Job starts tomorrow!

Just spotted this. The job on your MG ZR will be much the same as with the MG ZS irrespective of 1.4 or larger.
The VVC versions of the K-Series are only a slightly more involved job but, fortunately, working on the K-Series is a doddle ~ even with the mid engine location in the MGF/TF although access is more restricted there.
From what you describe, it would appear you have spotted the problem in good time well before damage to other parts of the engine is involved. Just the damaged cylinder head gasket. The job really is a doddle, just take your time and a compact digital camera is the best note book you can have so take loads of images, they will be a great help.
£800 is well OTT. Half that a more realistic figure unless of course other damage is done to the engine as a result of more severe over heating.
Job starts tomorrow ~ so how are things progressing? If still work in progress and you want advice, I'm usually over on MG-Rover.org most days and that is a good source for advice and how to information.
Dave wrote :~
One thing is worth taking extra time over. Try to identify what caused the gasket damage in the first place because they rarely ever fail, they are usually first damaged and then 'fail' to do the job they're designed for. In my experience, two of the so called failures were because of a worn water pumps. That is the prime suspect cause in my experience of the cars I've direct experience of, or those of acquaintances. The other two were as a result of professional oversight or plain incompentence by those entrusted to look after friends' cars. The fifth car, my own ZS did not need doing because I had wrongly identified a damaged CHG when the cause of the coolant loss was a worn water pump. Later cars like mine were fitted with an evaporator to the water pump. That collected the usually first tell tale small coolant losses from the wearing pump and evaoporates them. The idea being to protect the timing belt from possible harmful effects of the coolant lost on the Timing Belt which also drives the water pump. The replacement pump I fitted did NOT have an evaporator so when that pump starts to wear, coolant losses will appear under the car to alert me that the initial stages of wear are starting.
Although I removed a near perfect CHG from my MG ZS, no harm done as the replacement MLS gasket I fitted is a better upgrade item in my experience along with its so called head saver shim which I have always fitted although others doing the job sometimes do not.
So, pleased to report that all five K-Series CHGs I've replaced on these cars have so far proved absolutely 100% reliable after many 1000s of miles since. However, do keep in mind that the so called 'failures' were caught well before other damage to the engine was done. Cost of each job in parts alone about £100 which included all three belts, 10-40 semisynthetic, fresh OAT coolant and a water pump. Plus a couple of dishwasher tablets for a final cooling system clean out before c introducing the fresh 50-50 OAT coolant mix. I enjoyed each job and, with the passing of time, the satisfaction of a job well done is an additional bonus to the money saved.
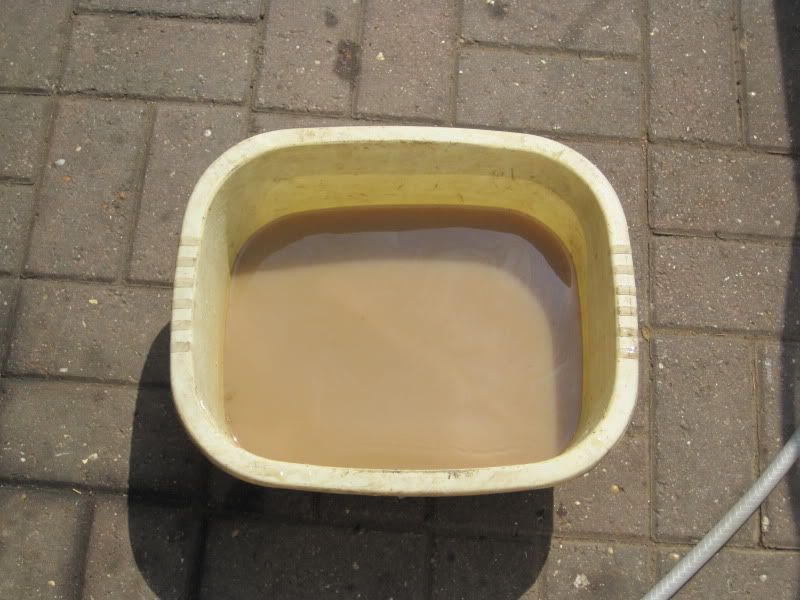
One final word of advice which I feel is the 'secret' of a job well done. It is essential to effectively clean out all of the old oil~coolant mix from the cooling system and sump contents. This is the most time consuming part of the job. Take your time and be thorough cleaning the system out of all the muck. Two cars I removed the radiators and shook them to flush out the stuff lodged in the small bore core tubes. Badly contaminated cooling systems with thick oil-coolant mix needed quite a bit of work, but, well worth it. So this :~
Can become this:~
This is what I drained from the system of this car with some rad flushing agent; Holts SPEEDflush IIRC ~ a perfect oil-coolant emulsification mix cleaned out with the flush ~ not nice and that after initial flushing with a garden hose :~
......and a really bad example like this Rover 25's radiator can become as clean as a whistle internally instead of having to buy a new one :~
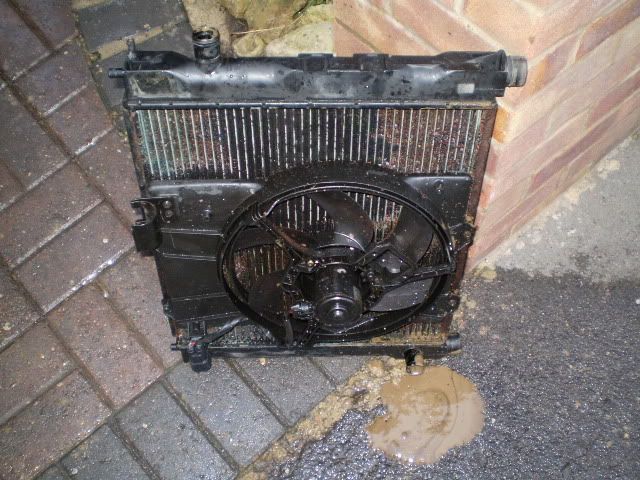
Professionals would rarely bother with this cleaning as it's very time consuming so ..."You need a new rad mate" ...
The car with those before and after pictures of the coolant expansion bottle I've been driving for about eight months since I did the work on it. It's a 1.8 Rover 45 Connoisseur and I've done about 4,000 miles in it. I drive it in preference to my usual daily drivers, Rover 620ti, as it uses far less fuel in these winter months and being a top spec Connoisseur, even has bum warmer front seats. Never thought I'd ever appreciate that sort of thing but I do. I'll be getting a pipe an slippers next. Well maybe the slippers as I do not smoke being an ex-40 a day man.
I've grown to like it. A really good means of getting about with the same engine as my MGZS. This R45 bought for little more than loose change as a "spares or repair" ebay special. Not a bad looking car either :~
I've been typing this lot with one eye on the TV Snooker highlights so if I've missed a typo or two, so be it.
.
The VVC versions of the K-Series are only a slightly more involved job but, fortunately, working on the K-Series is a doddle ~ even with the mid engine location in the MGF/TF although access is more restricted there.
From what you describe, it would appear you have spotted the problem in good time well before damage to other parts of the engine is involved. Just the damaged cylinder head gasket. The job really is a doddle, just take your time and a compact digital camera is the best note book you can have so take loads of images, they will be a great help.
£800 is well OTT. Half that a more realistic figure unless of course other damage is done to the engine as a result of more severe over heating.
Job starts tomorrow ~ so how are things progressing? If still work in progress and you want advice, I'm usually over on MG-Rover.org most days and that is a good source for advice and how to information.
Dave wrote :~
DVandrews said:
Things to do..
i) check the head has not annealed/softened, do a hardness test on the fire face on the exhaust side, it it is less than 95 brinell it is scrap. If the fire ring has tunneled into the head, it is scrap.
ii) peen the fire ring area of the head to eradicate porosity and then have it skimmed to remove the peening marks (Wiki on seloc.org)
iii) ensure the liners are 4 thou (0.1mm) proud of the block
iv) use a genuine Payen BW750 gasket
v) use genuine OE bolts with steel dowels.
vi) consider fitting a PRRT.
Dave
BTW, Dave's recommendations are all sound but, in my experience overkill. Only the most conscientious of professional outfits would go to those lengths and only if needed which in my limited experience of just FIVE K-Series CHG replacements, in each case was unnecessary. I used the MLS gasket ( MLS = Multi Layer Steel ) which some call the Land Rover upgrade although the basic MLS design is identical to those "Klinger" gaskets Rover fitted to their T-Series engines in later turbocharged 620ti and one or two other models with that engine back in the 1990s.i) check the head has not annealed/softened, do a hardness test on the fire face on the exhaust side, it it is less than 95 brinell it is scrap. If the fire ring has tunneled into the head, it is scrap.
ii) peen the fire ring area of the head to eradicate porosity and then have it skimmed to remove the peening marks (Wiki on seloc.org)
iii) ensure the liners are 4 thou (0.1mm) proud of the block
iv) use a genuine Payen BW750 gasket
v) use genuine OE bolts with steel dowels.
vi) consider fitting a PRRT.
Dave
One thing is worth taking extra time over. Try to identify what caused the gasket damage in the first place because they rarely ever fail, they are usually first damaged and then 'fail' to do the job they're designed for. In my experience, two of the so called failures were because of a worn water pumps. That is the prime suspect cause in my experience of the cars I've direct experience of, or those of acquaintances. The other two were as a result of professional oversight or plain incompentence by those entrusted to look after friends' cars. The fifth car, my own ZS did not need doing because I had wrongly identified a damaged CHG when the cause of the coolant loss was a worn water pump. Later cars like mine were fitted with an evaporator to the water pump. That collected the usually first tell tale small coolant losses from the wearing pump and evaoporates them. The idea being to protect the timing belt from possible harmful effects of the coolant lost on the Timing Belt which also drives the water pump. The replacement pump I fitted did NOT have an evaporator so when that pump starts to wear, coolant losses will appear under the car to alert me that the initial stages of wear are starting.
Although I removed a near perfect CHG from my MG ZS, no harm done as the replacement MLS gasket I fitted is a better upgrade item in my experience along with its so called head saver shim which I have always fitted although others doing the job sometimes do not.
So, pleased to report that all five K-Series CHGs I've replaced on these cars have so far proved absolutely 100% reliable after many 1000s of miles since. However, do keep in mind that the so called 'failures' were caught well before other damage to the engine was done. Cost of each job in parts alone about £100 which included all three belts, 10-40 semisynthetic, fresh OAT coolant and a water pump. Plus a couple of dishwasher tablets for a final cooling system clean out before c introducing the fresh 50-50 OAT coolant mix. I enjoyed each job and, with the passing of time, the satisfaction of a job well done is an additional bonus to the money saved.
One final word of advice which I feel is the 'secret' of a job well done. It is essential to effectively clean out all of the old oil~coolant mix from the cooling system and sump contents. This is the most time consuming part of the job. Take your time and be thorough cleaning the system out of all the muck. Two cars I removed the radiators and shook them to flush out the stuff lodged in the small bore core tubes. Badly contaminated cooling systems with thick oil-coolant mix needed quite a bit of work, but, well worth it. So this
:~Can become this:~
This is what I drained from the system of this car with some rad flushing agent; Holts SPEEDflush IIRC ~ a perfect oil-coolant emulsification mix cleaned out with the flush ~ not nice and that after initial flushing with a garden hose :~
......and a really bad example like this Rover 25's radiator can become as clean as a whistle internally instead of having to buy a new one :~
Professionals would rarely bother with this cleaning as it's very time consuming so ..."You need a new rad mate" ...
The car with those before and after pictures of the coolant expansion bottle I've been driving for about eight months since I did the work on it. It's a 1.8 Rover 45 Connoisseur and I've done about 4,000 miles in it. I drive it in preference to my usual daily drivers, Rover 620ti, as it uses far less fuel in these winter months and being a top spec Connoisseur, even has bum warmer front seats. Never thought I'd ever appreciate that sort of thing but I do. I'll be getting a pipe an slippers next. Well maybe the slippers as I do not smoke being an ex-40 a day man.
I've grown to like it. A really good means of getting about with the same engine as my MGZS. This R45 bought for little more than loose change as a "spares or repair" ebay special. Not a bad looking car either :~
I've been typing this lot with one eye on the TV Snooker highlights so if I've missed a typo or two, so be it.
.
Edited by MGJohn on Wednesday 7th December 01:36
Thanks for the advice John, I've been using the info on the other forums as well as using old fashioned common sense and working out 'what do we need to remove to get to X?'.
So far we've removed the airbox and inlet/exhaust from the engine as well as all the other electrical parts so now we're left with the engine still complete with belts attached.
Next job on Friday/Saturday (weather dependant) is to crank the engine over to meet the timing marks and then get cracking on removing the belts.
While the head is off we're going to check the condition of the valves/ports and see if they need a clean up as well. Chap at work reckons you can use a steel rule and feeler gauges to determine if the head needs skimming, any thoughts on this? Or is it best to get it looked at anyway?
Going to replace the gaskets (exhaust, inlet, HG and rocker cover where there was already a leak) as well as the headbolts, water pump and belts. Not sure whether to do the thermostat as well just to be on the safe side.
Luckily it would appear from draining the coolant that there isn't oil in the coolant, however there is quite clearly coolant in the oil, so we will be careful on flushing the system thoroughly to get rid of it all.
Although it looked quite daunting to start with so far (touch wood) it has been relatively easy. Every nut, bolt and hole has been marked using a paint pen and photo's have been taken along the way to provide reference for things. The engine will look like a paint by numbers by the time we're finished!
Couple of other tips. Disconnect or ideally remove the battery if not already done so.
Before undoing anything on the Cylinder Head prior to removal, Get the Index on the CRANKshaft Pulley correctly aligned to the engine's "safe" position. This cleaned and painted CRANKshaft Pulley has black marks to identify the "Safe" position index. The Pulley on your car will be dirty and that makes visual identification of the notch in the outer face of the Pulley hard to identify. I feel unseen for that notch with a finger or finger nail as in the car, a visual check is difficult because of the access limitations. That notch is in the Black Oblong Marker at the top of the Pulley's edge in this picture. The triangular black mark 180 degrees away makes an ideal visual check that the notch at the top is aligned to the safe position if that triangle is at the bottom as in the picture.
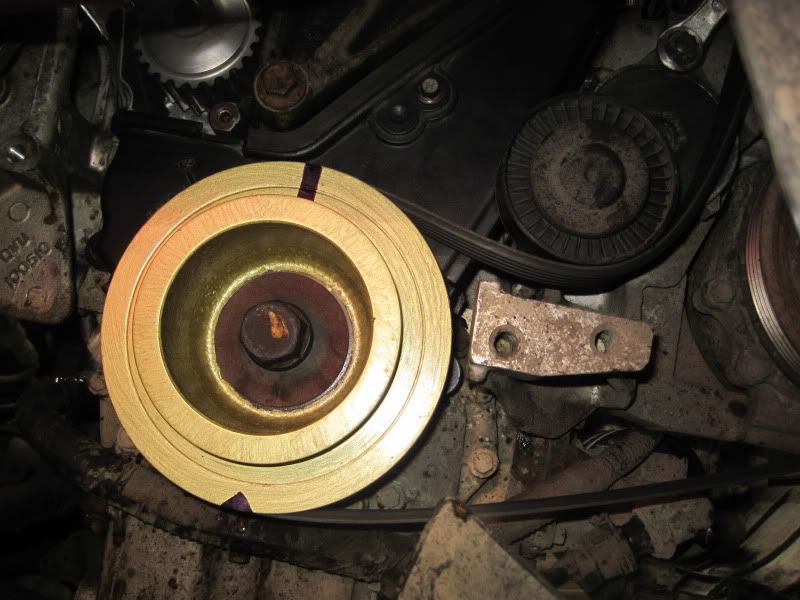
The engine is inclined slightly towards the front of the car and this is why the Pulley does not look upright in the picture. You could use a dab of Tippex and that would work just as well. With the CRANKshaft index in the safe position, look at the two CAMshaft Pulleys. Their indexes should be aligned like this locked in the SAFE position with the locking device ... about a fiver on ebay posted. A useful aid but, not essential :~
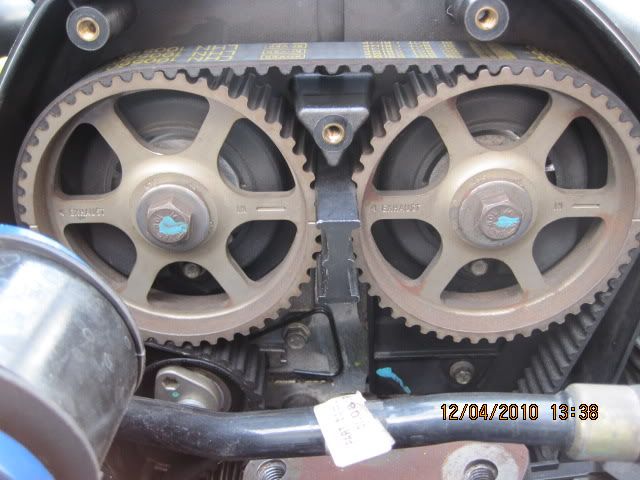
If they are not, and their IN ~ EXHAUST wording is upside down, rotate the CRANKshaft another 360 degrees and their wording will be the correct way up and all THREE Pulleys will be in the safe working position. Once the Cylinder head is removed, NEVER move the CRANKshaft pulley or you could disturb the cylinder liners and their sealant compound locations in the block. There is a tool to hold the Cylinder Liners tightly so that they will not move if the CRANKshaft is accidentally moved. However, I've never used one, I am just VERY careful not to move the CRANKshaft when the cylinder head is removed.
Good luck ~ let us know how you get on and do not hesitate to ask if you get stuck at some point.
EDIT to add @ 14:01
Oh yes, NEVER leave that CAMshaft locking device in place before reconnecting the battery prior to start up. Even in the best run workshops folks have done that when distracted and the engine is terminated as soon as the starter is operated. ALWAYS double check for that.
Before undoing anything on the Cylinder Head prior to removal, Get the Index on the CRANKshaft Pulley correctly aligned to the engine's "safe" position. This cleaned and painted CRANKshaft Pulley has black marks to identify the "Safe" position index. The Pulley on your car will be dirty and that makes visual identification of the notch in the outer face of the Pulley hard to identify. I feel unseen for that notch with a finger or finger nail as in the car, a visual check is difficult because of the access limitations. That notch is in the Black Oblong Marker at the top of the Pulley's edge in this picture. The triangular black mark 180 degrees away makes an ideal visual check that the notch at the top is aligned to the safe position if that triangle is at the bottom as in the picture.
The engine is inclined slightly towards the front of the car and this is why the Pulley does not look upright in the picture. You could use a dab of Tippex and that would work just as well. With the CRANKshaft index in the safe position, look at the two CAMshaft Pulleys. Their indexes should be aligned like this locked in the SAFE position with the locking device ... about a fiver on ebay posted. A useful aid but, not essential :~
If they are not, and their IN ~ EXHAUST wording is upside down, rotate the CRANKshaft another 360 degrees and their wording will be the correct way up and all THREE Pulleys will be in the safe working position. Once the Cylinder head is removed, NEVER move the CRANKshaft pulley or you could disturb the cylinder liners and their sealant compound locations in the block. There is a tool to hold the Cylinder Liners tightly so that they will not move if the CRANKshaft is accidentally moved. However, I've never used one, I am just VERY careful not to move the CRANKshaft when the cylinder head is removed.
Good luck ~ let us know how you get on and do not hesitate to ask if you get stuck at some point.
EDIT to add @ 14:01
Oh yes, NEVER leave that CAMshaft locking device in place before reconnecting the battery prior to start up. Even in the best run workshops folks have done that when distracted and the engine is terminated as soon as the starter is operated. ALWAYS double check for that.
Edited by MGJohn on Wednesday 7th December 14:01
Oh yes, checking the cylinder head face for truth. I use a Top Quality ENGINEERS RULE ( Straight Edge ) to check head faces and it is very reliable. All too often cylinder heads are always 'skimmed' when it is not necessary. Here's the old "Rabone Chestersman" straight edge I use to check the face of a Rover T-Series Cylinder head fitted to the Turbocharged cars.
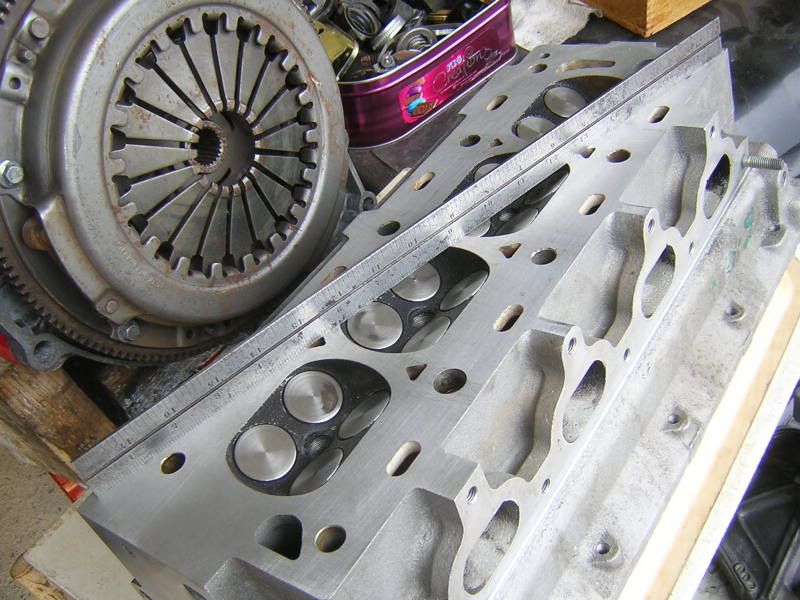
By positioning the straight edge along and across the face at various angles, you can check for gaps under the straight edge where they shouldn't be. Using a torch can help here too as the light will pass under the gaps.
..
By positioning the straight edge along and across the face at various angles, you can check for gaps under the straight edge where they shouldn't be. Using a torch can help here too as the light will pass under the gaps.
..
Great stuff thanks for the advice and the pics as well. 
I'll put some updates on here as we go. Would be nice to have it done and dusted before Xmas, but with the dark evenings (working outside) working time is limited!
Just as a final question (for now!), where do you normally buy the bits from, I've had a look at Rimmer Bros but they seem quite expensive. Is eBay the best place to go for bolts, belts and gaskets?
Cyder said:
Great stuff thanks for the advice and the pics as well.
I'll put some updates on here as we go. Would be nice to have it done and dusted before Xmas, but with the dark evenings (working outside) working time is limited!
Just as a final question (for now!), where do you normally buy the bits from, I've had a look at Rimmer Bros but they seem quite expensive. Is eBay the best place to go for bolts, belts and gaskets?
Look forward to the updates.I'll put some updates on here as we go. Would be nice to have it done and dusted before Xmas, but with the dark evenings (working outside) working time is limited!
Just as a final question (for now!), where do you normally buy the bits from, I've had a look at Rimmer Bros but they seem quite expensive. Is eBay the best place to go for bolts, belts and gaskets?
Never renewed the head through bolts on the ones I've done. My son and his K-Series mad mates rarely do if the bolts look and shape up like new which in my experience they always do.
Driving MGs and Rovers for many years, and looking after those same cars for my family and friends, I get my original parts from my local XPart outlet. As a long standing customer, I get a reasonable discount which is always a useful saving or even a good one on list prices for OE parts.
You can buy OE parts from ebay and occasionally there are good savings there. Rimmer Bros are not always expensive ~ I got four lower suspension arms ( two pairs ) for the 620ti in my family a few months back. They were having a clear out and after a chat with a helpful parts guy, when I said I'm thinking of buying four provided the price is right he offered me four at a price I really could not refuse. Four lower arms for the price of what one would have cost a few years back. That included postage for those heavy items!
Always shop around. Apart from the additional work renewing them in the old lower suspension arms, the two bushes in each arm cost £20 a side! Easier and less work to renew a whole arm with new bushes already in than hammering out the old, and pressing in the new bushes. Nice taught suspension and steering on those twelve year old cars!
If you're patient and search caraefully, there are huge savings to be made on car parts ~ even original equipment. Timing belts, water pumps, coolant ~ you name it!
..
Update time...
Got cracking on it again this morning (not ideal with a bit of a hangover from work's Xmas party last night, but anyway!).
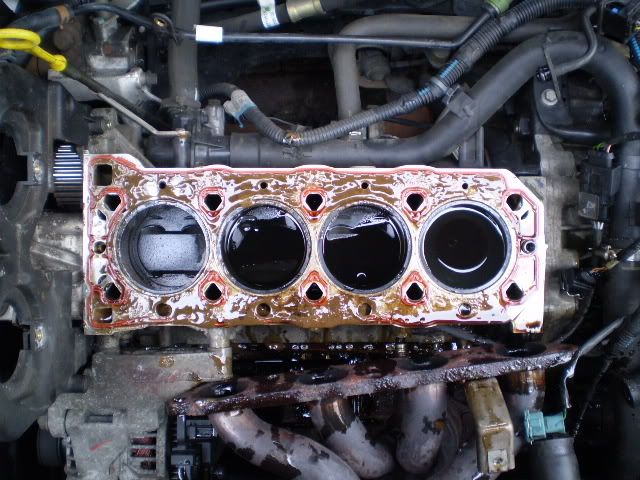
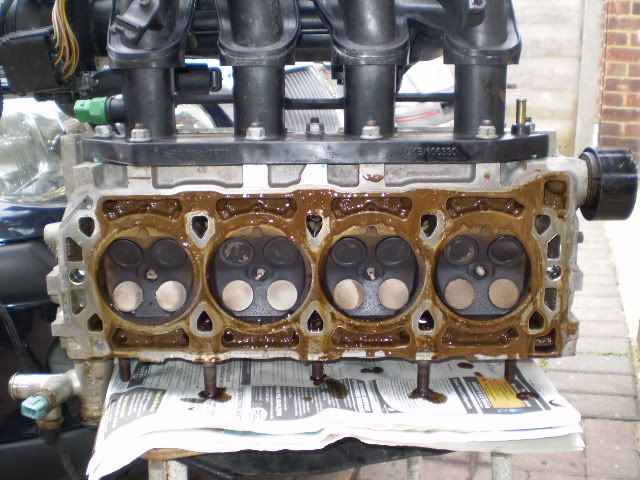
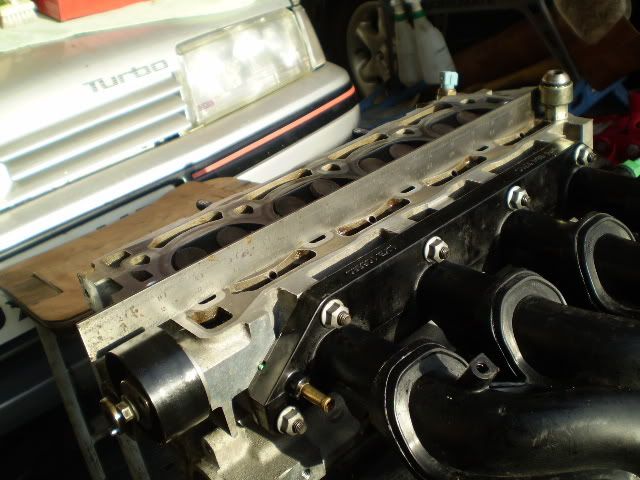
Removed the Camshaft Sprockets, unbolted the exhaust manifold and lifted the head clean out. It's pretty clear where the oil/water interface occured in the cylinder closest to the gearbox (is that 1 or 4?!)
The next step before checking for truth is to clean the head and the mating faces.
Any suggestions on what the best substance to use to clean the oil/water combo off the head?
The gasket that is on the car at the moment is the OE type I believe so will definitely be fitting the MLS onto it during the rebuild!
Getting there slowly!
Got cracking on it again this morning (not ideal with a bit of a hangover from work's Xmas party last night, but anyway!).
Removed the Camshaft Sprockets, unbolted the exhaust manifold and lifted the head clean out. It's pretty clear where the oil/water interface occured in the cylinder closest to the gearbox (is that 1 or 4?!)
The next step before checking for truth is to clean the head and the mating faces.
Any suggestions on what the best substance to use to clean the oil/water combo off the head?
The gasket that is on the car at the moment is the OE type I believe so will definitely be fitting the MLS onto it during the rebuild!
Getting there slowly!
Get yourself some engine degreasant and a mist sprayer from a Garden Centre, ideally one with adjustable twist nozzle for fine jet or wide mist spray. Put a 50-50 water degreasant mix in the mist sprayer and spray the dirty areas of the engine. I use a round wire brush in an electric drill to carefully clean up all the interfaces. Do not overdo it on the head and block faces. Let the wire brush do the work without too much pressure.
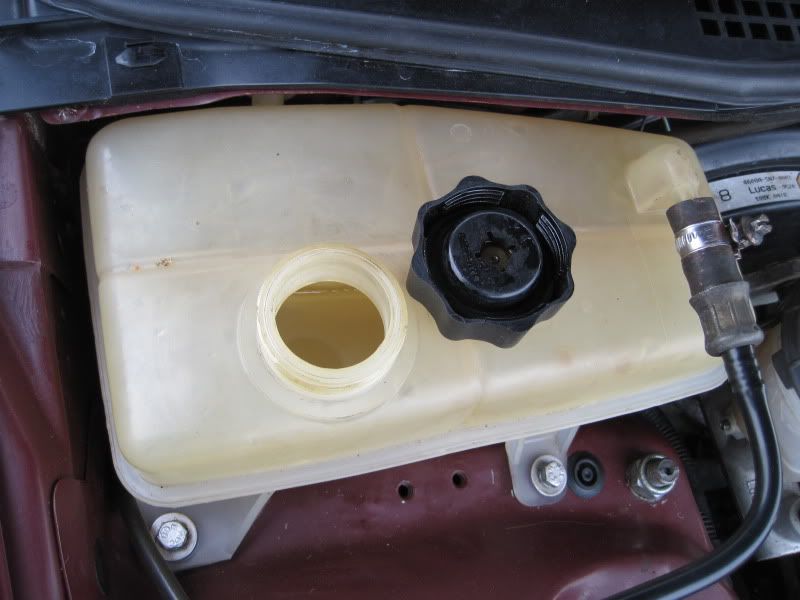
Take your time and with care this :~
Can become this :~
and this :~
this :~
If you have a quality straight edge check the head face after the clean up ~ I use an ancient Engineer's Rule made in the time when the UK had such industries.
All being well, the head will be ready to go onto this ~ do not forget the Head saver shim. Here it is in place on top of the Multi Layer Steel Cylinder Head gasket :~

Good luck. Do it right and you will be well pleased not to mention saving a nice few quid.
Take your time and with care this :~
Can become this :~
and this :~
this :~
If you have a quality straight edge check the head face after the clean up ~ I use an ancient Engineer's Rule made in the time when the UK had such industries.
All being well, the head will be ready to go onto this ~ do not forget the Head saver shim. Here it is in place on top of the Multi Layer Steel Cylinder Head gasket :~
Good luck. Do it right and you will be well pleased not to mention saving a nice few quid.
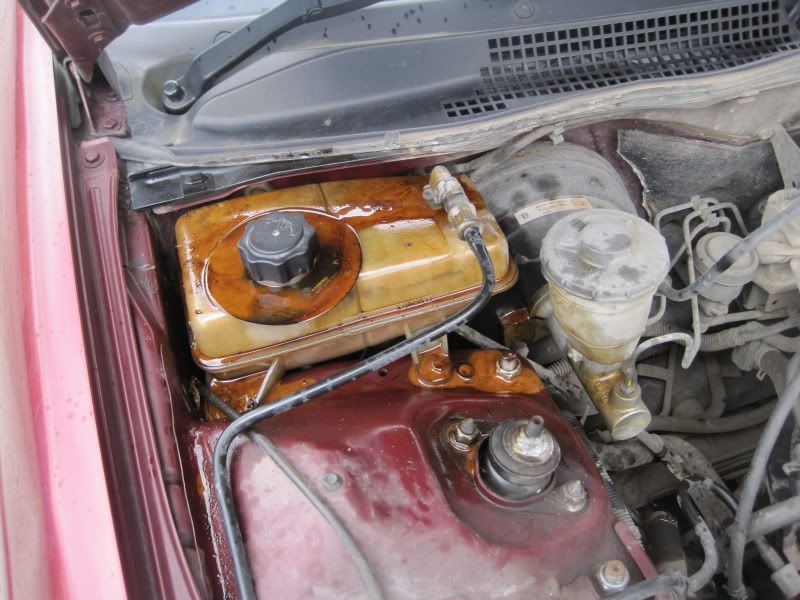
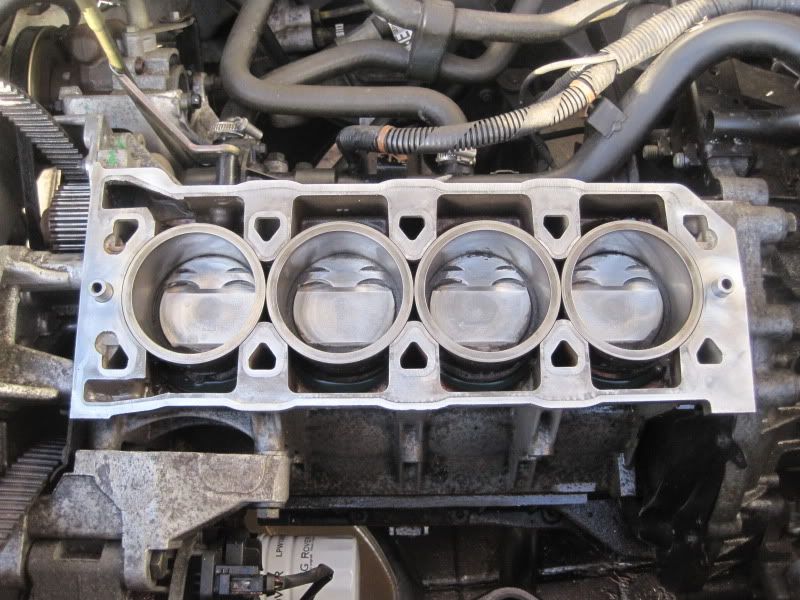
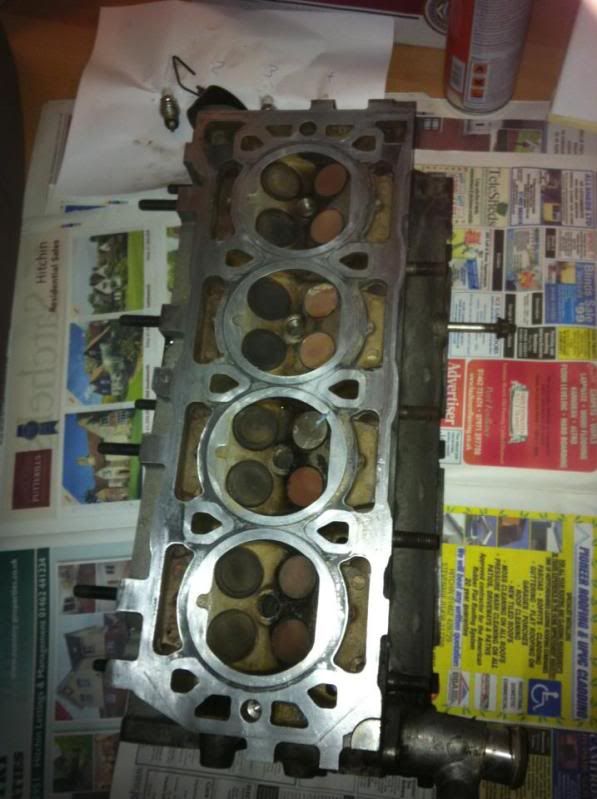
So today I've had the head in the sink with my pot of elbow grease out and it now looks like this.
I can't feel any pitting in the surface around where the fire rings are, but as you can see the surface is darkened around the that area and doesn't seem to want to come off!
I'm getting the straight edge and feeler gauges from work tomorrow to see if the head is within the 0.05mm warp tolerance.
Any thoughts on the state of the head? My arms are a bit achy from attacking it all afternoon!
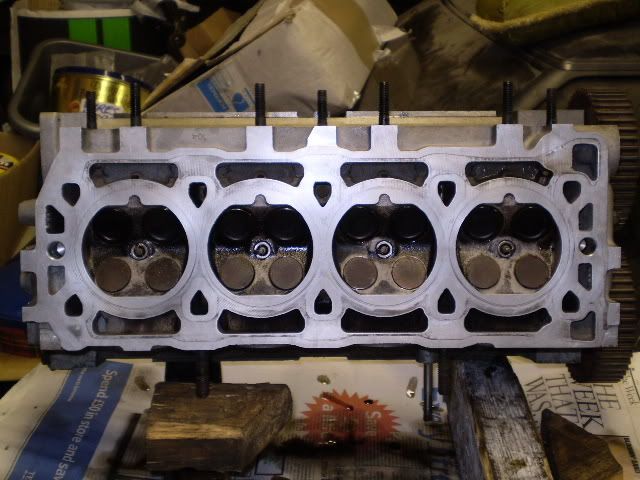
So tomorrow we start bolting the bugger back together.
I have noticed a problem...
I'm not sure how to remove the crank pulley. I got a wee bit trigger happy when dismantling the engine and cut the cambelt to get it out of the way and now the head is off can't allow the crank to turn over or all hell breaks loose inside the cylinder liners/bearings I believe.
What would be the best way to remove it please?!
Bad luck. Next time you will not make that mistake. ALWAYS tackle that job first!
You will have to lock the flywheel securely. This is done using a locking device through the starter motor aperture in the bell housing. A special locking tool is available that you could buy, or borrow on deposit from a local dealership.
WARNING: Those 22mm CRANKshaft Pulley Bolts on Rover K-Series can be very tight. This is the length I had to go to on my son's Rover 25. It was silly tight:~
Compare that to the ease it was removed from my MG ZS 120+ bought new in 2003 and has never been in a pro-garage. When renewing the Water Pump and all three belts, I used my 240v Impact Driver and it came undone in a fraction of a second. The Bolt on my son's Rover 25 would not budge using the same tool. In previous ownership that had simply been overtightened :~
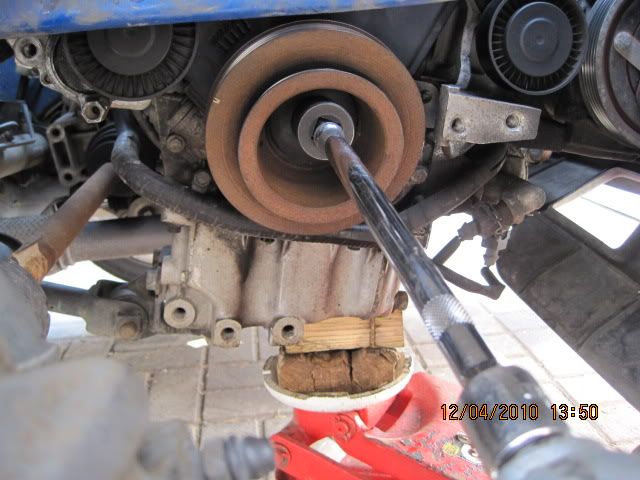
Do not attempt to undo it without securely locking that flywheel. Get advice locally if you are still unsure.
Good luck.
.
You will have to lock the flywheel securely. This is done using a locking device through the starter motor aperture in the bell housing. A special locking tool is available that you could buy, or borrow on deposit from a local dealership.
WARNING: Those 22mm CRANKshaft Pulley Bolts on Rover K-Series can be very tight. This is the length I had to go to on my son's Rover 25. It was silly tight:~
Compare that to the ease it was removed from my MG ZS 120+ bought new in 2003 and has never been in a pro-garage. When renewing the Water Pump and all three belts, I used my 240v Impact Driver and it came undone in a fraction of a second. The Bolt on my son's Rover 25 would not budge using the same tool. In previous ownership that had simply been overtightened :~
Do not attempt to undo it without securely locking that flywheel. Get advice locally if you are still unsure.
Good luck.
.
Edited by MGJohn on Friday 6th January 20:27
Gassing Station | MG | Top of Page | What's New | My Stuff