Pete's 94 Chimaera Project
Discussion


I've had a thread running on Retrorides for just over a year. I thought some of you may be interested so I'm going to copy all of the posts in to this thread to bring it up to the current time.
Here is my latest project, a 1994 TVR Chimaera. I've wanted one for around 20 years and I'd been saving up to buy one when an opportunity came up that was too good to pass up. I hadn't planned to buy one that was as much of a project but it's mostly there and it was cheap. The chap I bought it off (a friend of a friend) had bought it with the intention of turning it in to a race car and started to strip it (hence the lack of interior) and then moved away and it sat in his Mum's garage for the next 8 years.
The good bits - the bodywork is in pretty good condition, the wheels are tidy, the engine turns over by hand and has a genuine 65k miles, it has the T5 gearbox, the trim that is still intact (door cards, tunnel top, seats) are all pretty good, I have most of the bits to put it back together.
The bad bits - the outriggers need replacing, Paul (previous owner) never had is running (it was missing the ecu when he bought it from a TVR specialist), the carpets all got binned, some of the bits are going to be difficult to trim (round the windscreen and the back of the dash)
For some reason the plenum was off the car when Paul bought it. I think I've worked out why, in the box with the top of the plenum were two idle stepper motors, one old and one new. The old one looks like it had been sheared off as there is no thread on it.
As you can see there is plenty of work to do and money to be spent, however if I can do the work to it for £5k or less it will still be cheap TVR. The initial plan is to get the engine running before ploughing money in to chassis work.
No at lot to take pictures of currently. As I mentioned before when Paul had bought the car it was missing the ECU, he'd sourced one but I wanted to check it was a TVR one as they use a Landrover one with a different chip. It did have writing on the label which was a good sign but I took the lid off it to check the chip and that has some tape with 4.0 written on it so I'm hoping we're good with that.


I've put the ignition barrel back together (it had been taken apart because Paul thought he'd lost the keys and then found them) and I've put the column stalks back on. A battery has been purchased and connected up to get an idea of what is working. I couldn't test all of the lights because I'm missing the lower dash panel and switches where the radio goes but the column controls all worked, reverse lights, boot solenoid etc and importantly the touch key on the immobiliser turned off the light and I could get the ignition. Bits that didn't seem to work the main interior fan, the fuel gauge and the oil pressure gauge went straight to max, I also thought I'd turn the key just to see if the starter would engage briefly and not actually crank it yet but it just clicked so I presumed it might be jammed.
Yesterday evening I thought I would try connecting up the ECU mate code reader that came with the car to check it could communicate, but when I tried it couldn't talk to the ECU. I thought I'd have a quick google to find out what fuse was the ECU one is in case that was the cause and found a post where someone had changed the battery on an early Chimaera and then it wouldn't start. The early ones didn't have a remote fob and used the key to deactivate the alarm and it said if that wasn't deactivated the ECU, fuel pump and fuel gauge wouldn't get any power. I'd figured disarming the immobiliser would have been enough. As the doors and all the latches aren't on the car I plugged in the loom connector on one of the door locks to see if that would work and found when I pressed the microswitch on it a relay clicked and the alarm light stopped flashing. When I turned the ignition on the fuel gauge sprung in to life and the ECU mate could connect up, I also momentarily turned the key and the starter kicked in!
I've got a missing hose connector and blank for the plate at the bottom of the plenum on the way so that I can get that reassembled. The plan is to whip the plugs out and put a little oil down the bores. Then next week I'm planning to crank it over with the fuel pump relay pulled and plugs out to get some oil pressure, drain the fuel and put some fresh in and try and start it. It's my 40th next week and I have the day off so that seems like a good day to try a first start.
Today I whipped the plugs out and put a little oil down the bores. I left it for a bit and then pulled the fuel pump relay and thought I'd spin it over without the plugs in to get a bit of oil round the engine. I cranked it over for a few seconds and the oil pressure light didn't go out, I thought maybe it just needed a bit longer so tried again. I then noticed a big puddle of oil appearing under the car. It seems the ECU wasn't the only thing that had been removed but also the oil pressure sender! I'm glad I wasn't trying to run it. Oil pressure sender on order.


I set myself a target of making the car run today (my 40th birthday). So have been doing various bits in preparation this week.
Reassembled the plenum and connected all of the pipes.


I ordered an oil pressure sender from one of the TVR specialists but when it arrived it appears I'm missing an adapter as well as the thread is too small. Time limited I went to a local motor factors and picked up an oil pressure switch for a V8 Landrover Discovery to plug the hole, it was only a fiver. I screwed it in and spun the engine over again without the plugs, the oil pressure light went out and no obvious leaks.
When I was trying to find the paint code from the VIN plate I noticed the engine number ended HC. TVR did a HC model of the 400 Chimaera which had high lift cams and a couple of other tweaks and is 35bhp up over the standard 400. I was told to take the VIN with a pinch of salt as cars got badged up as all sorts and they are not necessarily correct. I was told if it was a HC the pistons would be pocketed as they had to be for the cam. Whilst I had the plugs out I borrowed a scope and had a look, they look pocketed to me.


Today as planned I tried to start her.
Here's the first attempt (Ignore the date on the Go Pro I was struggling to set it this morning!)

It took a couple of tries and she burst in to life!

The only issue is the revs wouldn't drop, it was sitting at between 2.5-3k rpm. Initially I thought a vacuum leak but then I noticed this.

The throttle pot was showing 21% even with it not running. I took the pipe from the MAF sensor off and looked at the butterfly and it's open a fair bit! From what I've read it should be pretty much completely closed, it looks like someone had been fiddling.

The annoying thing is the grub screw to adjust it is underneath so the plenum needs to come back off.
Reassembled the plenum and connected all of the pipes.
I ordered an oil pressure sender from one of the TVR specialists but when it arrived it appears I'm missing an adapter as well as the thread is too small. Time limited I went to a local motor factors and picked up an oil pressure switch for a V8 Landrover Discovery to plug the hole, it was only a fiver. I screwed it in and spun the engine over again without the plugs, the oil pressure light went out and no obvious leaks.
When I was trying to find the paint code from the VIN plate I noticed the engine number ended HC. TVR did a HC model of the 400 Chimaera which had high lift cams and a couple of other tweaks and is 35bhp up over the standard 400. I was told to take the VIN with a pinch of salt as cars got badged up as all sorts and they are not necessarily correct. I was told if it was a HC the pistons would be pocketed as they had to be for the cam. Whilst I had the plugs out I borrowed a scope and had a look, they look pocketed to me.
Today as planned I tried to start her.
Here's the first attempt (Ignore the date on the Go Pro I was struggling to set it this morning!)
It took a couple of tries and she burst in to life!
The only issue is the revs wouldn't drop, it was sitting at between 2.5-3k rpm. Initially I thought a vacuum leak but then I noticed this.
The throttle pot was showing 21% even with it not running. I took the pipe from the MAF sensor off and looked at the butterfly and it's open a fair bit! From what I've read it should be pretty much completely closed, it looks like someone had been fiddling.
The annoying thing is the grub screw to adjust it is underneath so the plenum needs to come back off.
Good news, I posted some bits on one of the Facebook groups and asked if something was missing from the linkage here

I had a reply saying that a rotary spring was missing and also that it had been assembled incorrectly the tab on the lower part should sit inside the fork. I thought this might be a spindle out job (it will be for the spring) but I was told if I loosened the 4 bolts holding the bracket to the plenum I should be able to move it enough to slot it in. Sure enough I was able to do it and with that done the throttle butterfly looks pretty much closed, the ECU Mate was now showing 6% on the throttle pot. I started her up and it was now idling at around 1100 rpm cold so much better. The engine sounds a bit tappy so I'll need to look in to that. It might be it just needs and oil change and running for a while as it's been sat so long or it could be manifold gaskets/manifold, hopefully nothing too major.
I had a reply saying that a rotary spring was missing and also that it had been assembled incorrectly the tab on the lower part should sit inside the fork. I thought this might be a spindle out job (it will be for the spring) but I was told if I loosened the 4 bolts holding the bracket to the plenum I should be able to move it enough to slot it in. Sure enough I was able to do it and with that done the throttle butterfly looks pretty much closed, the ECU Mate was now showing 6% on the throttle pot. I started her up and it was now idling at around 1100 rpm cold so much better. The engine sounds a bit tappy so I'll need to look in to that. It might be it just needs and oil change and running for a while as it's been sat so long or it could be manifold gaskets/manifold, hopefully nothing too major.
When I bought the car it was missing the lower dash panel with switches and buttons. The other week I was looking on ebay and found a listing for 'TVR Chimaera Hazard And Warning Light Switch Mounting Panel'.

I had presumed they were just fitted in to the fascia panel but there are actually metal mounting panels behind. I messaged the seller just to confirm they were correct and why I needed them and he replied to say that he actually had the switches and lights as well. We did a deal and I bought them. In one of the boxes with the car I had found the wiring harnesses for them so when they arrived I had a go at plugging them in to see what worked. A very helpful person on one of the facebook groups had drawn a diagram of which wire went where.

Success, everything works as it should. I'm going to clean up and paint the mounting plates before putting the switches and lights in.
When testing bits I did notice the brake lights didn't work.

That would explain it! New brake light switch ordered and fitted and they now work too.

I had presumed they were just fitted in to the fascia panel but there are actually metal mounting panels behind. I messaged the seller just to confirm they were correct and why I needed them and he replied to say that he actually had the switches and lights as well. We did a deal and I bought them. In one of the boxes with the car I had found the wiring harnesses for them so when they arrived I had a go at plugging them in to see what worked. A very helpful person on one of the facebook groups had drawn a diagram of which wire went where.
Success, everything works as it should. I'm going to clean up and paint the mounting plates before putting the switches and lights in.
When testing bits I did notice the brake lights didn't work.
That would explain it! New brake light switch ordered and fitted and they now work too.
New rear numberplate lights have been fitted as they were missing. They were direct replacements from a TVR supplier but the new ones had a little locating sort of pin that the originals can't of had, just had to file a little slot to fit them.


One of the things that I think is pretty cool on the early Chimaera's is the back lit translucent rear numberplate. I need to get a new plate as it's not in great condition but you get the idea.

Next was a new gas strut for the boot as the one that came with the car was weak when I fitted it and would barely hold the boot open. When looking in to it I found from a Pistonheads thread that SGS sell a longer one that allows the boot to open further. That has got to make it easier to put the roof panel in there and filling it with fuel. I think SGS worked with someone who had fitted LPG to spec it as they needed more space for the LPG filler nozzle.
Before

After

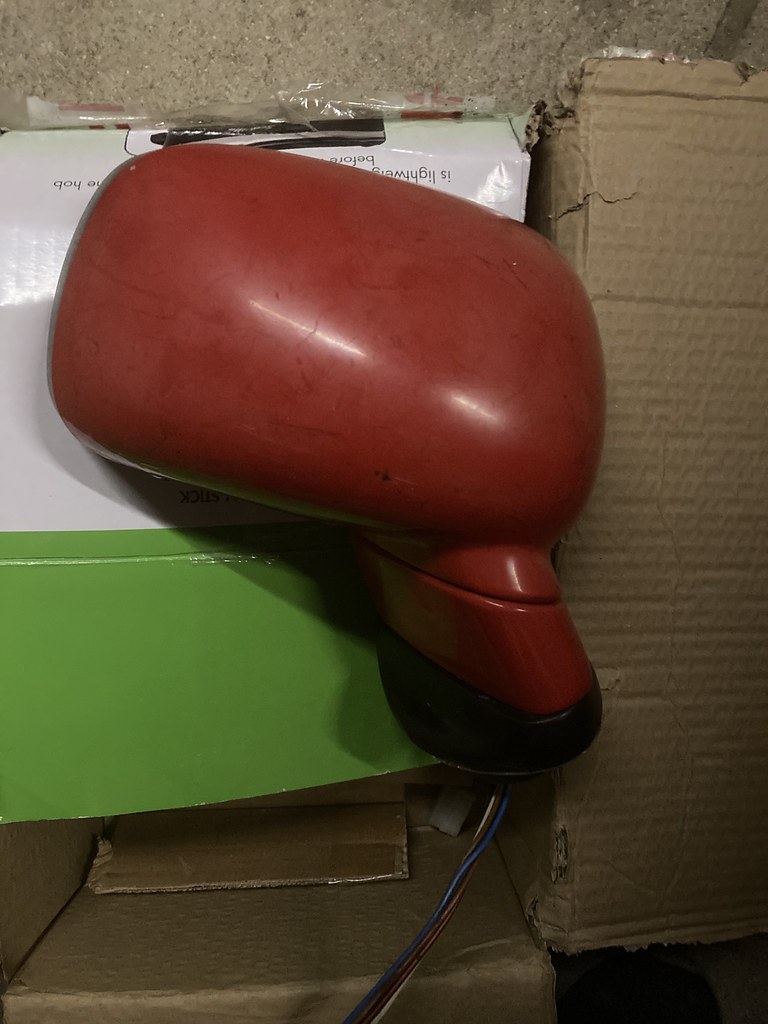
I won a pair of Corrado mirrors on ebay for £60 as the original items are hard to get hold of and fragile. There is a company who make some adapters to fit them without modification so I ordered some of those as well, more expensive than the mirrors were but I liked the idea of a bolt on solution.


I bought a service kit for the car from one of the TVR specialists along with the lambda extension cable which I was missing, the price of the cable made me wince but I couldn't find one anywhere else. I fitted the lambda cable and tried running it with the sensors plugged in. I think one of the sensors is faulty as it was popping and banging with them connected and the readings for the two on the ECU mate were showing differently when revved.
I changed the oil today, the plugs and air filter haven't been done yet, I thought I'd wait until it was a bit closer to being on the road to fitting them. There is a lot of debates about the best oil, some people saying 0w/40 fully synthetic, others saying 20w/50 as it's an old engine. I went for some Mobil 1 Super 2000 Semi Synthetic in 10w/40 grade. The important bit is the zinc content due to issues with cam wear on the Rover V8 and this oil has it in the formula.
The oil filter on the car is a bit of a pain to get at. It's easiest to get at from underneath, just tricky refitting with it prefilled with oil.

Whilst I had the car jacked up I had a better look at the outriggers. This is the worst bit I can see, it's just behind the passenger side front wheel.

Oh, and I can't remember if I mentioned but the engine tapping has stopped, I think it was just a sticky lifter as while it was running and up to temperature the other week it just suddenly stopped. It sounds pretty sweet now which is a result.
One of the things that I think is pretty cool on the early Chimaera's is the back lit translucent rear numberplate. I need to get a new plate as it's not in great condition but you get the idea.
Next was a new gas strut for the boot as the one that came with the car was weak when I fitted it and would barely hold the boot open. When looking in to it I found from a Pistonheads thread that SGS sell a longer one that allows the boot to open further. That has got to make it easier to put the roof panel in there and filling it with fuel. I think SGS worked with someone who had fitted LPG to spec it as they needed more space for the LPG filler nozzle.
Before
After
I won a pair of Corrado mirrors on ebay for £60 as the original items are hard to get hold of and fragile. There is a company who make some adapters to fit them without modification so I ordered some of those as well, more expensive than the mirrors were but I liked the idea of a bolt on solution.
I bought a service kit for the car from one of the TVR specialists along with the lambda extension cable which I was missing, the price of the cable made me wince but I couldn't find one anywhere else. I fitted the lambda cable and tried running it with the sensors plugged in. I think one of the sensors is faulty as it was popping and banging with them connected and the readings for the two on the ECU mate were showing differently when revved.
I changed the oil today, the plugs and air filter haven't been done yet, I thought I'd wait until it was a bit closer to being on the road to fitting them. There is a lot of debates about the best oil, some people saying 0w/40 fully synthetic, others saying 20w/50 as it's an old engine. I went for some Mobil 1 Super 2000 Semi Synthetic in 10w/40 grade. The important bit is the zinc content due to issues with cam wear on the Rover V8 and this oil has it in the formula.
The oil filter on the car is a bit of a pain to get at. It's easiest to get at from underneath, just tricky refitting with it prefilled with oil.
Whilst I had the car jacked up I had a better look at the outriggers. This is the worst bit I can see, it's just behind the passenger side front wheel.
Oh, and I can't remember if I mentioned but the engine tapping has stopped, I think it was just a sticky lifter as while it was running and up to temperature the other week it just suddenly stopped. It sounds pretty sweet now which is a result.
Edited by pmc_3 on Monday 12th February 21:03
I've got a few little jobs done since the last update.
The oil pressure sender adapter turned in to a bit of a game to source. I had one sent with the service kit I bought but the threads weren't correct so I returned it. Another TVR specialist has them listed but it was £19.50 + vat and then £8 for delivery! I didn't fancy paying that, I was pretty sure the sender thread was 1/8 NPT so I took a punt on an adapter from Demon Tweeks on ebay for £14.50 delivered.

I was worried it might be a bit long, but it fitted a treat.

When I first started the car I thought the gauge might be over reading and maybe I had the wrong sender but once the car was up to temperature it had dropped down to between 25-30psi. I also managed to get the car to idle when warm and was able to check if the fans kicked in which they did.
I got some new LED bulbs the for the number plate lights so decided I could fit the rear plate. I managed to salvage the original one by soaking all of the sticky strips off the back. I've drilled and screwed it on as when I tested it the original sticky strips were blocking some of the backlighting.
It's starting to look like a car from the rear now! Unfortunately I missed out on a good condition rear badge I was bidding on otherwise that would have been the rear exterior sorted.

I did however spot a good condition front badge on Facebook marketplace which I bought and have fitted. The original one could be repainted but this was cheap enough it wouldn't be worth the effort of sorting the original.


I've cleaned up the door locks (I'd mostly done one in the photo and just started the other) and refitted them to the body as it makes it easier to deactivate the alarm, I just need some seals now which are hard to come by. The aluminium housings were quite corroded but cleaned up fairly well. I need to fit the latches and central locking solenoids too but I want to repaint the mounting bracket first. I did connect up the central locking solenoids and tested them with the locks and they operated as they should.


The little cap that holds the plunger for the low brake fluid light on the reservoir cap was missing when I got the car, someone on facebook kindly sent me one. Another little job ticked off.


The past couple of evenings I've had a go at seeing if the roof is salvageable. It hadn't been folded down very carefully when it was removed and there were some big creases, a little split and it was very hard. I bolted the folding supports in place and then heated the rear screen with a heat gun on low to try and soften it a bit. I tried to open it out. It was tight but I managed it, although it pulled up a bit from the rear where I hadn't put the nuts on yet. I left it over night and this evening I've added the 3 nuts in the boot above the fuel tank, it now seems to fold a little easier as well. I tried putting it up with the hard solid section, it was really tight but I managed to get it in and I've left it on to see if it relaxes a little if it's left up for a bit.


I'm not sure if this little split can be repaired? it's where the screen was folded to almost a point. It would be a shame to have to put a new window in for just this.


I also got an ebay bargain, not necessarily something I need but I have a saved search for Chimaera bits and it popped up and I think it was incorrectly priced. A brand new starter motor with a label from one of the TVR specialists for £12 delivered. I was expecting the transaction to be cancelled but it turned up the following day!
I've found a TVR specialist in Downham Market which is just under 40 miles from me. I'm going to have a chat with them about doing the chassis repairs as I'd like to get that done fairly soon.
The oil pressure sender adapter turned in to a bit of a game to source. I had one sent with the service kit I bought but the threads weren't correct so I returned it. Another TVR specialist has them listed but it was £19.50 + vat and then £8 for delivery! I didn't fancy paying that, I was pretty sure the sender thread was 1/8 NPT so I took a punt on an adapter from Demon Tweeks on ebay for £14.50 delivered.
I was worried it might be a bit long, but it fitted a treat.
When I first started the car I thought the gauge might be over reading and maybe I had the wrong sender but once the car was up to temperature it had dropped down to between 25-30psi. I also managed to get the car to idle when warm and was able to check if the fans kicked in which they did.
I got some new LED bulbs the for the number plate lights so decided I could fit the rear plate. I managed to salvage the original one by soaking all of the sticky strips off the back. I've drilled and screwed it on as when I tested it the original sticky strips were blocking some of the backlighting.
It's starting to look like a car from the rear now! Unfortunately I missed out on a good condition rear badge I was bidding on otherwise that would have been the rear exterior sorted.
I did however spot a good condition front badge on Facebook marketplace which I bought and have fitted. The original one could be repainted but this was cheap enough it wouldn't be worth the effort of sorting the original.
I've cleaned up the door locks (I'd mostly done one in the photo and just started the other) and refitted them to the body as it makes it easier to deactivate the alarm, I just need some seals now which are hard to come by. The aluminium housings were quite corroded but cleaned up fairly well. I need to fit the latches and central locking solenoids too but I want to repaint the mounting bracket first. I did connect up the central locking solenoids and tested them with the locks and they operated as they should.
The little cap that holds the plunger for the low brake fluid light on the reservoir cap was missing when I got the car, someone on facebook kindly sent me one. Another little job ticked off.
The past couple of evenings I've had a go at seeing if the roof is salvageable. It hadn't been folded down very carefully when it was removed and there were some big creases, a little split and it was very hard. I bolted the folding supports in place and then heated the rear screen with a heat gun on low to try and soften it a bit. I tried to open it out. It was tight but I managed it, although it pulled up a bit from the rear where I hadn't put the nuts on yet. I left it over night and this evening I've added the 3 nuts in the boot above the fuel tank, it now seems to fold a little easier as well. I tried putting it up with the hard solid section, it was really tight but I managed to get it in and I've left it on to see if it relaxes a little if it's left up for a bit.
I'm not sure if this little split can be repaired? it's where the screen was folded to almost a point. It would be a shame to have to put a new window in for just this.
I also got an ebay bargain, not necessarily something I need but I have a saved search for Chimaera bits and it popped up and I think it was incorrectly priced. A brand new starter motor with a label from one of the TVR specialists for £12 delivered. I was expecting the transaction to be cancelled but it turned up the following day!
I've found a TVR specialist in Downham Market which is just under 40 miles from me. I'm going to have a chat with them about doing the chassis repairs as I'd like to get that done fairly soon.
I've continued to clean up some bits and get them refitted.
The plates the door latches bolt to were a bit manky. They won't be seen but I wanted to get rid of the surface rust and tidy them up a bit before refitting.

I gave them a bit of the flap disk and wire wheel treatment along with the dash switch/light mounting panels.

A couple of quick coats of some Nitromorse silver paint and they look much better

I figured out how it all went together and refitted the door latches with the solenoids and release cables both sides.

The warning lights and switches back in to the mounting plates (second attempt after putting them through the wrong side on the bigger plate!)

Boot latch, solenoid mounting plate and solenoid all refitted and working

I've also got the bonnet latch refitted.

Next up will be swapping one of the lambda sensors and doing a couple of fibreglass repairs, one to the battery box and one to reattach a snapped piece on the shelf behind the seats that the door release cable routes through.
I've spoken to Matt Smith Sports Cars and the car is booked in for the outriggers to be replaced at the end of June, that will be a big step forward once completed.
The plates the door latches bolt to were a bit manky. They won't be seen but I wanted to get rid of the surface rust and tidy them up a bit before refitting.
I gave them a bit of the flap disk and wire wheel treatment along with the dash switch/light mounting panels.
A couple of quick coats of some Nitromorse silver paint and they look much better
I figured out how it all went together and refitted the door latches with the solenoids and release cables both sides.
The warning lights and switches back in to the mounting plates (second attempt after putting them through the wrong side on the bigger plate!)
Boot latch, solenoid mounting plate and solenoid all refitted and working
I've also got the bonnet latch refitted.
Next up will be swapping one of the lambda sensors and doing a couple of fibreglass repairs, one to the battery box and one to reattach a snapped piece on the shelf behind the seats that the door release cable routes through.
I've spoken to Matt Smith Sports Cars and the car is booked in for the outriggers to be replaced at the end of June, that will be a big step forward once completed.
Some good progress on the car since the last update.
One of the things that didn't work was the horn. I couldn't hear the relay clicking when pushing the horn button. After a bit of research I thought it was probably the slip ring on the back of the boss, I found if I held the button and turned the wheel the horn would work at certain points. The boss didn't want to come off without a fight and in the end I had to use a 3 legged puller. When I finally got it off the slip ring looked pristine so I discounted that. I found if I earthed the wire from the boss to a different point on the car the horn worked so the issue was to do with the column earthing. In the end it turned out just to be the bolts on the column weren't fully tight and the horn was working when you turned the wheel because it was putting load on the column and making a contact.
The horns both worked but were a bit grotty so I gave them and the brackets a bit of wire brush treatment and quick paint before fitting them back to the car.


I fitted a new lambda sensor to replace the one that was missing the plug. A socket had to be adapted to remove it as they are smaller than most at 17mm and there isn't enough room to get a ring spanner in.

The car was still running rich when I ran it afterwards and wouldn't idle when hot. Rovergauge showed on the long term lambda readings -100% on the odd bank and it threw and error code for 'Injector bank even'. I tested the injector circuits for continuity and I checked they were pulsing as they should with noid lights. I came to the conclusion it was probably a leaky injector.
The car has just come back from a trip to Mat Smith Sports cars.

It went in to have the outriggers replaced as I knew there was a hole in the n/s one.
This is what was visible from underneath when I'd looked
This is what the top side looked like when it had been removed

Mat found the other side had been repaired previously with a sleeve but there was only a little welding at the bottom of the join!

New ones in place


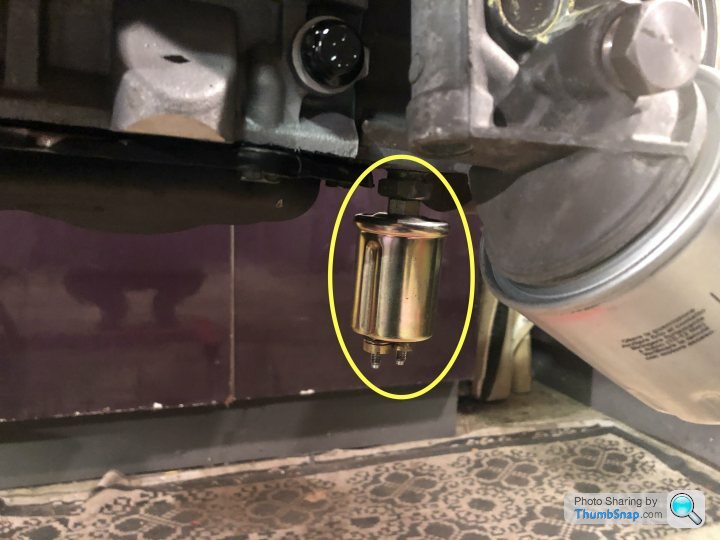
He found another hole on one of the top tubes below the o/s exhaust manifold so that was repaired at the same time. The fuel hoses were replaced and a new fuel filter I supplied fitted. I had Mat test and clean the injectors whilst the plenum was off. The injectors weren't too bad, the spray pattern wasn't great on a couple before cleaning but it's wasn't the cause of my over fueling issues. The work cost more than I paid for the car but it's money well spent, he's done a cracking job. The car is now solid and the money I've spent so far is still well below what I could pick up a ropey one for.
On Saturday I decided to swap the lambda sensors over just to see if my fault moved to the other bank. The car immediately sounded better and would idle when hot, previously it would stall if revved when warm. After a while it did throw a couple of faults 'Lambda sensor odd' and 'Low fuel pressure'. So I'm pretty sure the cause of the running issues is that lambda and I've ordered another today. I've also been told the low fuel pressure fault can come up when the car is running lean so hopefully it will clear that one too.
One of the things that didn't work was the horn. I couldn't hear the relay clicking when pushing the horn button. After a bit of research I thought it was probably the slip ring on the back of the boss, I found if I held the button and turned the wheel the horn would work at certain points. The boss didn't want to come off without a fight and in the end I had to use a 3 legged puller. When I finally got it off the slip ring looked pristine so I discounted that. I found if I earthed the wire from the boss to a different point on the car the horn worked so the issue was to do with the column earthing. In the end it turned out just to be the bolts on the column weren't fully tight and the horn was working when you turned the wheel because it was putting load on the column and making a contact.
The horns both worked but were a bit grotty so I gave them and the brackets a bit of wire brush treatment and quick paint before fitting them back to the car.
I fitted a new lambda sensor to replace the one that was missing the plug. A socket had to be adapted to remove it as they are smaller than most at 17mm and there isn't enough room to get a ring spanner in.
The car was still running rich when I ran it afterwards and wouldn't idle when hot. Rovergauge showed on the long term lambda readings -100% on the odd bank and it threw and error code for 'Injector bank even'. I tested the injector circuits for continuity and I checked they were pulsing as they should with noid lights. I came to the conclusion it was probably a leaky injector.
The car has just come back from a trip to Mat Smith Sports cars.
It went in to have the outriggers replaced as I knew there was a hole in the n/s one.
This is what was visible from underneath when I'd looked
This is what the top side looked like when it had been removed
Mat found the other side had been repaired previously with a sleeve but there was only a little welding at the bottom of the join!
New ones in place
He found another hole on one of the top tubes below the o/s exhaust manifold so that was repaired at the same time. The fuel hoses were replaced and a new fuel filter I supplied fitted. I had Mat test and clean the injectors whilst the plenum was off. The injectors weren't too bad, the spray pattern wasn't great on a couple before cleaning but it's wasn't the cause of my over fueling issues. The work cost more than I paid for the car but it's money well spent, he's done a cracking job. The car is now solid and the money I've spent so far is still well below what I could pick up a ropey one for.
On Saturday I decided to swap the lambda sensors over just to see if my fault moved to the other bank. The car immediately sounded better and would idle when hot, previously it would stall if revved when warm. After a while it did throw a couple of faults 'Lambda sensor odd' and 'Low fuel pressure'. So I'm pretty sure the cause of the running issues is that lambda and I've ordered another today. I've also been told the low fuel pressure fault can come up when the car is running lean so hopefully it will clear that one too.
Edited by pmc_3 on Monday 12th February 21:46
The lambda sensor didn't cure the issue and the low fuel pressure fault, that was actually caused by a misfire from one of the plug leads not seating properly. and the idle issue was the base idle was set too low. I've put a new set of angled leads on it so I could ditch the plug extenders, a new dizzy cap and rotor arm. I was then back to the original fault. I decided to test the fuel pressure as I thought the regulator might not be working properly and giving too much fuel pressure at idle.
With the vacuum disconnected

With the vacuum connected

Those figures seemed about right from what I'd read so I could rule that out. I bought a used genuine MAF sensor that I was told was good, I thought for £25 it would be worth having a spare. I tried plugging that in out of interest just to see if it made any difference (I had no reason to doubt the original one it wasn't throwing error codes and the voltages all seemed fine in the Rovergauge logs) and to my surprise the lambdas both started switching and the fueling seemed better. Swapping back to the original both lambdas went to -100% straight away and would only move slightly if revved. I've put the one I bought back on at the moment. I'm not going to get too involved in doing any more until I can actually do a road test on it and see how it drives.
The blower fan for the heaters was one thing that didn't work when I tested it. You could hear a click and it blew the fuse when turned to speed 3 so I figured it was seized. I thought whilst the interior is out it would be a good time to sort. TVR I'm guessing in an aid to save space put it behind a panel on the left hand side of the passenger foot well. The panel is screwed and siliconed in place and was a pain to get free, the battery and fuse box had to be removed to be able to get it out.


A bit of a spray with some WD40 on the bearings and I was able to free it off, I've sprayed them with some bearing lube and it seems to be all good now. I'm going to clean up and paint the heater pipes above it and replace the jubilee clips.
I've got new discs and pads ready to fit for the rear and braided hoses and a silicone coolant hose set have been ordered. I just need to decide what I'm doing with the front brakes and get a new fan belt and then once all fitted that should be most of the mechanical side of things sorted.
With the vacuum disconnected
With the vacuum connected
Those figures seemed about right from what I'd read so I could rule that out. I bought a used genuine MAF sensor that I was told was good, I thought for £25 it would be worth having a spare. I tried plugging that in out of interest just to see if it made any difference (I had no reason to doubt the original one it wasn't throwing error codes and the voltages all seemed fine in the Rovergauge logs) and to my surprise the lambdas both started switching and the fueling seemed better. Swapping back to the original both lambdas went to -100% straight away and would only move slightly if revved. I've put the one I bought back on at the moment. I'm not going to get too involved in doing any more until I can actually do a road test on it and see how it drives.
The blower fan for the heaters was one thing that didn't work when I tested it. You could hear a click and it blew the fuse when turned to speed 3 so I figured it was seized. I thought whilst the interior is out it would be a good time to sort. TVR I'm guessing in an aid to save space put it behind a panel on the left hand side of the passenger foot well. The panel is screwed and siliconed in place and was a pain to get free, the battery and fuse box had to be removed to be able to get it out.
A bit of a spray with some WD40 on the bearings and I was able to free it off, I've sprayed them with some bearing lube and it seems to be all good now. I'm going to clean up and paint the heater pipes above it and replace the jubilee clips.
I've got new discs and pads ready to fit for the rear and braided hoses and a silicone coolant hose set have been ordered. I just need to decide what I'm doing with the front brakes and get a new fan belt and then once all fitted that should be most of the mechanical side of things sorted.
Managed to get a bit of time on the car this week, so I tackled the front brakes. The old discs were looking a bit crusty. At the moment it's more of a recommissioning job than a restoration so I just wire brushed any flakey bits, I'll come back to it in the future and paint wishbones etc.

Looking a bit better now

I still have the braided hoses to do.
I've started looking at how the doors go back together and have figured out how the runners fit. I just want to get some new hinge bushes before they get refitted to the car. I drilled a hole through the mirror blocks to pass the wires through for the electrics and ground a little off the mounting lugs on the mirrors so they bolt up to the adapters. They still need a little tweaking but almost there.

The wires for one of the interior light switches in the sill had been dropped inside the sill. There was no easy way to access them so on the advice of one of the TVR specialists I used a small hole cutter to put a hole on the inside so I could fish the wires out and get them back through. I've put a rubber blanking plug in the hole I made.


I've managed to gather some more parts too. A lower dash in pretty good condition in the correct colour, although has a slightly annoying hole someone has drilled for an LED for an aftermarket alarm. A dash top in the correct colour which I got from a breakers and a TVR space saver spare wheel.


The dash top isn't quite as good as I was told there are a couple of small areas of damage to the leather, I was offered to return for a refund but I just asked for some money back. I've bought some flexible leather filler as I plan to refurb the seats and I'll get some dye and hopefully it will tidy up ok.


Looking a bit better now
I still have the braided hoses to do.
I've started looking at how the doors go back together and have figured out how the runners fit. I just want to get some new hinge bushes before they get refitted to the car. I drilled a hole through the mirror blocks to pass the wires through for the electrics and ground a little off the mounting lugs on the mirrors so they bolt up to the adapters. They still need a little tweaking but almost there.
The wires for one of the interior light switches in the sill had been dropped inside the sill. There was no easy way to access them so on the advice of one of the TVR specialists I used a small hole cutter to put a hole on the inside so I could fish the wires out and get them back through. I've put a rubber blanking plug in the hole I made.
I've managed to gather some more parts too. A lower dash in pretty good condition in the correct colour, although has a slightly annoying hole someone has drilled for an LED for an aftermarket alarm. A dash top in the correct colour which I got from a breakers and a TVR space saver spare wheel.
The dash top isn't quite as good as I was told there are a couple of small areas of damage to the leather, I was offered to return for a refund but I just asked for some money back. I've bought some flexible leather filler as I plan to refurb the seats and I'll get some dye and hopefully it will tidy up ok.
Thanks for the positive comments. I've got pretty much everything bar the carpet to get her all put back together, I'm just lacking time and a bit of enthusiasm at the moment. I need to find someone local with one and go for a passenger ride to spur me back on!
kris450 said:
Good effort Sir !! Fair bit of work by the looks of things but glad to see another being brought back to life.
Only thing I'll say is I think the oil pressure sender you changed should be screwed into the bottom of the block, between the front of the sump and the crank pulley. Granted this may not be the case on the earlier cars and I'm not familiar with them, so if I'm wrong then my apologies. Hopefully someone with more knowledge than me will confirm.
It should be here as far as I'm aware.
I think the location is different on the preserp engine. It certainly works where it is and tied it with where the wire for the sender was hanging.Only thing I'll say is I think the oil pressure sender you changed should be screwed into the bottom of the block, between the front of the sump and the crank pulley. Granted this may not be the case on the earlier cars and I'm not familiar with them, so if I'm wrong then my apologies. Hopefully someone with more knowledge than me will confirm.
It should be here as far as I'm aware.
PabloGee said:
Love reading through these.
Thank you for adding on here, please keep it rolling!
Same colour way as mine, except my interior is grey/blue, not cream.
Interesting about the door switch, I repositioned one of mine to make it work better and one of the wires popped off into the enclosed space, but I was able to get a small screwdriver behind it and pull it back out. I therefore hadn't contemplated how I would do that otherwise... I wonder how they wired it in the first place!
I was lucky with the drivers side one that one of the terminals was still poking out of the hole and I was able to coax the other one through. I'm guessing they must have used some sort of flexible rod and draw string before they fed all of the loom through the sill.Thank you for adding on here, please keep it rolling!
Same colour way as mine, except my interior is grey/blue, not cream.
Interesting about the door switch, I repositioned one of mine to make it work better and one of the wires popped off into the enclosed space, but I was able to get a small screwdriver behind it and pull it back out. I therefore hadn't contemplated how I would do that otherwise... I wonder how they wired it in the first place!
I've had a go at sorting out the dash top. I bought some flexible leather filler from furniture clinic. First of all I rubbed down the areas that needed repair with some 1500 grit sand paper and then I cleaned the areas with some alcohol cleaner. The filler looked a bit like PVA glue and I applied it with a spatula once it was dried I rubbed it down to make it smooth.
This is part way through

I needed to get some colourant to recolour the repaired areas but the colour match wasn't great between the dash top and the original trim.

I managed to find a piece about an inch square that I could cut off the bottom of the tunnel top trim and sent that to furniture clinic for colour matching. This weekend I had a go at recolouring the dash top.


It looks almost black in the photos but it is blue. Here it is in the daylight with the tunnel top cover, it's not a perfect match but it's pretty close.

I applied the colourant with a sponge, they say to dab it on but it looked like it was putting loads of air bubbles in it so I tried small circles and when the first coat dried it was all patchy. It then did as the guidance said and dabbed it and when it dried all the air bubbled disappeared. I'm pretty happy with the result, definitely passable. There are still some pressure indents where it had been placed on top of something at the breakers but I'm hoping these will disappear over time.
This is part way through
I needed to get some colourant to recolour the repaired areas but the colour match wasn't great between the dash top and the original trim.
I managed to find a piece about an inch square that I could cut off the bottom of the tunnel top trim and sent that to furniture clinic for colour matching. This weekend I had a go at recolouring the dash top.
It looks almost black in the photos but it is blue. Here it is in the daylight with the tunnel top cover, it's not a perfect match but it's pretty close.
I applied the colourant with a sponge, they say to dab it on but it looked like it was putting loads of air bubbles in it so I tried small circles and when the first coat dried it was all patchy. It then did as the guidance said and dabbed it and when it dried all the air bubbled disappeared. I'm pretty happy with the result, definitely passable. There are still some pressure indents where it had been placed on top of something at the breakers but I'm hoping these will disappear over time.
I haven't updated this thread for a while, work has continued but I was waiting until I had something worth posting.
I decided to tackle the change of coolant hoses, more as a precaution than anything. Had a bit of fun getting a few of the hoses off but got there in the end. It was a bit mucky under the radiator so I decided to whip that out and give it a clean up at the same time.

A quick clean up had it looking like this

The rad was actually in very good shape. I just got some new rubbers for the locating pins before I refitted it.

I decided I'd remove the metal heater pipes as well whilst the system was drained so they could be cleaned up and painted and I'll fit new jubilee clips at the same time. It looks worse than it is, I think some of it is spray glue from where the carpets were fitted.

I'm reusing the original metal pipes in the engine bay too, they were a bit pitted but cleaned up ok and can always be upgraded at a later stage.
Part way through attacking them with a wire wheel

A few coats of paint and ready to be refitted

The fitting of the silicone hoses wasn't quite as straight forward as I'd hoped. The notes did say trimming of some of the hoses may be required but some were slightly different shapes to the originals. Lots of trial fitting and trimming!
These are all the offcuts that were left

Got there in the end though and all now fitted

The rear discs and pads have now been replaced, the braided hoses have been done since too.

Moving to the inside of the car. One of the guides for the door release cables was snapped off when I bought the car, fortunately it was in a box of bits I got with the car.

I glassed it back in to place and then fitted the door release knob and new cables, I replaced the inner cables at the same time.

Next I decided it was time to remove the lower dash. Hopefully this is the most stripped the interior will look!

I've cleaned up and recoloured the replacement, which is now ready to fit, the worst bit to recolour was the stretchy pocket.
During

Afterwards


I've also fitted new hinge bushes to the doors in preparation for fitting and now have a carpet set for the car. The plan is to fit the dash, seatbelts, seats, doors and build the doors back up and then take it for an MOT. I am going to take it to someone to do the carpet fitting and it will be easier if I can drive it there. I'm trying to keep some momentum going at the moment and hoping to have it roadworthy soon.
I decided to tackle the change of coolant hoses, more as a precaution than anything. Had a bit of fun getting a few of the hoses off but got there in the end. It was a bit mucky under the radiator so I decided to whip that out and give it a clean up at the same time.
A quick clean up had it looking like this
The rad was actually in very good shape. I just got some new rubbers for the locating pins before I refitted it.
I decided I'd remove the metal heater pipes as well whilst the system was drained so they could be cleaned up and painted and I'll fit new jubilee clips at the same time. It looks worse than it is, I think some of it is spray glue from where the carpets were fitted.
I'm reusing the original metal pipes in the engine bay too, they were a bit pitted but cleaned up ok and can always be upgraded at a later stage.
Part way through attacking them with a wire wheel
A few coats of paint and ready to be refitted
The fitting of the silicone hoses wasn't quite as straight forward as I'd hoped. The notes did say trimming of some of the hoses may be required but some were slightly different shapes to the originals. Lots of trial fitting and trimming!
These are all the offcuts that were left
Got there in the end though and all now fitted
The rear discs and pads have now been replaced, the braided hoses have been done since too.
Moving to the inside of the car. One of the guides for the door release cables was snapped off when I bought the car, fortunately it was in a box of bits I got with the car.
I glassed it back in to place and then fitted the door release knob and new cables, I replaced the inner cables at the same time.
Next I decided it was time to remove the lower dash. Hopefully this is the most stripped the interior will look!
I've cleaned up and recoloured the replacement, which is now ready to fit, the worst bit to recolour was the stretchy pocket.
During
Afterwards
I've also fitted new hinge bushes to the doors in preparation for fitting and now have a carpet set for the car. The plan is to fit the dash, seatbelts, seats, doors and build the doors back up and then take it for an MOT. I am going to take it to someone to do the carpet fitting and it will be easier if I can drive it there. I'm trying to keep some momentum going at the moment and hoping to have it roadworthy soon.
Edited by pmc_3 on Thursday 23 May 13:19
Thanks for all the positive comments!
This was the piece I replaced https://www.johncraddockltd.co.uk/err4763-hose-to-...
I think this is the long one from the flame trap https://www.johncraddockltd.co.uk/err4762-hose-fro...
PabloGee said:
Where did you get the silicone hoses from?
I'm looking to replace the breather hose around the rocker covers and plenum, and can only find ACT.
Not a problem, feels like there's a price premium on them, just wondered if there are others out there.
I used the ACT silicone hoses for the cooling system. One of my breather hoses was perished, I replaced the perished bit with a new standard replacement from Craddocks. I'm looking to replace the breather hose around the rocker covers and plenum, and can only find ACT.
Not a problem, feels like there's a price premium on them, just wondered if there are others out there.
This was the piece I replaced https://www.johncraddockltd.co.uk/err4763-hose-to-...
I think this is the long one from the flame trap https://www.johncraddockltd.co.uk/err4762-hose-fro...
Loubaruch said:
Well done but I am surprised that you are not fitting the carpets yourself after all the other stuff you have tackled it will be a breeze!
It's more of a time thing than anything, everything I've looked at says it takes a couple of days and most of the work I'm doing is with the odd couple of hours here and there.Edited by pmc_3 on Friday 31st May 09:06
PabloGee said:
That first link is the bit that I replaced recently with a piece from Rimmer Bros, and it's splitting all over.
I might just give this one a go, for the cost...
Carpets - have you seen the video on Youtube of the Tools n Track guys doing Chim carpets?
They didn't replace the section across the back with the speakers, as he was just doing black for black carpets and that section was ok in his car, but it was more of an afternoon than a couple of days.
I just did mine with Fabric Paint, from Fabricare, but you're in a different position with no carpets in the car.
As a DIY project, I priced up to around £1k for carpets, optional underlay/heat/sound shielding, glue.
For someone else to do it, no idea.
The quality of most rubber products isn't good these days.I might just give this one a go, for the cost...
Carpets - have you seen the video on Youtube of the Tools n Track guys doing Chim carpets?
They didn't replace the section across the back with the speakers, as he was just doing black for black carpets and that section was ok in his car, but it was more of an afternoon than a couple of days.
I just did mine with Fabric Paint, from Fabricare, but you're in a different position with no carpets in the car.
As a DIY project, I priced up to around £1k for carpets, optional underlay/heat/sound shielding, glue.
For someone else to do it, no idea.
I've already got the carpet set, I bought one from Central TVR. Yeah, I've seen Tommy's videos it doesn't look too hard but I've got nothing for reference. I might end up having a go, I'm just keen to actually use the car this year.
This weekend I cleaned up the as much of the old silicone around where the heater fan fits and drilled out the holes slightly so it could be refitted with screws rather than rivets.

Screwed in place

Sealed with silicone. It's not pretty but it wasn't originally and it will be hidden.

I also refitted the heater pipes with new hoses and jubilee clips. The only cooling system hoses that are original now are the heater ones that run from the rear of the engine.

I'm going to refill the cooling system next and then provided there are no leaks the fuse box and battery can go back in place.
Screwed in place
Sealed with silicone. It's not pretty but it wasn't originally and it will be hidden.
I also refitted the heater pipes with new hoses and jubilee clips. The only cooling system hoses that are original now are the heater ones that run from the rear of the engine.
I'm going to refill the cooling system next and then provided there are no leaks the fuse box and battery can go back in place.
PabloGee said:
Yes, it seems the rubber parts are pants these days.
I fitted the Craddocks one yesterday, so like you, will see how it lasts.
Did your Central carpets come with any instructions?
Your car will be tip top when done - the one thing I’d love to do in mine is either replace the wiring loom (and probably new injectors), or replace the ECU and loom and ditch the mechanical ignition system.
Not sure if you plan to do any of that (not cheap), but whilst the car is apart…
The carpets just arrived in a box, no instructions.I fitted the Craddocks one yesterday, so like you, will see how it lasts.
Did your Central carpets come with any instructions?
Your car will be tip top when done - the one thing I’d love to do in mine is either replace the wiring loom (and probably new injectors), or replace the ECU and loom and ditch the mechanical ignition system.
Not sure if you plan to do any of that (not cheap), but whilst the car is apart…
Long term I'd like to change to aftermarket engine management but plenty of other things to do first, I'm not sure if it's had a cam and it's on 64k so that may be something it needs doing first. I'm not entirely sure how I can tell without it being stripped down, providing it drives ok I may get it on a rolling road to see how healthy the numbers are.
I set myself a target of making it to the Baston Car show on the 30th June, a big local show that some friends and colleagues were going to. It was an ambitious target but I cracked on to try and make it.
Lower dash, air vents, switch panel (after I epoxy glued the brackets to the rear of it), interior mirror and sunvisors reinstalled. I fitted some LED bulbs to the gauges before refitting those gauge panel.

A member of one of the facebook owners group donated a decent condition rear badge to the project, that was installed when I had a few minutes along with new wiper blades and front number plate.

I trial fitted one of the doors and it lined up pretty well. When I fitted the striker it didn’t seem to catch the latch all that well and was a bit notchy. After a while messing about trying to get it lined up I thought I’d come back to that.

When I went to fit the passenger door I thought I better put the loom in first. When I went to fit it I realised the grommets were missing so I had to order some of those in a hurry. They were a pain to fit to the wiring as the plugs are quite chunky and the hole was small, I didn’t want to cut them but didn’t want to have to de-pin the connectors. I managed with a couple of pairs of long nose pliers to stretch the hole enough to feed the plugs through one at a time. You can see here the size of the plugs and the size of the hole.

I had a day off and got the other door and the mirrors fitted. When I went to fit the striker from the box of bits to the drivers door I noticed that one had a shim, I thought I bet that was on the passenger side. I fitted it without the shim and the drivers door shut fine so I put the shim on the passenger one and that resolved the issue and the door then closed and popped open nicely. I started building the doors up with the runners and window motors.

Tunnel top installed and original radio fitted.

The MOT was booked for the 25th June. The only things I was a bit unsure of were the emissions and the handbrake. It passed on the emissions but failed on the handbrake with o/s rear recording no effort. No advisories so although a fail not a bad one considering the last MOT was in 2013.

My father in law came over the same evening and we had a look at the calliper. We’d adjusted the cable and checked everything was moving when we’d done the rear discs, pads and hoses. With the handbrake on the rear wheel still spinned freely. Upon removing the handbrake cable we found we could turn the mechanism with no resistance. The piston was removed to try and see if there was something obvious inside as there was no other access and upon turning the mechanism without the piston something suddenly pinged and re-engaged. Put the piston back in and it was working. So all reassembled.
I managed to get a retest the following day which it passed! However when I went out in to the car in the evening I found a puddle in the passenger footwell. I couldn’t see anywhere obvious apart from a drip on a screw the holds the pipes to the heater box, this made me think it might be the heater matrix. I dried it all out with blue roll, pleased the carpets haven’t been fitted yet.
[pic] https://live.staticflickr.com/65535/53828652404_66...

It was still dry inside the next day, I took it for another run so I could try and see where it was coming from when it got hot. When I got back I could hear a drip, on inspection I could see it was coming from one of the joins on the hose to the heater box, I poked it and it started dripping a lot quicker. I nipped it up with a 7mm socket on a small ratchet and it stopped dripping, I nipped all of the others up at the same time.
On the Friday evening (the show on the Sunday) I thought I’d go and put some fuel in ready to go to the show and upon turning the ignition on the fuel pump didn’t prime. A bit of investigation found the fuel pump relay had packed up, it had probably got damp from the heater leak. It’s not a standard relay, I did lots of phoning around Saturday morning whilst my daughter was in her dance class. I ended up going to Rimmerbros near Lincoln to get one before they closed at lunch time. I got it fitted and it resolved the issue, phew! The door cards got fitted late Saturday evening just to make it look a little more complete.
After it resisting my efforts all week I made it to the show (and made it home afterwards)


I do have some more jobs to add to the list after driving it. The speedo doesn’t work, I don’t get a speed reading with the laptop plugged in so it’s either the sensor on the diff or the TVR box of tricks that intercepts the signal before the Speedo. The big one is that the tappet rattle hasn’t stopped, it does come and go but needs addressing before I drive it much more.
Lower dash, air vents, switch panel (after I epoxy glued the brackets to the rear of it), interior mirror and sunvisors reinstalled. I fitted some LED bulbs to the gauges before refitting those gauge panel.
A member of one of the facebook owners group donated a decent condition rear badge to the project, that was installed when I had a few minutes along with new wiper blades and front number plate.
I trial fitted one of the doors and it lined up pretty well. When I fitted the striker it didn’t seem to catch the latch all that well and was a bit notchy. After a while messing about trying to get it lined up I thought I’d come back to that.
When I went to fit the passenger door I thought I better put the loom in first. When I went to fit it I realised the grommets were missing so I had to order some of those in a hurry. They were a pain to fit to the wiring as the plugs are quite chunky and the hole was small, I didn’t want to cut them but didn’t want to have to de-pin the connectors. I managed with a couple of pairs of long nose pliers to stretch the hole enough to feed the plugs through one at a time. You can see here the size of the plugs and the size of the hole.
I had a day off and got the other door and the mirrors fitted. When I went to fit the striker from the box of bits to the drivers door I noticed that one had a shim, I thought I bet that was on the passenger side. I fitted it without the shim and the drivers door shut fine so I put the shim on the passenger one and that resolved the issue and the door then closed and popped open nicely. I started building the doors up with the runners and window motors.
Tunnel top installed and original radio fitted.
The MOT was booked for the 25th June. The only things I was a bit unsure of were the emissions and the handbrake. It passed on the emissions but failed on the handbrake with o/s rear recording no effort. No advisories so although a fail not a bad one considering the last MOT was in 2013.
My father in law came over the same evening and we had a look at the calliper. We’d adjusted the cable and checked everything was moving when we’d done the rear discs, pads and hoses. With the handbrake on the rear wheel still spinned freely. Upon removing the handbrake cable we found we could turn the mechanism with no resistance. The piston was removed to try and see if there was something obvious inside as there was no other access and upon turning the mechanism without the piston something suddenly pinged and re-engaged. Put the piston back in and it was working. So all reassembled.
I managed to get a retest the following day which it passed! However when I went out in to the car in the evening I found a puddle in the passenger footwell. I couldn’t see anywhere obvious apart from a drip on a screw the holds the pipes to the heater box, this made me think it might be the heater matrix. I dried it all out with blue roll, pleased the carpets haven’t been fitted yet.
[pic] https://live.staticflickr.com/65535/53828652404_66...
It was still dry inside the next day, I took it for another run so I could try and see where it was coming from when it got hot. When I got back I could hear a drip, on inspection I could see it was coming from one of the joins on the hose to the heater box, I poked it and it started dripping a lot quicker. I nipped it up with a 7mm socket on a small ratchet and it stopped dripping, I nipped all of the others up at the same time.
On the Friday evening (the show on the Sunday) I thought I’d go and put some fuel in ready to go to the show and upon turning the ignition on the fuel pump didn’t prime. A bit of investigation found the fuel pump relay had packed up, it had probably got damp from the heater leak. It’s not a standard relay, I did lots of phoning around Saturday morning whilst my daughter was in her dance class. I ended up going to Rimmerbros near Lincoln to get one before they closed at lunch time. I got it fitted and it resolved the issue, phew! The door cards got fitted late Saturday evening just to make it look a little more complete.
After it resisting my efforts all week I made it to the show (and made it home afterwards)
I do have some more jobs to add to the list after driving it. The speedo doesn’t work, I don’t get a speed reading with the laptop plugged in so it’s either the sensor on the diff or the TVR box of tricks that intercepts the signal before the Speedo. The big one is that the tappet rattle hasn’t stopped, it does come and go but needs addressing before I drive it much more.
Gassing Station | Chimaera | Top of Page | What's New | My Stuff