Ducati Multistrada 1000 DS Scrambler project
Discussion


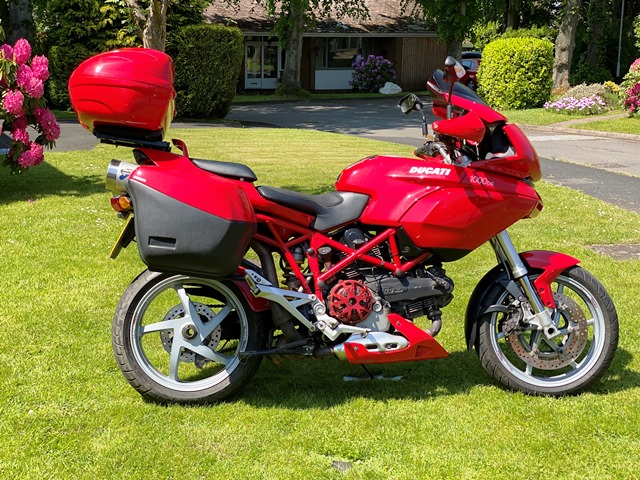
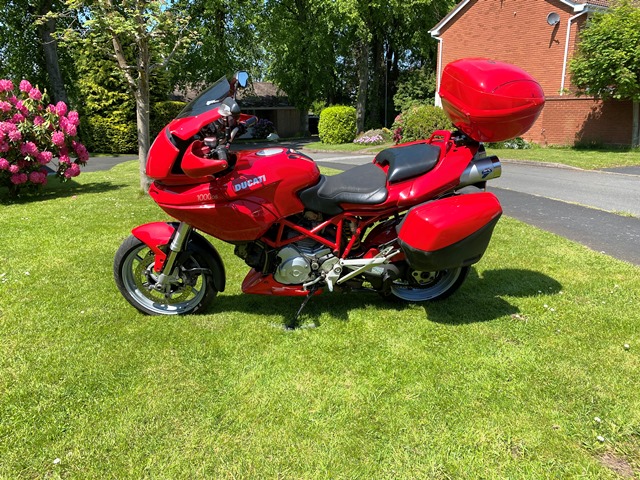
June 2021 and I have been mulling over doing another special, rather than a Restoration, which I did last time with an early Monster 900 . I have been riding around the last project I built, the Multistrada with the FCR carbs on it, which goes really well! My favourite bike to ride! One of the problems with it though is the single seat, my wife likes to come out on pillion sometimes… So I decided to build a scrambler/flat track/adventure type bike, with a dual seat on.
I looked around for another 1000 DS Multistrada and this red one turned up at the right price. These are cheap to buy as many are suffering leaking and bubbling tanks, and faded LCD screens. I am still formulating ideas at the moment, but I have made a bit of a start so I have stripped it of all the parts I wont use so I can sell these on.
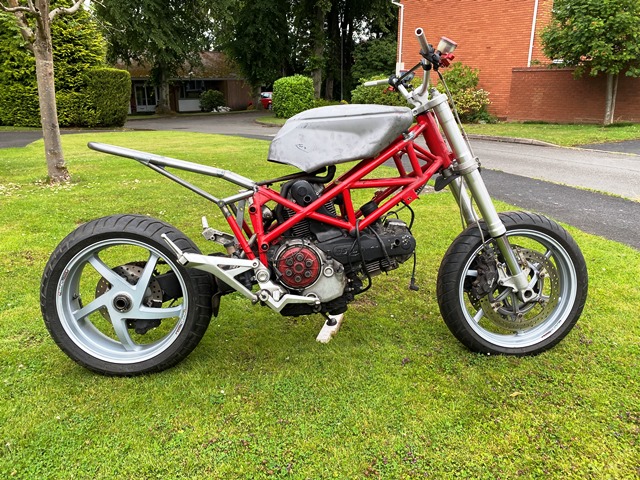
but below is a rough mock up with a borrowed seat. Also a picture of the last 4 specials I have built over the last few years. This will be a slow build as I want to enjoy the summer!


I looked around for another 1000 DS Multistrada and this red one turned up at the right price. These are cheap to buy as many are suffering leaking and bubbling tanks, and faded LCD screens. I am still formulating ideas at the moment, but I have made a bit of a start so I have stripped it of all the parts I wont use so I can sell these on.
but below is a rough mock up with a borrowed seat. Also a picture of the last 4 specials I have built over the last few years. This will be a slow build as I want to enjoy the summer!
Go for an mx style seat, ie one with a pad for your b ks up the front of the tank, to take that abrupt angle out. And go for the shorter lower tank, I reckon, like the second orange one you did.
And make this one yellow!
ks up the front of the tank, to take that abrupt angle out. And go for the shorter lower tank, I reckon, like the second orange one you did. And make this one yellow!
Edited by poo at Paul's on Wednesday 9th June 14:50
Edited by poo at Paul's on Thursday 10th June 12:53
Stuart Fordyce said:
If yours has got a centre stand and panniers they used to go for £££. I got rid of mine due to side stand issues, dodgy electrics and I was already on my second tank. I'm not surprised they're a dying breed.
Yes, the panniers went for £300 and the stand for £134! In fact, I have just hit £1700 for the parts I have sold that I know I wont use and still have some to sell!poo at Paul's said:
Go for an mx style seat, ie one with a pad for your bks up the front of the tank, to take that abrupt angle out. And go for the shorter lower tank, I reckon, like the second orange one you did.
And make this one yellow!
No way, this one will be orange as well…ks up the front of the tank, to take that abrupt angle out. And go for the shorter lower tank, I reckon, like the second orange one you did. And make this one yellow!
You are right about the tank…
Sometimes I just sit for a while and look at the silhouette of a build in the garage with the lights out… I did this the other night (my wife thinks I am mad!) and I kept coming to the conclusion that the tank is not what I want… So off to the bike breaker who lets me wonder around his BIG unit. I took a cardboard cut-out of the shape I wanted with me, and some measurements… of the hundreds of tanks I looked at (surprising how many are now plastic!) , none were suitable, mainly due to the angle of the frame.
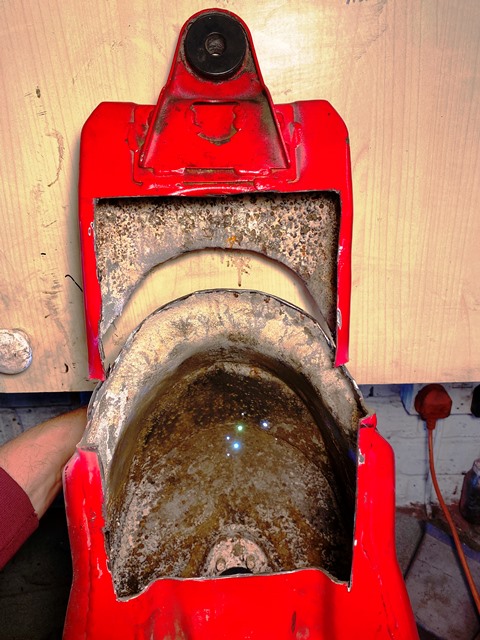
On the last build I used a 999 tank which worked well, so I decided to try a shortened version on this build. I didn’t feel bad cutting this up as its so badly corroded, and it just goes to show what leaving a bike for a long period with ethanol based fuel in it does inside the tank. you can see from the light I am holding behind it that its actually perforated on the top! So it’s off to the blasters with it to see what state its in when it comes back…. I have a fall back, but its a perfect 999 tank, be a shame to cut it up... If the one comes back from the blasters and its too bad, I will probably use it to mock up, and see if I can find a dented one.
My FCR 41's came this morning
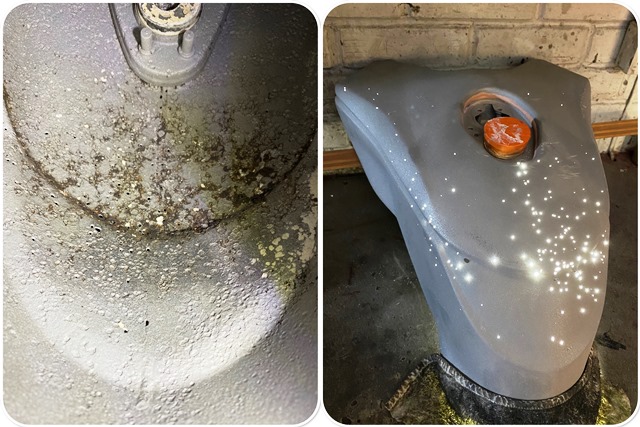
well the tank came back from the blasters… as you can see its full of pin holes, and for the first time in over 40 years of repairing tanks I feel I have been beaten! there is no point in trying to repair this! I put a light inside to shop the extent of the corrosion. look after your tanks guys!
buzzer said:
well the tank came back from the blasters… as you can see its full of pin holes, and for the first time in over 40 years of repairing tanks I feel I have been beaten! there is no point in trying to repair this! I put a light inside to shop the extent of the corrosion. look after your tanks guys!
That´s very interesting. I have a 999.The second photo reminds me of the starlight headling in Rolls Royce cars.
Good luck by the way.
Kawasicki said:
That´s very interesting. I have a 999.
The second photo reminds me of the starlight headling in Rolls Royce cars.
Good luck by the way.
have a check in the tank! I add a bit of 2 stroke to the fuel in my older bikes to keep the rust a bay, or drain them.The second photo reminds me of the starlight headling in Rolls Royce cars.
Good luck by the way.
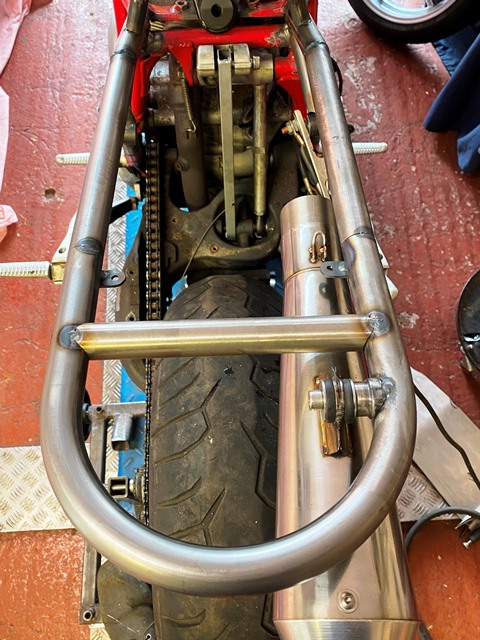
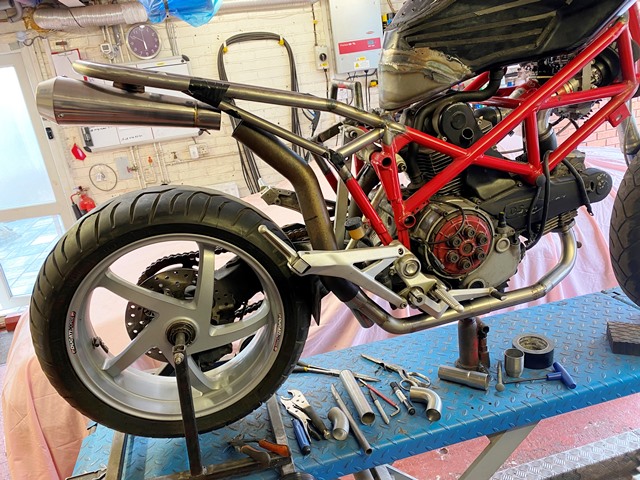
Started the frame modifications, just tacked up at the moment. On this build I want to keep the seat height right for me, but also allow for an under seat exhaust and a seat long enough for a pillion. I have replaced the shocker with a strut at the moment so I can see what things look like at max and min travel.
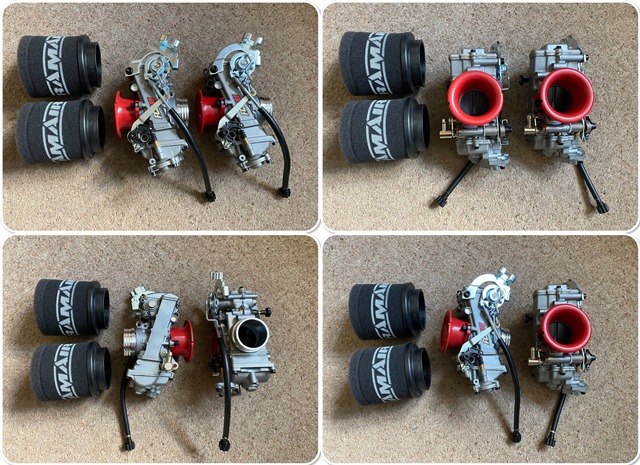
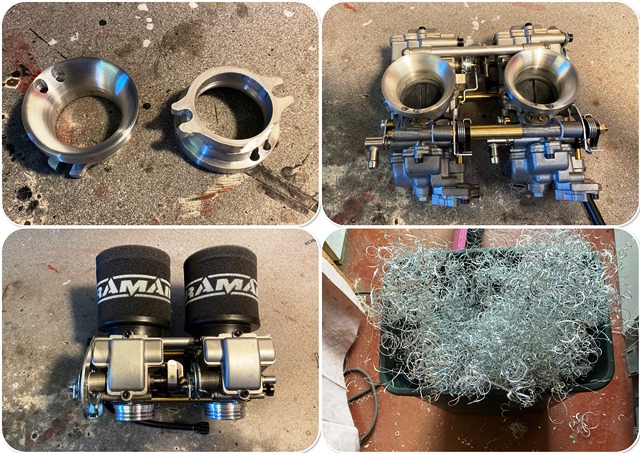
on my last build I run a pair of FCR carbs, it runs really well so for this build I chose the same carbs, but this time decided to bolt them together, and use a common split spindle to control the slides. this means I can use a single pull/ pull throttle arrangement, instead of the 4 cables system I used before. It also means I can run a TPS on the end of the spindle.
I thought it would be easy, I got some 8mm silver steel for the spindle, and a couple of new bearings with seals instead of the closed cup bearings… unfortunately the threads on the locating pins into the spindle is an unusual thread and I couldn’t find a tap… so I had to make some new pins as well… All done now though, including a linkage in the middle so I can balance the carbs .
I have also made some new velocity stacks to accommodate some foam filters… there is a few hours work in those! and a pile of swarf!
Short video to demonstrate how I hand turn the bellmouth on the stacks!
https://www.youtube.com/watch?v=Ot4jIKXcFuI
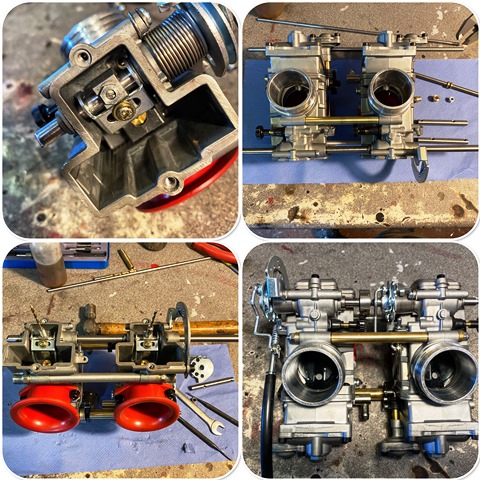
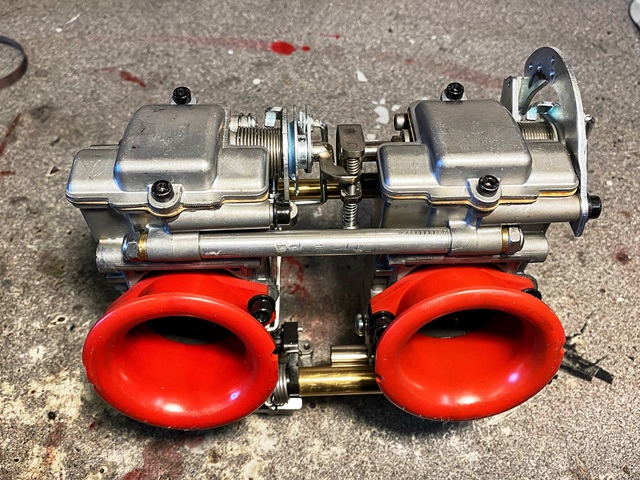
raining_sulphur said:
I keep saying it, but you are a wizard. Awesome craftsmanship as per usual.
I’m excited to see the final product.
I dont think my wife would call me a wizard... she has other names for me!I’m excited to see the final product.
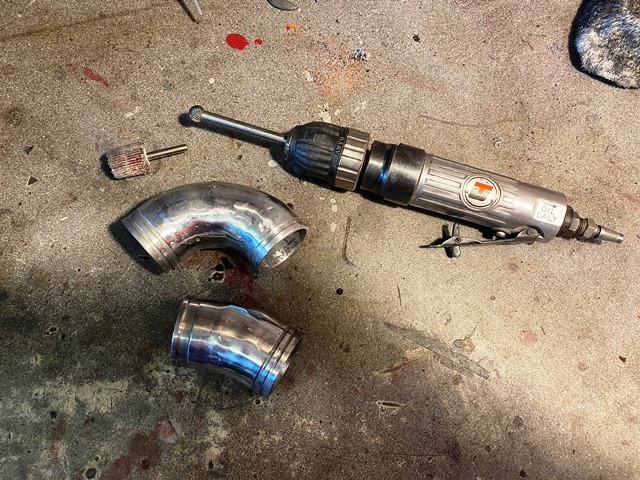
To mount the carbs I needed to make some alloy custom manifolds. I made these using the pie /lobster cut method. I set the chop saw to 7 degrees and cut off a selection of pieces and tape them together until I have the right shape… I then mark the position of each and weld them together, ensuring I have good penetration, which I then grind off inside to make them smooth. the long bur in the picture is a beast to use!

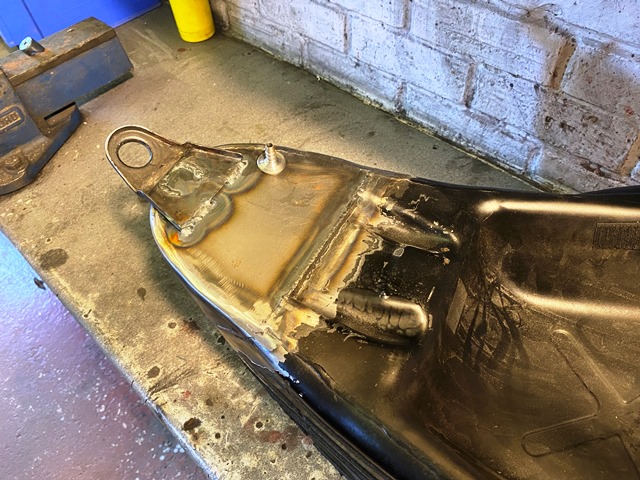
Onto the tank. I managed to source a very clean 999 tank, but of course this is too long for the build… so out came the angle grinder and off came the back! measure twice cut once!. I then fabricated a new back end and welded it into place. When welding stuff like this, everything needs to be clean for a good half inch either side of the weld, so I clean both sides with emery paper, and use to carb cleaner to ensure there is no grease… also wipe the welding rod with some as well…
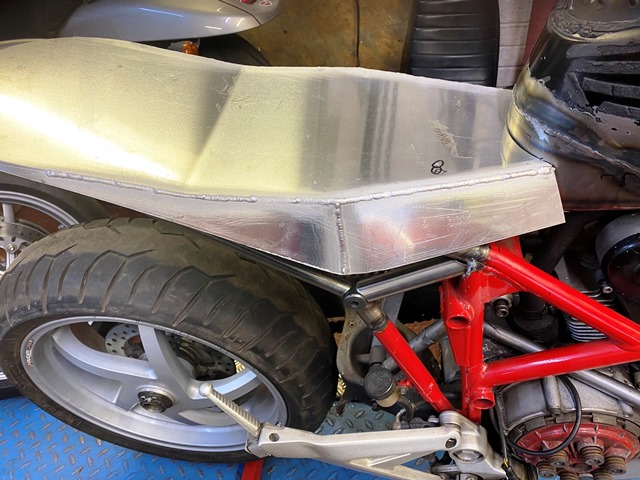
Once the back/side piece was in place I planished the sides so the new piece had the same radius as the tank. then I welded the bottom in. to test for leaks I use two methods… some dye penetrant and developer, and if it passes this test, I do a final check with air at just 3 PSI and squirt it with soapy water.


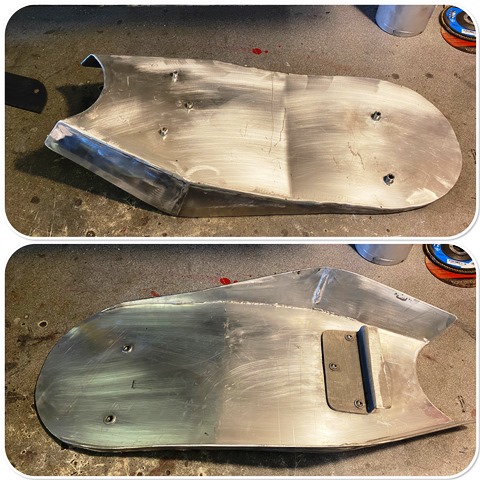
One of the most difficult things I find to make on a bike is the seat… this one i have used a different approach as (a) its a dual seat and (b) I am making the base out of aluminium. I mocked up what I wanted in cardboard first, and then transferred the patterns onto some 3mm aluminium. Then I seam welded it… It came out ok, be interesting to see what its like once its to the final shape and the foam and cover is on!

Next job will be the exhaust system but to do this I needed a silencer to get the mock up right… I wanted a small slim silencer, that was re-packable, and that I could fit a baffle come MOT time… and a bit retro/old school. I searched but couldn’t find any suitable, they were all too wide as I want an under seat, side mounted setup. so I modified a cheap (£16!) stainless steel one off eBay. I would have loved to have made one from scratch but don’t have a cone roller, and to buy a ready made stainless cone is expensive. the hardest part of making this was actually drilling three holes for the bolts to hold the end cone in. the stainless is incredibly hard! after blunting 3 new drills, and buying a cobalt drill and that not touching it, I ended up making a punch and die and punching the holes!
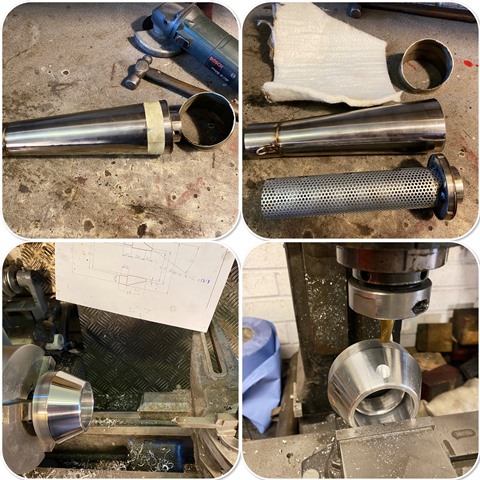
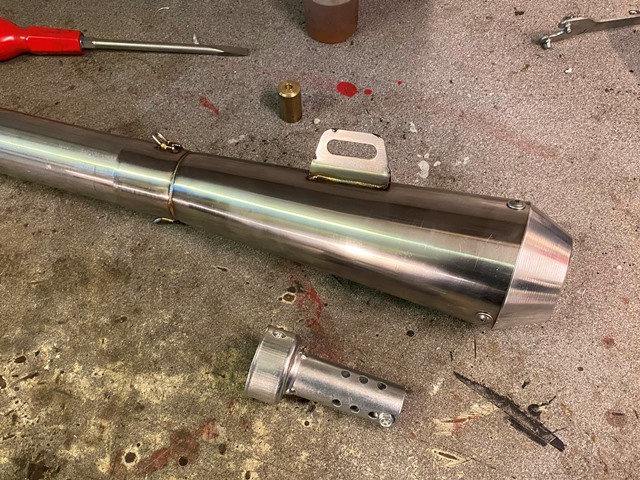
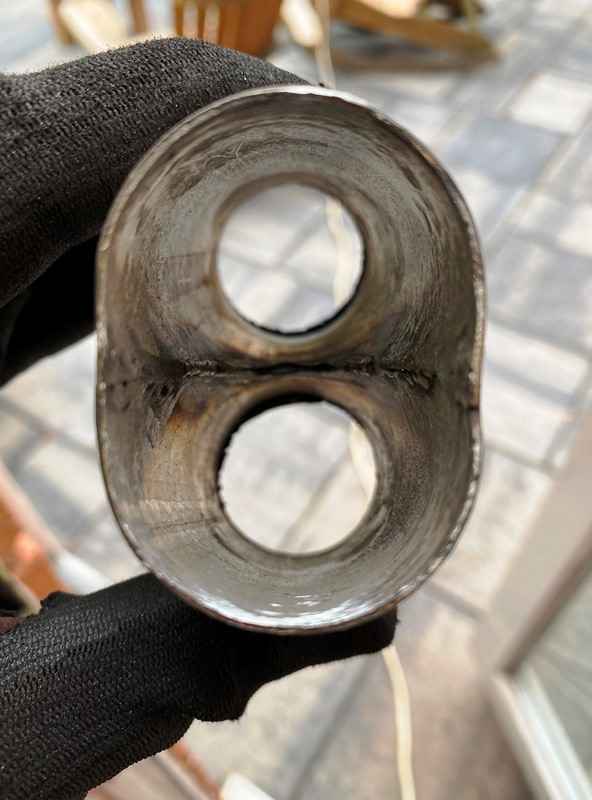
With the silencer finished I mounted it on the frame. I decided to make it rubber mounted to keep the vibrations down a bit. The collector was challenging… first one I made I was not happy with, so the second one I welded it on the inside with the TIG, which came out well and should flow OK. Stuck for a few days now as I need a couple of mandrel bends to finish it off.
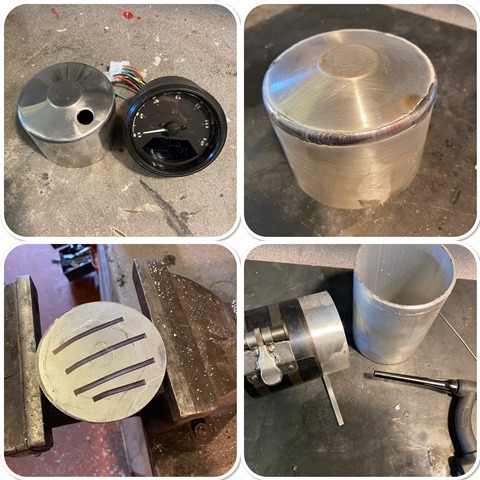
the speedo/ rev counter I am going to use has a plastic case... which does not look good. I tried to get some tube the right diameter but it was too big or too small, so I cut 12mm out of some bigger stuff and seam welded it back up, using a piston ring clamp to pull it together to weld it. I knew it wouldn't look right with a flat bottom so I made a conical one by spinning it in the lathe. The alloy needs to be soft for this so I annealed it by heating it up to temperature, and letting it cool. A neat trick to know when its the right temperature is to use a Sharpie pen, and when its burn off and has disappeared, its the right temperature! a bearing on the end of a bar makes it easy! here is a short video...
https://www.youtube.com/watch?v=EzapW5hnO3I
https://www.youtube.com/watch?v=EzapW5hnO3I
Bob_Defly said:
I'm disappointed that you used some premade alloy, and didn't go and dig up some bauxite. Shame.


The seat base is finished, added the rivinuts to hold it on, and made a bracket so it only bolts on at the rear so it comes off easily. The last build is a pain to remove the seat. just need to add the foam and sand it to shape. I am happy with the mock-up but cant decide if the front mudguard needs to go central or biased to the front, but that can wait a while. the exhaust is all but finished apart from polishing and adding the hoops for the springs.

Gassing Station | Biker Banter | Top of Page | What's New | My Stuff