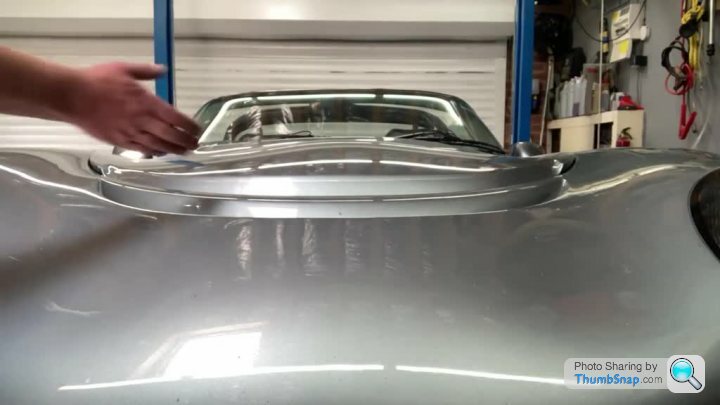
Front Opening Bonnet Mod
Discussion
Not for the faint hearted but it can be done.
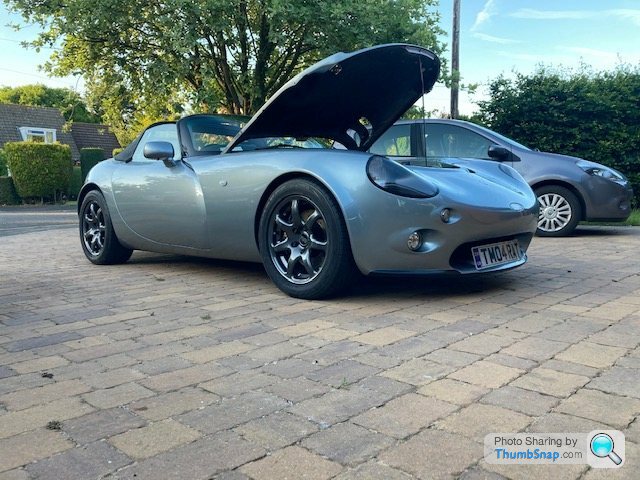
It’s not a quick Sunday morning job, it’ll take a few full on days and you’ll need the ability and equipment to cut, weld grind, drill etc.
You’ll need
A pair of modern mini bonnet catches
Stainless rectangular box section 25x50
Stainless 2mm x 20/22mm polished
Stainless 6x30 bar
1m of 8mm stainless rod
West six10 injectable epoxy system
Sponge
P40 & 38 to make good the rear edge / underside of bonnet and strengthen front edge for bonnet catch
Crimp in panel fixings (Spalding fasteners)
A 2mm, 5m Bowden cable kit
A collection of stainless nuts and bolts
Masking tape
Graphite grease
Tig welder
Grinder
Pedestal drill
Dremel
Battery drill
Blowtorch
Vice
Spanner’s, sockets and screwdrivers
BRAVERY
First, stick some tape around the wing edges where the bonnet meets the wings.
Mark rear edge of bonnet accurately
Make a couple of stainless brackets from polished stainless to mount to each side of rear edge of bonnet about a foot long.
Drill 3 fixing holes in the stainless, roughly central, one into the ‘gummed corners’ area, two to go through the bonnet lip.
Use stainless to mark and drill bonnet from sides to ensure perfect alignment.
Countersink holes in stainless to take m5 countersink screws. Fit washers and nuts to temporarily mount. Mark rear edge of bonnet carefully on stainless to ascertain suitable hinge point
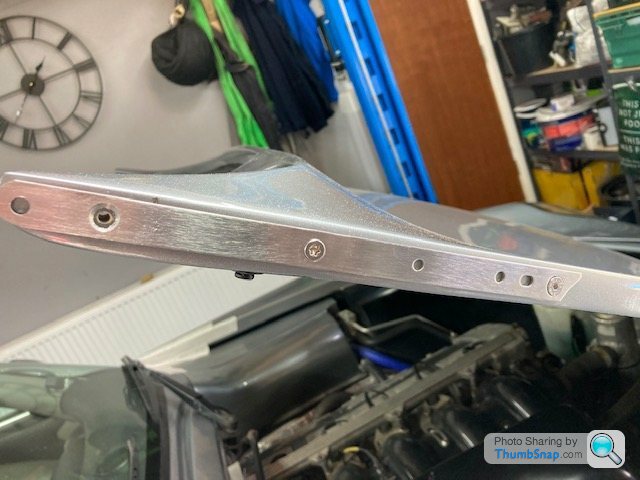
Remove and drill 6mm ‘pivot point’ hole in stainless. I used a penny washer to decide on position.
Grind rear edge underside of bonnet to clear a screw fixing (m6 Allen key bolt). Round off the hinge end of stainless to suit body clearances, which are especially tight on near side of car. I used a penny washer again to marke a curved end around the hinge hole.
Fixing stainless back on bonnet, this time using nylocs. Close bonnet.
Using a short scribe mark 6mm hole to be drilled in reveal edge of wing.
Open bonnet. Take various braver pills.
Carefully consider the position of this in light of the crimp fixings are to go here. Clearance to the upper wing skin is critical to not splitting the glass fibre when crimping up later.
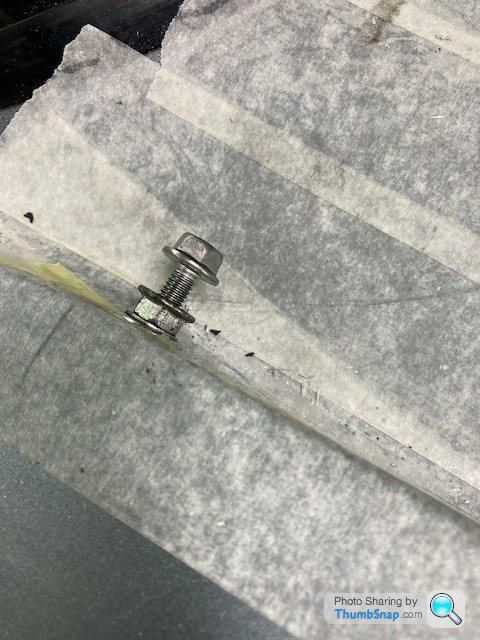
Drilling is a one hit thing and a pain to access. I used a 3mm drill to accurately position the hole but then resorted to dremel to open it up to suit the crimp fixing.
I stuffed a load of sponge in the void and pumped west system epoxy in before crimping up the fixing. Messy business, use protection on the paintwork. Wearing gloves is regrettably a thing I forgot. My fingerprints have now returned.
 |https://thumbsnap.com/tpoxjD5q[/url]
You’ve reached the stage to remove the bonnet catch and hinges and to mount to the bonnet. If you’ve got it all right it will line up. We’ll done.
If not you’ll have to remake the stainless brackets until it does. I remade one to raise the bonnet a couple of mm on the drivers side. Easy enough using the template you’ve already made.
Next bonnet pins for catches.
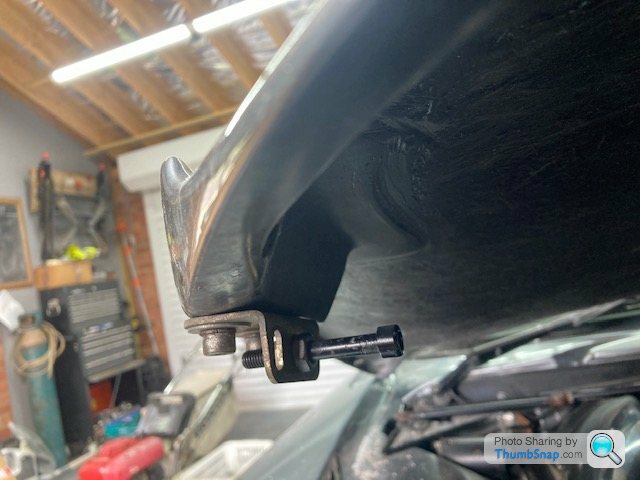
Remove the original bonnet hinge brackets and drill an 8mm hole central between the adjustment slots. Remove studs if you have them. Pins are simply m8 plain shank bolts about 50mm long., secured with a couple of nuts
 |https://thumbsnap.com/Q9DaqMZg[/url]
Centre all adjustments on these brackets to give wriggle room later.
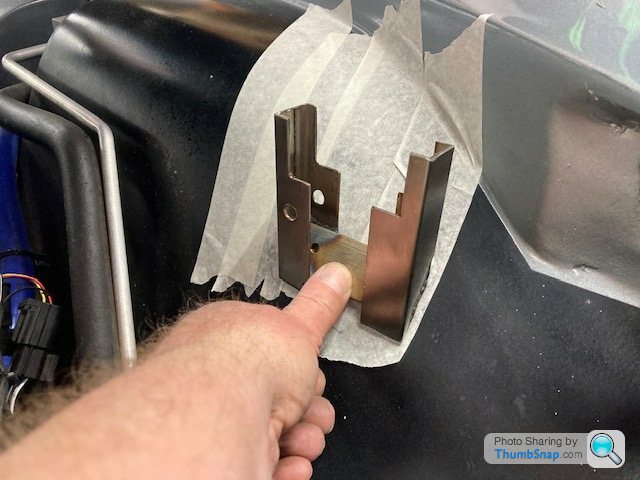
Take some 25x50 box section and cut one end to match the angle of the inner wing. Chop off about 6” long. Cut it down the middle of the 50mm face, creating two u sections. Insert a mini bonnet catch so it fits snuggly and measure with between the two u sections. Cut a bit of 6x30 stainless flat bar to the length you measured. Drill a couple of equally spaced 5mm holes and tap M6x1. Weld this on the tapered end of the two u channels. Repeat for the other one.
 |https://thumbsnap.com/27PPDt7u[/url]
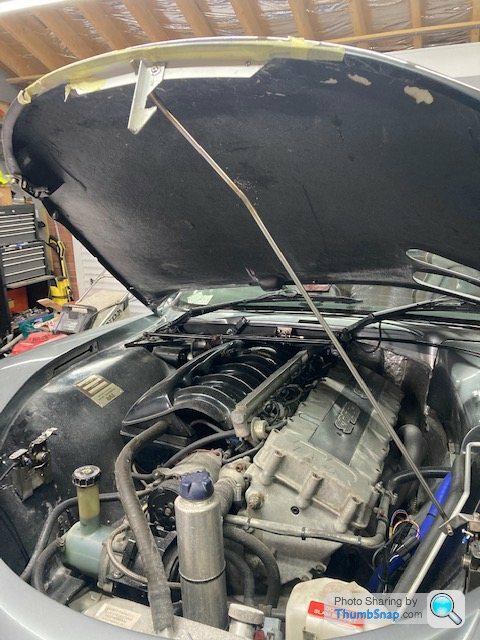
Stick the mini catches in the brackets and ‘click’ into place on the bonnet pins. Line inner wing with masking tape and insert cut off pencils in the m5 holes, or attach pencils using tape.
NOTE THE SAFETY CATCH IN THE IMAGE BELOW IS NOT THE FINAL DESIGN. THE CATCH IS NOW FIXED TO THE CHASSIS AS DESCRIBED BELOW THE PICTURE.
 |https://thumbsnap.com/TrF44jcv[/url]
You’ll need to pack out the catches to make sure they hang level and central and horizontal and just touch the inner wing when closing.
I slid the catch up and down in the u channels until I found the right spot.
This process is a bit trial and error. Make sure you’re happy before drilling the inner wings. My markings took interpretation to get right. Once right I pushed the mini catches into the u channels an extra 6 mm and welded them in. This approach allows use of stainless spacers under the brackets for fine. Inner height adjustment.
Fit a Bowden cable to one catch and bolt in place from within the wheel arch. This permits removal if it won’t unlock at any stage.
Once happy with the position, drill out the lower of the two arch skins with a hole cutter to access the void between the two skins. Fill the void with glass fibre paste, finish flush. Re drill from top.
Make a couple of load spreading plates approx 3” x 5” to mount within wheel arch. Bolt up and pull the cable, make sure nothing catches and releases easily in pulling.
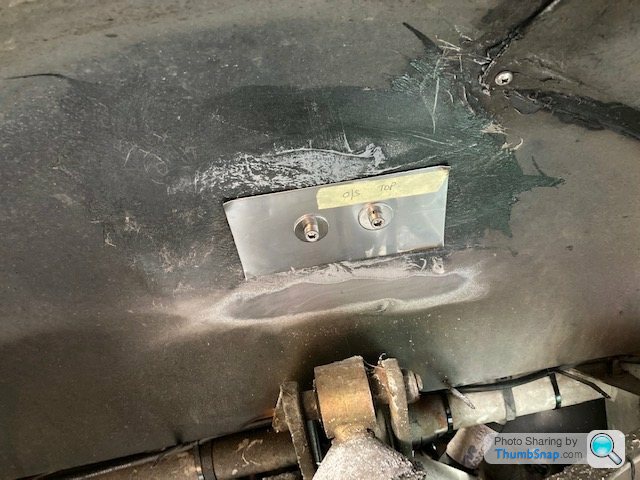 |https://thumbsnap.com/rioMh3eN[/url]
Repeat for the other side.
Clearances and tolerances are tight. Expect a half day of faffing to get it all aligned.
Make or buy a Bowden cable splitter to fit where the old bonnet catch was.
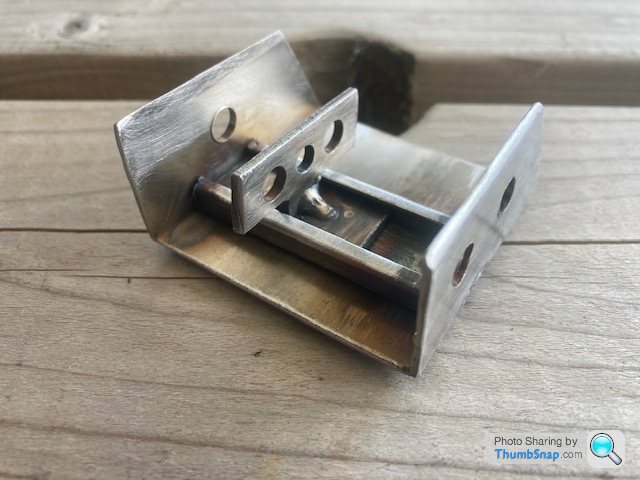 |https://thumbsnap.com/6Ko8HC6N[/url]
I binned the cable to the steering column and went with a bulkhead mounted lever just accessible from the rear edge of the bonnet.
Remove bonnet and cut off the off centre support using a disc cutter. Fill it with glass fibre paste, straighten it up a bit and fit centrally using an m6 bolt screwed into a central tapped hole. It’s bonnet lip mounted using a single bolt and epoxy. Repair the area you cut the centre support from. If careful this is all hidden and will not necessitate a bonnet respray.
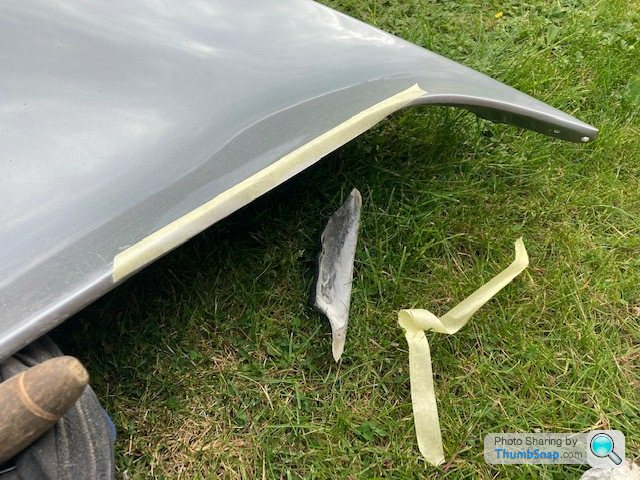 |https://thumbsnap.com/85eqMha1[/url]
Take about 300mm of 30mm x 12 unequal aluminium angle or similar and bend to match the lip profile of the front of the bonnet, with the short leg of the angle resting behind the lip.
Drill an 8.5mm hole just off centre (30/40mm)and a 6mm on centre of the angle on the 30mm leg.
Fix angle to bonnet using a few small (m4/5) nuts and screws.
Glass fibre paste under the lip to add strength and retain nuts, pull a little if the glass fibre up the back of the angle to prevent it being pulled off (a few bolts in the lips are unlikely to win a 150mph bonnet safety catch event alone).
Using 8mm rod and a few bits of stainless fashion a prop. Mine hinges on the r/h bonnet catch, and clips into the l/h catch when not in use. A bend if required to clear the oil tank breather hose when down, which affords better access when up.
Cut a short piece (60mm long) of the 30mm unequal angle and mount in reverse outside the curve but with short leg hanging under to fixed piece. This is the keep for the bonnet safety catch.
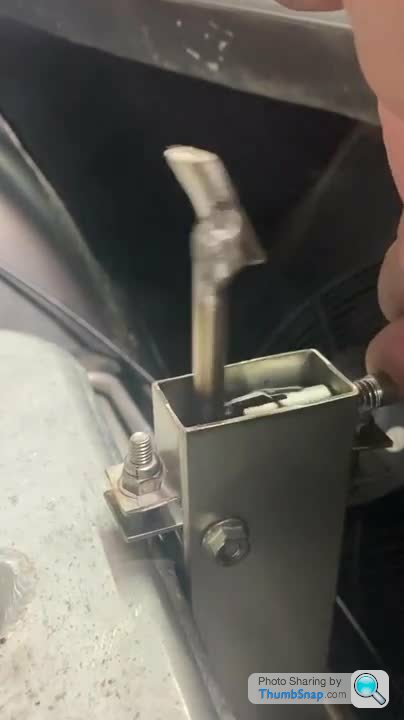
Safety catch. This was a head scratcher but very pleased with the final outcome. Basic clamp box action shown below, catch designed to fit inside the top of this.
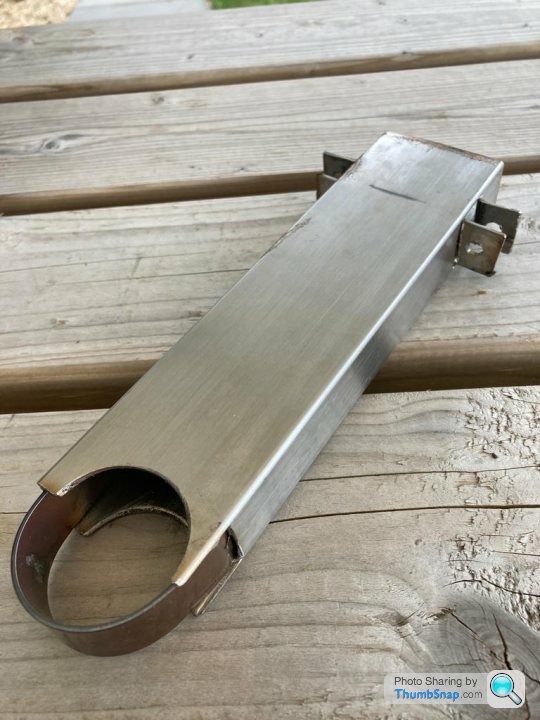 |https://thumbsnap.com/jB4MW3wv[/url]
Take a piece of 50x25 stainless steel box section and hole cut a chassis sized hole in the 50mm face, making sure it’s close to one edge so it almost cuts through the sidewall.
Take a piece of the 20mm stainless strip and firm a long u shape to the profile of the chassis. I did this using a blow torch, axle stand shaft and a vice.
Cut the box section to remove one half of the holes you cut, so it would sit on the chassis rail.
Sit it vertically on the chassis rail centrally in front of the oil tank. Mark oil tank top. Cut bottom and two sides of two 13mm holes on the short sides of the box section where the u bend clamp is to come out, about 13mm from the top of the oil tank leaving just enough room for a bolt head to miss the oil tank. Bend the flaps up to form clamp bolt mounts above the square holes. I drilled 6mm bolt holes before cutting or bending. Insert the u bend mocking up or in situ clamping the chassis. Mark the u bend on both inner and outer side, remove and bend 90 degrees outwards so will come out of the box section. Drill holes for bolts before bending. Cut the total height of the box section about 15mm longer than the top of the square holes.
Fashion a pivoting lever, I used off it of 8mm rod, a 6mm threaded stand off spacer, tig welder, a compression spring and 6mm x 50 plain shanked bolt and nut and a bit of faffing. You want about 25mm of clearance above the fully closed position. Test it before bolting in situ.
You’re done. Rejoice snuggly at being almost first to have a Tamora bonnet that opens the right way.
Usual caveats. Don’t do it unless you’re really sure you can… it’s a scary job that will frustrate but the results are definitely worth it to me.


It’s not a quick Sunday morning job, it’ll take a few full on days and you’ll need the ability and equipment to cut, weld grind, drill etc.
You’ll need
A pair of modern mini bonnet catches
Stainless rectangular box section 25x50
Stainless 2mm x 20/22mm polished
Stainless 6x30 bar
1m of 8mm stainless rod
West six10 injectable epoxy system
Sponge
P40 & 38 to make good the rear edge / underside of bonnet and strengthen front edge for bonnet catch
Crimp in panel fixings (Spalding fasteners)
A 2mm, 5m Bowden cable kit
A collection of stainless nuts and bolts
Masking tape
Graphite grease
Tig welder
Grinder
Pedestal drill
Dremel
Battery drill
Blowtorch
Vice
Spanner’s, sockets and screwdrivers
BRAVERY
First, stick some tape around the wing edges where the bonnet meets the wings.
Mark rear edge of bonnet accurately
Make a couple of stainless brackets from polished stainless to mount to each side of rear edge of bonnet about a foot long.
Drill 3 fixing holes in the stainless, roughly central, one into the ‘gummed corners’ area, two to go through the bonnet lip.
Use stainless to mark and drill bonnet from sides to ensure perfect alignment.
Countersink holes in stainless to take m5 countersink screws. Fit washers and nuts to temporarily mount. Mark rear edge of bonnet carefully on stainless to ascertain suitable hinge point

Remove and drill 6mm ‘pivot point’ hole in stainless. I used a penny washer to decide on position.
Grind rear edge underside of bonnet to clear a screw fixing (m6 Allen key bolt). Round off the hinge end of stainless to suit body clearances, which are especially tight on near side of car. I used a penny washer again to marke a curved end around the hinge hole.
Fixing stainless back on bonnet, this time using nylocs. Close bonnet.
Using a short scribe mark 6mm hole to be drilled in reveal edge of wing.
Open bonnet. Take various braver pills.
Carefully consider the position of this in light of the crimp fixings are to go here. Clearance to the upper wing skin is critical to not splitting the glass fibre when crimping up later.
Drilling is a one hit thing and a pain to access. I used a 3mm drill to accurately position the hole but then resorted to dremel to open it up to suit the crimp fixing.
I stuffed a load of sponge in the void and pumped west system epoxy in before crimping up the fixing. Messy business, use protection on the paintwork. Wearing gloves is regrettably a thing I forgot. My fingerprints have now returned.
 |https://thumbsnap.com/tpoxjD5q[/url]
You’ve reached the stage to remove the bonnet catch and hinges and to mount to the bonnet. If you’ve got it all right it will line up. We’ll done.
If not you’ll have to remake the stainless brackets until it does. I remade one to raise the bonnet a couple of mm on the drivers side. Easy enough using the template you’ve already made.
Next bonnet pins for catches.
Remove the original bonnet hinge brackets and drill an 8mm hole central between the adjustment slots. Remove studs if you have them. Pins are simply m8 plain shank bolts about 50mm long., secured with a couple of nuts
 |https://thumbsnap.com/Q9DaqMZg[/url]
Centre all adjustments on these brackets to give wriggle room later.
Take some 25x50 box section and cut one end to match the angle of the inner wing. Chop off about 6” long. Cut it down the middle of the 50mm face, creating two u sections. Insert a mini bonnet catch so it fits snuggly and measure with between the two u sections. Cut a bit of 6x30 stainless flat bar to the length you measured. Drill a couple of equally spaced 5mm holes and tap M6x1. Weld this on the tapered end of the two u channels. Repeat for the other one.
 |https://thumbsnap.com/27PPDt7u[/url]
Stick the mini catches in the brackets and ‘click’ into place on the bonnet pins. Line inner wing with masking tape and insert cut off pencils in the m5 holes, or attach pencils using tape.
NOTE THE SAFETY CATCH IN THE IMAGE BELOW IS NOT THE FINAL DESIGN. THE CATCH IS NOW FIXED TO THE CHASSIS AS DESCRIBED BELOW THE PICTURE.
 |https://thumbsnap.com/TrF44jcv[/url]
You’ll need to pack out the catches to make sure they hang level and central and horizontal and just touch the inner wing when closing.
I slid the catch up and down in the u channels until I found the right spot.
This process is a bit trial and error. Make sure you’re happy before drilling the inner wings. My markings took interpretation to get right. Once right I pushed the mini catches into the u channels an extra 6 mm and welded them in. This approach allows use of stainless spacers under the brackets for fine. Inner height adjustment.
Fit a Bowden cable to one catch and bolt in place from within the wheel arch. This permits removal if it won’t unlock at any stage.
Once happy with the position, drill out the lower of the two arch skins with a hole cutter to access the void between the two skins. Fill the void with glass fibre paste, finish flush. Re drill from top.
Make a couple of load spreading plates approx 3” x 5” to mount within wheel arch. Bolt up and pull the cable, make sure nothing catches and releases easily in pulling.
 |https://thumbsnap.com/rioMh3eN[/url]
Repeat for the other side.
Clearances and tolerances are tight. Expect a half day of faffing to get it all aligned.
Make or buy a Bowden cable splitter to fit where the old bonnet catch was.
 |https://thumbsnap.com/6Ko8HC6N[/url]
I binned the cable to the steering column and went with a bulkhead mounted lever just accessible from the rear edge of the bonnet.
Remove bonnet and cut off the off centre support using a disc cutter. Fill it with glass fibre paste, straighten it up a bit and fit centrally using an m6 bolt screwed into a central tapped hole. It’s bonnet lip mounted using a single bolt and epoxy. Repair the area you cut the centre support from. If careful this is all hidden and will not necessitate a bonnet respray.
 |https://thumbsnap.com/85eqMha1[/url]
Take about 300mm of 30mm x 12 unequal aluminium angle or similar and bend to match the lip profile of the front of the bonnet, with the short leg of the angle resting behind the lip.
Drill an 8.5mm hole just off centre (30/40mm)and a 6mm on centre of the angle on the 30mm leg.
Fix angle to bonnet using a few small (m4/5) nuts and screws.
Glass fibre paste under the lip to add strength and retain nuts, pull a little if the glass fibre up the back of the angle to prevent it being pulled off (a few bolts in the lips are unlikely to win a 150mph bonnet safety catch event alone).
Using 8mm rod and a few bits of stainless fashion a prop. Mine hinges on the r/h bonnet catch, and clips into the l/h catch when not in use. A bend if required to clear the oil tank breather hose when down, which affords better access when up.
Cut a short piece (60mm long) of the 30mm unequal angle and mount in reverse outside the curve but with short leg hanging under to fixed piece. This is the keep for the bonnet safety catch.
Safety catch. This was a head scratcher but very pleased with the final outcome. Basic clamp box action shown below, catch designed to fit inside the top of this.
 |https://thumbsnap.com/jB4MW3wv[/url]
Take a piece of 50x25 stainless steel box section and hole cut a chassis sized hole in the 50mm face, making sure it’s close to one edge so it almost cuts through the sidewall.
Take a piece of the 20mm stainless strip and firm a long u shape to the profile of the chassis. I did this using a blow torch, axle stand shaft and a vice.
Cut the box section to remove one half of the holes you cut, so it would sit on the chassis rail.
Sit it vertically on the chassis rail centrally in front of the oil tank. Mark oil tank top. Cut bottom and two sides of two 13mm holes on the short sides of the box section where the u bend clamp is to come out, about 13mm from the top of the oil tank leaving just enough room for a bolt head to miss the oil tank. Bend the flaps up to form clamp bolt mounts above the square holes. I drilled 6mm bolt holes before cutting or bending. Insert the u bend mocking up or in situ clamping the chassis. Mark the u bend on both inner and outer side, remove and bend 90 degrees outwards so will come out of the box section. Drill holes for bolts before bending. Cut the total height of the box section about 15mm longer than the top of the square holes.
Fashion a pivoting lever, I used off it of 8mm rod, a 6mm threaded stand off spacer, tig welder, a compression spring and 6mm x 50 plain shanked bolt and nut and a bit of faffing. You want about 25mm of clearance above the fully closed position. Test it before bolting in situ.
You’re done. Rejoice snuggly at being almost first to have a Tamora bonnet that opens the right way.
Usual caveats. Don’t do it unless you’re really sure you can… it’s a scary job that will frustrate but the results are definitely worth it to me.

Edited by Top Gear TVR on Monday 27th June 20:26
Edited by Top Gear TVR on Monday 27th June 21:39
Gassing Station | Tamora, T350 & Sagaris | Top of Page | What's New | My Stuff


