My next project has arrived. Another "They all do that" ...
Discussion


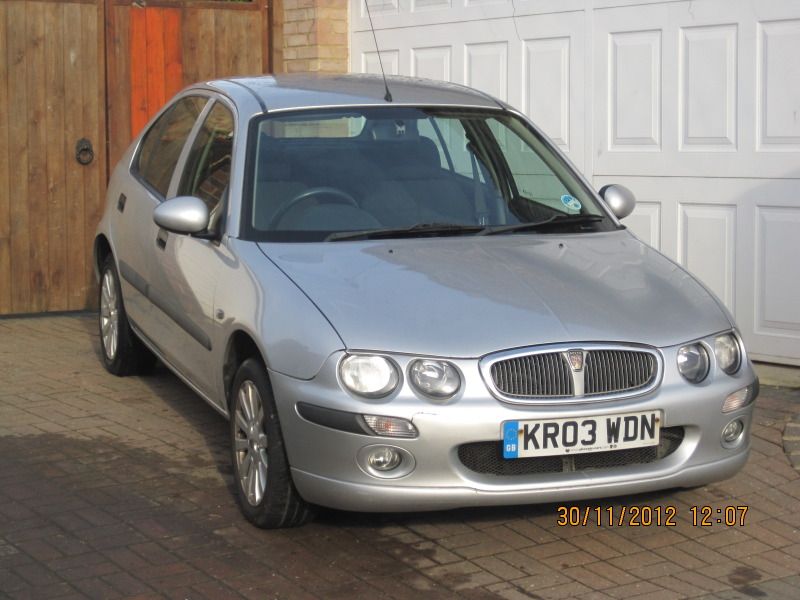
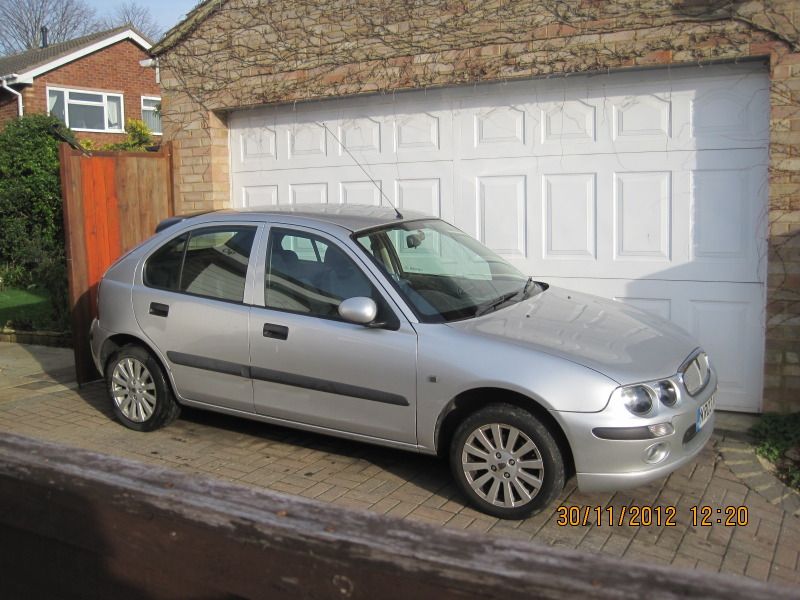
My next project has arrived. A 2003 Rover 1.4 Impression.
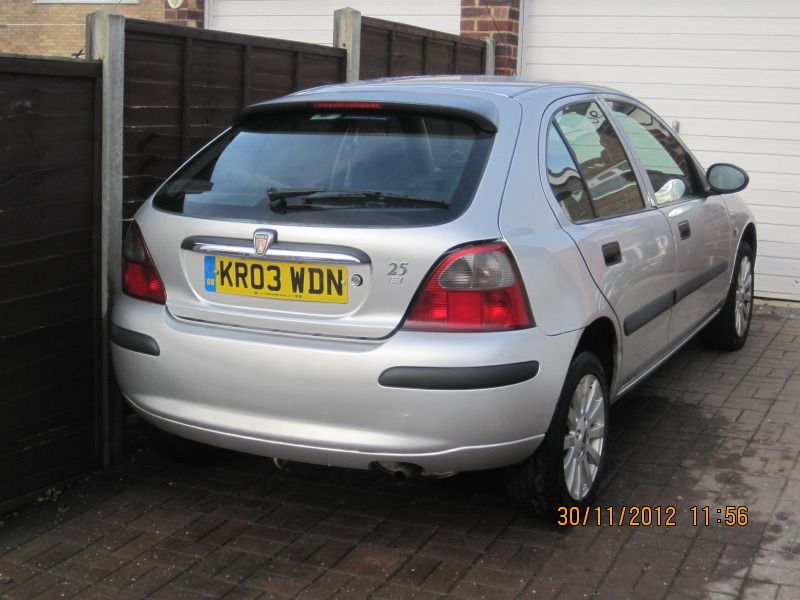
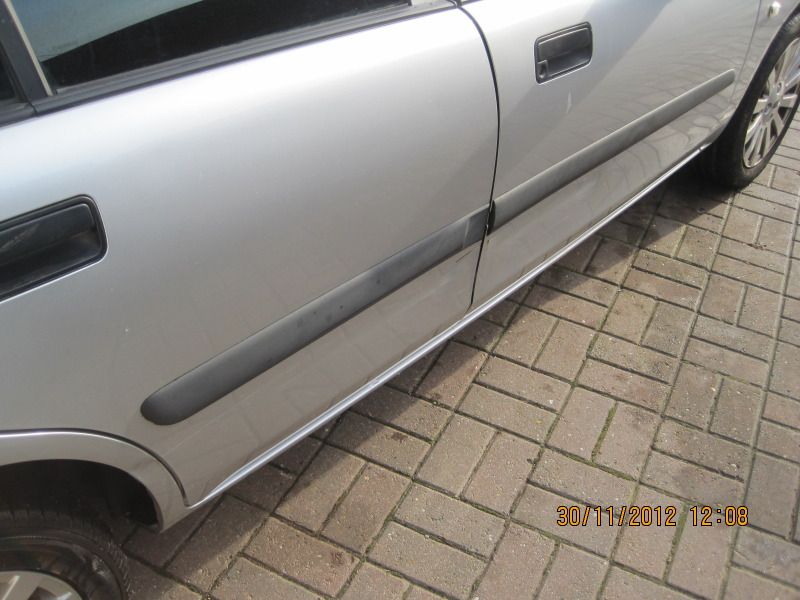
A few niggles, light scuff damage along OFFside of car. Both Doors and rear wheel arch.
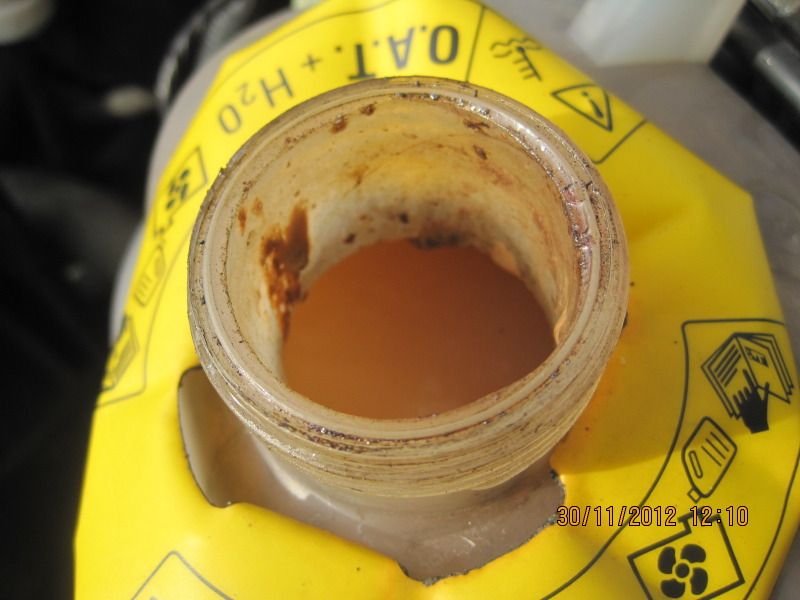
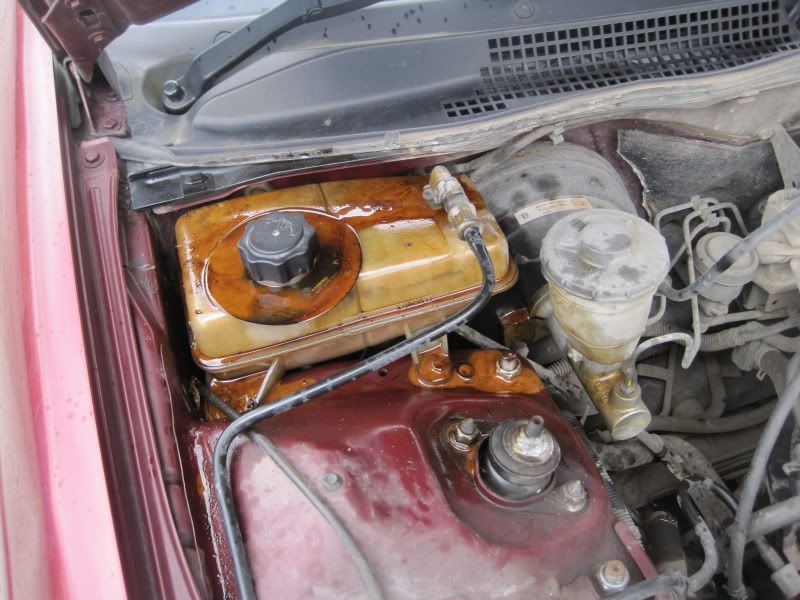
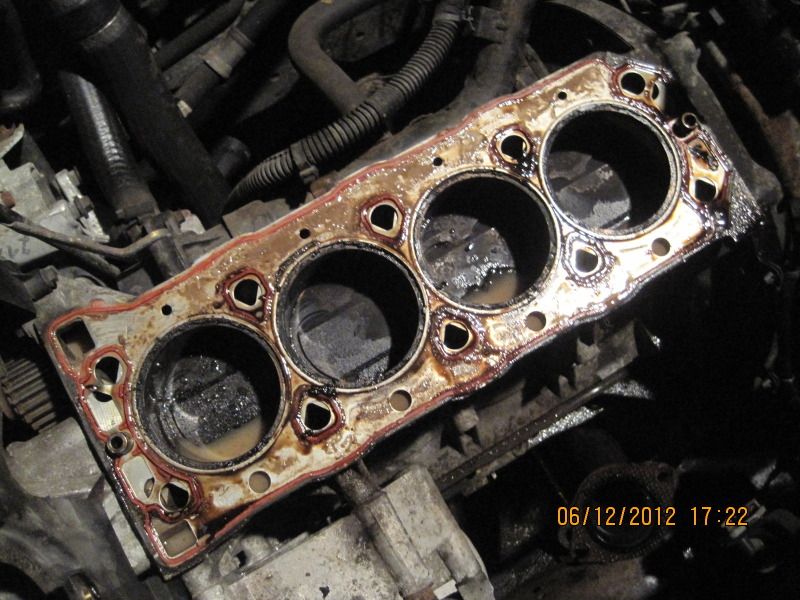
Here is the reason the previous owner decided to sell up. Evidence of Oil-Coolant mixing in the sump showing on the Dip Stick :~
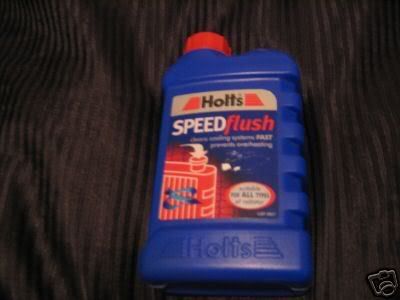
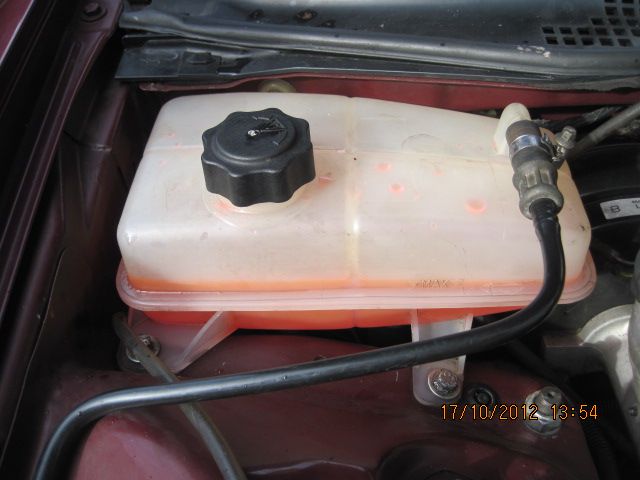
Further evidence of Oil reaching the coolant. I had already added some SPEEDFlush to the coolant and run the engine for a while. SPEEDFlush is good for clearing a lot of the oil which lurks in the cooling system when a Cylinder Head Gasket becomes damaged. The Coolant and Coolant Expansion Bottle were far dirtier prior to adding the SPEEDFlush and running the engine. :~
Not a bad looking car :~
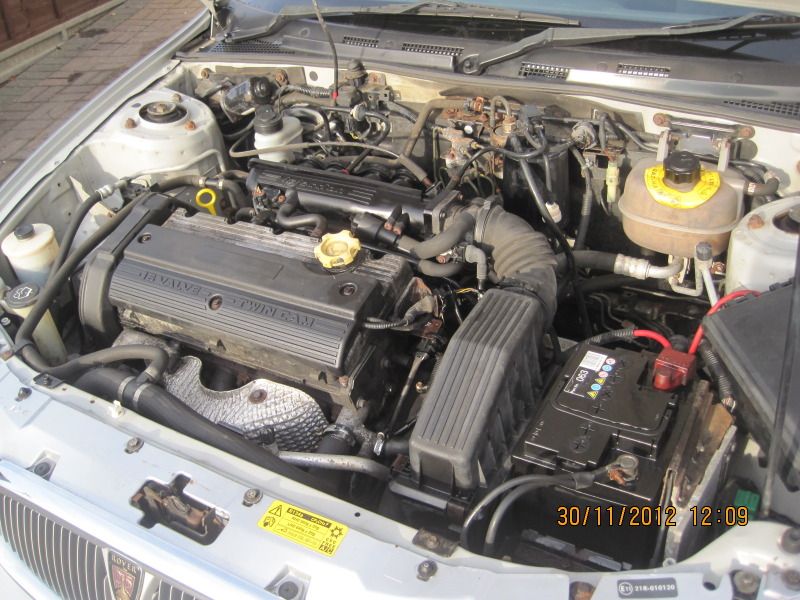
The engine and the engine compartment were filthy and full of dead leaves etc. I gave it a bit of a clean using a Mist Sprayer with a dilute engine degreasant solution. Drove it round to the nearby Jet Wash to clean the whole area up, including the front Alloy Wheels which were black with Pad Filth. I dislike working on a filthy engine. The car drove very well. One thing I really liked, the steering wheel situated perfectly in the straight ahead position when driving straight ahead. Plus, the Steering Wheel locked in the straight ahead position too. These are signs I like to see in a car adding to confidence as you get to know more about it.
It was a typical "ebay Spares or repair" car and the honest description may have put some people off including myself initially. wanting something to keep me productively occupied for the next few weeks or so I decided to take a chance. so far, the signs are good that I've backed a winner here. Not counting my chickens just yet. I shall take it ... carefully ... to my friendly MoT tester and have booked it in for Monday. A couple of careful miles only should not do any harm. I've arranged that the emissions be tested first and if it fails to meet those values to stop the test and I'll take it away and renew the Cylinder Head Gasket. If it passes the emissions to continue with the full test. Although the car drove beautifully, brakes, steering, lights tyres etc all there, it is still much of an unknown quantity to me. The MoT expires today... tax until end of December.
So far so good. More follows.
A few niggles, light scuff damage along OFFside of car. Both Doors and rear wheel arch.
Here is the reason the previous owner decided to sell up. Evidence of Oil-Coolant mixing in the sump showing on the Dip Stick :~
Further evidence of Oil reaching the coolant. I had already added some SPEEDFlush to the coolant and run the engine for a while. SPEEDFlush is good for clearing a lot of the oil which lurks in the cooling system when a Cylinder Head Gasket becomes damaged. The Coolant and Coolant Expansion Bottle were far dirtier prior to adding the SPEEDFlush and running the engine. :~
Not a bad looking car :~
The engine and the engine compartment were filthy and full of dead leaves etc. I gave it a bit of a clean using a Mist Sprayer with a dilute engine degreasant solution. Drove it round to the nearby Jet Wash to clean the whole area up, including the front Alloy Wheels which were black with Pad Filth. I dislike working on a filthy engine. The car drove very well. One thing I really liked, the steering wheel situated perfectly in the straight ahead position when driving straight ahead. Plus, the Steering Wheel locked in the straight ahead position too. These are signs I like to see in a car adding to confidence as you get to know more about it.
It was a typical "ebay Spares or repair" car and the honest description may have put some people off including myself initially. wanting something to keep me productively occupied for the next few weeks or so I decided to take a chance. so far, the signs are good that I've backed a winner here. Not counting my chickens just yet. I shall take it ... carefully ... to my friendly MoT tester and have booked it in for Monday. A couple of careful miles only should not do any harm. I've arranged that the emissions be tested first and if it fails to meet those values to stop the test and I'll take it away and renew the Cylinder Head Gasket. If it passes the emissions to continue with the full test. Although the car drove beautifully, brakes, steering, lights tyres etc all there, it is still much of an unknown quantity to me. The MoT expires today... tax until end of December.
So far so good. More follows.
Using details from the V5 I got the full MOT data from VOSA.
I got the impression the young chap who sold it to me received the car from his Grandfather a year ago. During the past twelve months up until the damaged cylinder head gasket last month, the car had covered 10,000 miles going by the MoT data.
Prior to that, between 2006 and 2011, the car had very little use completing less than 8,000 miles during that six year period. Between 2010 and 2011, according to the MoT data the car completed a mere 286 miles. Only 313 miles the previous year. Hardly used at all by his grandfather. By the way, the seller drove a silver BMW Zed 3.
I am the third owner.
I am keen to remove the cylinder head and see what's what but I must be patient and see what the MoT reveals on Monday afternoon at 4pm.
So, not wanting to waste time I had a "two birds with one stone" My daily driver Rover 620ti has completed about 5,000 miles since I last changed the oil and filter. The oil in the T-Series engine is still in good condition. I usually change the oil in my and my family's cars around 6,000 miles. The oil in this Rover 25 is contaminated. So, with that in mind, I dropped the hot oil from my 620ti and carefully collected it in a bowl. Then put in the new 10-40 semisynthetic.
Then dropped the contaminated oil from the Rover 25 and it was nowhere near as bad as I expected. Pleased about that. I have seen far worse when renewing a CHG on a K-Series. Then put the oil from the 620ti into the little Rover.
Finally I drained the cooling system of the contaminated coolant to which I had added the SPEEDFlush. Even that did not look too bad. Again seen far worse.
So with some used but good clean oil now in the engine, that short round trip to the MoT station come Monday afternoon should not do much harm at all. There is some oil-coolant inter mixing in both sump and cooling system but nowhere near as bad as I had anticipated.
More follows.
I got the impression the young chap who sold it to me received the car from his Grandfather a year ago. During the past twelve months up until the damaged cylinder head gasket last month, the car had covered 10,000 miles going by the MoT data.
Prior to that, between 2006 and 2011, the car had very little use completing less than 8,000 miles during that six year period. Between 2010 and 2011, according to the MoT data the car completed a mere 286 miles. Only 313 miles the previous year. Hardly used at all by his grandfather. By the way, the seller drove a silver BMW Zed 3.
I am the third owner.
I am keen to remove the cylinder head and see what's what but I must be patient and see what the MoT reveals on Monday afternoon at 4pm.
So, not wanting to waste time I had a "two birds with one stone"
My daily driver Rover 620ti has completed about 5,000 miles since I last changed the oil and filter. The oil in the T-Series engine is still in good condition. I usually change the oil in my and my family's cars around 6,000 miles. The oil in this Rover 25 is contaminated. So, with that in mind, I dropped the hot oil from my 620ti and carefully collected it in a bowl. Then put in the new 10-40 semisynthetic.Then dropped the contaminated oil from the Rover 25 and it was nowhere near as bad as I expected. Pleased about that. I have seen far worse when renewing a CHG on a K-Series. Then put the oil from the 620ti into the little Rover.
Finally I drained the cooling system of the contaminated coolant to which I had added the SPEEDFlush. Even that did not look too bad. Again seen far worse.
So with some used but good clean oil now in the engine, that short round trip to the MoT station come Monday afternoon should not do much harm at all. There is some oil-coolant inter mixing in both sump and cooling system but nowhere near as bad as I had anticipated.
More follows.
MoT Test Time 4pm today :~
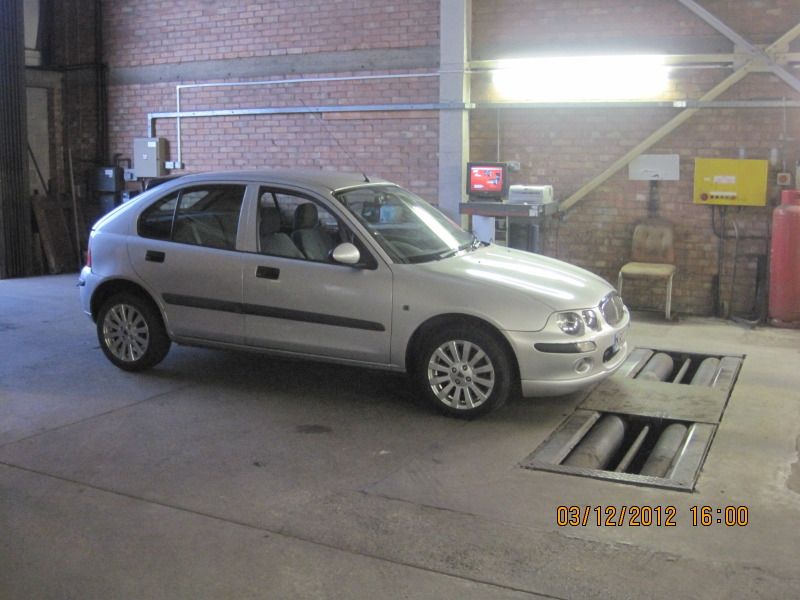
Always an unknown quantity when buying a used car are the Emission readings on the test. Despite the damaged Cylinder Head Gasket allowing a little oil-to-coolant and coolant-to-oil exchanges, I have seen far worse, the car passed the Emission criteria very well indeed. Result :~
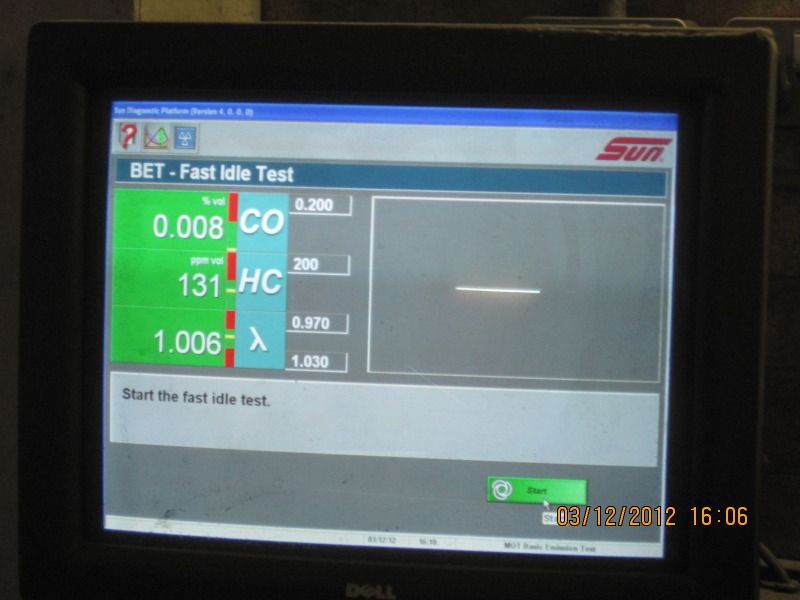
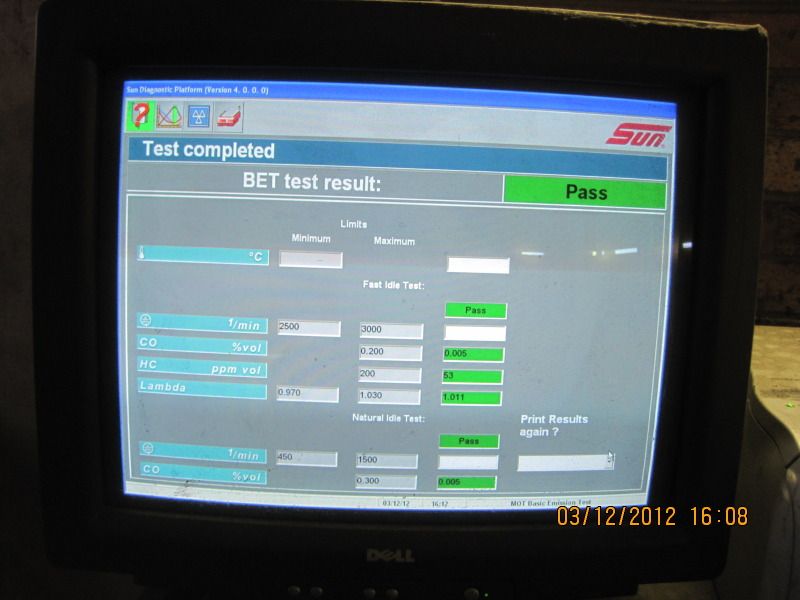
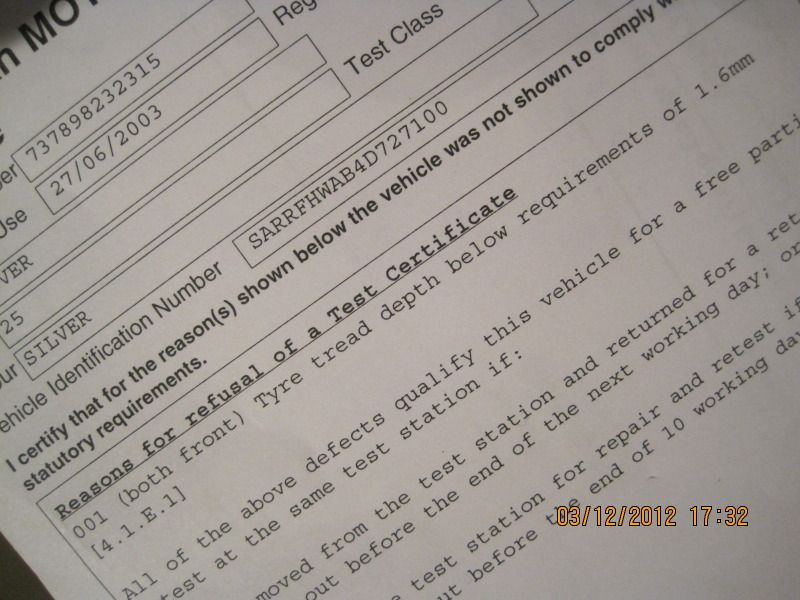
It was then that I asked the friendly tester any problems and he advised it needed both front tyres replacing, the only failure.

Not a bad result at all :~
Earlier I had drained the coolant ( mostly water ) where I had added a bottle of this SPEEDFlush two days ago :~
I have a couple of good alloy wheels and tyres in the garage to suit and will fit those for the retest sometime tomorrow. Then, with a year MoT Certificate, I can make a start on the Cylinder Head Gasket replacement after draining all the coolant again. That way there should be little muck left in the engine to clear away.
It had done the trick by dissolving most of the oil in the cooling system. Even so, I filled the system again with only water and added another bottle of SPEEDFlush before setting off for the MoT test. I'll drain the system again after the retest.
So, I learnt something more today. A car can pass the emissions test even with a damaged Cylinder Head Gasket.
Always an unknown quantity when buying a used car are the Emission readings on the test. Despite the damaged Cylinder Head Gasket allowing a little oil-to-coolant and coolant-to-oil exchanges, I have seen far worse, the car passed the Emission criteria very well indeed. Result :~
It was then that I asked the friendly tester any problems and he advised it needed both front tyres replacing, the only failure.
Not a bad result at all :~
Earlier I had drained the coolant ( mostly water ) where I had added a bottle of this SPEEDFlush two days ago :~
I have a couple of good alloy wheels and tyres in the garage to suit and will fit those for the retest sometime tomorrow. Then, with a year MoT Certificate, I can make a start on the Cylinder Head Gasket replacement after draining all the coolant again. That way there should be little muck left in the engine to clear away.
It had done the trick by dissolving most of the oil in the cooling system. Even so, I filled the system again with only water and added another bottle of SPEEDFlush before setting off for the MoT test. I'll drain the system again after the retest.
So, I learnt something more today. A car can pass the emissions test even with a damaged Cylinder Head Gasket.
Rather than tour the breaker yards looking for two suitable tyres for the retest, got a couple of new ones which set me back £98 for the pair.
Removing the wheels revealed fairly new front brake discs and pads which I was pleased to see.
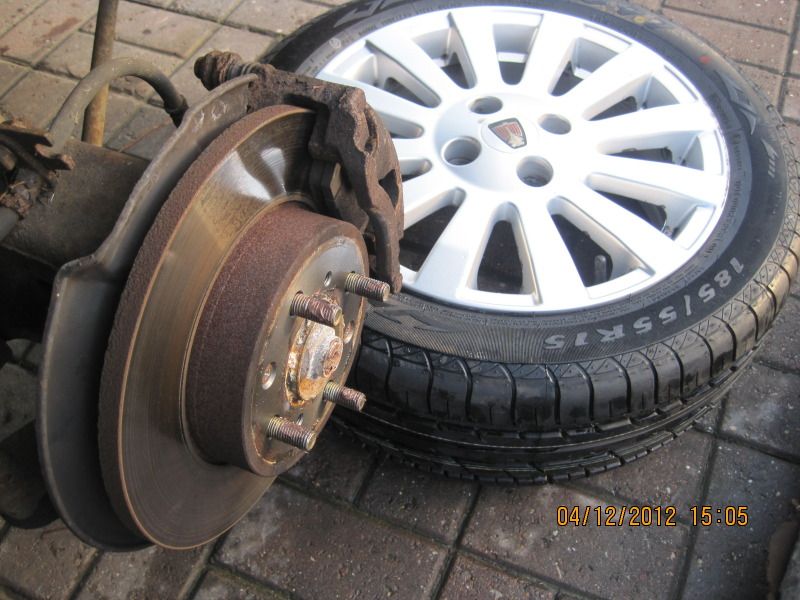
Close up showing the Brake Disc and Brake Pad condition :~
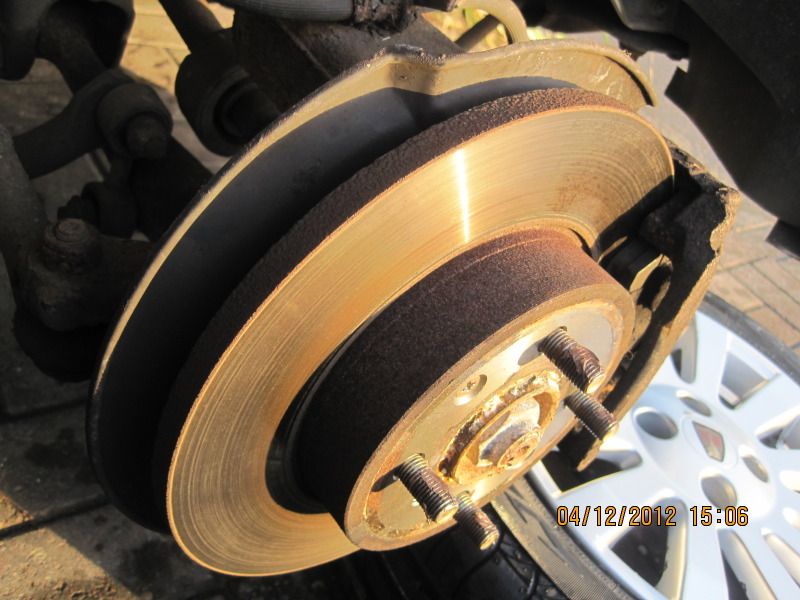
The low winter sun of the mid afternoon has given it a rusty tint. Both front wheels now in place so off for the retest :~
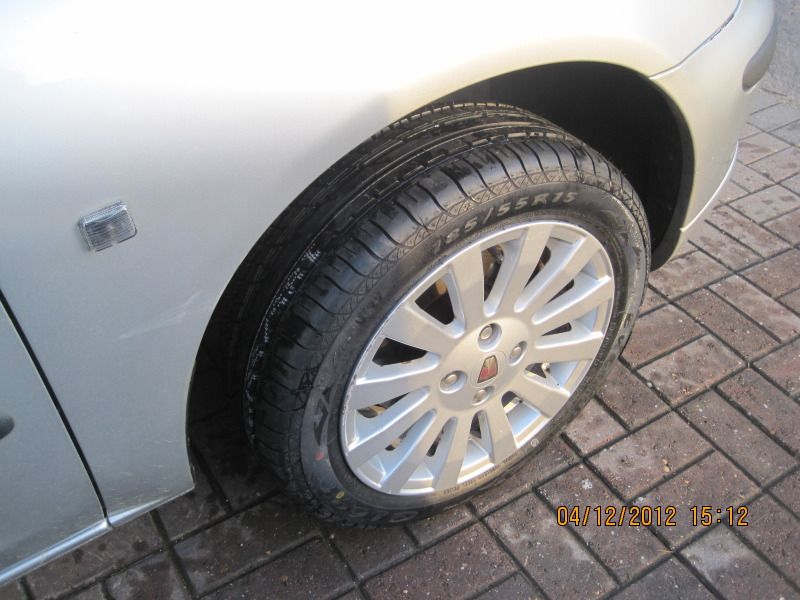
A pass and no advisories. Car drove really nicely on the new rubber. It drove OK previously but, looking at the tyres one was indeed through to the cords just on the inner edge. The other looked legal but, had a perished rubber look about it with numerous minute cracks on the sidewalls and elsewhere which incidentally were nowhere near the wear limit indexes between the treads. It was looking like a tired old worn remould with the treads about to seperate from the body of the tyre. Not nice.
I filled up my 620ti to the brim which was used for towing the little car. The return journey included over an hour's stop-start crawl in traffic negotiating an accident involving a white van on the M6 causing long tailbacks around Junctions 1-3. Very frustrating journey. So, with those delays in mind, I was pleasantly surprised to find the old Rover 620ti still recorded 25 mpg despite not being driven for economy and with that frustrating session stop-start towing on the M6.
The MoT tester remarked on the VOSA year and mileage details showing. The car only covering a few hundred miles for several years prior to 2011. The in the hands of the Grandson, clocked 10,000 during 2011-12.
Dont mind the cold so if little sign of rain or snow tomorrow, I'll get stuck in with the tools. I plan to renew the Timing and other drive belts, the Water Pump as well as the Cylinder Head Gasket. The Genuine MG-R Water Pump I've obtained is fitted with the Evaporator... I would prefer to fit the non-Evaporator Water Pump as they alloy drips to show under the car to alert the car user that the pump is wearing and leaking. The later design evaporates those first coolant loss drips from the worn pump so does not leave any tell tale signs under the car to alert the user.
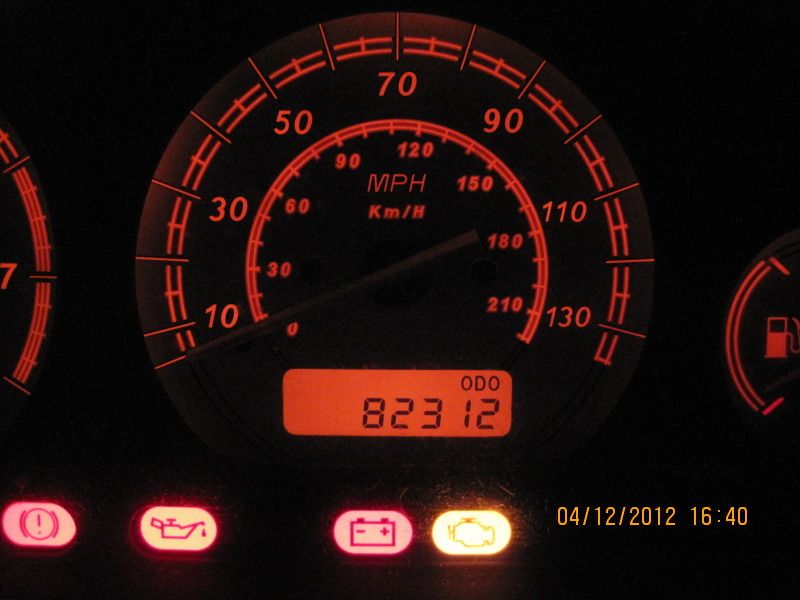
Car now showing :~
More follows,
.
Removing the wheels revealed fairly new front brake discs and pads which I was pleased to see.
Close up showing the Brake Disc and Brake Pad condition :~
The low winter sun of the mid afternoon has given it a rusty tint. Both front wheels now in place so off for the retest :~
A pass and no advisories. Car drove really nicely on the new rubber. It drove OK previously but, looking at the tyres one was indeed through to the cords just on the inner edge. The other looked legal but, had a perished rubber look about it with numerous minute cracks on the sidewalls and elsewhere which incidentally were nowhere near the wear limit indexes between the treads. It was looking like a tired old worn remould with the treads about to seperate from the body of the tyre. Not nice.
I filled up my 620ti to the brim which was used for towing the little car. The return journey included over an hour's stop-start crawl in traffic negotiating an accident involving a white van on the M6 causing long tailbacks around Junctions 1-3. Very frustrating journey. So, with those delays in mind, I was pleasantly surprised to find the old Rover 620ti still recorded 25 mpg despite not being driven for economy and with that frustrating session stop-start towing on the M6.
The MoT tester remarked on the VOSA year and mileage details showing. The car only covering a few hundred miles for several years prior to 2011. The in the hands of the Grandson, clocked 10,000 during 2011-12.
Dont mind the cold so if little sign of rain or snow tomorrow, I'll get stuck in with the tools. I plan to renew the Timing and other drive belts, the Water Pump as well as the Cylinder Head Gasket. The Genuine MG-R Water Pump I've obtained is fitted with the Evaporator... I would prefer to fit the non-Evaporator Water Pump as they alloy drips to show under the car to alert the car user that the pump is wearing and leaking. The later design evaporates those first coolant loss drips from the worn pump so does not leave any tell tale signs under the car to alert the user.
Car now showing :~
More follows,
.
Just remembered something about this little Rover I'm working on worth a mention. When I topped up and bled the cooling system and added the SPEEDFlush, driving the car the few miles to the Mot test, the heater was set to full blast and blew as cold as an efficient AirCon! No heat at all...  Obviously the smaller passageways in the heater matrix were blocked with the emulsified oil-coolant mix. However nearing the Mot test facility, the heater suddenly started blowing hot, really hot and I appreciated that heat in the current very cold conditions.
Obviously, the SPEEDflush had done it stuff and cleared those blocked smaller passageways in the Heater Matrix.
I used the Speedflush like this before on another K-Series car with a far worse so called failure. I was disappointed that no heat came from the heater even though set to full and the blower fan on fast speed. Suddenly I heard a muted "Pop" sound from somewhere under the dash and a few seconds later, nice hot warmth came from the heater vents. That Speedflush does the trick and is money well spent. It really helps clear most of the oil-coolant emulsified muck from the cooling system. A couple of years again I bought a dozen small bottles of SPEEDflush off ebay at a very favourable discount. Worked out about £2 each small bottle. I've used several bottles since and all have worked well leaving cooling systems well cleaned internally.
This was one of the worst I worked on:~
Becomes this :~
and stays that way if the job is done well.
Obviously the smaller passageways in the heater matrix were blocked with the emulsified oil-coolant mix. However nearing the Mot test facility, the heater suddenly started blowing hot, really hot and I appreciated that heat in the current very cold conditions.Obviously, the SPEEDflush had done it stuff and cleared those blocked smaller passageways in the Heater Matrix.
I used the Speedflush like this before on another K-Series car with a far worse so called failure. I was disappointed that no heat came from the heater even though set to full and the blower fan on fast speed. Suddenly I heard a muted "Pop" sound from somewhere under the dash and a few seconds later, nice hot warmth came from the heater vents. That Speedflush does the trick and is money well spent. It really helps clear most of the oil-coolant emulsified muck from the cooling system. A couple of years again I bought a dozen small bottles of SPEEDflush off ebay at a very favourable discount. Worked out about £2 each small bottle. I've used several bottles since and all have worked well leaving cooling systems well cleaned internally.
This was one of the worst I worked on:~
Becomes this :~
and stays that way if the job is done well.
jith said:
Interesting stuff John. Nobody could accuse you of not being dedicated!
Look forward to you getting the head off.
J
Well, helps to pass the time.. Look forward to you getting the head off.
J

Made a bit of progress today :~
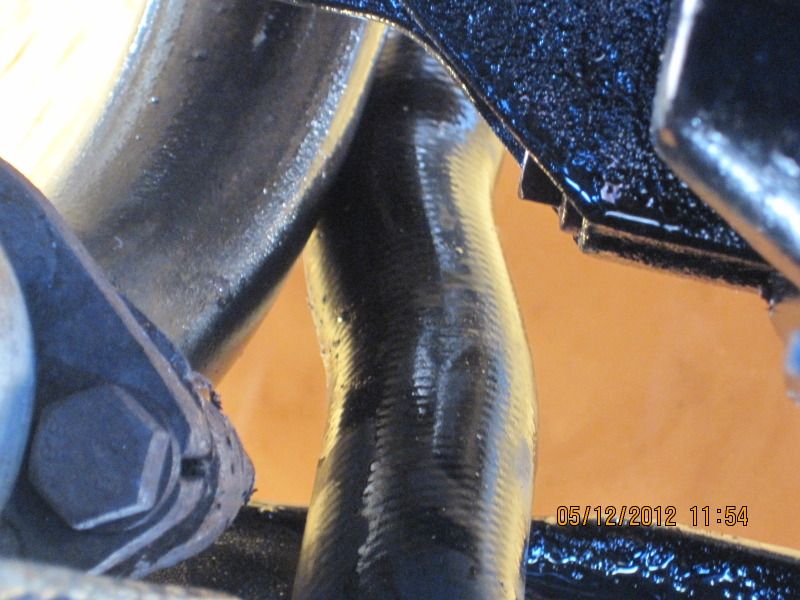
Made a start by releasing three of the coolant hoses:~
They were far easier to pull away from their locations as I had been through all that first time a few days ago. Nine years firmly clamped makes the Rubber form a close fitting shape on the location which is always difficult to remove carefully trying to avoid damaging the rubber.
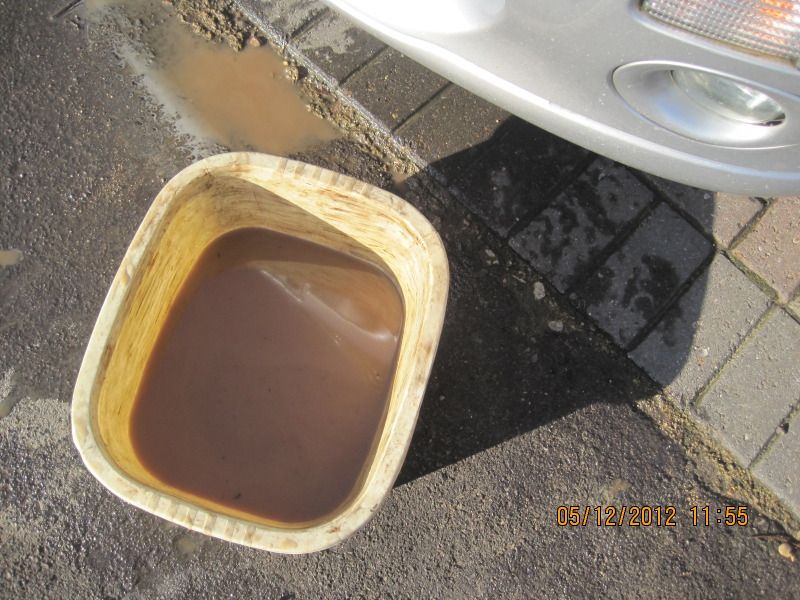
Then by lowering the bottom Radiator Hose released end down towards a large bowl below, the coolant ( mainly Water with a flushing agent ) was collected with minimal spillage :~
That mud coloured stuff shows the SPEEDFlush has done the business. Not a trace of lumps of Emulsified Oil-Water mix anywhere :~
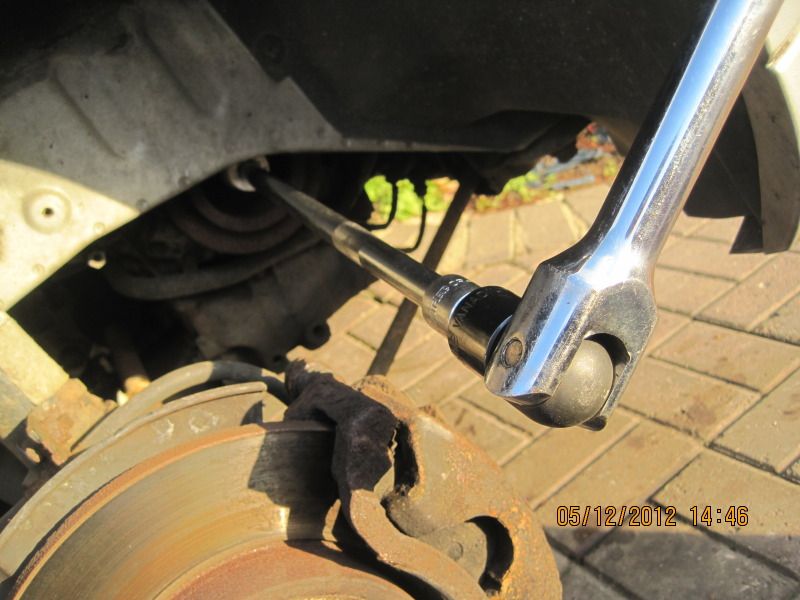
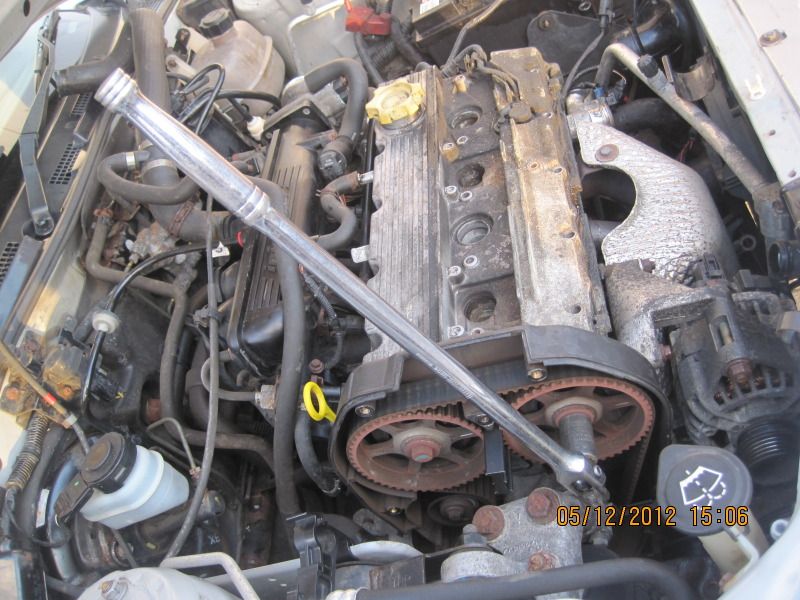
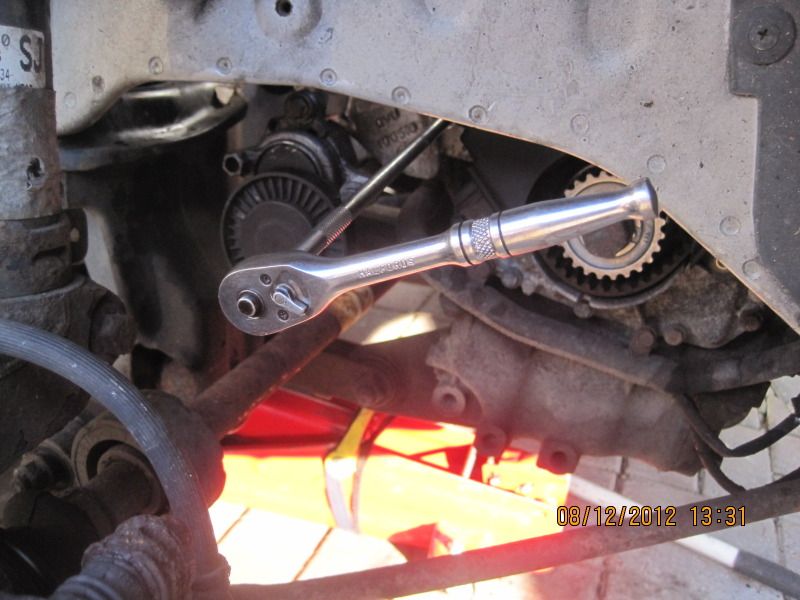
Removed OFFside front Road Wheel and placed car on Axle Stand. Located the Stand on one of the reinforced rails under the car. That allowed me to use my 22mm Socket and Breaker Bar to correctly align the engine into the "SAFE" position.
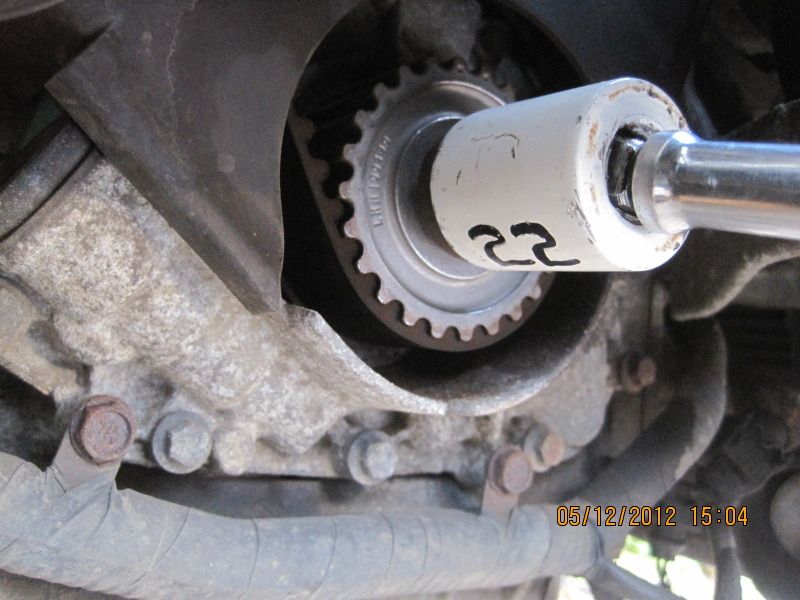
Then using my DeWalt 240volt Mains Impact Wrench I released the CRANKshaft Pulley Bolt. I thought it was not going to cope with the job as the Wrench struggled for several seconds then the bolt suddenly loosened :~

Then replaced the 22mm Bolt back in its location and realigned the engine into the safe position. The Impact Wrench had moved the CRANKshaft a few degrees away from safe :~
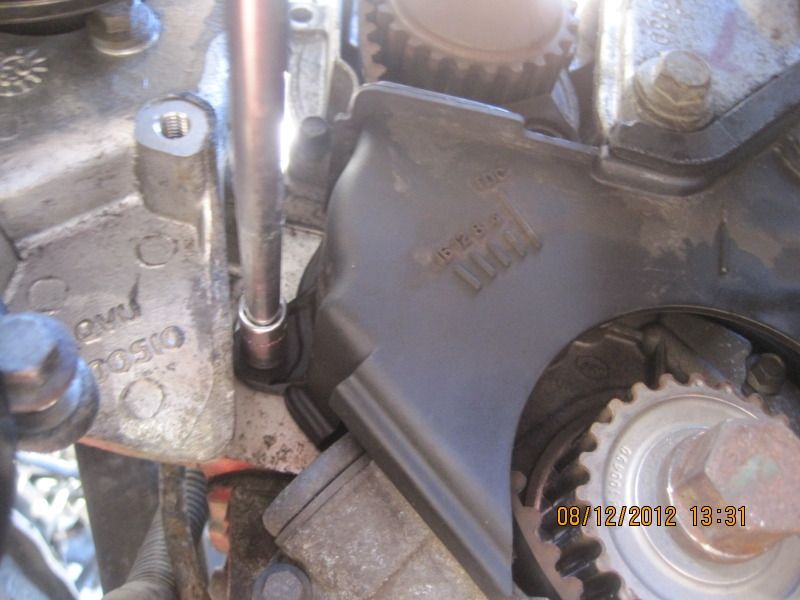
Then Inserted the CAMshaft Locking Tool ( about £4 on ebay ) to hold the TWO CAMshafts securely to allow me to loosen each of their 17mm Bolts :~
Then removed the Locking device and both bolts and using a large Screwdriver, carefully levered the two Pulleys off their CAMshafts. WARNING... NEVER leave that locking device in place until it's needed when the new Timing Belt is fitted ... Why? Some poor devils having done all the work left it in place and then tried to start the car....
Result:~ Ruined engine :~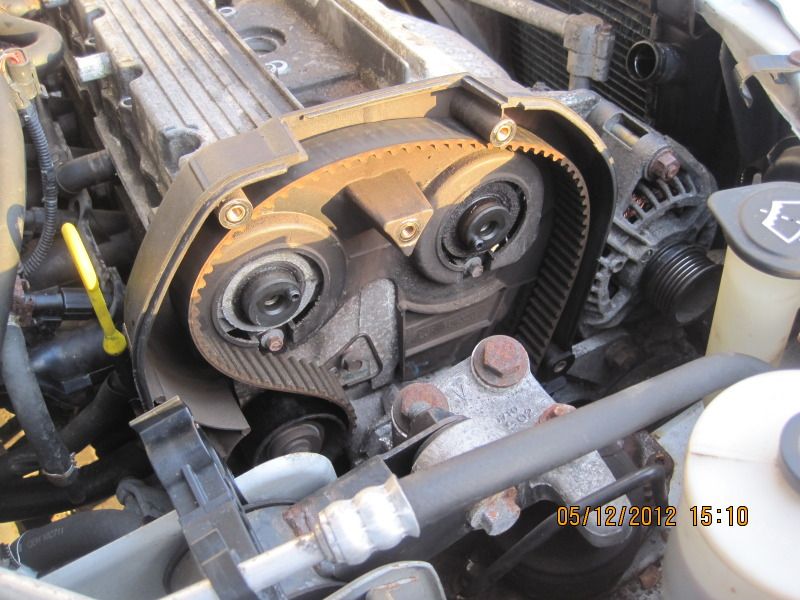
I also removed the two small and short 8mm bolts which secure the upper inner Timing Belt Cover to the Cylinder Head. One bolt below the centre of each CAMshaft. That Inner Cover can remain in place when the time comes to lift the Cylinder Head.
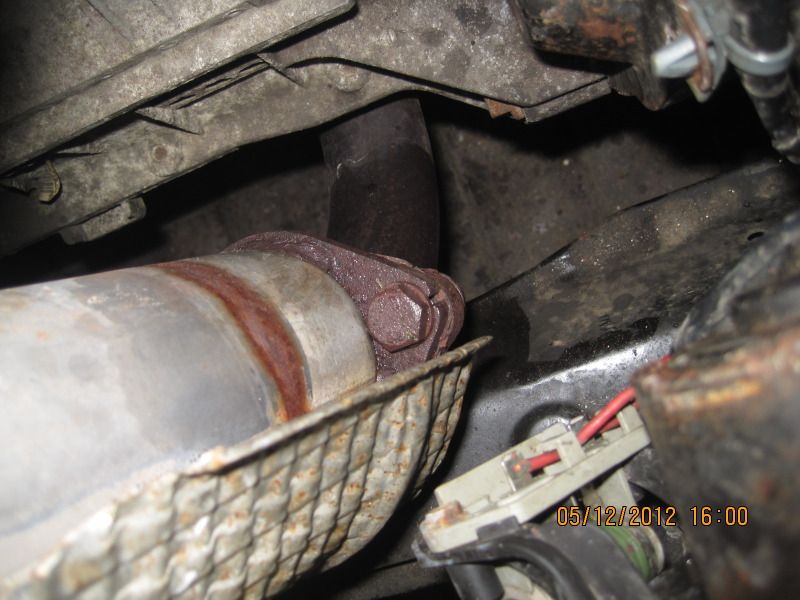
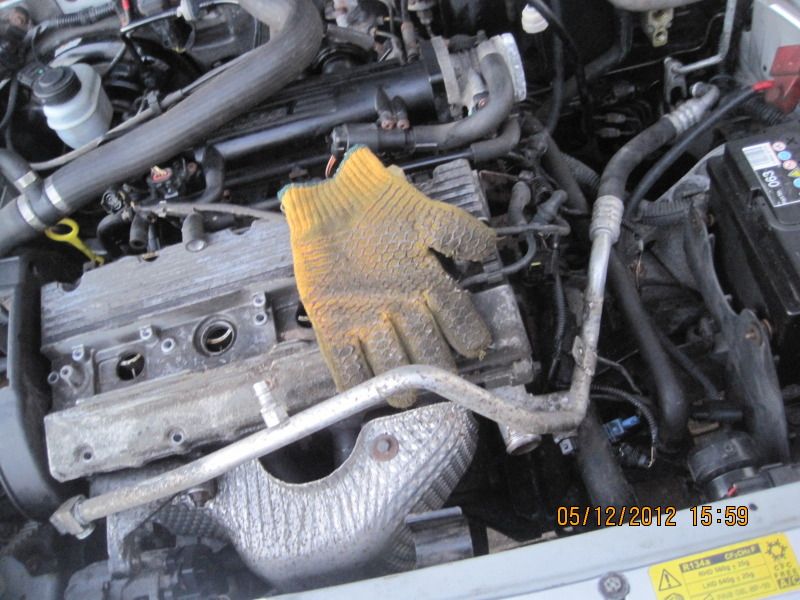
I planned to detach the Plastic Inlet Manifold prior to removing the cylinder head. That has the advantage of not having to disconnect all the electrical and fule connections. However, the Inlet Manifold is secure by 13mm Nuts and these have become corroded and will be difficult to remove in situ without the risk of rounding a few off which is to be avoided at all costs. So, I'll play that by ear when the time comes to lift the Cylinder Head. There was another problem from corrosion ~ there's always a few on old cars.. The two 15mm lower manifold nuts either side of the Manifold on their 17mm Bolts were loath to be removed. Slightly seized on their bolts and will need a 17mm spanner on their Bolt heads to facilitate seperating the Manifold from the Exhaust pipe. I prefer to leave the Exhaust Manifold in place as it is easier to work without disturbing the Ex-Manifold and its gasket. The beauty of the K-Series is that its components are so light, you can do this. That's the Bolt head in the centre of this picture. It simply spun round and round. Will need a spanner on both ends to undo :~
Access to those two bolts is very difficult as the AirCon Pipe is in the way. As the AirCon is not working and in need of regassing, I removed that Pipe which was held inplace by three 8mm bolts. Much better access now.
By now the Sun had dipped behind the hill and the Temperature started to drop like a stone. The tools were very cold to handle now even though I used rubber gloves. So packed up for the day and weather allowing, will get stuck in tomorrow. Apart from those annoying corrosion problems, well satisfied with the leisurely progress made today.
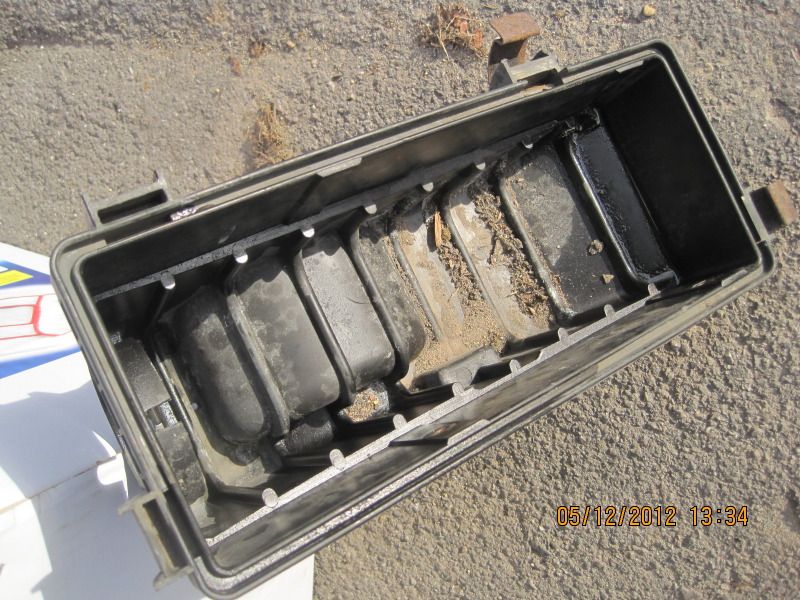
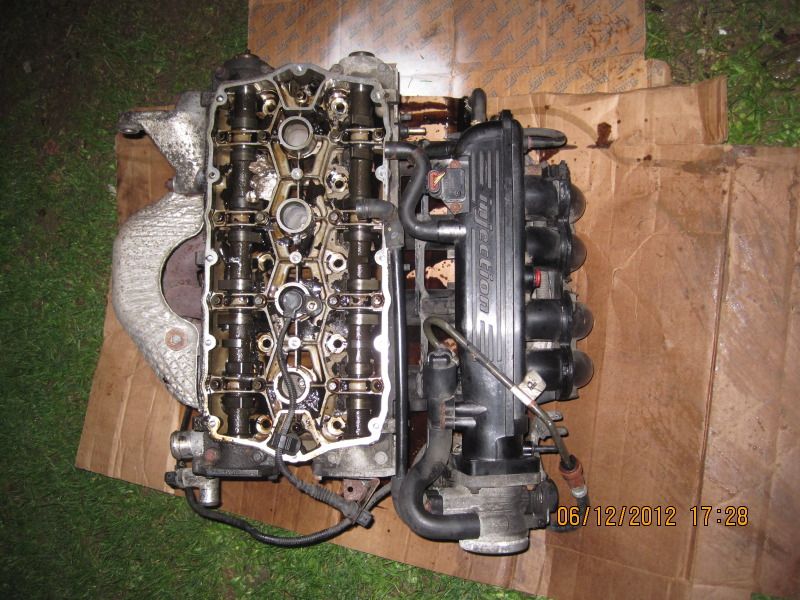
Finally, here's evidence that the Air Filter has been doing its job well. note all that grit and road filth. Without the Air Filter, guess where that lot of filth would go ...
More follows.
Well documented, everyone has there own way of doing things!
I prefer to remove the exhaust manifold from the head, btw where the manifold meets the downpipe shouldnt that be a stud rather than a 17mm bolt??? its been off or broken before!
I prefer to undo the inlet manifold electrical block connector and speedfit fuel pipes as its a lot quicker to do this and remove the inlet manifold on the bench.
One last point of advice which you can tell me to shove if you want, Impact guns lose a lot of power through extensions, hence why the 22mm crank pulley bolt may have been exra tight, either a deep 22mm socket or lowering the engine to gain access without the extension makes life a lot easier without having to mess around locking the flywheel if an extended impact gun cant shift it
Ex X Power said:
Well documented, everyone has there own way of doing things!
I prefer to remove the exhaust manifold from the head, btw where the manifold meets the downpipe shouldnt that be a stud rather than a 17mm bolt??? its been off or broken before!
I prefer to undo the inlet manifold electrical block connector and speedfit fuel pipes as its a lot quicker to do this and remove the inlet manifold on the bench.
One last point of advice which you can tell me to shove if you want, Impact guns lose a lot of power through extensions, hence why the 22mm crank pulley bolt may have been exra tight, either a deep 22mm socket or lowering the engine to gain access without the extension makes life a lot easier without having to mess around locking the flywheel if an extended impact gun cant shift it
Yes, those exhaust bolts and not studs were a surprise to me. Those cars previously worked on did not have bolts, just studs.I prefer to remove the exhaust manifold from the head, btw where the manifold meets the downpipe shouldnt that be a stud rather than a 17mm bolt??? its been off or broken before!
I prefer to undo the inlet manifold electrical block connector and speedfit fuel pipes as its a lot quicker to do this and remove the inlet manifold on the bench.
One last point of advice which you can tell me to shove if you want, Impact guns lose a lot of power through extensions, hence why the 22mm crank pulley bolt may have been exra tight, either a deep 22mm socket or lowering the engine to gain access without the extension makes life a lot easier without having to mess around locking the flywheel if an extended impact gun cant shift it
Yes, I will leave the Inlet manifold attached too, just release the various fuel and electrical quick release connections. The Plastic Inlet manifold is so light, it is not a back breaker for one working and lifting single handed.
Yes, good point about using an extension on the impact wrench. Does make a difference. Because of the location and the far too tight socket holding device on the socket drive, I have to use a short extension. I will drop the engine to access some of those lower Timing Cover 8mm bolts.
I have known these K-Series 22mm CRANKshaft Pulley Bolts to be silly tight so much so that my mains 240volt Impact Wrench could not cope. My son's Rover 25 was one such a couple of years ago. Had to do this to release it with my son holding it in Top Gear and with foot firmly on the brakes. Scaffold Pole and heavy duty 3/4" Breaker Bar did the trick with me standing on the Pole.... very carefully ..
 ... :~
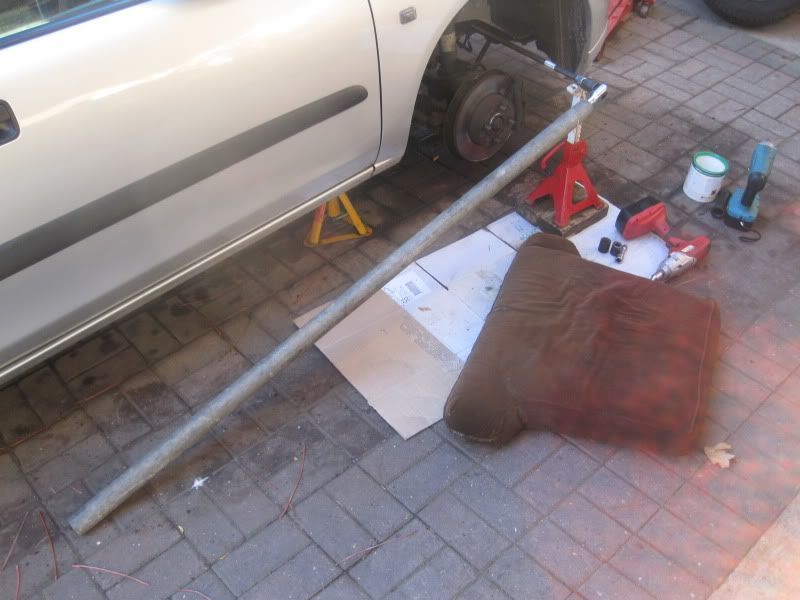
No real need to be that tight. His car was another needing a Cylinder Head Gasket replacement. Did not cost a lot with the gasket issue and well over two years later with lots of daily use, never missed a beat. Ideal for a student with little cash and looking for his first job in a difficult employment ( lack of ) market.
Still cold with fine rain for past couple of hours. Now stopped so will wrap up and spend a few minutes on the job before it gets dark.
Getting there... little by little weather allowing..
Busy with other things for most of today and did not make a start on the car until after 3 O'Clock when the light rain stopped. Tad warmer too but I put on a load of clothes as I hate being cold.
Those two partially corrosion seized lower Exhaust Manifold bolts I tackled first. They simply spun round when I tried to remove them yesterday. I had given them both a good dose of Penetrating Fluid last night and amazingly, they were both undone using finger power only... result
One of the Quick Release fuel line connectors ( Speedfit Fuel Line Connectors which are a very clever idea ) would not quick release.... I suspect heavy handedness in previous ownership. I therefore undone the Union in that fuel line where it sits on the top of the Fuel Filter. I shall be renewing that Filter anyway.
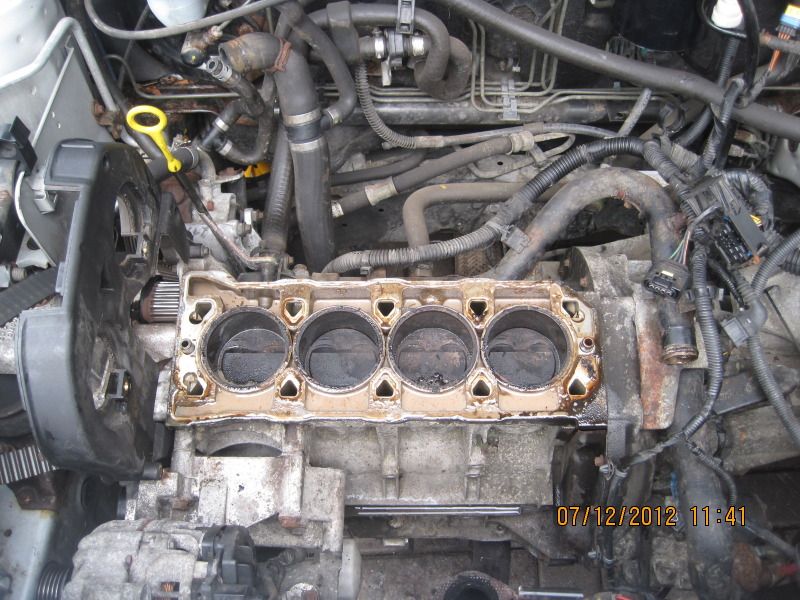
So, with all coolant hoses, fuel lines, electrical connectors removed or disconnected, I leant over the engine and with both hands at either end, gave a tug or two. The Cylinder Head lifted and I was able to lift it up and out of the engine compartment with both Inlet and Exhaust Manifolds still attached single handed. Something you could not do with many engines.
It was dark by the time I had finished and here's a few images of the work today.
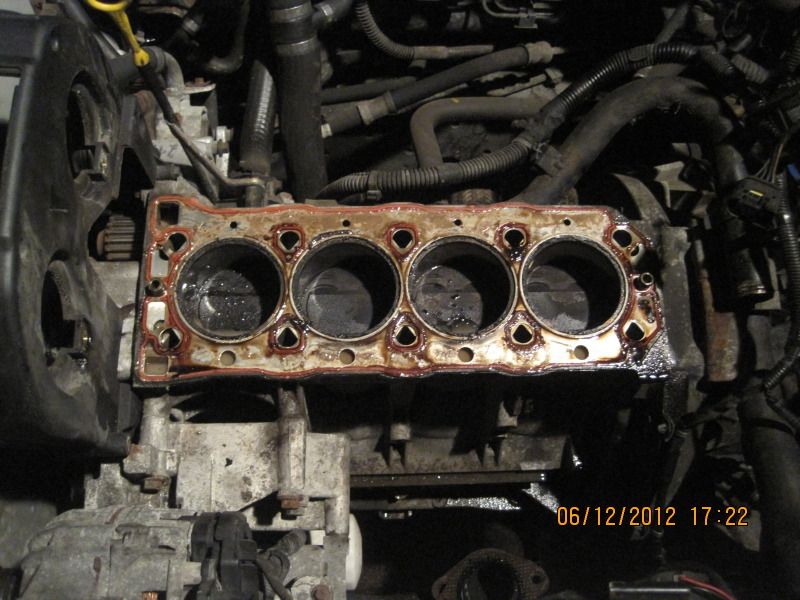
Nowhere near as bad as some I've seen. I will clean up these components when time allows and check those cylinder head and cylinder block interfaces for truth with my trusty straight edge. Initial inspection ~ in the dark with a torch ~ shows a cylinder head face skim will not be necessary.
Ongoing ~ when time allows.
Those two partially corrosion seized lower Exhaust Manifold bolts I tackled first. They simply spun round when I tried to remove them yesterday. I had given them both a good dose of Penetrating Fluid last night and amazingly, they were both undone using finger power only... result
One of the Quick Release fuel line connectors ( Speedfit Fuel Line Connectors which are a very clever idea ) would not quick release....
I suspect heavy handedness in previous ownership. I therefore undone the Union in that fuel line where it sits on the top of the Fuel Filter. I shall be renewing that Filter anyway. So, with all coolant hoses, fuel lines, electrical connectors removed or disconnected, I leant over the engine and with both hands at either end, gave a tug or two. The Cylinder Head lifted and I was able to lift it up and out of the engine compartment with both Inlet and Exhaust Manifolds still attached single handed. Something you could not do with many engines.
It was dark by the time I had finished and here's a few images of the work today.
Nowhere near as bad as some I've seen. I will clean up these components when time allows and check those cylinder head and cylinder block interfaces for truth with my trusty straight edge. Initial inspection ~ in the dark with a torch ~ shows a cylinder head face skim will not be necessary.
Ongoing ~ when time allows.
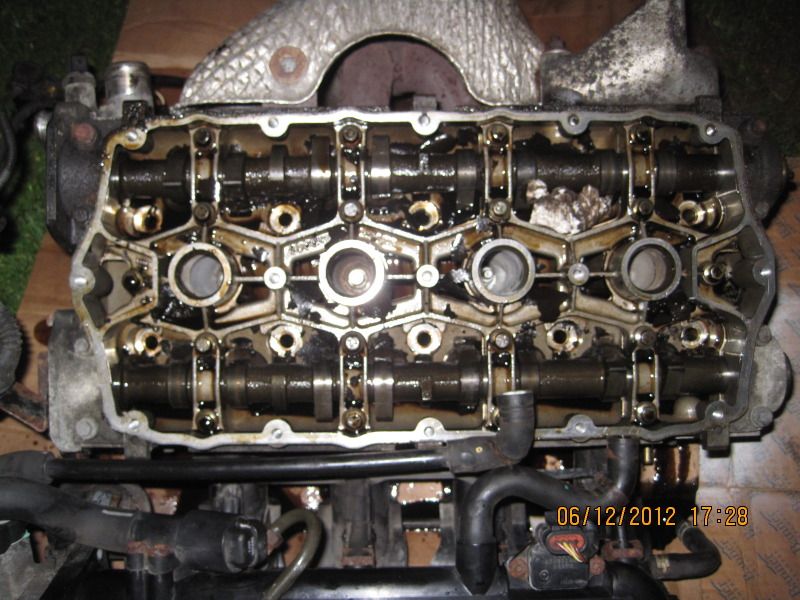
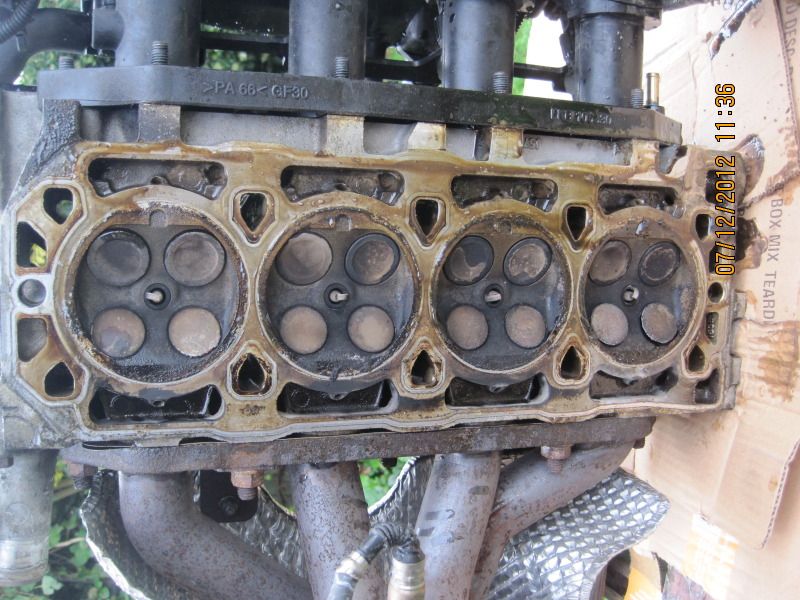
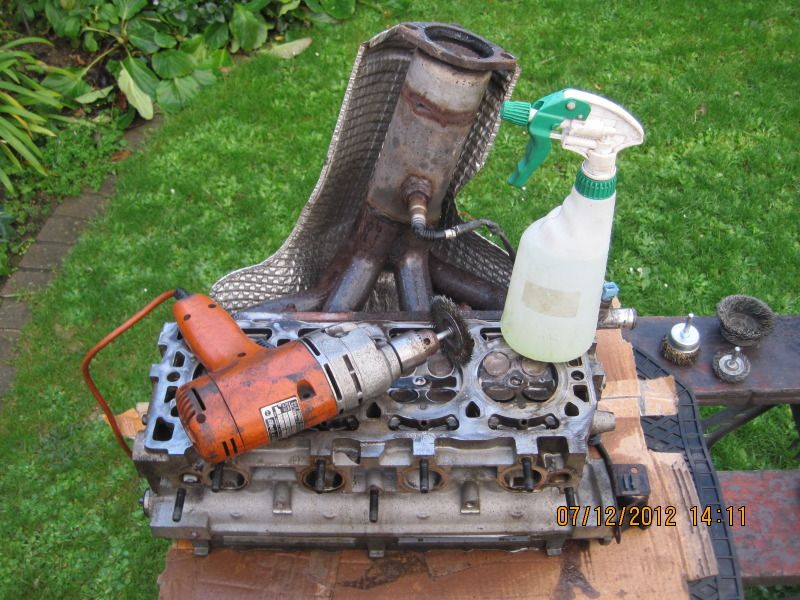
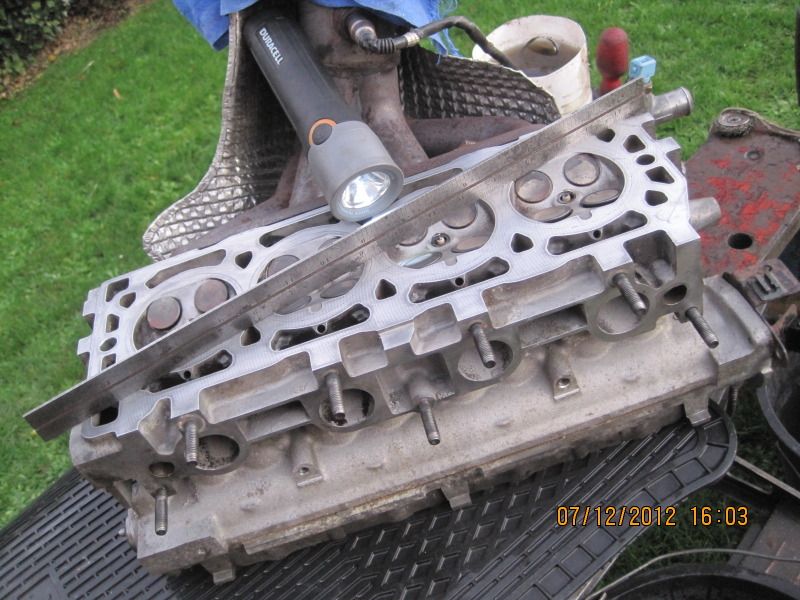
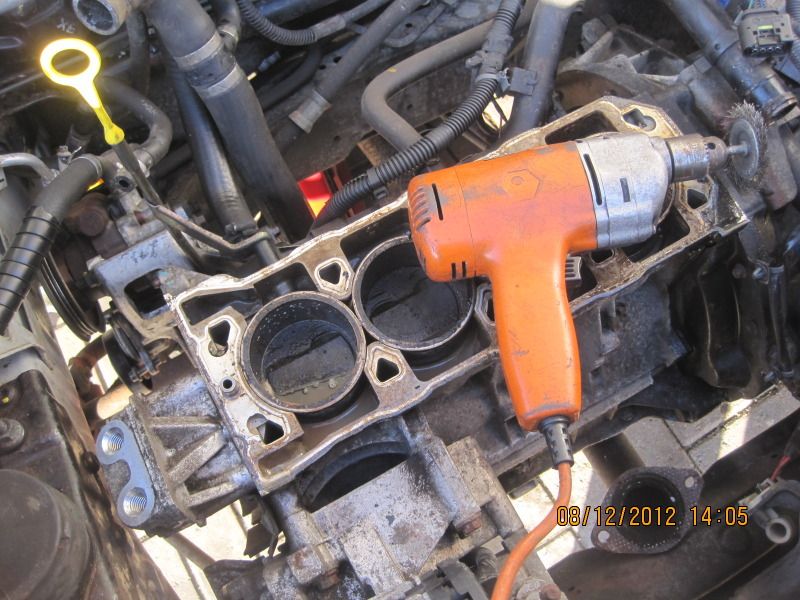
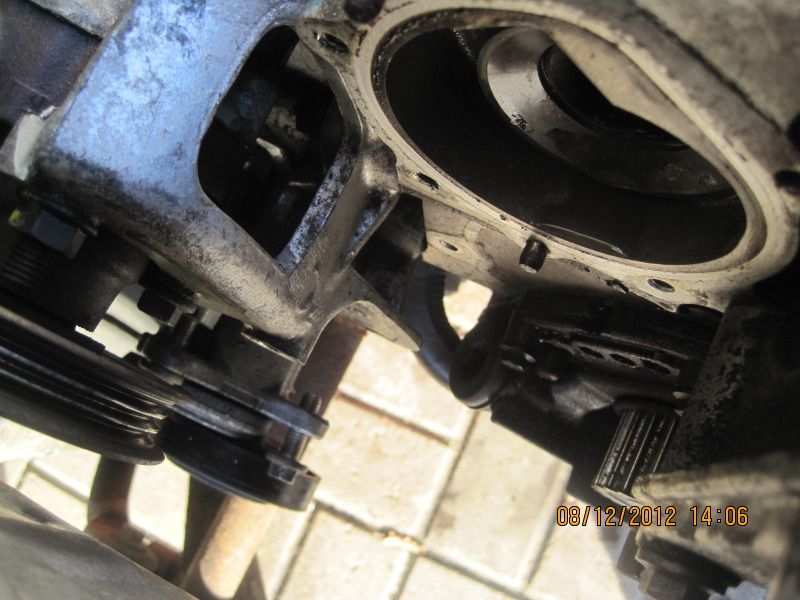
Much rain and shine today which meant using an electric drill could be iffy. From about 3pm the skies cleared so I got the tools ready only to have a few seconds of rain make everything wet. Even so, made some progress cleaning up and checking the Cylinder Head for truth. When cleaned up, I was pleased to observe that the Fire Ring witness marks were very light so no sign of any overheating deep indentation fire ring damage in the usual hot area around the Exhaust Valves. A Head skim to clean up the surface will not be necessary. It rarely is unless the car was driven on when the overheating signs were ignored there and damage done. Here's a few images I took which are self explanatory.
Before starting. I've seen far worse :~
Tools ready for the clean up. No engine degreasant to hand so I used some Washing Up Liquid diluted in a Mist Sprayer. Then carefully and lightly used the wire brush in the Electric Drill :~
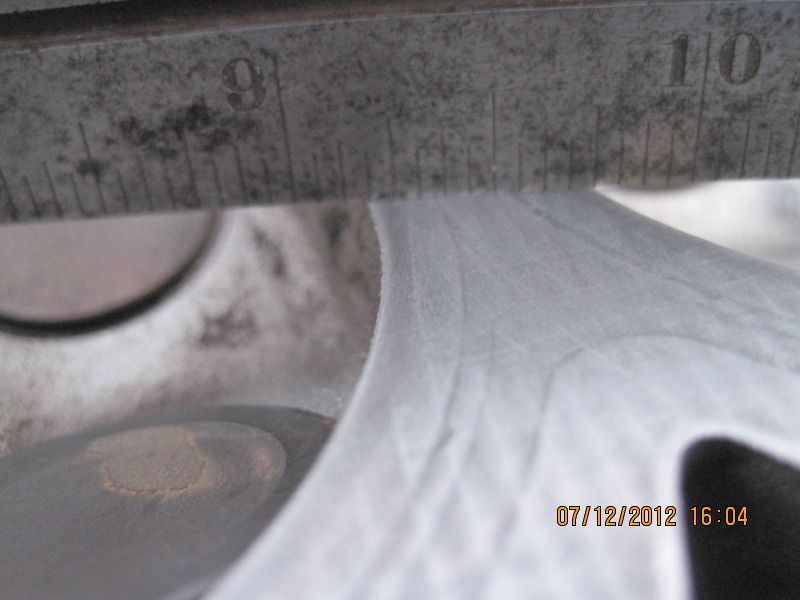
Working quickly and carefully as it was fast getting dark and black clouds moving in this direction, I soon had the Cylinder Head face clean and ready for checking with my trusty straight edge. I used the edge in several directions across the head with a torch light which would reveal any uneven areas or signs or warping. Not a trace of either. That head is good to go.

Weather allowing, tomorrow I will clean up the Cylinder Block and fit the new Water Pump.
Here's what the Block currently looks like. That filthy liquid in the coolant passageways around each cylinder will drain away quickly once the old Water Pump is removed. Any left I will use a syringe to suck out.
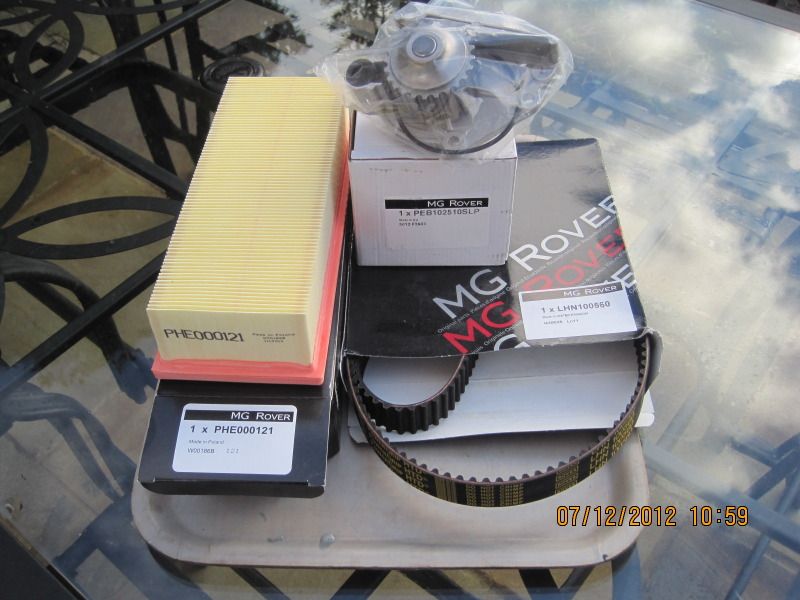
These are the new MG-R OE parts I will fit as work progresses :~
Finally, here's the reason those lower manifold nuts ( and bolts ) simply spun round when I tried to undo them. That was a delaying surprise I was not prepared for... The Nuts were not fitted to studs as with all the earlier cars I've worked on, so this nut and bolt fixing must be a change with the later cars :~
Getting there.
Before starting. I've seen far worse :~
Tools ready for the clean up. No engine degreasant to hand so I used some Washing Up Liquid diluted in a Mist Sprayer. Then carefully and lightly used the wire brush in the Electric Drill :~
Working quickly and carefully as it was fast getting dark and black clouds moving in this direction, I soon had the Cylinder Head face clean and ready for checking with my trusty straight edge. I used the edge in several directions across the head with a torch light which would reveal any uneven areas or signs or warping. Not a trace of either. That head is good to go.
Weather allowing, tomorrow I will clean up the Cylinder Block and fit the new Water Pump.
Here's what the Block currently looks like. That filthy liquid in the coolant passageways around each cylinder will drain away quickly once the old Water Pump is removed. Any left I will use a syringe to suck out.
These are the new MG-R OE parts I will fit as work progresses :~
Finally, here's the reason those lower manifold nuts ( and bolts ) simply spun round when I tried to undo them. That was a delaying surprise I was not prepared for...
The Nuts were not fitted to studs as with all the earlier cars I've worked on, so this nut and bolt fixing must be a change with the later cars :~Getting there.
hidetheelephants said:
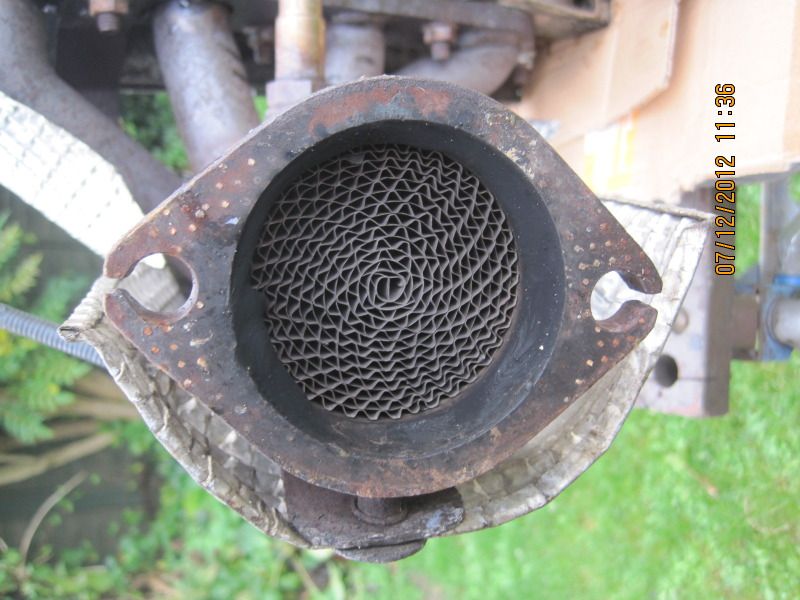
What's the corrugated stuff in the manifold for?
That's the core of the Catalytic Converter. Contains precious metals and is recyclable. Platinum, Rhodium and Palladium and Titanium I believe are used in the construction of Catalytic Converters. A metallic wash of some of those precious metals over that 'honeycomb' core during manufacture is the Catalyst which converts much of the harmful gases into less harmful ones... I think .. When they first appeared a decade or two ago, there was always a distinctive Sulphurous 'bad egg' like smell about the roads which I rarely experience in more recent years. That may also be fuel related too.
MGJohn said:
That's the core of the Catalytic Converter. Contains precious metals and is recyclable. Platinum, Rhodium and Palladium and Titanium I believe are used in the construction of Catalytic Converters. A metallic wash of some of those precious metals over that 'honeycomb' core during manufacture is the Catalyst which converts much of the harmful gases into less harmful ones... I think ..
When they first appeared a decade or two ago, there was always a distinctive Sulphurous 'bad egg' like smell about the roads which I rarely experience in more recent years. That may also be fuel related too.
Catalyst in the manifold? Every day is a schoolday. Not very replaceable though, is it?When they first appeared a decade or two ago, there was always a distinctive Sulphurous 'bad egg' like smell about the roads which I rarely experience in more recent years. That may also be fuel related too.
hidetheelephants said:
MGJohn said:
That's the core of the Catalytic Converter. Contains precious metals and is recyclable. Platinum, Rhodium and Palladium and Titanium I believe are used in the construction of Catalytic Converters. A metallic wash of some of those precious metals over that 'honeycomb' core during manufacture is the Catalyst which converts much of the harmful gases into less harmful ones... I think ..
When they first appeared a decade or two ago, there was always a distinctive Sulphurous 'bad egg' like smell about the roads which I rarely experience in more recent years. That may also be fuel related too.
Catalyst in the manifold? Every day is a schoolday. Not very replaceable though, is it?When they first appeared a decade or two ago, there was always a distinctive Sulphurous 'bad egg' like smell about the roads which I rarely experience in more recent years. That may also be fuel related too.
Several K-Series cars in the family since 1993 and never needed to replace one. Even so, removal is fairly easy if ever needed even for an amateur DIYer mechanic like me with limited amateur facilities. Can be done via the engine compartment from above if you do not have fat arms...
Beautiful sunny winter's day so made steady progress working in the dry but very cold conditions this afternoon working at my usual leisurely pace.
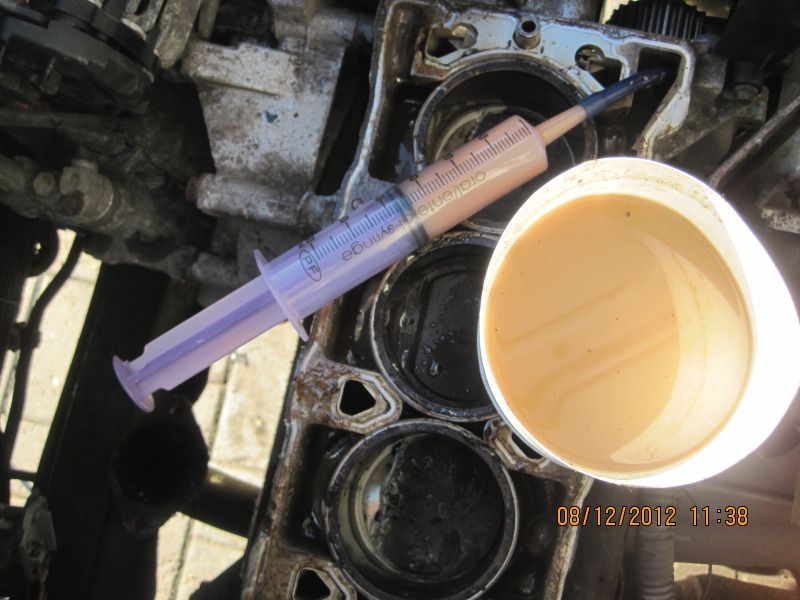
Prior to the work cleaning up the block, I used this Syringe with short piece of rubber hose to extract the remaining old coolant :~
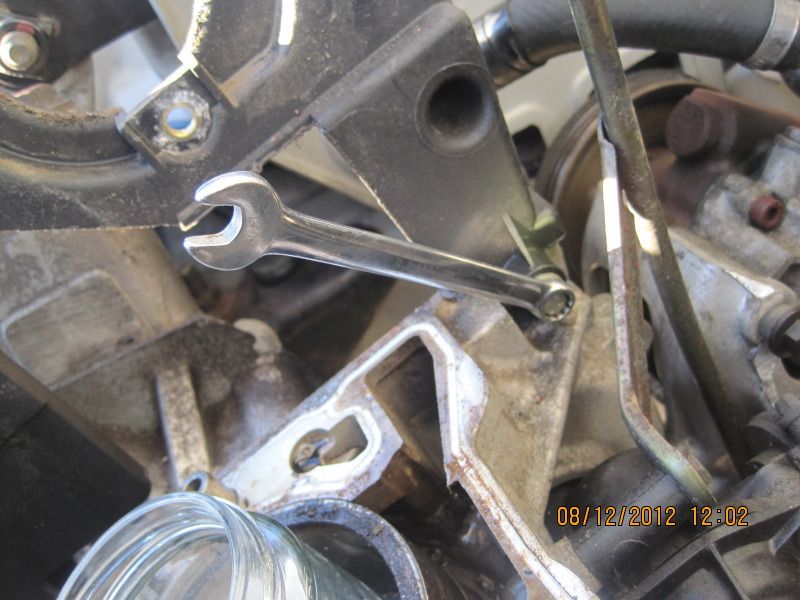
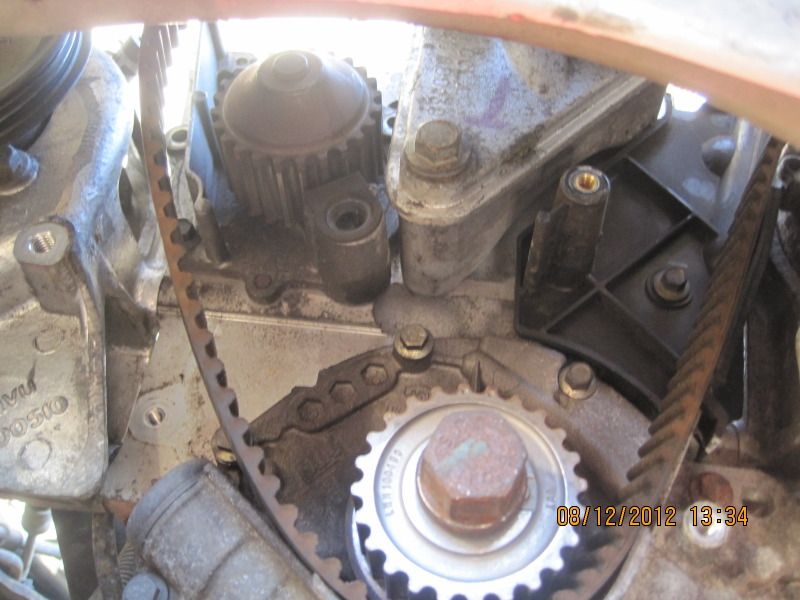
This 'silver' 8mm bolt is very difficult to access with the Cylinder Head in place. Easy with the head removed. It bolts into the Water Pump from the 'reverse' side and also holds the Inner Timing Belt Cover.
PAS Belt Tensioner 10mm Bolts loosened allowing it to be swung clear allowing access to the small 8mm Timing and Water Pumps bolts to be accessed.
Removing those 'hidden' bolts :~
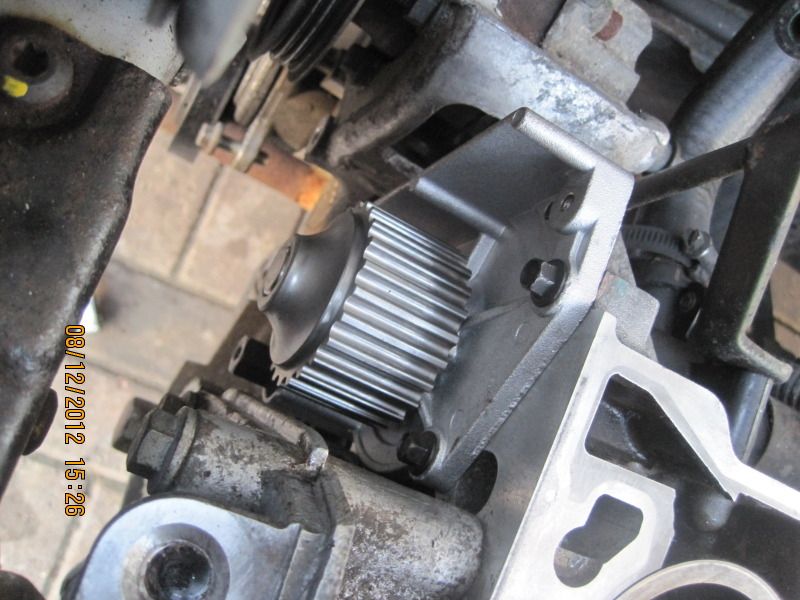
Lower Timing Belt Cover removed revealing old Belt and Water Pump, both of which will be renewed.
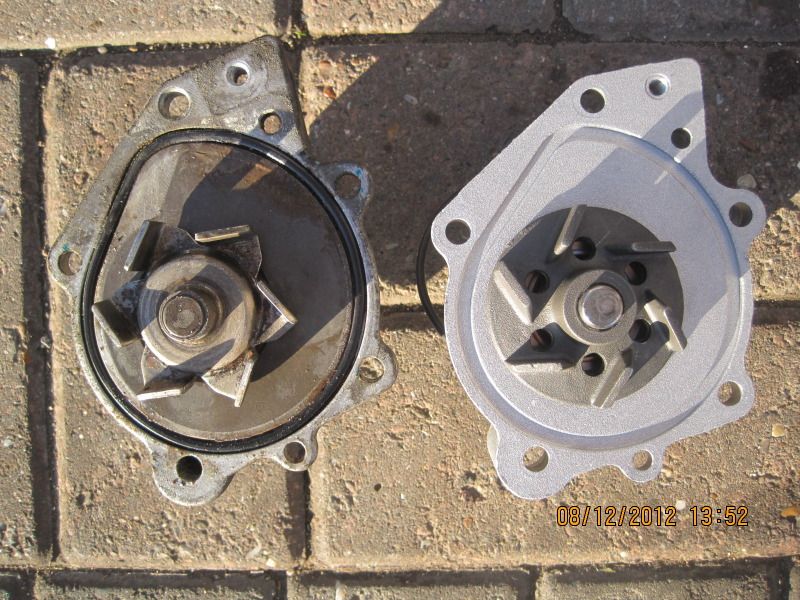
New and old Water Pumps.
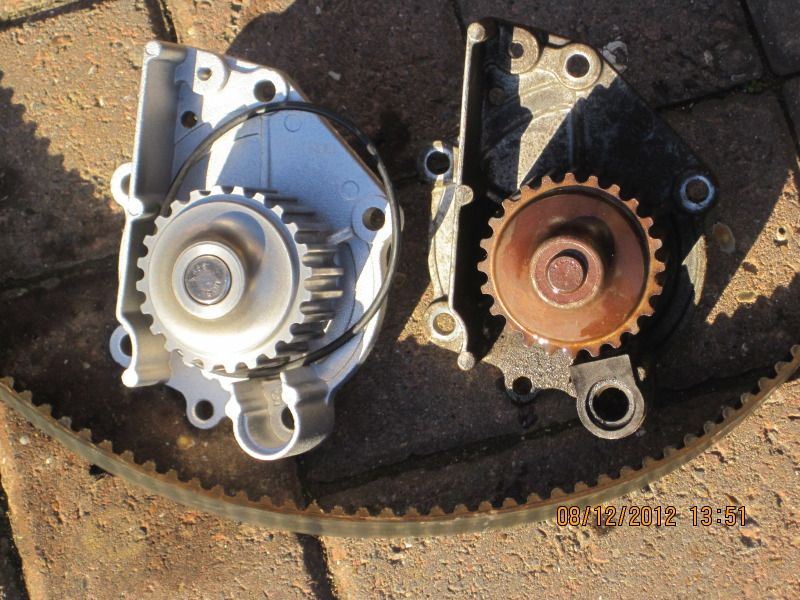
New MG-R Pump has cast Impellor, old has pressed steel one.
Clean up about to start :~
Water Pump location prior to clean up. Lower left shows PAS Belt tensioner swung clear.
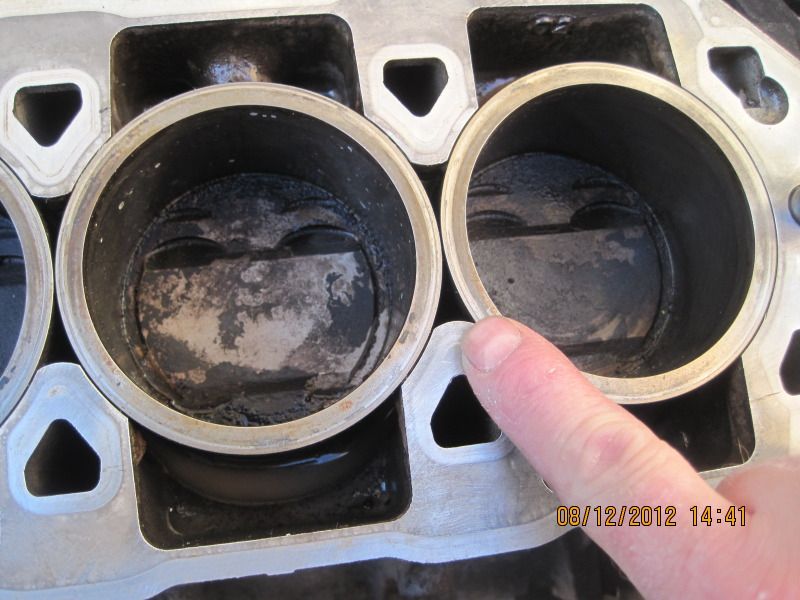
Cleaned up Cylinder Block given the Cylinder Liner "Finger Test". All four liners passed on all four points around their top circumference. Good sign that.
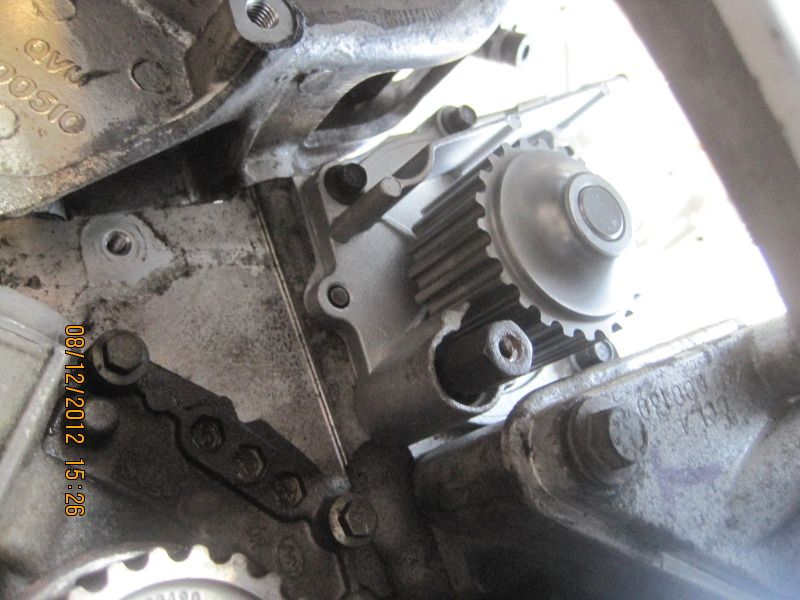
New Water Pump fitted :~
Block given final clean up. Dirt always finds its way onto the surface no matter how careful you work.
New Water Pump in place and all bolts tightened.
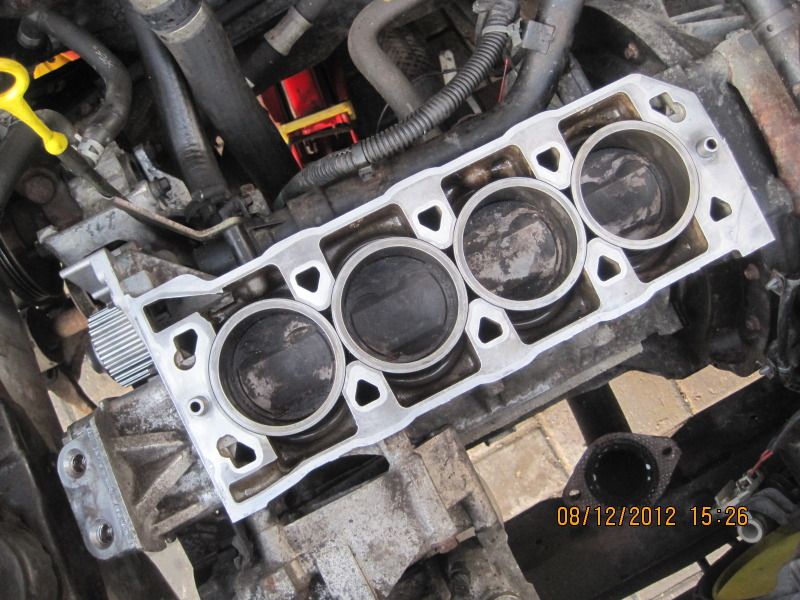
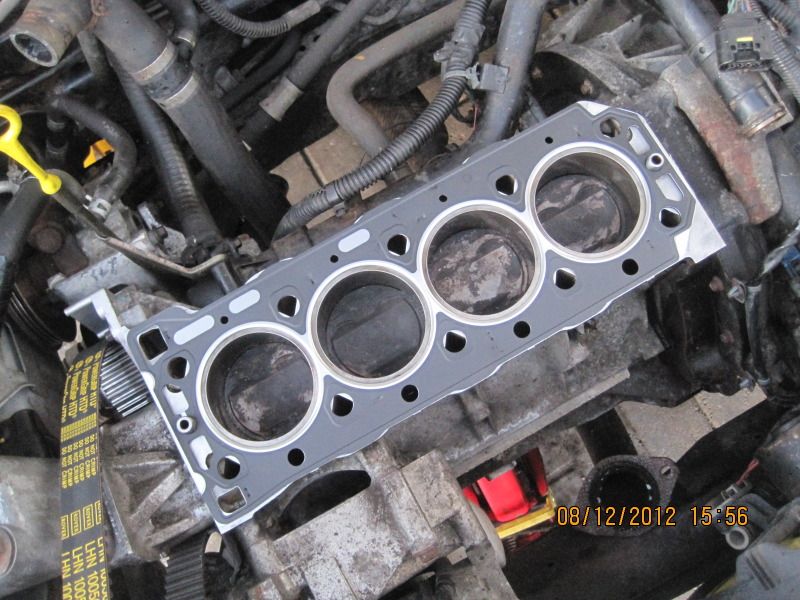
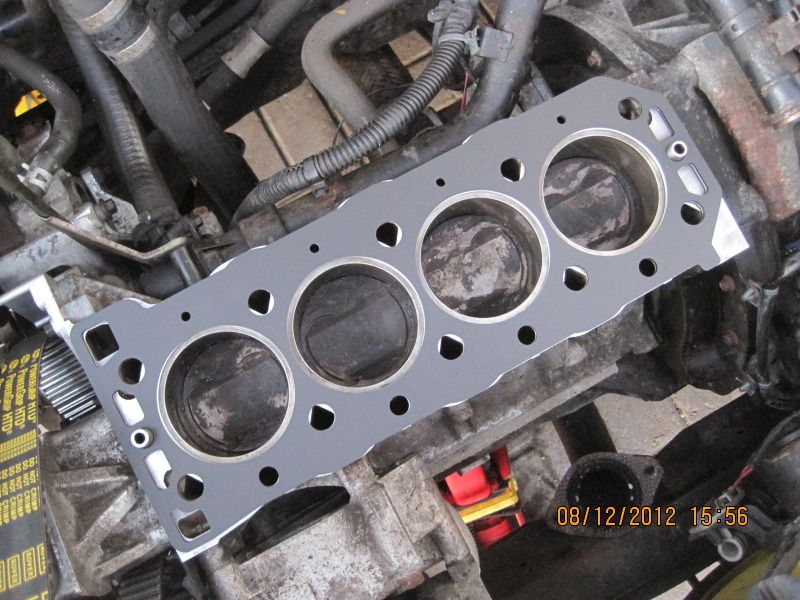
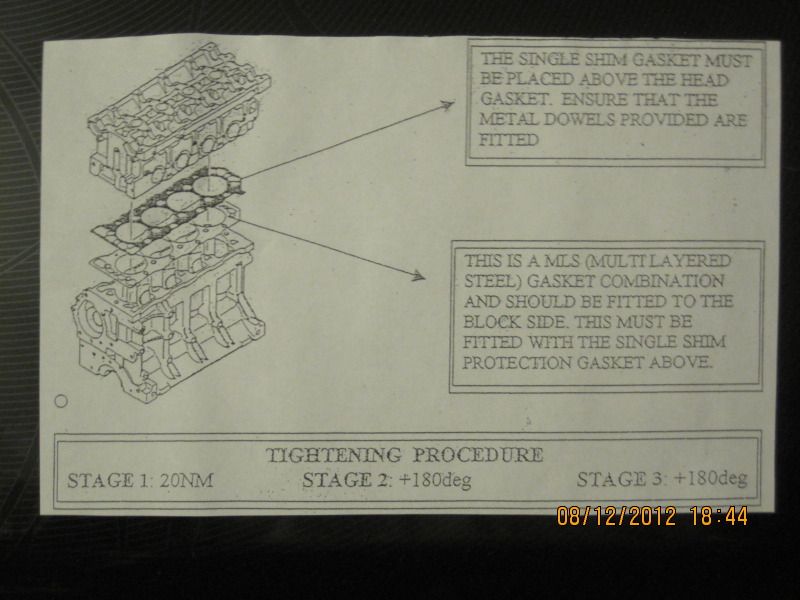
With new Timing belt in place, the main engine mount can be refitted. It needs to be removed to remove the old and fit the new. The engine is supported with a Trolley Jack or Axle Stand with the mount removed. Then fit the new MLS ( Multi-Layer-Steel ) Cylinder Head gasket.
Head Saver Shim fitted on top of the Head Gasket.
Cylinder Head fitted lightly in place. I will get the Torque Wrench on those 10 Through Bolts ( Nine in place in picture ) but that will have to wait until tomorrow weather permitting.
Meantime, bad light stopped play @ 16:13 ~ Superb Sunset though in still very clear sky.
Please with today's progress ~ getting there ...
Ongoing.
Prior to the work cleaning up the block, I used this Syringe with short piece of rubber hose to extract the remaining old coolant :~
This 'silver' 8mm bolt is very difficult to access with the Cylinder Head in place. Easy with the head removed. It bolts into the Water Pump from the 'reverse' side and also holds the Inner Timing Belt Cover.
PAS Belt Tensioner 10mm Bolts loosened allowing it to be swung clear allowing access to the small 8mm Timing and Water Pumps bolts to be accessed.
Removing those 'hidden' bolts :~
Lower Timing Belt Cover removed revealing old Belt and Water Pump, both of which will be renewed.
New and old Water Pumps.
New MG-R Pump has cast Impellor, old has pressed steel one.
Clean up about to start :~
Water Pump location prior to clean up. Lower left shows PAS Belt tensioner swung clear.
Cleaned up Cylinder Block given the Cylinder Liner "Finger Test". All four liners passed on all four points around their top circumference. Good sign that.
New Water Pump fitted :~
Block given final clean up. Dirt always finds its way onto the surface no matter how careful you work.
New Water Pump in place and all bolts tightened.
With new Timing belt in place, the main engine mount can be refitted. It needs to be removed to remove the old and fit the new. The engine is supported with a Trolley Jack or Axle Stand with the mount removed. Then fit the new MLS ( Multi-Layer-Steel ) Cylinder Head gasket.
Head Saver Shim fitted on top of the Head Gasket.
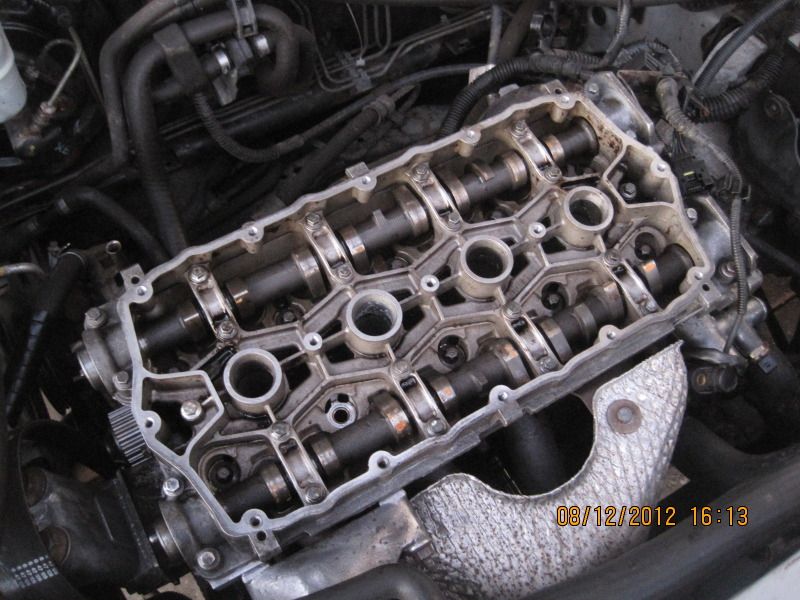
Cylinder Head fitted lightly in place. I will get the Torque Wrench on those 10 Through Bolts ( Nine in place in picture ) but that will have to wait until tomorrow weather permitting.
Meantime, bad light stopped play @ 16:13 ~ Superb Sunset though in still very clear sky.
Please with today's progress ~ getting there ...
Ongoing.
Good stuff John.
I did same job on the mr2 last month, do you ever get problems with your drill and steel wheel cleaning method?
I spent hours with razor blades on the block and had the head skimmed because of all the things I'd read about not scratching the surfaces, would be nice to know in future if I could just use your method instead.
Also, what's the purpose of the head saver shim?

Manicminer said:
Good stuff John.
I did same job on the mr2 last month, do you ever get problems with your drill and steel wheel cleaning method?
I spent hours with razor blades on the block and had the head skimmed because of all the things I'd read about not scratching the surfaces, would be nice to know in future if I could just use your method instead.
Also, what's the purpose of the head saver shim?
I believe that sometimes the softer alloy of the Cylinder Head surface can suffer indentations from the stronger metal of the gasket's Fire Rings. There are always Fire Ring witness marks even in a healthy engine. However, if a car user does not spot the first signs of coolant loss or simply drives on anyway ~ I have known folks do that in their cars ~ the severe overheating can allow the Fire Rings to make DEEP grooves in the softer alloy of the head. I have read that some of these severe overheating indentations are as deep as 1mm! That could mean the cylinder head is scrap rather than needing a skim. In the case of less serious Fire Ring indentations, a head skim has never been necessary and fitting the saver shim protects the head from further problems.I did same job on the mr2 last month, do you ever get problems with your drill and steel wheel cleaning method?
I spent hours with razor blades on the block and had the head skimmed because of all the things I'd read about not scratching the surfaces, would be nice to know in future if I could just use your method instead.
Also, what's the purpose of the head saver shim?
I've done close to a dozen of these now and in each case I've used the MLS and the Saver shim. All still going strong and no problems. Not needed the head to be skimmed either.
By the way, a useful Instruction Guideline came with the MLS for those fitting one of these for the first time :~
Edit to add @ 19:11
That old Black and Dekker drill is now forty years old....
My good lady bought it for me soon after we were married. Still giving good service all these years later despite being abused rather than used occasionally. I have disassembled it and regreased the bearings once or twice during that time which revitalises the Drill. That Wire Brush and ones similar I've used many times CAREFULLY and LIGHTLY on those softer metal surfaces. Never had a problem. Just be careful and do not be heavy handed. Edited by MGJohn on Saturday 8th December 19:11
Gassing Station | Rover | Top of Page | What's New | My Stuff