Out the garage today
Discussion


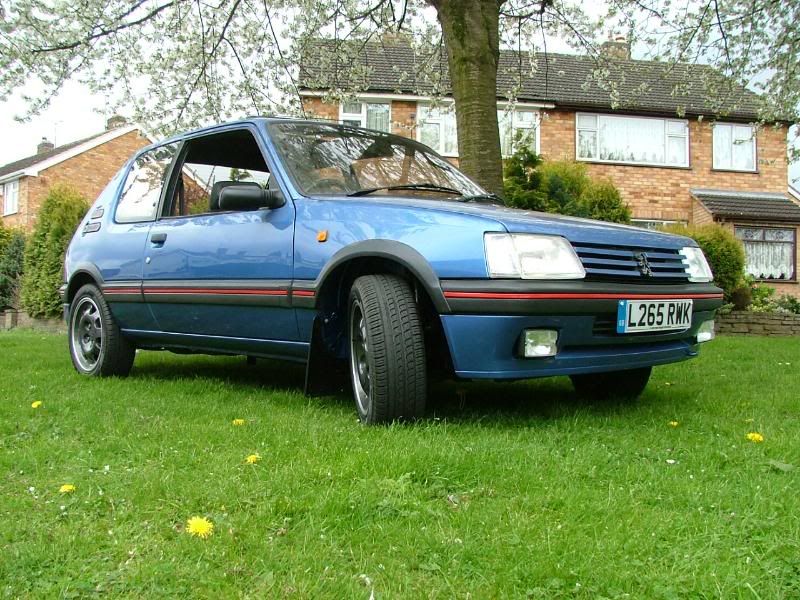
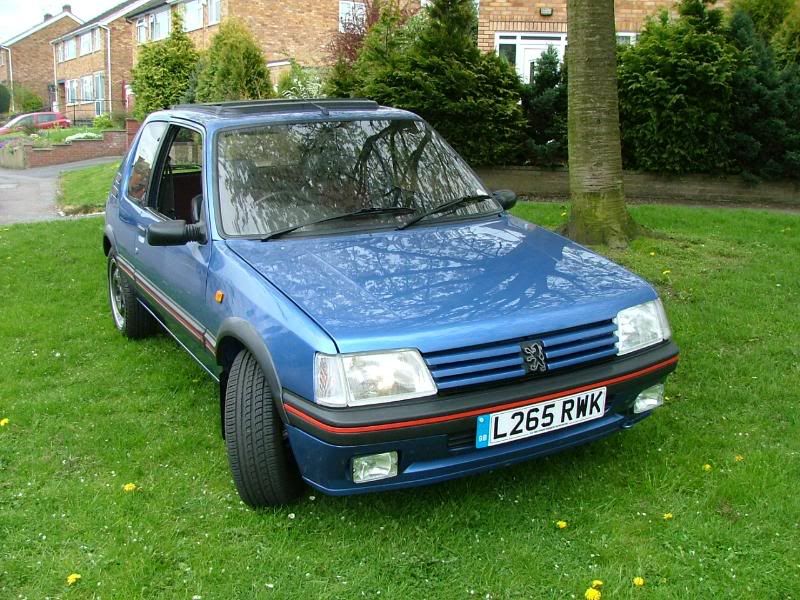
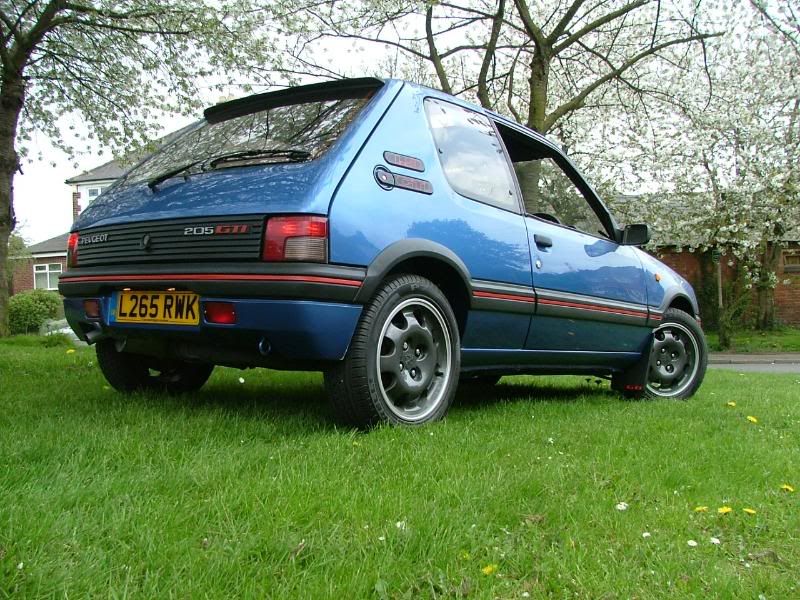
As it was nice out and i had a bit of a head ache from drinking a little too much again i decided i was going to get the car out the garage and get them ready for the mot's.
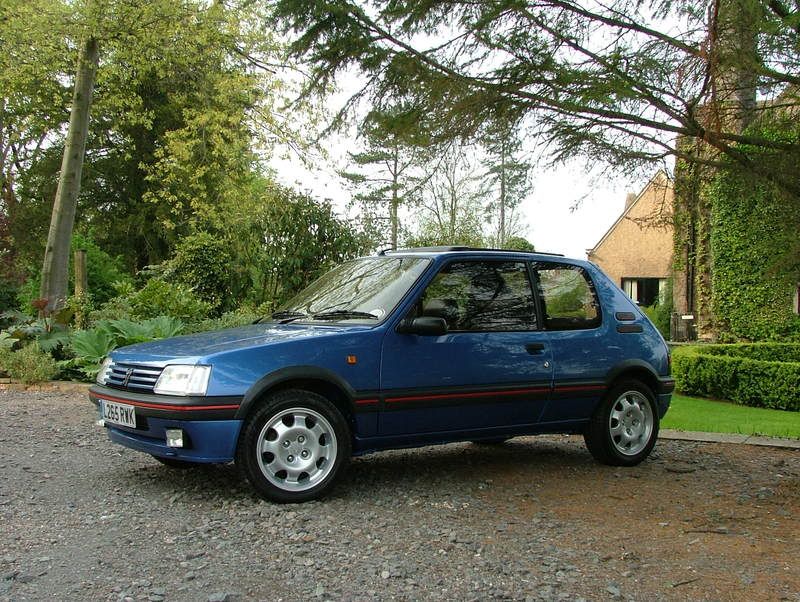
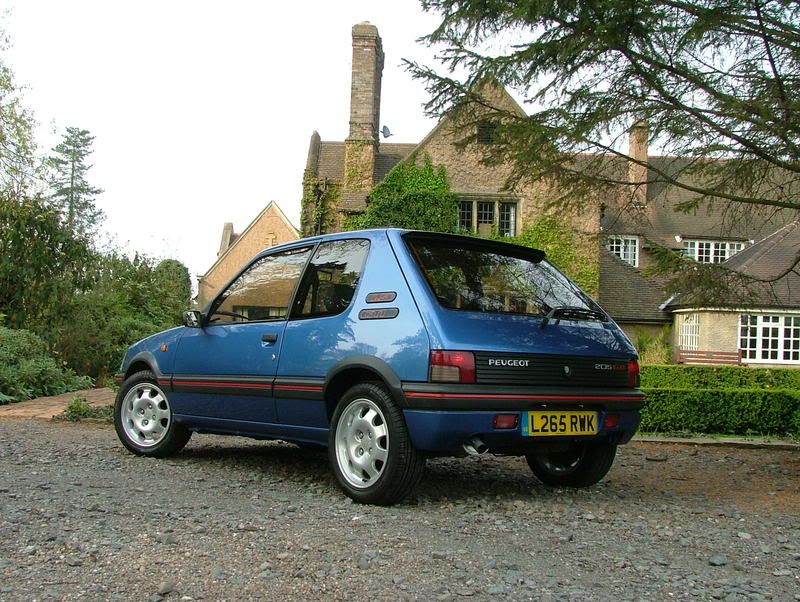
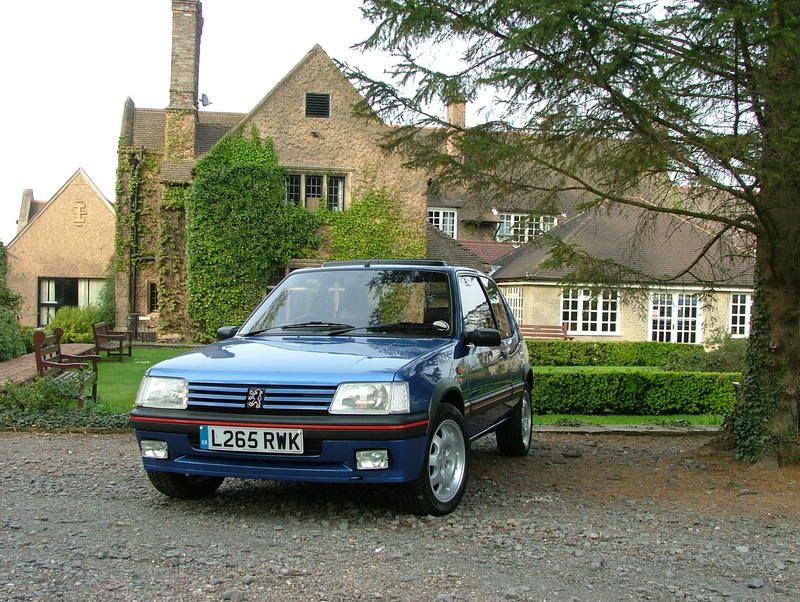
Well i got the 205 out and decided to take it out for a little drive, got some petrol pumped up the tyres and had a little fun in it, found a little spot to take some photo's and it started to rain, well a quick few rushed photo's and tried to get it back before it was covered in rain, i failed :lol
Heres a few photo's-
When i got back the girl friend had decided to shut the garage door so i couldnt just drive it straight in.
Ah well she is having a bath now-
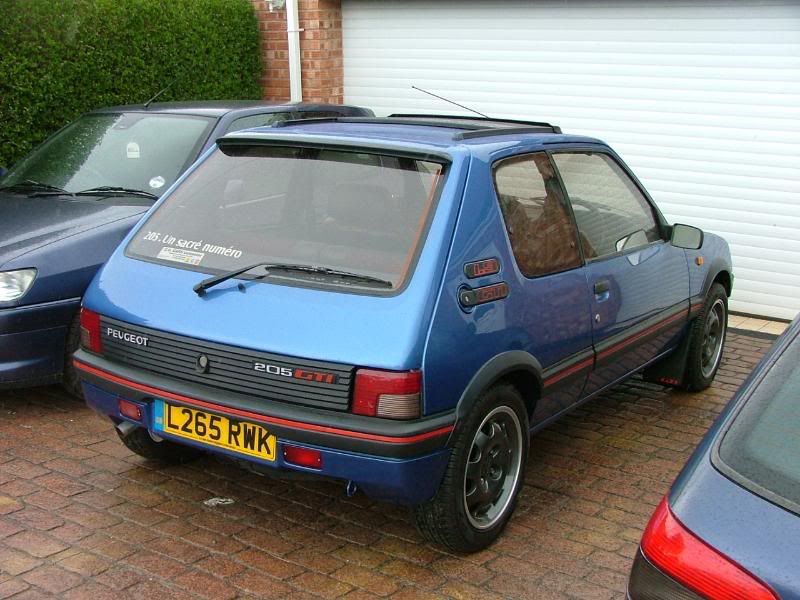
I actually forgot how mint the car really is, need to drive it more i think and remove that rear sticker decided i dont like it, just checked the mileage and i did a whole 9 miles last year
Hope you all like.
Well thats as far as i got and i cant be arsed to sort the other cars out now.
Carl
Well i got the 205 out and decided to take it out for a little drive, got some petrol pumped up the tyres and had a little fun in it, found a little spot to take some photo's and it started to rain, well a quick few rushed photo's and tried to get it back before it was covered in rain, i failed :lol
Heres a few photo's-
When i got back the girl friend had decided to shut the garage door so i couldnt just drive it straight in.
Ah well she is having a bath now-
I actually forgot how mint the car really is, need to drive it more i think and remove that rear sticker decided i dont like it, just checked the mileage and i did a whole 9 miles last year
Hope you all like.
Well thats as far as i got and i cant be arsed to sort the other cars out now.
Carl


I do love it to bits thats one of the reasons i just use it when its nice, she is my pride and joy.
Fo those of you who are interested here is what i have done to it since i have owned it-
Its a long list.
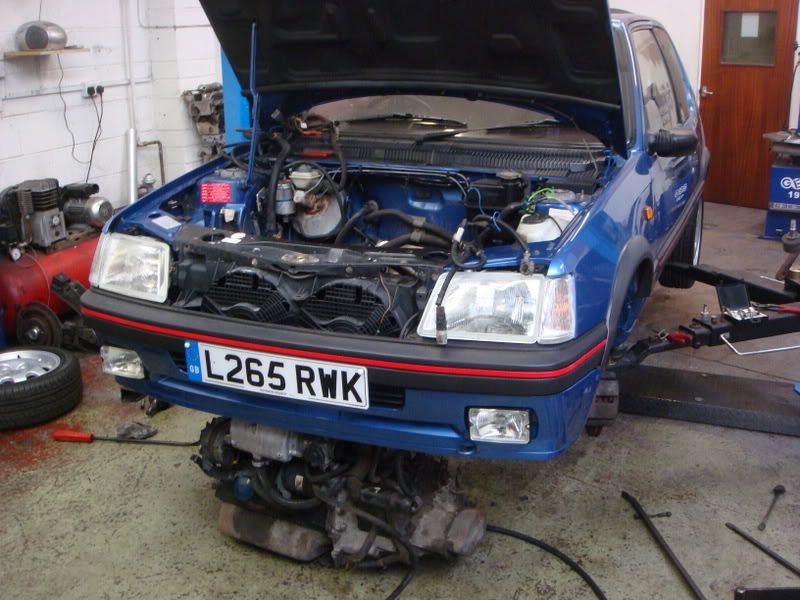
Well some of you may know at the beginning of the year i bought a very nice example of a 1.9 205 gti finished in miami blue, i have always wanted to buy a 205 and fit the gti6 engine to it, well the car has been sat in the corner of my garage now for months collecting dust due to not having any time to start it, well that all changed yesterday as work was slack and the lad i have who works with me had nothing to do so it all started.
The car itself is a 1994 205 1.9 gti with the later engine and ecu setup so only produces 122bhp which back in the day was good but by todays standard is no match for anything really.
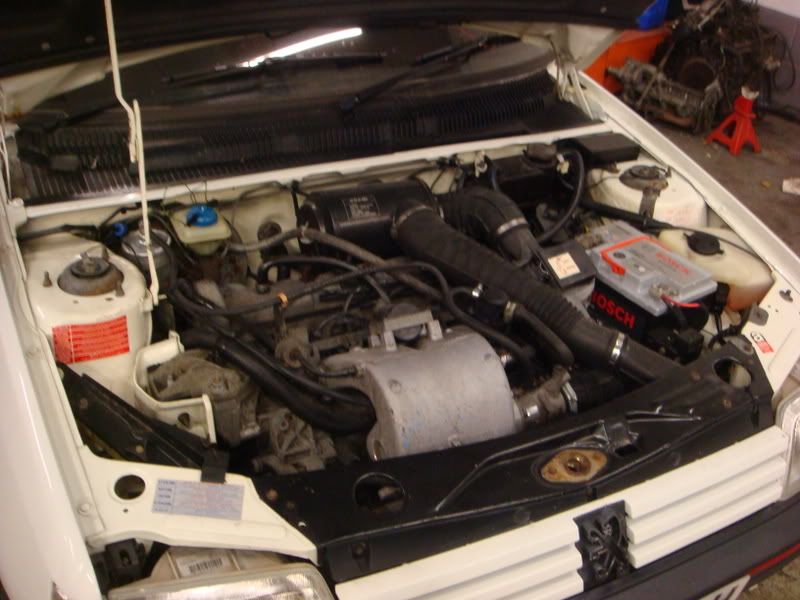
How it was when i bought it-
The engine bay as it looked-
Then after a couple of hours this is what we managed (in the back of my head i was thinking what have i done!)-
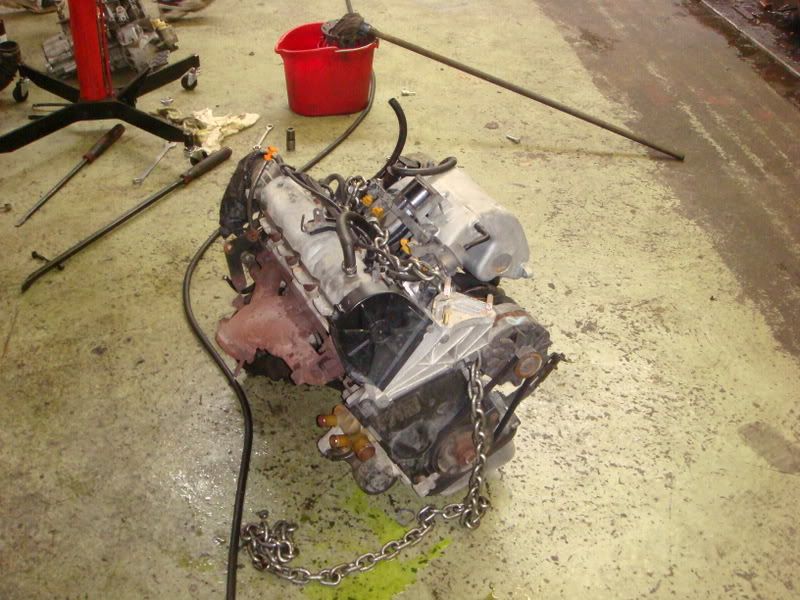
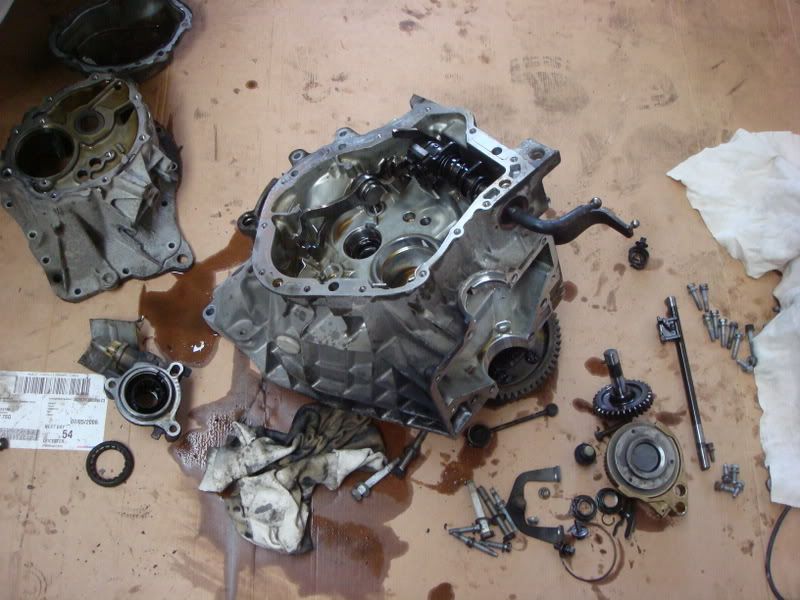
With the old engine completely removed, it looks a nice and dry engine to be fair and so it should really after only covering 66k-
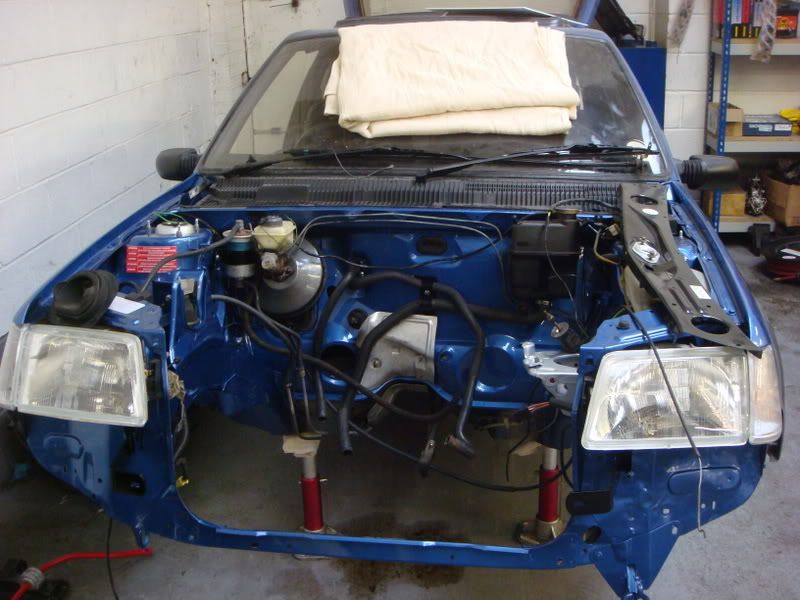
With the engine removed the bay looked a little grubby-
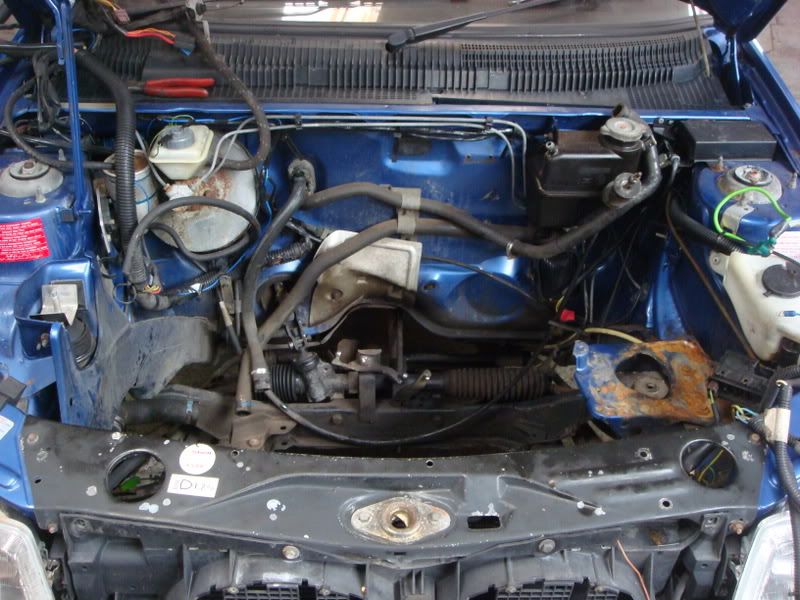
After a good clean with the hot washer and some elbow grease it came out like this-
The only bit thats going to need a fettle is the battery tray, looks like a battery must have leaked some acid in the past and done this-
Well one of these lumps should fit it i guess :lol-
Not really, i had a block and head to pieces and have started to rebuild it as once the lump is fitted i want to forget about it and jsut be able to use the car when i want without any hassles.
Heres the block, all reassembled, just going to give the block a good rub down and apply some engine laquer to it-
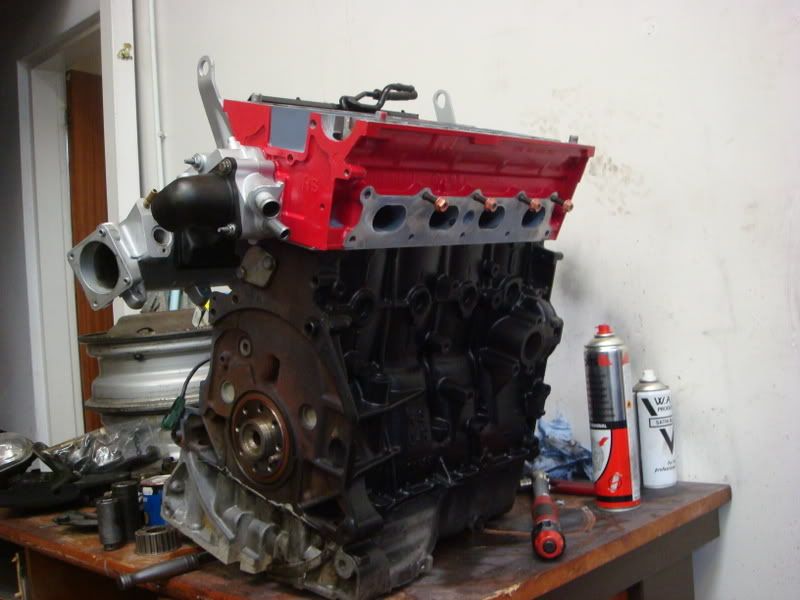
The cylinder head is all fully rebuilt and i had the clever idea of painting it again with engine laquer but in red, well once applied it looked a bit pink to me, what do you think?-
Well done a little more today, cleaned back the block with the wire wool adapter in the drill, acid etch primed the block and then sprayed over it with high temperature black paint.
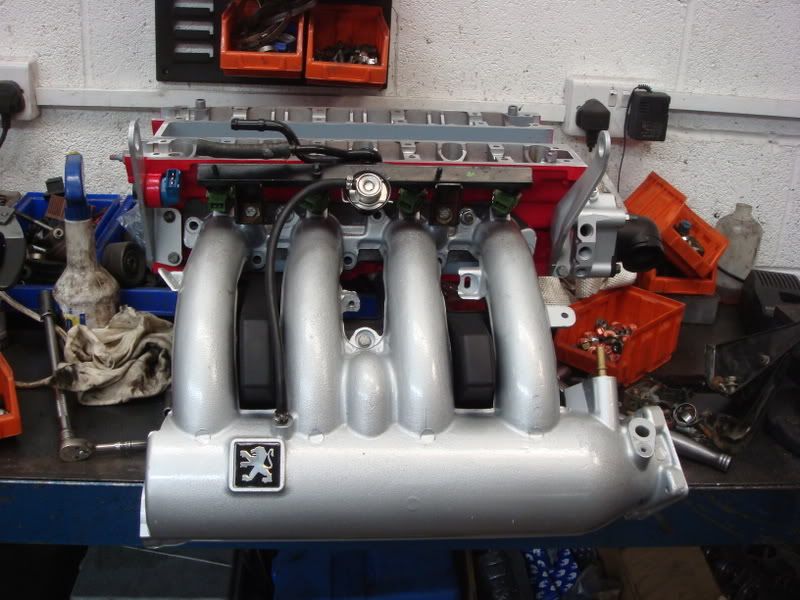
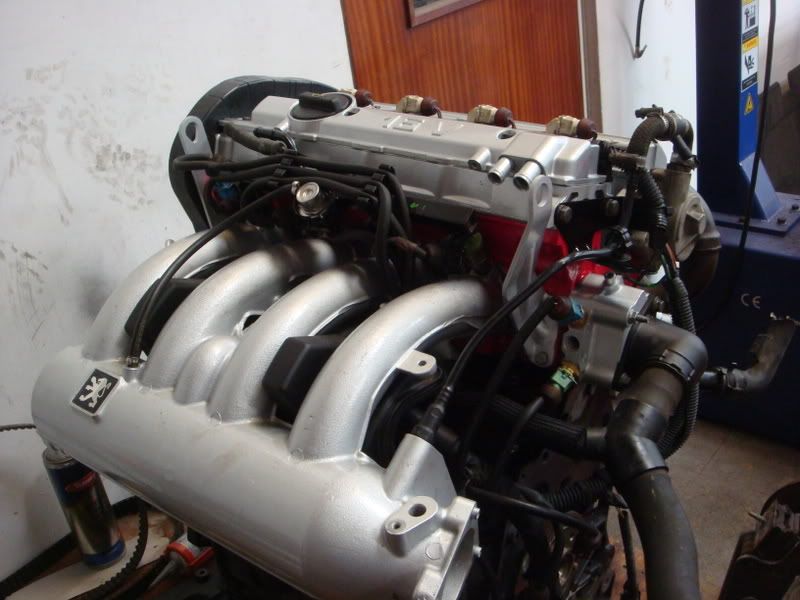
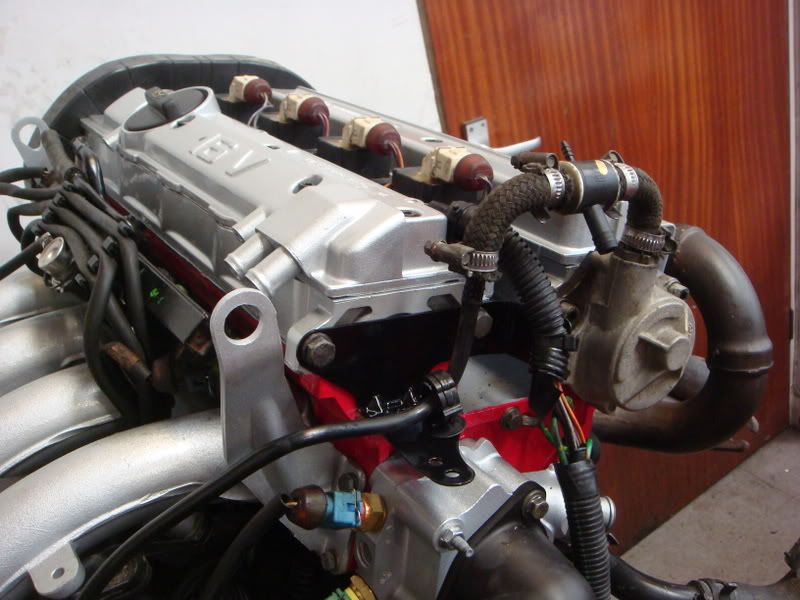
Then fitted the head, have to say this may be the most colourfull engine bay i have seen once this is all back together-
Not much more to up date as i am waiting for some parts to be delivered (sent them away to be made pretty :lol).
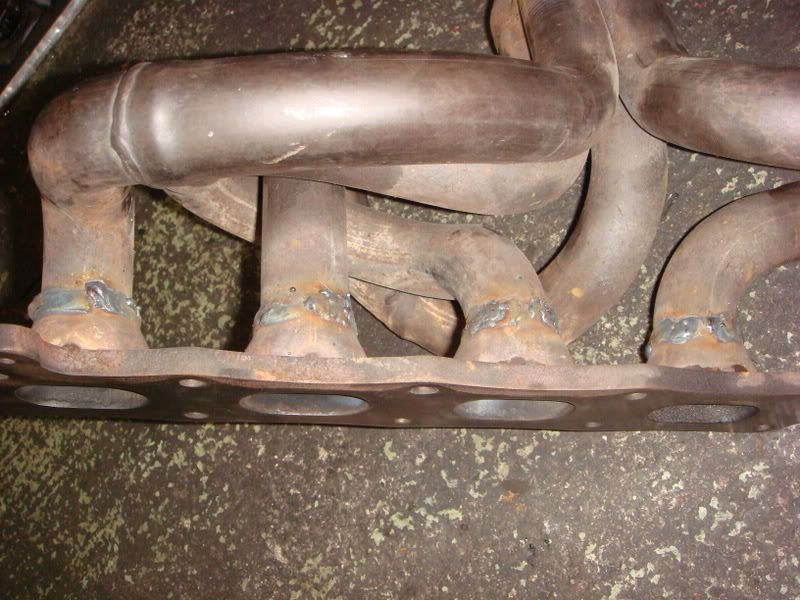
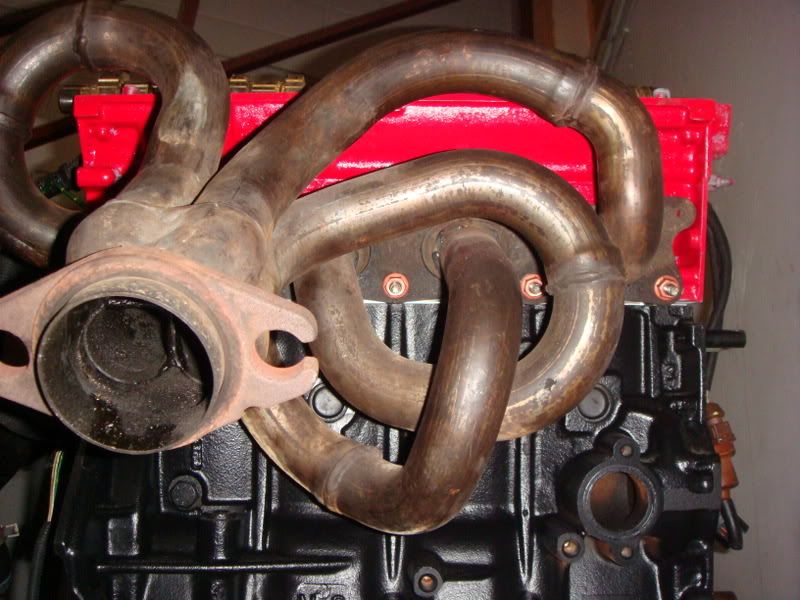
Just been messing with the exhaust manifold and this envolved cutting it and making the angle a few degress tighter so hopefully this will clear the bulk head and make it a tidier install, i set about the manifold with a grinder and cut almost through it then bent the manifold down and re welded it back up.
Here are a few pictures so you can understand my dribble.
This is the manifold once the cut and bend down had been applied and then re welded up, i never though about taking a before photo. :crazy
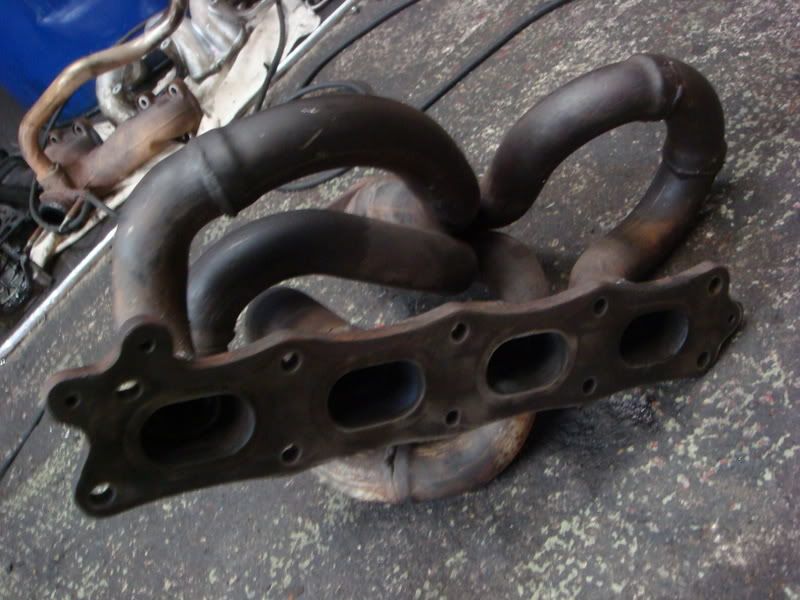
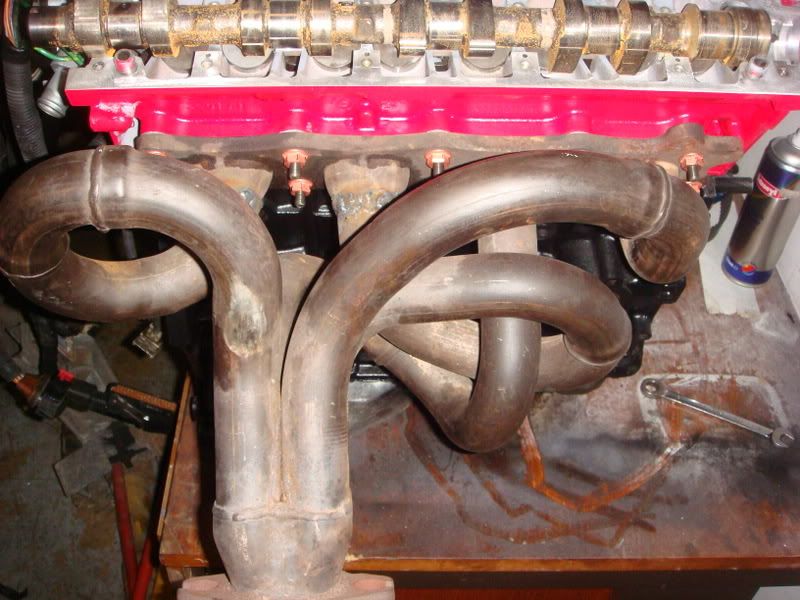
A pic of it fitted to the lump, its angle is slightly tighter to the back of the block-
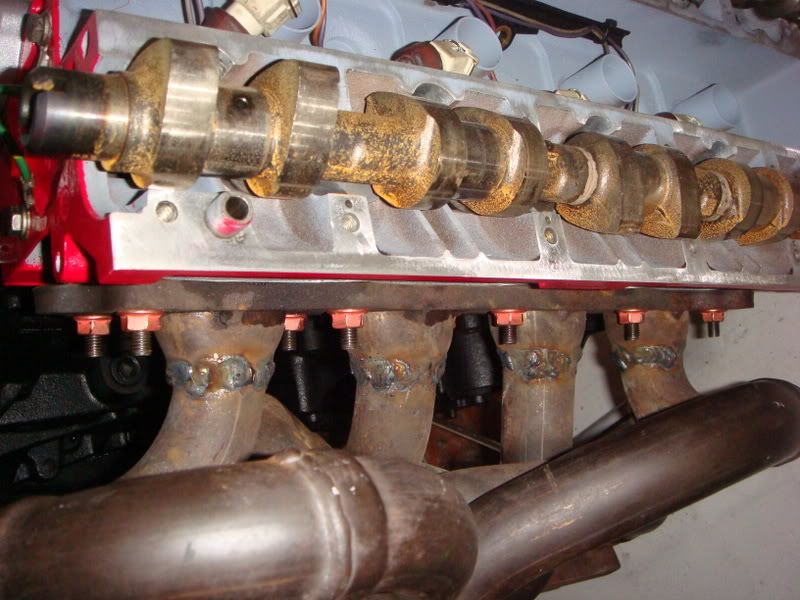
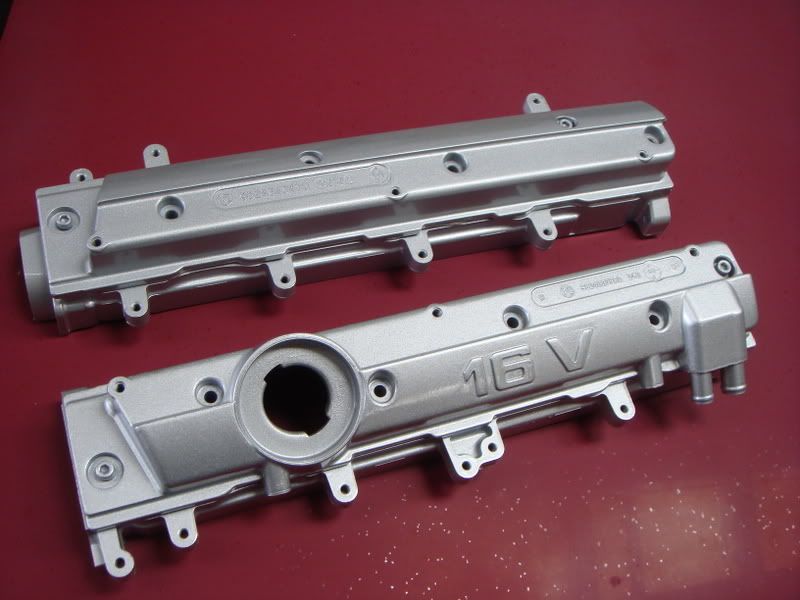
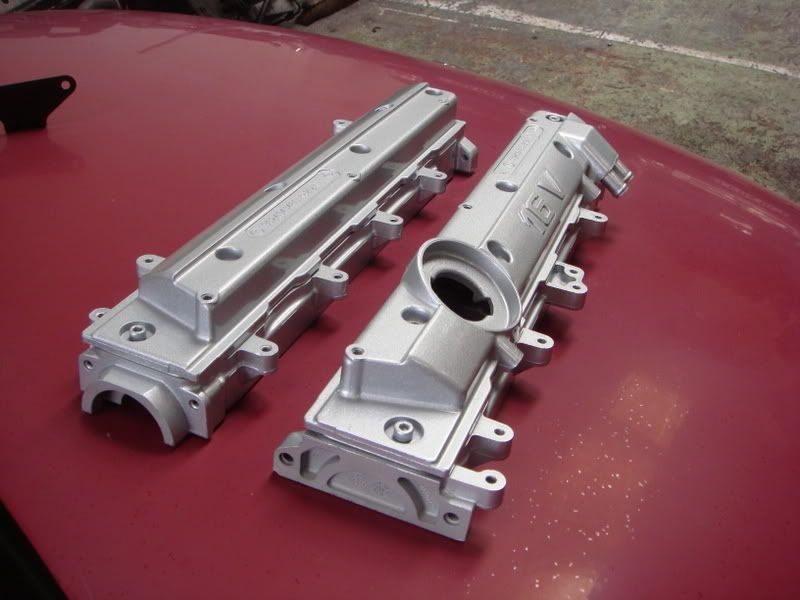
Well got my shiney bits back so i can put a bit more of it back together-
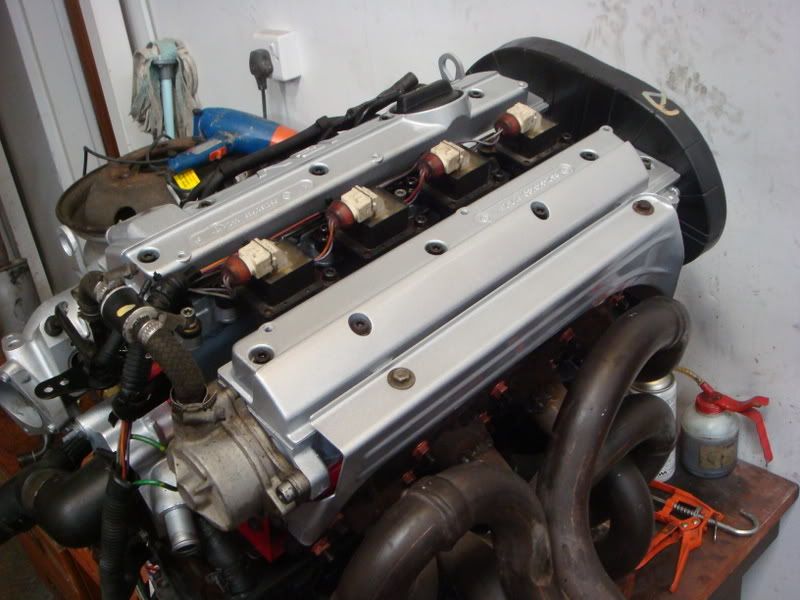
rocker cover and cam carriers-
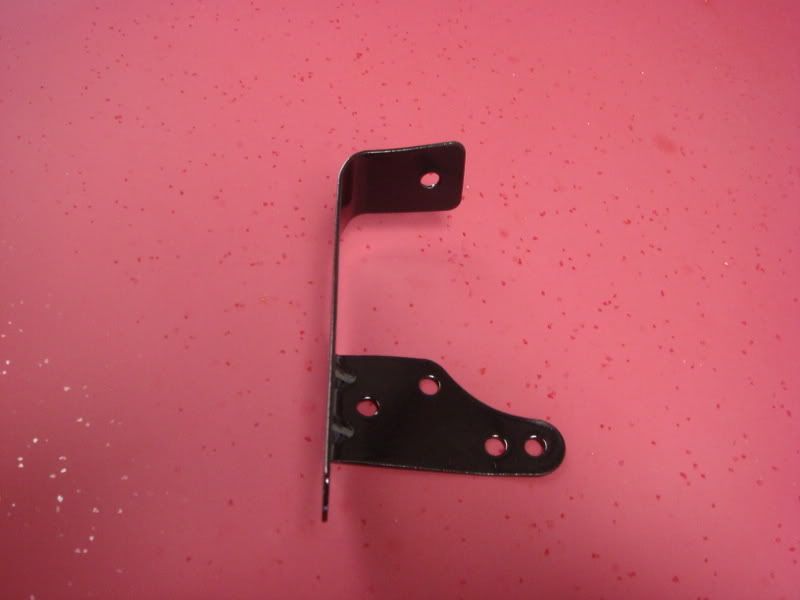
Varoius brackets re painted black, heres one of them-
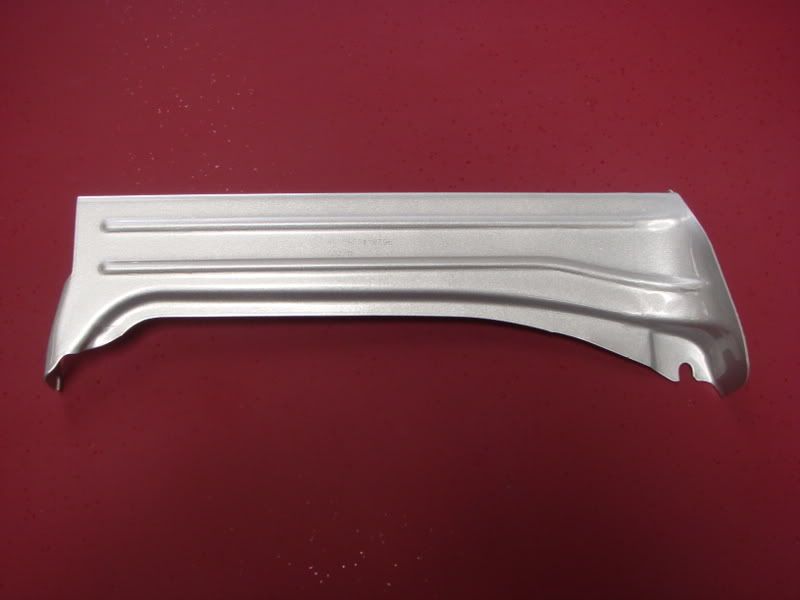
Exhaust manifold heat sheild-
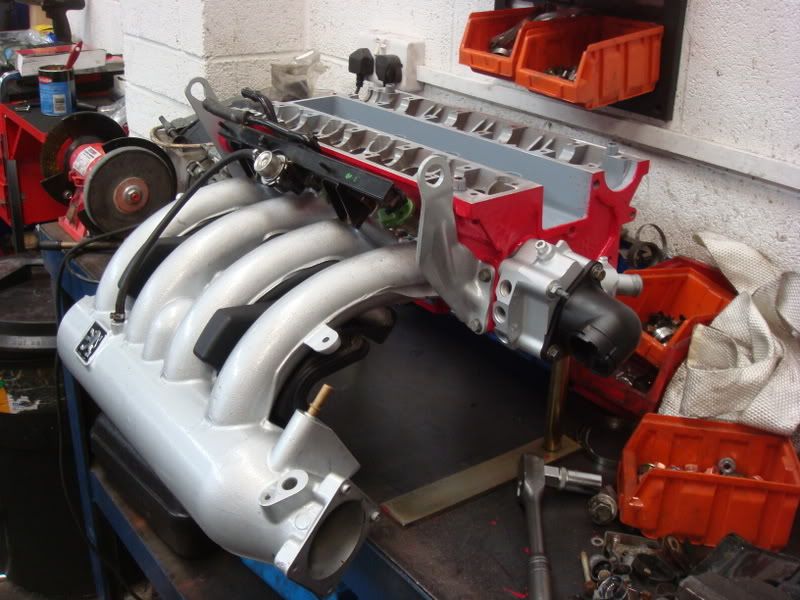
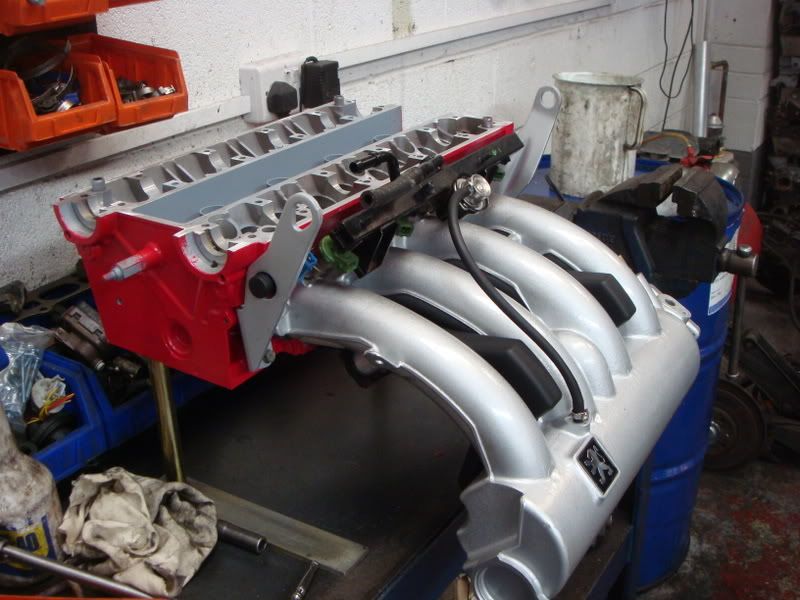
Here's all the bits fitted to the engine, made up with them as they fit so well and look better than new-
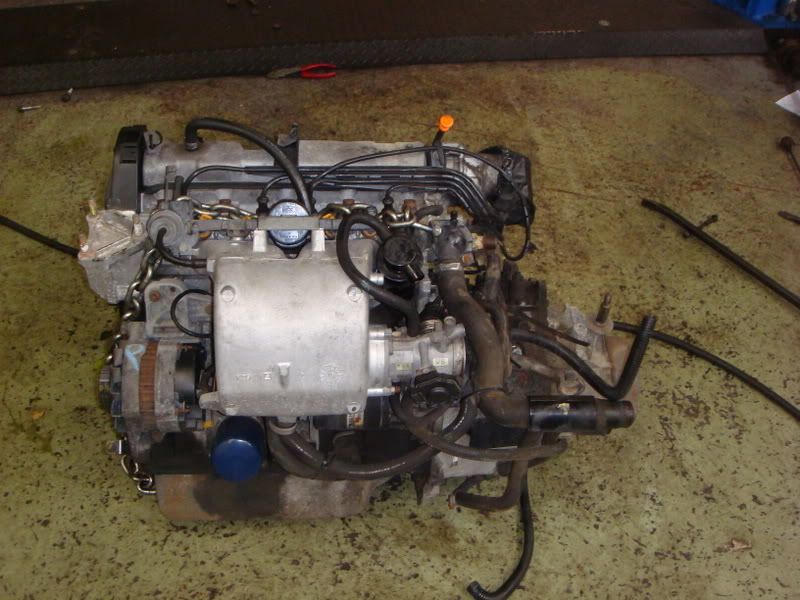
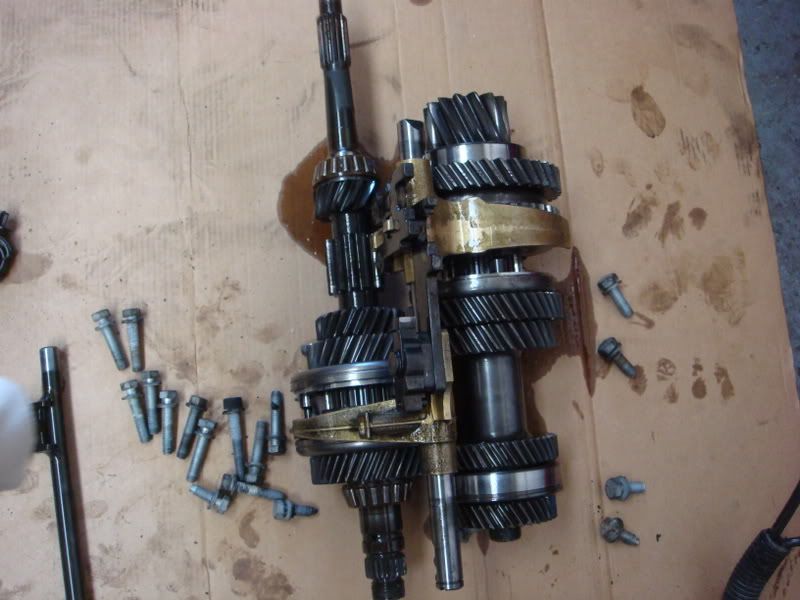
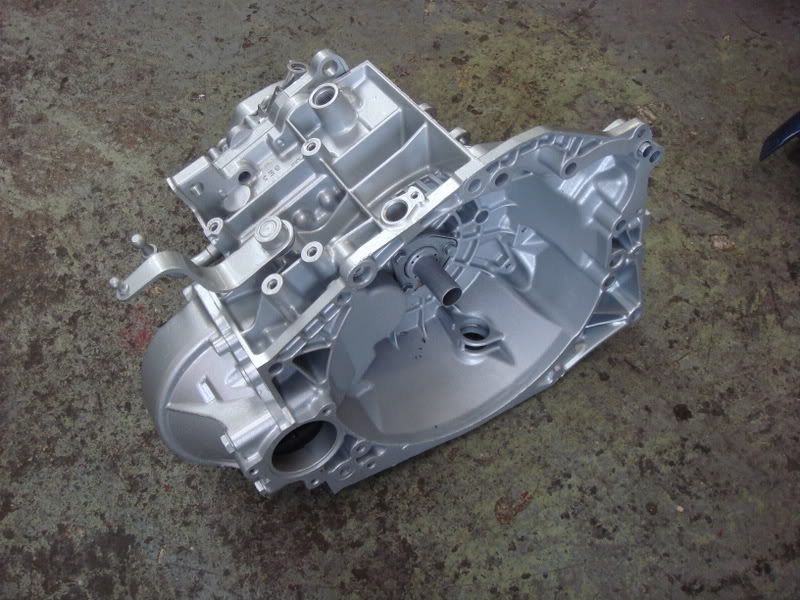
Well thats the engine coming along nicely, just waiting for a few more bits to arrive so i changed my engine for the gearbox and stripped down a five speed Citroen Xsara box and checked it over, it looks really good and considering its done over 100k has no real marks to it at all.
Thinking about sending the casing off to be powder coatedB)
Box of bits :lol
Not really done a great deal more to this project at the minute as i am waiting for various parts to arrive.
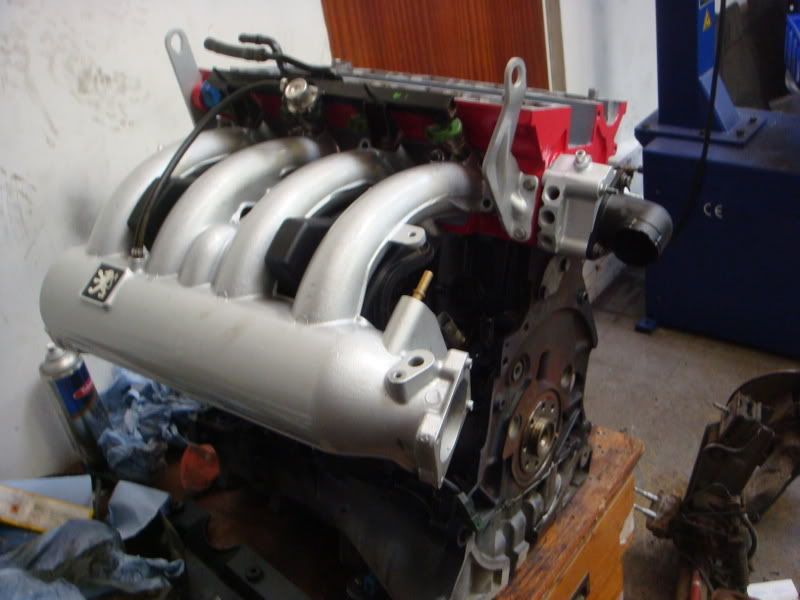
Although i did receive a fly wheel and a few bits back from the powder coaters, manganed to fit all the pullies, new water pump etc and fit my modified engine block bracket for the engine mount.
A few teasers, starting to look very pretty-
Heres the bracket i modified with a rather large stil saw, cut the brackets off for the power steering pump, a bit the same way you would if you were fitting the supercharger kit, once this was done i sent the bracket away to be powder coated (its an addiction i tell you:lol)
Obviously you dont cut the brackets off if you car is equipt with pas, mine isnt.
Just waiting for the gear box casing to come back from the powder coaters then the engine and box are ready to be mated back to the engine bay.
Once the engine is sat in the bay i have another sump that has been........ yes wait for it..... powder coated :lol Not fitted that yet as i fear it would get mangled as the engine is slid along the floor whilst fitting it.
Still undecided as to whether i should have the bay re painted as in some places there is the odd mark/scratch and dare i say it some surface rust:angry
Little bit of an update, i got the gearbox back from the painters today, just got to put all the internals back in it and mate it to the engine then i am done with the engine.
I may (well you know i will) remove the subframe/lower arms and get all that powder coated whilst i am at it, i have decided to get the bay painted too, seems daft not too whislt its all out.
Obviousley this is going to hold the build up as there is alot more work to do but once completed it should look very smart.
Gear box pics-
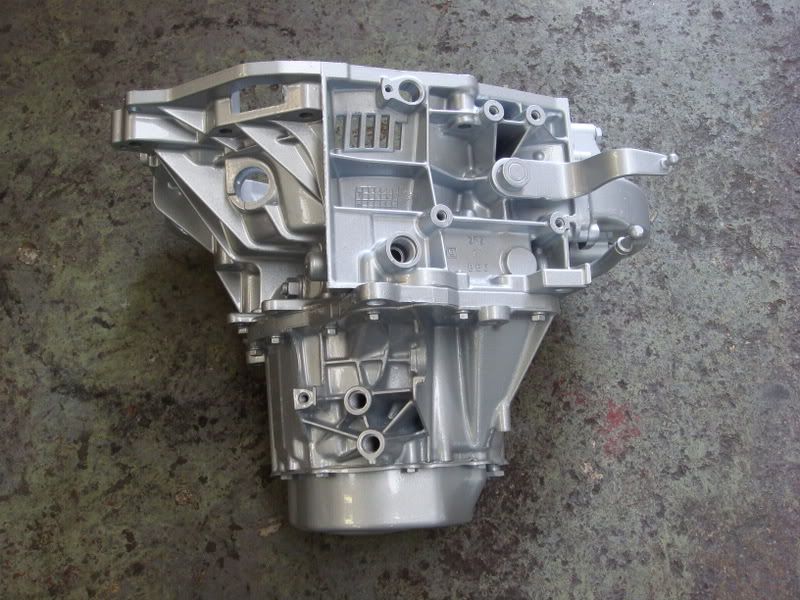
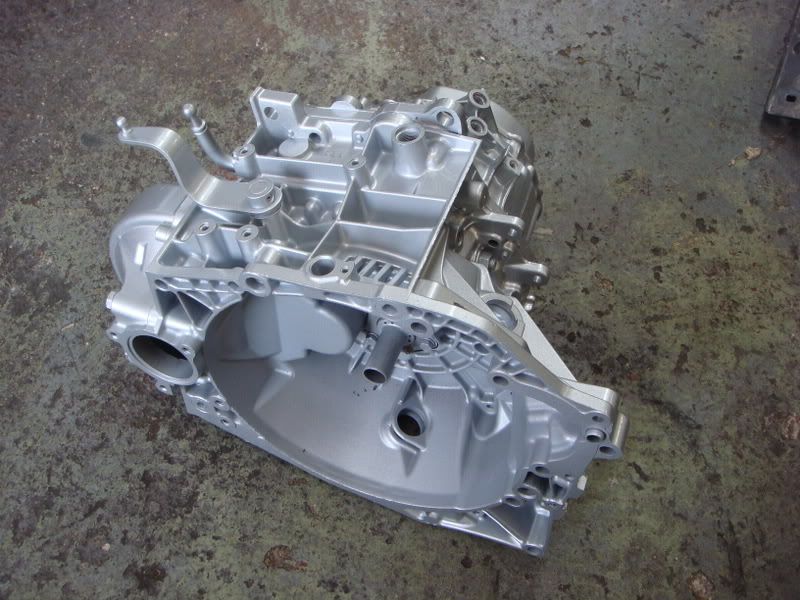
Well the box is back together, just got to put the end cap on and fit it to the engine.
Have to say i am glad i removed all the internal's prior to the casing being shot blasted as when i removed the casing to put the internal's back it was more or less filled with the sand.
Went back togther really well, and i remembered where the bits went which was a bonus.
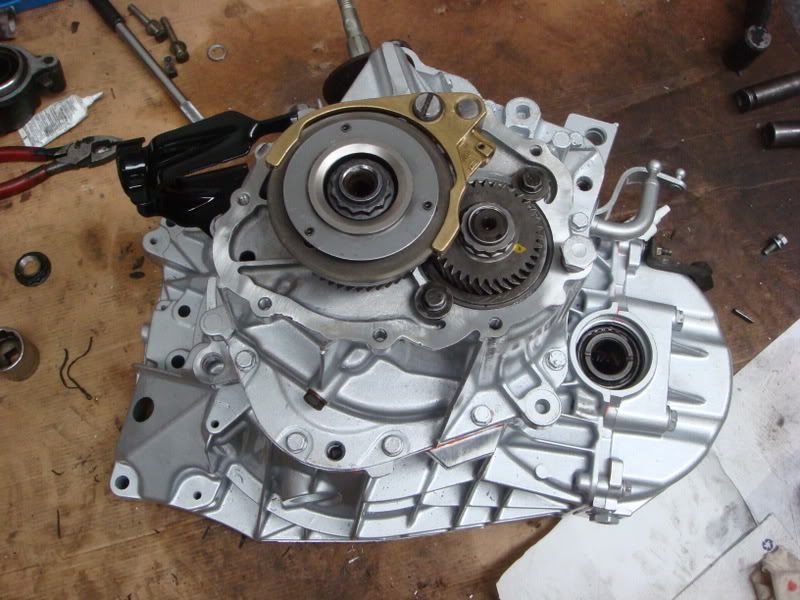
i have put the gearbox back together sealed it all up and mated it to the engine-
Also got the subframe back from the powder coaters and it looks great, had the antiroll bar and brackets done too-

Just got to do a few little bits now to finish the engine off and get the engine bay painted.
The bay now is more or less bare and just needs the wiring removing, had some fun when i removed the air horn with the garage air line :lol:lol
Dave called me a cock and nearly smashed it up!!! I dont think he like being force fed his cob by the scare.
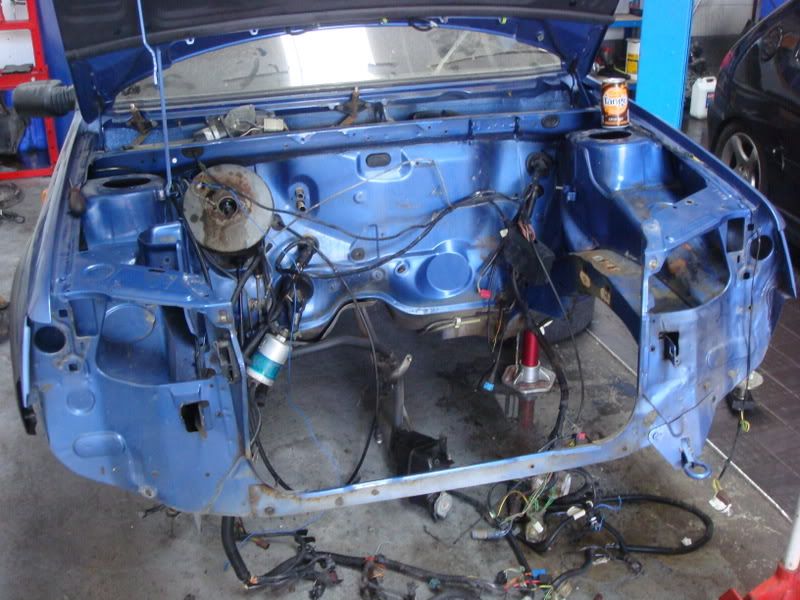
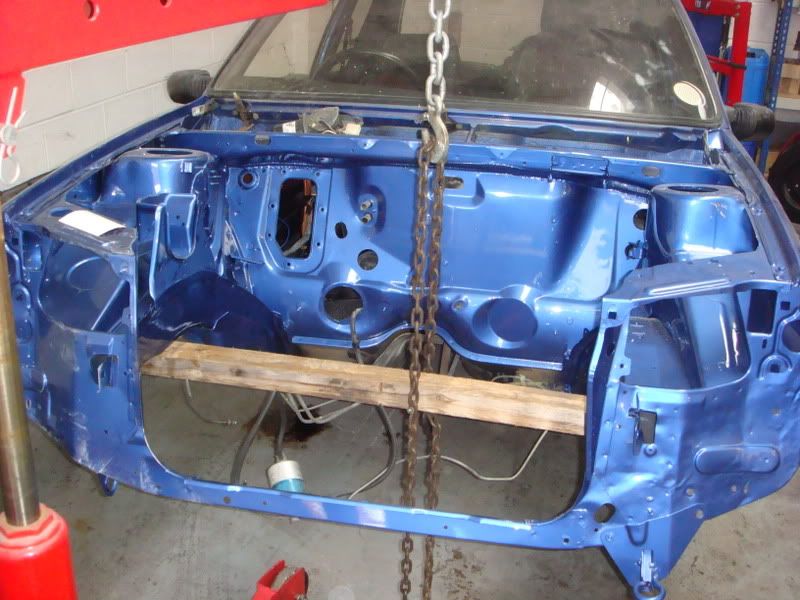
totally stripped now and ready for paint-
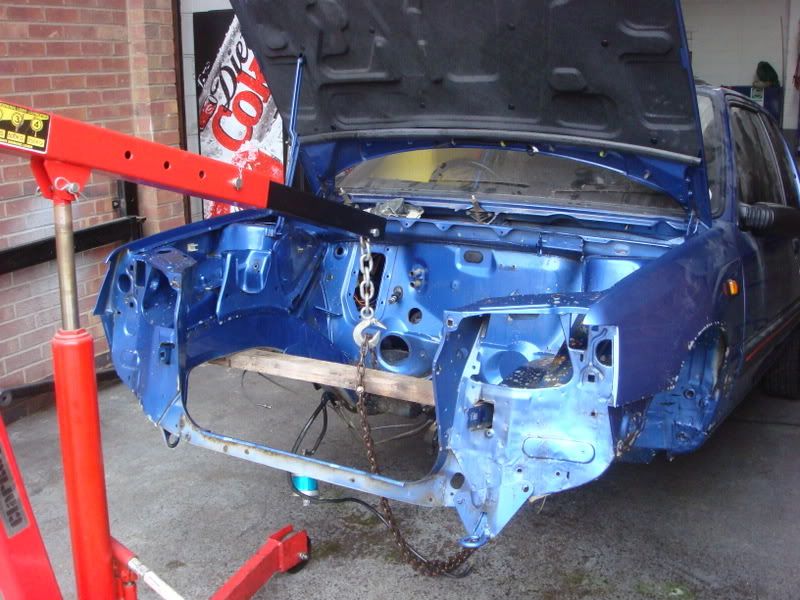
All washed off and rid of all the grime and gunge that builds up, took me ages and i think the grime that came off the car landed on me!!
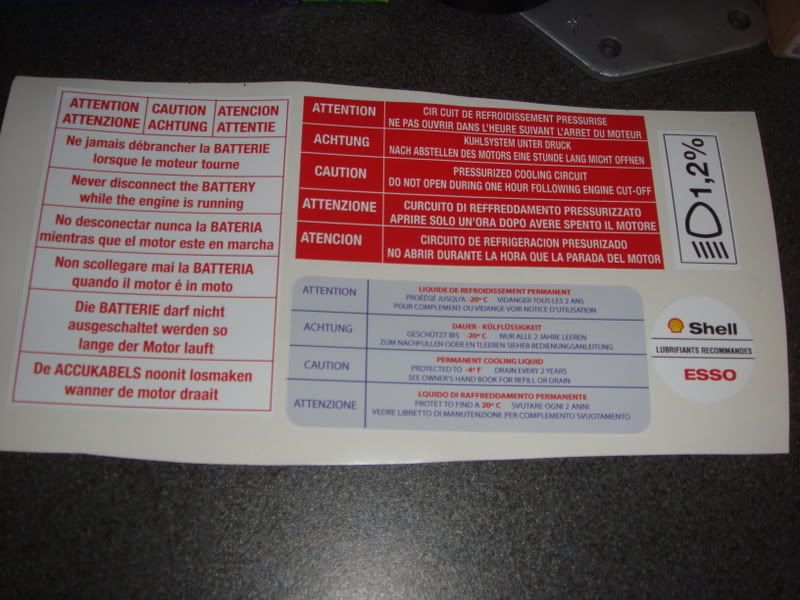
Also picked up my new engine bay sticker set (i made these and still have some left)-
Wahoo, i got it back today with a fresh nicely painted bright blue bay, its now the case of putting it all back together, the joy.
Put my new stickers on the bay, literrally two minutes after it arrived back.
Here you go-
Got back on to this again today,
Started by putting the suspension back together, using a few bits that are not meant for the 205 so i am keeping it quiet at the minute untill i know its going to work, coimplete new top mount kit and new springs putting all together with new shocks-

Was a real arse to do as they are a little special but once fitted to the car look good and seem to clear ok, looking spankly too-
Then i started to slowly put all the bits back from where they origianally came from, most of the bits removed have been powder coated so look like new, even went to the local fixing's shop and got new nuts and bolts :lol-
Come to a bit of a stand still again as i forgot to get the servo powder coated and cant do much more untill this is refitted
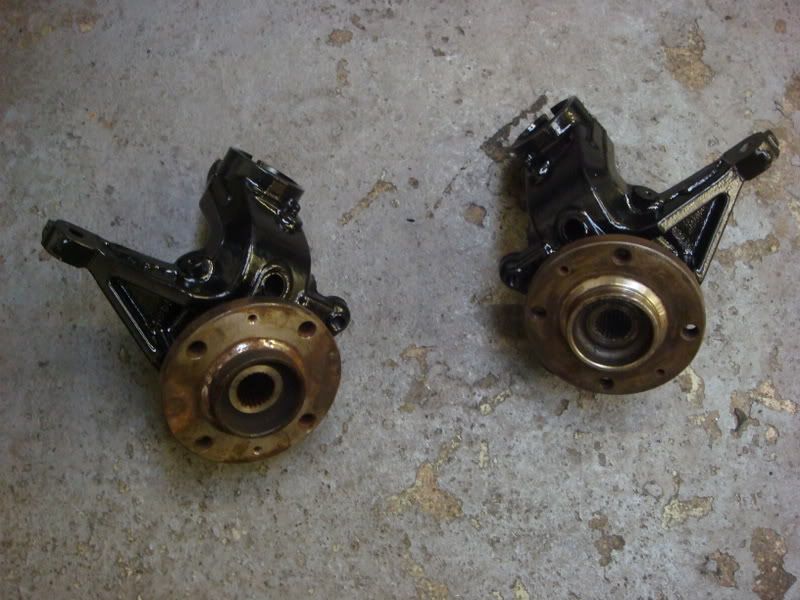
Had a pair of hub carriers painted black-
Fitted the wheel bearings, trying not to damage the paint-
The servo came back looking great in anthracite, much better than the rusty crap it looked like before.
Ordered the last few bits i need so i am hoping by the end of the week to have a six lump sitting in the bay looking very pretty.
I have my fingers crossed that the master cylinder will clear and that i have no issues with the exhaust manifold. Time will tell.
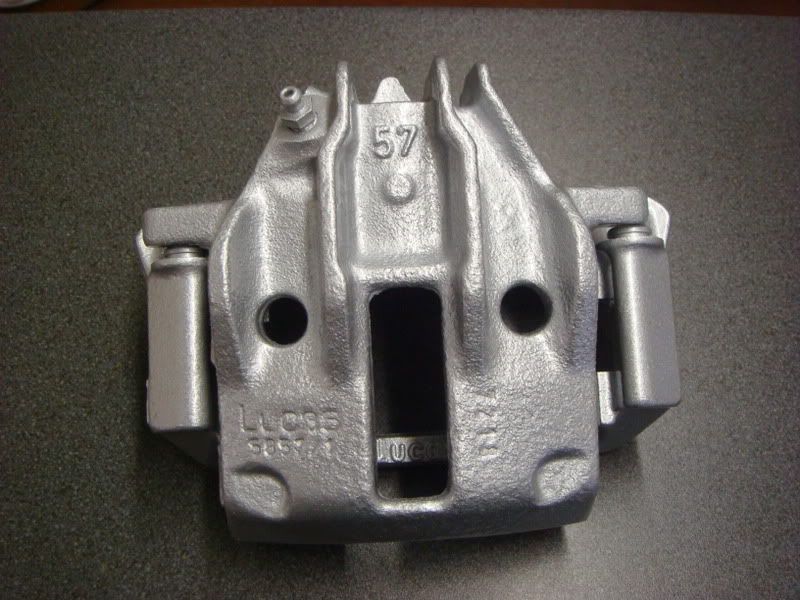
The calipers i have had powder coated too-
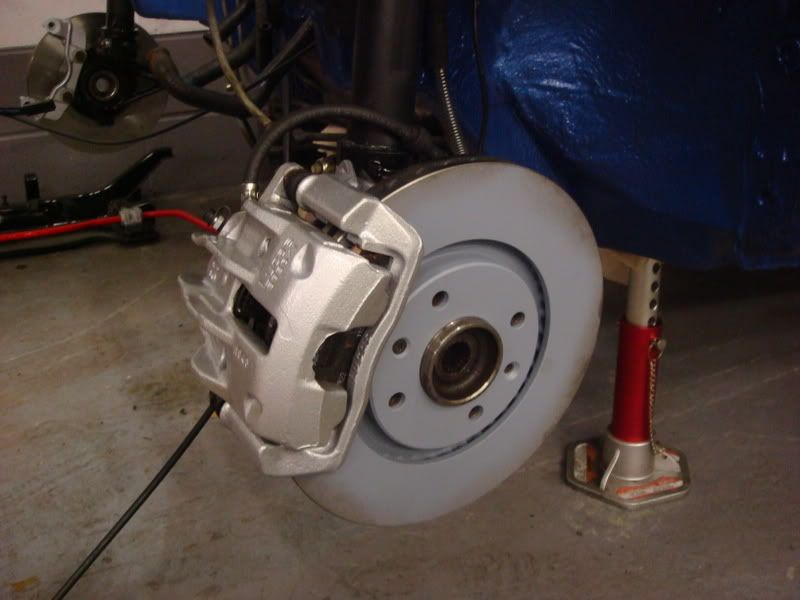
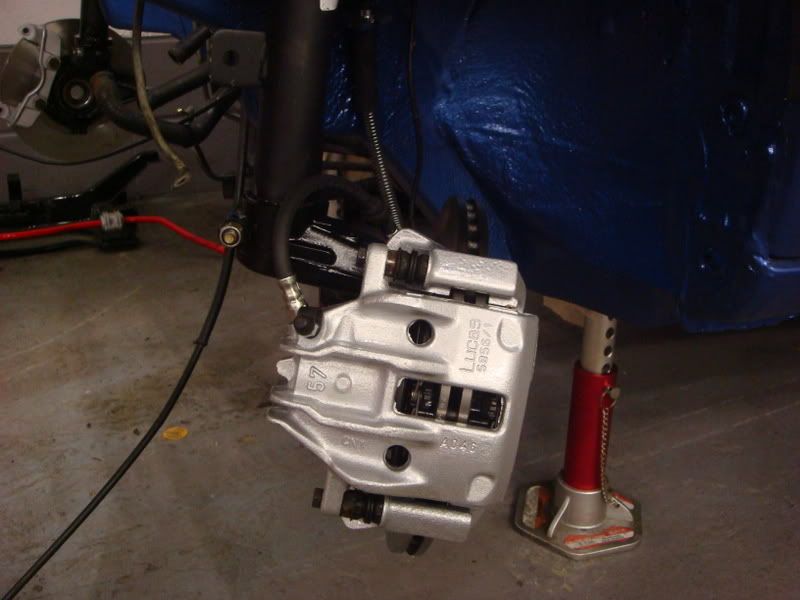
Brakes all built back up and fitted, painted the centre of the disc's, once the car has been driven it will remove the over spray and will leave a nice coated centre that wont look horrible when the metal corrodes-
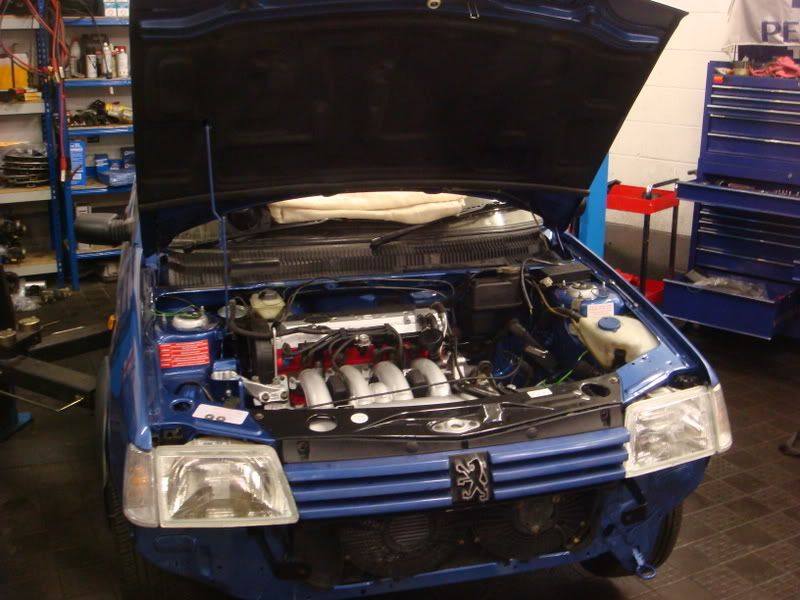
This is what it is looking like now-
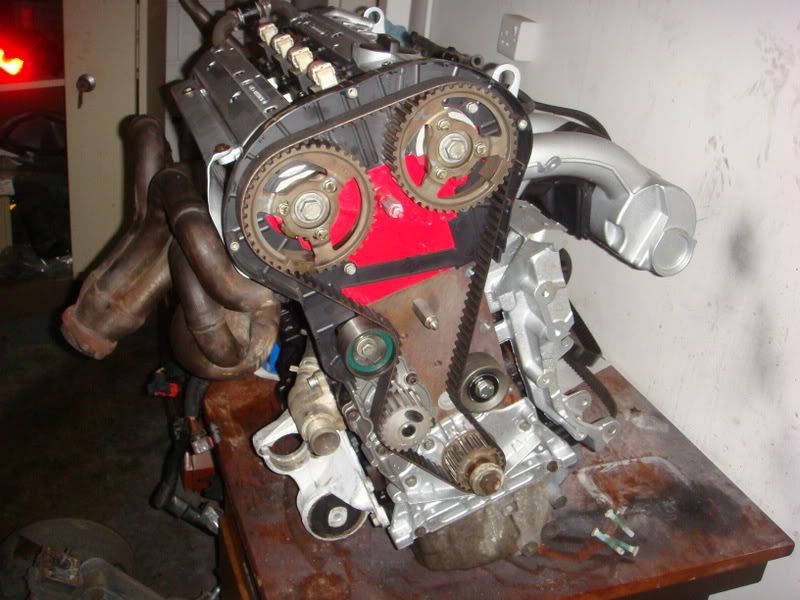
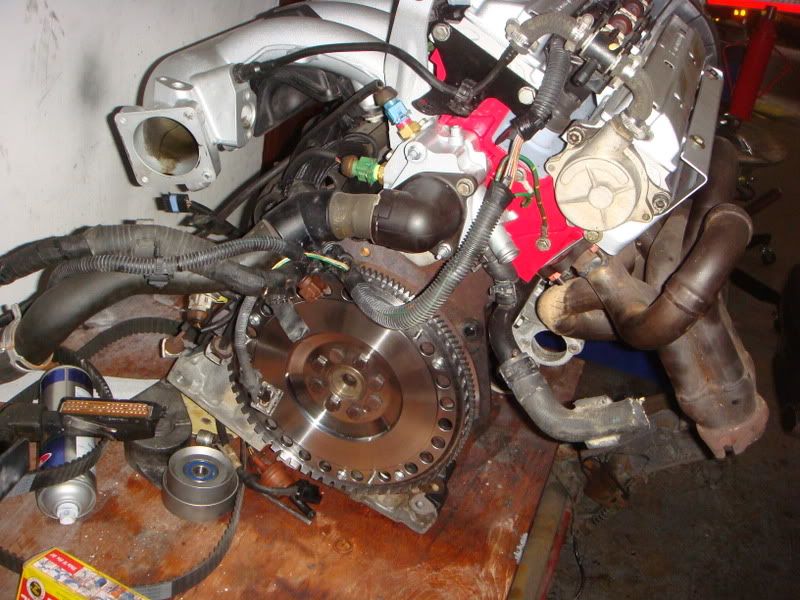
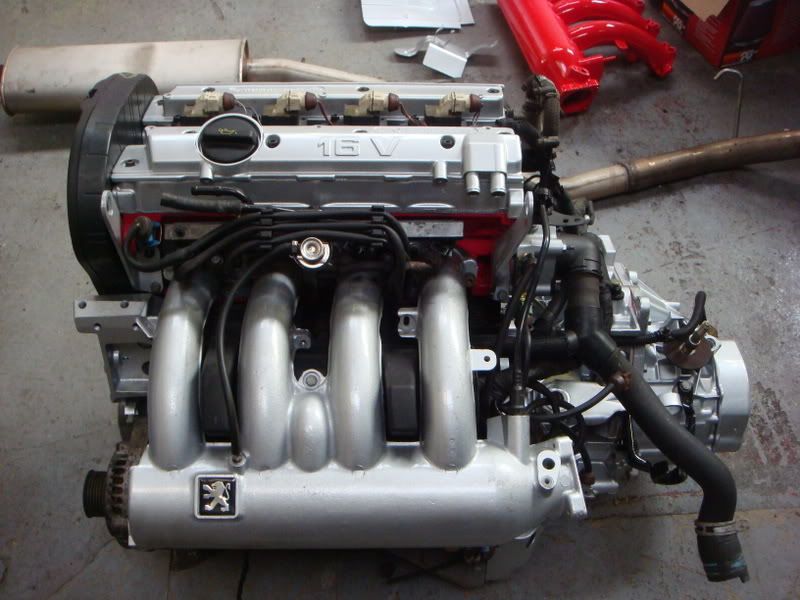
Well the day is getting close to the car being finished, had a really good session with it today and managed to get the engine in (yay)
Lining it up to fit, it does look like it wont fit-
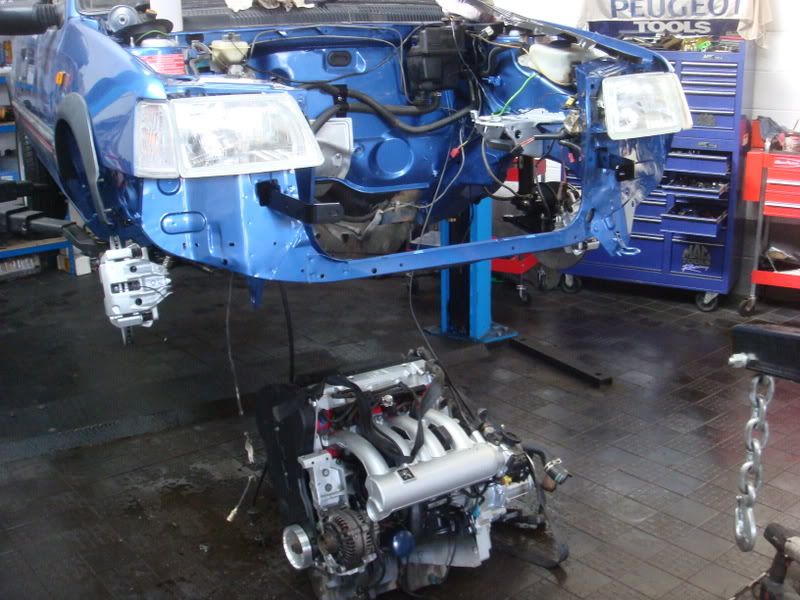
A bit closer, to me to you-
Lining it up to the engine and gearbox mount, had a little mishap with this when i decided to put the gearbox stud in the wrong hole in the gear box, it made the clutch arm hit the bottom of the battery tray, felt a bit of a tit when i realised what i had done.
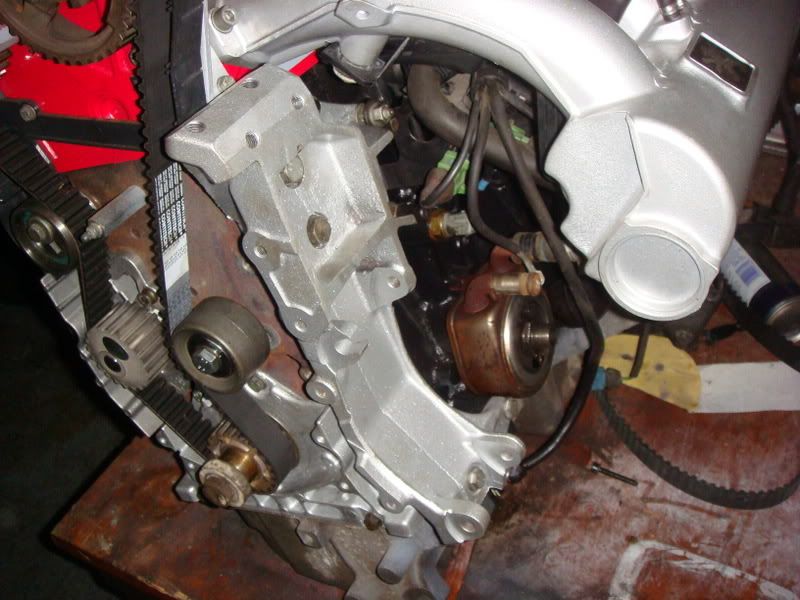
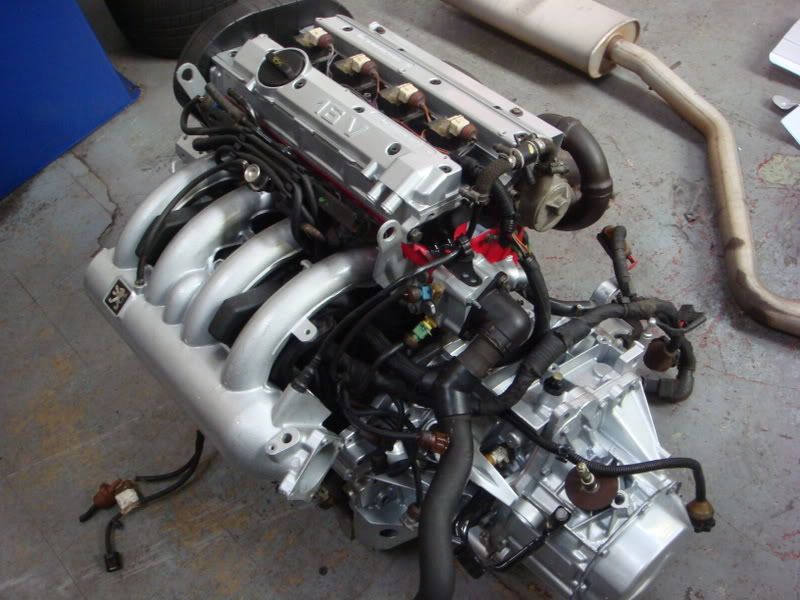
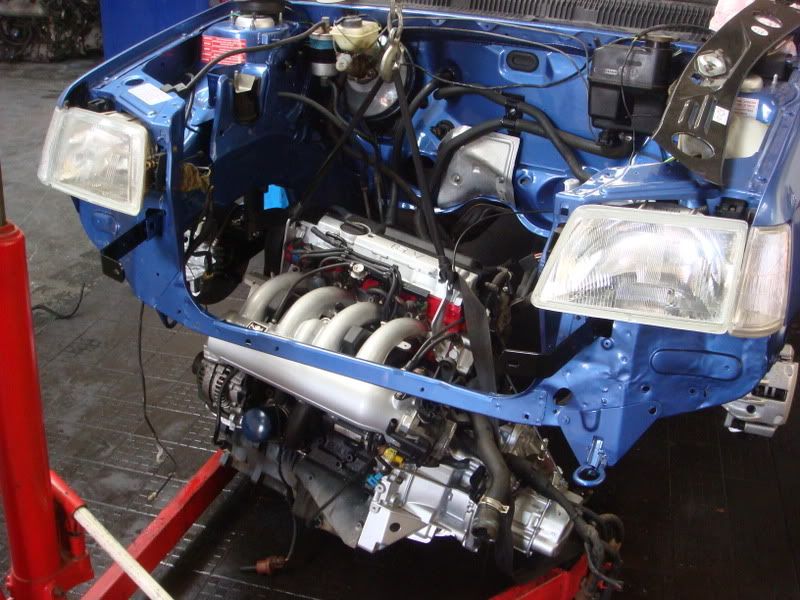
A bit further in, as you can see it is sitting happily on the mounts, just hope it clears in all the necessary places-
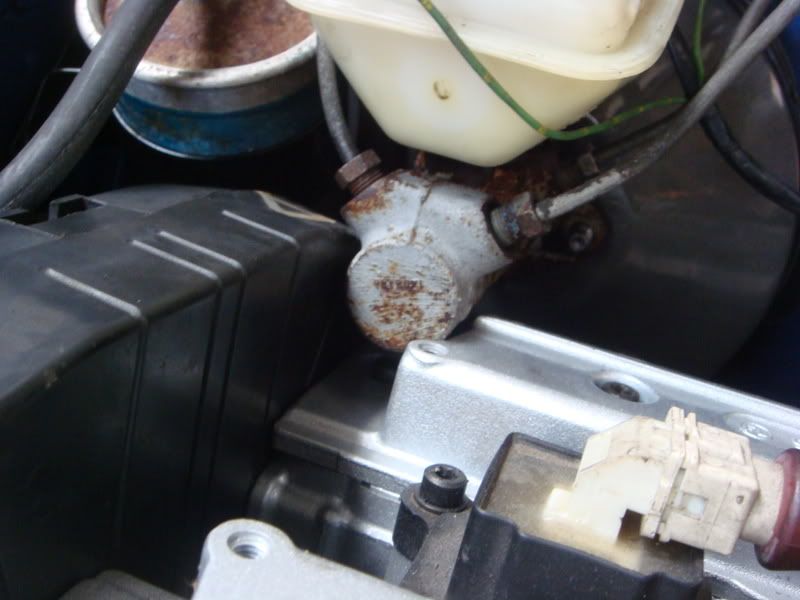
Well as you can see the lump is in and guess what i am chuffed to bits as all the places people struggle with i seem to have been lucky, its close to the master cylinder but the exhaust and the front panel are fine (dont worry the master cylinder is going to be replaced, and sohas the fuel filter now:lol)-
Well up up up, car goes up on the ramp and i fit the subframe, i had to say finding all the bolts was a mission, i had forgot which ones were which, just got to fit my shiney new sump, yes i know but you could'nt leave it looking like it is now:lol-
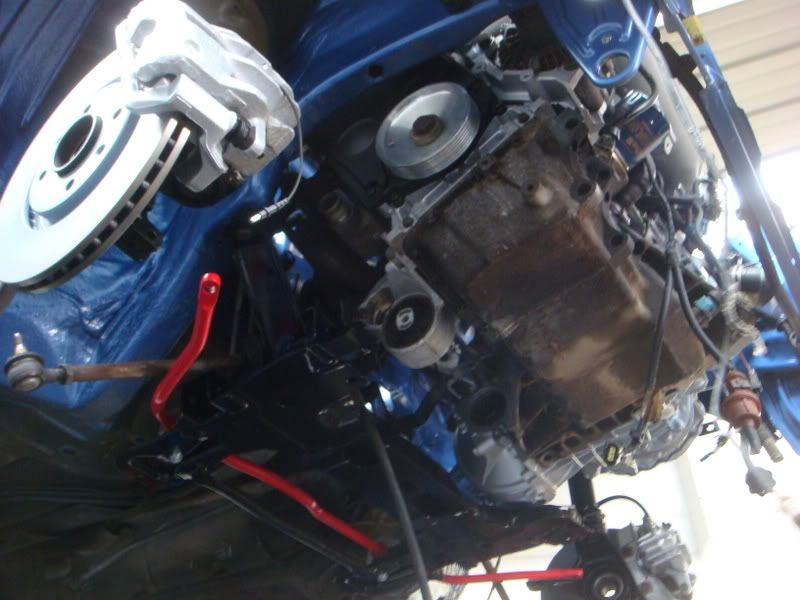
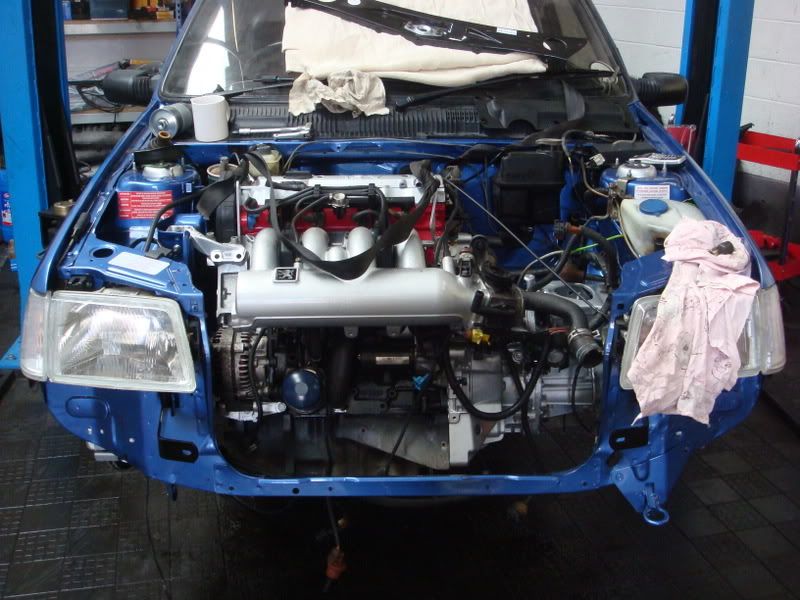
Well thats about as far as i can go now, just fitted all the subframe and ancillaries, bolted all the driveshafts back in and put the wheels back on, it was great to see the car standing on its own feet again-
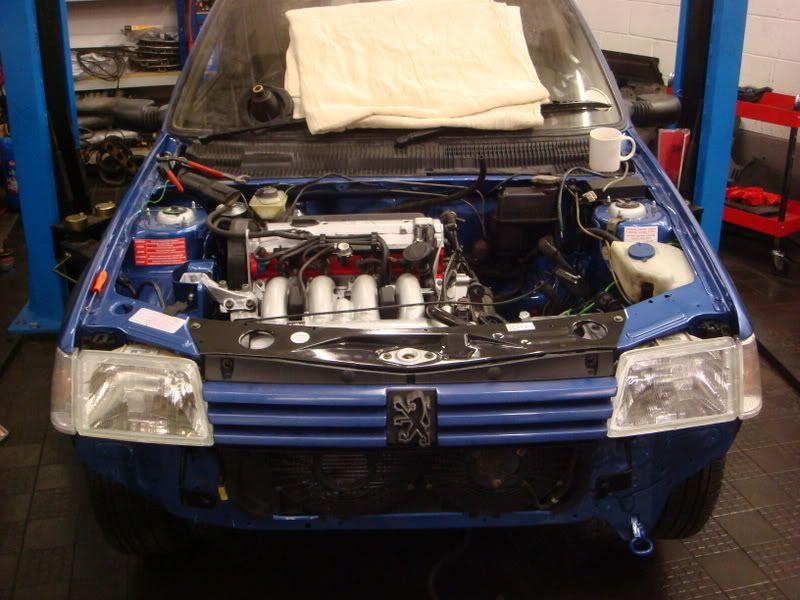
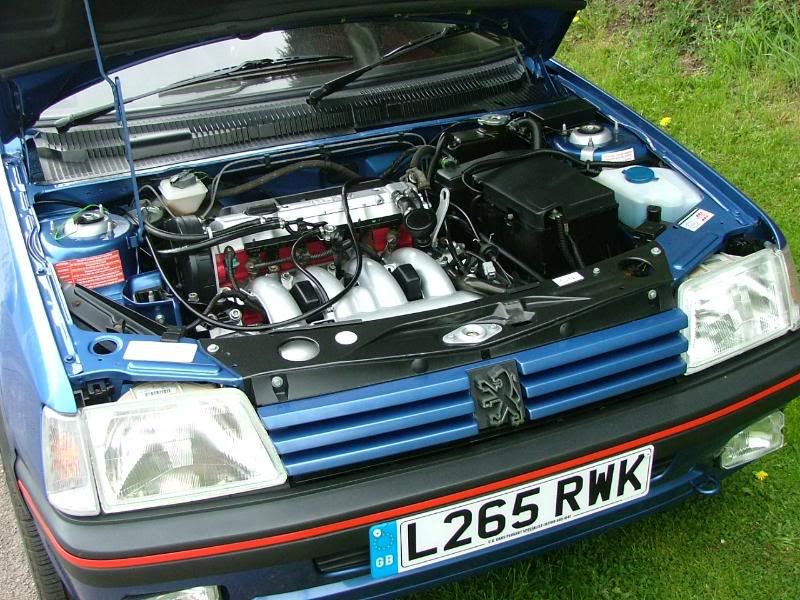
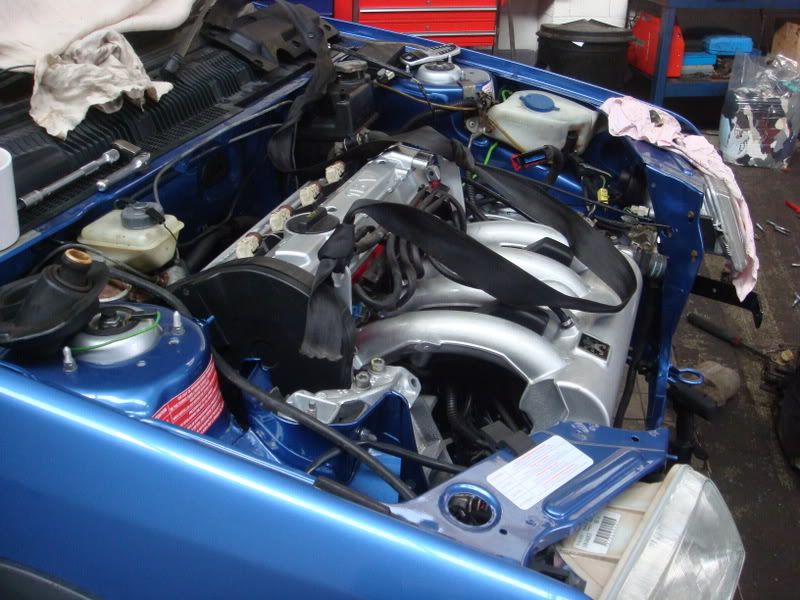
Its a shane the inlet manifold is covered up by the front panel but ho hum, all thats left to do now is get it all wired up and connect the coolant hoses, managed to put all the fuel lines on and have just fitted the bonnet too. From the bay looking like this-
To this-
Thats more or less the lot to be fair, copied from another forum so may not make sense all the way through but you generally should get the idea.
Thanks, carl
Fo those of you who are interested here is what i have done to it since i have owned it-
Its a long list.
Well some of you may know at the beginning of the year i bought a very nice example of a 1.9 205 gti finished in miami blue, i have always wanted to buy a 205 and fit the gti6 engine to it, well the car has been sat in the corner of my garage now for months collecting dust due to not having any time to start it, well that all changed yesterday as work was slack and the lad i have who works with me had nothing to do so it all started.
The car itself is a 1994 205 1.9 gti with the later engine and ecu setup so only produces 122bhp which back in the day was good but by todays standard is no match for anything really.
How it was when i bought it-
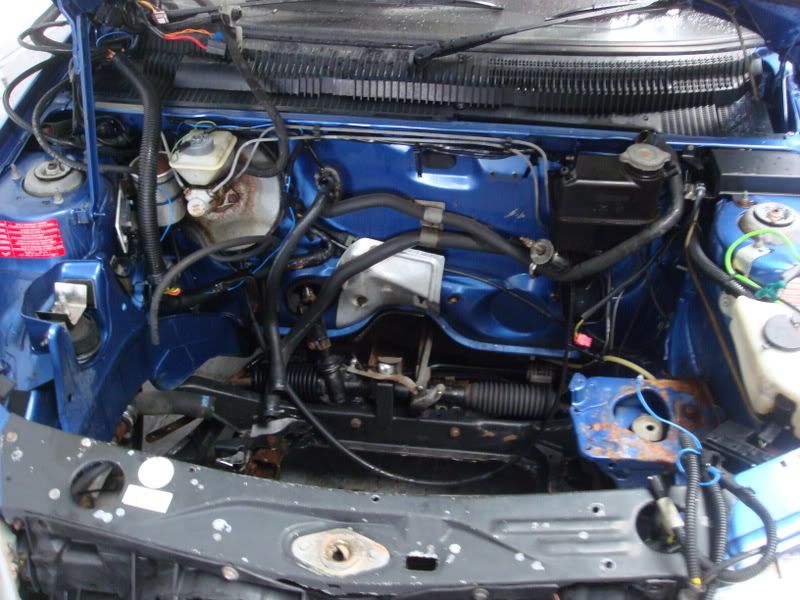
The engine bay as it looked-
Then after a couple of hours this is what we managed (in the back of my head i was thinking what have i done!)-
With the old engine completely removed, it looks a nice and dry engine to be fair and so it should really after only covering 66k-
With the engine removed the bay looked a little grubby-
After a good clean with the hot washer and some elbow grease it came out like this-
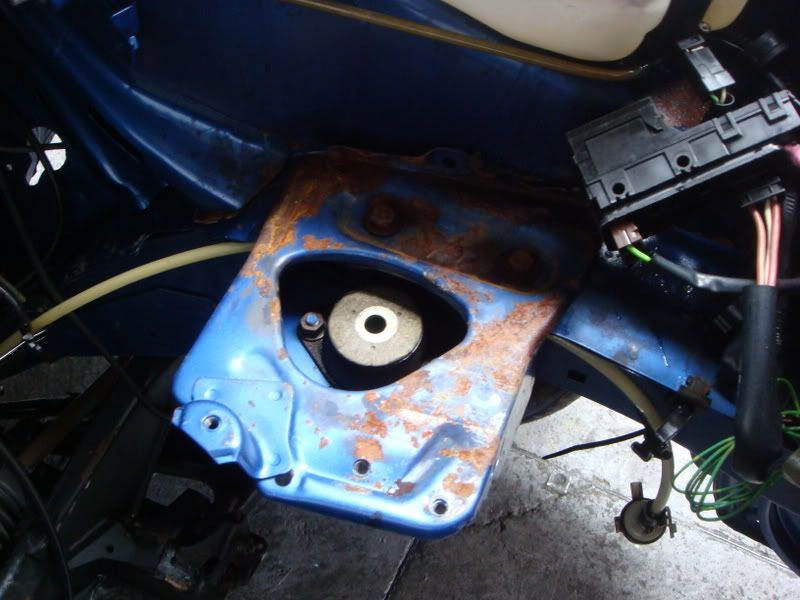
The only bit thats going to need a fettle is the battery tray, looks like a battery must have leaked some acid in the past and done this-
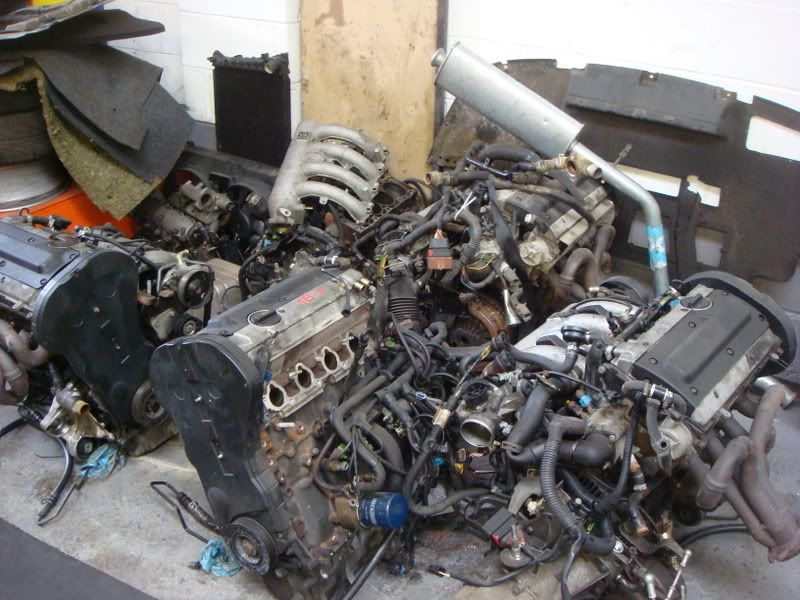
Well one of these lumps should fit it i guess :lol-
Not really, i had a block and head to pieces and have started to rebuild it as once the lump is fitted i want to forget about it and jsut be able to use the car when i want without any hassles.
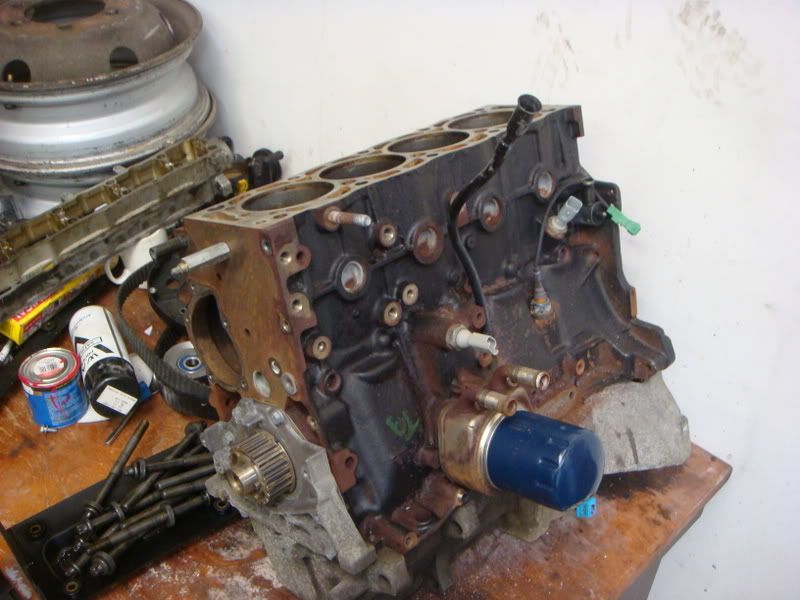
Heres the block, all reassembled, just going to give the block a good rub down and apply some engine laquer to it-
The cylinder head is all fully rebuilt and i had the clever idea of painting it again with engine laquer but in red, well once applied it looked a bit pink to me, what do you think?-
Well done a little more today, cleaned back the block with the wire wool adapter in the drill, acid etch primed the block and then sprayed over it with high temperature black paint.
Then fitted the head, have to say this may be the most colourfull engine bay i have seen once this is all back together-
Not much more to up date as i am waiting for some parts to be delivered (sent them away to be made pretty :lol).
Just been messing with the exhaust manifold and this envolved cutting it and making the angle a few degress tighter so hopefully this will clear the bulk head and make it a tidier install, i set about the manifold with a grinder and cut almost through it then bent the manifold down and re welded it back up.
Here are a few pictures so you can understand my dribble.
This is the manifold once the cut and bend down had been applied and then re welded up, i never though about taking a before photo. :crazy
A pic of it fitted to the lump, its angle is slightly tighter to the back of the block-
Well got my shiney bits back so i can put a bit more of it back together-
rocker cover and cam carriers-
Varoius brackets re painted black, heres one of them-
Exhaust manifold heat sheild-
Here's all the bits fitted to the engine, made up with them as they fit so well and look better than new-
Well thats the engine coming along nicely, just waiting for a few more bits to arrive so i changed my engine for the gearbox and stripped down a five speed Citroen Xsara box and checked it over, it looks really good and considering its done over 100k has no real marks to it at all.
Thinking about sending the casing off to be powder coatedB)
Box of bits :lol
Not really done a great deal more to this project at the minute as i am waiting for various parts to arrive.
Although i did receive a fly wheel and a few bits back from the powder coaters, manganed to fit all the pullies, new water pump etc and fit my modified engine block bracket for the engine mount.
A few teasers, starting to look very pretty-
Heres the bracket i modified with a rather large stil saw, cut the brackets off for the power steering pump, a bit the same way you would if you were fitting the supercharger kit, once this was done i sent the bracket away to be powder coated (its an addiction i tell you:lol)
Obviously you dont cut the brackets off if you car is equipt with pas, mine isnt.
Just waiting for the gear box casing to come back from the powder coaters then the engine and box are ready to be mated back to the engine bay.
Once the engine is sat in the bay i have another sump that has been........ yes wait for it..... powder coated :lol Not fitted that yet as i fear it would get mangled as the engine is slid along the floor whilst fitting it.
Still undecided as to whether i should have the bay re painted as in some places there is the odd mark/scratch and dare i say it some surface rust:angry
Little bit of an update, i got the gearbox back from the painters today, just got to put all the internals back in it and mate it to the engine then i am done with the engine.
I may (well you know i will) remove the subframe/lower arms and get all that powder coated whilst i am at it, i have decided to get the bay painted too, seems daft not too whislt its all out.
Obviousley this is going to hold the build up as there is alot more work to do but once completed it should look very smart.
Gear box pics-
Well the box is back together, just got to put the end cap on and fit it to the engine.
Have to say i am glad i removed all the internal's prior to the casing being shot blasted as when i removed the casing to put the internal's back it was more or less filled with the sand.
Went back togther really well, and i remembered where the bits went which was a bonus.
i have put the gearbox back together sealed it all up and mated it to the engine-
Also got the subframe back from the powder coaters and it looks great, had the antiroll bar and brackets done too-
Just got to do a few little bits now to finish the engine off and get the engine bay painted.
The bay now is more or less bare and just needs the wiring removing, had some fun when i removed the air horn with the garage air line :lol:lol
Dave called me a cock and nearly smashed it up!!! I dont think he like being force fed his cob by the scare.
totally stripped now and ready for paint-
All washed off and rid of all the grime and gunge that builds up, took me ages and i think the grime that came off the car landed on me!!
Also picked up my new engine bay sticker set (i made these and still have some left)-
Wahoo, i got it back today with a fresh nicely painted bright blue bay, its now the case of putting it all back together, the joy.
Put my new stickers on the bay, literrally two minutes after it arrived back.
Here you go-
Got back on to this again today,
Started by putting the suspension back together, using a few bits that are not meant for the 205 so i am keeping it quiet at the minute untill i know its going to work, coimplete new top mount kit and new springs putting all together with new shocks-
Was a real arse to do as they are a little special but once fitted to the car look good and seem to clear ok, looking spankly too-
Then i started to slowly put all the bits back from where they origianally came from, most of the bits removed have been powder coated so look like new, even went to the local fixing's shop and got new nuts and bolts :lol-
Come to a bit of a stand still again as i forgot to get the servo powder coated and cant do much more untill this is refitted
Had a pair of hub carriers painted black-
Fitted the wheel bearings, trying not to damage the paint-
The servo came back looking great in anthracite, much better than the rusty crap it looked like before.
Ordered the last few bits i need so i am hoping by the end of the week to have a six lump sitting in the bay looking very pretty.
I have my fingers crossed that the master cylinder will clear and that i have no issues with the exhaust manifold. Time will tell.
The calipers i have had powder coated too-
Brakes all built back up and fitted, painted the centre of the disc's, once the car has been driven it will remove the over spray and will leave a nice coated centre that wont look horrible when the metal corrodes-
This is what it is looking like now-
Well the day is getting close to the car being finished, had a really good session with it today and managed to get the engine in (yay)
Lining it up to fit, it does look like it wont fit-
A bit closer, to me to you-
Lining it up to the engine and gearbox mount, had a little mishap with this when i decided to put the gearbox stud in the wrong hole in the gear box, it made the clutch arm hit the bottom of the battery tray, felt a bit of a tit when i realised what i had done.
A bit further in, as you can see it is sitting happily on the mounts, just hope it clears in all the necessary places-
Well as you can see the lump is in and guess what i am chuffed to bits as all the places people struggle with i seem to have been lucky, its close to the master cylinder but the exhaust and the front panel are fine (dont worry the master cylinder is going to be replaced, and sohas the fuel filter now:lol)-
Well up up up, car goes up on the ramp and i fit the subframe, i had to say finding all the bolts was a mission, i had forgot which ones were which, just got to fit my shiney new sump, yes i know but you could'nt leave it looking like it is now:lol-
Well thats about as far as i can go now, just fitted all the subframe and ancillaries, bolted all the driveshafts back in and put the wheels back on, it was great to see the car standing on its own feet again-
Its a shane the inlet manifold is covered up by the front panel but ho hum, all thats left to do now is get it all wired up and connect the coolant hoses, managed to put all the fuel lines on and have just fitted the bonnet too. From the bay looking like this-
To this-
Thats more or less the lot to be fair, copied from another forum so may not make sense all the way through but you generally should get the idea.
Thanks, carl

Looks awesome that Carl, wish we could fit a GTi-6 engine to our rally car, I bet its a lovely step up from the 1.9 
Slightly off topic, could I PM you about some things? We can't get our 205 started, and seem to have tried everything we can think of! Be grateful for any advice
I think I'll have to own a Miami Blue GTi at some point, I was so close to getting a GTi instead of the BMW...
Slightly off topic, could I PM you about some things? We can't get our 205 started, and seem to have tried everything we can think of! Be grateful for any advice
I think I'll have to own a Miami Blue GTi at some point, I was so close to getting a GTi instead of the BMW...

Looks great Carl,
Its nice to see someone spending a bit of time and effort to install an engine conversion to a factory finish standard. Thats exactly what i aim for myself, although my gti6 conversion isn't as tidy as yours (but my excuse is that its a track car lol)
Dont see many L platers around
Its nice to see someone spending a bit of time and effort to install an engine conversion to a factory finish standard. Thats exactly what i aim for myself, although my gti6 conversion isn't as tidy as yours (but my excuse is that its a track car lol)
Dont see many L platers around
Gassing Station | Readers' Cars | Top of Page | What's New | My Stuff