
Kelvinators BMW E36 M3-28i
Discussion


So four years ago (woah, four years!) I had a rather decent early E36 M3.
Unfortunately I made the mistake of selling that car, and M3s aren't getting any cheaper, so now it's harder than ever to get another one. Rubbish ones are expensive and good ones are even more expensive.
A couple of months ago I purchased an E91 335i, which although having been modded, so it was fast, it was as dull as bricks to drive otherwise. I wanted another analogue car, like an M3, where the only driving is done by me, not a computer.
I put the E91 up for sale and got offered an E36 M3 for a swap, which of course I'm going to be super interested in. Unfortunately the seller was someone reluctant to provide VIN details of the car initially, and it turned out that it was actually a 328i that had had a full M3 conversion. Initially I wasn't interested, I wanted a "real" M3, but the more I thought of it, the more a reshelled car actually made sense to me.
I didn't want to modify my previous M3 much, as i was concerned about ruining its "originality", so a car that already wasn't original means i can do the mods i didn't do to the previous M3. It sadly also means that it doesn't hold the same value as a real M3, but oh well.
So this is what I have ended up.
1996 BMW 328i Shell (New Zealand New)
Boston Green Metallic
Slicktop
The donor M3 was a South African spec BF92 1996 M3 in Daytona Violet
3.0L S50B30 engine (no emissions gear, no cats, but the full fat engine unlike the early SA spec cars)
5 Speed manual with LSD
Vader seats (Nappa leather)
M3 suspension and brakes
The donor had aluminium doors, but they weren't carried over
The only mods are
20" Chrome Work VS-KF
Full sound system with full boot install and a sully sik early 00s flip up touch screen headunit
Everything else is stock M3.
Unfortunately the car is a complete basket case, and has way more issues than expected and more keep popping up every day. The good thing is that I love a project, and fully intend to have this car as a nice solid car I can enjoy driving.
The good first
New headlining
Good condition interior (except steering wheel where all the leather has been removed)
Tidy exterior (and Boston Green is a stunning colour!)
Smooth gearbox and quiet engine (other than Vanos noise)
Head gasket and timing chain recently done, with head professionally cleaned up
So far the issues identified are
Vanos is dead. No power below 4000rpm, and can hear the usual grumble/rattle.
Starter doesn't always engage first time (free spins and engages when key is released, and then will start next try)
Passengers window only goes up about an inch at a time
Ignition barrel sometimes free spins
Airbag light stays on a long time before going out. Codes for passenger occupancy sensor
Shifter bushings well and truly gone
A high idle
A vacuum leak (since fixed, idle still high)
Headlight low beam not working on one side (since fixed. Fuse)
Oil cap hemorrhaging oil
All exterior rubber seals badly perished
Driveshaft coupling cracked and falling to bits
Clutch bites at the floor and the clutch pedal is offset/twisted to the left
Washer bottle sensor failed
No ext. temp sensor connected
Gearbox selector shaft seal leaking
Hose clamps missing or loose on fuel lines under car
Front LH tire losing pressure
20" wheels rub on all four guards
And there will no doubt be more things I discover as i go. In the meantime the car is mostly driveable, albeit leaking oil from the oil cap quicker than I can clean it off, and pumping the tire up each time I drive it.
The plans are to fix all the above issues, starting with the wheels are are stupid and huge, and then finally getting around to doing some mods. I have also ordered a bunch of other parts already, including Vanos seals.
Unfortunately the seller twisted the truth on the KM the donor car had on it, claiming the cluster fitted to the car was sourced from a friend and is from a different M3, and the original donor has about 80,000km less than the cluster (and the donors cluster was faulty so it was sold). INPA confirmed that the cluster is the one from the original donor.... so yeah.
I'm looking at maybe fitting a pair of Recaro seats, as they are more comfortable than the Vaders, but need to look further into he mounts for the floor.
The sound install in the boot will probably be coming out and standard boot linings/trim fitted. The subs sound average, likely due to settings on the amps, and i don't care enough to set them up properly.
I also want to upgrade the suspension, but keep standard-ish height (due to my steep driveway). Thinking Koni shocks and either stock springs or H&R. Swaybars are apparently a good upgrade too, as are binning the original rubber bushes.
This is the story of my 1996 BMW M328i
In the meantime, here are some photos.


Unfortunately I made the mistake of selling that car, and M3s aren't getting any cheaper, so now it's harder than ever to get another one. Rubbish ones are expensive and good ones are even more expensive.
A couple of months ago I purchased an E91 335i, which although having been modded, so it was fast, it was as dull as bricks to drive otherwise. I wanted another analogue car, like an M3, where the only driving is done by me, not a computer.
I put the E91 up for sale and got offered an E36 M3 for a swap, which of course I'm going to be super interested in. Unfortunately the seller was someone reluctant to provide VIN details of the car initially, and it turned out that it was actually a 328i that had had a full M3 conversion. Initially I wasn't interested, I wanted a "real" M3, but the more I thought of it, the more a reshelled car actually made sense to me.
I didn't want to modify my previous M3 much, as i was concerned about ruining its "originality", so a car that already wasn't original means i can do the mods i didn't do to the previous M3. It sadly also means that it doesn't hold the same value as a real M3, but oh well.
So this is what I have ended up.
1996 BMW 328i Shell (New Zealand New)
Boston Green Metallic
Slicktop
The donor M3 was a South African spec BF92 1996 M3 in Daytona Violet
3.0L S50B30 engine (no emissions gear, no cats, but the full fat engine unlike the early SA spec cars)
5 Speed manual with LSD
Vader seats (Nappa leather)
M3 suspension and brakes
The donor had aluminium doors, but they weren't carried over
The only mods are
20" Chrome Work VS-KF
Full sound system with full boot install and a sully sik early 00s flip up touch screen headunit
Everything else is stock M3.
Unfortunately the car is a complete basket case, and has way more issues than expected and more keep popping up every day. The good thing is that I love a project, and fully intend to have this car as a nice solid car I can enjoy driving.
The good first
New headlining
Good condition interior (except steering wheel where all the leather has been removed)
Tidy exterior (and Boston Green is a stunning colour!)
Smooth gearbox and quiet engine (other than Vanos noise)
Head gasket and timing chain recently done, with head professionally cleaned up
So far the issues identified are
Vanos is dead. No power below 4000rpm, and can hear the usual grumble/rattle.
Starter doesn't always engage first time (free spins and engages when key is released, and then will start next try)
Passengers window only goes up about an inch at a time
Ignition barrel sometimes free spins
Airbag light stays on a long time before going out. Codes for passenger occupancy sensor
Shifter bushings well and truly gone
A high idle
A vacuum leak (since fixed, idle still high)
Headlight low beam not working on one side (since fixed. Fuse)
Oil cap hemorrhaging oil
All exterior rubber seals badly perished
Driveshaft coupling cracked and falling to bits
Clutch bites at the floor and the clutch pedal is offset/twisted to the left
Washer bottle sensor failed
No ext. temp sensor connected
Gearbox selector shaft seal leaking
Hose clamps missing or loose on fuel lines under car
Front LH tire losing pressure
20" wheels rub on all four guards
And there will no doubt be more things I discover as i go. In the meantime the car is mostly driveable, albeit leaking oil from the oil cap quicker than I can clean it off, and pumping the tire up each time I drive it.
The plans are to fix all the above issues, starting with the wheels are are stupid and huge, and then finally getting around to doing some mods. I have also ordered a bunch of other parts already, including Vanos seals.
Unfortunately the seller twisted the truth on the KM the donor car had on it, claiming the cluster fitted to the car was sourced from a friend and is from a different M3, and the original donor has about 80,000km less than the cluster (and the donors cluster was faulty so it was sold). INPA confirmed that the cluster is the one from the original donor.... so yeah.
I'm looking at maybe fitting a pair of Recaro seats, as they are more comfortable than the Vaders, but need to look further into he mounts for the floor.
The sound install in the boot will probably be coming out and standard boot linings/trim fitted. The subs sound average, likely due to settings on the amps, and i don't care enough to set them up properly.
I also want to upgrade the suspension, but keep standard-ish height (due to my steep driveway). Thinking Koni shocks and either stock springs or H&R. Swaybars are apparently a good upgrade too, as are binning the original rubber bushes.
This is the story of my 1996 BMW M328i
In the meantime, here are some photos.
I can't make this stuff up, I really can't. I found out why the Vanos isn't working, and it's not what I was thinking...
I have been messing around for the past few days trying to get INPA and DIS to work properly. I can get INPA to read everything but the DME (ECU), but I finally got DIS working today, and its reading the engine DME.

This means I can finally read engine codes and see if there is anything obviously wrong.

That's a yes then. This was the only code, thankfully. I had wondered about the TPS since the reading from live data in the VNC (Vanos Control unit) in INPA was weird, but the VNC didn't have codes for those sensors, only Vanos related ones (of which it had an old code for something random in German, which wasn't an active code).
So what was weird? Well, the Throttle Position Sensor either read as below, with the engine off


And didn't change when the throttle was opened, or did this when the engine was running (also note the two bars at the very top not reading anything)
https://youtu.be/yRacLEAwmjg
That reading looked familiar.... almost like it was reading engine position.
I disconnected the plugs, and checked the wiring colours. This was the plug off the TPS

And the Intake Cam Position Sensor

These two live right next to each other, and have identical plugs.

I check the wiring diagram, and sure enough the TPS colours were wrong. It should be Brown, Brown/Black and Red/Yellow
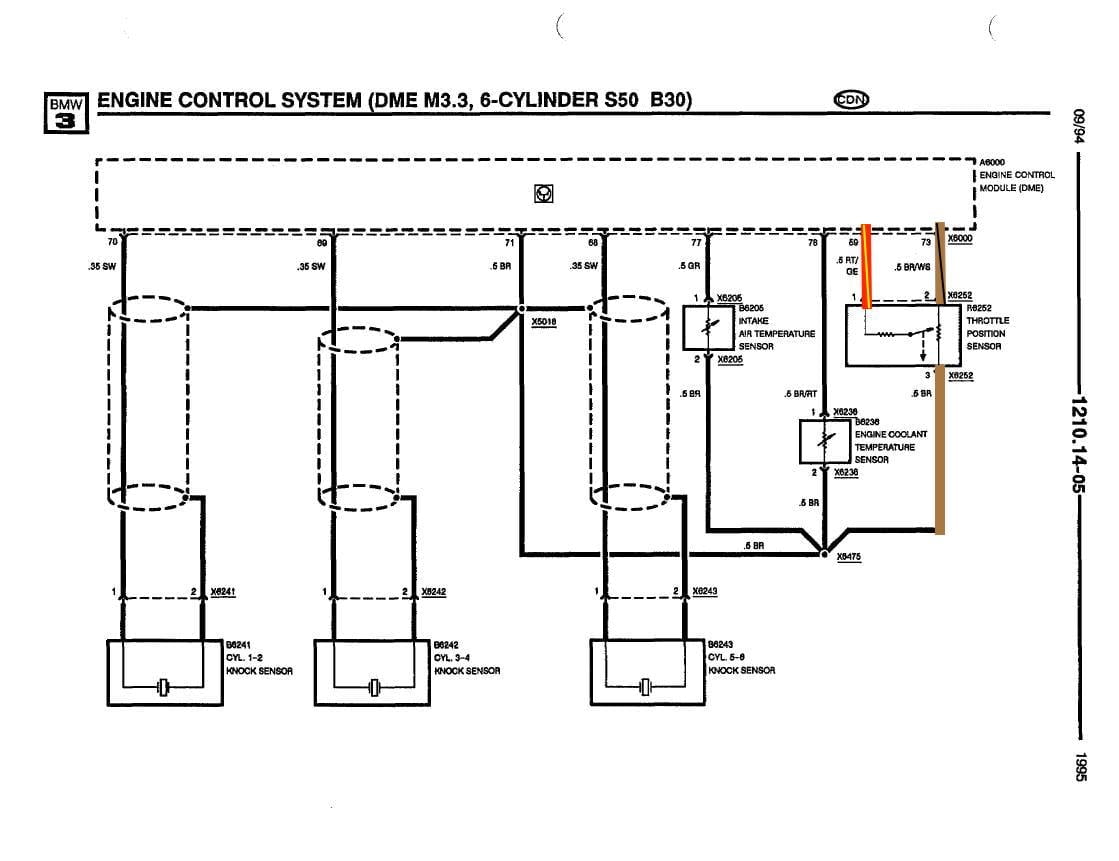
And the CPS should be Yellow, Black and Shielded Brown

So, what does that mean? Well, the two connectors had indeed been swapped. I swapped them over, connected them as they should be, and checked in INPA again.

The TPS now read correctly, and I also noted that the two top bars now also had a reading, so suspect that's linked to the cam sensor.
You can also see from the above photo, that the engine finally idles at the correct RPM now too. Obviously the engine thinking it was at WOT, but not moving, was causing the DME to keep the idle up.
The result? Its picked up a lot of down low power, almost like the Vanos is now actually doing something. Funny that. Easy way to gain power, much easier than Type-R stickers or a pod filter.
The exhaust sounds different too, I suspect this is down to the cam timing being correct now, instead of the inlet cam just sitting in one spot (or maybe even varying depending on throttle position!)
With the idle also correct, unfortunately the misfire at idle is more obvious. Hopefully it's either Vanos, or something simple like spark plugs or coils. I'll check them out shortly.
I can only presume this switch happened when the previous owner had everything unplugged to replace the head gasket. That was in 2016, so obviously it's been wrong for a while now, but confirms that I was right about the Vanos not working.
It's still slower than my old M3, but hopefully rebuilding the Vanos can make that gap closer.
I have been messing around for the past few days trying to get INPA and DIS to work properly. I can get INPA to read everything but the DME (ECU), but I finally got DIS working today, and its reading the engine DME.

This means I can finally read engine codes and see if there is anything obviously wrong.

That's a yes then. This was the only code, thankfully. I had wondered about the TPS since the reading from live data in the VNC (Vanos Control unit) in INPA was weird, but the VNC didn't have codes for those sensors, only Vanos related ones (of which it had an old code for something random in German, which wasn't an active code).
So what was weird? Well, the Throttle Position Sensor either read as below, with the engine off


And didn't change when the throttle was opened, or did this when the engine was running (also note the two bars at the very top not reading anything)
https://youtu.be/yRacLEAwmjg
That reading looked familiar.... almost like it was reading engine position.
I disconnected the plugs, and checked the wiring colours. This was the plug off the TPS

And the Intake Cam Position Sensor

These two live right next to each other, and have identical plugs.

I check the wiring diagram, and sure enough the TPS colours were wrong. It should be Brown, Brown/Black and Red/Yellow

And the CPS should be Yellow, Black and Shielded Brown

So, what does that mean? Well, the two connectors had indeed been swapped. I swapped them over, connected them as they should be, and checked in INPA again.

The TPS now read correctly, and I also noted that the two top bars now also had a reading, so suspect that's linked to the cam sensor.
You can also see from the above photo, that the engine finally idles at the correct RPM now too. Obviously the engine thinking it was at WOT, but not moving, was causing the DME to keep the idle up.
The result? Its picked up a lot of down low power, almost like the Vanos is now actually doing something. Funny that. Easy way to gain power, much easier than Type-R stickers or a pod filter.
The exhaust sounds different too, I suspect this is down to the cam timing being correct now, instead of the inlet cam just sitting in one spot (or maybe even varying depending on throttle position!)
With the idle also correct, unfortunately the misfire at idle is more obvious. Hopefully it's either Vanos, or something simple like spark plugs or coils. I'll check them out shortly.
I can only presume this switch happened when the previous owner had everything unplugged to replace the head gasket. That was in 2016, so obviously it's been wrong for a while now, but confirms that I was right about the Vanos not working.
It's still slower than my old M3, but hopefully rebuilding the Vanos can make that gap closer.
The 20s are off, I should have the replacements this weekend. I know its almost a clichè these days, but i scored a set of 5x 7.5" style 24s for a good price, so will go for a square setup (obviously). I happen to like how E36s look with Style 24, so its a win. Also gives me a spare, since its hard to fix a flat with an amplifier.

I have also removed the clutch pedal to see why its cocked off to the left. The bushes looked OK, albeit old and crusty, so have ordered a new pedal and some delrin bushes to see if that sorts it. Also have a ton of other bits shooting around the world heading my way, including bits to rebuild the vanos, fix leaks, and get us back on the road again.
I have checked the coils and plugs (for the first 4 cylinders before i ran out of time) and all the coils are looking tired, with signs of what almost looks and smells like soot on them. All the plugs look a bit old, which is weird seeing as they were done in 2016 and not many KM ago (must be less than 10,000km). i do have a misfire, so may replace the coils as a matter of course.
I have also removed the clutch pedal to see why its cocked off to the left. The bushes looked OK, albeit old and crusty, so have ordered a new pedal and some delrin bushes to see if that sorts it. Also have a ton of other bits shooting around the world heading my way, including bits to rebuild the vanos, fix leaks, and get us back on the road again.
I have checked the coils and plugs (for the first 4 cylinders before i ran out of time) and all the coils are looking tired, with signs of what almost looks and smells like soot on them. All the plugs look a bit old, which is weird seeing as they were done in 2016 and not many KM ago (must be less than 10,000km). i do have a misfire, so may replace the coils as a matter of course.
I'm still waiting on parts, which sucks, because I just want to go out and drive, but in the meantime I fixed a couple of small things.
One thing the car has been suffering from since I got it is lots of play in the pedals. It turns out the bushes on the clutch pedal were stuffed, so new ones are on their way, but worse than that, the whole pedal box moved a lot when pressing a pedal. If you pushed the brake pedal, even by hand with the engine off, you could watch as the master cylinder tilted up a couple of cm. Pressing one pedal also moved the other pedal, it was all over the show.
It looks like the reason for the pedal box moving is that when the car was manual converted by the previous owner, they didn't fit number 4 in the diagram, so the pedal box isn't braced. Sigh.

I just went out and got an M8x25 bolt, loosened off the other 4, and installed the new bolt. Tightened it all up, and now almost no movement in the pedal box or master cylinder. Huge difference. Just another lazy cockup the previous owner did.
As an aside, I managed to get the remote locking working too. I replaced the batteries in the key, and used this video to program it.
https://youtu.be/Jy8Luef9FEA
It's a pretty simple process with the three button key. Get in, shut the door. Turn the ignition to 1 and then off again, remove key. Then immediately hold down the Unlock button (left small button) and press the Lock button three times. The car locks should cycle locked and unlocked by themselves. Repeat for any other key remotes. Now insert the key into the ignition, and turn it to 1 again, and then off. The key(s) should now be programmed to the car.
Oh yeah, this casually happened too. Off came the 20s.

And I went for a drive to Palmy to pick up a set of wheels that I had someone bring down from Auckland.

A set of five (four genuine and one fake) Style 24 7.5" stock M3 wheels. The spare, which is the fake, is pretty rough, but the others are in decent shape, after a clean. The tires are shot (and all the wrong size), and it has semi-slicks on the front, so I'll need to replace them all around.

It's a huge improvement already though

Now I just need to offload the (Fake) 20" wheels. Unfortunately I'm having issues finding a new home for them without basically giving them away. Despite what the seller advertised, and told me, they aren't genuine Work wheels, they are actually Lenso Work wheels. A good copy, but they are single piece replicas, worth about 1/3 genuine wheels

So, back to waiting for parts.....
One thing the car has been suffering from since I got it is lots of play in the pedals. It turns out the bushes on the clutch pedal were stuffed, so new ones are on their way, but worse than that, the whole pedal box moved a lot when pressing a pedal. If you pushed the brake pedal, even by hand with the engine off, you could watch as the master cylinder tilted up a couple of cm. Pressing one pedal also moved the other pedal, it was all over the show.
It looks like the reason for the pedal box moving is that when the car was manual converted by the previous owner, they didn't fit number 4 in the diagram, so the pedal box isn't braced. Sigh.

I just went out and got an M8x25 bolt, loosened off the other 4, and installed the new bolt. Tightened it all up, and now almost no movement in the pedal box or master cylinder. Huge difference. Just another lazy cockup the previous owner did.
As an aside, I managed to get the remote locking working too. I replaced the batteries in the key, and used this video to program it.
https://youtu.be/Jy8Luef9FEA
It's a pretty simple process with the three button key. Get in, shut the door. Turn the ignition to 1 and then off again, remove key. Then immediately hold down the Unlock button (left small button) and press the Lock button three times. The car locks should cycle locked and unlocked by themselves. Repeat for any other key remotes. Now insert the key into the ignition, and turn it to 1 again, and then off. The key(s) should now be programmed to the car.
Oh yeah, this casually happened too. Off came the 20s.

And I went for a drive to Palmy to pick up a set of wheels that I had someone bring down from Auckland.

A set of five (four genuine and one fake) Style 24 7.5" stock M3 wheels. The spare, which is the fake, is pretty rough, but the others are in decent shape, after a clean. The tires are shot (and all the wrong size), and it has semi-slicks on the front, so I'll need to replace them all around.

It's a huge improvement already though

Now I just need to offload the (Fake) 20" wheels. Unfortunately I'm having issues finding a new home for them without basically giving them away. Despite what the seller advertised, and told me, they aren't genuine Work wheels, they are actually Lenso Work wheels. A good copy, but they are single piece replicas, worth about 1/3 genuine wheels

So, back to waiting for parts.....

Thanks guys. Yeah its bit of a mess but totally saveable. Most of the mess is either the previous owners questionable style (wheels, boot install), deferred maintenance (vanos, shifter bushes etc), or just cock ups when doing the swap. The body is solid and rust free, the engine and driveline are sweet, and the interior is very tidy.
In regards to whether its better than a tuned 328i, i'd say yes. Having owned a driven a few BMWs, nothing compares to how a proper ///M engine delivers power. The S50B30 just keeps pulling like a freight train to redline, and just keeps revving and revving. Its a very special engine.
I do like a good project though.
In regards to whether its better than a tuned 328i, i'd say yes. Having owned a driven a few BMWs, nothing compares to how a proper ///M engine delivers power. The S50B30 just keeps pulling like a freight train to redline, and just keeps revving and revving. Its a very special engine.
I do like a good project though.
I don't know about you, but I don't like using gross worn out steering wheels, and the wheel on the M328i was beyond terrible. Unfortunately the replacement didn't go as planned.
When I got the car I thought something was weird about the steering wheel. It had a gross rubbery feeling, and it actually turns out that the previous owner has removed the leather and this is the padding that is normally under the leather.


It wasn't nice to hold, and was kinda squidgy and moved on the wheel. Ugh.
I thought I had won the lottery when a MINT condition, almost new three spoke wheel came up on Trademe. It was from an E46 but looked physically identical (more on that later). I purchased it and marveled at how nice the leather was. So much grain!

Due to the airbag the first step to removing the wheel is to disconnect the battery. First, move your boot trim, disconnect the LED strip and move your massive capacitor. Wait, not everyone's boot has these?


And then disconnect the negative battery terminal. Check on the battery which is which, as not everyone has enough common sense to use the proper wiring colours...

And then go make a coffee, wait for it to cool down, drink it, and then it should be safe to mess with the airbag. I don't know if the waiting time is important, but everyone else says to wait, and hell, I don't fancy an airbag to the arm or face during removal.
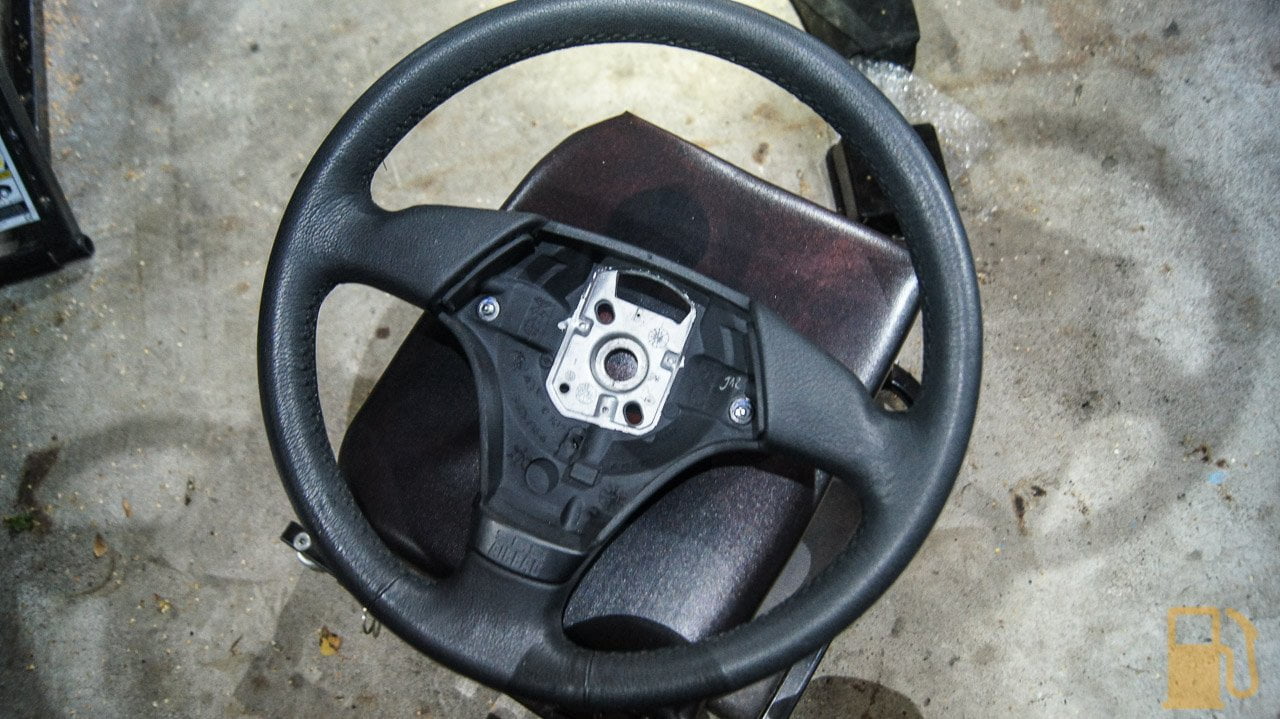
The airbag is held to the wheel with two T30 torx screws, one in the back of each side spoke. You can see them either side of the circular center below.

Once you undo these the airbag can be lifted out. It is hooked into the wheel at the bottom, so you need to pull the top forward and out to remove. On the back of the airbag there is an orange connector, this just pulls straight off, away from the airbag. There is also a small spade terminal to remove.

There is a large 16MM bolt in the middle of the wheel holding it to the column. Undo this a few turns, but don't take it completely off (it'll stop you taking a wheel to the face), and wiggle/pull the wheel off the spline). Make sure the wheel is dead straight, remove the bolt completely and mark the shaft to indicate center. Before you remove the wheel though, remove the lower steering wheel shroud, and disconnect the two connectors coming from the steering wheel slip ring. DO NOT try to remove the grey connector from the back of the slip ring. It isn't a connector.

Now you can remove the wheel.
This is where it went wrong though. I needed to swap the clock spring/slip ring from the back of the old wheel to the new one. Unfortunately this is where I learnt that there is one massive different between an E36 version of the wheel, and an E46 one.
On the E36, the slip ring screws to the back of the wheel with three little screws

It also comes through the back of the wheel at about 1-2 o'clock

The E46 wheel, although looking identical otherwise, has no mounting for the slip ring, as on the E46 the slip ring is mounted to the column, not the wheel

You can also notice that the wiring is designed to come through dead at the top

They are the same, but different enough that you can't easily use an E46 wheel on an E36. Apparently you can machine the back of the wheel to fit the slip ring, but that takes some precision work. You can't use the E46 slip ring or airbag, as they are two stage and have different wiring (not to mention mount to the column).
So my gorgeous mint condition wheel is useless to me. I have found a cheap replacement to my wheel on Facebook, so should have that at some point. It has all its leather, but has aged/worn. I'll probably buy a stitch on leather cover for it, but anything has to be better than the leather-less wheel.
It's a real shame I have a passengers airbag in this car, otherwise I would just bin the airbag wheel and go with a nice Momo or something. It's too obvious that the car should have an airbag wheel, when it still has the passengers airbag (unlike my old M3 with had only the drivers airbag, no passenger).
When I got the car I thought something was weird about the steering wheel. It had a gross rubbery feeling, and it actually turns out that the previous owner has removed the leather and this is the padding that is normally under the leather.


It wasn't nice to hold, and was kinda squidgy and moved on the wheel. Ugh.
I thought I had won the lottery when a MINT condition, almost new three spoke wheel came up on Trademe. It was from an E46 but looked physically identical (more on that later). I purchased it and marveled at how nice the leather was. So much grain!


Due to the airbag the first step to removing the wheel is to disconnect the battery. First, move your boot trim, disconnect the LED strip and move your massive capacitor. Wait, not everyone's boot has these?


And then disconnect the negative battery terminal. Check on the battery which is which, as not everyone has enough common sense to use the proper wiring colours...

And then go make a coffee, wait for it to cool down, drink it, and then it should be safe to mess with the airbag. I don't know if the waiting time is important, but everyone else says to wait, and hell, I don't fancy an airbag to the arm or face during removal.
The airbag is held to the wheel with two T30 torx screws, one in the back of each side spoke. You can see them either side of the circular center below.

Once you undo these the airbag can be lifted out. It is hooked into the wheel at the bottom, so you need to pull the top forward and out to remove. On the back of the airbag there is an orange connector, this just pulls straight off, away from the airbag. There is also a small spade terminal to remove.

There is a large 16MM bolt in the middle of the wheel holding it to the column. Undo this a few turns, but don't take it completely off (it'll stop you taking a wheel to the face), and wiggle/pull the wheel off the spline). Make sure the wheel is dead straight, remove the bolt completely and mark the shaft to indicate center. Before you remove the wheel though, remove the lower steering wheel shroud, and disconnect the two connectors coming from the steering wheel slip ring. DO NOT try to remove the grey connector from the back of the slip ring. It isn't a connector.

Now you can remove the wheel.
This is where it went wrong though. I needed to swap the clock spring/slip ring from the back of the old wheel to the new one. Unfortunately this is where I learnt that there is one massive different between an E36 version of the wheel, and an E46 one.
On the E36, the slip ring screws to the back of the wheel with three little screws

It also comes through the back of the wheel at about 1-2 o'clock

The E46 wheel, although looking identical otherwise, has no mounting for the slip ring, as on the E46 the slip ring is mounted to the column, not the wheel

You can also notice that the wiring is designed to come through dead at the top

They are the same, but different enough that you can't easily use an E46 wheel on an E36. Apparently you can machine the back of the wheel to fit the slip ring, but that takes some precision work. You can't use the E46 slip ring or airbag, as they are two stage and have different wiring (not to mention mount to the column).
So my gorgeous mint condition wheel is useless to me. I have found a cheap replacement to my wheel on Facebook, so should have that at some point. It has all its leather, but has aged/worn. I'll probably buy a stitch on leather cover for it, but anything has to be better than the leather-less wheel.
It's a real shame I have a passengers airbag in this car, otherwise I would just bin the airbag wheel and go with a nice Momo or something. It's too obvious that the car should have an airbag wheel, when it still has the passengers airbag (unlike my old M3 with had only the drivers airbag, no passenger).
Yet another issue I wasn't aware of until I had taken ownership of the car and driven away, was that the Airbag warning light was staying on too long, indicating an issue.
I'm not sure how or why it wasn't lit on the test drive, maybe we had the car running long enough before I got in to drive it for the light to go away, but it was indicating there was an issue every other time I turned the key. The light would come on with the ignition, as it should, flash, but then stay lit for a good few minutes, before going out.
A lit Airbag light is a WOF fail, but for some reason the light does go out, it just takes ages.
Anyway, I fired up my old diagnostic laptop, launched INPA and checked for codes in the Airbag system. I had three. Two were related to voltage (low battery) and one was for "Sitzbelegungserkennung Beifahrer".

Ah yup, that old chestnut. Translated to English, it means "Seat occupancy recognition front passenger".
The occupancy sensor issue is a well known one in the E36 community. It is basically an electrical mat inside the base of the passenger seat, which detects when weight is in the seat and tells the SRS system there is someone sitting there, and in the event of an accident to fire the passenger airbag. If it doesn't detect weight, it thinks no one is there, and wont fire the airbag.

The problem is that the mat can get worn or damaged over time, just from regular movement and pressure. Apparently kneeling on the seat base can damage them too (much more concentrated pressure). Once the mat fails, it will trigger the Airbag light and throw an error code.
The official way to fix it is to disassemble the seat, remove the old mat and fit a replacement. This is an excessive amount of work for little gain.
The unofficial way to do it, is to bypass the mat with a couple of resistors and a diode, which tricks the SRS system into thinking there is always someone in the seat, and to always fire the airbag in an accident. Some people DIY this with really ugly results, but a far tidier way to do it is to buy a proper bypass plug off the likes of eBay.
Mine cost about $11 plus shipping from a German seller, a hell of a lot cheaper than the $60+ they are asking for the exact same thing on Trademe.

Installation is easy. Disconnect the battery. Wait for a few minutes, then remove the four nuts/bolts that hold down the seat, and tilt it back to access the underside. This is where I discovered my occupancy sensor control unit under the seat wasn't even plugged in... The wires were just floating around on the floor

That plug should be in the white socket on the bottom of this unit

Regardless, I chose to bypass the mat anyway. It was probably why it had been disconnected, in some misguided attempt to "fix" it.
Twist the unit sideways to release it from the seat base, unplug the black connector on the side, plug the bypass into the socket, and reattach the box to the seat base. Done. Easy.

Reinstall the seat, reconnect the battery, turn the ignition on and marvel at how the Airbag light is still lit.
I don't know if it's the same on all cars, but mine needed the codes to be cleared. I plugged my laptop back in, fired up my freshly updated (and now in English) INPA, and checked for codes. Sure enough there was one for the occupancy sensor. I cleared this, cycled the ignition, the light went straight out. I checked codes again, and nothing.

The live data from the system also shows that the "pressure sensor" is OK.

Great success. One more thing ticked off the list.
I'm not sure how or why it wasn't lit on the test drive, maybe we had the car running long enough before I got in to drive it for the light to go away, but it was indicating there was an issue every other time I turned the key. The light would come on with the ignition, as it should, flash, but then stay lit for a good few minutes, before going out.

A lit Airbag light is a WOF fail, but for some reason the light does go out, it just takes ages.
Anyway, I fired up my old diagnostic laptop, launched INPA and checked for codes in the Airbag system. I had three. Two were related to voltage (low battery) and one was for "Sitzbelegungserkennung Beifahrer".

Ah yup, that old chestnut. Translated to English, it means "Seat occupancy recognition front passenger".
The occupancy sensor issue is a well known one in the E36 community. It is basically an electrical mat inside the base of the passenger seat, which detects when weight is in the seat and tells the SRS system there is someone sitting there, and in the event of an accident to fire the passenger airbag. If it doesn't detect weight, it thinks no one is there, and wont fire the airbag.

The problem is that the mat can get worn or damaged over time, just from regular movement and pressure. Apparently kneeling on the seat base can damage them too (much more concentrated pressure). Once the mat fails, it will trigger the Airbag light and throw an error code.
The official way to fix it is to disassemble the seat, remove the old mat and fit a replacement. This is an excessive amount of work for little gain.
The unofficial way to do it, is to bypass the mat with a couple of resistors and a diode, which tricks the SRS system into thinking there is always someone in the seat, and to always fire the airbag in an accident. Some people DIY this with really ugly results, but a far tidier way to do it is to buy a proper bypass plug off the likes of eBay.
Mine cost about $11 plus shipping from a German seller, a hell of a lot cheaper than the $60+ they are asking for the exact same thing on Trademe.

Installation is easy. Disconnect the battery. Wait for a few minutes, then remove the four nuts/bolts that hold down the seat, and tilt it back to access the underside. This is where I discovered my occupancy sensor control unit under the seat wasn't even plugged in... The wires were just floating around on the floor

That plug should be in the white socket on the bottom of this unit

Regardless, I chose to bypass the mat anyway. It was probably why it had been disconnected, in some misguided attempt to "fix" it.
Twist the unit sideways to release it from the seat base, unplug the black connector on the side, plug the bypass into the socket, and reattach the box to the seat base. Done. Easy.

Reinstall the seat, reconnect the battery, turn the ignition on and marvel at how the Airbag light is still lit.
I don't know if it's the same on all cars, but mine needed the codes to be cleared. I plugged my laptop back in, fired up my freshly updated (and now in English) INPA, and checked for codes. Sure enough there was one for the occupancy sensor. I cleared this, cycled the ignition, the light went straight out. I checked codes again, and nothing.

The live data from the system also shows that the "pressure sensor" is OK.

Great success. One more thing ticked off the list.
LiquidRS said:
Great thread and hats off to you for taking on such a challenging project. As far as I know, all SA M3s either had the B30 (initially) and then the B32 later on, so not too sure about your "full fat" statement earlier up in the thread.
Allegedly the early 3.0 cars, built in SA as CKD, used a slightly different B30 than the later ones like mine, designed for lower quality leaded fuels. The later ones are the same as the German cars, but without emissions gear. I dont specifically know what the differences are in the early ones, but there are rumors of a lower CR.Parts are arriving almost constantly, so it was time to start cracking on fixing my BMW.
It's been a month now, since I obtained the M328i, and it's spent 98% of that time in the garage in bits. I've driven it home, to and from work once, and that's as far as its been in my ownership. Unfortunately the list of failures just kept getting bigger for those first couple of weeks, but now I feel I'm almost on top of the list and it isn't growing.
Parts from all over the world, mainly The States, have arrived, with more still en route now. I decided to start with work under the car, as I needed to get new tires on the Style 24 wheels, so the car would be up on the QuickJacks, and it made sense.
The main work I needed to do was to replace all the bushing in the shifter assembly, as there was far too much play when in gear, and much like Tess, it was like trying to row in a bucket of porridge. This is work I carried out on my first BMW when I had it converted to manual, and they didn't put any bushing in at the time. The shifter shaft seal was also leaking, making a hell of a mess, and accelerating the degradation of rubber bushes etc.
The other job whilst there is to replace the drive shaft flex disk, or Giubo (usually pronounced Gwee-Boh, but apparently meant to be pronounced Joo-Boh). I noticed this was badly cracked when I had the car over the pit at work, so ordered a replacement. The drive shaft needs to be dropped to make accessing the shifter bushes easier, so it's a good time to do it.

The first step once the car was in the air, was to drop the exhaust mid section. It's not hard to drop, just four flanges to undo, but its damn heavy. It also turns out one of the front flanges has been leaking, because one flange had a crushed flat gasket and lots of sealant, the other flange had no gasket, just gasket goop.

With the exhaust section down, there is a heat shield that needs to be removed. It has six screws holding it in.

To drop the drive shaft first you must loosen off the nuts holding the center bearing as this will need to be lowered later, and remove the cross brace in the bottom of the above photo.
I marked the two flanges with a paint pen to help align them again later, and then went in with the ugga dugga gun to spin off the bolts holding the flanges to the flex disk. These are 18mm nuts and bolts. Turns out I didn't even have an 18mm spanner (most socket and spanner sets skip 18mm as its uncommon), so I had to rush out and buy one.

Once all the bolts are out, remove the two nuts holding the center bearing in and then the drive shaft can be lowered out of the way. The Giubo was pretty shocking. It even had chunks missing.

Compared to the new one

With the shaft out I had access to the shifter assembly. I don't have photos of this in place because it was very messy and a real pain to get out. I had issues getting the rear bushing, and the "b d" clip out, but there are lots of tutorials online on how to get them out.
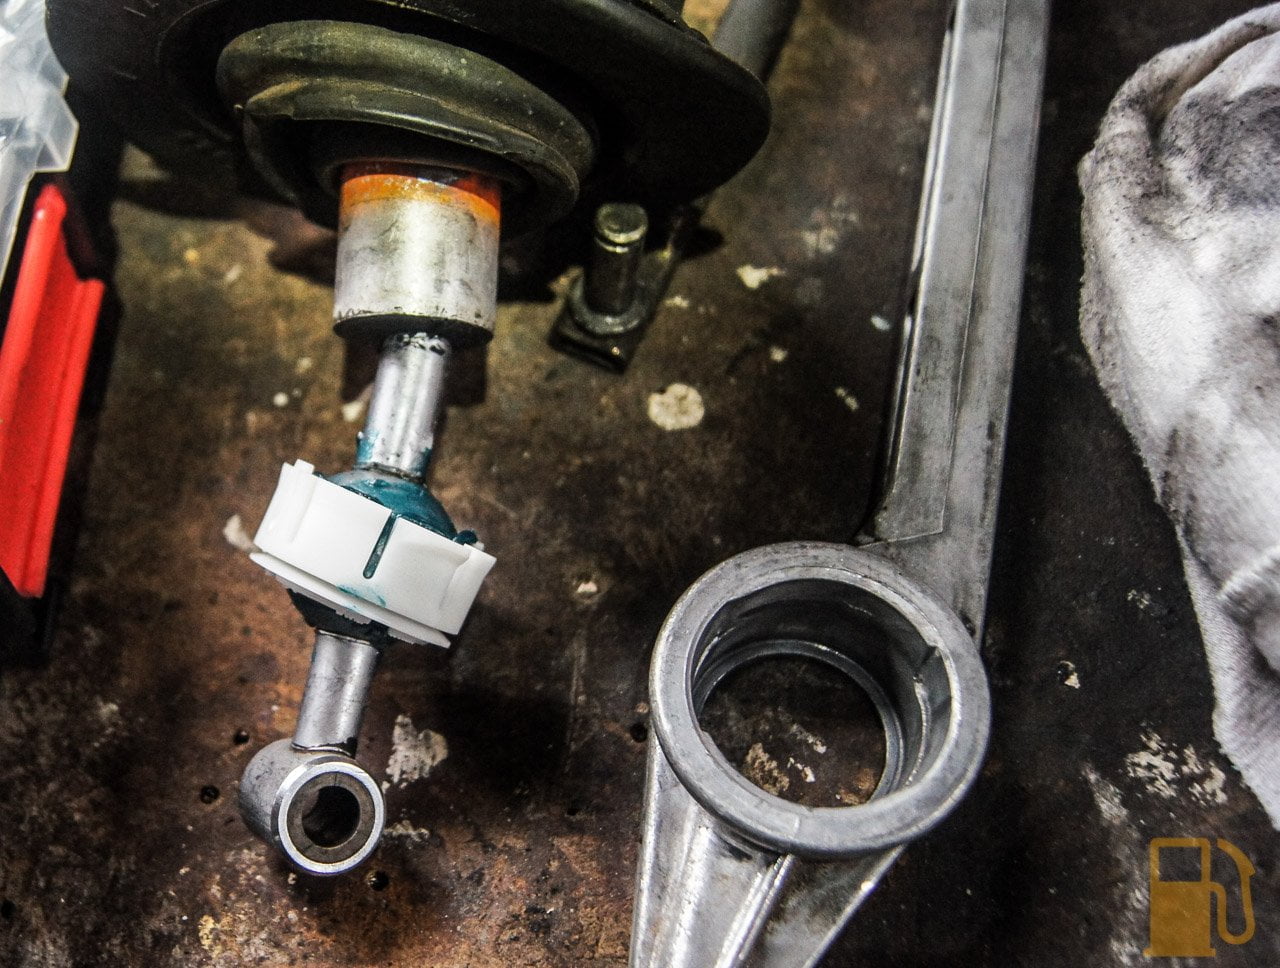
Once on the bench it was obvious why there was so much play. There were no plastic washers (which take up slack) where the green arrow points, and the ones with the orange arrow were worn paper thin.
The main joint usually has a foam insert in it to increase resistance to movement. This had absorbed oil from the leaking selector shaft seal and turned to mush

This bush which supports the main shifter arm had gone soft and worn out

I stripped all the parts down and gave them a clean. I first replaced the shifter "bearing". The old one had worn and gone brittle.


I pressed out the old arm bush and fit the replacement

On went the new yellow plastic washers.

A new main joint was obtained also. This comes with the new foam insert. This is an updated design that actually does away with the plastic washers on this end of the shift rod. Interestingly it's also made of an alloy and significantly lighter than the old steel one.

You can see on the new one there is a built in sleeve that takes up the space where the washers would have been on the old one


One tip I will say, is DO NOT REMOVE the retaining clip on the joint. It's a real prick to get back into place, and impossible to put on once the joint is in the car. Instead, slip the ring up the joint so it exposes the hole for the retaining pin. Move the ring to where the green line is. Once the retaining pin is in place, this allows you to easily push the ring back into place to lock the pin in.

Before I could refit the shifter assembly, I needed to tackle the horribly leaking selector seal. This is a very common issue, and other than bad access, not a hard job to fix. I gave the area a quick clean to expose the old seal. The rubber was hard as a rock and I couldn't get a screwdriver or a pick into it, so no wonder it was leaking. I ended up using the recommended alternate option, instead of removing the old seal (which was proving hard), drift the old seal further into the bore and then install the new seal in front of it. Use a 15mm deep socket to install the seal, as it's a perfect fit on the seals outer edge.

With the seal in, I reinstalled the shifter assembly. A quick test shows its lovely and notchy in its feel, with minimal movement in gear. Can't wait to drive with it.
Now I needed to install the new Giubo and reinstall the drive shaft. This is bit of a stty job, due to limited space for ratchets and spanners, but fairly straight forward.
One major thing to keep in mind is to ensure the arrows point toward the flange that the bolt attaches to. You can just make out the small arrow in the below photo. The green arrow is pointing both to it, and in the direction its pointing in. The green line is where the flange should be that the bolt goes through.

Once all the bolts are in, all the nuts are on and lightly nipped up, I torqued all the bolts up (per flange. Start with the three bolts on one flange and then do the other three) to the required 115NM. This is a lot of torque when lying on a rolling creeper with limited room!

I torqued them all up, and then did a quick pass of all bolts again to make sure they were all locked in nice and tight.
Then it was a matter of refitting the center bearing (remembering to preload the center bearing 5mm to the front of the car), rear brace and heat shield.
I still need to refit the exhaust, but I'm waiting on new gaskets, which should hopefully show up early next week.
As an aside, I also replaced the fuel filter whilst under the car today. It was too hard to get good photos under there of it, so no good guide (and there are heaps out there already), but it's interesting to note the old one was either the original filter, or hadn't been replaced in a long time. There was no obvious date stamp on it, but the label on the filter is old enough that I can't even find a matching photo online. Even if it isn't really that old, no harm in knowing it has a new one in there now.


I'm getting closer to having the car back on the road. Unfortunately before I can take it for another hoon I need to remove the valve cover and replace the gasket as I found out the other day it's hemorrhaging oil down the back corner. This means I may as well rebuild the Vanos whilst I'm in there. Yay.
It's been a month now, since I obtained the M328i, and it's spent 98% of that time in the garage in bits. I've driven it home, to and from work once, and that's as far as its been in my ownership. Unfortunately the list of failures just kept getting bigger for those first couple of weeks, but now I feel I'm almost on top of the list and it isn't growing.
Parts from all over the world, mainly The States, have arrived, with more still en route now. I decided to start with work under the car, as I needed to get new tires on the Style 24 wheels, so the car would be up on the QuickJacks, and it made sense.
The main work I needed to do was to replace all the bushing in the shifter assembly, as there was far too much play when in gear, and much like Tess, it was like trying to row in a bucket of porridge. This is work I carried out on my first BMW when I had it converted to manual, and they didn't put any bushing in at the time. The shifter shaft seal was also leaking, making a hell of a mess, and accelerating the degradation of rubber bushes etc.
The other job whilst there is to replace the drive shaft flex disk, or Giubo (usually pronounced Gwee-Boh, but apparently meant to be pronounced Joo-Boh). I noticed this was badly cracked when I had the car over the pit at work, so ordered a replacement. The drive shaft needs to be dropped to make accessing the shifter bushes easier, so it's a good time to do it.

The first step once the car was in the air, was to drop the exhaust mid section. It's not hard to drop, just four flanges to undo, but its damn heavy. It also turns out one of the front flanges has been leaking, because one flange had a crushed flat gasket and lots of sealant, the other flange had no gasket, just gasket goop.

With the exhaust section down, there is a heat shield that needs to be removed. It has six screws holding it in.

To drop the drive shaft first you must loosen off the nuts holding the center bearing as this will need to be lowered later, and remove the cross brace in the bottom of the above photo.
I marked the two flanges with a paint pen to help align them again later, and then went in with the ugga dugga gun to spin off the bolts holding the flanges to the flex disk. These are 18mm nuts and bolts. Turns out I didn't even have an 18mm spanner (most socket and spanner sets skip 18mm as its uncommon), so I had to rush out and buy one.

Once all the bolts are out, remove the two nuts holding the center bearing in and then the drive shaft can be lowered out of the way. The Giubo was pretty shocking. It even had chunks missing.

Compared to the new one

With the shaft out I had access to the shifter assembly. I don't have photos of this in place because it was very messy and a real pain to get out. I had issues getting the rear bushing, and the "b
d" clip out, but there are lots of tutorials online on how to get them out.Once on the bench it was obvious why there was so much play. There were no plastic washers (which take up slack) where the green arrow points, and the ones with the orange arrow were worn paper thin.

The main joint usually has a foam insert in it to increase resistance to movement. This had absorbed oil from the leaking selector shaft seal and turned to mush

This bush which supports the main shifter arm had gone soft and worn out

I stripped all the parts down and gave them a clean. I first replaced the shifter "bearing". The old one had worn and gone brittle.


I pressed out the old arm bush and fit the replacement

On went the new yellow plastic washers.

A new main joint was obtained also. This comes with the new foam insert. This is an updated design that actually does away with the plastic washers on this end of the shift rod. Interestingly it's also made of an alloy and significantly lighter than the old steel one.

You can see on the new one there is a built in sleeve that takes up the space where the washers would have been on the old one


One tip I will say, is DO NOT REMOVE the retaining clip on the joint. It's a real prick to get back into place, and impossible to put on once the joint is in the car. Instead, slip the ring up the joint so it exposes the hole for the retaining pin. Move the ring to where the green line is. Once the retaining pin is in place, this allows you to easily push the ring back into place to lock the pin in.

Before I could refit the shifter assembly, I needed to tackle the horribly leaking selector seal. This is a very common issue, and other than bad access, not a hard job to fix. I gave the area a quick clean to expose the old seal. The rubber was hard as a rock and I couldn't get a screwdriver or a pick into it, so no wonder it was leaking. I ended up using the recommended alternate option, instead of removing the old seal (which was proving hard), drift the old seal further into the bore and then install the new seal in front of it. Use a 15mm deep socket to install the seal, as it's a perfect fit on the seals outer edge.

With the seal in, I reinstalled the shifter assembly. A quick test shows its lovely and notchy in its feel, with minimal movement in gear. Can't wait to drive with it.
Now I needed to install the new Giubo and reinstall the drive shaft. This is bit of a s
tty job, due to limited space for ratchets and spanners, but fairly straight forward.One major thing to keep in mind is to ensure the arrows point toward the flange that the bolt attaches to. You can just make out the small arrow in the below photo. The green arrow is pointing both to it, and in the direction its pointing in. The green line is where the flange should be that the bolt goes through.

Once all the bolts are in, all the nuts are on and lightly nipped up, I torqued all the bolts up (per flange. Start with the three bolts on one flange and then do the other three) to the required 115NM. This is a lot of torque when lying on a rolling creeper with limited room!

I torqued them all up, and then did a quick pass of all bolts again to make sure they were all locked in nice and tight.
Then it was a matter of refitting the center bearing (remembering to preload the center bearing 5mm to the front of the car), rear brace and heat shield.
I still need to refit the exhaust, but I'm waiting on new gaskets, which should hopefully show up early next week.
As an aside, I also replaced the fuel filter whilst under the car today. It was too hard to get good photos under there of it, so no good guide (and there are heaps out there already), but it's interesting to note the old one was either the original filter, or hadn't been replaced in a long time. There was no obvious date stamp on it, but the label on the filter is old enough that I can't even find a matching photo online. Even if it isn't really that old, no harm in knowing it has a new one in there now.


I'm getting closer to having the car back on the road. Unfortunately before I can take it for another hoon I need to remove the valve cover and replace the gasket as I found out the other day it's hemorrhaging oil down the back corner. This means I may as well rebuild the Vanos whilst I'm in there. Yay.
BMW remote keys have a reputation for the rubber buttons wearing out. Thankfully it's not that hard to give them a spruce up.
The rubber buttons on the remote go soft and wear out from repeated use and age. This makes them hard to press, ugly and sometimes if they go sticky, unpleasant to touch.

Both of the keys that came with the car look the same. The Lock button is just sticky mush that doesn't actually respond unless you mash your finger inside the rubber, and all the diagrams have worn off.
Start by accessing the screws on the back of the housing. If it's still there, there will be a small panel covering them that just pops off

Remove the screws and the back will come off. This is also a good time to change the batteries if they are low. CR1220 x2.

The guts of the remote are a press fit into the housing. Gently dig it out of the housing and put to one side.

Now you can see the horror. The mashed up rubber. Also note in the above photo, the black thing at the top of the key with writing on it, that is the EWS transponder chip. These don't tend to be held in with anything, and will take any opportunity to fall out and ps off somewhere hard to find it again. Take it out and put it somewhere safe. Don't lose it or its a new key plus coding.
I purchased a couple of these "Replacement Remote Key Fob Case Shell 3 Buttons Fit For Bmw E38 E39 E36 Black" from Ebay. There are some different variations depending on what sort of key you have.

The ones I bought have the provision for a red light to flash through the housing. Unfortunately my older style keys don't have the light, it's where the transponder lives, so I had to cut that off the new button pads. This did need further trimming to fit the EWS chip in snuggly.

The old button pad is held in by being moulded through small notches in the key housing. You can push the old rubber pads out from the front, but if they are still stuck in there you may need to cut around the edges to help it along.

The replacement button pad pushes in from the back of the housing.

This took a lot of trimming to fit the transponder chip in, and also to fit a capacitor that sticks out on the circuit board. I had to trim along the orange line to give it space, or it would push the Lock button outwards

I reassembled the key, and tested. The buttons are much easier to press now and work reliably. The key looks and feels nicer.

The fit isn't perfect, and the buttons don't quite sit flush, but I'm hoping as they wear in a bit it will level out.

Over all though, for the $1.09 per button pad, it's a steal and such an easy way to give it new life. Sometimes it's the small things that are the best.
The rubber buttons on the remote go soft and wear out from repeated use and age. This makes them hard to press, ugly and sometimes if they go sticky, unpleasant to touch.

Both of the keys that came with the car look the same. The Lock button is just sticky mush that doesn't actually respond unless you mash your finger inside the rubber, and all the diagrams have worn off.
Start by accessing the screws on the back of the housing. If it's still there, there will be a small panel covering them that just pops off

Remove the screws and the back will come off. This is also a good time to change the batteries if they are low. CR1220 x2.

The guts of the remote are a press fit into the housing. Gently dig it out of the housing and put to one side.

Now you can see the horror. The mashed up rubber. Also note in the above photo, the black thing at the top of the key with writing on it, that is the EWS transponder chip. These don't tend to be held in with anything, and will take any opportunity to fall out and p
s off somewhere hard to find it again. Take it out and put it somewhere safe. Don't lose it or its a new key plus coding.I purchased a couple of these "Replacement Remote Key Fob Case Shell 3 Buttons Fit For Bmw E38 E39 E36 Black" from Ebay. There are some different variations depending on what sort of key you have.

The ones I bought have the provision for a red light to flash through the housing. Unfortunately my older style keys don't have the light, it's where the transponder lives, so I had to cut that off the new button pads. This did need further trimming to fit the EWS chip in snuggly.

The old button pad is held in by being moulded through small notches in the key housing. You can push the old rubber pads out from the front, but if they are still stuck in there you may need to cut around the edges to help it along.

The replacement button pad pushes in from the back of the housing.

This took a lot of trimming to fit the transponder chip in, and also to fit a capacitor that sticks out on the circuit board. I had to trim along the orange line to give it space, or it would push the Lock button outwards

I reassembled the key, and tested. The buttons are much easier to press now and work reliably. The key looks and feels nicer.

The fit isn't perfect, and the buttons don't quite sit flush, but I'm hoping as they wear in a bit it will level out.

Over all though, for the $1.09 per button pad, it's a steal and such an easy way to give it new life. Sometimes it's the small things that are the best.
Gassing Station | Readers' Cars | Top of Page | What's New | My Stuff