front plate carrier mod
Discussion


The front plate carrier has bugged me since I got the car. Maybe fine for those huge UK/EU number plates (but stubby personalised ones are legal in UK).
Removing it is just four Torx then you drill out the heads of two rivets using a metal bit.
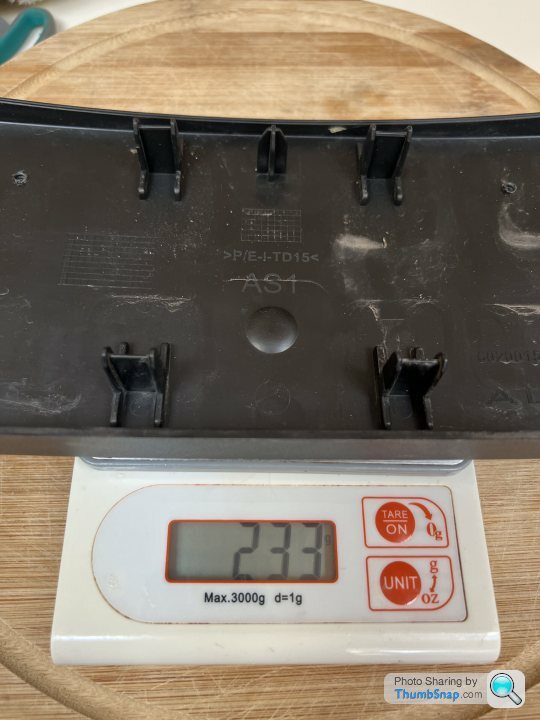
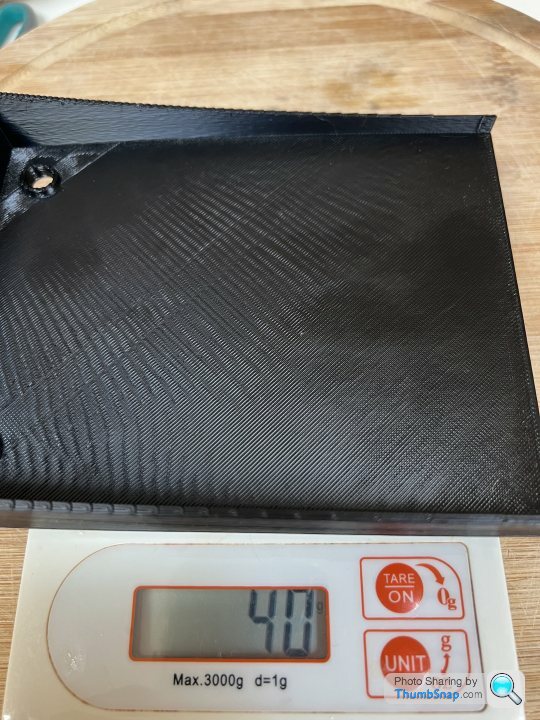
The original plate carrier is 233 grams. I designed a 3d printed ABS carrier and it is 40 grams x 2 (had to print a left and a right side). So as a bonus you get more weight saving than the flax speaker cones. I guess.
Used a couple of plugs for the holes that the factory puts in the nose that the rivets went into. (see one in the picture).
Another choice would be small blue vinyl stickers.
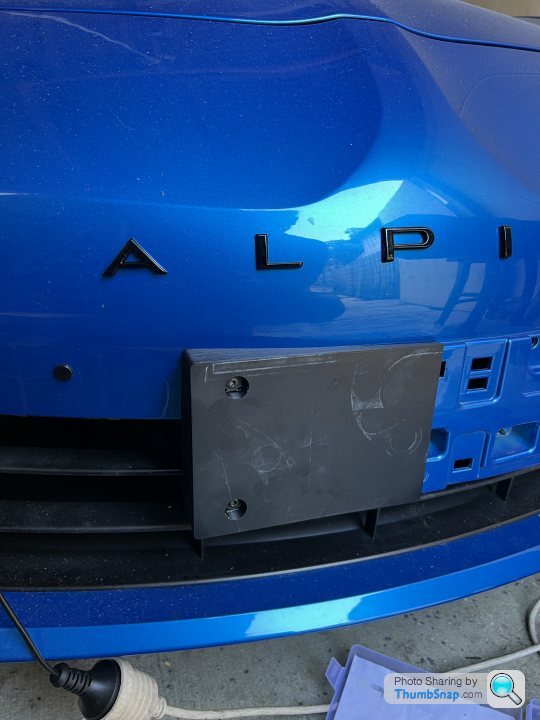
This is a draft print of the left half to check the spline on the nose which took a few goes to get right. I'll fasten the plate to the carrier with the same self tapping screws and post a pic of the final result.
Unfortunately our Australian "Slim line" plates are wider than the blue platform this cover fits over, but not as deep, so we will still see some of the plate carrier top and bottom. There are other front plate styles with different dimensions but I will be sticking with the smallest..
Removing it is just four Torx then you drill out the heads of two rivets using a metal bit.
The original plate carrier is 233 grams. I designed a 3d printed ABS carrier and it is 40 grams x 2 (had to print a left and a right side). So as a bonus you get more weight saving than the flax speaker cones. I guess.
Used a couple of plugs for the holes that the factory puts in the nose that the rivets went into. (see one in the picture).
Another choice would be small blue vinyl stickers.
This is a draft print of the left half to check the spline on the nose which took a few goes to get right. I'll fasten the plate to the carrier with the same self tapping screws and post a pic of the final result.
Unfortunately our Australian "Slim line" plates are wider than the blue platform this cover fits over, but not as deep, so we will still see some of the plate carrier top and bottom. There are other front plate styles with different dimensions but I will be sticking with the smallest..
Edited by a110au on Wednesday 14th December 06:25
A great effort using technology and a skill set unknown to myself. I used my model building skills to cut the ends off and then re-attach😢. If only the front bumper had been made without that pre mounting plate, I could have used my preferred method of stick-on plates.
https://flic.kr/p/2nNmTMh
https://flic.kr/p/2nNmTMh
yours looks great like that, what did you do for the left and right black plastic shell ends, just leave it open and sand the cut? hard to see from the picture.
Yeah that whole poorly painted complex block on the nose is a huge shame and so pointless. It looks like a chunk of the Borg spaceship. For what?
And then they puncture the pristine front anyway, twice, for the mounting plastic that is the same shape in every market no matter the plate standards..
While finishing off the design today I also realised just how much debris that open shovel front collects on the radiator. I was thinking oh I don't have to worry so much about this not being in the UK with leaves and twigs everywhere on the roads but it has collected quite a bit and they tend to gather up in the two far corners. And also anything with any weight entering, bends a fin.
Definitely getting that wire mesh front. A must!
Edited by a110au on Thursday 15th December 22:15
Edited by a110au on Thursday 15th December 22:17
After much measuring and faffing with straight edges and right angles, I used my dremel with a fiber glass cutting disc to cut off the ends. The plynth was then cut to length and the end re attached using black epoxy on the inside, once dry they were sanded, filled with polyfiller😂, sanded again then sprayed with Plasticote. Only a small bit of fettling required to fit flush with the contour of the bumper.
I agree about the use of rivets to fix to the bumper, why? What is wrong with double sided tape! Like yourself I used plastic plugs to fill the holes(thanks eBay). The paint touch-up for the plugs was the most expensive item!
I only wish I had thought to find someone with the skills to use a 3D printer🫣.
neil-g8km6 said:
After much measuring and faffing with straight edges and right angles, I used my dremel with a fiber glass cutting disc to cut off the ends. The plynth was then cut to length and the end re attached using black epoxy on the inside, once dry they were sanded, filled with polyfiller??, sanded again then sprayed with Plasticote. Only a small bit of fettling required to fit flush with the contour of the bumper..
Ah that's very professional.A 3d printer is, on the whole, a solution looking for a problem if I'm honest with myself but when it isn't frustrating it can be fun.
Definitely getting that wire mesh front. A must!
Grill on the front is my next project when it's nice and warm🥶
Personally I don't like the Zunsport grill across the front, I'll take off the front bumper and put discreet mesh behind, did the same on the Boxster and looked far better and more OP.
I have already looked into the process and it's not difficult, series of plastic clips and screws.
Gassing Station | Alpine | Top of Page | What's New | My Stuff