Guide - how to install exhaust and new studs on 718 GT4
Discussion


Dropped this in here in case anyone with a 718 GT4 wants a mini guide. Taken from my readers car thread.
https://www.pistonheads.com/gassing/topic.asp?h=0&...
Exhaust Installation
Grab a brew....
I couldn't bare that lovely looking Brooke Racing Exhausts Inconel 625 pipe sitting there, not doing anything. I had a spare hour, so decided to get to work on fitting it to the GT4. The garage is still out of order, so I decided to work 'old school', in the open air, within courtyard.
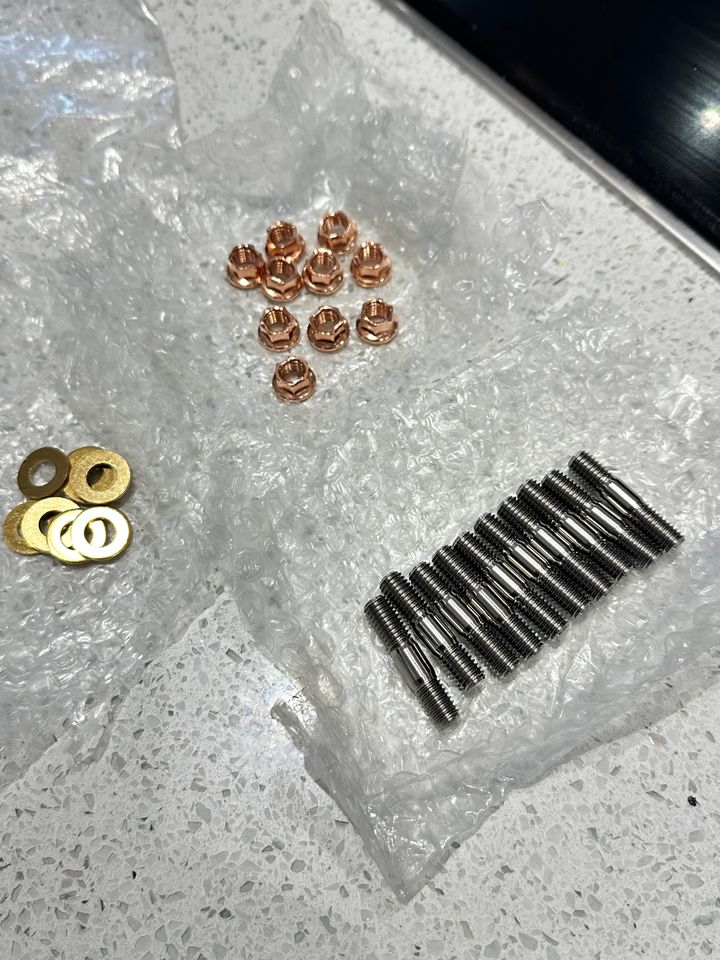
I ordered some Titanium studs, Copper bolts and brass washers from String Theory to replace the OEM hardware. If you have owned a Porsche then you know why I am doing that. They rust worse than a Landrover, and the plan is to ensure that the exhaust can be hot swapped in less that 30 mins if I want to in the future.
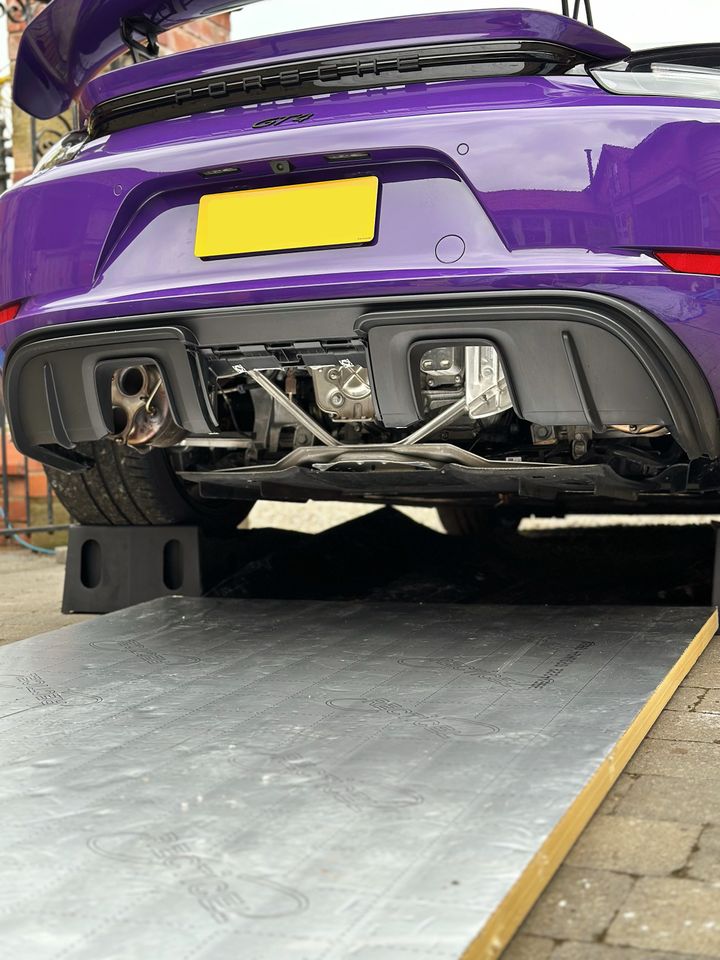
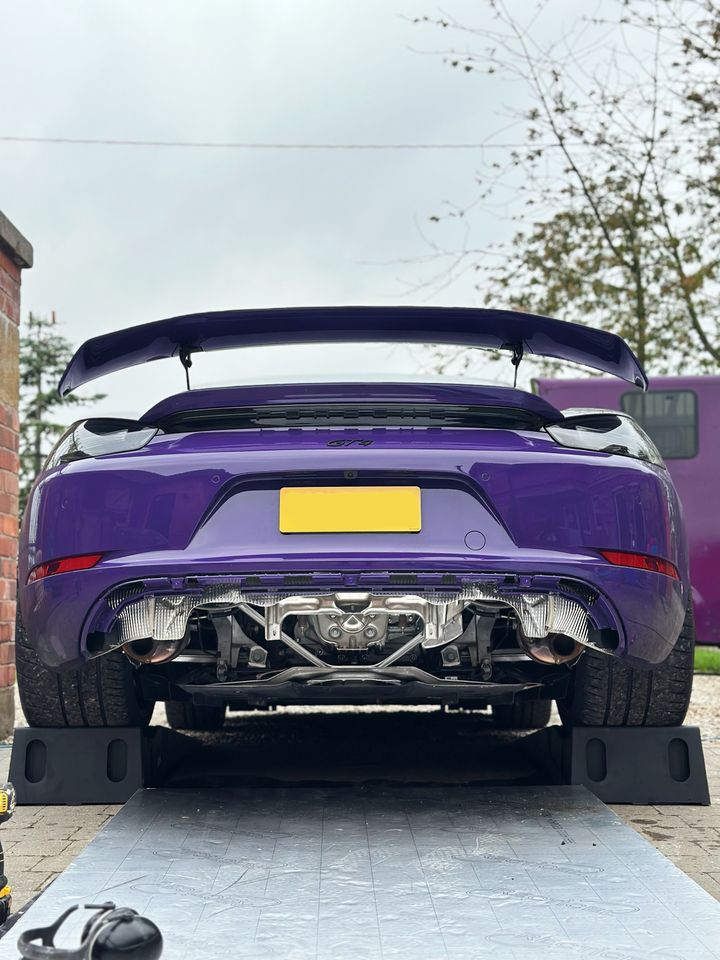
I get set to work by reversing the GT4 on some extra wide and long ramps, no clearance issues and huge amount of space for me to work underneath the GT4 without having to get jacks, stands, etc out.

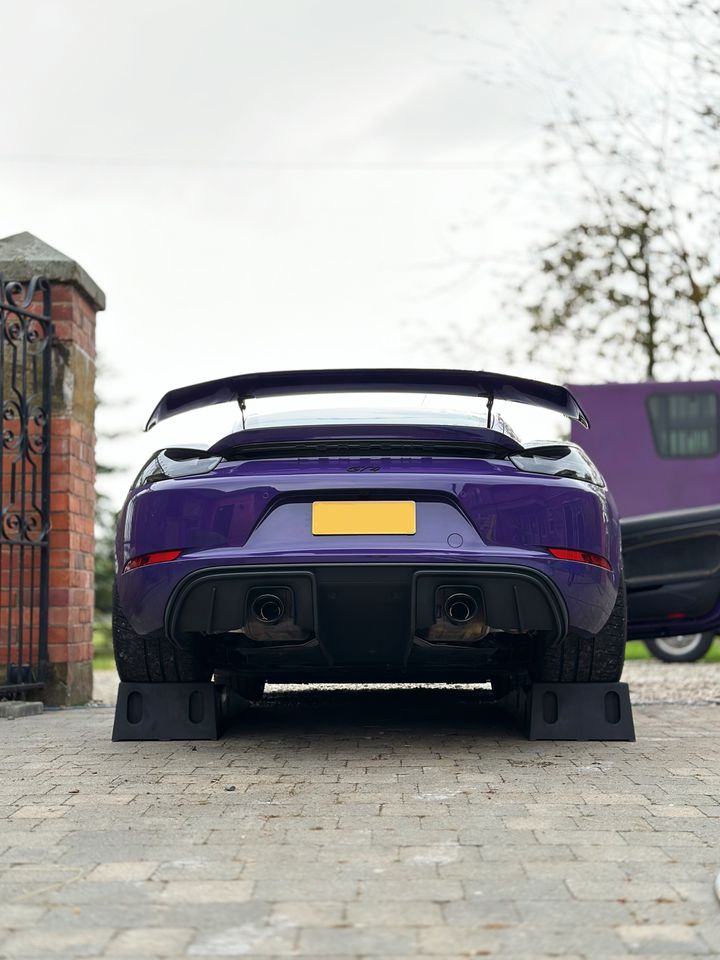
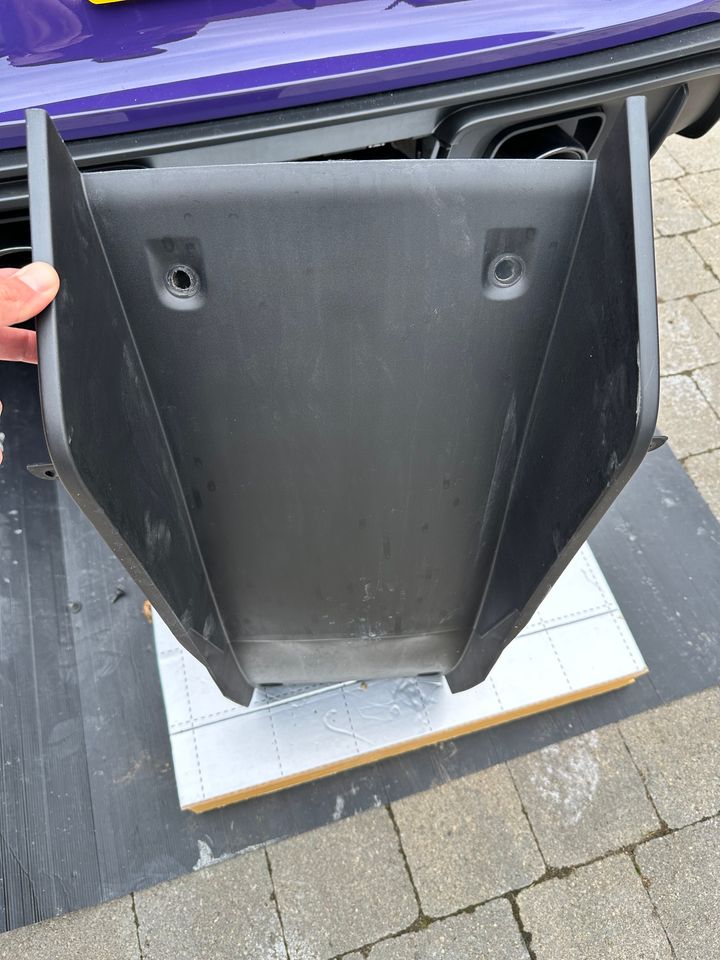
First job is to remove the central part of the diffuser, that took 2 mins as its really easy to remove with a T25 bit in my driver.
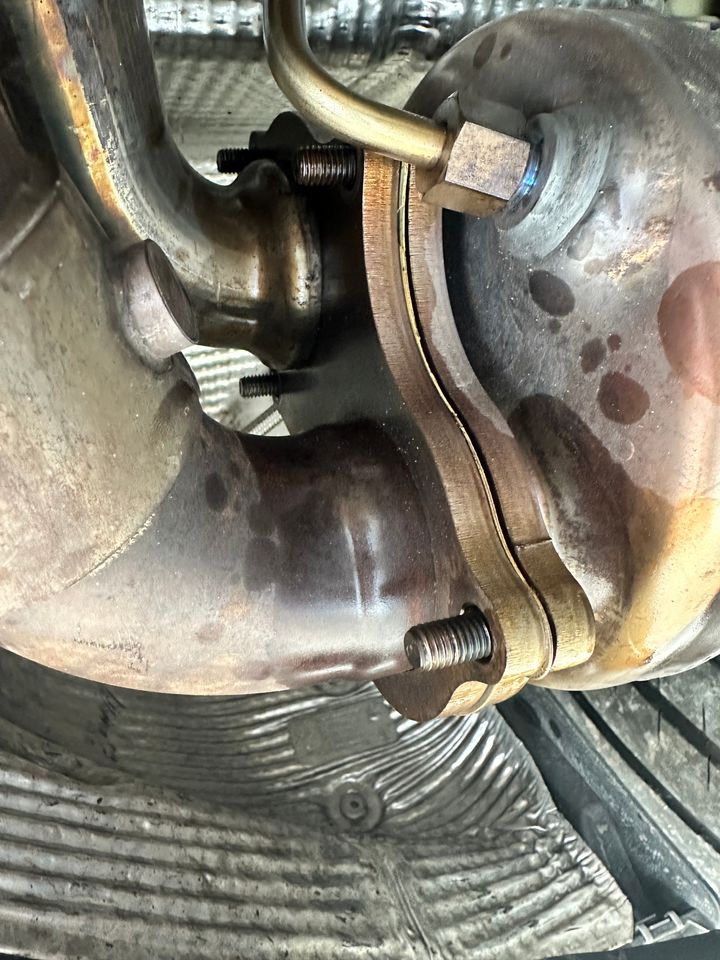
Next was the removal of 10 x 12mm nuts (5 each side) connecting the OPF pipes to the backbox. I was lucky as the GT4 had around 1k miles when I had bought it, never driven in the rain, and dry stored. So the hardware was like new. Thank the lord!
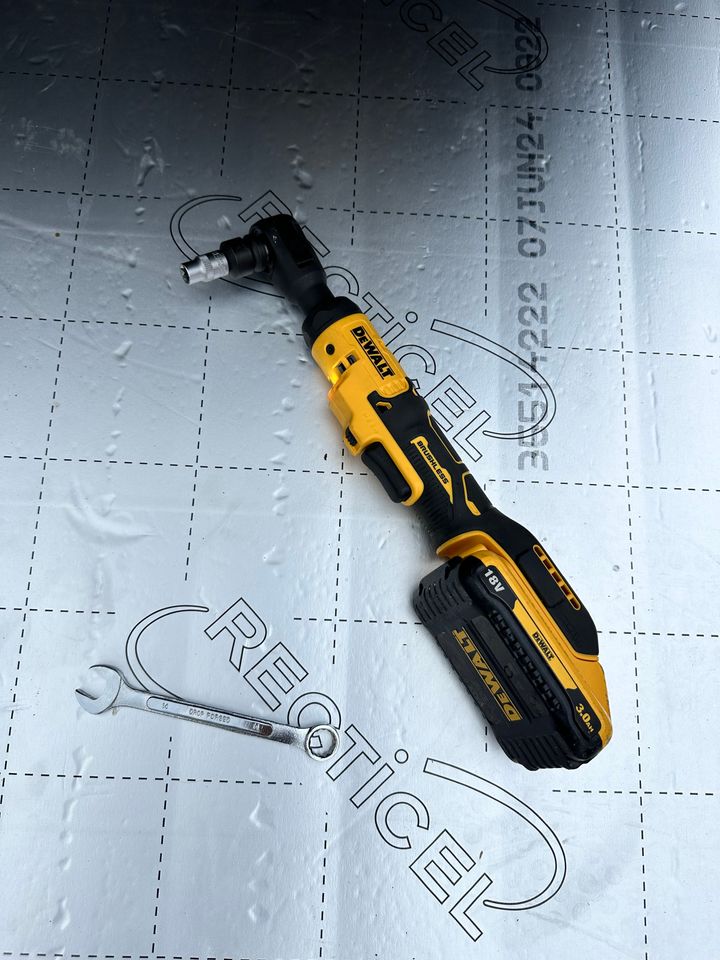
Made even easier using this beast:
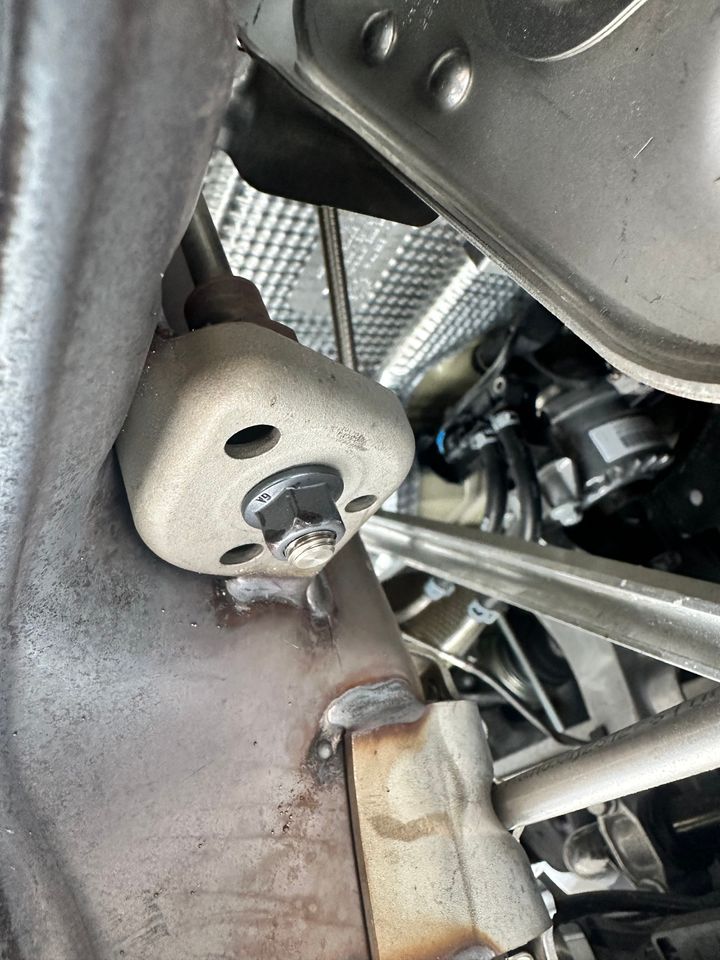
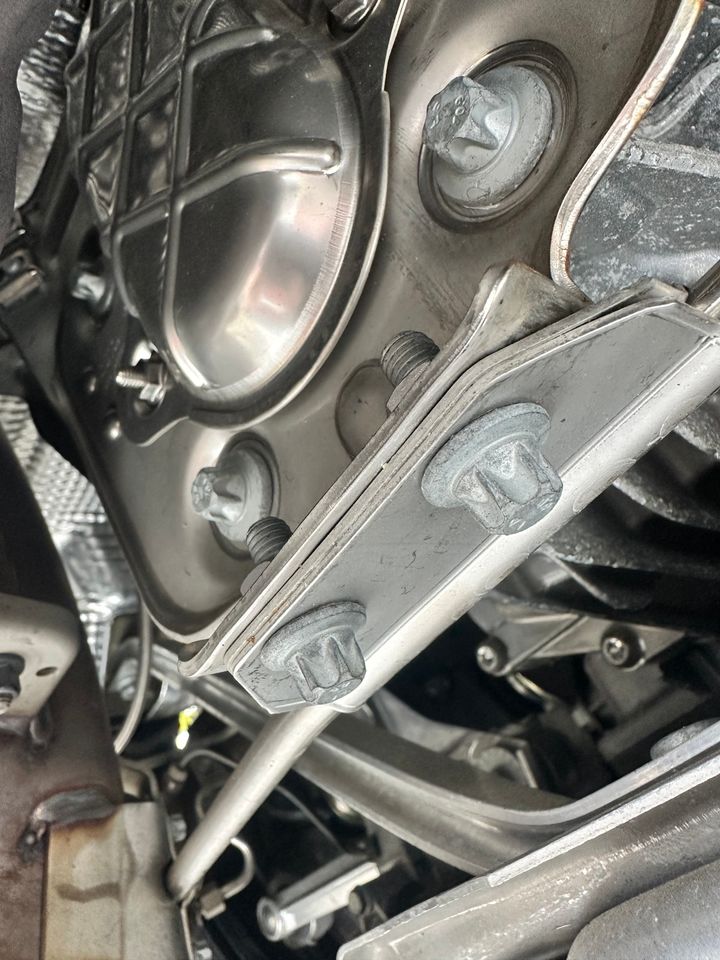
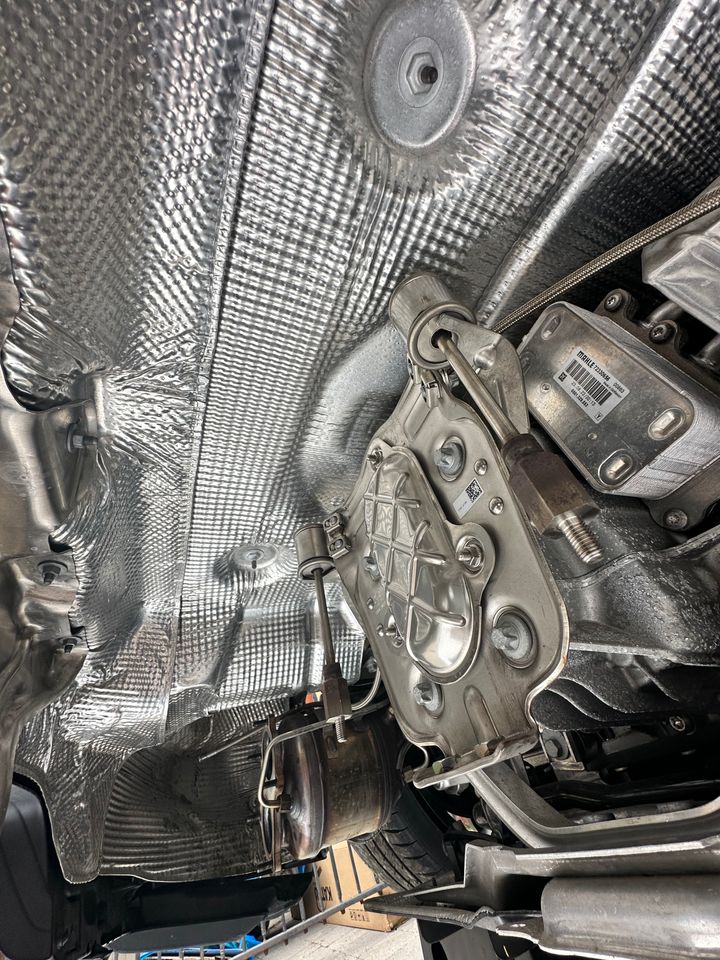
There are 2 x 12mm nuts to remove from the central hangers and 2 x E14 bolts that mount the bracket to the rear of the transmission. Easily done.
So that was all the fixings removed. Remember, I don't have the vacuum pipes installed, this would be the next step.
I then had to 'pull' the backbox towards the rear of the car so that I could clear the studs (which are fairly long), soon after the GT4 gave birth to a very large baby!
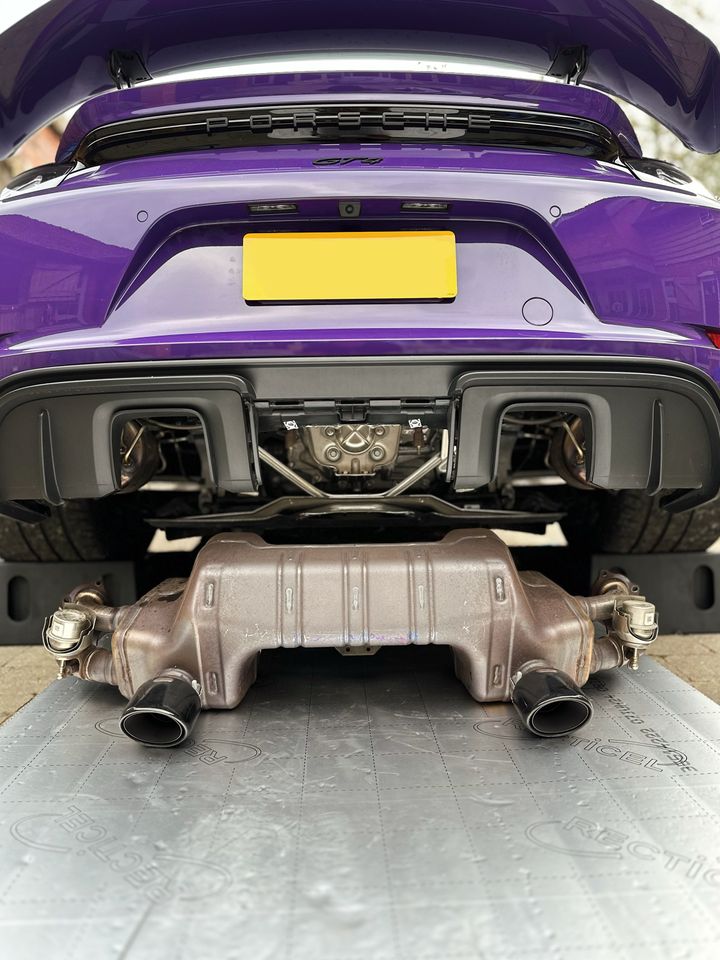
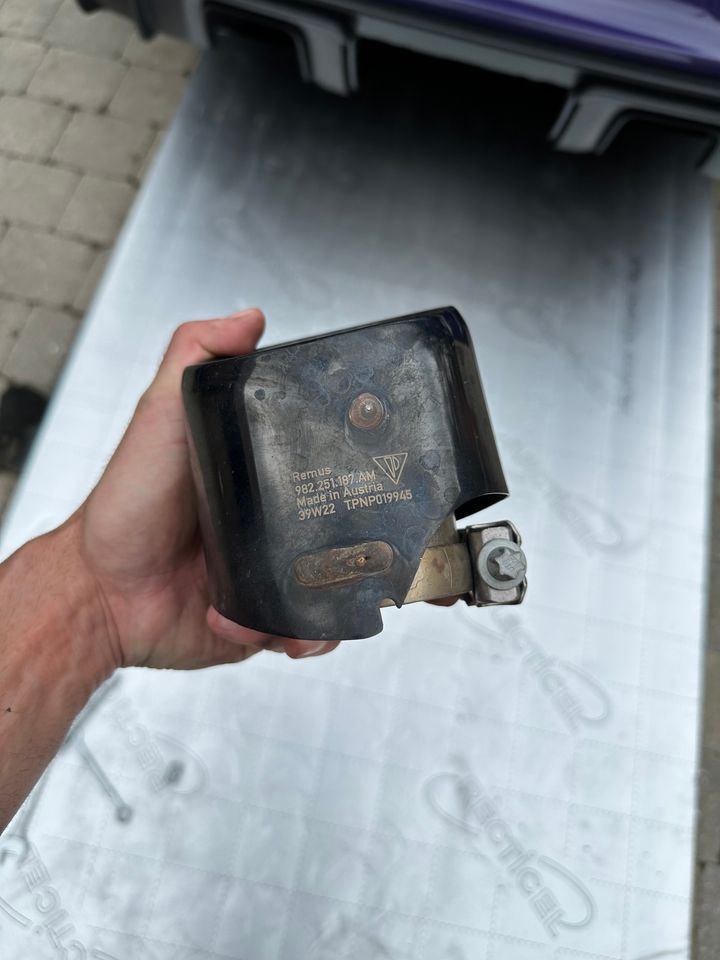
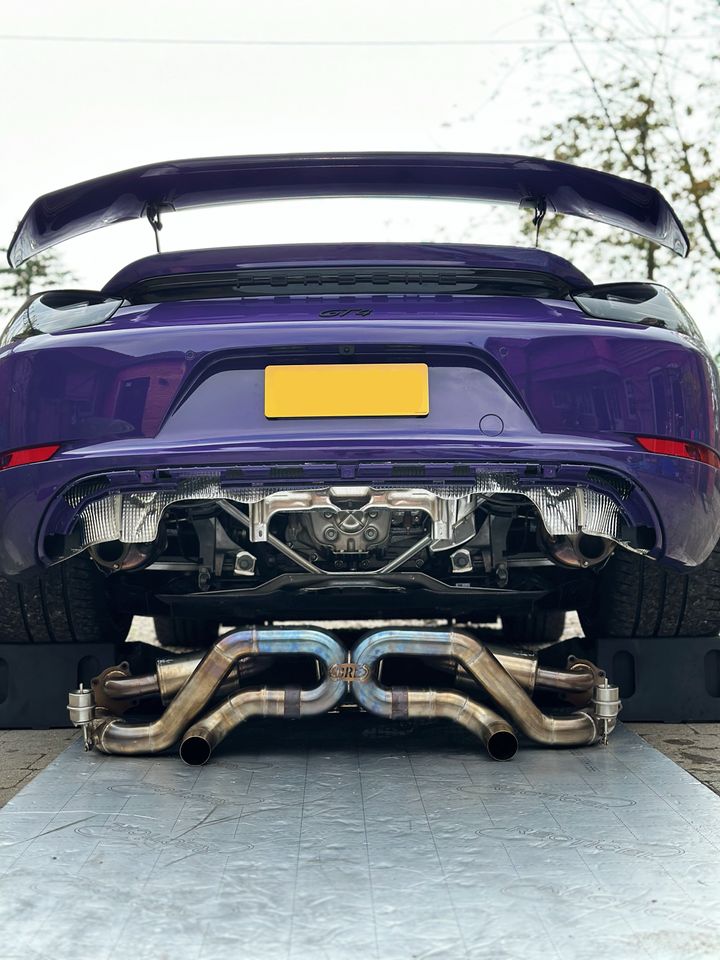
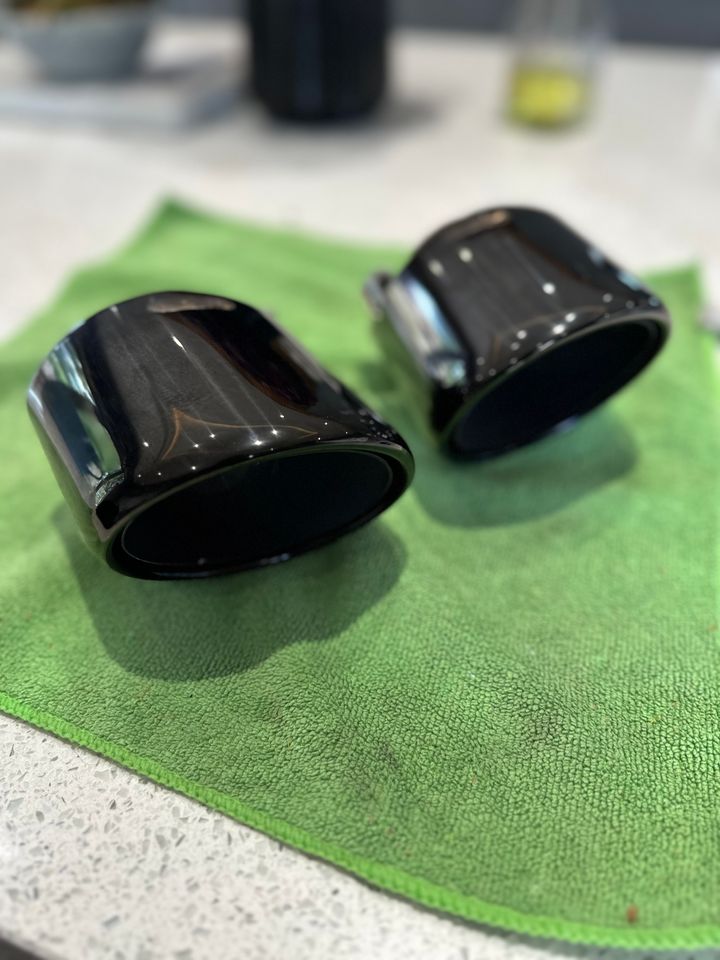
So that was the huge, heavy OEM system removed. I then got around to removing the tips as I want to retain these for the 'OEM' look by swapping them over to the inconel pipe. I found it interesting that these are made by Remus.
It looked pretty good under there, very impressed by my purchase, this GT4 is a minter!
Even though you don't need to remove the rear diffuser (piece that attaches to the rear bumper), I decided to do so for a bit more room. it was only 8 bolts and 4 mins of my time.
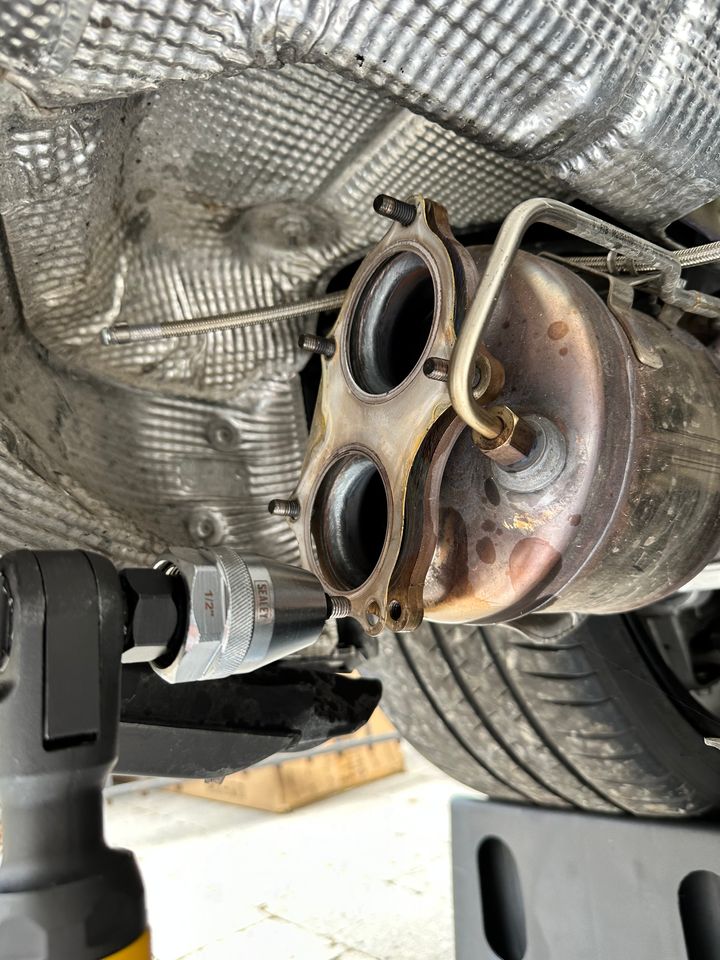
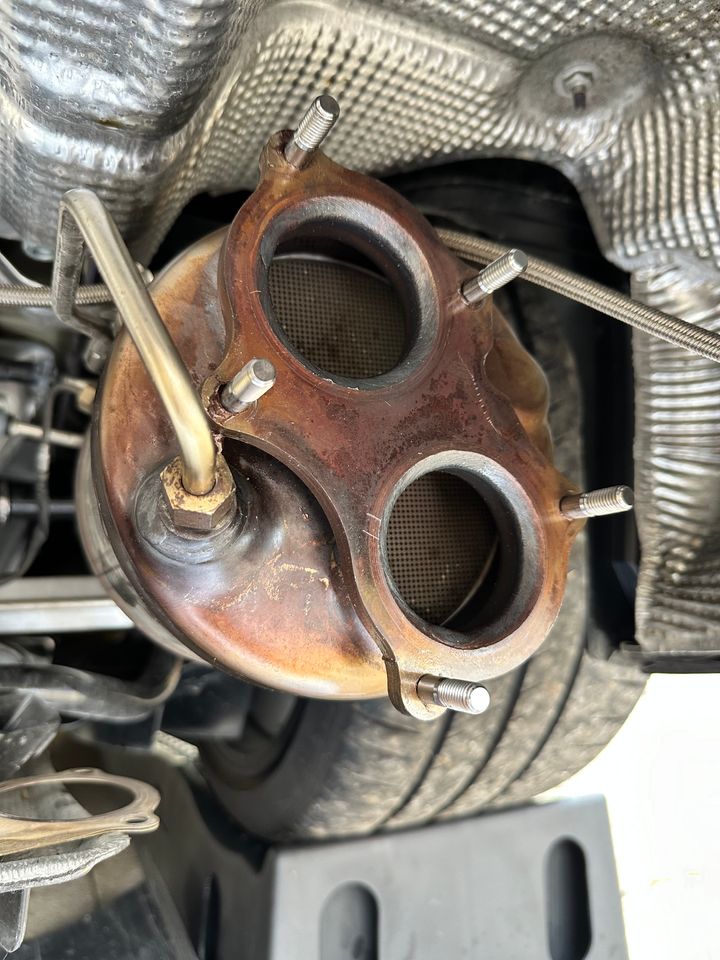
Stud removal was super easy on most of them using this tool. It grips hard when 'loosened', thus pulls the stud out of the OPF. Easier than using the 2 bolt method.
Here is the GT4's new jewellery.
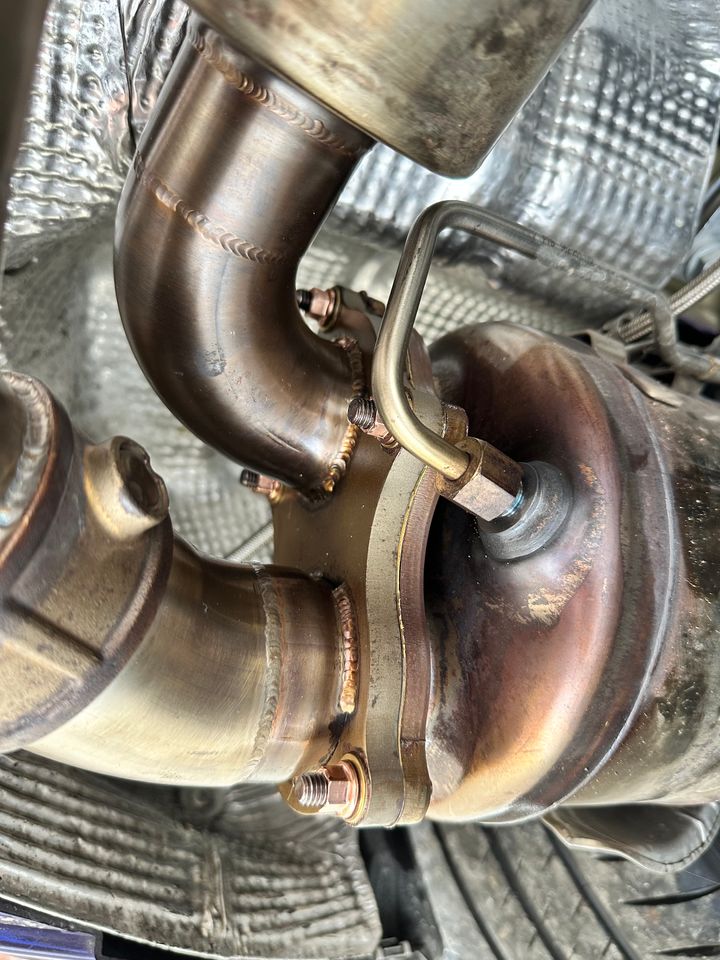
After a bit of cleaning of the threads by re-tapping a m8 1.25 tap, I then added some copper slip anti- seize prior to installing the titanium studs.
I then mated the new system to the OPFs and reversed the procedure mentioned above to fasten it. Only difference is that it didn't need to use the bracket/bolts to mount it to the transmission. I guess it's so light it doesn't need the support.
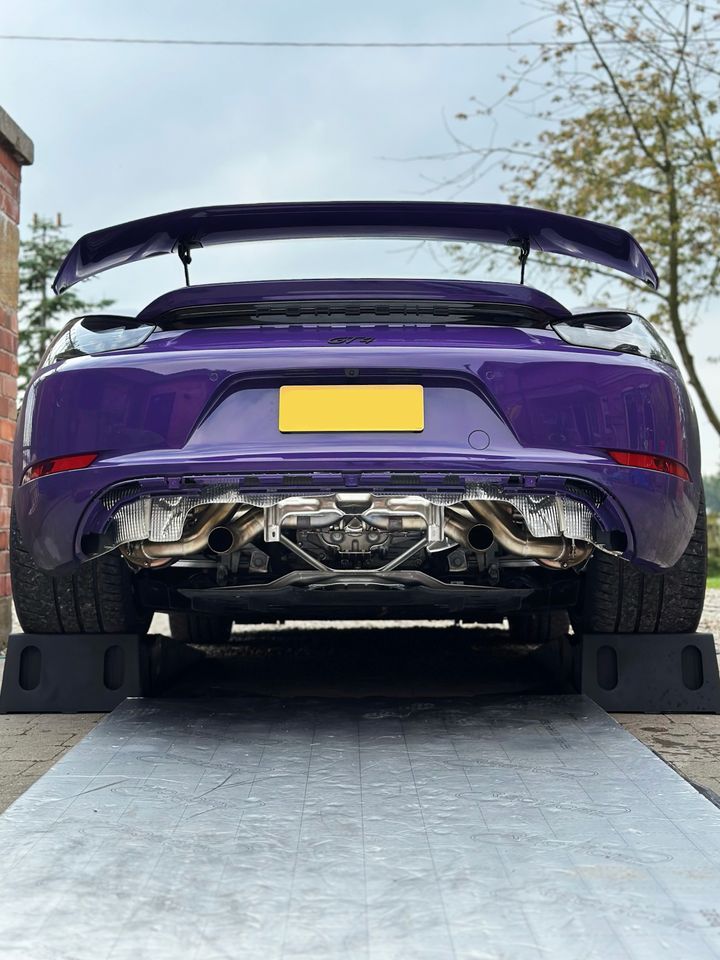
I kind of liked the look of the pipe with no tips and no diffuser, just like owning an RSR (in my dreams!)
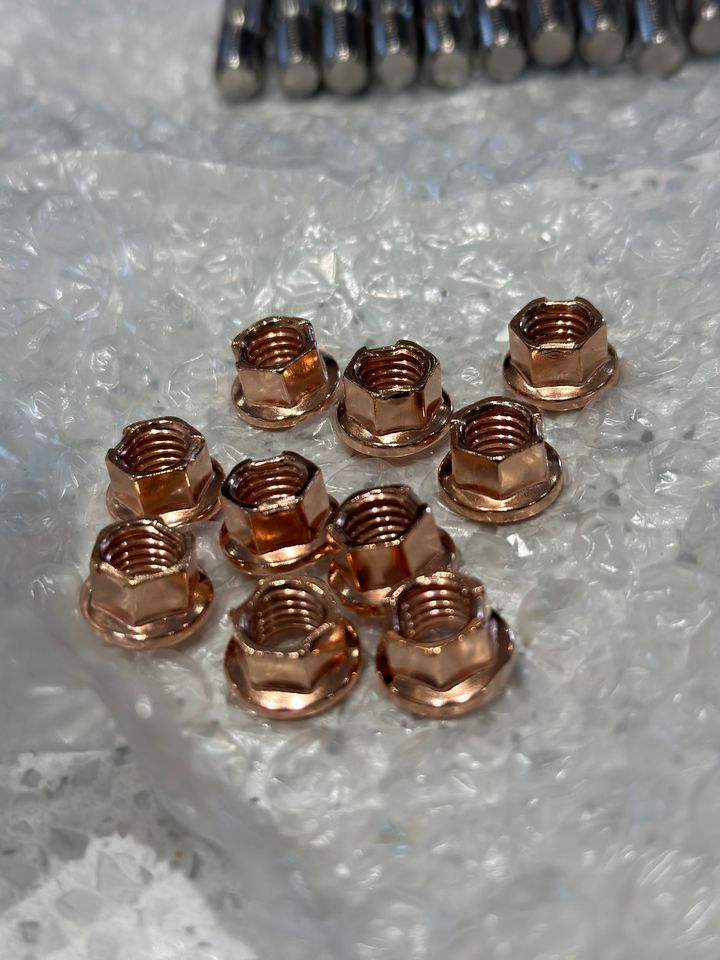
Here are the copper nuts installed.
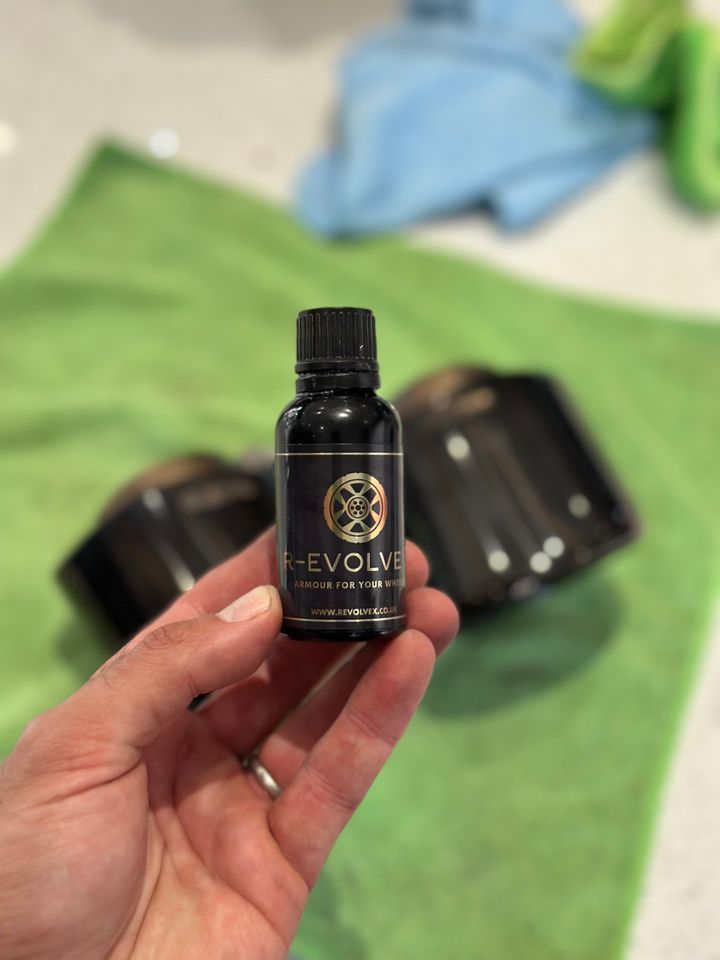
So talking about tips, I cleaned them up and coated them in my favourite ceramic coating that could deal with the high temperature
No pics of them fitted (or the diffuser back on), as quite frankly, I couldn't wait to hit the horseshoe pass and try this damn thing out!
I can report that it sounds amazing, especially higher up in the rev range. The 0.9mm thin inconel and X-pipe design really allows this engine to scream to the redline. Not unlike a GT(3).
As an example, before there was no point in driving with the windows down as there was just no sound. All the sound came from induction (inside) as it is piped in through the firewall. Now, I can wind the windows down and hear the bark of the downshifts and scream of the redline at all speeds. Just how I remembered my GT3 and old 981 GT4.
What a transformation.
I bet it will sound even better with the BMC intake filters I have bought. They worked well on the 981 and added that extra 'suck / roar' on full throttle.
I have loads more planned with the GT4..... but time to get back to finishing the garage. I finished skimming the walls this week, so onto underfloor heating next!
Until next time.
CT
https://www.pistonheads.com/gassing/topic.asp?h=0&...
Exhaust Installation
Grab a brew....
I couldn't bare that lovely looking Brooke Racing Exhausts Inconel 625 pipe sitting there, not doing anything. I had a spare hour, so decided to get to work on fitting it to the GT4. The garage is still out of order, so I decided to work 'old school', in the open air, within courtyard.
I ordered some Titanium studs, Copper bolts and brass washers from String Theory to replace the OEM hardware. If you have owned a Porsche then you know why I am doing that. They rust worse than a Landrover, and the plan is to ensure that the exhaust can be hot swapped in less that 30 mins if I want to in the future.
I get set to work by reversing the GT4 on some extra wide and long ramps, no clearance issues and huge amount of space for me to work underneath the GT4 without having to get jacks, stands, etc out.
First job is to remove the central part of the diffuser, that took 2 mins as its really easy to remove with a T25 bit in my driver.
Next was the removal of 10 x 12mm nuts (5 each side) connecting the OPF pipes to the backbox. I was lucky as the GT4 had around 1k miles when I had bought it, never driven in the rain, and dry stored. So the hardware was like new. Thank the lord!
Made even easier using this beast:
There are 2 x 12mm nuts to remove from the central hangers and 2 x E14 bolts that mount the bracket to the rear of the transmission. Easily done.
So that was all the fixings removed. Remember, I don't have the vacuum pipes installed, this would be the next step.
I then had to 'pull' the backbox towards the rear of the car so that I could clear the studs (which are fairly long), soon after the GT4 gave birth to a very large baby!
So that was the huge, heavy OEM system removed. I then got around to removing the tips as I want to retain these for the 'OEM' look by swapping them over to the inconel pipe. I found it interesting that these are made by Remus.
It looked pretty good under there, very impressed by my purchase, this GT4 is a minter!
Even though you don't need to remove the rear diffuser (piece that attaches to the rear bumper), I decided to do so for a bit more room. it was only 8 bolts and 4 mins of my time.
Stud removal was super easy on most of them using this tool. It grips hard when 'loosened', thus pulls the stud out of the OPF. Easier than using the 2 bolt method.
Here is the GT4's new jewellery.
After a bit of cleaning of the threads by re-tapping a m8 1.25 tap, I then added some copper slip anti- seize prior to installing the titanium studs.
I then mated the new system to the OPFs and reversed the procedure mentioned above to fasten it. Only difference is that it didn't need to use the bracket/bolts to mount it to the transmission. I guess it's so light it doesn't need the support.
I kind of liked the look of the pipe with no tips and no diffuser, just like owning an RSR (in my dreams!)
Here are the copper nuts installed.
So talking about tips, I cleaned them up and coated them in my favourite ceramic coating that could deal with the high temperature
No pics of them fitted (or the diffuser back on), as quite frankly, I couldn't wait to hit the horseshoe pass and try this damn thing out!
I can report that it sounds amazing, especially higher up in the rev range. The 0.9mm thin inconel and X-pipe design really allows this engine to scream to the redline. Not unlike a GT(3).
As an example, before there was no point in driving with the windows down as there was just no sound. All the sound came from induction (inside) as it is piped in through the firewall. Now, I can wind the windows down and hear the bark of the downshifts and scream of the redline at all speeds. Just how I remembered my GT3 and old 981 GT4.
What a transformation.
I bet it will sound even better with the BMC intake filters I have bought. They worked well on the 981 and added that extra 'suck / roar' on full throttle.
I have loads more planned with the GT4..... but time to get back to finishing the garage. I finished skimming the walls this week, so onto underfloor heating next!
Until next time.
CT
Edited by christurbo on Saturday 21st September 19:11
VvrooomM said:
What is the tool used to remove the studs?
Here you go, it’s a Sealey stud extractor. It tightens as you ‘undo’ it with an impact driver. https://amzn.eu/d/4THPJoa
christurbo said:
First Sea Lord said:
Nice!
I've been thinking about upgrading my 718 Spyder's system. The above has inspired me...
It's very easy and worth it. You don't need to swap the studs over, it would be a super quick job if you skipped that step.I've been thinking about upgrading my 718 Spyder's system. The above has inspired me...
The first time I did mine the car was 18 months old /10.000 miles and that hour job turned into 4 hours and 4 unpleasant hours at that and I known Specialists that have taken longer to do it when it all goes horribly wrong.
First nut I went to on my car snapped straight off leaving the stud flush, I tried the rest and they all felt the same as they were so badly corroded, access is poor so you need to give yourself every opportunity of getting them off first time, I tried using a penetrating fluid and leaving overnight, cleaned the threads where I could with a wire brush but still no success, In the end I had to heat the studs til they were glowing red and even then I ended up hammering a smaller socket over then nuts as they just rounded off, another two, once I got them cracked off thread locked themselves on the way out and had to be chewed on and off til they finally came off. I was lucky as some of the studs extracted themselves as the nuts thread locked, the others were a nightmare to get out, some had snapped so had to be drilled and tapped which with the lack of access is a right chew to get a drill in and worth mentioning I am fortunate enough to have ramps and burning gear and all the tools needed at hand.
In Short if you are considering doing this job yourself and your nuts/studs look rusty just be prepared.
JeffC said:
It is worth mentioning that this is a Very easy job on a car that is close to new but can be an absolute nightmare on older cars . How on earth Porsche can use fixings of such poor quality really amazes me. I can go to 30 year old 150,000 mile Honda and every one will just come off.
The first time I did mine the car was 18 months old /10.000 miles and that hour job turned into 4 hours and 4 unpleasant hours at that and I known Specialists that have taken longer to do it when it all goes horribly wrong.
First nut I went to on my car snapped straight off leaving the stud flush, I tried the rest and they all felt the same as they were so badly corroded, access is poor so you need to give yourself every opportunity of getting them off first time, I tried using a penetrating fluid and leaving overnight, cleaned the threads where I could with a wire brush but still no success, In the end I had to heat the studs til they were glowing red and even then I ended up hammering a smaller socket over then nuts as they just rounded off, another two, once I got them cracked off thread locked themselves on the way out and had to be chewed on and off til they finally came off. I was lucky as some of the studs extracted themselves as the nuts thread locked, the others were a nightmare to get out, some had snapped so had to be drilled and tapped which with the lack of access is a right chew to get a drill in and worth mentioning I am fortunate enough to have ramps and burning gear and all the tools needed at hand.
In Short if you are considering doing this job yourself and your nuts/studs look rusty just be prepared.
I’ve been very much humbled by these issues before when cracking on having seen a couple of YouTube videos. Still all good learning and fun. The first time I did mine the car was 18 months old /10.000 miles and that hour job turned into 4 hours and 4 unpleasant hours at that and I known Specialists that have taken longer to do it when it all goes horribly wrong.
First nut I went to on my car snapped straight off leaving the stud flush, I tried the rest and they all felt the same as they were so badly corroded, access is poor so you need to give yourself every opportunity of getting them off first time, I tried using a penetrating fluid and leaving overnight, cleaned the threads where I could with a wire brush but still no success, In the end I had to heat the studs til they were glowing red and even then I ended up hammering a smaller socket over then nuts as they just rounded off, another two, once I got them cracked off thread locked themselves on the way out and had to be chewed on and off til they finally came off. I was lucky as some of the studs extracted themselves as the nuts thread locked, the others were a nightmare to get out, some had snapped so had to be drilled and tapped which with the lack of access is a right chew to get a drill in and worth mentioning I am fortunate enough to have ramps and burning gear and all the tools needed at hand.
In Short if you are considering doing this job yourself and your nuts/studs look rusty just be prepared.
Enjoy the new exhaust btw. I do love a few choice mods on cars. They can be transformative.
JeffC said:
It is worth mentioning that this is a Very easy job on a car that is close to new but can be an absolute nightmare on older cars . How on earth Porsche can use fixings of such poor quality really amazes me. I can go to 30 year old 150,000 mile Honda and every one will just come off.
The first time I did mine the car was 18 months old /10.000 miles and that hour job turned into 4 hours and 4 unpleasant hours at that and I known Specialists that have taken longer to do it when it all goes horribly wrong.
First nut I went to on my car snapped straight off leaving the stud flush, I tried the rest and they all felt the same as they were so badly corroded, access is poor so you need to give yourself every opportunity of getting them off first time, I tried using a penetrating fluid and leaving overnight, cleaned the threads where I could with a wire brush but still no success, In the end I had to heat the studs til they were glowing red and even then I ended up hammering a smaller socket over then nuts as they just rounded off, another two, once I got them cracked off thread locked themselves on the way out and had to be chewed on and off til they finally came off. I was lucky as some of the studs extracted themselves as the nuts thread locked, the others were a nightmare to get out, some had snapped so had to be drilled and tapped which with the lack of access is a right chew to get a drill in and worth mentioning I am fortunate enough to have ramps and burning gear and all the tools needed at hand.
In Short if you are considering doing this job yourself and your nuts/studs look rusty just be prepared.
That sounds hellish! Even more of a reason to swap out the hardware when you can. The first time I did mine the car was 18 months old /10.000 miles and that hour job turned into 4 hours and 4 unpleasant hours at that and I known Specialists that have taken longer to do it when it all goes horribly wrong.
First nut I went to on my car snapped straight off leaving the stud flush, I tried the rest and they all felt the same as they were so badly corroded, access is poor so you need to give yourself every opportunity of getting them off first time, I tried using a penetrating fluid and leaving overnight, cleaned the threads where I could with a wire brush but still no success, In the end I had to heat the studs til they were glowing red and even then I ended up hammering a smaller socket over then nuts as they just rounded off, another two, once I got them cracked off thread locked themselves on the way out and had to be chewed on and off til they finally came off. I was lucky as some of the studs extracted themselves as the nuts thread locked, the others were a nightmare to get out, some had snapped so had to be drilled and tapped which with the lack of access is a right chew to get a drill in and worth mentioning I am fortunate enough to have ramps and burning gear and all the tools needed at hand.
In Short if you are considering doing this job yourself and your nuts/studs look rusty just be prepared.
Not sure why Porsche use low quality fixings.
It makes me think I should change the header studs / bolts and header to OPF ones now.
christurbo said:
That sounds hellish! Even more of a reason to swap out the hardware when you can.
Not sure why Porsche use low quality fixings.
It makes me think I should change the header studs / bolts and header to OPF ones now.
Thanks for the write up - is this the string theory kit you used please? Not sure why Porsche use low quality fixings.
It makes me think I should change the header studs / bolts and header to OPF ones now.
https://stringtheorygarage.com/products/stg-titani...
Only query I have is it says the nuts are 10mm on the ST pack - you mention in the first post the nuts are 12mm?
Thanks!
dbjames said:
Thanks for the write up - is this the string theory kit you used please?
https://stringtheorygarage.com/products/stg-titani...
Only query I have is it says the nuts are 10mm on the ST pack - you mention in the first post the nuts are 12mm?
Thanks!
Correct. The OEM nuts at 12mm and the replacements from string theory are 10mm. Good luck. https://stringtheorygarage.com/products/stg-titani...
Only query I have is it says the nuts are 10mm on the ST pack - you mention in the first post the nuts are 12mm?
Thanks!
Gassing Station | Boxster/Cayman | Top of Page | What's New | My Stuff