Help installing aftermarket seats
Discussion
Hi,
I am looking to install a set of Cobra Misano seats into my 981 Cayman and wondered if anybody could help with information regarding connecting the Cobra seat heaters to the existing Porsche connector? Does anyone know if you can purchase an adaptor as such?
In addition does anybody know of a resistor which connects to the original porsche connector to defeat the airbag warning that will appear on the dash once the OE seat is disconnected.
Thank you for your assitance.
Dan.
I think/hope (I'm about to do the same) that the seat heaters are a simple 12v supply and the clever bit (the cycling) is actually controlled by the bit behind the dash (on some cars it's done by a relay in the seat).
If this is the case, you should be able to cut the switch and relay from the cobra heaters and simply attach the two wires to the relevant pins on the car side connector.
For the airbag, you can use a resistor to fool the car into thinking that it is still there. You will need to find a wiring diagram for the 981 to understand which pins you need to connect it between. Likewise you will need to find the resistance. On the 987 I have been told that it is between 2.5 and 3 ohms
Edited by LennyM1984 on Friday 15th October 17:52
Thanks LennyM1984, this is what my research across the Web was coming to, the Cobra seat connector literally is just two wires. I've also bought some Recaro plug in resistors and have been given a wiring diagram from someone on the Cayman FB page. I'm just waiting for the seat bases and runners to arrive from GSM to get started on the install.
Looking forward to getting them in as the comfort seats just don't offer enough support.
Looking forward to getting them in as the comfort seats just don't offer enough support.
Too late now but in the future don't bother with the recaro resistors. A resistor is a resistor (assuming that you have the correct resistance) and they cost pennies (usually less than 1p each).
I don't know what the connector looks like on a 981 but on a 987 it looks as though spade connectors (you can buy 100s for £5 or so) may work for the heated seat connections.
I'm installing Cobra Nogaros in mine (I wanted something suitable for the track but which I could actually get out of at a petrol station) so PM me if you get stuck and I'll try to help (my dad is a retired electronics engineer so he can usually work these things out)
Edited by LennyM1984 on Saturday 16th October 08:02
Thanks LennyM1984, I had seen some cheaper resistors on ebay and wasnt really sure what I was looking for but read on another forum of someone who used them successfully so I opted for what I hope is the easy route.
I'll be in touch if I get stuck. If you figure out the connectors under the seat let me know
I'll be in touch if I get stuck. If you figure out the connectors under the seat let me know
Hi LennyM1984,
I found this post (link to thread - https://www.pistonheads.com/gassing/topic.asp?h=0&... elsewhere on the forum which is quite useful for seat fitment and more info on the yellow connector under the seat although nothing about seat heater connections.
I'm still waiting for my bases to to turn up from GSM . . . . .
short-shift said:
In short - complete success.
After a little bit of work and adaptation, the LHD folding buckets are now safely installed in my RHD car. The seat belt warning lamp works perfectly (driver's side only) and the airbag warning light operates exactly as it should.
Phew!
Findings:
I think it's worth recapping the main findings which seem to be that:
1. Bucket seat sets are handed and separately part-numbered for LHD and RHD cars in UK/EUR/RoW markets only by virtue of the driver's-side seat belt buckle carrying an electrical connection (for the seat belt warning lamp).
2. Transposing the seat belt stalks and related electical connections over between seats is an easy DIY task.
3. In 981/991 generation cars, there is no passenger occupancy sensor fitted to UK/EUR/RoW seats (meaning that passenger-side airbags cannot be disabled, except through fitment and operation of the optional airbag-off key kit). This is different to the situation with US and Canada spec cars, where passenger occupancy sensors are fitted.
"How-to" notes:
A couple of people have asked for a "how-to" and, knowing how useful these threads can be for future owners, I'm happy to post some of the details as follows, subject - of course - to the usual disclaimer that I can't be held responsible for the outcome or consequences of any attempt you may make to follow the steps that I took.
I should start by saying that I was replacing 18-way Adaptive Sports Seats (I323/324) with the so-called folding bucket seats (or 997 GT2 buckets) although these are more formally called the Sports Bucket Seat (I388/389). I suspect, though, that the same principles will apply to the replacement of any type of 991 or 981 seat (be they manual 4-ways, electrical 14-ways or electrical 18 ways) with the folding buckets. I also believe that the same approach should work when replacing either of the electrically adjustable options (14-way or 18-way) with the latest fixed-back buckets, often called LWBs or 918-style seats (I373/374).
So, summarising the method (and including some imagery where things are a bit unusual, or specific, or tricky)...
1. Remove the existing seats:
1.1 Starting with the driver's seat, remove the trim covers at the front of the seat rails (use a screwdiver to raise the tab and then pull the trims forward and out).
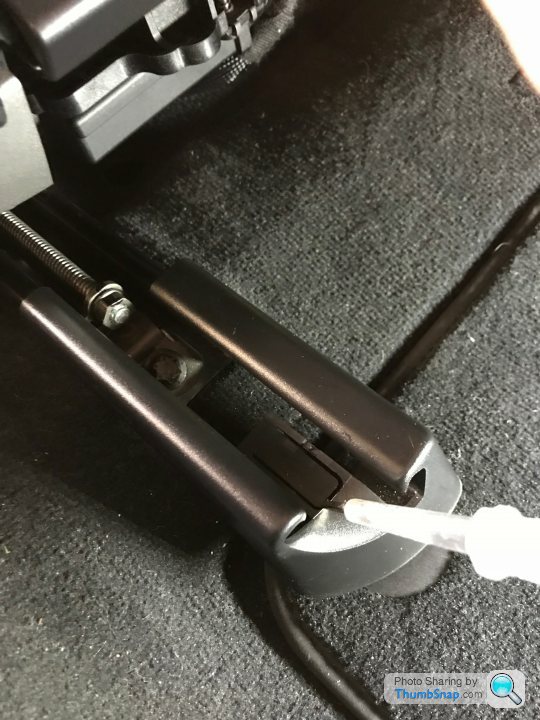
1.2 Power the seat forwards to gain access to the two rear seat rail fixings and remove; power the seat rearwards and remove the two front fixings.
1.3 Power the seat to a mid-position (fore/aft) then make sure the seat is placed in its lowest position and power the backrest as far forward as possible; this is to make the seat as compact as possible for removal through the door aperture.
1.4 Repeat steps 1.1 to 1.3 for the passenger's side seat.
1.5 Remove the key from the ignition slot and disconnect the battery - remembering to remove the earth (-ve) connection first (to minimise the risk of a 'short' to exposed metalwork whilst removing the supply (+ve) connection).
1.6 Look underneath the front edge of the driver's side seat and locate the large yellow connector. Pulling the black 'wrap around' tab away from the body of the connector will cause the two parts (car and seat) of the connector to separate. The seat is now mechanically and electrically disconnected from the car.
1.6 Place protective padding in and over the door sill areas to provide protection whilst removing the seats. Prepare to be shocked by the weight of the seats, but from outside the car reach in and lift each seat out in turn. You may find it best to tilt the entire seat rearwards to help position it for removal through the aperture. Be careful not to damage the car (the seat rails have sharp-edged locating pins that protrude out from under the rail), or yourself as you wrestle with the size and weight of the seat!
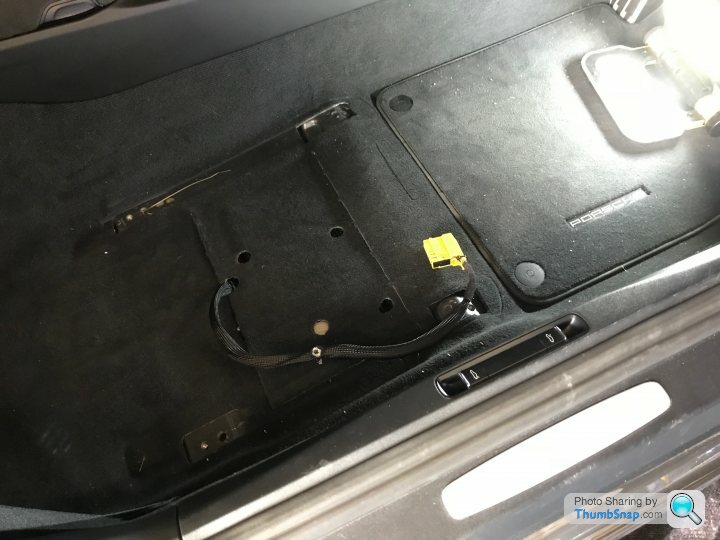
1.7 Repeat for the pasenger side seat - the heavy work is now done and the floor area on each side of the car should like this:
2. Prepare the replacement LHD seats for RHD fitment
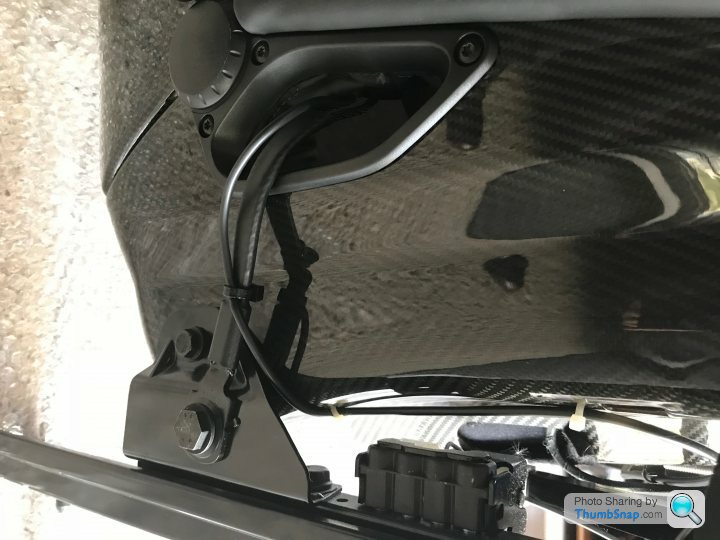
2.1 The seat belt stalk on the LH seat (the driver's seat of the LHD seat-set) also carries the electrical cable for the driver's side seat belt warning device and looks like this:
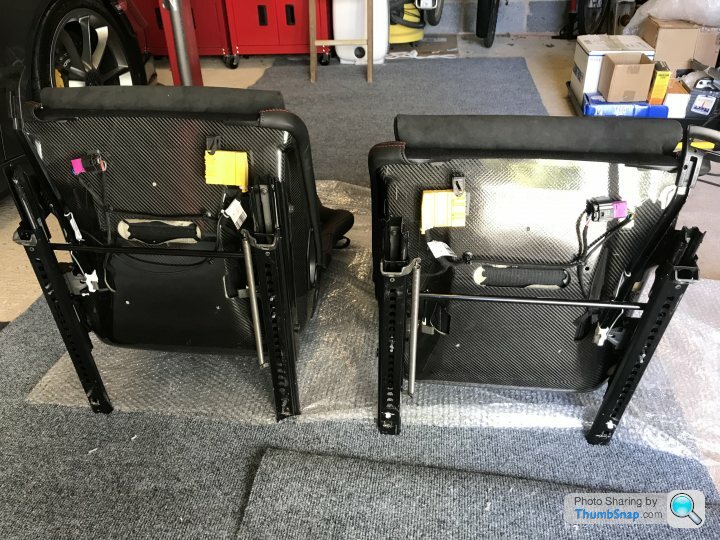
The following image shows the underside of the complete LHD seat set but, rather confusingly, I have positioned them incorrectly (the wrong way round, relative to each other). Dohh! Anyway...
 .
.
In the photos you should be able to see the single electrical cable that runs underneath the LH (driver's) seat from the seat belt buckle and into the yellow connector. As you look at the photo, it's the seat to the left of the picture. The buckle, cable and the related part of the connector need to be swapped over to what is the passenger seat in the LHD case, so that this becomes the driver's seat in the RHD installation.
2.2 Note the run of the cable under the LH seat (so that you can reproduce it on the RH seat) then remove the clips that fasten it to the underside of the seat pan moulding so that the cable is fixed only at each end - at the seat belt buckle and where it enters the yellow connector.
2.3 The yellow connector actually houses three different sub-connector blocks; the seat-belt buckle cable feeds into the small grey coloured two-pin rectangular block at the 'near' end of the yellow housing. (You can see the main power terminals in the black part, and what I believe to be the seat-mounted thorax-airbag electrical connections in the L-shaped grey connector, in the middle of the assembly).
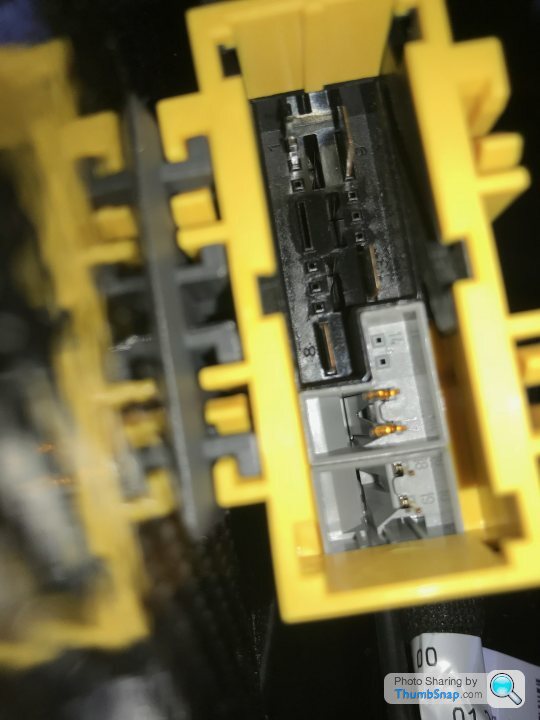
2.4 Squeeze the small tabs on the short edge of the yellow connector housing so that the seat belt warning sub-connector block can be removed from the yellow moulding. You can see the relevant grey block sliding out in the following two images:
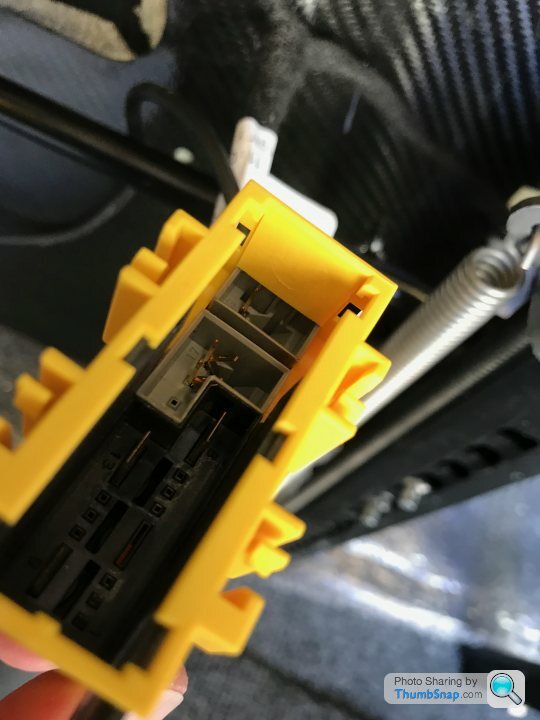
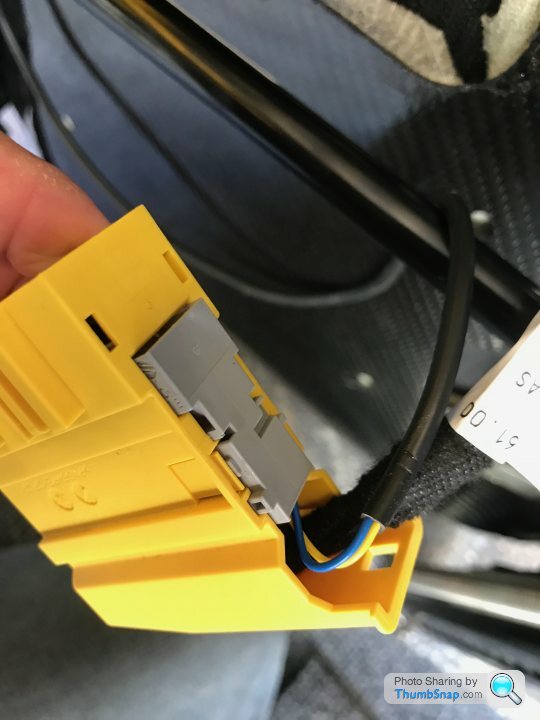
Once the sub-connector is out, it will look like this:
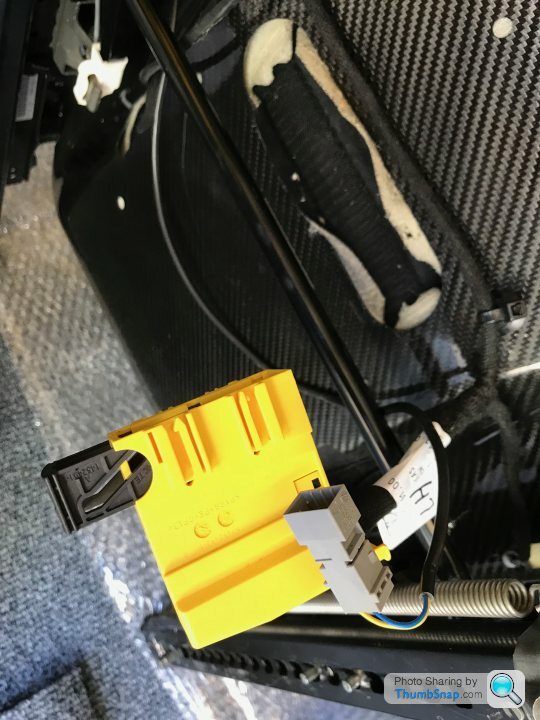
2.5 Now remove the seat belt buckle, cable and sub-connector from the LH seat, using a 17mm socket to unfasten the seat belt stalk from the seat frame.
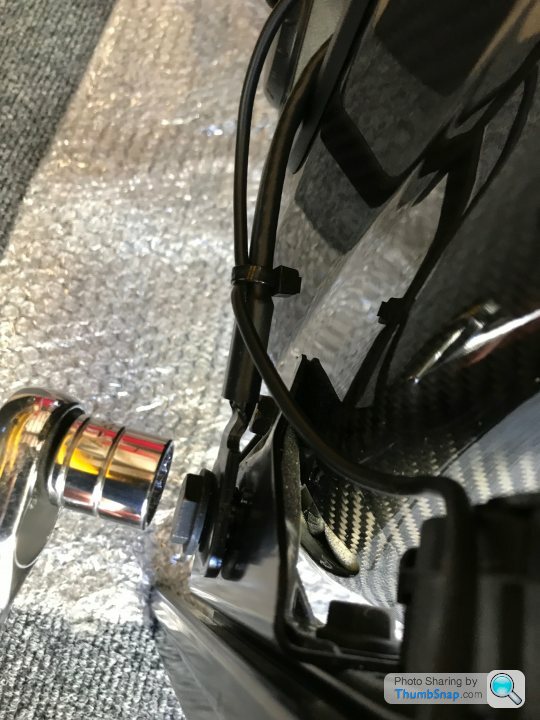
2.6 On the RH seat, open-up the yellow connector block housing and remove the small grey sub-connector block that is identcal to the one used on the LH seat - except that it has no pins or electrical cable attached!
2.7 Remove the seat belt buckle from the RH seat.
2.8 Simply transpose the seat belt stalks from one seat to the other, so that the wired stalk, cable and connector is now attached to the RH seat (the driver's seat in the RHD fitment) and the 'bare' stalk is attached to the LH (now passenger) seat. Re-route the electrical cable to run under the RH seat , reusing the original clips and adding new cable-ties as necessary, and reassemble both yellow connector block assemblies with the wired or 'bare' grey sub-blocks as appropriate. The seat belt stalk and cable will now be fitted to the RH seat as follows:
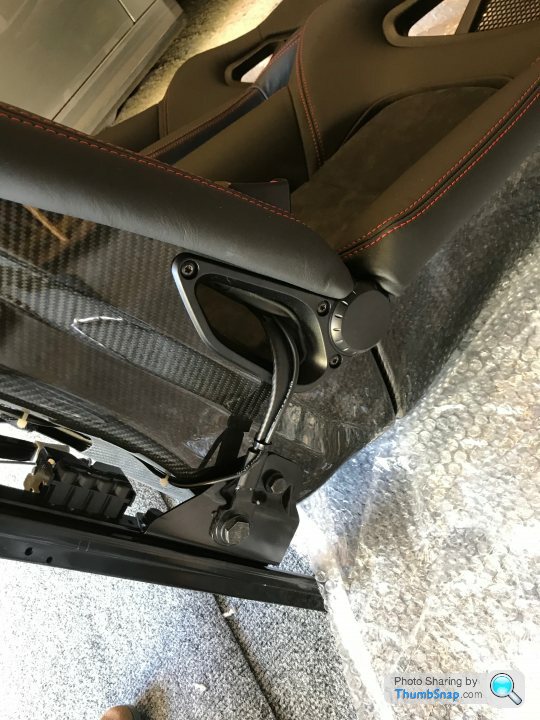
2.9 The new seats are now configured for RHD installation, and ready for fitment to the car.
3. Finishing up
3.1 Fit the new seats back into the car (they are so easy to lift in!) and fix them down using the front and rear mechanical fixings.
3.2 Reconnect the yellow connector blocks under each of the driver's and passenger's seat, pushing-in the U-shaped black latch to lock the two halves securely together.
3.3 The seat belt installation now needs to be optimised for the bucket seat installation. This involves mounting the lower belt fixing point to the seat frame, rather than on the vehicle sill. Locate and remove the sill-mounted seat belt fixing (and place the spacer tube somewhere safe for use when the original seats are refitted):
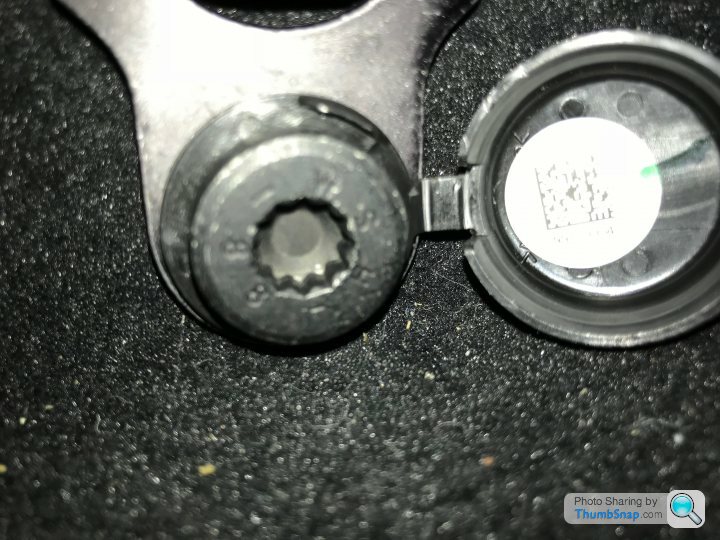
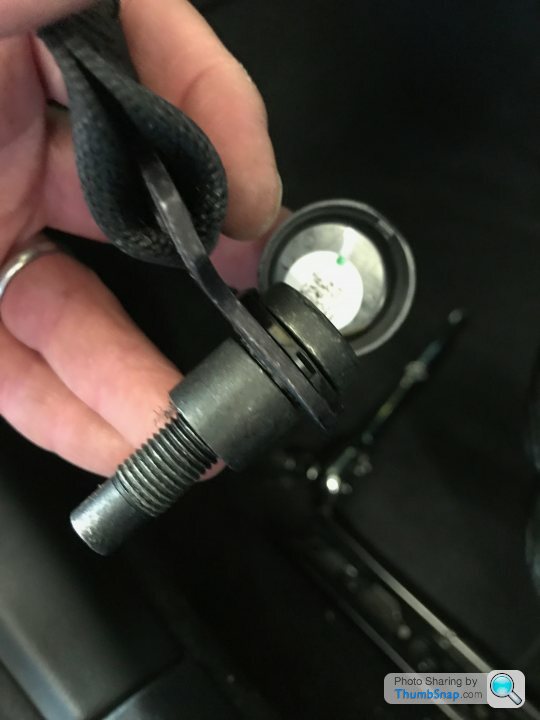
Route what is now the free end of the seat belt through the aperture in the side bolster of the bucket seat so that it emerges in an outboard direction; fix this end of the belt to the mounting point in the seat frame usingthe bolt that has been removed from the sill mounting point.

3.4 Take a deep breath and reconnect the battery terminals (reverse of earlier; reconnect the supply (+ve) terminal first, then the earth (-ve) connection).
3.5 Insert the key in tke key slot and power up the car, taking care to hold your breath... The airbag warning light should extinguish after approximately 5 seconds and the seat belt warning lamp should remain illuminated until the driver's seat belt is fastened. As per usual, in fact.
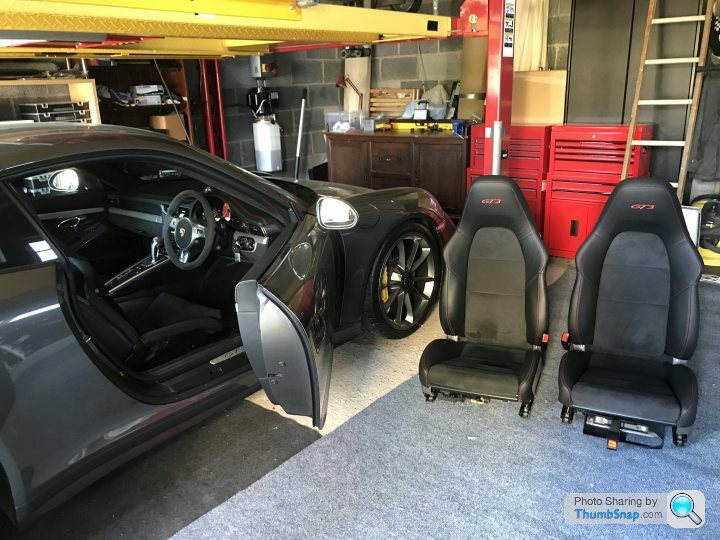
3.6 Time to stand back and admire your handiwork! You should have a couple of spare seats standing next to the car looking something like this:
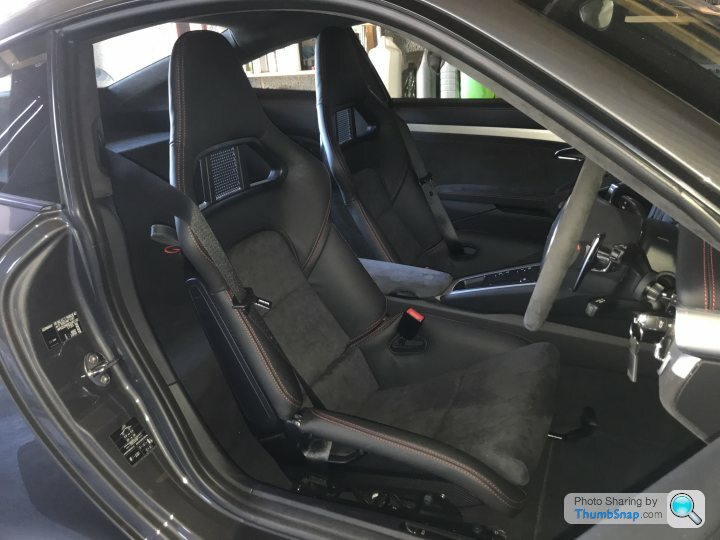
And the finished job will put a grin on your face!
I hope that is helpful!
James
After a little bit of work and adaptation, the LHD folding buckets are now safely installed in my RHD car. The seat belt warning lamp works perfectly (driver's side only) and the airbag warning light operates exactly as it should.
Phew!
Findings:
I think it's worth recapping the main findings which seem to be that:
1. Bucket seat sets are handed and separately part-numbered for LHD and RHD cars in UK/EUR/RoW markets only by virtue of the driver's-side seat belt buckle carrying an electrical connection (for the seat belt warning lamp).
2. Transposing the seat belt stalks and related electical connections over between seats is an easy DIY task.
3. In 981/991 generation cars, there is no passenger occupancy sensor fitted to UK/EUR/RoW seats (meaning that passenger-side airbags cannot be disabled, except through fitment and operation of the optional airbag-off key kit). This is different to the situation with US and Canada spec cars, where passenger occupancy sensors are fitted.
"How-to" notes:
A couple of people have asked for a "how-to" and, knowing how useful these threads can be for future owners, I'm happy to post some of the details as follows, subject - of course - to the usual disclaimer that I can't be held responsible for the outcome or consequences of any attempt you may make to follow the steps that I took.
I should start by saying that I was replacing 18-way Adaptive Sports Seats (I323/324) with the so-called folding bucket seats (or 997 GT2 buckets) although these are more formally called the Sports Bucket Seat (I388/389). I suspect, though, that the same principles will apply to the replacement of any type of 991 or 981 seat (be they manual 4-ways, electrical 14-ways or electrical 18 ways) with the folding buckets. I also believe that the same approach should work when replacing either of the electrically adjustable options (14-way or 18-way) with the latest fixed-back buckets, often called LWBs or 918-style seats (I373/374).
So, summarising the method (and including some imagery where things are a bit unusual, or specific, or tricky)...
1. Remove the existing seats:
1.1 Starting with the driver's seat, remove the trim covers at the front of the seat rails (use a screwdiver to raise the tab and then pull the trims forward and out).

1.2 Power the seat forwards to gain access to the two rear seat rail fixings and remove; power the seat rearwards and remove the two front fixings.
1.3 Power the seat to a mid-position (fore/aft) then make sure the seat is placed in its lowest position and power the backrest as far forward as possible; this is to make the seat as compact as possible for removal through the door aperture.
1.4 Repeat steps 1.1 to 1.3 for the passenger's side seat.
1.5 Remove the key from the ignition slot and disconnect the battery - remembering to remove the earth (-ve) connection first (to minimise the risk of a 'short' to exposed metalwork whilst removing the supply (+ve) connection).
1.6 Look underneath the front edge of the driver's side seat and locate the large yellow connector. Pulling the black 'wrap around' tab away from the body of the connector will cause the two parts (car and seat) of the connector to separate. The seat is now mechanically and electrically disconnected from the car.
1.6 Place protective padding in and over the door sill areas to provide protection whilst removing the seats. Prepare to be shocked by the weight of the seats, but from outside the car reach in and lift each seat out in turn. You may find it best to tilt the entire seat rearwards to help position it for removal through the aperture. Be careful not to damage the car (the seat rails have sharp-edged locating pins that protrude out from under the rail), or yourself as you wrestle with the size and weight of the seat!
1.7 Repeat for the pasenger side seat - the heavy work is now done and the floor area on each side of the car should like this:

2. Prepare the replacement LHD seats for RHD fitment
2.1 The seat belt stalk on the LH seat (the driver's seat of the LHD seat-set) also carries the electrical cable for the driver's side seat belt warning device and looks like this:

The following image shows the underside of the complete LHD seat set but, rather confusingly, I have positioned them incorrectly (the wrong way round, relative to each other). Dohh! Anyway...
 .
. In the photos you should be able to see the single electrical cable that runs underneath the LH (driver's) seat from the seat belt buckle and into the yellow connector. As you look at the photo, it's the seat to the left of the picture. The buckle, cable and the related part of the connector need to be swapped over to what is the passenger seat in the LHD case, so that this becomes the driver's seat in the RHD installation.
2.2 Note the run of the cable under the LH seat (so that you can reproduce it on the RH seat) then remove the clips that fasten it to the underside of the seat pan moulding so that the cable is fixed only at each end - at the seat belt buckle and where it enters the yellow connector.
2.3 The yellow connector actually houses three different sub-connector blocks; the seat-belt buckle cable feeds into the small grey coloured two-pin rectangular block at the 'near' end of the yellow housing. (You can see the main power terminals in the black part, and what I believe to be the seat-mounted thorax-airbag electrical connections in the L-shaped grey connector, in the middle of the assembly).

2.4 Squeeze the small tabs on the short edge of the yellow connector housing so that the seat belt warning sub-connector block can be removed from the yellow moulding. You can see the relevant grey block sliding out in the following two images:


Once the sub-connector is out, it will look like this:

2.5 Now remove the seat belt buckle, cable and sub-connector from the LH seat, using a 17mm socket to unfasten the seat belt stalk from the seat frame.

2.6 On the RH seat, open-up the yellow connector block housing and remove the small grey sub-connector block that is identcal to the one used on the LH seat - except that it has no pins or electrical cable attached!
2.7 Remove the seat belt buckle from the RH seat.
2.8 Simply transpose the seat belt stalks from one seat to the other, so that the wired stalk, cable and connector is now attached to the RH seat (the driver's seat in the RHD fitment) and the 'bare' stalk is attached to the LH (now passenger) seat. Re-route the electrical cable to run under the RH seat , reusing the original clips and adding new cable-ties as necessary, and reassemble both yellow connector block assemblies with the wired or 'bare' grey sub-blocks as appropriate. The seat belt stalk and cable will now be fitted to the RH seat as follows:

2.9 The new seats are now configured for RHD installation, and ready for fitment to the car.
3. Finishing up
3.1 Fit the new seats back into the car (they are so easy to lift in!) and fix them down using the front and rear mechanical fixings.
3.2 Reconnect the yellow connector blocks under each of the driver's and passenger's seat, pushing-in the U-shaped black latch to lock the two halves securely together.
3.3 The seat belt installation now needs to be optimised for the bucket seat installation. This involves mounting the lower belt fixing point to the seat frame, rather than on the vehicle sill. Locate and remove the sill-mounted seat belt fixing (and place the spacer tube somewhere safe for use when the original seats are refitted):


Route what is now the free end of the seat belt through the aperture in the side bolster of the bucket seat so that it emerges in an outboard direction; fix this end of the belt to the mounting point in the seat frame usingthe bolt that has been removed from the sill mounting point.

3.4 Take a deep breath and reconnect the battery terminals (reverse of earlier; reconnect the supply (+ve) terminal first, then the earth (-ve) connection).
3.5 Insert the key in tke key slot and power up the car, taking care to hold your breath... The airbag warning light should extinguish after approximately 5 seconds and the seat belt warning lamp should remain illuminated until the driver's seat belt is fastened. As per usual, in fact.
3.6 Time to stand back and admire your handiwork! You should have a couple of spare seats standing next to the car looking something like this:

And the finished job will put a grin on your face!

I hope that is helpful!
James
Edited by short-shift on Tuesday 9th October 07:27
Gassing Station | Boxster/Cayman | Top of Page | What's New | My Stuff


