Spyder front grills
Discussion
Cleaned mine out only yesterday - quite hard to get right into the corner with the Hoover.
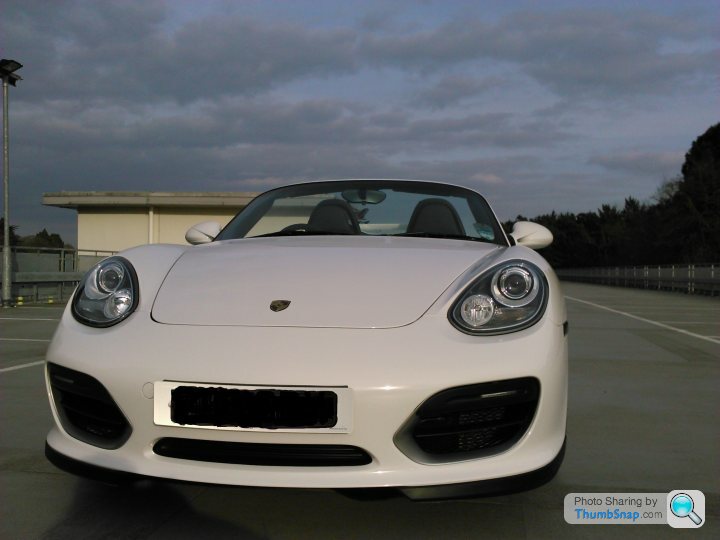
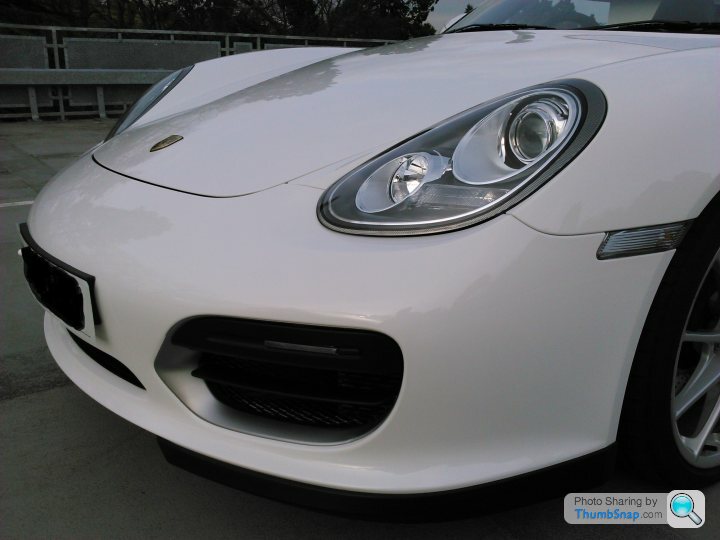
Can you take a pic of the whole front of the car with them fitted please?
Quite like the idea of having them, although when (if) I renew my warranty I'm wondering what Porsche say about them being fitted...
Can you take a pic of the whole front of the car with them fitted please?
Quite like the idea of having them, although when (if) I renew my warranty I'm wondering what Porsche say about them being fitted...
griffter said:
Sorry, to be clear, I made these myself - but I'm not intending to go into business!
Happy to describe the process for someone else to do the same.
Zyp I will take a picture just as soon as they stop salting the roads...
Great, thanks.Happy to describe the process for someone else to do the same.
Zyp I will take a picture just as soon as they stop salting the roads...
Out of interest, did you have to take the existing silver plastic trim off to fit the grills, and if so how do they come off?
Zyp said:
Cleaned mine out only yesterday - quite hard to get right into the corner with the Hoover.
I use one of these to get into the corners.http://www.ebay.co.uk/itm/like/300612355803?hlpht=...
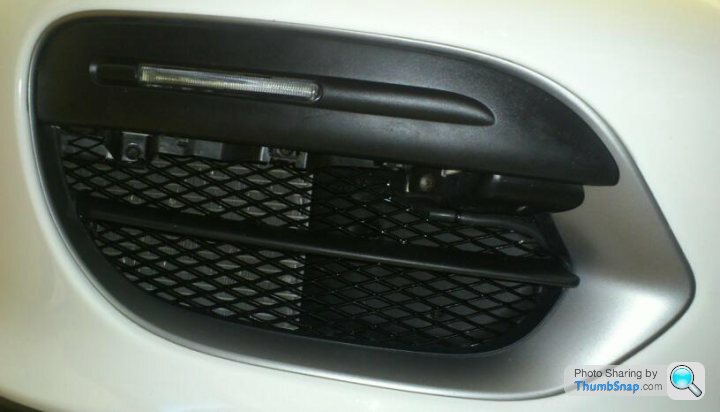
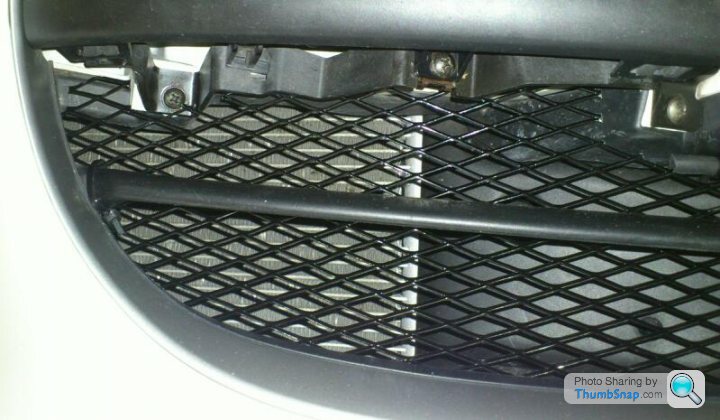
As promised - happy to explain anything further:
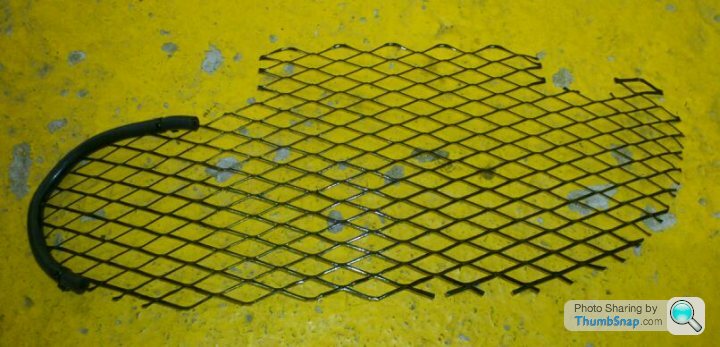
Spyder grills (may work for other 987s)
What you do and don’t need to do:
You do not need to remove any trim to fit these grills. You ‘post’ them through the top aperture, manoeuvre them into position behind the plastic cross piece and pull them into place from the front.
The most time-consuming part is trimming and gently contouring the first grill to fit. It is most time-consuming to accurately trim them to get an ‘interference fit’ along the bottom edge so that the mesh ‘catches’ on the shoulder of the internal trim and holds it place. It would be a lot quicker to trim them to fit a little more loosely and to hold them in place only with pull ties. Once you’ve made one grill, you can turn it over and use it as a pattern for the second.
I used two pull ties to discreetly hold each grill in place, one at either end of the plastic cross piece across the radiator aperture.
You will need:
Aluminium mesh sheet for the grills themselves. I used WIDE aperture BLACK Foliatec material from Demon Tweeks:
http://www.demon-tweeks.co.uk/performance/grilles-...
About £20 +vat. This is enough to make three grills so you can make one mistake!
About 30cm silicon vacuum tubing for the protective edging. I had some already but this is the kind of stuff:
http://www.demon-tweeks.co.uk/motorsport/vacuum-tu...
Smallest 3mm bore will be about right.
At least 8 narrow pull-ties. These are to secure the vacuum tubing to the mesh (as a trim) and to secure the grills to the car.
Some wire ties or pipe cleaners are very handy to temporarily hold the grill in position, and to hold the template firmly to the mesh to ensure you cut the mesh accurately. You can also use them as ‘hooks’ to pull the final mesh grill into position.
It’s also worth having some duct tape handy to use to temporarily protect the plastic inside the internal plastic radiator aperture housing from getting scratched, and to loosen the three screws holding the LED sidelight above the grill to facilitate fitment. Don’t forget to remove tape before you finally fit the grills!
I found the easiest way to cut the mesh was with tin-snips. You might manage with stout scissors – being aluminium, the mesh is pretty easy to handle, cut and form by hand.
Before fitting:
Thoroughly clean out any dirt and debris from inside the radiator housing using a vacuum cleaner with suitable attachment, brush and/or by hand.
Making and fitting these grills does NOT require any trim to be removed. They are fitted by ‘posting’ them through the top opening, manoeuvring into place by hand and pulling into position with the aid of hooks (e.g. pipe cleaners looped through the mesh, or hooks made from a wire coat-hanger).
Method:
I used some flexible fishpond/gutter mesh to make a template. This is soft and won’t damage the car being repeatedly pushed and pulled through the radiator aperture to trim it to get the shape right.
PM me for a paper template – you might well manage with paper.
Use wire ties or pipe cleaners to securely fasten the template to the mesh while you cut the mesh to its initial shape. The template I used is oversize, but the bottom profile is right. This is your datum. Get this right and the rest will follow. The mesh should fit along the bottom edge, just butting up against the back of the silver trim.
If you cut the mesh to the template, you will need to trim the left, right and top edges slightly until you are happy with the fit. The mesh should pull into place with gentle force. The bottom and side edges will ‘catch’ on the internal plastic radiator aperture housing and help hold the grill in place. Be particularly careful around the edge of the aperture nearest the number plate. This is visible from outside, so a good fit important as is not damaging the internal housing. I think it is worth trimming the mesh so that the edges do catch, but be careful not to damage the plastic. Use duct tape to protect the plastic while trial fitting and remove before final fitting. You can either trim the top edge so that it has ‘tongues’ which protrude between the brackets securing the LED sidelight to the bumper (which helps mount the grill more rigidly and is why you loosened the screws beforehand), or you could just cut the top of the grill straight across just at the top of the radiator aperture. The grill will still be held securely by pull ties and will be quicker and easier to fit.
It’s a case of trial and error to get the fit right. Trim a little at a time until the fit is right. It is worth trying to trim the mesh so that the trimmed edges are not sharp so as to minimise the risk of scratching the car and yourself.
Once you are happy with the fit of the mesh gently bend it to have a curvature across its width. This means that when you fix the mesh to the plastic cross-piece using a pull tie at either end, the curvature pulls the centre of the grill up tight against the back of the cross-piece, securing it firmly across its width. If you have trimmed the mesh so the edges catch, you will find the fit is very secure but can still be removed by ‘popping’ it out. Fine adjustments can be made by bending the edge of the mesh slightly. It will ‘give’ quite readily even if trimmed to catch on the edges, resulting in a snug, secure fit.
Prior to finally fitting I made a trim piece for the edge of the grill near the number plate. This is because fitting and removing the grill risks scratching the plastic which the grill butts up against and which is visible from outside. I made the trim piece by cutting a 15cm (or so) length of silicone vacuum tubing along its length on one side so it could ‘clip’ on to the edge of the grill. I then used pull ties to secure it to the grill.
Having made one grill, it is easy to then secure the grill to a new piece of mesh and cut the second grill. I did this and got it right first time! Pay attention to the ‘grain’/’direction’ of the mesh if you are a perfectionist and want both sides identical (otherwise it is possible to get the mesh ‘upside down’).
After all that trial and error trimming you should be used to inserting the grill through the top opening, manoeuvring it into position and pulling it up against the cross piece using hooks. Use pull ties to secure the grill to either end of the plastic cross piece, use a hook to gently pull the edges up against the rear edge of the plastic trim (this is where trimming to catch means that it will stay in place) and if necessary, tighten up the three screws holding the LED side light to the bumper.
Now go and drive.
Gassing Station | Boxster/Cayman | Top of Page | What's New | My Stuff


 |http://thumbsnap.com/obqAQvnI[/