Metal shower waste leaking
Discussion


House builder failed to properly lag our wet room in that water finds its way under the metal waste trough and onto the ceiling below. There is some kind of seam or join along the sides of the waste, which water finds its way through. The seam has been sealed with some form of mastic, which lifts after a couple of years.
I'd welcome suggestions please on a more permanent repair. Would some form of 'chemical metal' work, which I assume is waterproof?
Picture attached. The seam is behind the black moldy mastic.
TIA.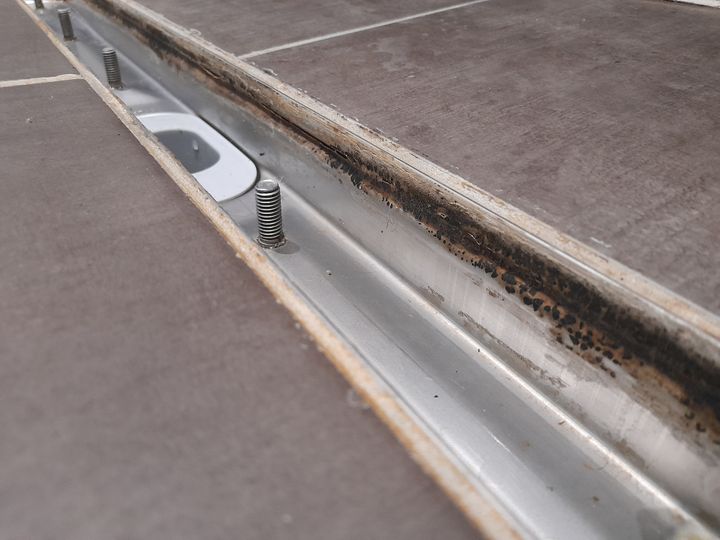
I'd welcome suggestions please on a more permanent repair. Would some form of 'chemical metal' work, which I assume is waterproof?
Picture attached. The seam is behind the black moldy mastic.
TIA.
It would be good to be sure whether the leak is at the tp of the metal channel or the channel/waste fitting joint.
I would think 'chemical metal' would be the wrong answer, you want something flexible.
If the problem is the join under the tile edges/top pf the drain trough, I would look at cleaning it out, maybe opening it out a bit, priming the tiles with a polyurethane sealer(water based varnish?) then filling the join with polyurethane sealant such as Puraflex.
The success of this will depend on creating a continuous gap and turning it into a continuous gasket of flexible sealant. You also need the sealant to stick to both sides of the gap.
You might even end up dremmeling the gap wider so you can get a respectable bad of sealant in there.
If other options are doomed, a non-setting sealant may be the answer, When all else fails, reach for the TBS. (tarryblacks t).
t).
The other thing is, make sure the drain flows freely, if the water level is always below the 'suspect' join, problems will be less.
I would think 'chemical metal' would be the wrong answer, you want something flexible.
If the problem is the join under the tile edges/top pf the drain trough, I would look at cleaning it out, maybe opening it out a bit, priming the tiles with a polyurethane sealer(water based varnish?) then filling the join with polyurethane sealant such as Puraflex.
The success of this will depend on creating a continuous gap and turning it into a continuous gasket of flexible sealant. You also need the sealant to stick to both sides of the gap.
You might even end up dremmeling the gap wider so you can get a respectable bad of sealant in there.
If other options are doomed, a non-setting sealant may be the answer, When all else fails, reach for the TBS. (tarryblacks
t).The other thing is, make sure the drain flows freely, if the water level is always below the 'suspect' join, problems will be less.
OutInTheShed said:
It would be good to be sure whether the leak is at the tp of the metal channel or the channel/waste fitting joint.
I would think 'chemical metal' would be the wrong answer, you want something flexible.
If the problem is the join under the tile edges/top pf the drain trough, I would look at cleaning it out, maybe opening it out a bit, priming the tiles with a polyurethane sealer(water based varnish?) then filling the join with polyurethane sealant such as Puraflex.
The success of this will depend on creating a continuous gap and turning it into a continuous gasket of flexible sealant. You also need the sealant to stick to both sides of the gap.
You might even end up dremmeling the gap wider so you can get a respectable bad of sealant in there.
If other options are doomed, a non-setting sealant may be the answer, When all else fails, reach for the TBS. (tarryblackst).
The other thing is, make sure the drain flows freely, if the water level is always below the 'suspect' join, problems will be less.
Thanks for your very helpful response.I would think 'chemical metal' would be the wrong answer, you want something flexible.
If the problem is the join under the tile edges/top pf the drain trough, I would look at cleaning it out, maybe opening it out a bit, priming the tiles with a polyurethane sealer(water based varnish?) then filling the join with polyurethane sealant such as Puraflex.
The success of this will depend on creating a continuous gap and turning it into a continuous gasket of flexible sealant. You also need the sealant to stick to both sides of the gap.
You might even end up dremmeling the gap wider so you can get a respectable bad of sealant in there.
If other options are doomed, a non-setting sealant may be the answer, When all else fails, reach for the TBS. (tarryblacks
t).The other thing is, make sure the drain flows freely, if the water level is always below the 'suspect' join, problems will be less.
I'm pretty confident the grout is sound and leak is from the seam on the vertical sides of the trough. The drain is cleaned regularly to ensure water doesn't build up in the trough.
I'm nervous about making the gap bigger, notwithstanding the benefits of better sealant adhesion. What is TBS?
More time today - the slot drain will most likely come with a fitting kit of sticky strips of epdm type membrane that seal the trough to the slightly sloping substrate around it, so any moisture hits the slightly sloped membrane and runs into the drain.
Unless the doughnuts that installed it didn’t read the instructions either because they can’t read or because they’ve been allowed to hold sharp tools that they think they’re in some way special and therefore know everything.
I know this because we’ve had one fitted in Portugal which leaked from day one through a concrete floor and has now been bogged up with silicone to avoid retiling… I found all the membranes still in the fking box the kit came in, together with the unfolded instructions and the little plastic mounting feet that are clearly way too technical for the average ‘plumber’.
Silicone is the quick fix but it’s not the correct solution.
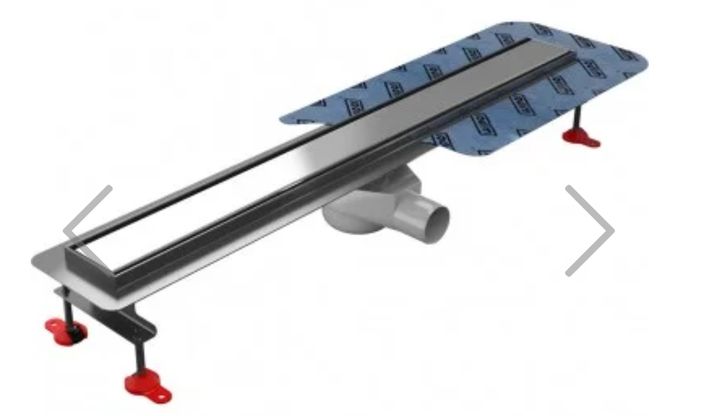
Install with the membranes as above pic and theoretically minimal silicone is needed just to lightly seal the tile edge to the drain.
Install using monkeys who can’t read or follow little pictures that have been drawn specifically for the verbally challenged and it’ll leak and need a full tube of goop smearing all over the tile-drain interface to avoid leakage.
Unless the doughnuts that installed it didn’t read the instructions either because they can’t read or because they’ve been allowed to hold sharp tools that they think they’re in some way special and therefore know everything.
I know this because we’ve had one fitted in Portugal which leaked from day one through a concrete floor and has now been bogged up with silicone to avoid retiling… I found all the membranes still in the f
king box the kit came in, together with the unfolded instructions and the little plastic mounting feet that are clearly way too technical for the average ‘plumber’. Silicone is the quick fix but it’s not the correct solution.
Install with the membranes as above pic and theoretically minimal silicone is needed just to lightly seal the tile edge to the drain.
Install using monkeys who can’t read or follow little pictures that have been drawn specifically for the verbally challenged and it’ll leak and need a full tube of goop smearing all over the tile-drain interface to avoid leakage.
andy43 said:
More time today - the slot drain will most likely come with a fitting kit of sticky strips of epdm type membrane that seal the trough to the slightly sloping substrate around it, so any moisture hits the slightly sloped membrane and runs into the drain.
Unless the doughnuts that installed it didn’t read the instructions either because they can’t read or because they’ve been allowed to hold sharp tools that they think they’re in some way special and therefore know everything.
I know this because we’ve had one fitted in Portugal which leaked from day one through a concrete floor and has now been bogged up with silicone to avoid retiling… I found all the membranes still in the fking box the kit came in, together with the unfolded instructions and the little plastic mounting feet that are clearly way too technical for the average ‘plumber’.
Silicone is the quick fix but it’s not the correct solution.
Install with the membranes as above pic and theoretically minimal silicone is needed just to lightly seal the tile edge to the drain.
Install using monkeys who can’t read or follow little pictures that have been drawn specifically for the verbally challenged and it’ll leak and need a full tube of goop smearing all over the tile-drain interface to avoid leakage.
Thanks Andy.Unless the doughnuts that installed it didn’t read the instructions either because they can’t read or because they’ve been allowed to hold sharp tools that they think they’re in some way special and therefore know everything.
I know this because we’ve had one fitted in Portugal which leaked from day one through a concrete floor and has now been bogged up with silicone to avoid retiling… I found all the membranes still in the f
king box the kit came in, together with the unfolded instructions and the little plastic mounting feet that are clearly way too technical for the average ‘plumber’. Silicone is the quick fix but it’s not the correct solution.
Install with the membranes as above pic and theoretically minimal silicone is needed just to lightly seal the tile edge to the drain.
Install using monkeys who can’t read or follow little pictures that have been drawn specifically for the verbally challenged and it’ll leak and need a full tube of goop smearing all over the tile-drain interface to avoid leakage.
My neighbour has a commercial interior refit business. He says only amateurs read instructions, which says it all really. Funny enough, they often have bits in the box they didn't need.
Other than retiling after doing the membranes properly the best option would be to strip all the existing mouldy silicone off, use brake cleaner aerosol to really degrease everything, then reapply top quality anti fungal goop.
Yeah, the whole ‘only amateurs read instructions’ is exactly why us amateurs don’t really like tradespersons much.
Yeah, the whole ‘only amateurs read instructions’ is exactly why us amateurs don’t really like tradespersons much.
Gassing Station | Homes, Gardens and DIY | Top of Page | What's New | My Stuff