Railway Sleeper Retaining Wall - Fixings / Method
Discussion


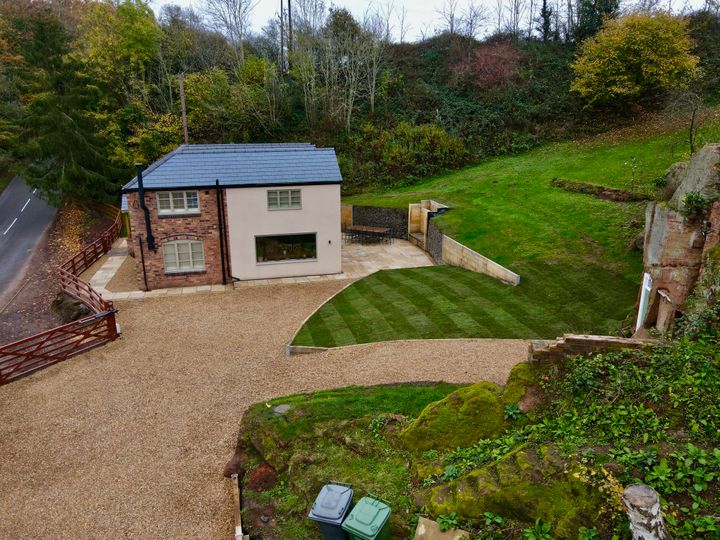
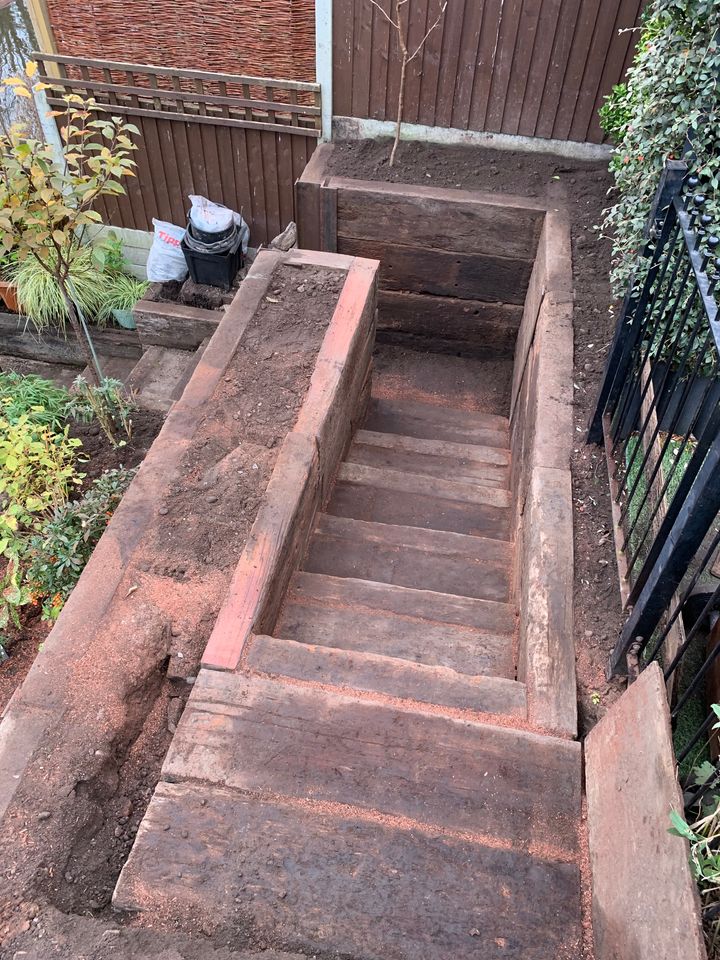
We currently have a 600mm earth bank at 60 degrees that we want to cut back to vertical and place old railway sleepers in front
Looking for the quick / easy solution to fix them
I was thinking of driving angle iron behind them and nailing them to that
The issue is that as it's a curve, we can't brick bond them together. I was going to nail restraint straps between the stacks - might have to cut the sleepers in half to get around the curve but I'm hoping not
As cars may hit them I'm loathe to rely just on a rear fixing
I know most use the 200/250mm timber lok screws but I was thinking drilling a hole and hammering a pin / all thread through them would be far stronger - or will they suffice ?
Drilling vertical holes in them, then driving re-bar into the ground, plus landscape screws to join then together is a common route. Where two ends butt up to each other, try to lap them over each other brick style, even it’s only 9’’ or so: the fact it will be built on a radius should help it leaning over, not sure if it bends in like a dam or bends out. As said though, don’t expect it to last forever, especially treated softwood, jarrah or azobe will be a better long term bet, b d to work with though!
d to work with though!KTMsm said:
Moving within 5 years and I'm using the proper reclaimed oak railway sleepers
I've got a three-high retaining wall of sleepers for my driveway. They are "proper" old railway sleepers, and although they are soft around the edges the middle of the wood is rock-hard (as I found when i needed to cut through one with a chainsaw). I've had them in place 15 years and they are probably 50 years older than that in their previous career.Held together with 300mm Timbalock screws. Their own weight keeps them in place.
wolfracesonic said:
Drilling vertical holes in them, then driving re-bar into the ground, plus landscape screws to join then together is a common route.
Drilling and hammering through sounds ideal - but I've got no chance of drilling that straight individuallyI presume you're drilling through in one hit - that's one hell of a long drill bit
wolfracesonic said:
Drilling vertical holes in them, then driving re-bar into the ground, plus landscape screws to join then together is a common route. Where two ends butt up to each other, try to lap them over each other brick style, even it’s only 9’’ or so: the fact it will be built on a radius should help it leaning over, not sure if it bends in like a dam or bends out. As said though, don’t expect it to last forever, especially treated softwood, jarrah or azobe will be a better long term bet, bd to work with though!
That's what I did, on a bed of concrete with the re-bar (12mm steel rod) driven into the (wet) concrete.d to work with though!KTMsm said:
How are we drilling 500mm + deep holes ?
I once bought a drill welded to a rod for similar but google is struggling to find anything - the extension bars seem to only work with flat drill bits - that would be one hell of a task
You can get many other types of drill bit with a hex shaft which will fit in an extension. I once bought a drill welded to a rod for similar but google is struggling to find anything - the extension bars seem to only work with flat drill bits - that would be one hell of a task
For example
https://www.amazon.co.uk/stores/page/34D26E1A-3C1C...
Edited by 4Q on Wednesday 18th December 11:41
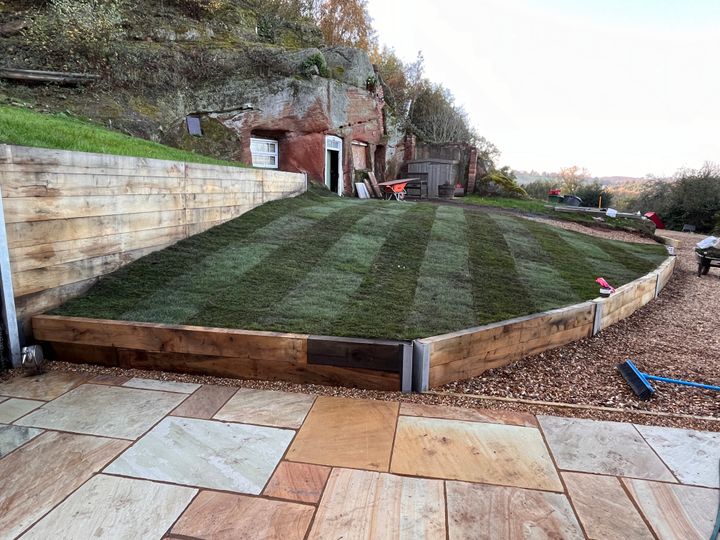
I built one a few years back to support a new lawn. We laid the first level of sleepers down, drilled through them and used M10 threaded rods driven a few feet in the ground at each end of the sleeper. Sleepers then countersunk and a nut and washer threaded on the rod to bolt down the sleeper tight to the ground. Timber Lok hex screws then secure each level of sleepers to the level below. Sleepers were laid in an interlocking fashion and corners were held together with angle brackets in the internal of the corners to help stop the whole stack leaning forward.
It hasn't moved at all since installation and the reclaimed sleepers are in the same state as they were when we installed them. I don't see them rotting much within the next 10 years or so and even if they do, replacement is quite easy anyway. Creosote isn't fun to work with and will ruin any clothing you get it on.
You could achieve similar using rebar through the entire structure and into the ground but we had the threaded rods and nuts in stock so used them.
Anything more than 3-4 sleepers high then I would consider gabion baskets filled with stone or a concrete block retaining wall.
4Q said:
You can get many other types of drill bit with a hex shaft which will fit in an extension.
For example
https://www.amazon.co.uk/stores/page/34D26E1A-3C1C...
Perfect - thanksFor example
https://www.amazon.co.uk/stores/page/34D26E1A-3C1C...
Edited by 4Q on Wednesday 18th December 11:41
We have recently done a variety.
Some chunky heights we used Gabion baskets, some places we used sleeper walls.
Not the best pic, but you get the idea.
We sourced galvanised steel posts for the sleepers to slot into, then plates attaching each sleeper to the one above and below, to reduce bowing, then a french drain at the bottom of each run, lined the back of each sleeper wall with DPM and then backfilled with some rubble, then a weed membrane and then earth on top, followed by turf
Lower level version is here ;
url]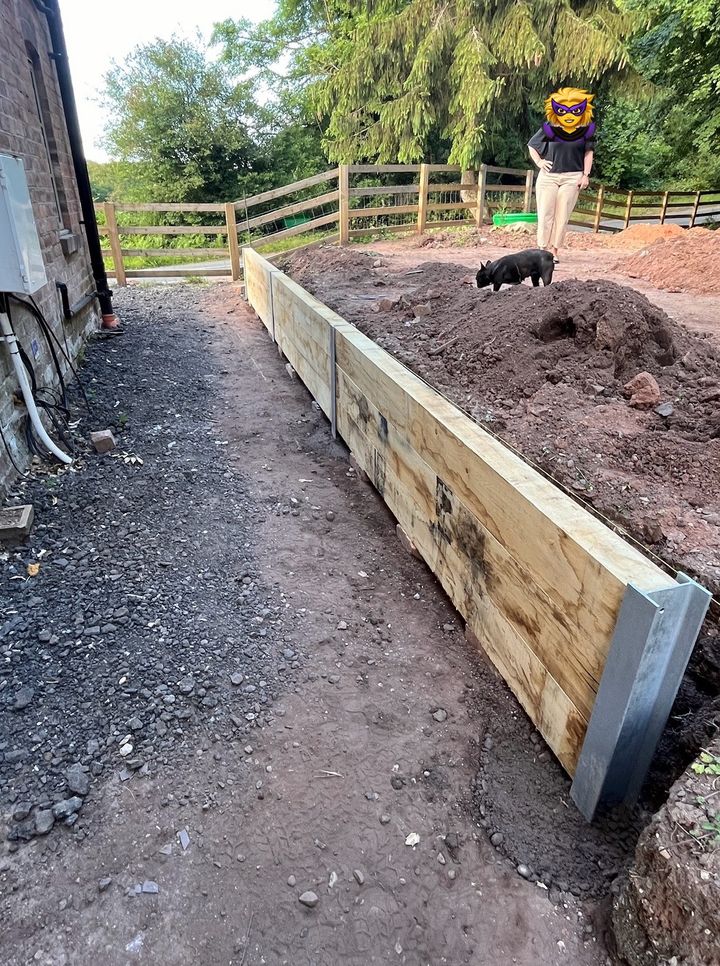 |https://forums-images.pistonheads.com/71509/202412185331386[/url]
Its big brother is here;
We used some big old hex type bolts to screw everything together and an impact gun, pre drilling where necessary…
Hope helpful

Some chunky heights we used Gabion baskets, some places we used sleeper walls.
Not the best pic, but you get the idea.
We sourced galvanised steel posts for the sleepers to slot into, then plates attaching each sleeper to the one above and below, to reduce bowing, then a french drain at the bottom of each run, lined the back of each sleeper wall with DPM and then backfilled with some rubble, then a weed membrane and then earth on top, followed by turf
Lower level version is here ;
url]
Its big brother is here;
We used some big old hex type bolts to screw everything together and an impact gun, pre drilling where necessary…
Hope helpful
KTMsm said:
4Q said:
You can get many other types of drill bit with a hex shaft which will fit in an extension.
For example
https://www.amazon.co.uk/stores/page/34D26E1A-3C1C...
Perfect - thanksFor example
https://www.amazon.co.uk/stores/page/34D26E1A-3C1C...
Edited by 4Q on Wednesday 18th December 11:41
For any rebar/screw holes you can buy oak plugs to just bosh in flush, tidies up the final finish hugely.
I’ve just done (well, I had it done…) a sleeper wall, using genuine tropical hardwood sleepers holding up about a metre of bank.
I used 8 foot H section steel and slotted the sleepers into them. Fiddly around the steps, but turned out well.
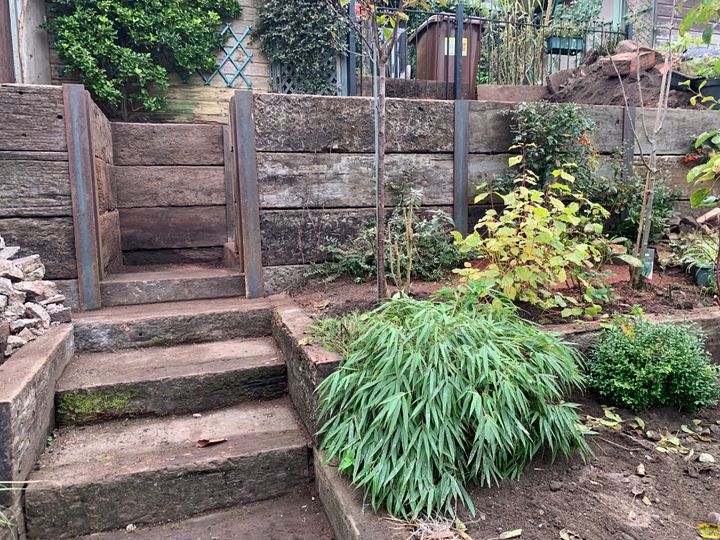
I reckon you could engineer a ‘curve’ by angling the ends of the sleepers in the steels
I used 8 foot H section steel and slotted the sleepers into them. Fiddly around the steps, but turned out well.
I reckon you could engineer a ‘curve’ by angling the ends of the sleepers in the steels
Nigel O: I had similar built at our last house.
PLEASE be careful when those sleeper steps are wet in winter. They WILL go slimey and you will end up on your arse, winded and bruised. I know.
OP: it’s 600mm. Don’t over engineer it, but don’t skimp either.
You’ve got a lot of very good tips there for locking the sleepers together.
Post pics of progress and finished article.
RC1807 said:
Nigel O: I had similar built at our last house.
PLEASE be careful when those sleeper steps are wet in winter. They WILL go slimey and you will end up on your arse, winded and bruised. I know.
Maybe try to find something like this that will cover the whole step: https://safetyproductsdirect.co.uk/product/grp-sta...PLEASE be careful when those sleeper steps are wet in winter. They WILL go slimey and you will end up on your arse, winded and bruised. I know.
RC1807 said:
Nigel O: I had similar built at our last house.
PLEASE be careful when those sleeper steps are wet in winter. They WILL go slimey and you will end up on your arse, winded and bruised. I know.
The lower flight of steps has been down for over a year and you’re right - they get quite slippery. The garden back on to a cabal, then open fields, so it gets a lot of weather.PLEASE be careful when those sleeper steps are wet in winter. They WILL go slimey and you will end up on your arse, winded and bruised. I know.
I’ll definitely be fitting some anti-slip tread plates when the project is complete (still got to add estate fencing to the top to prevent dogs and grand-kids falling off the edge)
Gassing Station | Homes, Gardens and DIY | Top of Page | What's New | My Stuff