Rotten Bathroom Flooring - Toilet Plinth?
Discussion
I've replaced a giant hole in the boards on the middle landing, next stage of the project is to deal with the rot in the 3rd floor bathroom.
I've pulled up and removed the carpet (1970s Original?), Rubber underlay and exposed the flooring - 18mm T&G Chipboard with 360mm spaced joists.
The source of the troubles is the toilet; I've already cut back one rotten board, and I'm just planning my way around the rest..

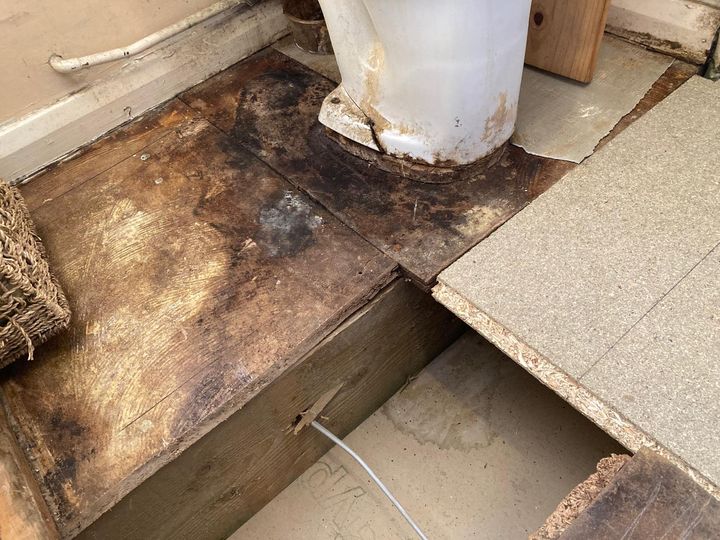
I'm just slightly stumped by the toilet. I intend to remove the bowl, but I note there's some kind of plinth beneath, and it seems to have been set on its own floorboard?
The Toilet itself is rear exit, with some pipework below.
I'm just a little stumped on how to "Do it properly" - Is it standard practice to have the bowl on a separate floorboard and plinth? I get the impression most of the modern rear exit toilets are made to go directly atop flooring?
Can I just reinstate a single, larger board so it is properly supported across all the joists, and leave out the toilet plinth? (See - Replacement new board not getting to the joist - Other option is to add a couple of crossbattens, but that is how it was originally - No wonder it felt flimsy!
The last owner of this place was a keen DIYer that thought plumb was a fruit and level is a type of railroad crossing, so I'm always very cautious to get things "By the book" where possible
I've pulled up and removed the carpet (1970s Original?), Rubber underlay and exposed the flooring - 18mm T&G Chipboard with 360mm spaced joists.
The source of the troubles is the toilet; I've already cut back one rotten board, and I'm just planning my way around the rest..
I'm just slightly stumped by the toilet. I intend to remove the bowl, but I note there's some kind of plinth beneath, and it seems to have been set on its own floorboard?
The Toilet itself is rear exit, with some pipework below.
I'm just a little stumped on how to "Do it properly" - Is it standard practice to have the bowl on a separate floorboard and plinth? I get the impression most of the modern rear exit toilets are made to go directly atop flooring?
Can I just reinstate a single, larger board so it is properly supported across all the joists, and leave out the toilet plinth? (See - Replacement new board not getting to the joist - Other option is to add a couple of crossbattens, but that is how it was originally - No wonder it felt flimsy!
The last owner of this place was a keen DIYer that thought plumb was a fruit and level is a type of railroad crossing, so I'm always very cautious to get things "By the book" where possible

LordLoveLength said:
Is the plinth there just to match the height of the toilet to the stack?
You can get offset couplers to cope with small variations in height.
Good thought..You can get offset couplers to cope with small variations in height.
It was about flush with the carpet; There was a 2mm rubberised underlay:-
______Carpet_______ |//////////////////////////////|
2mm Rubber---------|/////////PLINTH////////|
=18mm Chipboard=================
I'm planning on putting down a foamy/ water resistent 2mm Underlay with laminate boards; I suppose with the toilet out and the panel below it replaced I could look at getting the rest of the floor sorted out, then picking up a replacement toilet bowl and seeing if anything is needed to lift it..
119 said:
That looks like a sand and cement mix that was used to bed the toilet down.
The plinth itself seems to be thin strips of batten (Odd way of doing it?) - Just tapemeasure'd it and they come to ~2cm thick, so I'm thinking take the whole thing out, then if needed I can scribe out the base of a new toilet and put it up on some chipboardPitre said:
Trustmeimadoctor said:
I wouldn't be putting chipboard in a bathroom especially under a toilet
Indeed, use either OSB or real wood planks.By chipboard - I'm using treated P5 TGV4 Caberfloor boards (Matching the existing install) which seem to be rated for it - The "Scope creep" in me does want to pull up the whole lot and redo it with actual planking, but at that rate I'll need an RV to live in whilst I finish my "Quick project" 
I did pull the lid off the mystery box behind the toilet, revealing the waste stack in the corner and the board rotten all the way back - So I'll probably pull that down, Fix some of the plumbing (Found out why the sink drains poorly - The waste runs uphill....) and *consider* relocating the toilet a bit, towards the window, and perhaps consider rotating it 90degs.
I'll see if I can grab some more pictures shortly!
https://www.diy.com/departments/p5-tgv4-chipboard-...
That's the one!
As before, there was a rubber underlay below the carpet - But that's the same stuff I encountered in the Landing, and it hasn't been layed below the bathtub.
That's the one!
As before, there was a rubber underlay below the carpet - But that's the same stuff I encountered in the Landing, and it hasn't been layed below the bathtub.
With those you can see the board below the toilet, rotten board between toilet & bathtub strech back into that magic box - Which is only hiding the plumbing against the wall, an absurdly routed filler for the toilet, and some kind of hideous failure of the window's moisture seal (And a book?)
Even with the Toilet remaining in place, at least I could squeeze a larger bathtub in...
Thinking now is:
Remove the toilet entirely
Remove the boxing behind the toilet
(Cap off & relocate the toilet filler so It's coming from the right hand side?)
Get both of those boards up entirely and replace
Then I'll have a reasonably clean slate on deciding if / where to relocate the toilet, hopefully making slightly better use of the space..
A side waste would be nice to give back a little more standing room - Rotating it 90deg would possibly work but be a bit of a knee-room / feng shui challenge with the space available beside the waste stack, once accounting for the cistern.
XCP said:
Some people are very brave.
I'd definitely have got a pro in.
I have had moments of doubt, but sheer (blind / stupid?) audacity leads me to believe I can achieve anything! I'd definitely have got a pro in.

Given it's mostly a state of "Can't get much worse", I feel slighly better about pulling everything apart.
I've removed the bowl and most of the box behind it now and am feeling a little more "on track" - Once the toilet side floorboards are up (And wasp nest relocated into a hoover bag
 - It is showing no signs of life! ), Then I can get them replaced and the room measured up...
The measurements can be scrawled on some scrap floorboard (
 ) for a trip to the bathroom shop to lay out something new, taking on board some professional advice (At last?)
Then I can look at pulling out the bathtub and sink / wall fixings, sorting out the last of the crap floor under the bath,
focus on getting a solid subfloor down, and tidy up the plumbing horrors.
Walls could get a spruce up (I haven't tried my hand at tiling yet?
 )
) Then get the tub, sink & toilet in and box off the waste once more.
Never have had a shower either - I'm inclined to get the basic bath back in first, but a "stretch goal" would be to add a pumped shower to the tub.
Still on 1970's finest wood framed single glazed window which overlaps though, so that would need to go - And I don't want to learn the finer points of glazing on the 3rd floor!
The exterior wall is a horrid Thermalite panel thing, too, so I'm inclined to stand-off from it to match the depth of the brickwork and fix that horrid damp / wet run from the window area at the same time...
What was it I was saying about scope creep?

In the spirit of me using this as a bit of a live build thread, Some updates from the last couple of days:
I've ignored the wasp nest at the moment whilst I get the floorboard up fully to clear it out and investigate the source.
As mentioned, toilet bowl and backing frame were all removed.
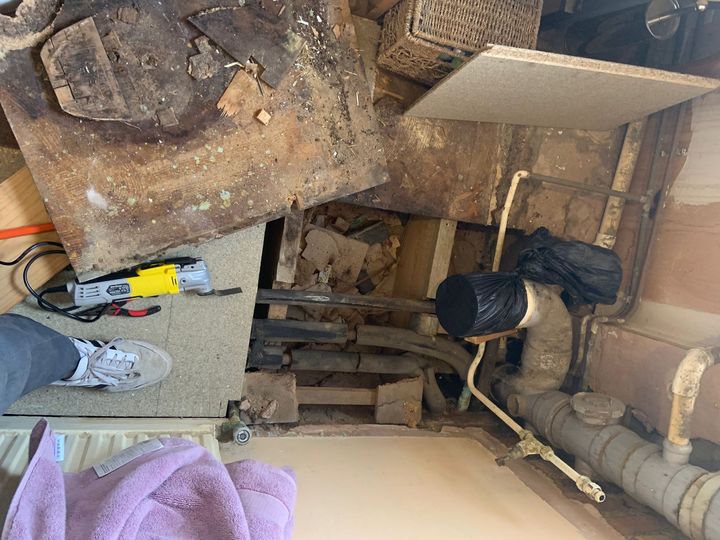
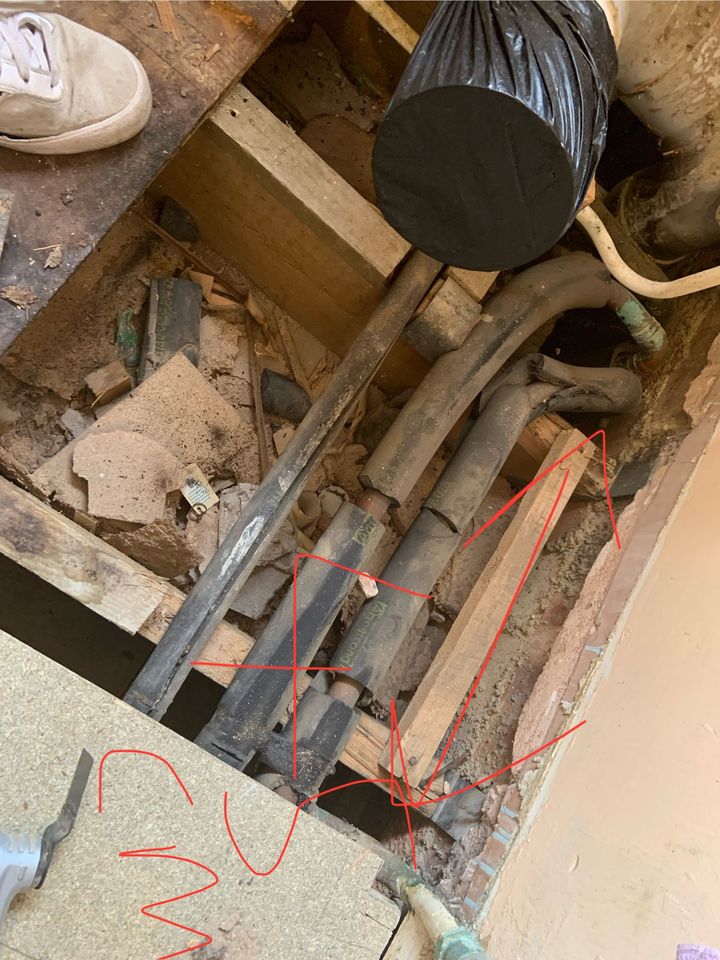
After ripping out the toilet panel, I found the remains of the last re-modelling (1980?) under the floorboards...


One of my favourite features here, other than the living room ceiling being used as a skip, is the rather twiggy bit of batten with chipboard scraps nailed in it being used to fill the notches in the joist....
I'll get a proper bit of structural batten in there whilst I'm at it, as well as getting some preventative treatment on the joists - By some miracle, they all appear to be in good condition, with a bit of surface grot at worst, but seeing as they're accessible a bit of cuprinol can't go amiss.

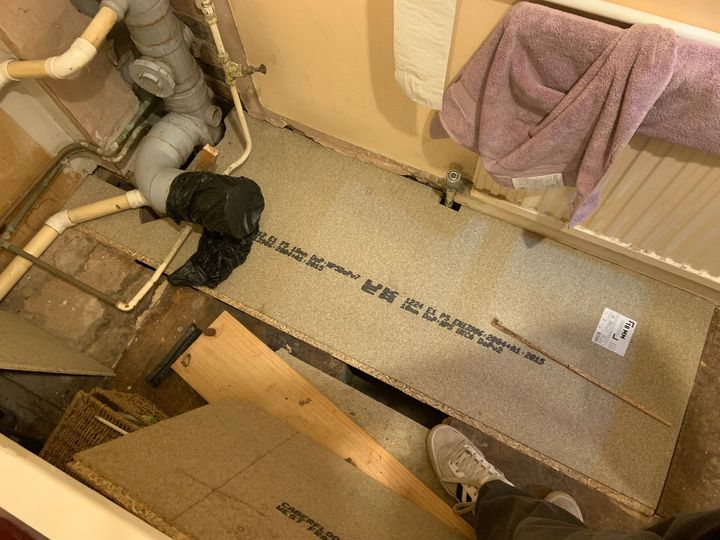
I'm quite chuffed with the fitment of the replacement - Perfectly notched for the wastes / radiator and perfectly to length - Not bad considering it was cutout on the driveway just after sunset!
(FYI - I know the tounge is exposed; the replacement board is slightly wider - No hackjobs here!)
The next board over (Concealing the wasp nest) is next to come up; I've got to figure out a means of supporting the bath whilst I get the old panel out and new panel back in, given the misalignment with the joists and length of panel being replaced, But I'm sure something can be arranged.
Also on the list is some plumbing tidy up - I've put 2&2 together, looking at the burn mark behind the tee for the cistern filler, I'm wondering if the last chap that lived here was responsible..
I'll look to cut that back to the wall and likely just cap it off for the time being (To be sorted out properly when I know where the rest is going!)
Whilst I've got the pipes drained, I can get some isolators on the taps too - I don't think they existed whenever the last plumbing was done here...
I've ignored the wasp nest at the moment whilst I get the floorboard up fully to clear it out and investigate the source.
As mentioned, toilet bowl and backing frame were all removed.
After ripping out the toilet panel, I found the remains of the last re-modelling (1980?) under the floorboards...
One of my favourite features here, other than the living room ceiling being used as a skip, is the rather twiggy bit of batten with chipboard scraps nailed in it being used to fill the notches in the joist....
I'll get a proper bit of structural batten in there whilst I'm at it, as well as getting some preventative treatment on the joists - By some miracle, they all appear to be in good condition, with a bit of surface grot at worst, but seeing as they're accessible a bit of cuprinol can't go amiss.
I'm quite chuffed with the fitment of the replacement - Perfectly notched for the wastes / radiator and perfectly to length - Not bad considering it was cutout on the driveway just after sunset!
(FYI - I know the tounge is exposed; the replacement board is slightly wider - No hackjobs here!)
The next board over (Concealing the wasp nest) is next to come up; I've got to figure out a means of supporting the bath whilst I get the old panel out and new panel back in, given the misalignment with the joists and length of panel being replaced, But I'm sure something can be arranged.
Also on the list is some plumbing tidy up - I've put 2&2 together, looking at the burn mark behind the tee for the cistern filler, I'm wondering if the last chap that lived here was responsible..
I'll look to cut that back to the wall and likely just cap it off for the time being (To be sorted out properly when I know where the rest is going!)
Whilst I've got the pipes drained, I can get some isolators on the taps too - I don't think they existed whenever the last plumbing was done here...
Gassing Station | Homes, Gardens and DIY | Top of Page | What's New | My Stuff


 k - It gets better