Large crack- stone wall
Discussion
Hi,
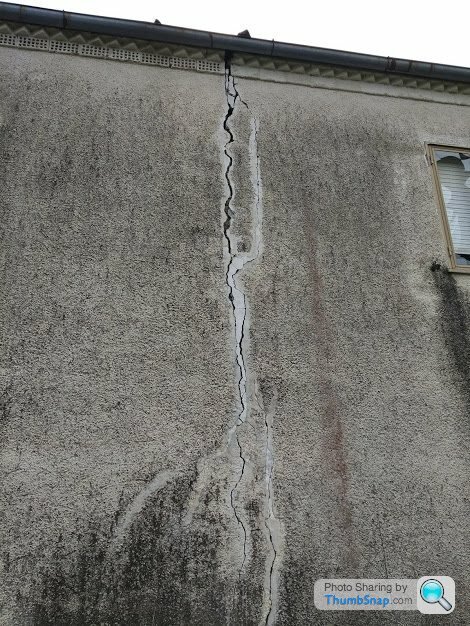
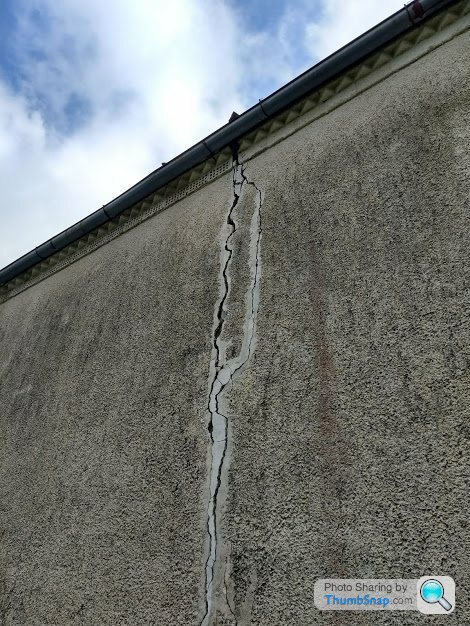
I have a large vertical crack
It's a single skin stone house wall, unknown age but at least 80 years old. With render over external and internal. The crack goes right the way through and is pretty much plumb. It's been there a long time and hasn't moved any more. The wall is basically split in two halves- they're no longer tied in to each other at all. It's subsided, underpinning not an option currently, I'd be better rebuilding then but I don't have time for that currently so Iwant to make it secure and weathertight to be usable.
The house is not in England, I don't need to worry about any building regs, etc. I just need it sorted. It runs the entire height of the house, floor to ceiling, in places the crack is 40-50mm wide. you can see daylight through it. Someones had a go at shoving render in and over it previously.
.
I've looked at two ptions- take out a few stones around the crack on the bottom 4 courses and relay, tying in properly. Then progressing up the entire height like this, relaying a few courses at a time. Supporting above by acrows as I go
My other option was the helibar crack stitching bars, but i don't know how to fill the actual crack if I do them- Helibar do a resin but only up to 25mm wide. Could I just infill with mortar/stone
Is rebuilding a few courses at a time viable? or will it lead to the whole thing coming down?


I have a large vertical crack

It's a single skin stone house wall, unknown age but at least 80 years old. With render over external and internal. The crack goes right the way through and is pretty much plumb. It's been there a long time and hasn't moved any more. The wall is basically split in two halves- they're no longer tied in to each other at all. It's subsided, underpinning not an option currently, I'd be better rebuilding then but I don't have time for that currently so Iwant to make it secure and weathertight to be usable.
The house is not in England, I don't need to worry about any building regs, etc. I just need it sorted. It runs the entire height of the house, floor to ceiling, in places the crack is 40-50mm wide. you can see daylight through it. Someones had a go at shoving render in and over it previously.
.
I've looked at two ptions- take out a few stones around the crack on the bottom 4 courses and relay, tying in properly. Then progressing up the entire height like this, relaying a few courses at a time. Supporting above by acrows as I go
My other option was the helibar crack stitching bars, but i don't know how to fill the actual crack if I do them- Helibar do a resin but only up to 25mm wide. Could I just infill with mortar/stone
Is rebuilding a few courses at a time viable? or will it lead to the whole thing coming down?


Ouch!!
I had a vertical crack in my gable end wall, 1850's random sandstone.
In my case it was caused by previous owner taking out the internal inglenook stove and not replacing kingstones that held the inner and outer leaves together.
I used helibar and resin mortar in the mortar layers that I could get to. I think I used about 15 over the full gable end height.
The wall was then re-rendered in lime render.
4 years on and no sign of any crack.
Once you remove your render (at least a metre wide) down the crack you should be able to find courses that will suit. The fact that the bars will probably end up being different lengths and arranged in a more random pattern is only going to help.
First job is to remove the render to see your next move.
BTW. I used a helibar kit from Ebay not the Helifix brandname - much cheaper.
Ricky146a said:
Ouch!!
I had a vertical crack in my gable end wall, 1850's random sandstone.
In my case it was caused by previous owner taking out the internal inglenook stove and not replacing kingstones that held the inner and outer leaves together.
I used helibar and resin mortar in the mortar layers that I could get to. I think I used about 15 over the full gable end height.
The wall was then re-rendered in lime render.
4 years on and no sign of any crack.
Once you remove your render (at least a metre wide) down the crack you should be able to find courses that will suit. The fact that the bars will probably end up being different lengths and arranged in a more random pattern is only going to help.
First job is to remove the render to see your next move.
BTW. I used a helibar kit from Ebay not the Helifix brandname - much cheaper.
Thank you!I had a vertical crack in my gable end wall, 1850's random sandstone.
In my case it was caused by previous owner taking out the internal inglenook stove and not replacing kingstones that held the inner and outer leaves together.
I used helibar and resin mortar in the mortar layers that I could get to. I think I used about 15 over the full gable end height.
The wall was then re-rendered in lime render.
4 years on and no sign of any crack.
Once you remove your render (at least a metre wide) down the crack you should be able to find courses that will suit. The fact that the bars will probably end up being different lengths and arranged in a more random pattern is only going to help.
First job is to remove the render to see your next move.
BTW. I used a helibar kit from Ebay not the Helifix brandname - much cheaper.
I think the previous owner was of the "it'll buff out" persuasion, there's several attempts at squashing render in.
Great tip on the Ebay versions, I was debating whether they'd be as good as the 'official' Helibars and whether it's worth the risk but it sounds like they were good for you.
I'm not back out at the house till next Easter (it's in Southern Itay) but I'm making a plan now so I can take everything out there I'll need and just get it done.
B17NNS said:
To fill the crack clean it out, give it a slurry coat of SBR and force mortar in with pointing gun until it comes out the other side.
Thanks! This is what i will do. Edited by B17NNS on Friday 26th October 14:04
It's lime mortar, I assume that doesn't make any difference with the SBR? I'm planning to take out a few bags of hydrated lime and mix the mortar with that.
As mentioned above remove the render and see what you are up against. It maybe that a mixture of all types of repairs mentioned will be what's best.
Being able to work inside and out at the same time may not be a good idea.
I would choose one side and make it a firm and finished repair before taking on the other side.
Being able to work inside and out at the same time may not be a good idea.
I would choose one side and make it a firm and finished repair before taking on the other side.
veti said:
Hi,
take out a few stones around the crack on the bottom 4 courses and relay, tying in properly. Then progressing up the entire height like this, relaying a few courses at a time. Supporting above by acrows as I go
Should you go this route I see no reason why you couldn't do it in one go. If the wall has already separated then there's nothing to support, each course you stitch will improve the integrity.take out a few stones around the crack on the bottom 4 courses and relay, tying in properly. Then progressing up the entire height like this, relaying a few courses at a time. Supporting above by acrows as I go
This was the kit I used
https://www.permagard.co.uk/crack-stitching-kit
Turning the end of the bars (last 2 inches or so) into the lime mortar also adds a bit of extra strength to the repair if you see what I mean.
Only mix as much of the resin mortar as you need for one or two bars as it goes off quite quickly (it is powder form in the tub).
You could use the mortar gun in the kit to fill the crack as B17 suggests above.
Also as said above, check that the movement has already stopped.
quote=Ricky146a]This was the kit I used
https://www.permagard.co.uk/crack-stitching-kit
Turning the end of the bars (last 2 inches or so) into the lime mortar also adds a bit of extra strength to the repair if you see what I mean.
Only mix as much of the resin mortar as you need for one or two bars as it goes off quite quickly (it is powder form in the tub).
You could use the mortar gun in the kit to fill the crack as B17 suggests above.
Also as said above, check that the movement has already stopped.
[/quote]
Thank you! I'll buy the kit plus some extra grout and bars.It's about 6 metres tall I'm thinking spacing at 300mm, giving me a nice round 20 to complete the job.
It hasn't moved for a year, I've used the tell tale things. Obviously no guarantee it won't slide away completely or drop more but that's a gamble I'm taking.
Dogwatch said:
I would have thought that type of construction was a lot more than 80 years old but whatever its age the house has obviously been there for quite a while. Has something changed locally to cause earth movement such as a new build?
Yes I would guess older too, records from the notary in Italy could only say 80+, not sure if that's a common thing there. No new builds around at all, it's in a small village, no building/industry going on, own plot of around 3/4 acre with a few trees but none within 8 metres or so.
Italy is, of course, a notorious earthquake zone. But it doesn't seem like that kind of damage to me, it's more of a classic subsidence.
I don't want to get involved in underpinning,etc. At that point I'd rather rebuild but currently I'm looking to be out there for 8-10 weeks a year so that's not doable.Looking to do a 'running repair' to get it weathertight and livable.
Just been thinking about your cracked wall for a while (sad, I know but I have nothing better to do!).
It is Very vertical for a normal subsidence crack. Even more so for a random stone construction.
It seems to start at the top at the junction of different capping stones (ventilated (or dimpled) to plain). Coincidence??
Why was it rendered? Possibly to cover different building materials? Has an extension to the wall been made or rebuilt?
I am probably over-thinking it and need to get out more but finding the reason for the crack is just as important as fixing it if only to set your mind at rest.
Be aware that when you remove the render the crack will look a lot worse as water will have tracked down the crack and worn the soft mortar away.
All of that being said, the above stitching repair is still the way to go.
Any pics of the inside of the crack?
Ricky146a said:
Just been thinking about your cracked wall for a while (sad, I know but I have nothing better to do!).
It is Very vertical for a normal subsidence crack. Even more so for a random stone construction.
It seems to start at the top at the junction of different capping stones (ventilated (or dimpled) to plain). Coincidence??
Why was it rendered? Possibly to cover different building materials? Has an extension to the wall been made or rebuilt?
I am probably over-thinking it and need to get out more but finding the reason for the crack is just as important as fixing it if only to set your mind at rest.
Be aware that when you remove the render the crack will look a lot worse as water will have tracked down the crack and worn the soft mortar away.
All of that being said, the above stitching repair is still the way to go.
Any pics of the inside of the crack?
It is Very vertical for a normal subsidence crack. Even more so for a random stone construction.
It seems to start at the top at the junction of different capping stones (ventilated (or dimpled) to plain). Coincidence??
Why was it rendered? Possibly to cover different building materials? Has an extension to the wall been made or rebuilt?
I am probably over-thinking it and need to get out more but finding the reason for the crack is just as important as fixing it if only to set your mind at rest.
Be aware that when you remove the render the crack will look a lot worse as water will have tracked down the crack and worn the soft mortar away.
All of that being said, the above stitching repair is still the way to go.
Any pics of the inside of the crack?
 It's certainly on my mind too!
I know it does have the look of it not being extended and not being tied together, in some ways I hope that's it because that seems better than subsidence. That was my first thought when I viewed it but the seller said no extension and had always been one piece.
I don't know for sure, records on it aren't clear one way or the other. I guess I'll know for certain as soon as I remove the render. I've deliberately not disturbed it as it has to sit through the winter now so I thought leaving it for at least some protection was best.
Either way though, you think the stitching is way forward? I suppose that would tie it in if it wasn't originally
Gassing Station | Homes, Gardens and DIY | Top of Page | What's New | My Stuff


