Anyone interested in home-built sailing dinghies?
Discussion


ApOrbital said:
What a great thread hope your wife is better now.
Thank you, she is. She needed a fairly simple surgical procedure but it meant cutting her open and there was a recovery period needed once abdominal muscles have been cut through - similar to that needed after a caesarean section. It all went well but I'd taken the week off work to generally be around and do all the stuff around the house she normally does so between that and while she was sleeping I was able to get a bit done on the boat every day almost which felt great.We got some more done today.
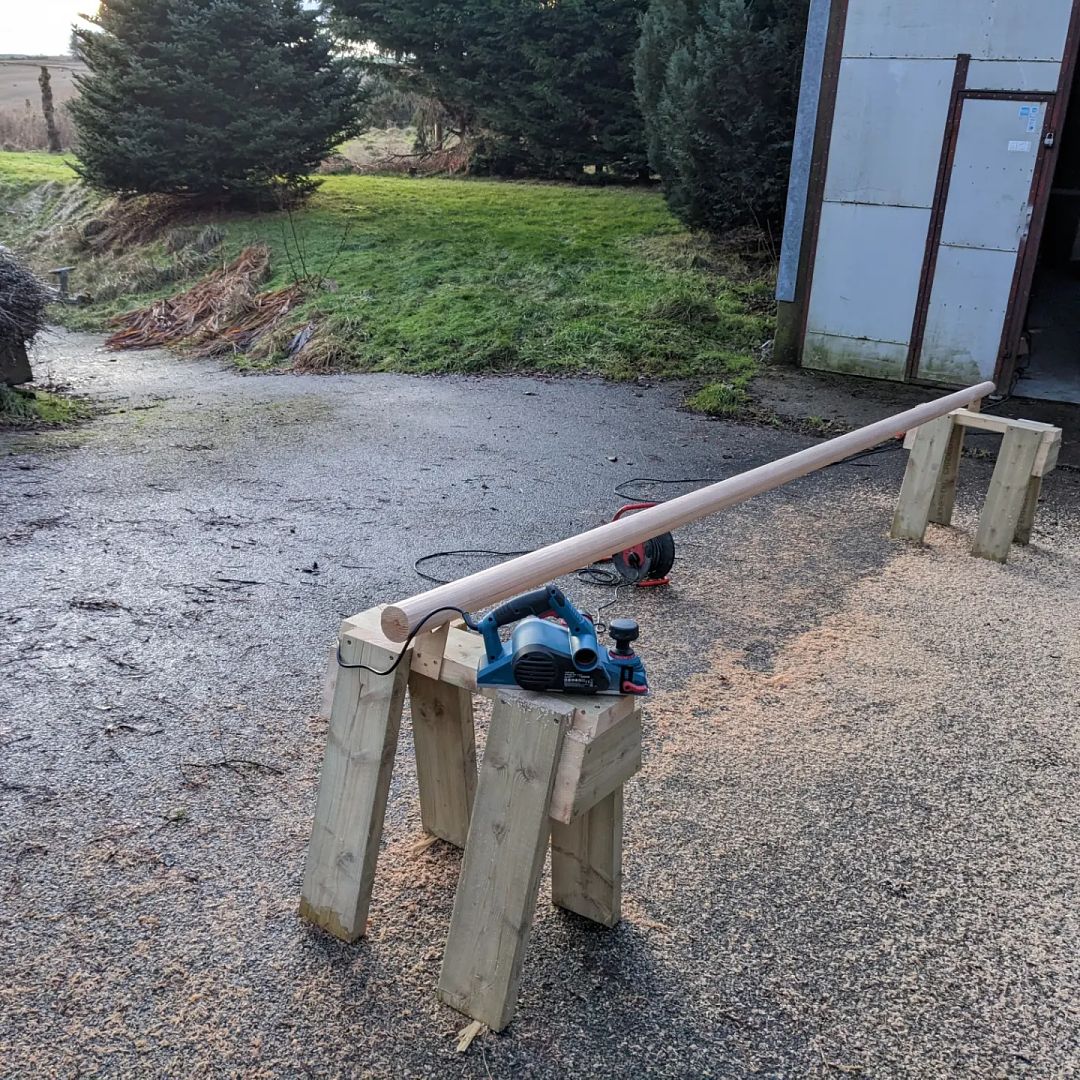
With the glue on the mast cured, my daughter today helped me plane it down to final dimensions (and square!) before marking on the taper at the top 1000mm using a baton. The taper was cut down with a hand-held power planer which is one of my power tools I'm less confident with due to variable results. Practise makes perfect though, apparently, and whilst not actually perfect the mast is close enough and we're happy with it.
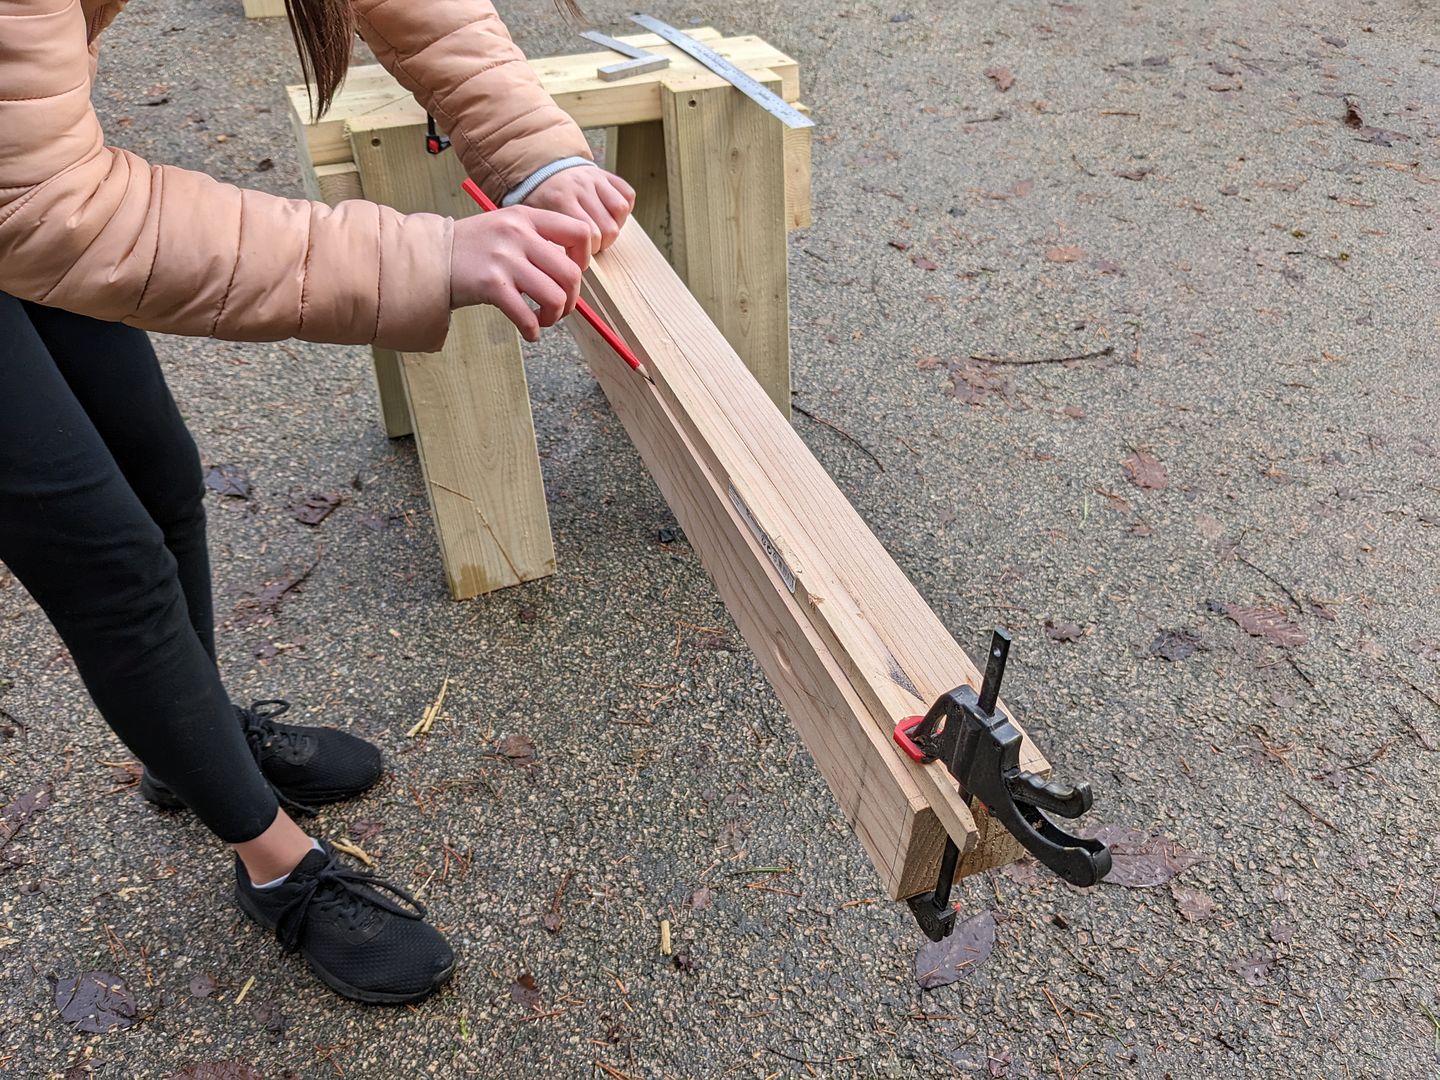
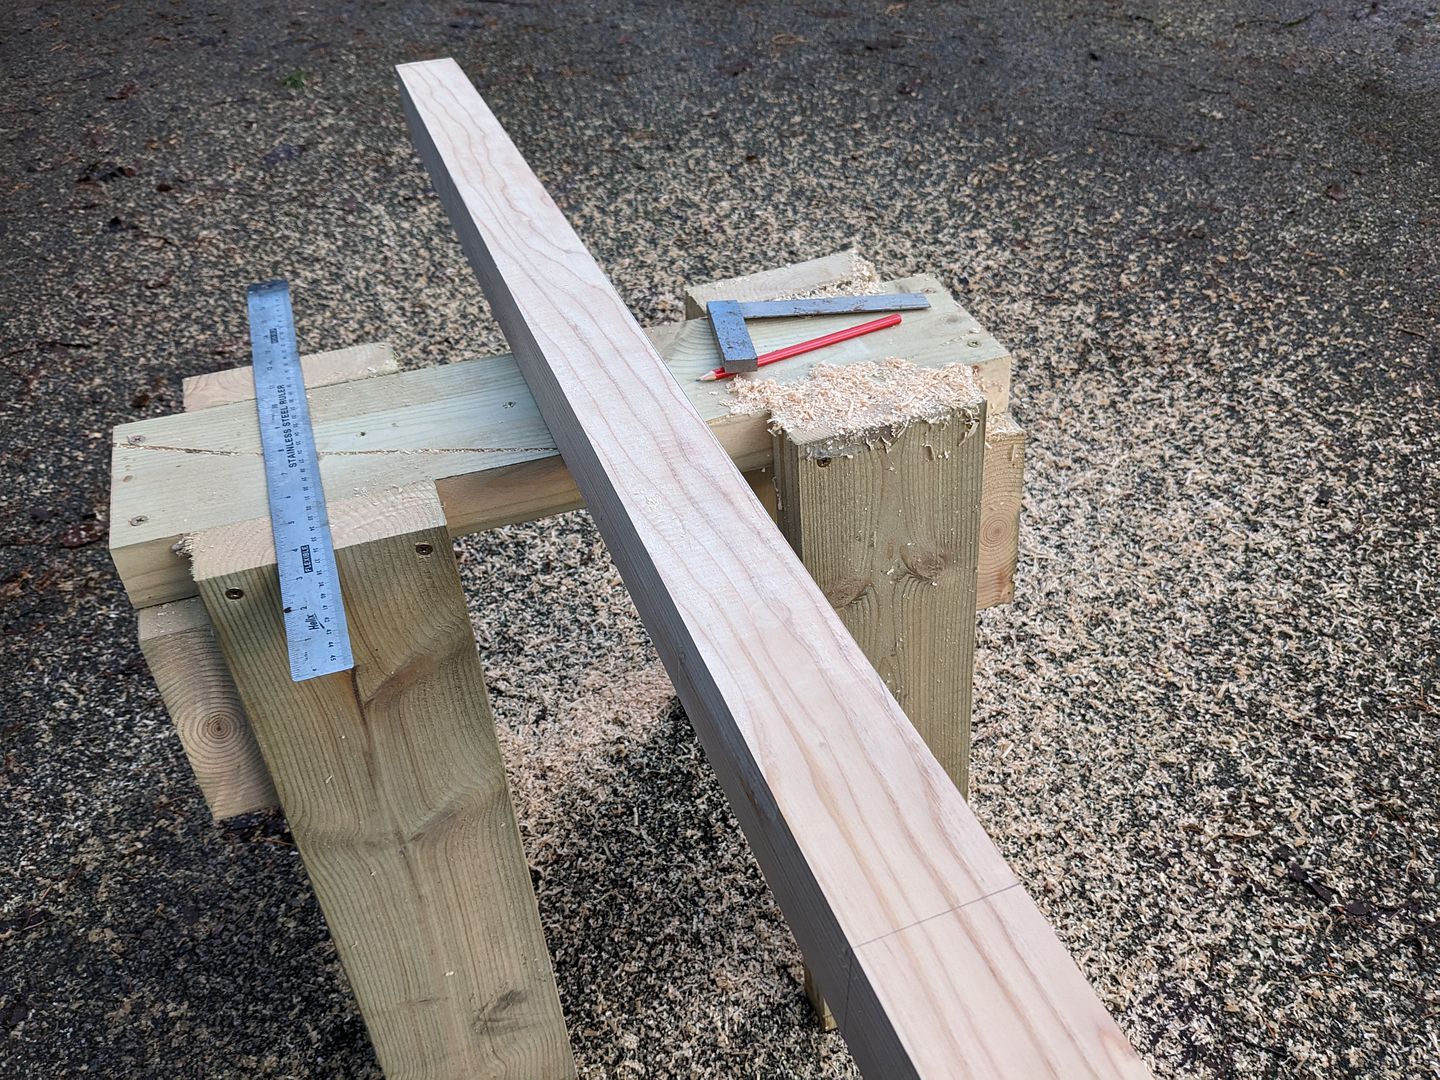
The next job is to mark on lines to guide the planer (or me, really) as we turn it from a 4 sided square to an 8 sided octogon cross section. We'll then knock the corners off again to make it 16 sided before changing to the hand planer to make it 32 sided before finishing to the final round shape with a sanding belt.

To aid marking for the first octogon shape we've made a marking gauge from a piece of wood, 2 nails and 2 pencils. They're spaced in a ratio of 7-10-7 which draws on where the new corners will be.
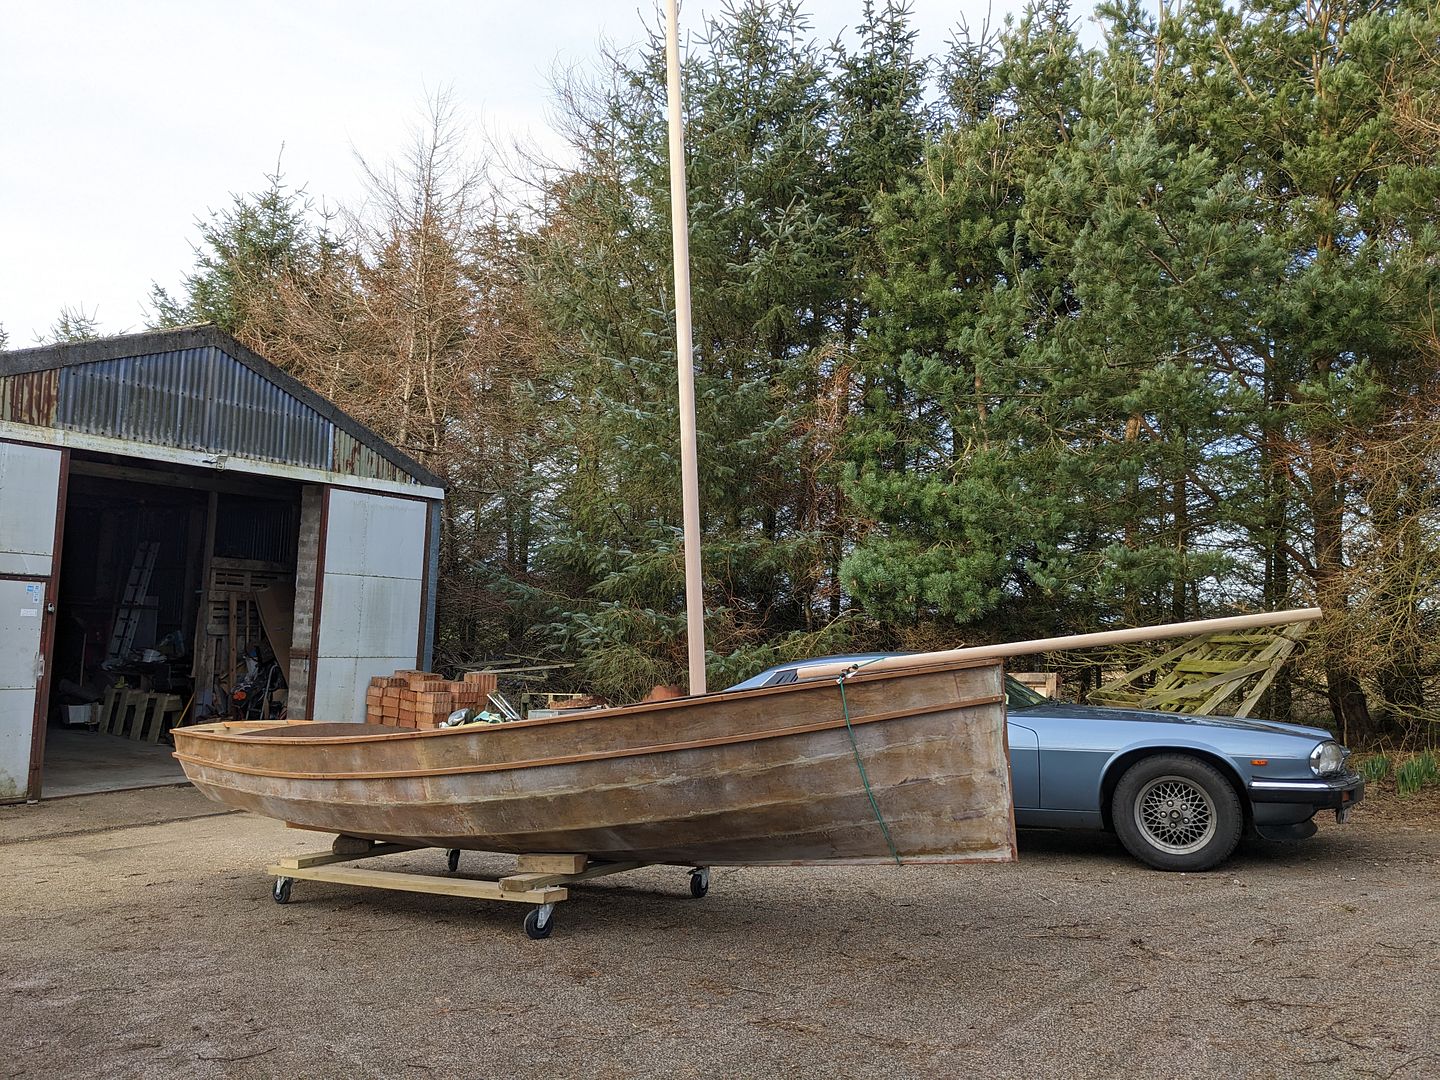
Unfortunately I've had an annoyingly small part break on my old Jag XJ-S which none-the-less renders it undriveable (the end of the gear selector cable has broken off - it left the gearbox in reverse when it failed and yesterday the car tried to take off backwards and would have smashed Melitele had I not been quick on the brakes) meaning the big garage is unavailable for big woodwork so I'm doing this outside. Up here in NE Scotland I'm above 57deg North so daylight is fading and it doesn't seem like a good idea to try planing my mast octagonal in the dark, so that's me done for the night I think.
ApOrbital said:
You are albert einstein AICMFP 
Alas not my idea at all - none of these things are - I'm just copying more experienced builders. This little widget worked pretty well though 
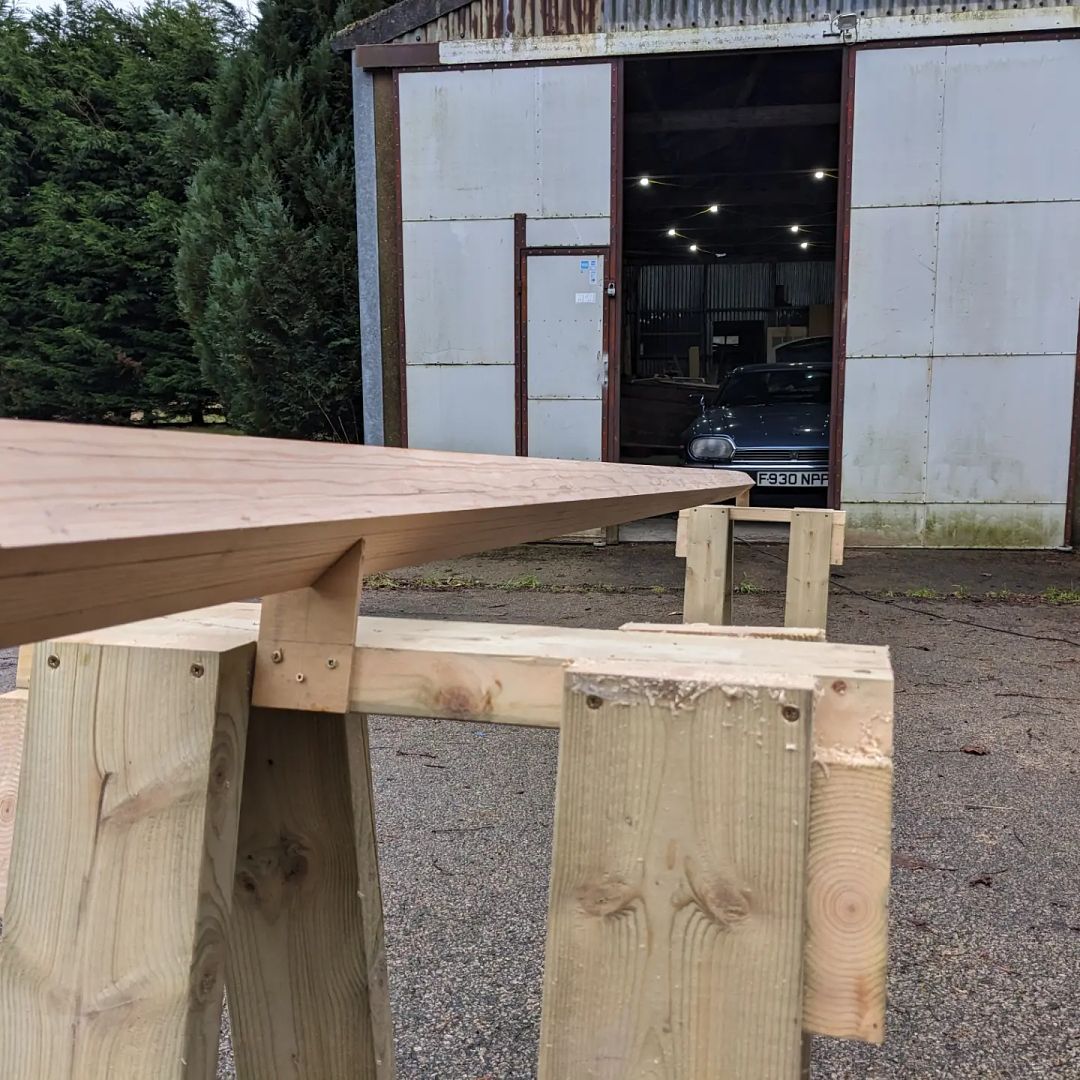
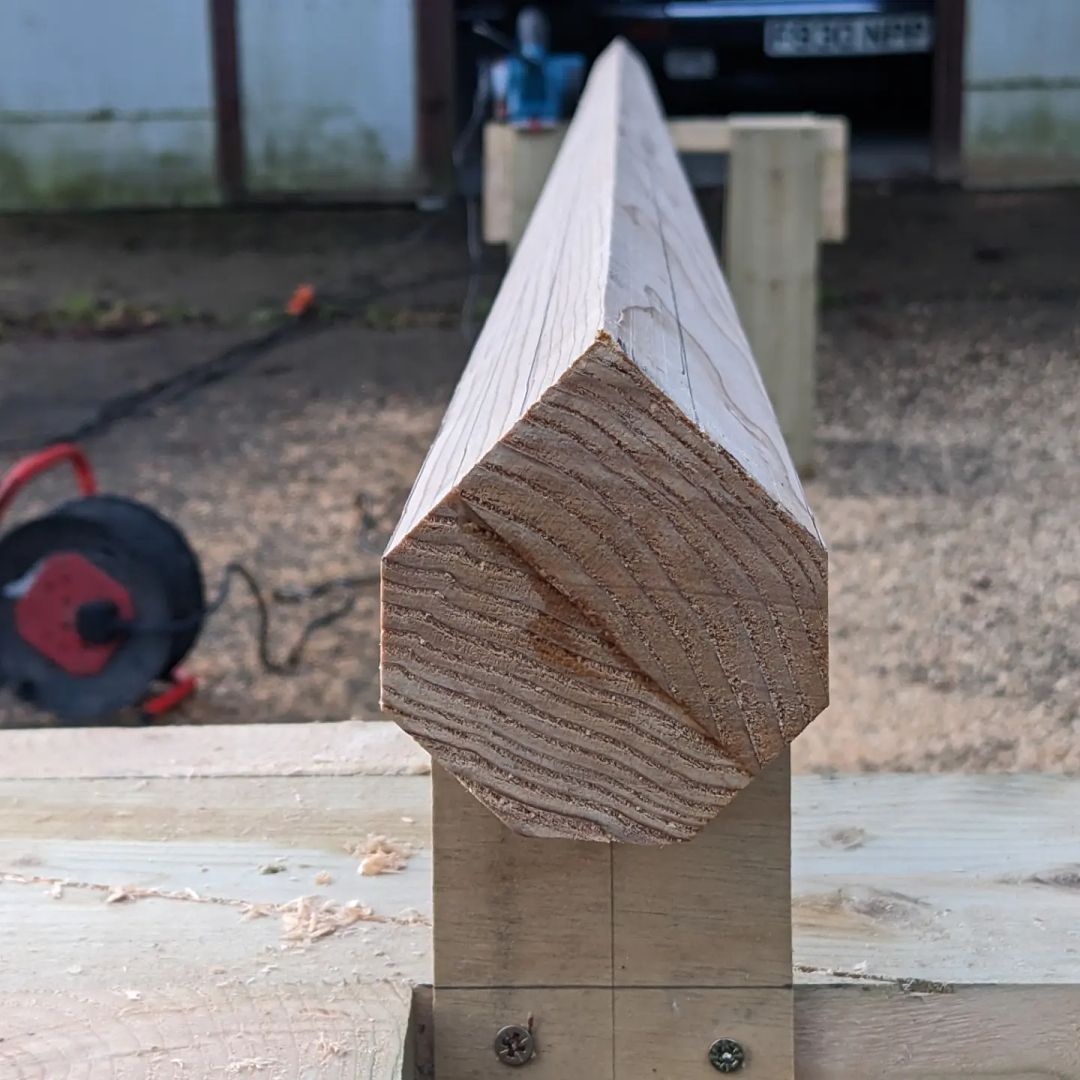
I started planing the square down to octagon but the very low cost and rather aged power planer gave out shortly after beginning. It still runs but makes funny noises. I think a bearing may have gone. Anyway, I bought one from Screwfix on Click and Collect and drove over to Inverurie to collect it then did the rest after lunch. The light was fading so I haven't attempted the final sanding but the mast is now a 32 sided cylinder ready for that. The part came for the XJ-S too so I'll try to get that fitted tomorrow so it's not in the way any more.
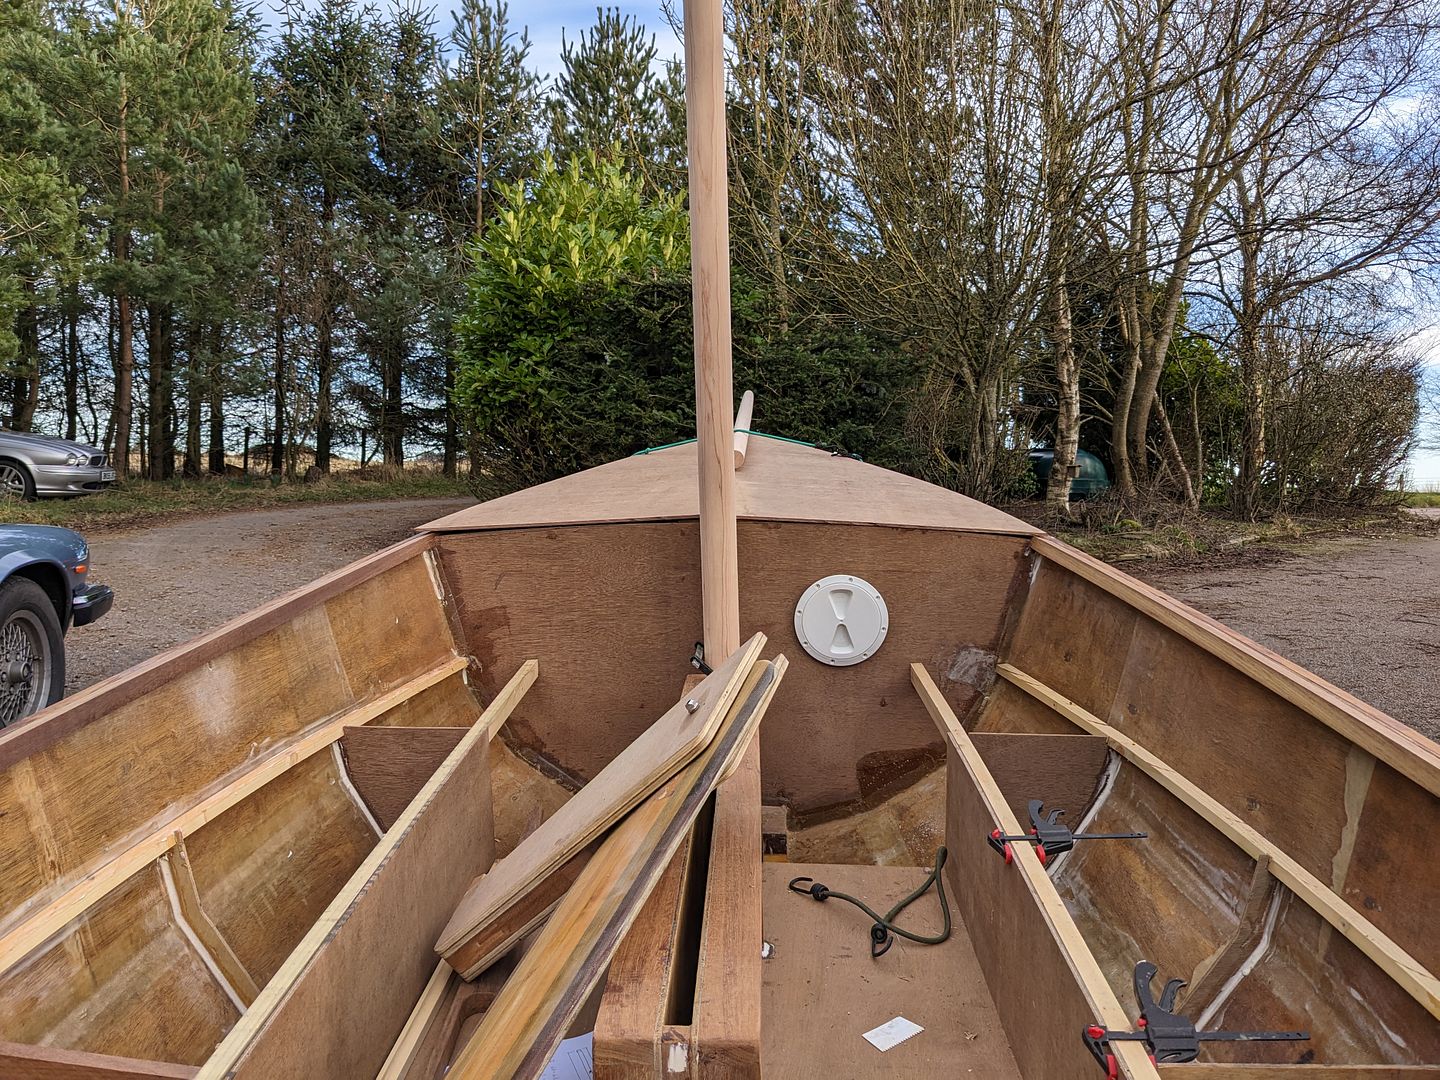
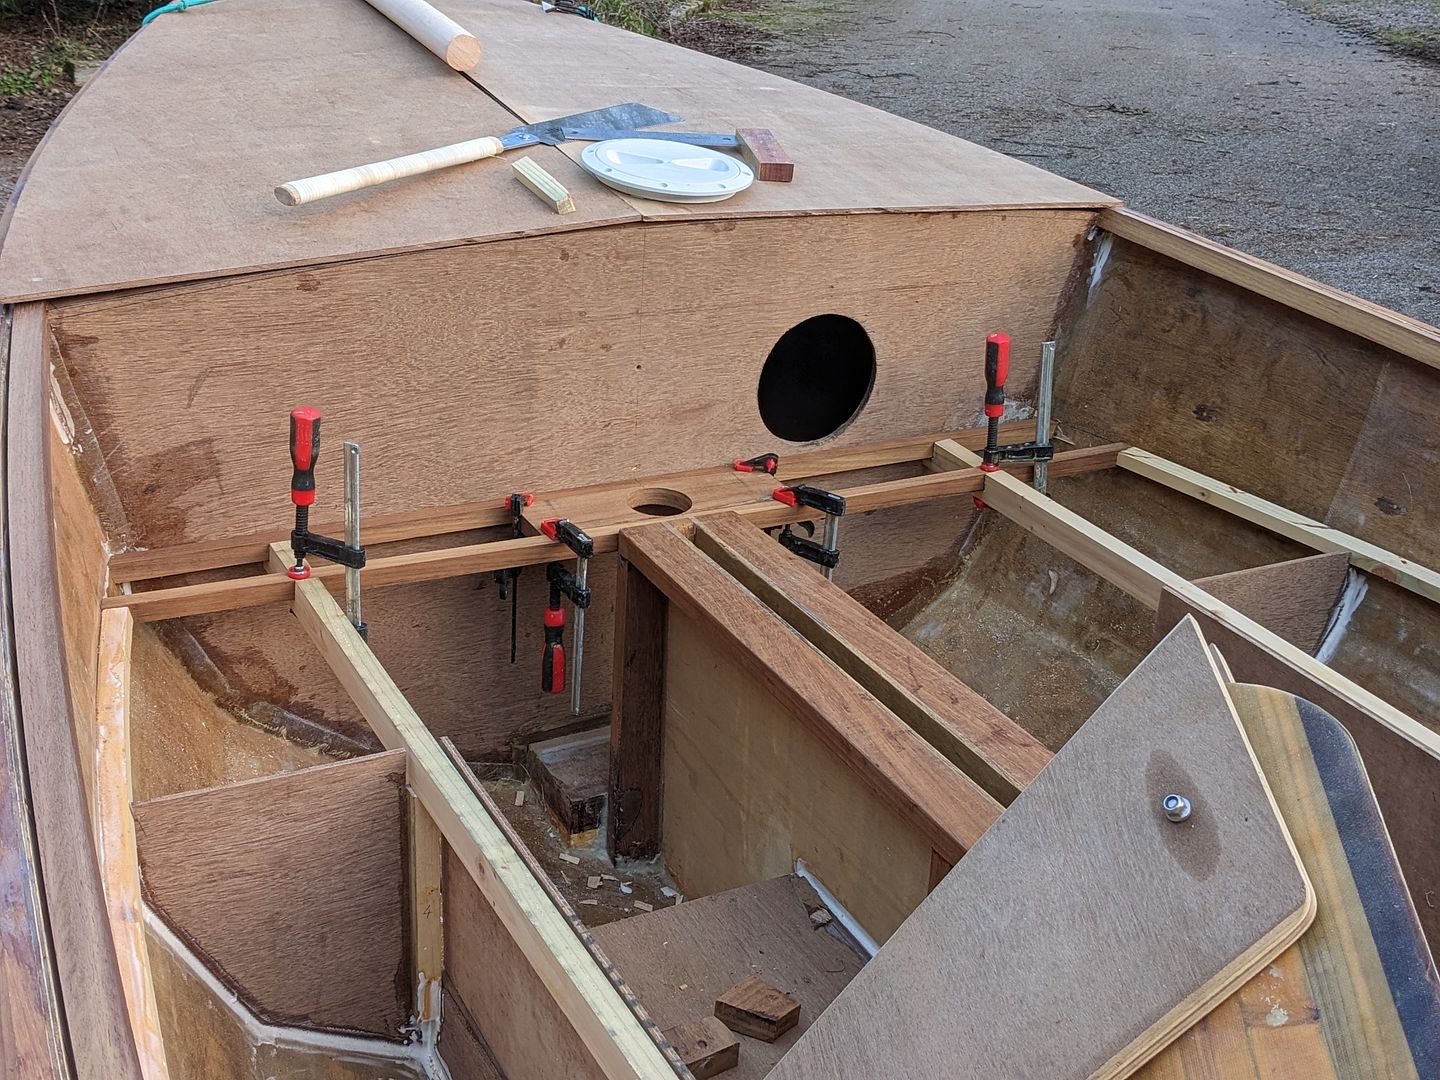
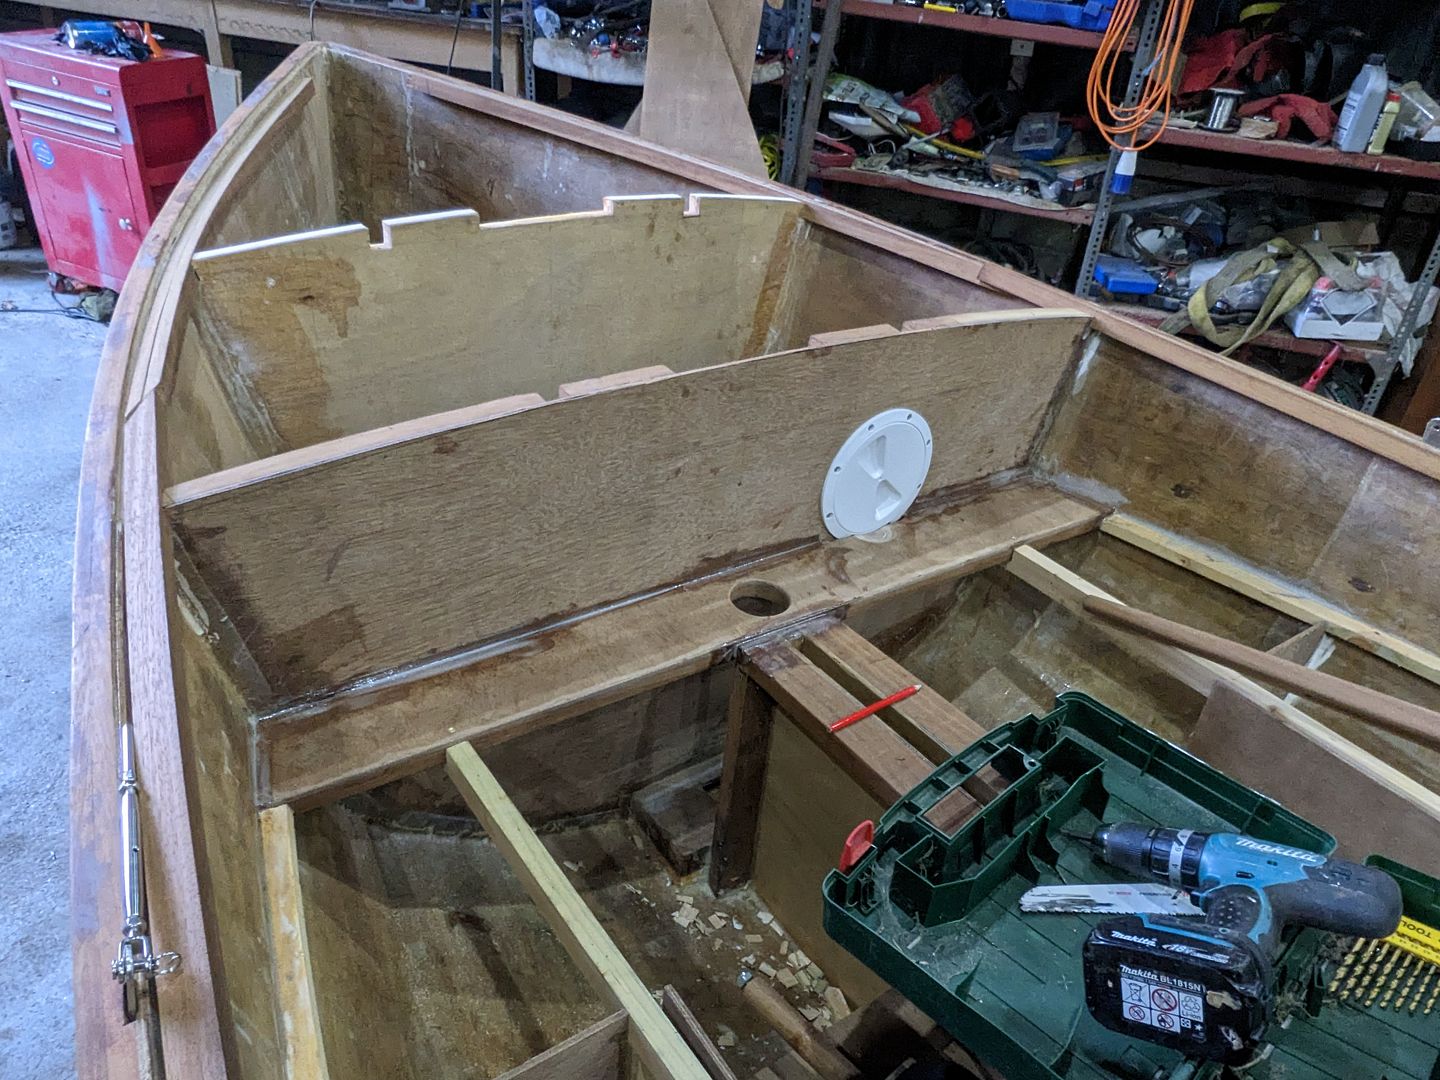
Today I cut some wood into several smaller pieces of wood. Very useful huh? Actually today I made a good start on the foredeck. This is two halves of 6mm ply which wasn't too hard really. The overall task and much of today's sawdust, noise and time was spent making a consistent 6mm deep rebate into the hull planks for the deck to sit in flush with the gunwales, then fair off both of the bulkheads, batons and the big breasthook accordingly. It's all done now.
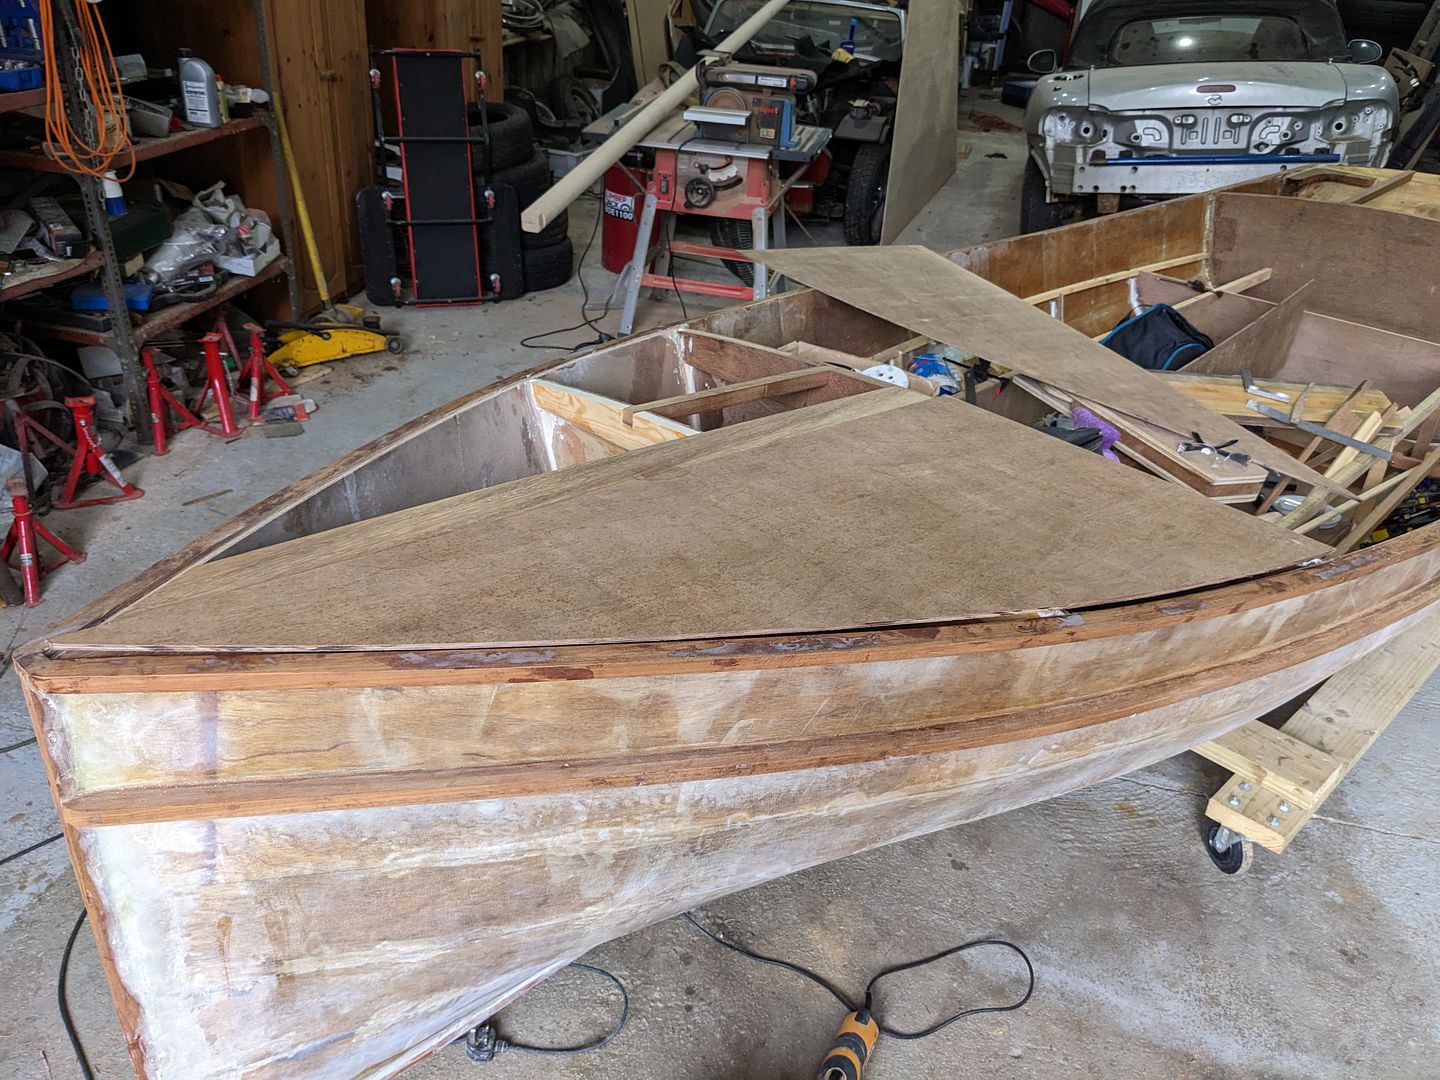
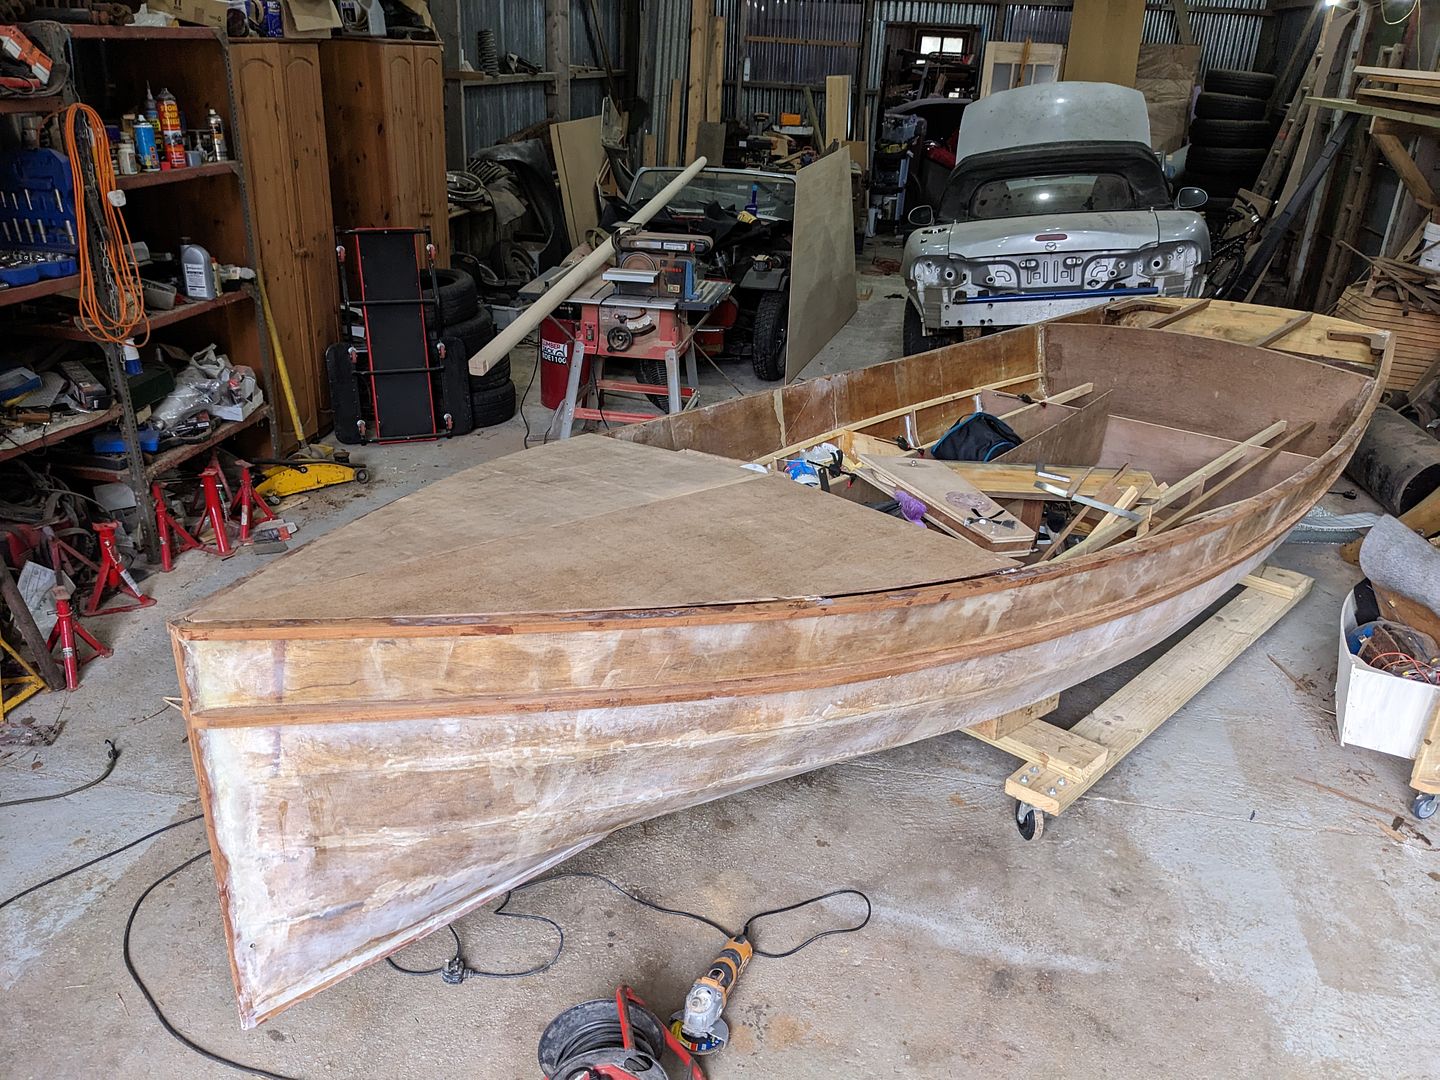


The deck could be glued down now leaving only final trimming of the aft edge which is close but I've deliberately left a couple of millimetres long for later. What I'm actually going to do next however is build the bowsprit, fabricate the bowsprit's fittings from stainless steel, and build out framing for a hatch either side of the batons to give access to the void between the bulkheads for some extra storage. I'll also be fitting some chunky hardwood back to back with the gunwale which I can mount some cleats too for tieing the boat up securely - one doesn't want those attached to 6mm plywood only! Once all that's done, then I'll glue the deck down with blind fittings to bolt down the bowsprit hardware to the breasthook.
The deck could be glued down now leaving only final trimming of the aft edge which is close but I've deliberately left a couple of millimetres long for later. What I'm actually going to do next however is build the bowsprit, fabricate the bowsprit's fittings from stainless steel, and build out framing for a hatch either side of the batons to give access to the void between the bulkheads for some extra storage. I'll also be fitting some chunky hardwood back to back with the gunwale which I can mount some cleats too for tieing the boat up securely - one doesn't want those attached to 6mm plywood only! Once all that's done, then I'll glue the deck down with blind fittings to bolt down the bowsprit hardware to the breasthook.
I should have been making paint today but the paint machine is broken and we're awaiting a replacement part, so, dinghy it is!
It's been fairly productive and both daughters stayed off their phones/chromebooks etc to help.
First we cut out the blanks for the bowsprit from a rough sawn Douglas Fir board. This proved to be a lovely straight and close grained piece of wood once cleaned up. The diameter will eventually be 45mm for about half its length and tapered forward of this. Overall length is just shy of 2 metres. You'll have to imagine it round though because gluing it up is as far as this could go today.


It seemed a shame to waste the day (and the labour) though so we cut up another Iroko board and machined up 25mm square strips for the inner rails. The board isn't/wasn't long enough for the whole length of the boat so these will need spliced in. Obviously I had to mark out and cut corresponding notches out of the bulkheads to let these in. Overall it went smoothly.

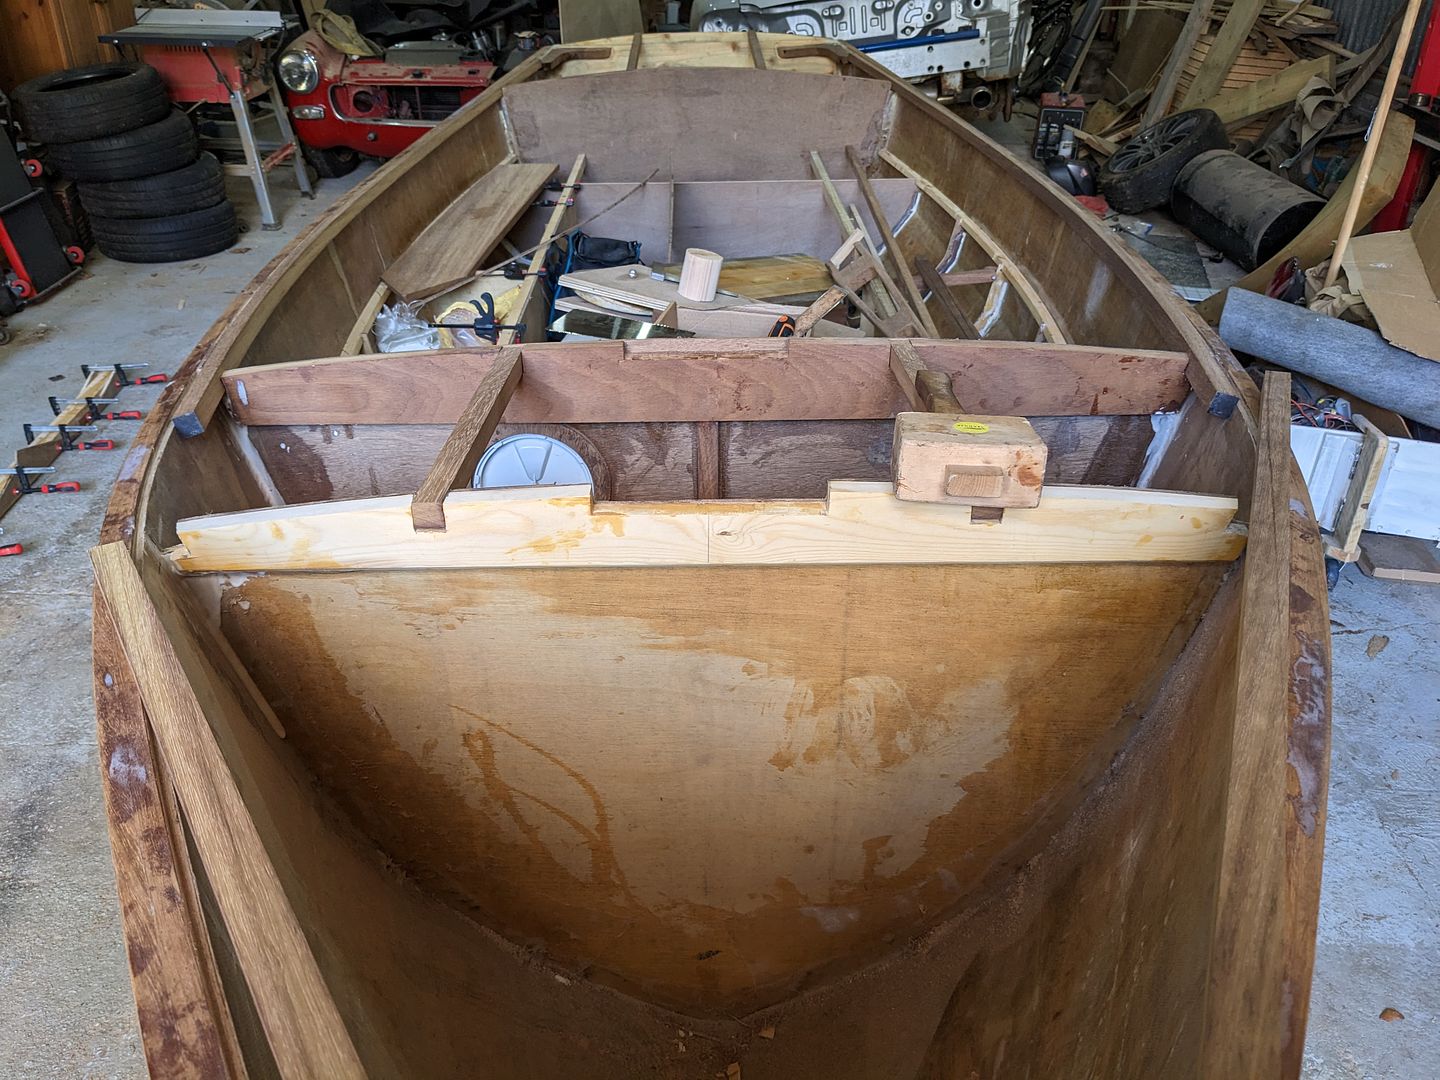
To make the splice less visible and also where the strength these parts bring is less needed (i.e. the open cockpit area) I'm placing them forward. Without resorting to steam I realised after a few trials that I wasn't going to be able to bend the forward lengths in without breaking something.
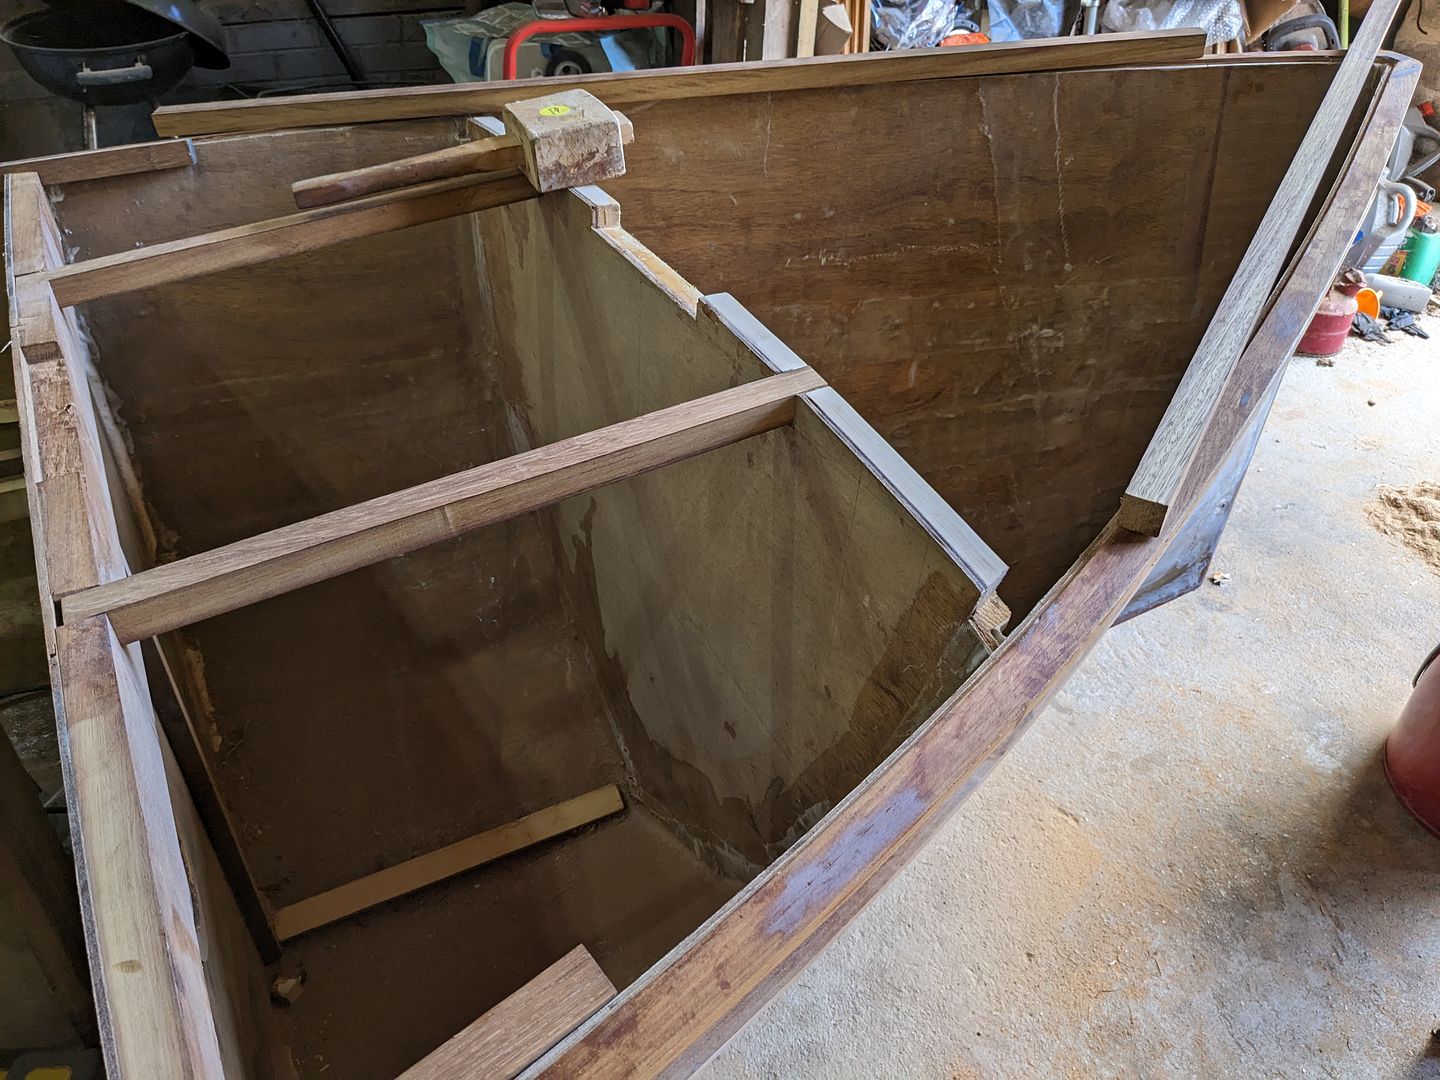
Instead I whizzed the short forward bits through the bandsaw and the resulting two strips half the thickness bend into place easily.
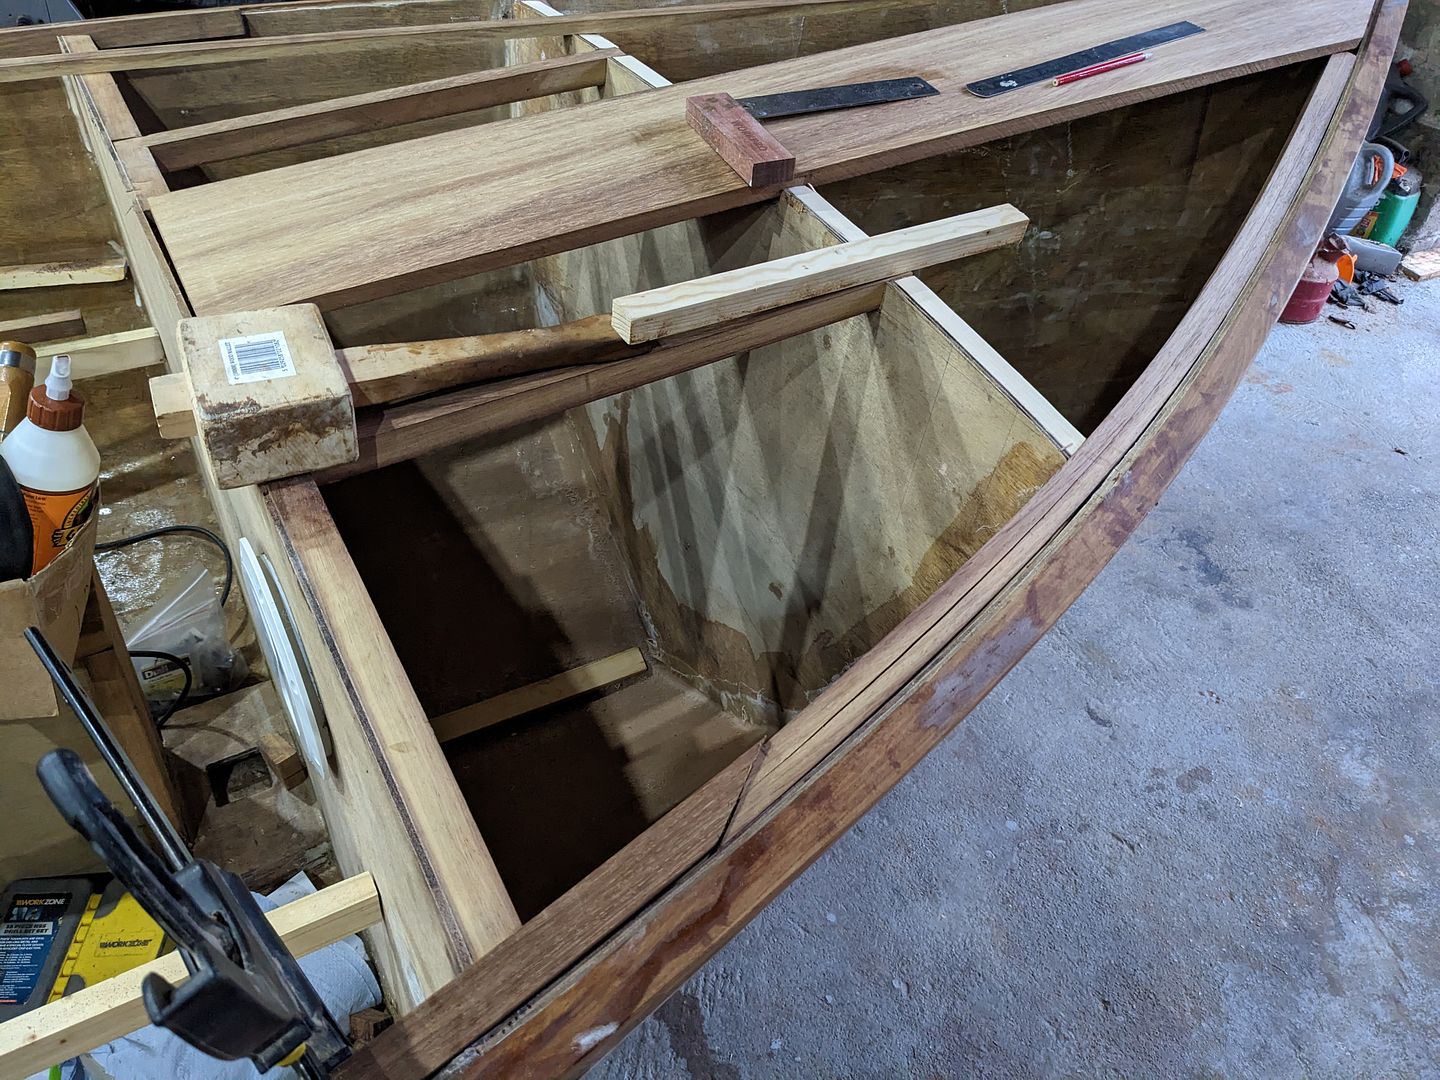
I still need to cut the splice out of the long piece on the other side, and I need to trim the forward ends to fit the breast hook. Basically I'm done for the night though as I need the clamps which are on the bowsprit before I can epoxy all this in. It really is true that one can never have too many clamps. Unfortunately it's also true that one also never has enough money, so a line must be drawn somewhere and patience will supply the necessary clamps.
It's been fairly productive and both daughters stayed off their phones/chromebooks etc to help.
First we cut out the blanks for the bowsprit from a rough sawn Douglas Fir board. This proved to be a lovely straight and close grained piece of wood once cleaned up. The diameter will eventually be 45mm for about half its length and tapered forward of this. Overall length is just shy of 2 metres. You'll have to imagine it round though because gluing it up is as far as this could go today.
It seemed a shame to waste the day (and the labour) though so we cut up another Iroko board and machined up 25mm square strips for the inner rails. The board isn't/wasn't long enough for the whole length of the boat so these will need spliced in. Obviously I had to mark out and cut corresponding notches out of the bulkheads to let these in. Overall it went smoothly.
To make the splice less visible and also where the strength these parts bring is less needed (i.e. the open cockpit area) I'm placing them forward. Without resorting to steam I realised after a few trials that I wasn't going to be able to bend the forward lengths in without breaking something.
Instead I whizzed the short forward bits through the bandsaw and the resulting two strips half the thickness bend into place easily.
I still need to cut the splice out of the long piece on the other side, and I need to trim the forward ends to fit the breast hook. Basically I'm done for the night though as I need the clamps which are on the bowsprit before I can epoxy all this in. It really is true that one can never have too many clamps. Unfortunately it's also true that one also never has enough money, so a line must be drawn somewhere and patience will supply the necessary clamps.
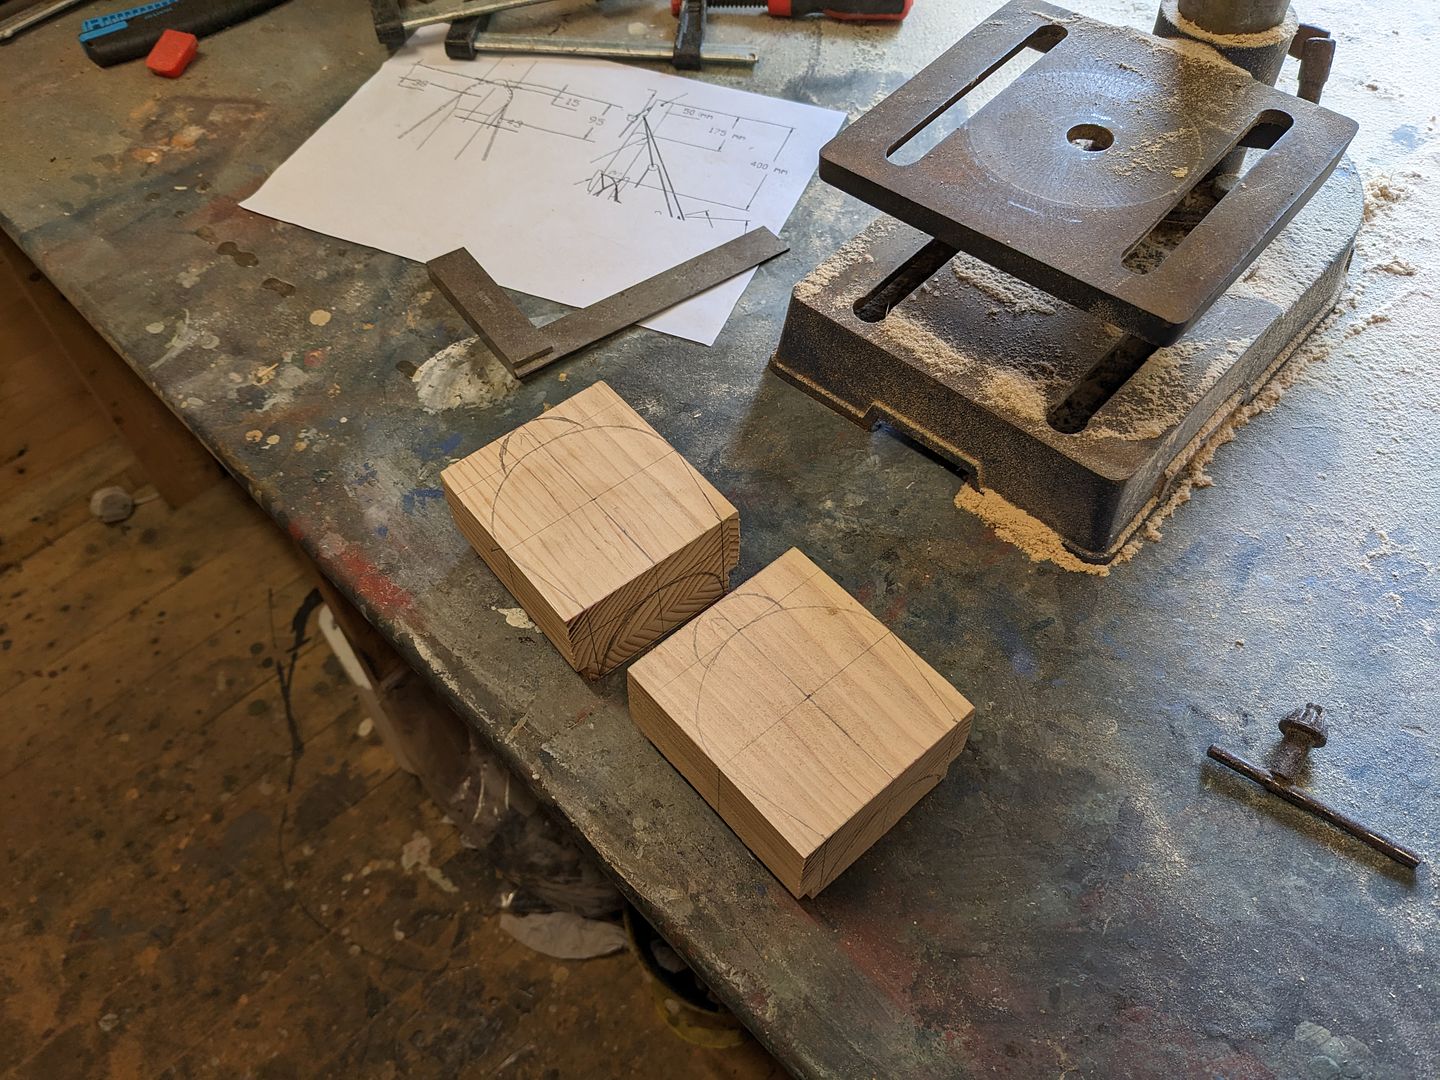
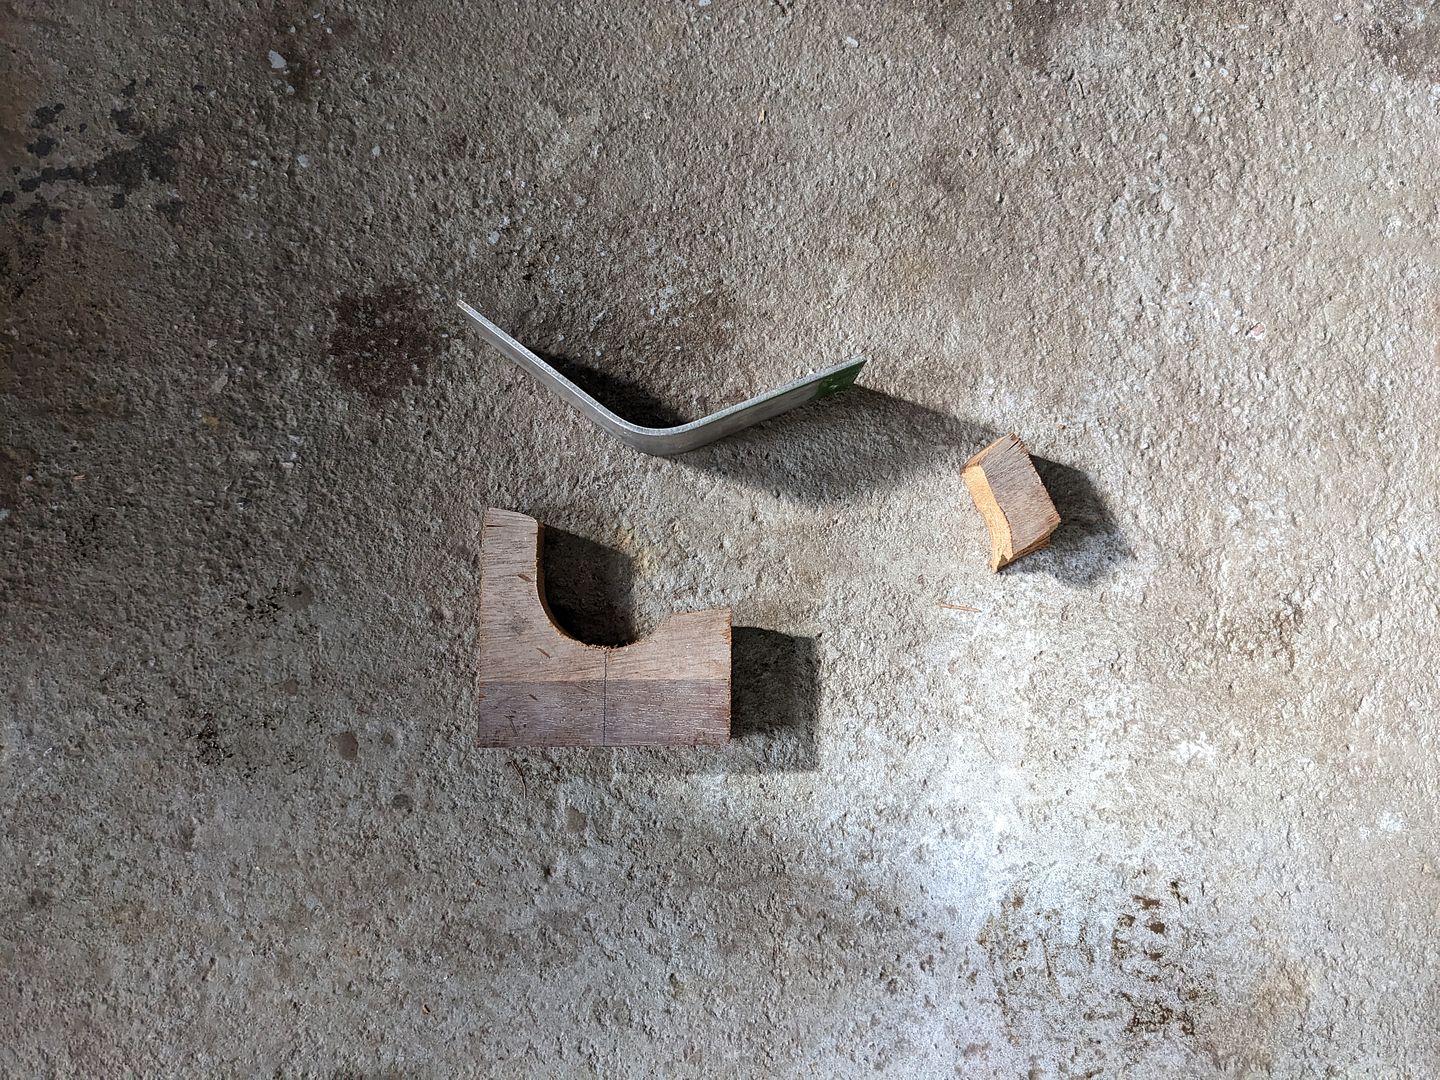
I've made a start on the mast partner using Iroko. I've had a bit of a visit from the eff-up fairy though in that I managed to mis-remember the mast diameter between checking the plans and cutting a hole. The mast is 75mm, and the hole is only 70mm. Not the end of the world but I've made more work for myself...
dhutch said:
As always, tremendous progress and good work well done.
Makes perfect sense have a splice and two thinner strips on the inside of the bow locker, as said you will never know or see it!
I would love to have the amount of covered space you havezl, and if I had it I would have a band saw! Might even get the time and energy needed to use it occasionally.
It is really good to have it actually, and indeed was one of the things my wife and I agreed was a key feature when house shopping back in 2013/2014. We didn't actually have too many requirements other than enough bedrooms, a bit of character, space around us without curtain twitchers and an outbuilding of sorts for all my indulgences.Makes perfect sense have a splice and two thinner strips on the inside of the bow locker, as said you will never know or see it!
I would love to have the amount of covered space you havezl, and if I had it I would have a band saw! Might even get the time and energy needed to use it occasionally.
That said, I'm sure I'm getting softer with age as I still resent having to do jobs on the cars when I'm not in the mood citing cold and damp as reasons not to do them. I used to have to do them outside on a stone driveway! Now I find myself wishing it was all insulated and heated. So much for having some self respect!
Another chunk of time has flown by but I haven't been entirely idle (although admittedly rather consumed by work).
My younger daughter loves making and editing videos, mostly related to Minecraft and Roblox gaming popular with her age group but I persuaded her to make a short on showing the sanding tool we made for final rounding of the spars. I marvel at what kids can do and what tools are available to do it these days, speaking as a 42 year old who was fairly tech-savvy himself at a similar age. That it can all be done by an 11 year old on a smart phone is amazing really.
So that's that.
I'm going on my sail making course later this month which I'm really looking forward to. I'm already fairly comfortable with the theory, maths and design aspect but expect I'll be worse than useless with the sewing machine. The good news is my wife is coming on the course too and she's quite a proficient amateur seamstress who churns out handbags, jackets, dresses, T-shirts, jumpers, trousers and dresses on a whim over a weekend between all the Parents Taxi service duties. Between us, we should have the skills to make and maintain our more traditional type sails. We won't be competent to make the modern high-tech racing sails but we're not bothered about that.
We have chosen the nice clipper canvas material, are not having luff wires, and are having brass piston hanks for the two headsails attaching them to standing stays i.e. neither will be set flying. We'll be making the gaff ourselves at home. The staysail (the inner jib) is going to be cross cut and the jib (outer) is going to be mitre cut.
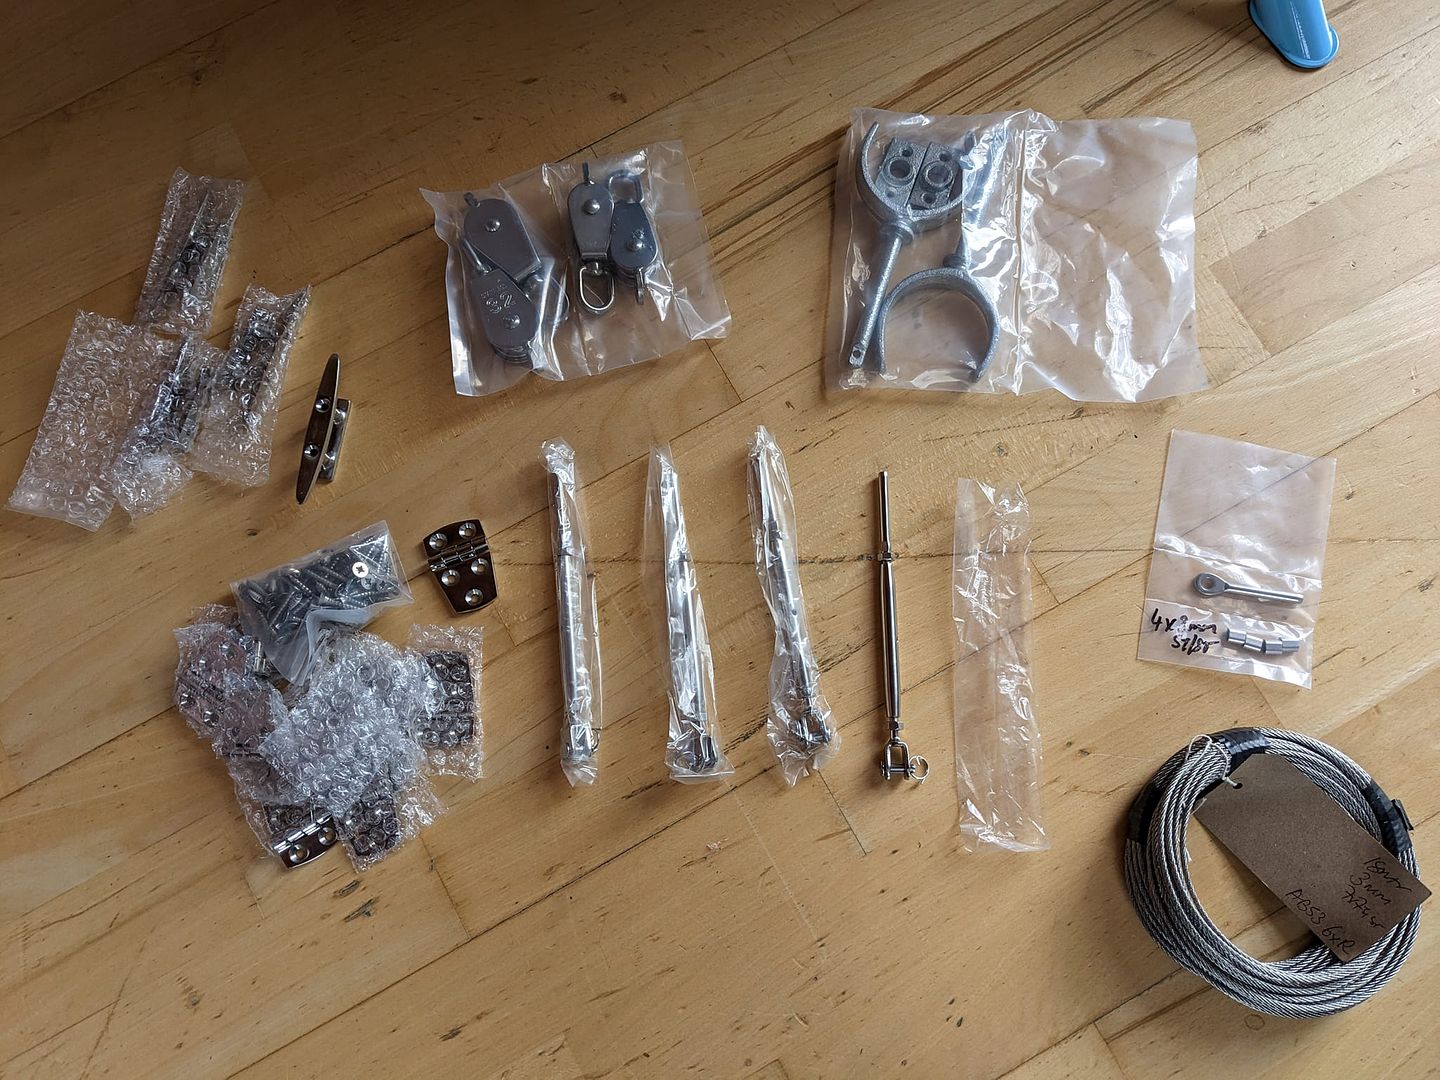
As I work towards turning the wooden poles into actual spars, the attachments for the rigging turned up yesterday albeit in kit form. Behold some stainless steel flat and round bar. I've got a new reel of 316 welding wire and already have argon gas down in the garage too. I can mig weld mild steel alright but have never welded stainless before so I'll sacrifice a few small bits to practise on before going for the actual fittings.

I have, off the top of my head, the following metal fittings to make:
2 x Chain Plates (cut only)
3 x Fittings for the bowsprit (bent and welded)
1 x Strap for the boom gooseneck (bent and welded)
Maybe 1 x fitting for the top of the mast to assist attaching the forestays (bent and welded)
1 x horse for the boom sheet traveller over the tiller (bent and welded)
2 x rudder pintle modifications to suit my bigger headstock (bent and welded)
1 x Fitting for the bobstay attachment to the stem (cut only)
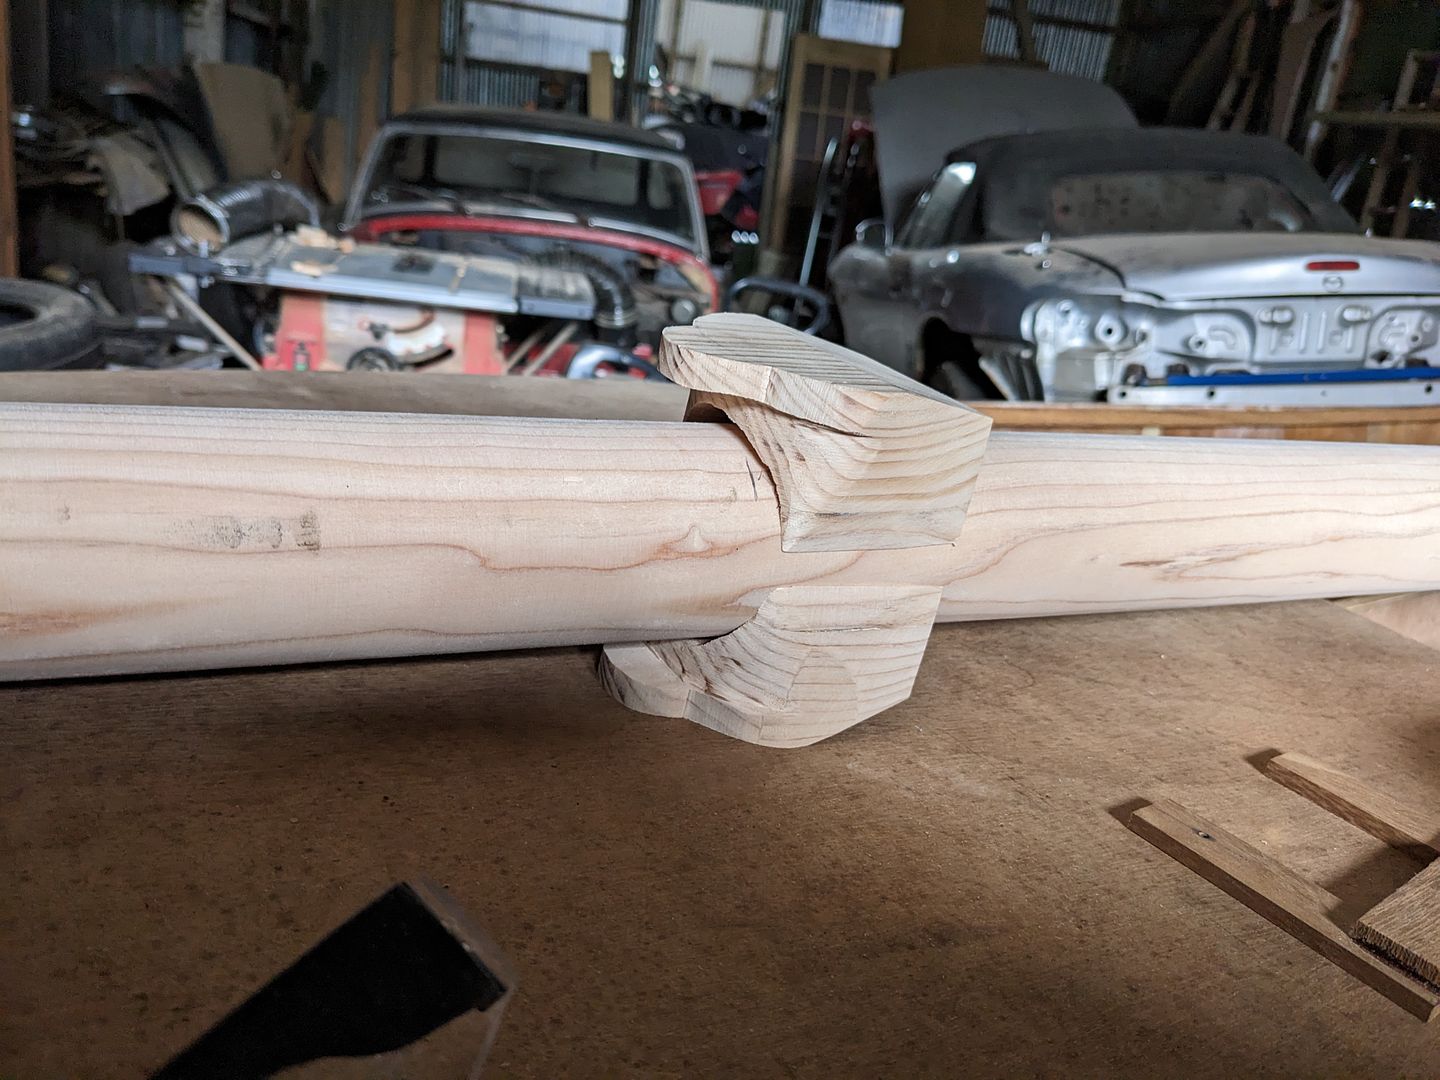
In addition, I've been trying to find the shroud partners inside two chunky blocks of Douglas Fir I had to glue up. These are close enough now that I know they'll be successful - they just need final opening out to perfectly fit the mast taper at the height they attach at and final hand finishing. After that they'll be glued on and the mast is ready for varnishing, which is quite exciting really!
I've just whilst typing this had notification that another package is arriving this afternoon which has my stainless steel deck cleats, most of the pulley blocks, enough 3mm 7x7 stainless steel cable, swage sleeves etc and turn buckles to make the standing rigging and fully finish the mast and bowsprit off. I'm feeling quite motivated to press on now as it feels like it's going to start to turn into a functioning boat soon rather than a 16ft long garden planter.
Alas, I am compelled to work to pay the bills though...
My younger daughter loves making and editing videos, mostly related to Minecraft and Roblox gaming popular with her age group but I persuaded her to make a short on showing the sanding tool we made for final rounding of the spars. I marvel at what kids can do and what tools are available to do it these days, speaking as a 42 year old who was fairly tech-savvy himself at a similar age. That it can all be done by an 11 year old on a smart phone is amazing really.
So that's that.
I'm going on my sail making course later this month which I'm really looking forward to. I'm already fairly comfortable with the theory, maths and design aspect but expect I'll be worse than useless with the sewing machine. The good news is my wife is coming on the course too and she's quite a proficient amateur seamstress who churns out handbags, jackets, dresses, T-shirts, jumpers, trousers and dresses on a whim over a weekend between all the Parents Taxi service duties. Between us, we should have the skills to make and maintain our more traditional type sails. We won't be competent to make the modern high-tech racing sails but we're not bothered about that.
We have chosen the nice clipper canvas material, are not having luff wires, and are having brass piston hanks for the two headsails attaching them to standing stays i.e. neither will be set flying. We'll be making the gaff ourselves at home. The staysail (the inner jib) is going to be cross cut and the jib (outer) is going to be mitre cut.
As I work towards turning the wooden poles into actual spars, the attachments for the rigging turned up yesterday albeit in kit form. Behold some stainless steel flat and round bar. I've got a new reel of 316 welding wire and already have argon gas down in the garage too. I can mig weld mild steel alright but have never welded stainless before so I'll sacrifice a few small bits to practise on before going for the actual fittings.
I have, off the top of my head, the following metal fittings to make:
2 x Chain Plates (cut only)
3 x Fittings for the bowsprit (bent and welded)
1 x Strap for the boom gooseneck (bent and welded)
Maybe 1 x fitting for the top of the mast to assist attaching the forestays (bent and welded)
1 x horse for the boom sheet traveller over the tiller (bent and welded)
2 x rudder pintle modifications to suit my bigger headstock (bent and welded)
1 x Fitting for the bobstay attachment to the stem (cut only)
In addition, I've been trying to find the shroud partners inside two chunky blocks of Douglas Fir I had to glue up. These are close enough now that I know they'll be successful - they just need final opening out to perfectly fit the mast taper at the height they attach at and final hand finishing. After that they'll be glued on and the mast is ready for varnishing, which is quite exciting really!
I've just whilst typing this had notification that another package is arriving this afternoon which has my stainless steel deck cleats, most of the pulley blocks, enough 3mm 7x7 stainless steel cable, swage sleeves etc and turn buckles to make the standing rigging and fully finish the mast and bowsprit off. I'm feeling quite motivated to press on now as it feels like it's going to start to turn into a functioning boat soon rather than a 16ft long garden planter.
Alas, I am compelled to work to pay the bills though...
Edited by jamieduff1981 on Thursday 13th April 09:27
Edited by jamieduff1981 on Thursday 13th April 09:30
A pile of components arrived:
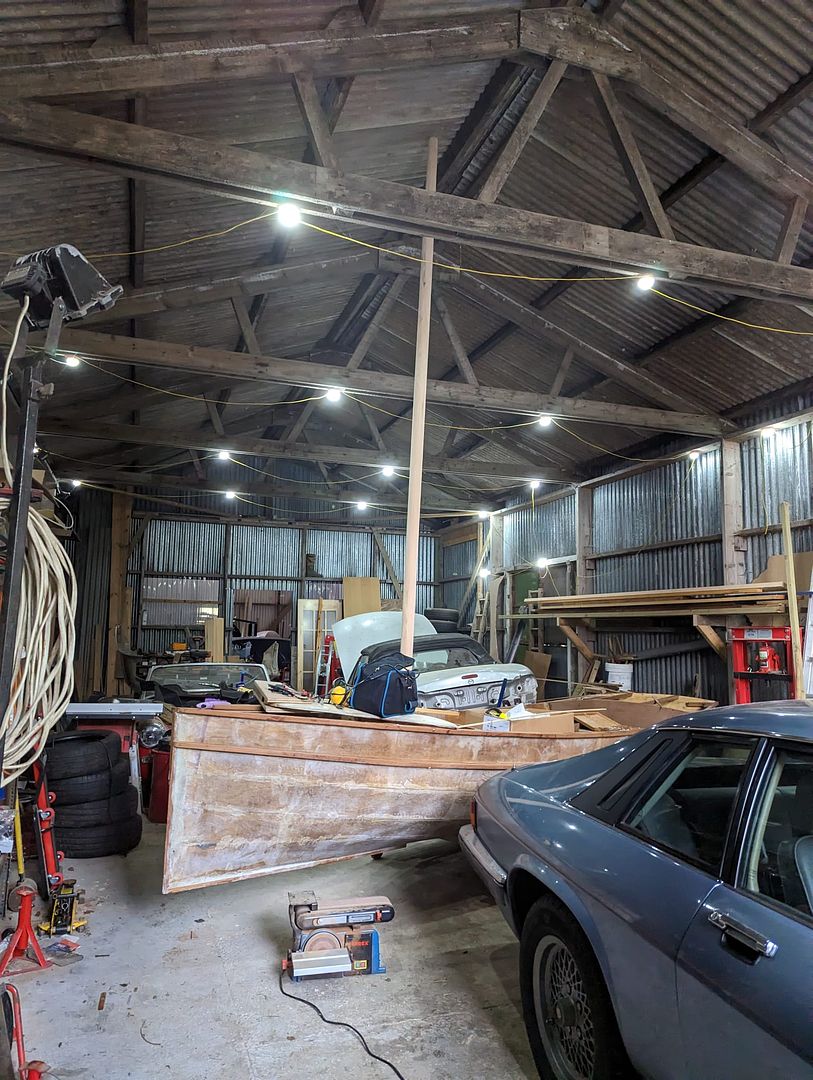
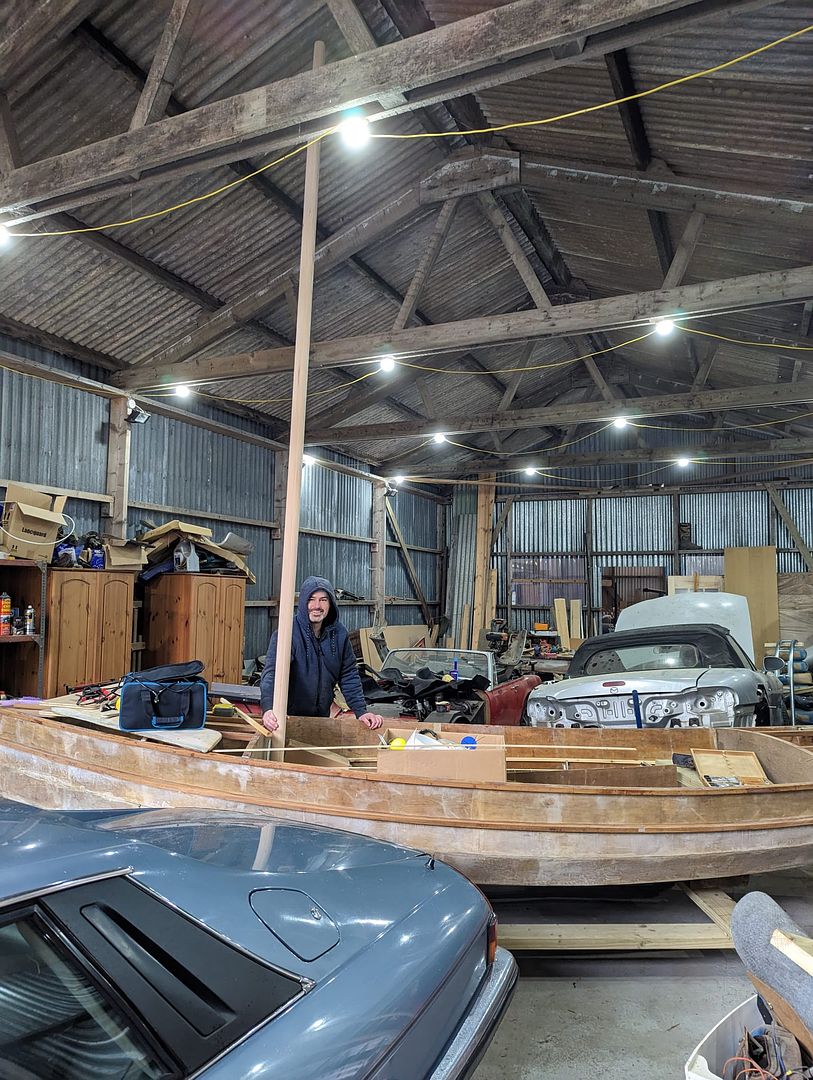
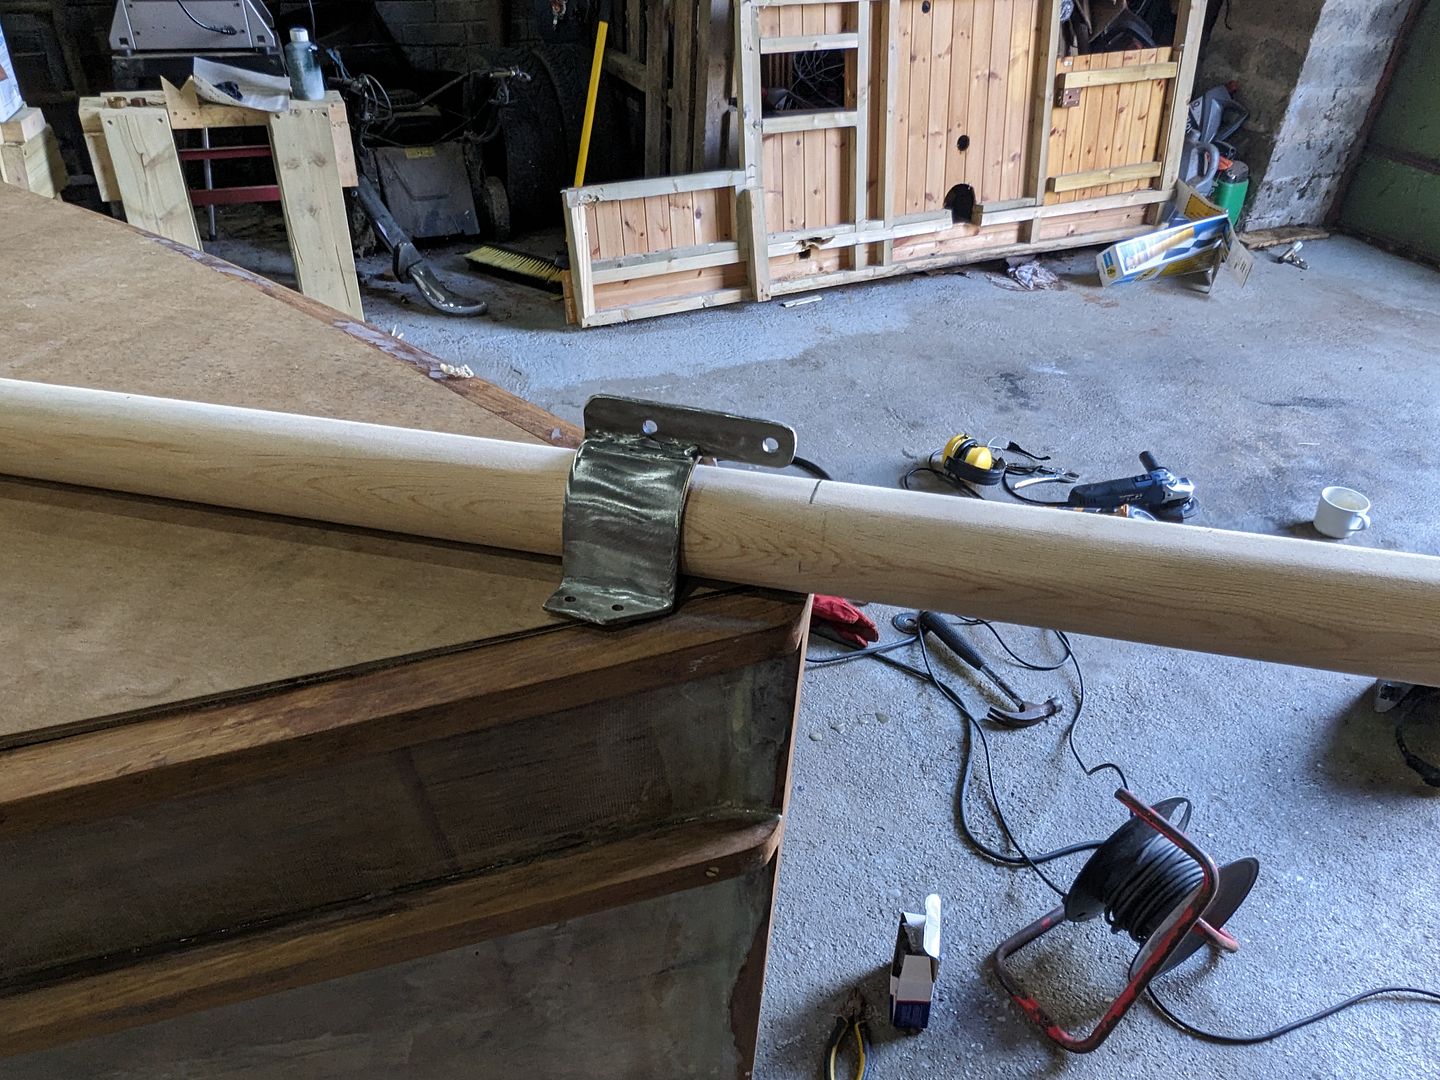
Meanwhile I got the shroud partners glued on to the mast and since it's not raining today I decided to pull the boat out of my shed and try the mast in the mast partner now that it's been sanded down to final diameter.
Obviously, since my wife and I are both proud to be rather childish at heart, it was then necessary to sit in the boat to make boaty-equivalent of broom-broom noises.
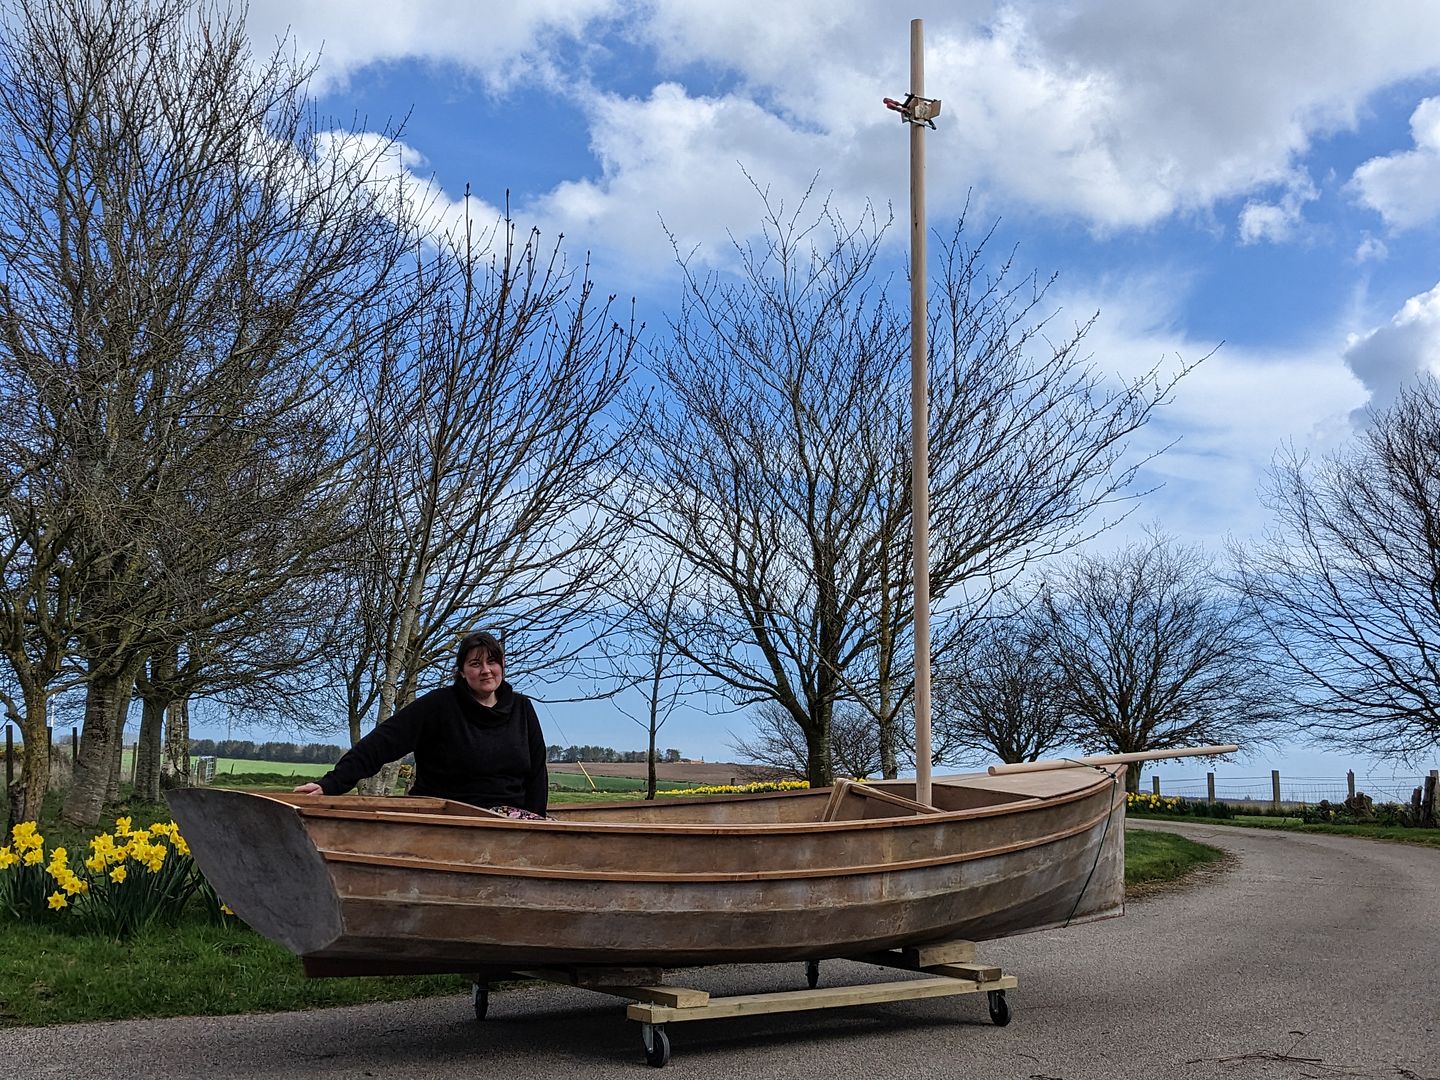
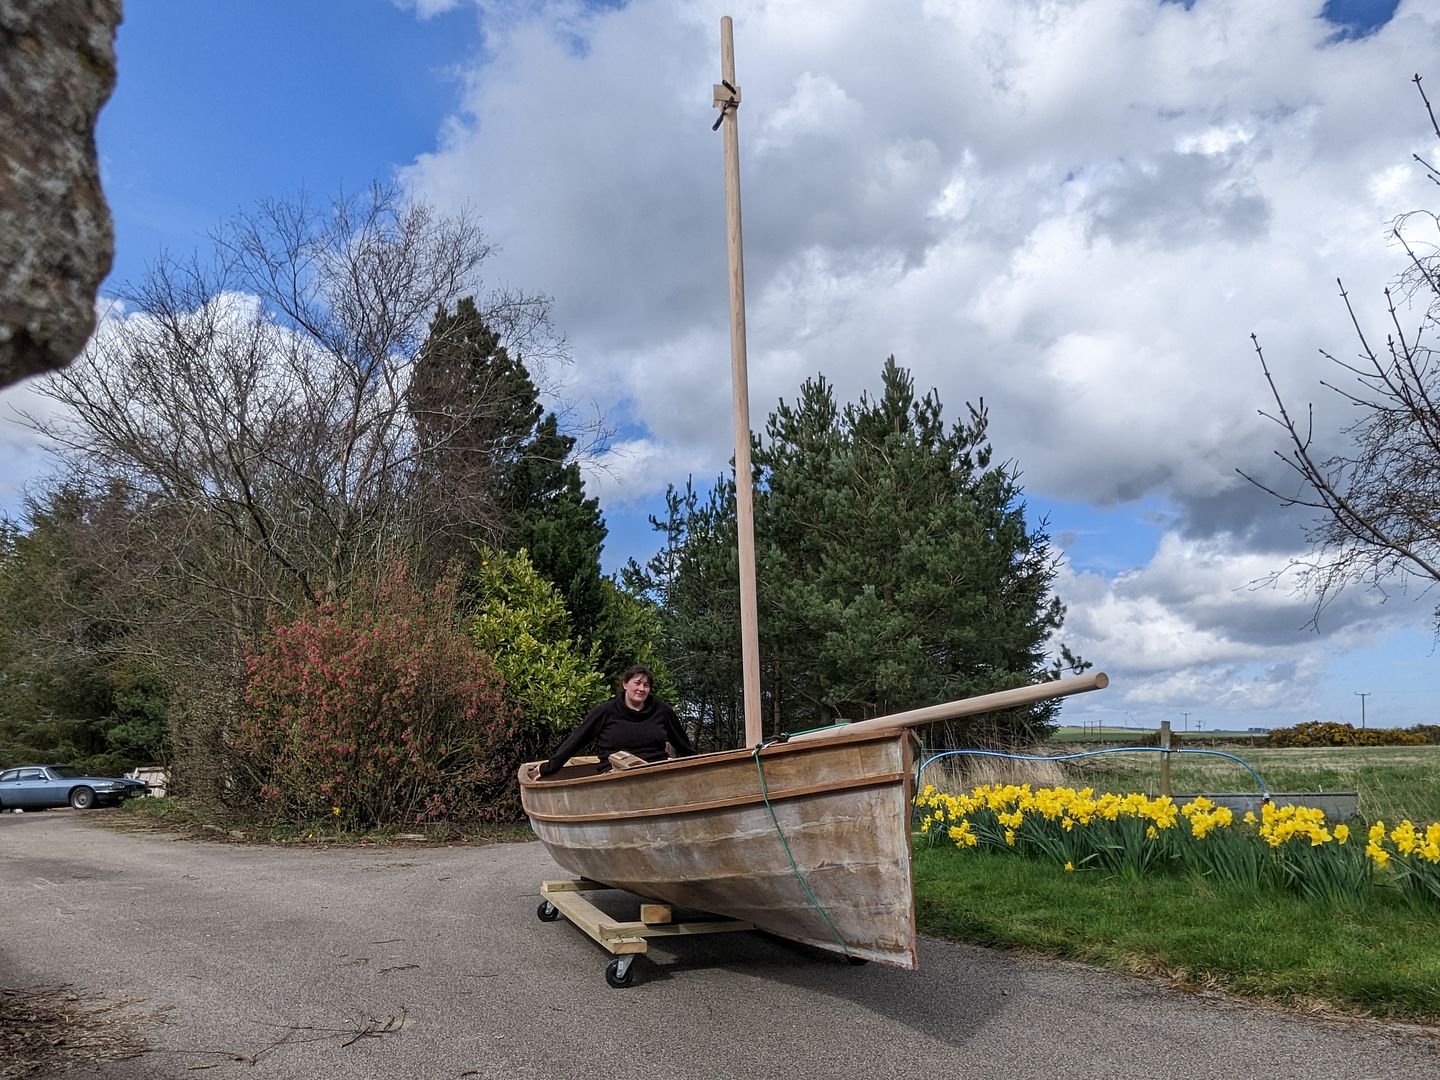
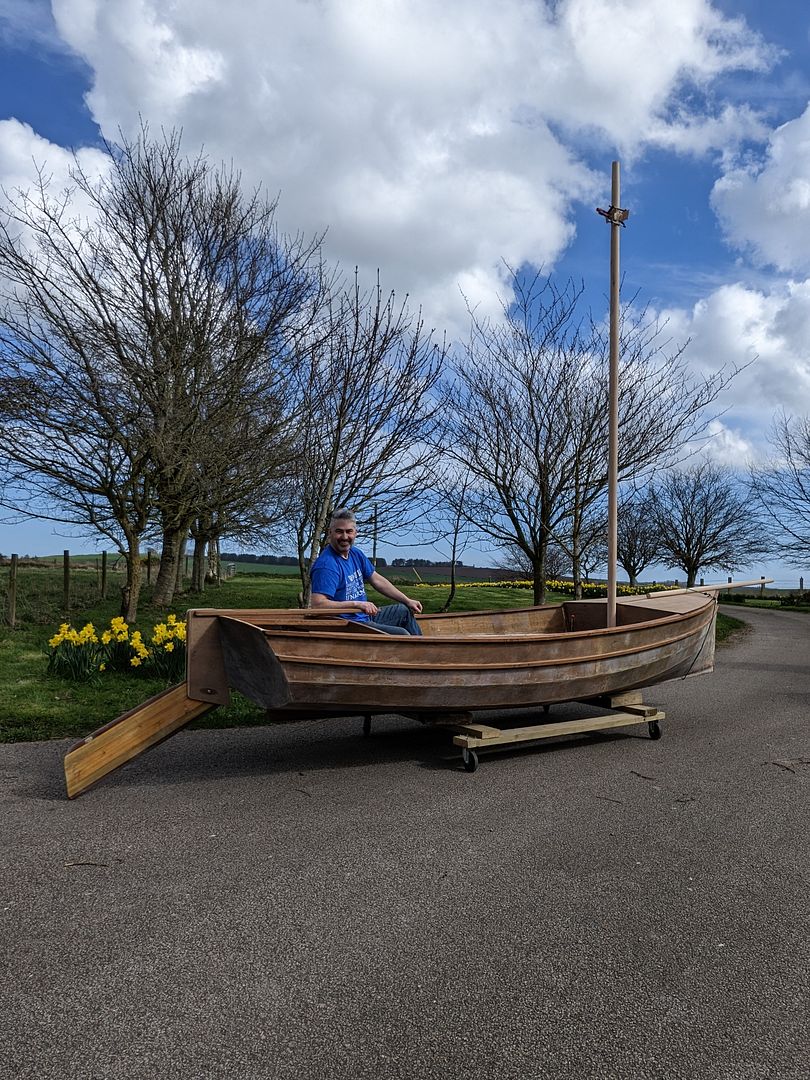
There's actually more glue curing on the boat and I think I'll pop out and glue up a few more joints. I will then be in a position to flip the boat over again, glue on the remaining two hardwood strakes either side of the daggerboard slot, fair up the hull and paint it.
Clearly I have some metalwork fabrication in my near future too now.
Meanwhile I got the shroud partners glued on to the mast and since it's not raining today I decided to pull the boat out of my shed and try the mast in the mast partner now that it's been sanded down to final diameter.
Obviously, since my wife and I are both proud to be rather childish at heart, it was then necessary to sit in the boat to make boaty-equivalent of broom-broom noises.
There's actually more glue curing on the boat and I think I'll pop out and glue up a few more joints. I will then be in a position to flip the boat over again, glue on the remaining two hardwood strakes either side of the daggerboard slot, fair up the hull and paint it.
Clearly I have some metalwork fabrication in my near future too now.
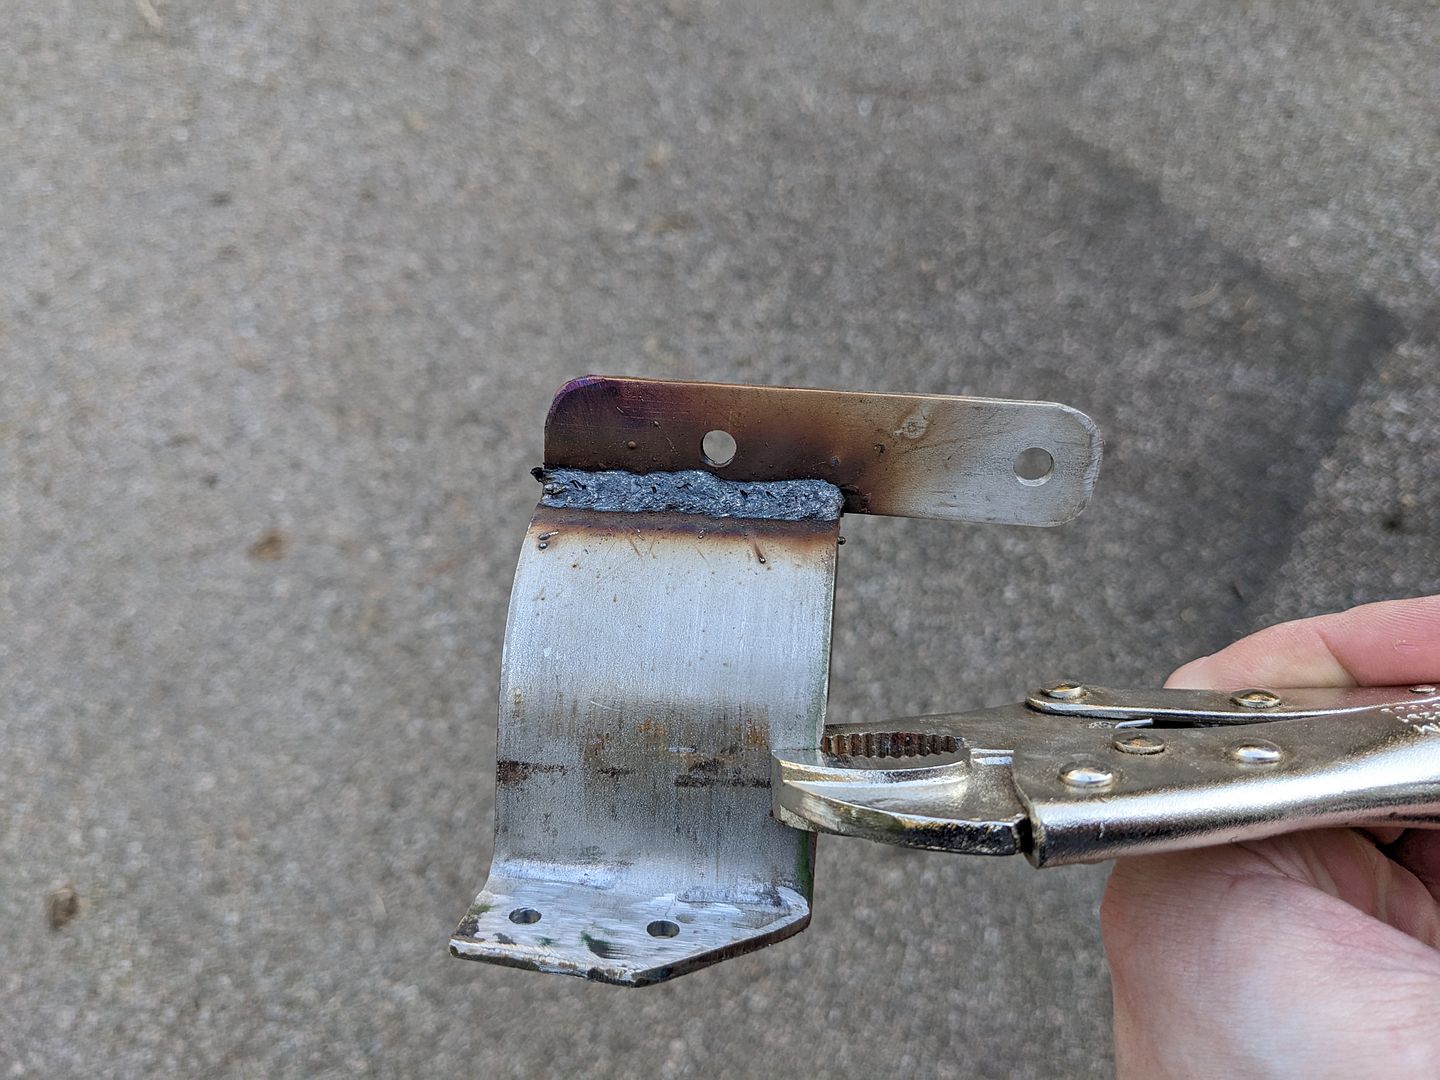
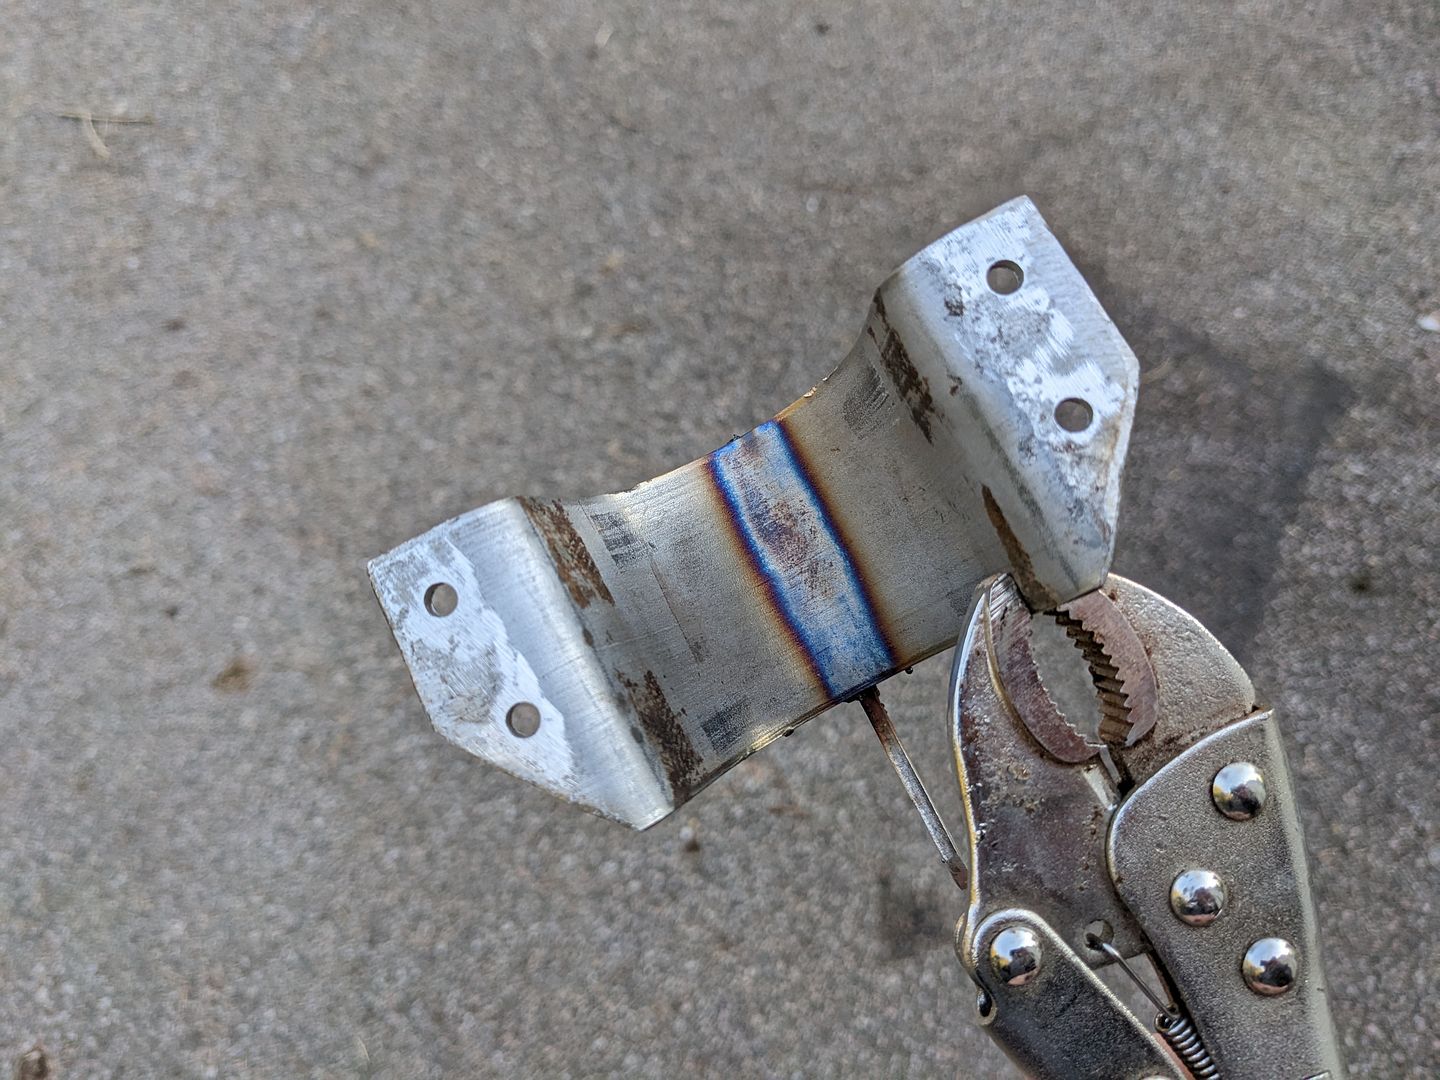
Stainless steel isn't fun to work with, but I've made the chain plates.
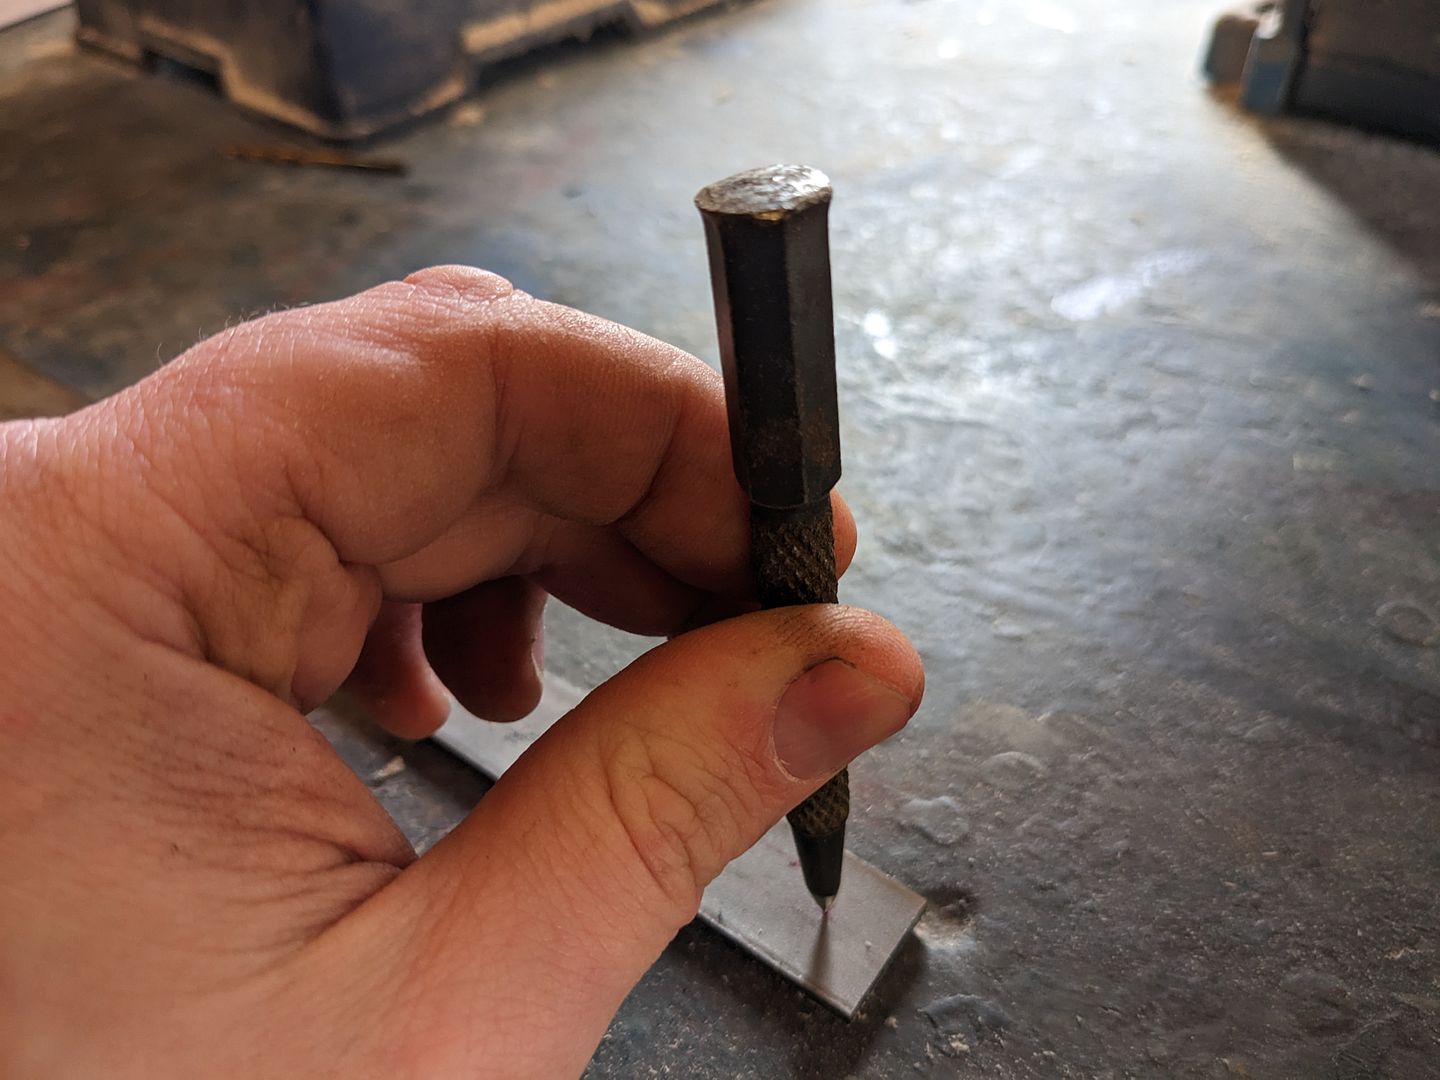
As someone more used to mild steel and aluminium, the first signs of trouble were punching the hole centres to help stop the drill bit going for a walk. Normally a sharp whack with a hammer will make a nice indentation. On 316 stainless a tiny mark is achieved and after 8 punches I need to grind a new point on my punch!
Stainless steel likes to create really sharp and nasty burrs so to avoid bleeding I've been deburring as I go from one stage to the next. My hands aren't as tough as every-day manual workers might be but I do a lot of work with my hands and generally am not easily sliced by metal edges, but equally I'm not a complete fool and there's no reward to taking risks here.
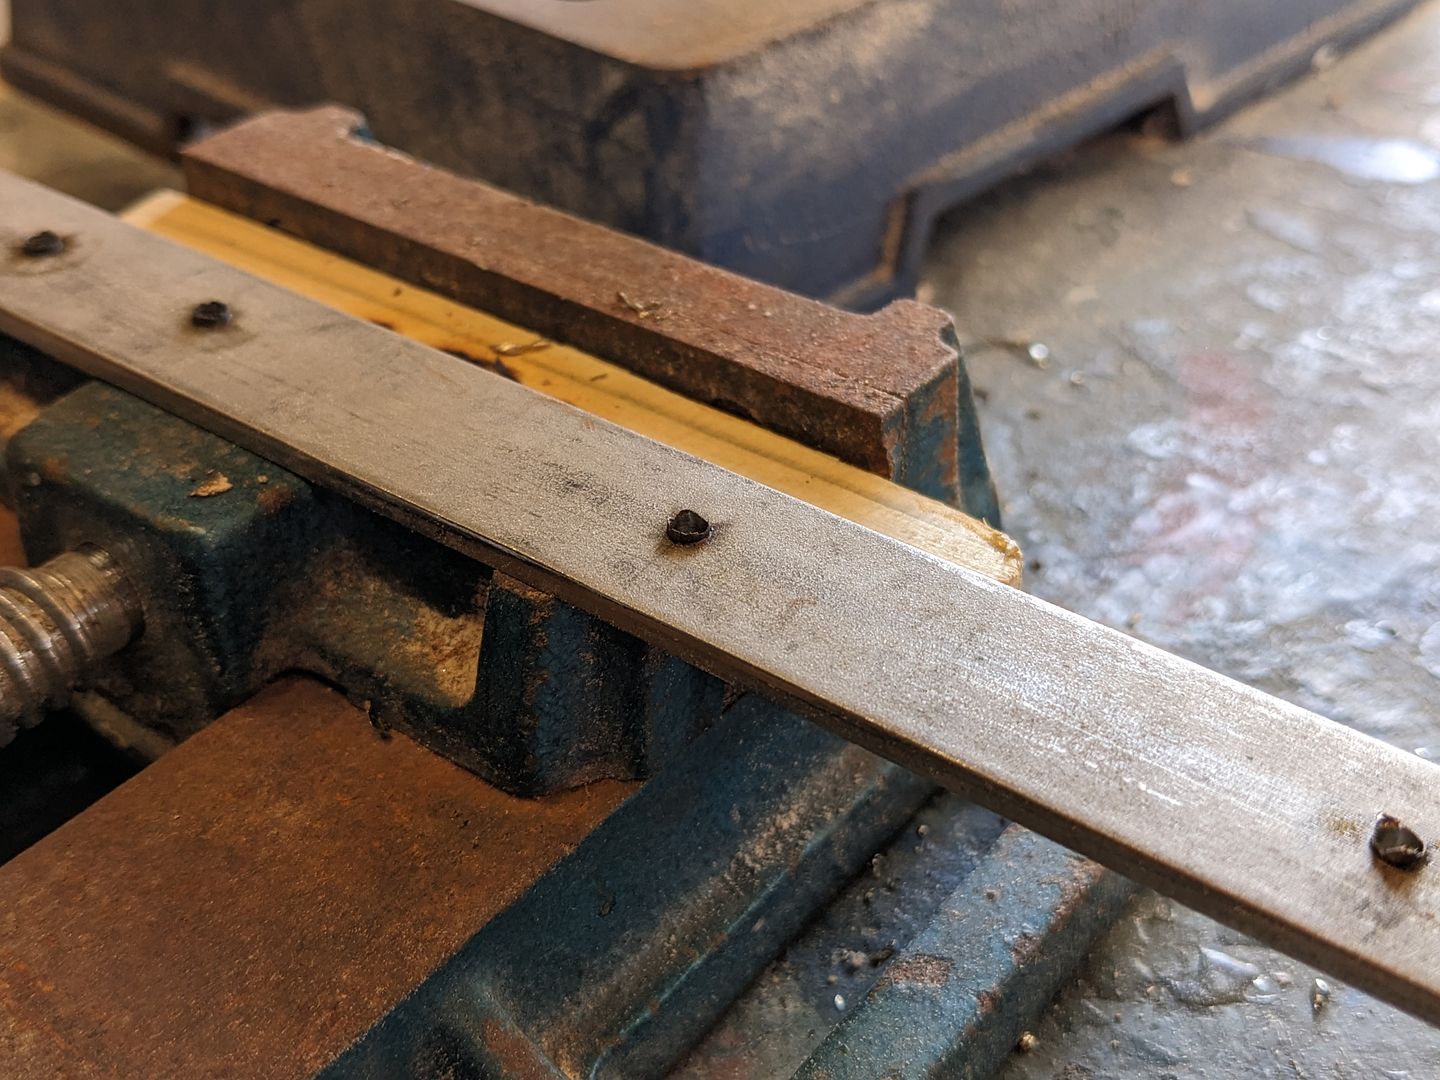
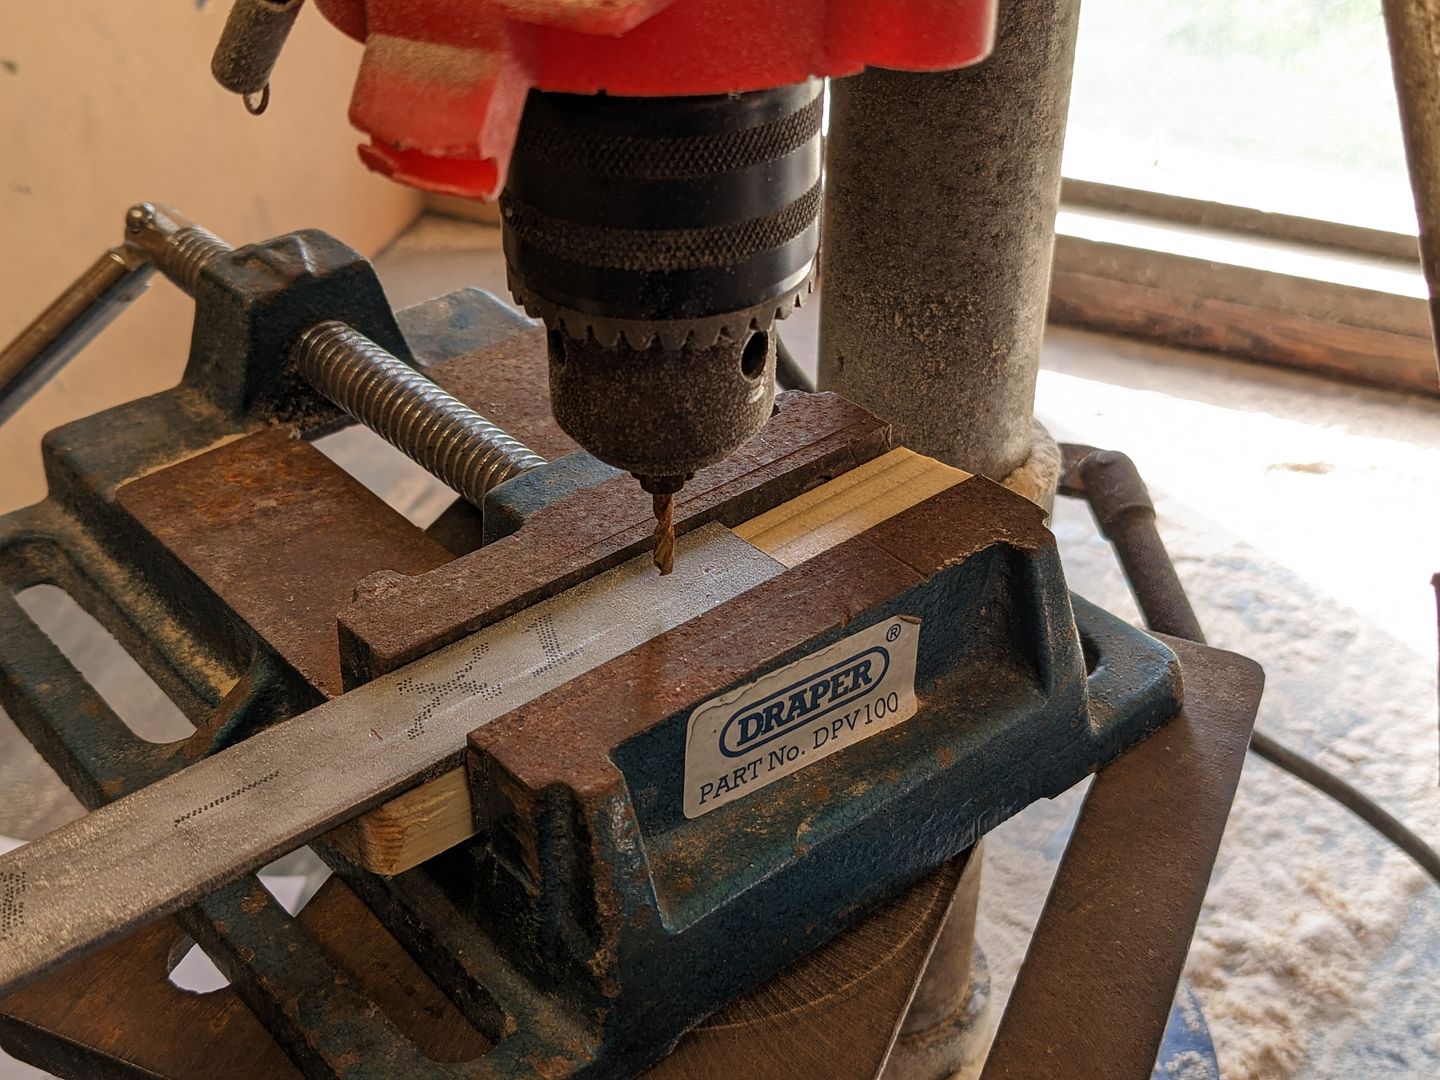
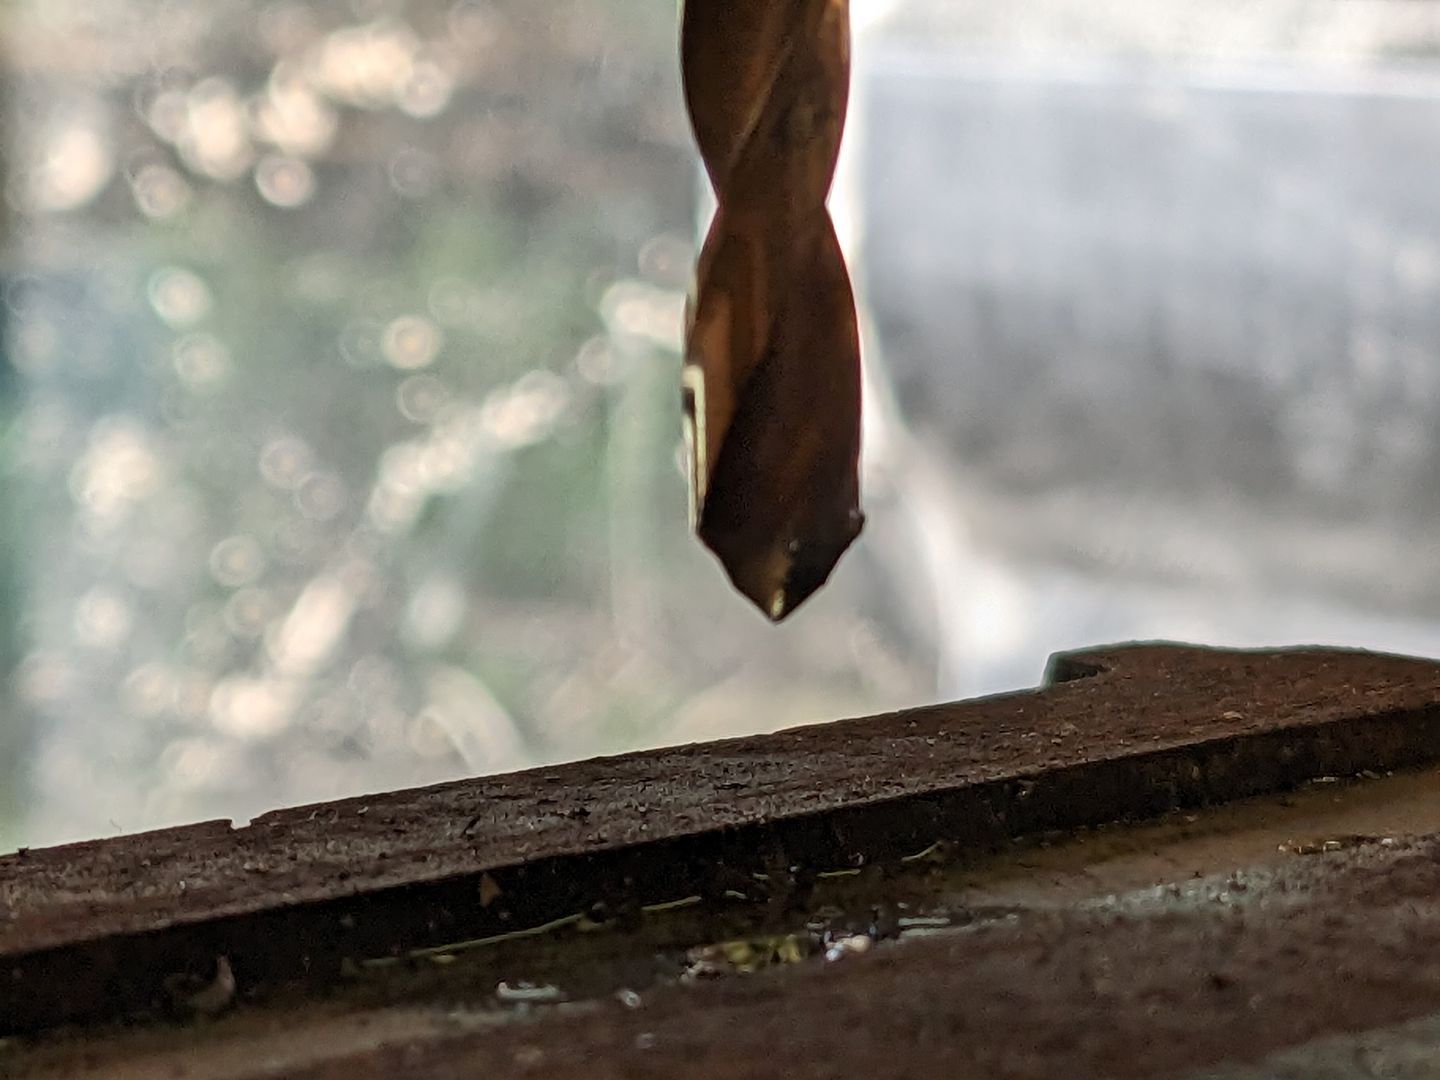
It's toasted my HSS drill bits so I've got some Cobalts on order. I have a drill sharpener but after sharpening these won't cut stainless at all so they're relegated to drilling holes in wood. That's ok. One can never have too many drill bits...
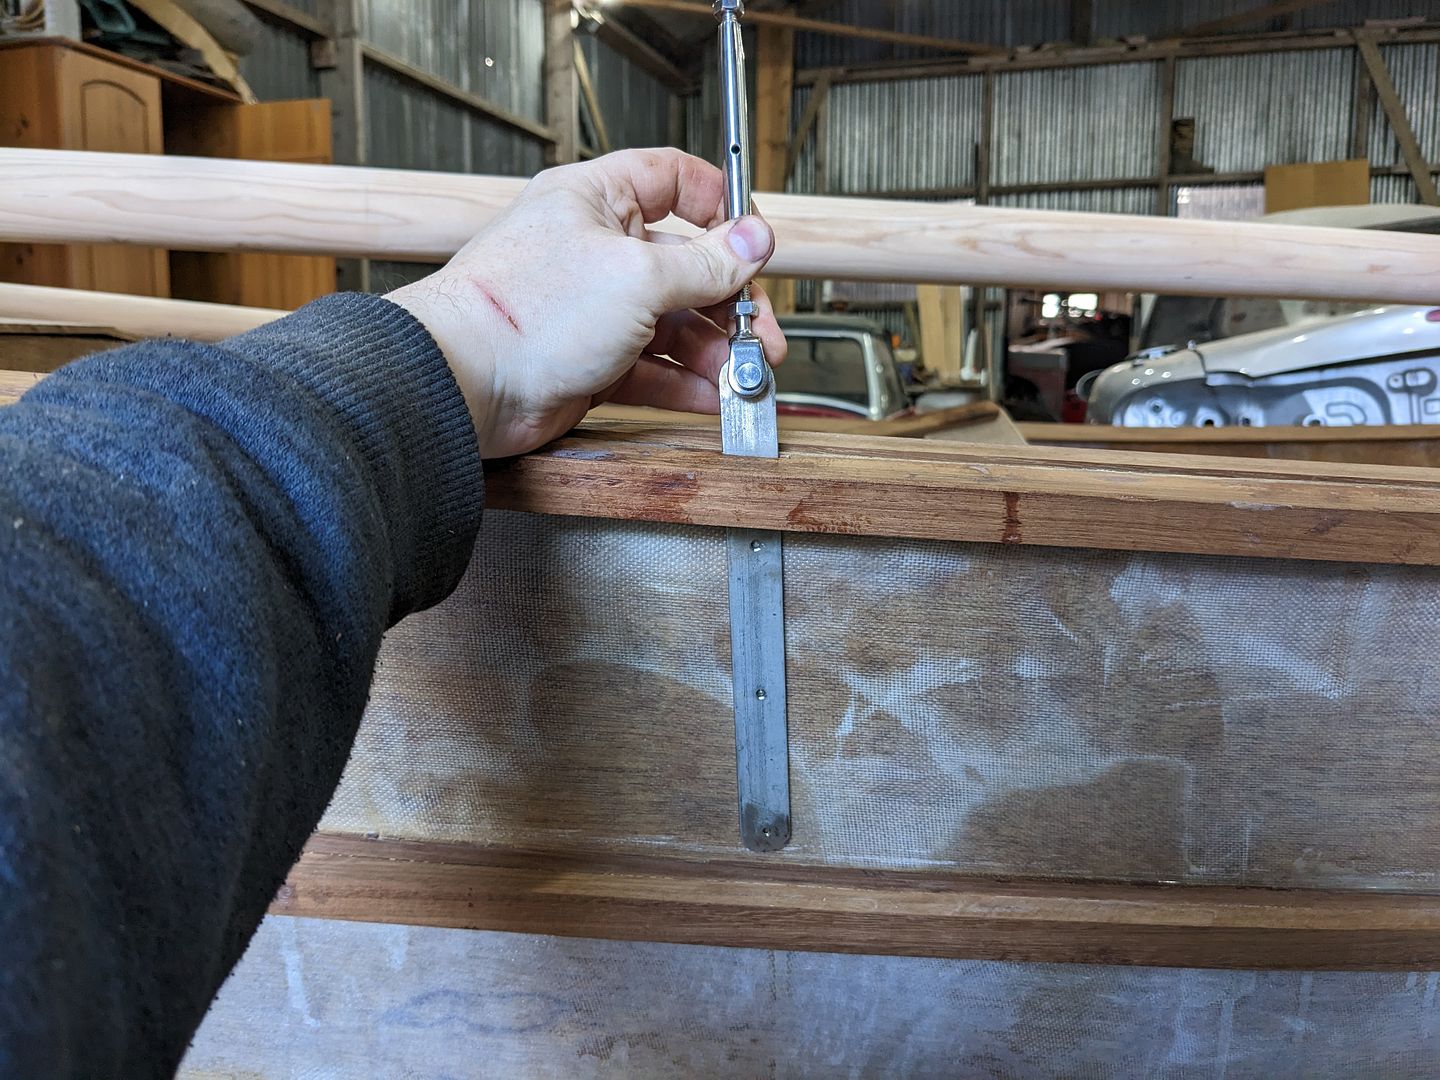
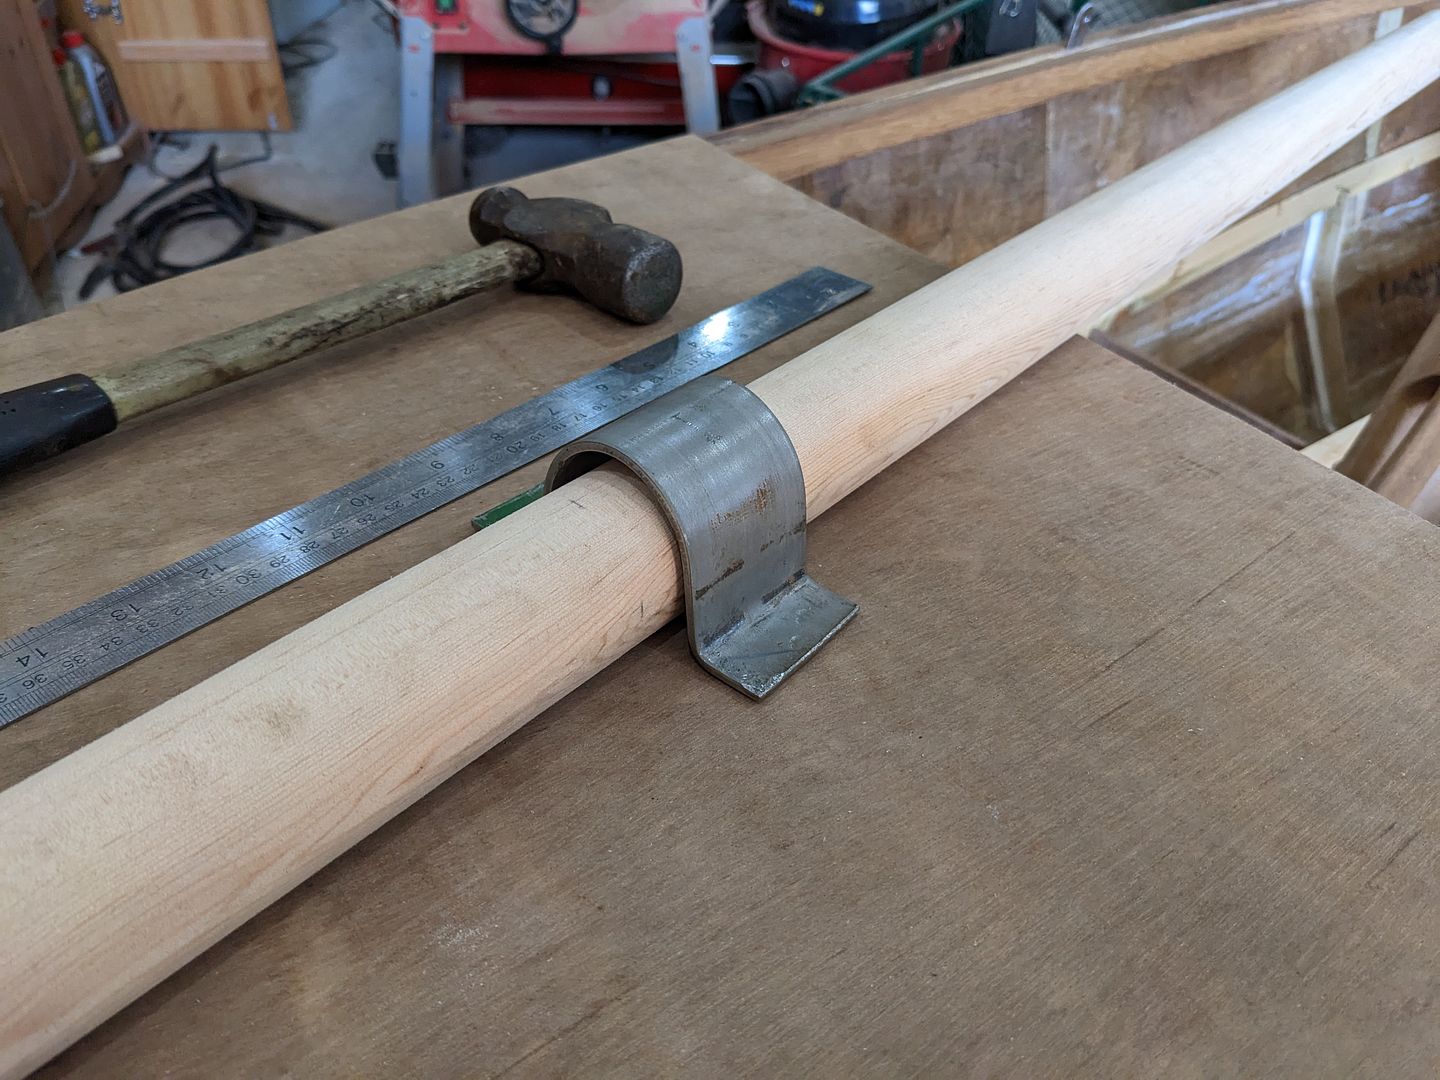
They still need to be polished up, but here is a chain plate. The 3 mounting holes still need opened out to 5mm (5mm drill bit was smoked drilling the other one) to bolt through the hull, whilst the turnbuckle's clevis pin goes through a 6mm hole. The plate has a bend above the gunwale to reverse its angle off vertical to point the turnbuckle towards the top of the mast. For rigging and de-rigging for road transport the clevis pin pulls out. Easy peasy.
At the top of the mast, the shrounds will be swaged into loops, passed over the top of the mast and guided by the partners down towards the turnbuckles something like this, if you'll excuse the roughness of a quick sketch:

As someone more used to mild steel and aluminium, the first signs of trouble were punching the hole centres to help stop the drill bit going for a walk. Normally a sharp whack with a hammer will make a nice indentation. On 316 stainless a tiny mark is achieved and after 8 punches I need to grind a new point on my punch!
Stainless steel likes to create really sharp and nasty burrs so to avoid bleeding I've been deburring as I go from one stage to the next. My hands aren't as tough as every-day manual workers might be but I do a lot of work with my hands and generally am not easily sliced by metal edges, but equally I'm not a complete fool and there's no reward to taking risks here.
It's toasted my HSS drill bits so I've got some Cobalts on order. I have a drill sharpener but after sharpening these won't cut stainless at all so they're relegated to drilling holes in wood. That's ok. One can never have too many drill bits...
They still need to be polished up, but here is a chain plate. The 3 mounting holes still need opened out to 5mm (5mm drill bit was smoked drilling the other one) to bolt through the hull, whilst the turnbuckle's clevis pin goes through a 6mm hole. The plate has a bend above the gunwale to reverse its angle off vertical to point the turnbuckle towards the top of the mast. For rigging and de-rigging for road transport the clevis pin pulls out. Easy peasy.
At the top of the mast, the shrounds will be swaged into loops, passed over the top of the mast and guided by the partners down towards the turnbuckles something like this, if you'll excuse the roughness of a quick sketch:
I made a start over the weekend at forming one of the brackets I'll use to hold the bowsprit and forestays. This will sit on the forepeak above the stem and will bolt through the breast hook.
I thought I'd try bending the 40mm x 3mm stainless steel flat bar in a wooden form using the hydraulic press in my garage I use for suspension bushes and wheel bearings etc. It's amazing how many times this thing has paid for itself in avoiding paying garages, particularly given the logistical hassle of getting from my house with a broken car to a garage and back again, then reverse when it's finished and ready to collect!
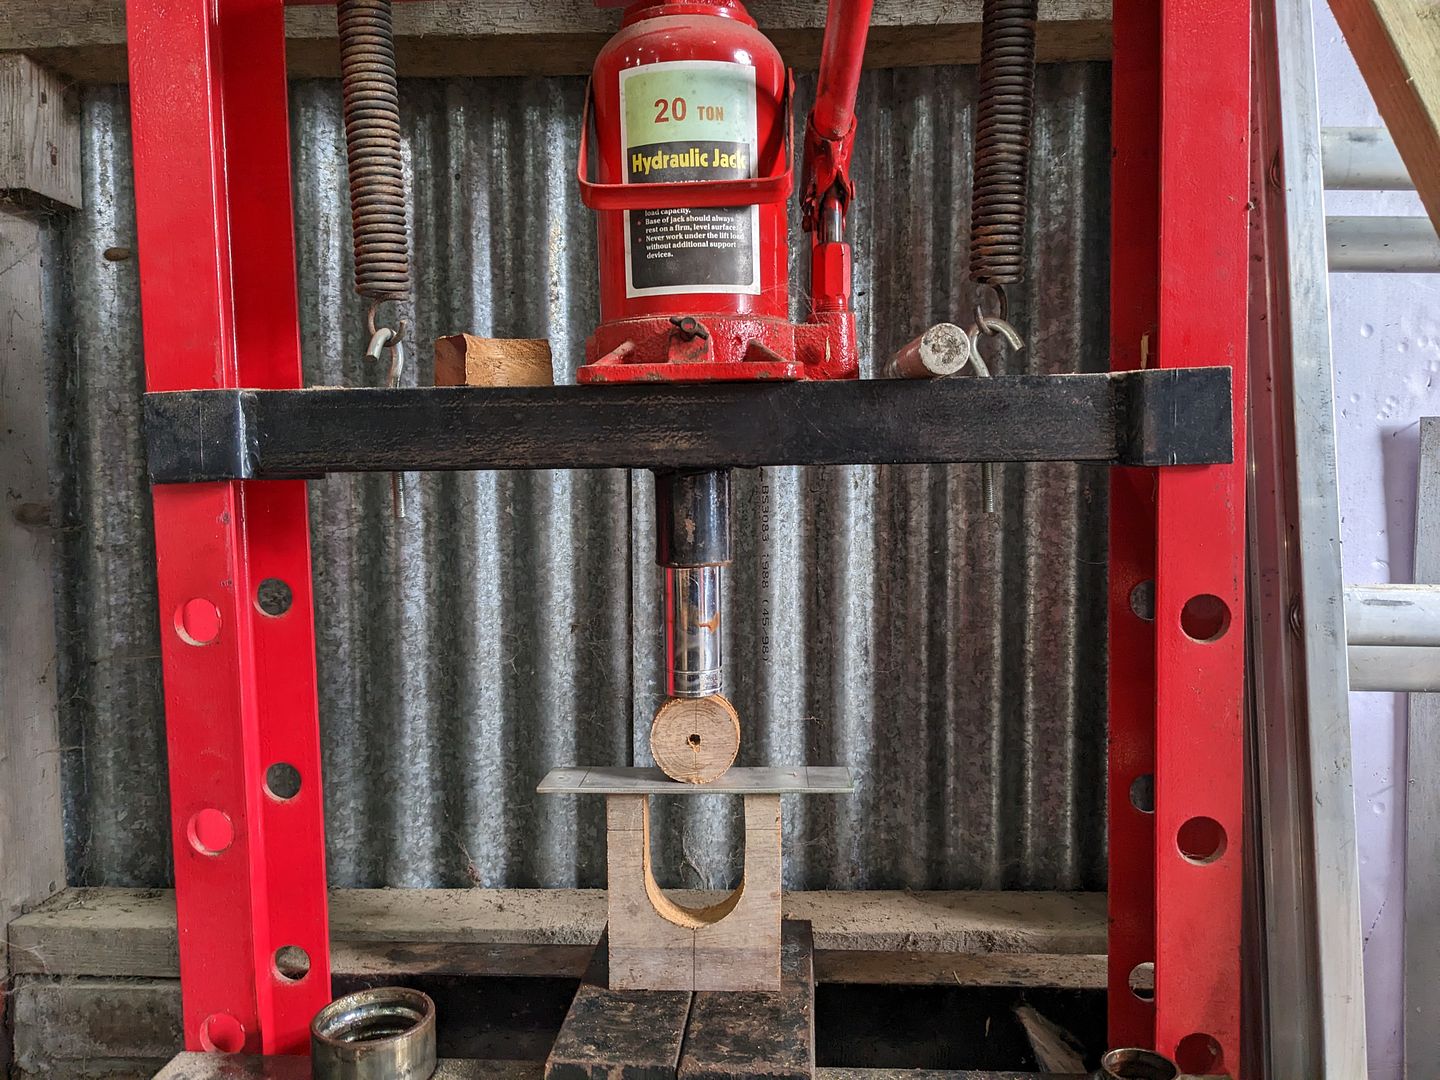
That looked promising but I underestimated how stiff the steel was whilst overestimating the strength of iroko.
I tried again using a beefier form.

This worked. It's a loose fit - there's about 2.5mm all round, but I plan on leathering the bowsprit here so it doesn't rattle or clunk around, and can always wedge if I need to.
Once the Cobalt drills are here and I can finish drilling the holes, this bit will be welded on like so and the forestay and attachment for the staysail's clew will go here.

I thought I'd try bending the 40mm x 3mm stainless steel flat bar in a wooden form using the hydraulic press in my garage I use for suspension bushes and wheel bearings etc. It's amazing how many times this thing has paid for itself in avoiding paying garages, particularly given the logistical hassle of getting from my house with a broken car to a garage and back again, then reverse when it's finished and ready to collect!
That looked promising but I underestimated how stiff the steel was whilst overestimating the strength of iroko.
I tried again using a beefier form.
This worked. It's a loose fit - there's about 2.5mm all round, but I plan on leathering the bowsprit here so it doesn't rattle or clunk around, and can always wedge if I need to.
Once the Cobalt drills are here and I can finish drilling the holes, this bit will be welded on like so and the forestay and attachment for the staysail's clew will go here.
dukeboy749r said:
Very impressive!
Thanks for looking in 
OutInTheShed said:
Stainless is funny stuff.
Sometimes it's easy to drill with normal HSS bits.
Other times carbide is the answer.
Yes I think the inconsistency is quite unnerving actually!Sometimes it's easy to drill with normal HSS bits.
Other times carbide is the answer.
Last night I did my first stainless steel weld. I had planned to practise on scraps first but forgot. It's just a mig weld and the settings I guessed at worked out fine actually.
After a very cursory clean up it looks like it will be an acceptable part after proper clean up and some polishing.
I also got the mast partner glued and screwed in permanently which is another step forward.
B'stard Child said:
What wire/gas were you using - If I had a steel/steel with argoshield light that looked like that I'd have said I'd forgotten to turn the gas on
I'll happily weld SS with normal mild steel welding wire and argoshield light - I know it will just rust where the weld is
Hi! Yeah it did look a bit dirty but it cleaned up rather nicely. I used 316LSI stainless steel mig welding wire, and my gas is 80something% argon and CO2 mix which I'd read online should work ok with it. It's possible the bottle is a bit low - I've done a fair bit on my MX-5 with it already. I have 2 others here fresh so will change it over and see what happens on the next fitting I'll happily weld SS with normal mild steel welding wire and argoshield light - I know it will just rust where the weld is
I spent last week in Stromness on a traditional sail making course run by the Orkney Maritime College. It was a really great 5 days. There was online work to do beforehand, but I had since New Year to do it.
We used the two headsails for my dinghy as the course project, and the 6 (and a half) of us split into two groups with me in one and my wife in the other.
Whilst my wife is already a pretty competent sewing machinist who makes all her own bags and clothes and made the costumes for our daughters' dance school's show last year, I have never sewn anything since making a stripy fish out of felt in home economics class in school, and generally have no aptitude for materials which aren't rigid. My first attempt on the big clutch-controlled industrial sewing machine went really badly which reinforced my conviction that I was really going to struggle with this.

Fortunately? it turned out the machine was damaged and nobody else did any better so we all ended up using servo-motor machines instead, where I gradually realised I could infact sew in a reasonably straight line if I practised a little.
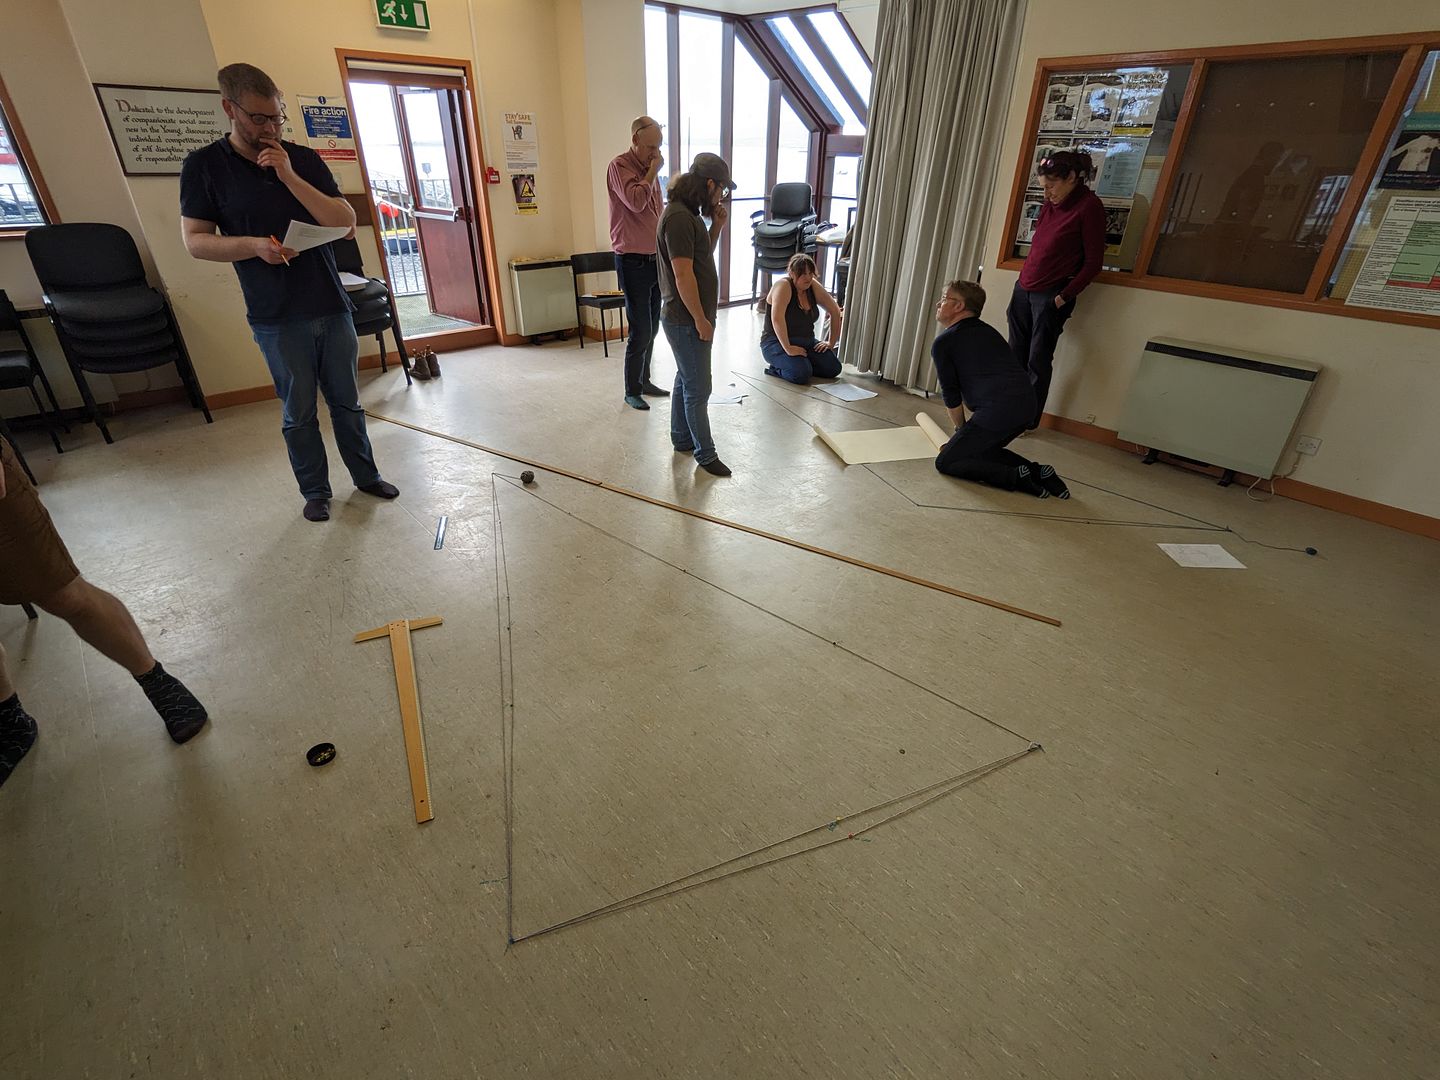
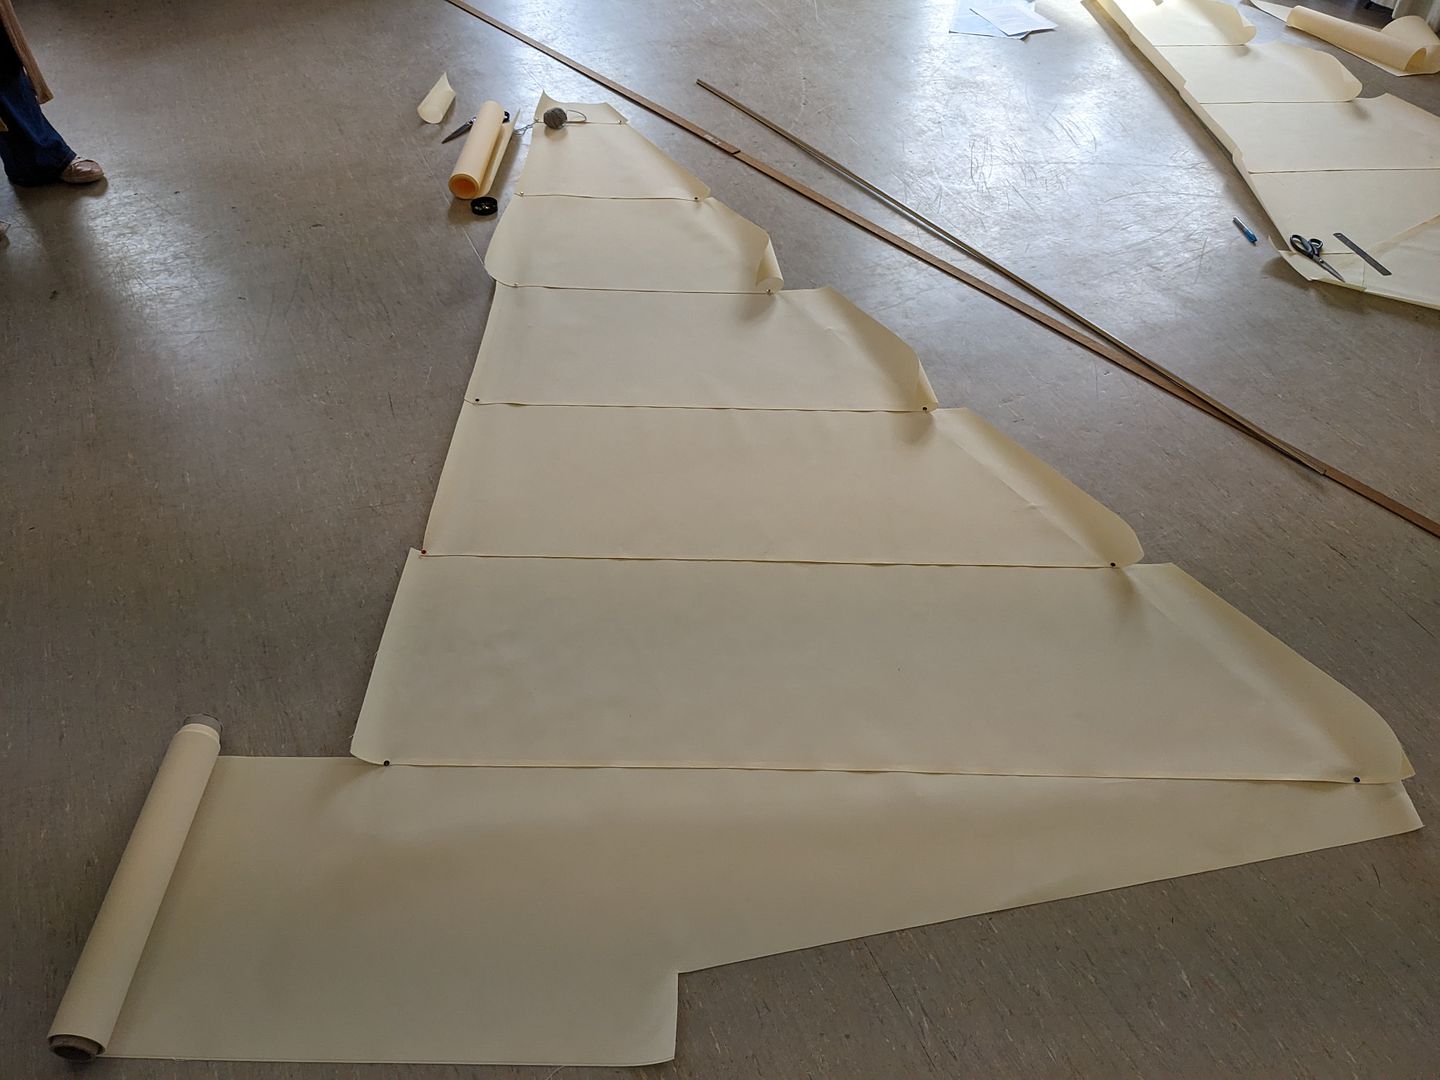
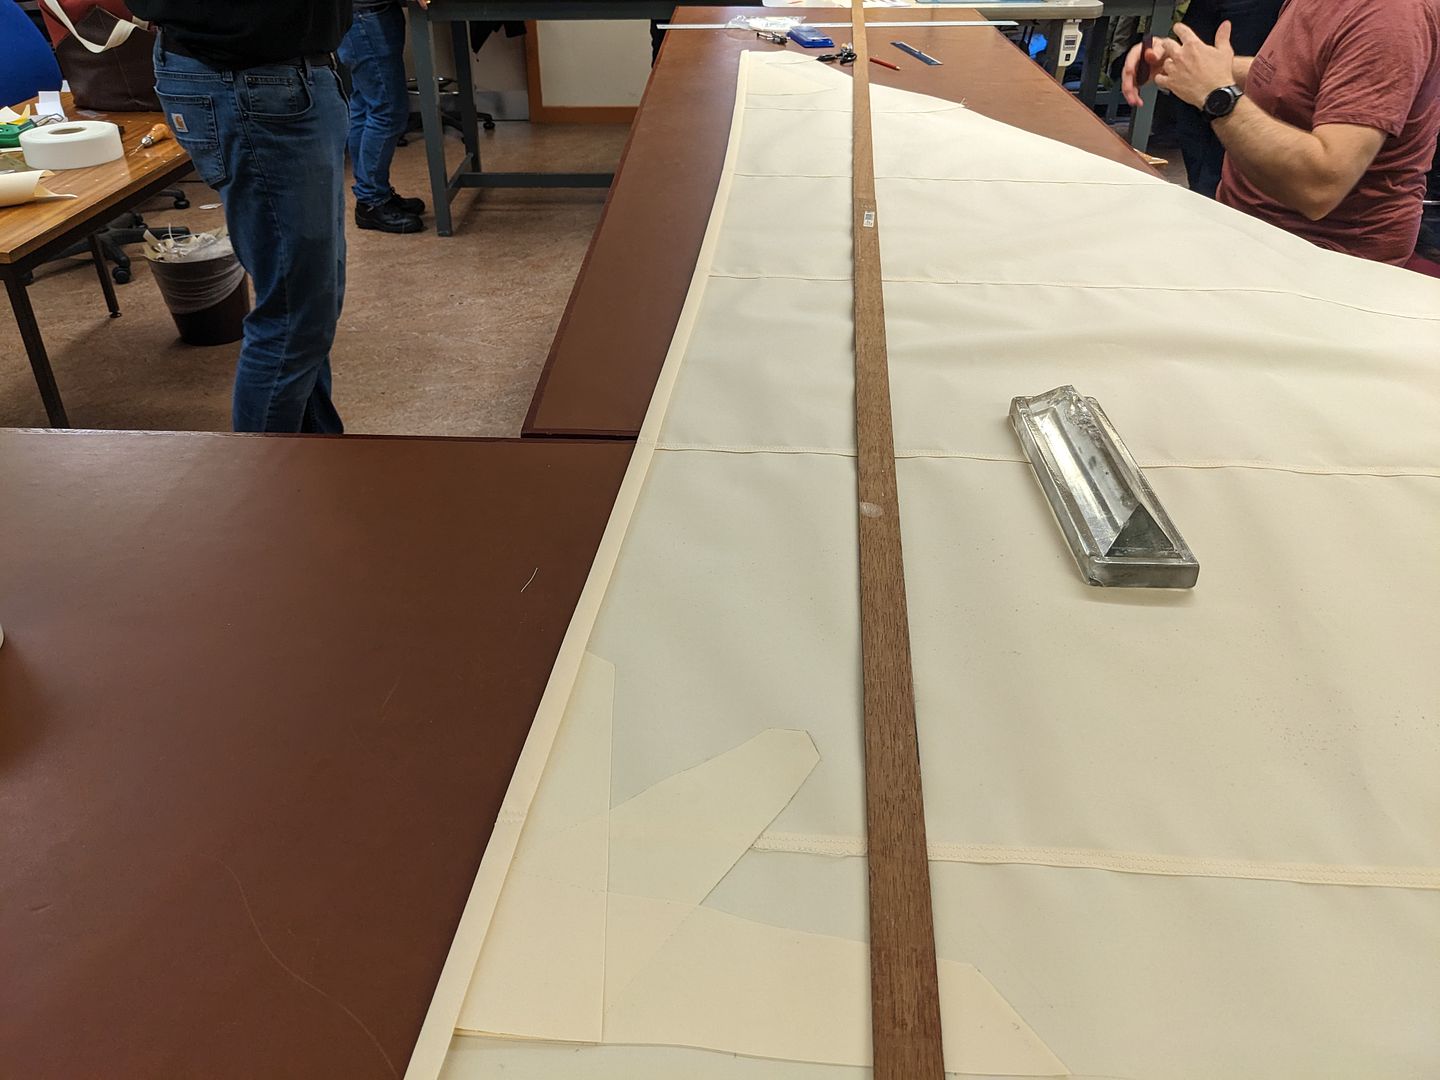
My group worked on the staysail using a cross-cut design. Here we've reduced the sail plan dimensions to allow for stretch, have lofted the reduced dimensions out onto the floor and are calculating and pinning draught points and edge curves.
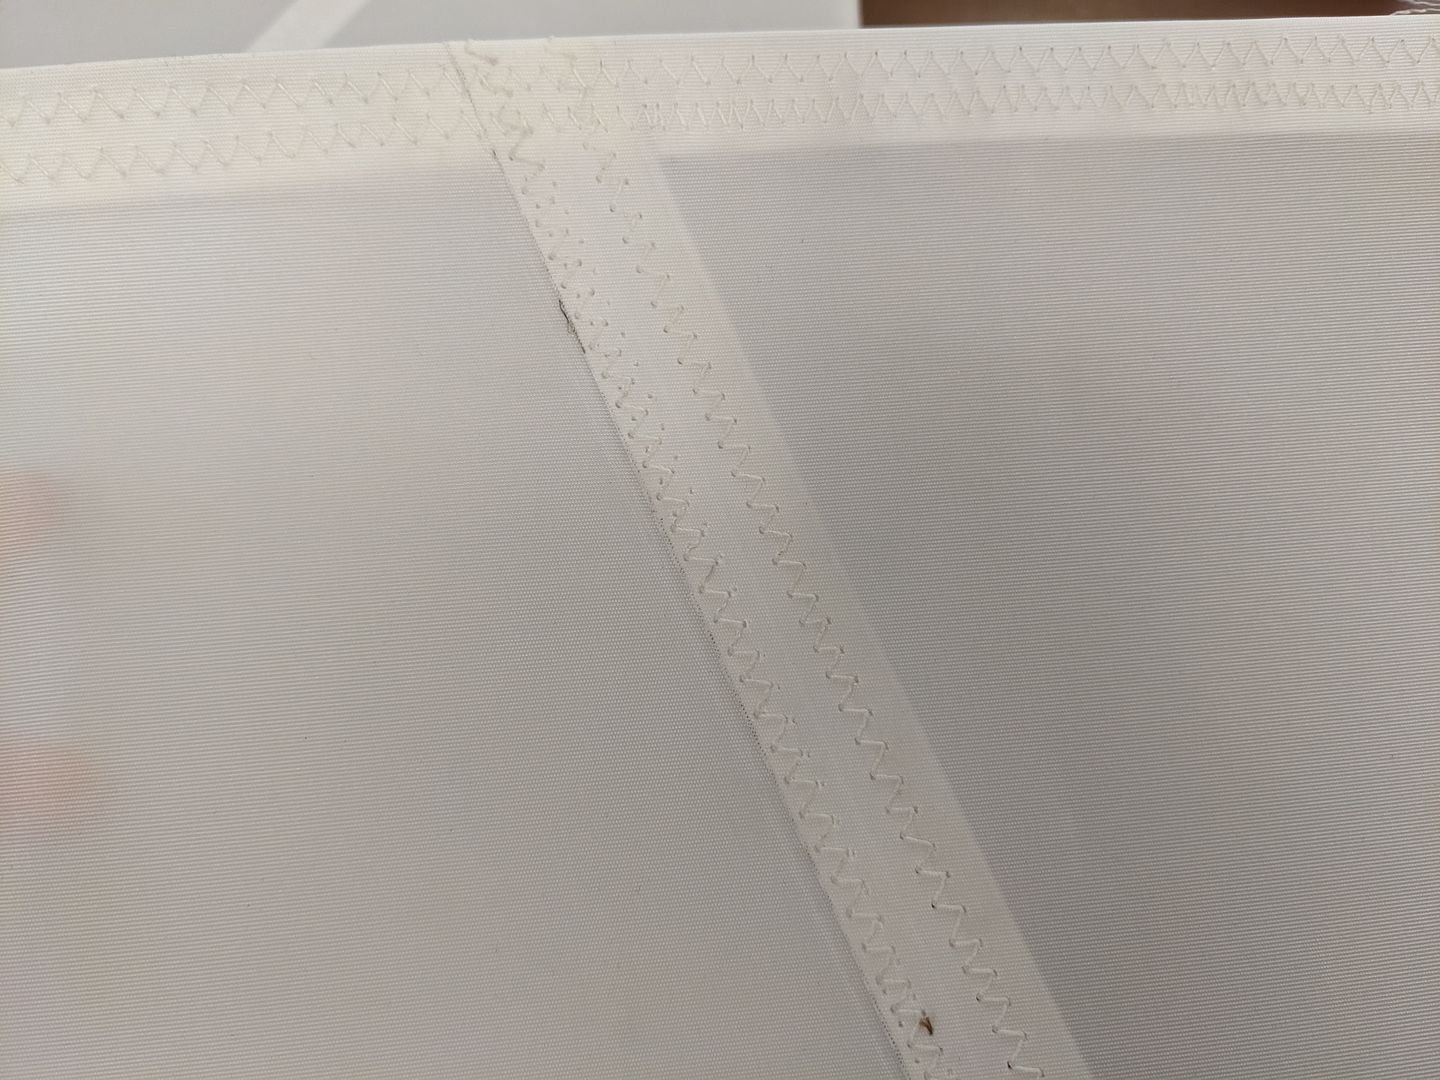
I am quite fussy in a sensory sense and whilst I respect Dacron's ubiquity, I hate how it feels and sounds. I chose Clipper Canvas instead. It's still a synthetic fibre and is hot rolled and resin coated so it's nice and airtight like Dacron but very quickly feels (and sounds) like old fashioned cotton canvas, but is much more stable than cotton canvas whilst having a bit more bias elongation (i.e. diagonal stretch) than Dacron. The Clipper Canvas came in 150cm widths, but on sails the size of those on my dinghy that is far too wide and leaves limited scope for shaping the sails. Hence, we slit the cloth into 50cm widths. Here we are laying out the cloth.
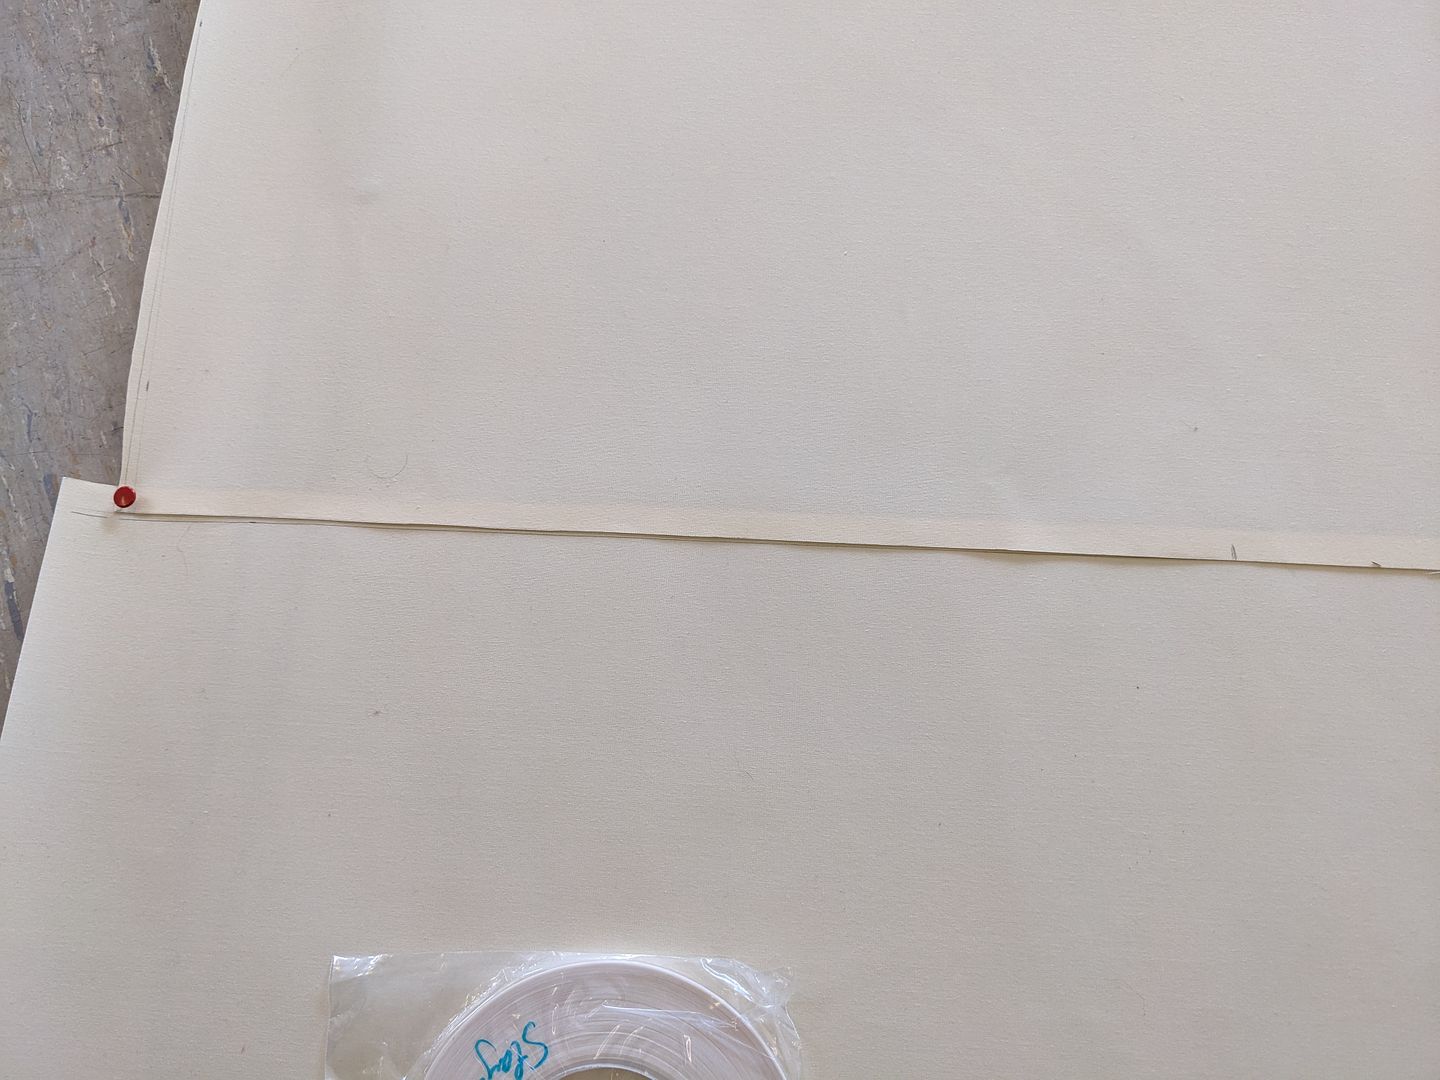
Broadseams were calculated and marked on in hard pencil next. This is the tack seam which gets a double allowance. The rest were half or less as severe. After the photo the panel above was taped in position with its edge following the pencil line, and the sail no longer sits flat on the floor.

Likewise the leech tapers were calculated, marked then taped.
We designed our corner patches, cut and positioned these for sewing.

Meanwhile, the other team was doing likewise on our jib, but we decided to go for a mitre cut for that sail so we could learn more overall.
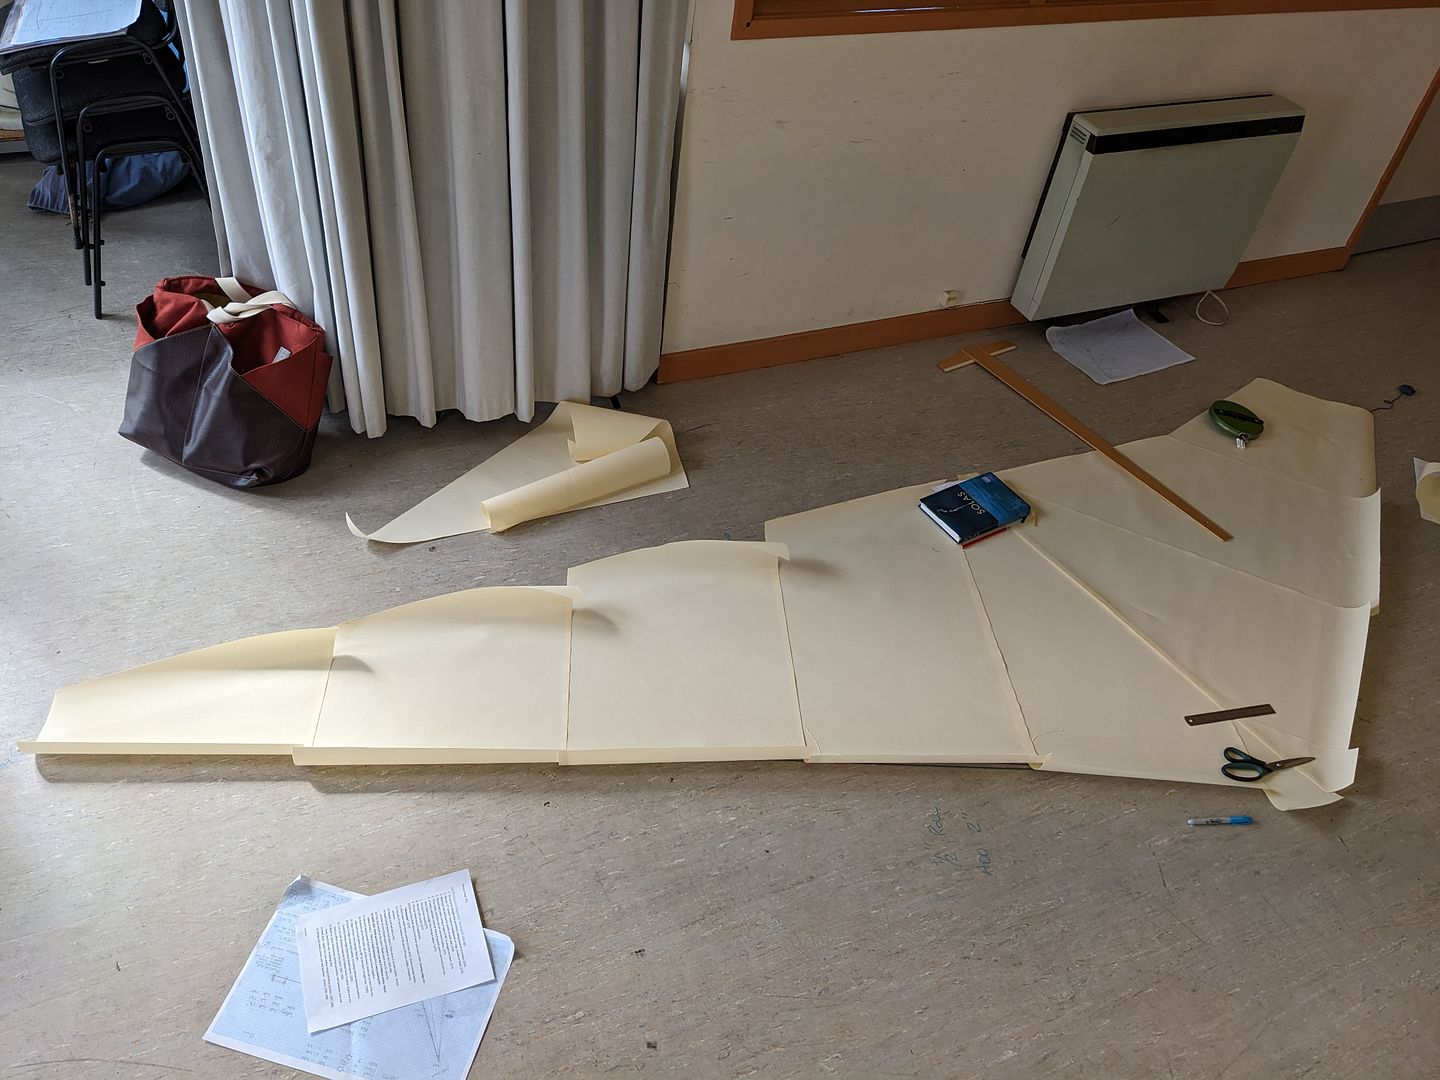
We lifted the sail off the floor at that point to check the curvature in 3 dimensions, made a couple of very small adjustments then sewed the panels together. This done, we then moved onto marking our edge curves with a baton, trimming then folding our edge seams.
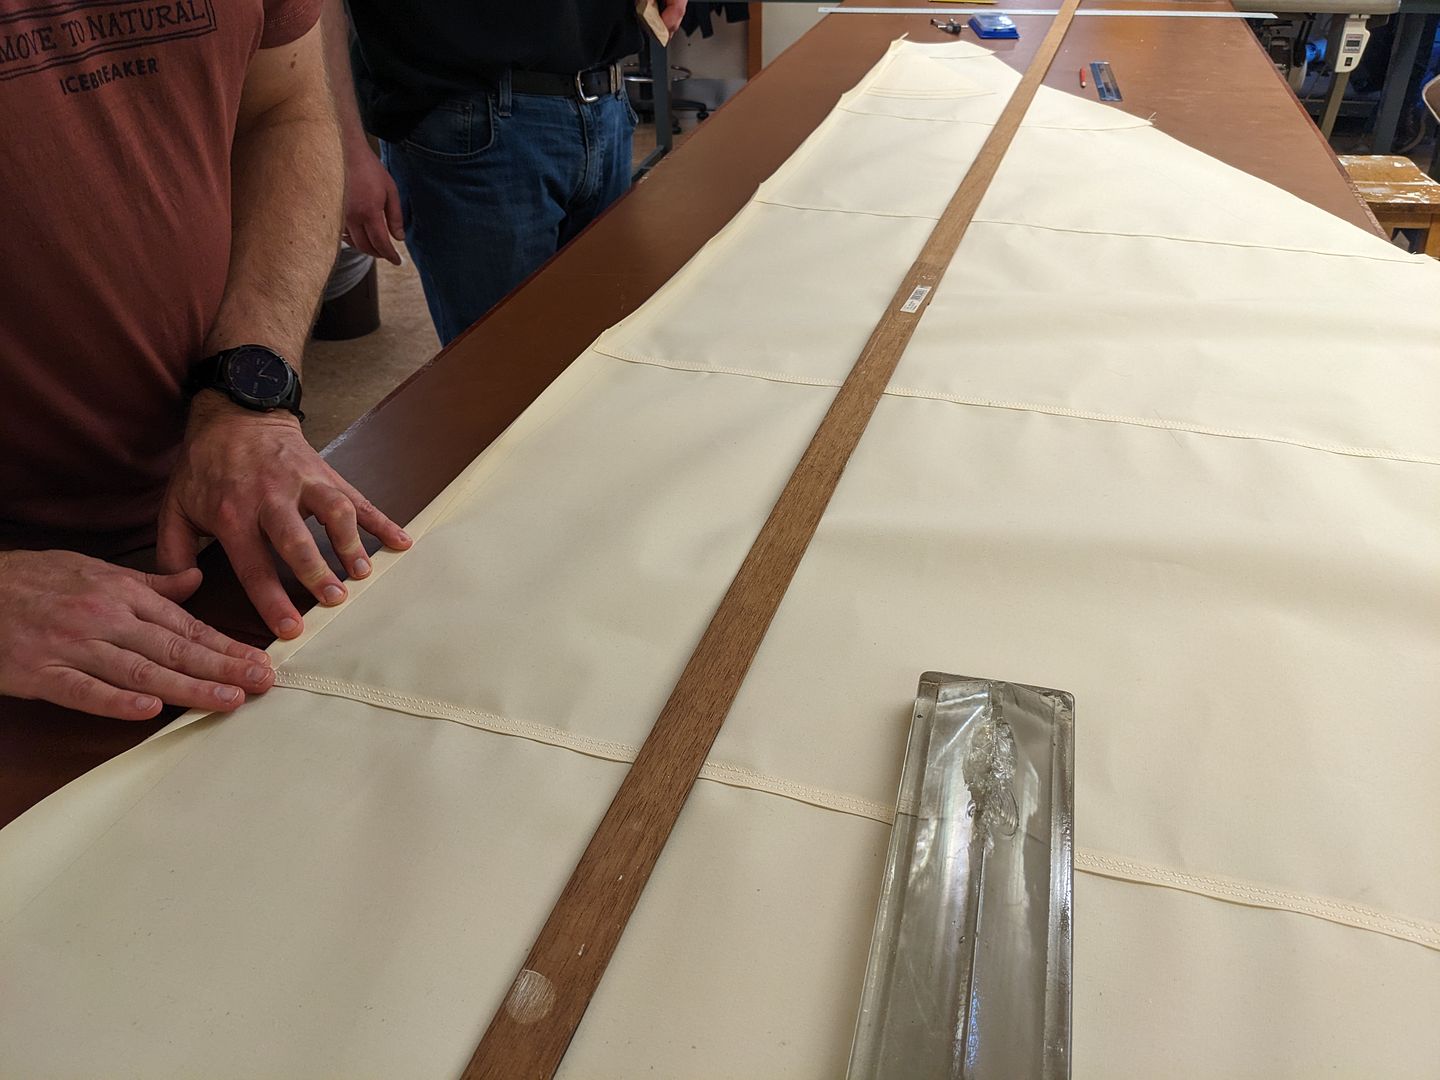
Now the edges and patches were ready for sewing.
This took us to the end of Day 2. On Day 3, we took time out from our sails to learn about assessing existing sails for repairs, and did some repairs for a local chap with a nice Shetland Model with a 4 sided lugsail.
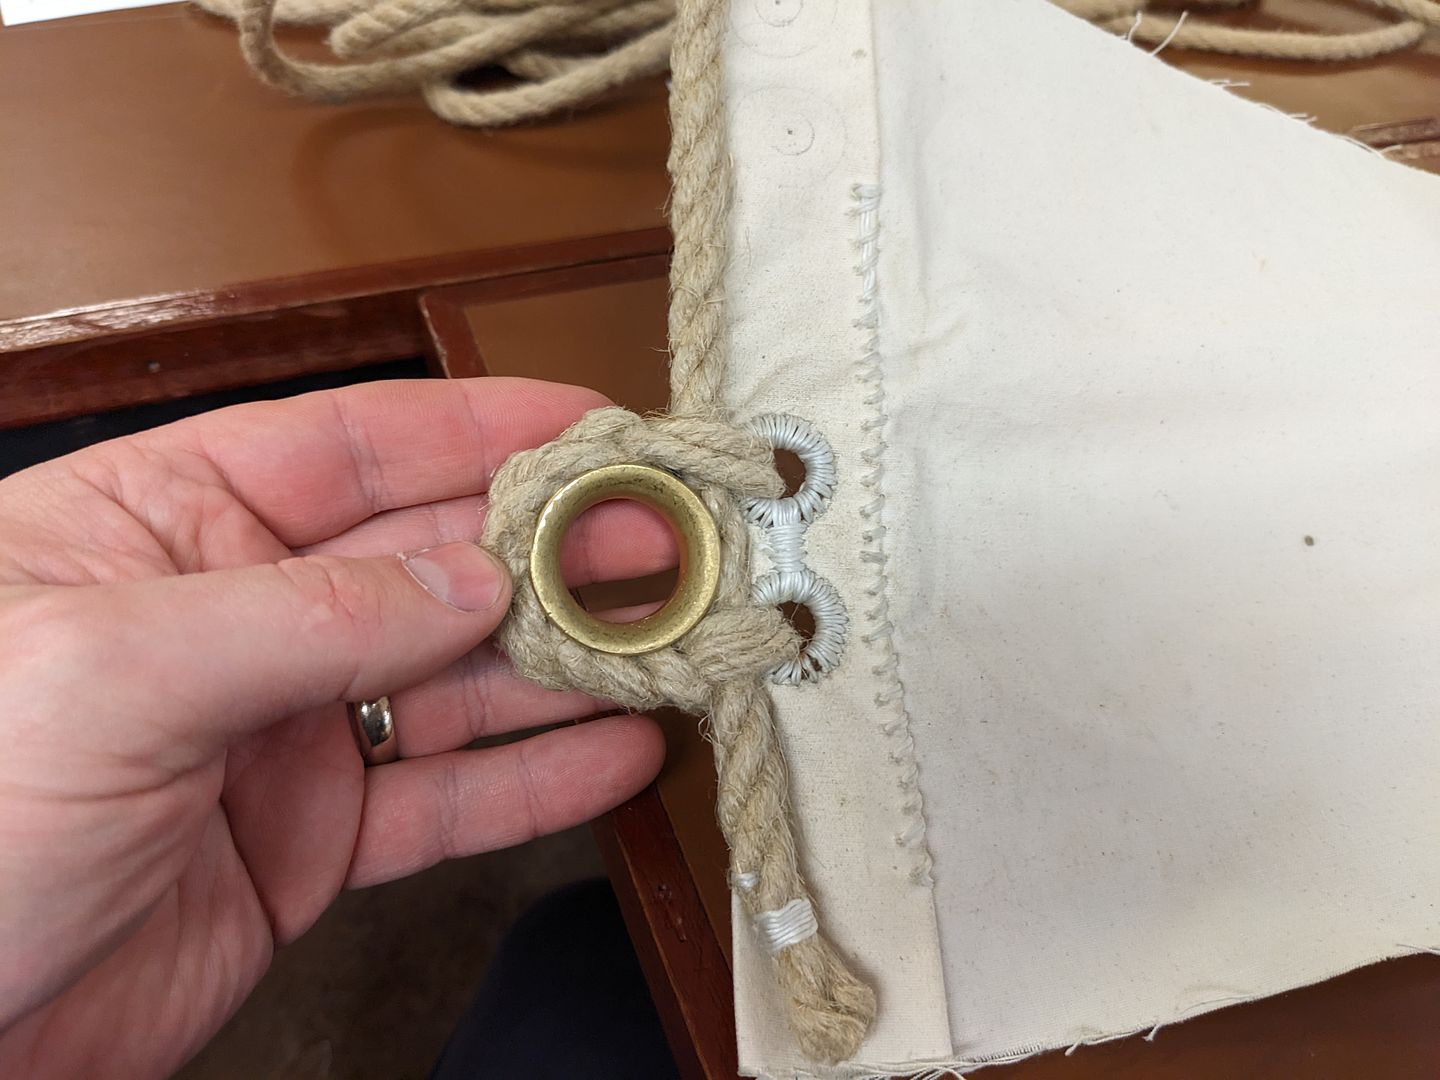
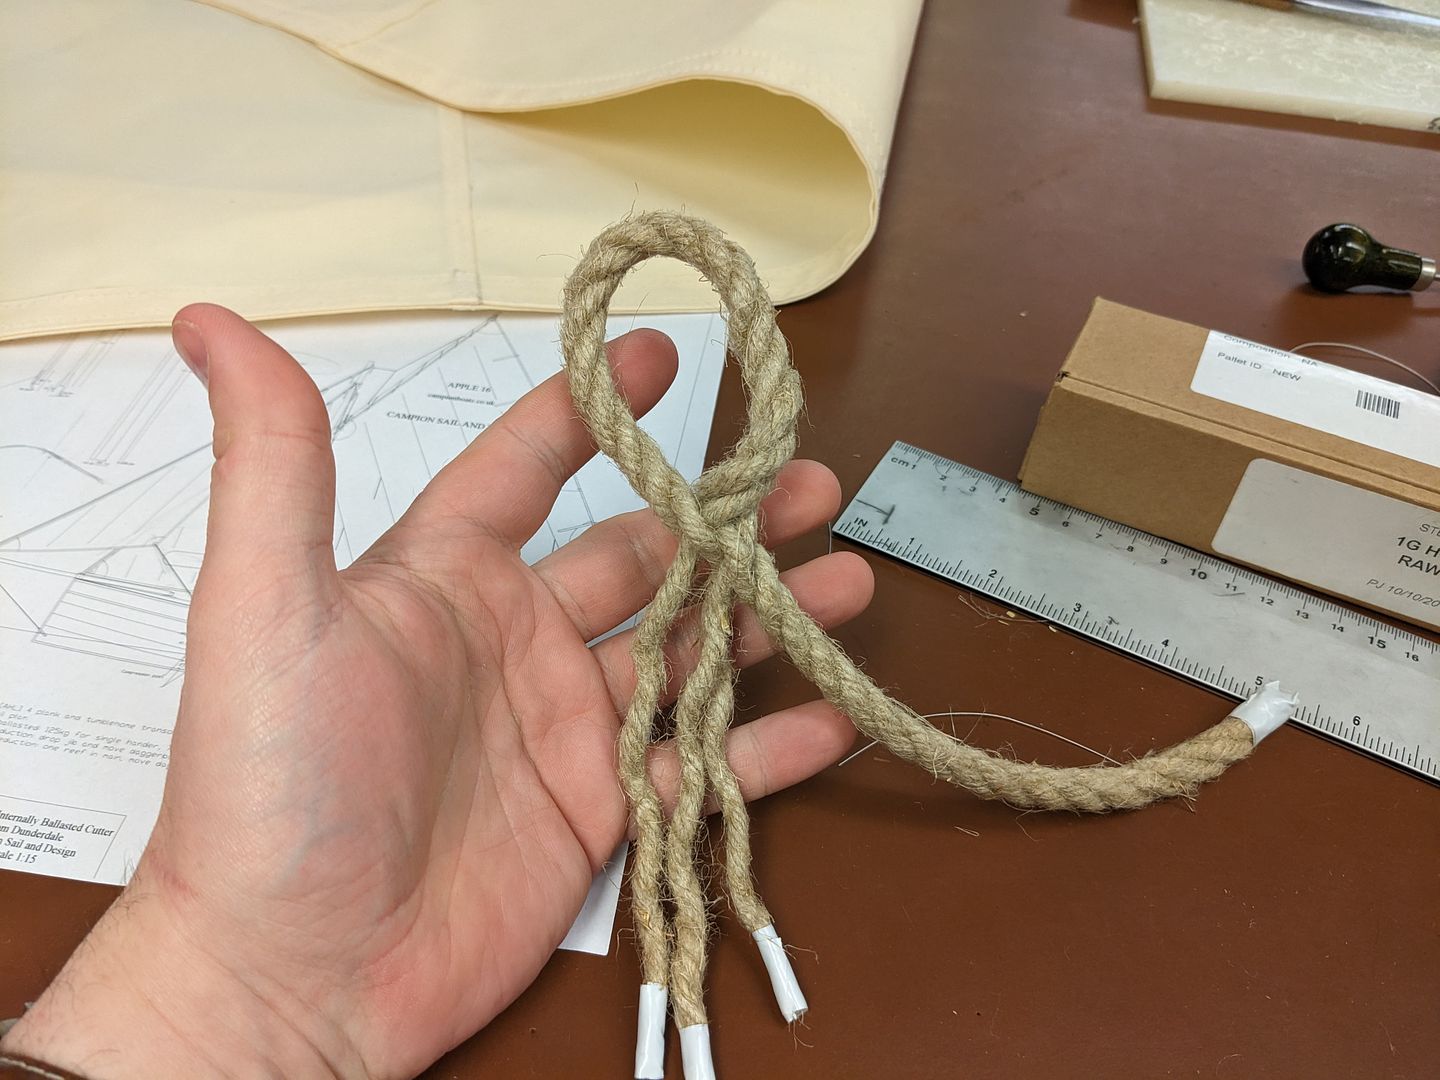
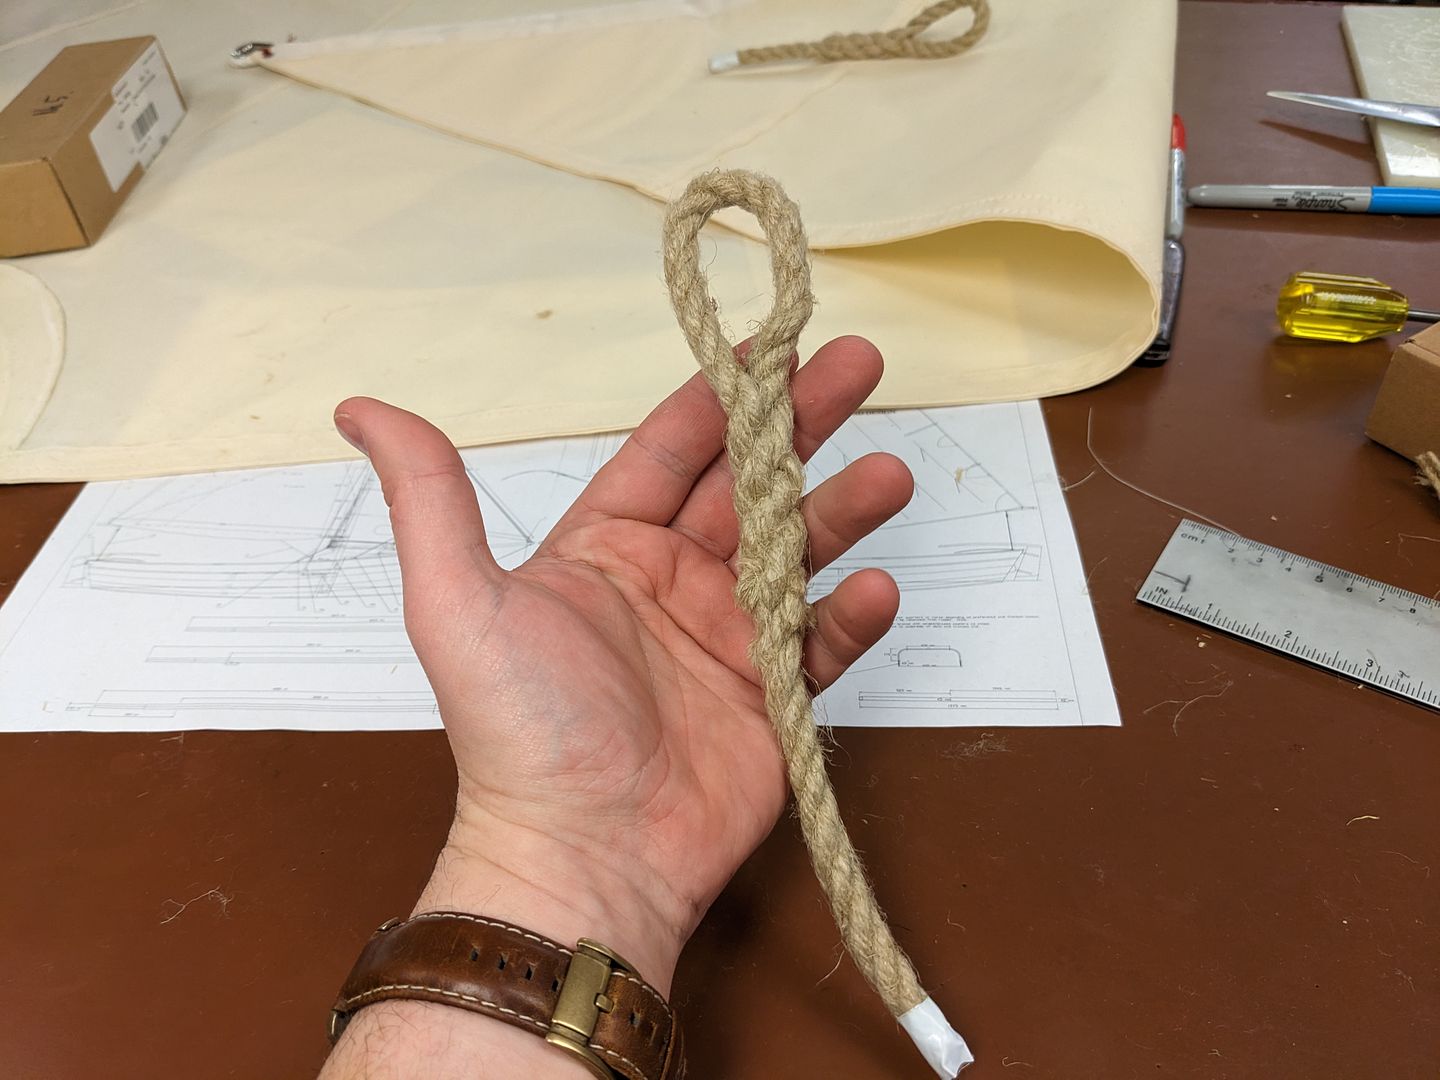
On Wednesday night, we worked until 10pm learning traditional hand sewing and rope work techniques which was fun.
Pt3
I learned how to make a sailmaker's eye splice
We all agreed to abandon the staysail at this point, which my wife and I plan to finish with traditional bolt roping and handsewn eyelets and cringles. There simply wouldn't be time to do this on the course. Instead, we all focused on completing the jib using slightly more contemporary methods. This involved pre-tensioning a luff rope, splicing in thimbles, then sewing it in.

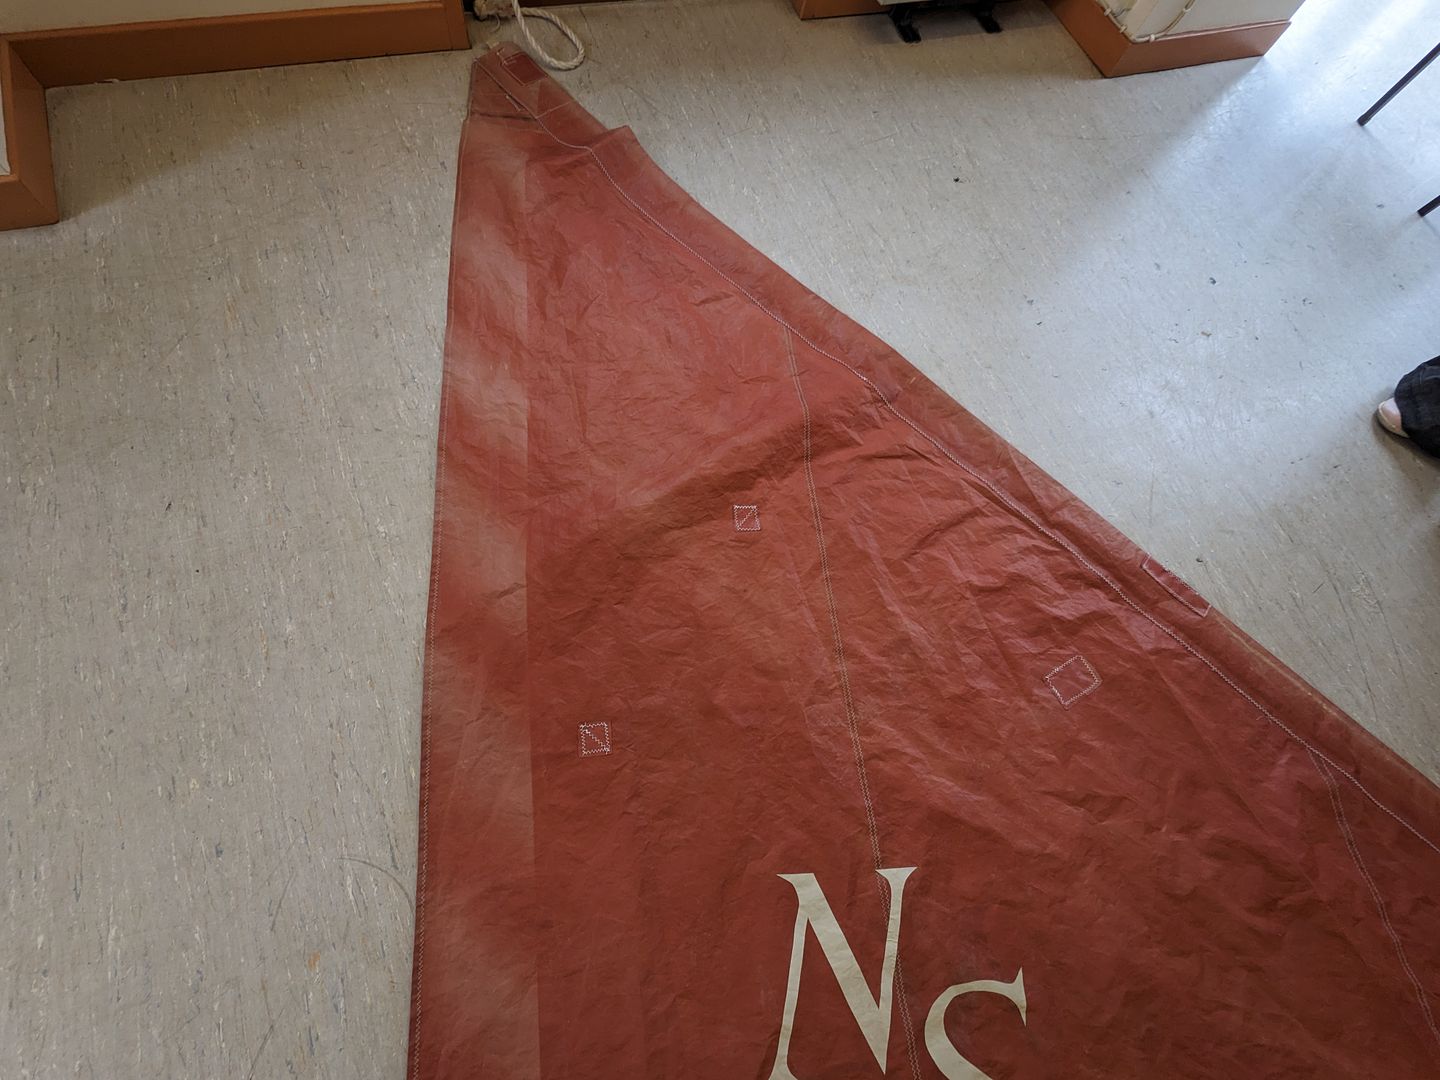
Once finished, we test flew out jib on the course leader's 23ft boat. The stay is a bit too upright for this sail and the sheet angle wrong so I'm pushing the sheet down a bit here to get a better idea of the sail. We're quite happy with it.

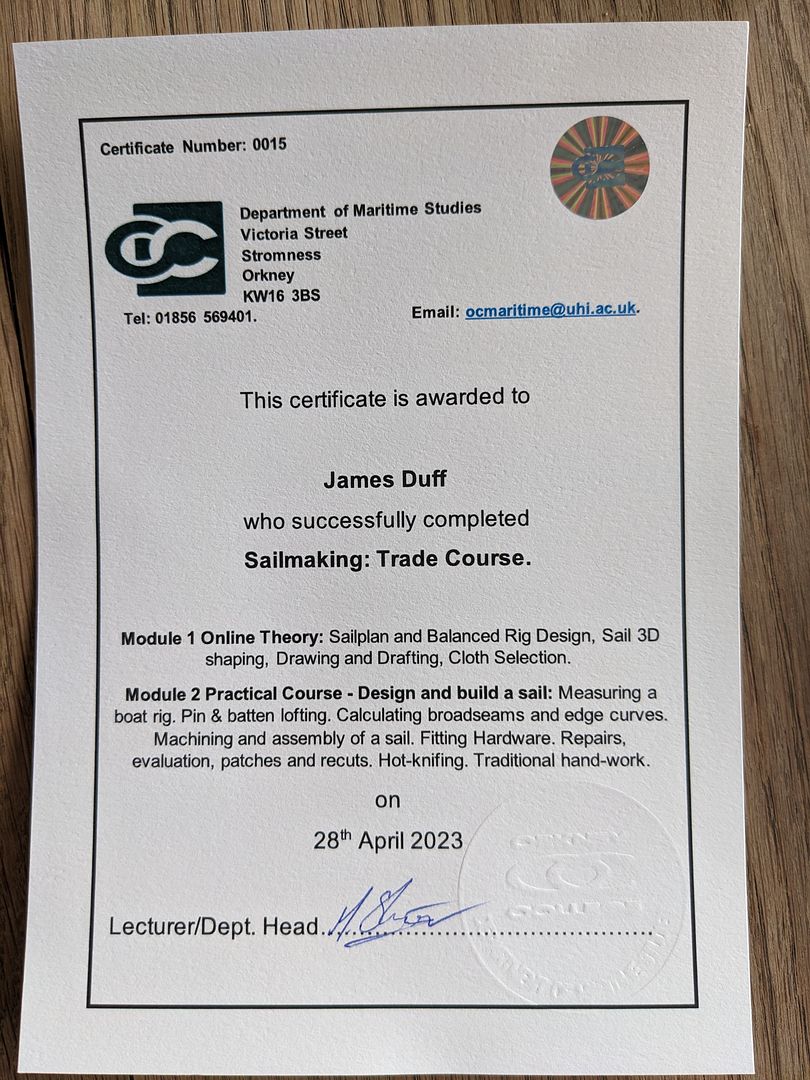
We each got nice little certificates to say we finished the course.
...and waved goodbye to the Orkney isles. This is the third time we've been there, and I'm sure we'll end up back there again some time.

Thanks for reading
We used the two headsails for my dinghy as the course project, and the 6 (and a half) of us split into two groups with me in one and my wife in the other.
Whilst my wife is already a pretty competent sewing machinist who makes all her own bags and clothes and made the costumes for our daughters' dance school's show last year, I have never sewn anything since making a stripy fish out of felt in home economics class in school, and generally have no aptitude for materials which aren't rigid. My first attempt on the big clutch-controlled industrial sewing machine went really badly which reinforced my conviction that I was really going to struggle with this.
Fortunately? it turned out the machine was damaged and nobody else did any better so we all ended up using servo-motor machines instead, where I gradually realised I could infact sew in a reasonably straight line if I practised a little.
My group worked on the staysail using a cross-cut design. Here we've reduced the sail plan dimensions to allow for stretch, have lofted the reduced dimensions out onto the floor and are calculating and pinning draught points and edge curves.
I am quite fussy in a sensory sense and whilst I respect Dacron's ubiquity, I hate how it feels and sounds. I chose Clipper Canvas instead. It's still a synthetic fibre and is hot rolled and resin coated so it's nice and airtight like Dacron but very quickly feels (and sounds) like old fashioned cotton canvas, but is much more stable than cotton canvas whilst having a bit more bias elongation (i.e. diagonal stretch) than Dacron. The Clipper Canvas came in 150cm widths, but on sails the size of those on my dinghy that is far too wide and leaves limited scope for shaping the sails. Hence, we slit the cloth into 50cm widths. Here we are laying out the cloth.
Broadseams were calculated and marked on in hard pencil next. This is the tack seam which gets a double allowance. The rest were half or less as severe. After the photo the panel above was taped in position with its edge following the pencil line, and the sail no longer sits flat on the floor.
Likewise the leech tapers were calculated, marked then taped.
We designed our corner patches, cut and positioned these for sewing.
Meanwhile, the other team was doing likewise on our jib, but we decided to go for a mitre cut for that sail so we could learn more overall.
We lifted the sail off the floor at that point to check the curvature in 3 dimensions, made a couple of very small adjustments then sewed the panels together. This done, we then moved onto marking our edge curves with a baton, trimming then folding our edge seams.
Now the edges and patches were ready for sewing.
This took us to the end of Day 2. On Day 3, we took time out from our sails to learn about assessing existing sails for repairs, and did some repairs for a local chap with a nice Shetland Model with a 4 sided lugsail.
On Wednesday night, we worked until 10pm learning traditional hand sewing and rope work techniques which was fun.
Pt3
I learned how to make a sailmaker's eye splice
We all agreed to abandon the staysail at this point, which my wife and I plan to finish with traditional bolt roping and handsewn eyelets and cringles. There simply wouldn't be time to do this on the course. Instead, we all focused on completing the jib using slightly more contemporary methods. This involved pre-tensioning a luff rope, splicing in thimbles, then sewing it in.
Once finished, we test flew out jib on the course leader's 23ft boat. The stay is a bit too upright for this sail and the sheet angle wrong so I'm pushing the sheet down a bit here to get a better idea of the sail. We're quite happy with it.
We each got nice little certificates to say we finished the course.
...and waved goodbye to the Orkney isles. This is the third time we've been there, and I'm sure we'll end up back there again some time.
Thanks for reading
B'stard Child said:
Lovely skills to have
I still splice ropes for household/garden stuff - we have a sail in the garden as a sunshade and the ropes are spliced into eyelets in the corners
I kinda wish I'd done this sooner, but better late than never!I still splice ropes for household/garden stuff - we have a sail in the garden as a sunshade and the ropes are spliced into eyelets in the corners
Now having a rough idea of the going rates for new sails by the square metre and average hourly rates for sail maker labour I'm glad I did this before paying someone to make mine. The trick, I think, will be to keep our hands in often enough to remain fresh on certain aspects of it. As you've highlighted, the possibilities to use these skills in a more abstract way are extensive
I had a few pressing things to do, but this weekend I started modifying the inexpensive used combi trailer.
I started by getting the bow up where I wanted it. The Apple 16 is a rather different shape compared to the GP14 which I think was on this trailer before.
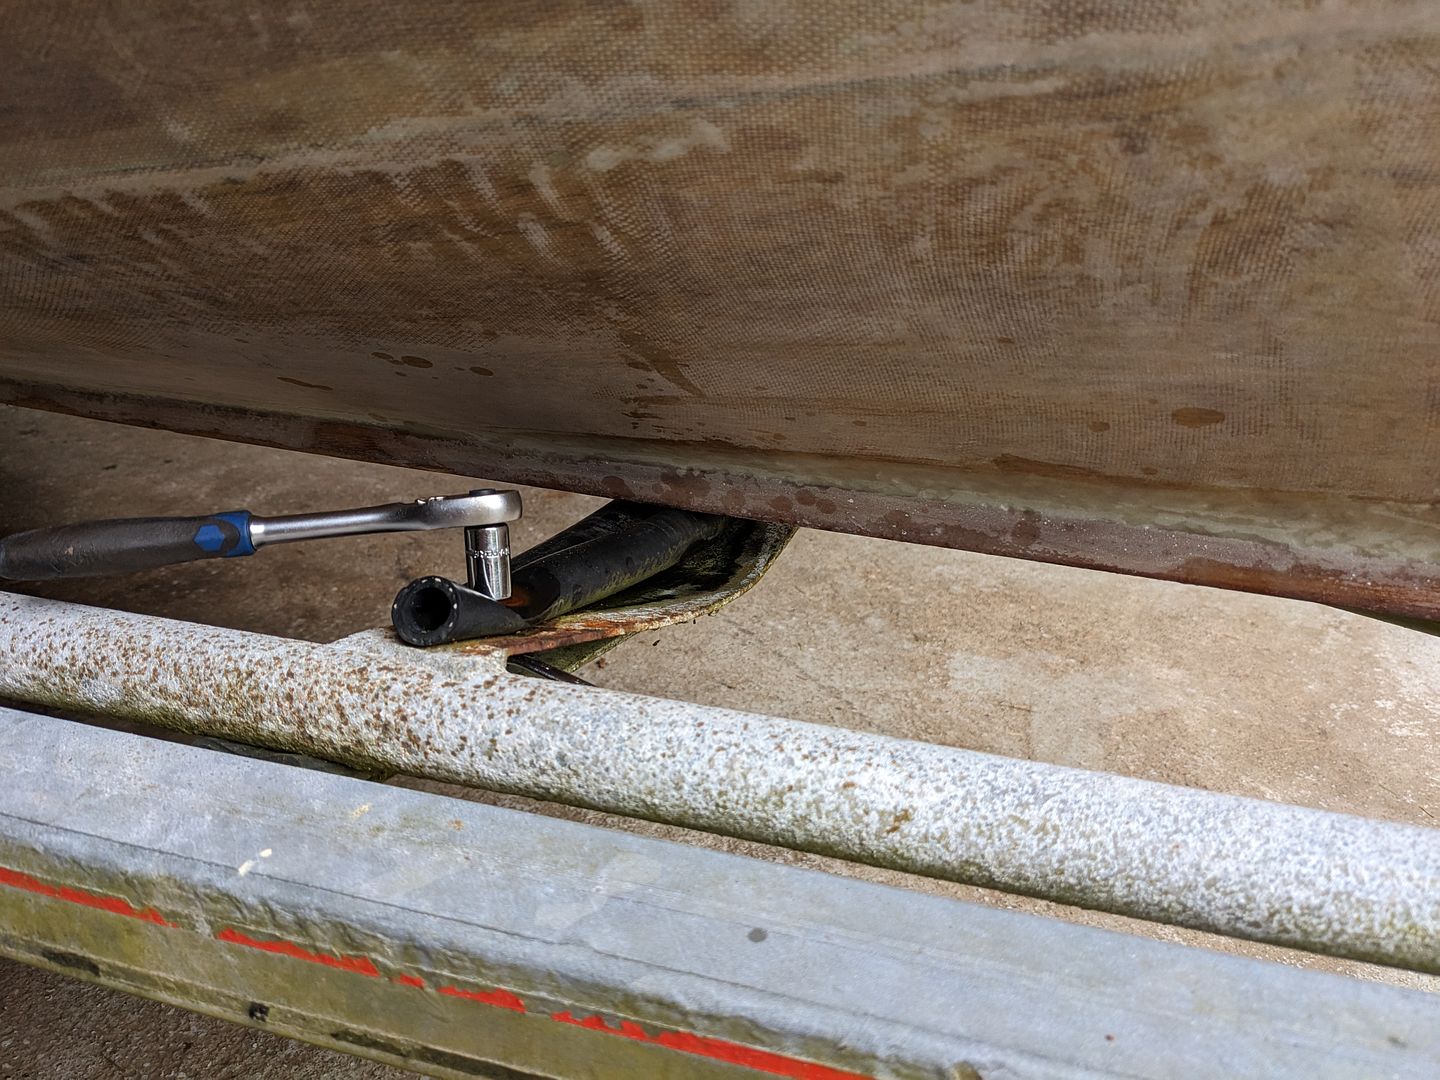
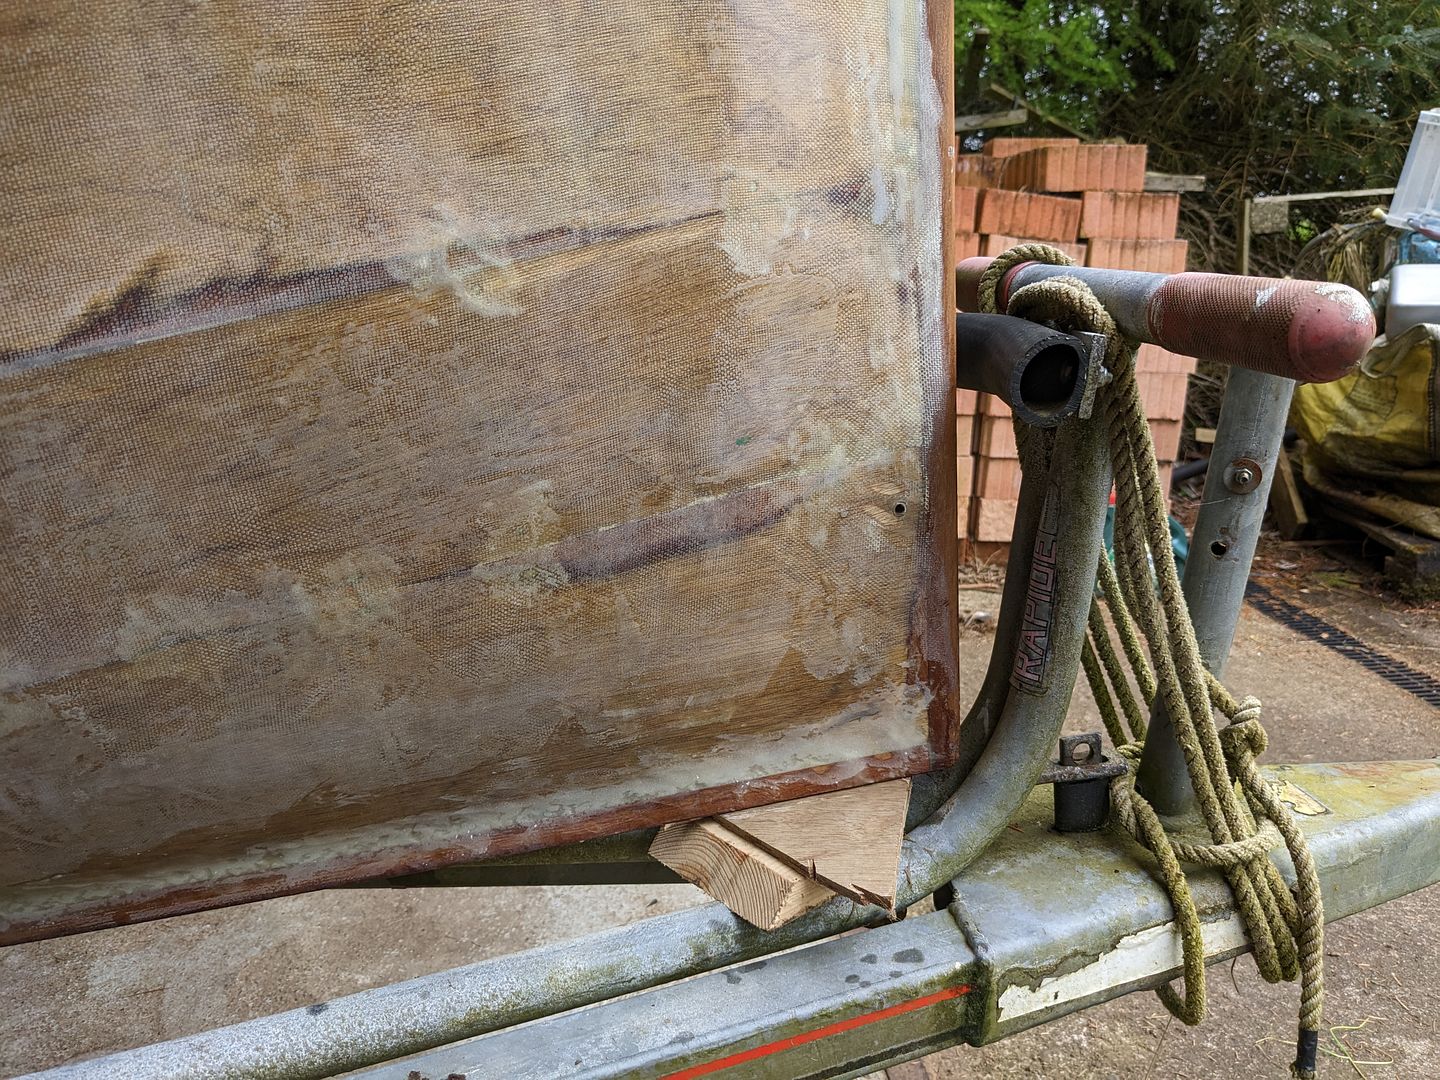
That's better. Not finished, but going in the right direction.

It sits on its keel in the centre, but the GP14 was gunwale hung. I want to use these for stablity and to share some of the weight.
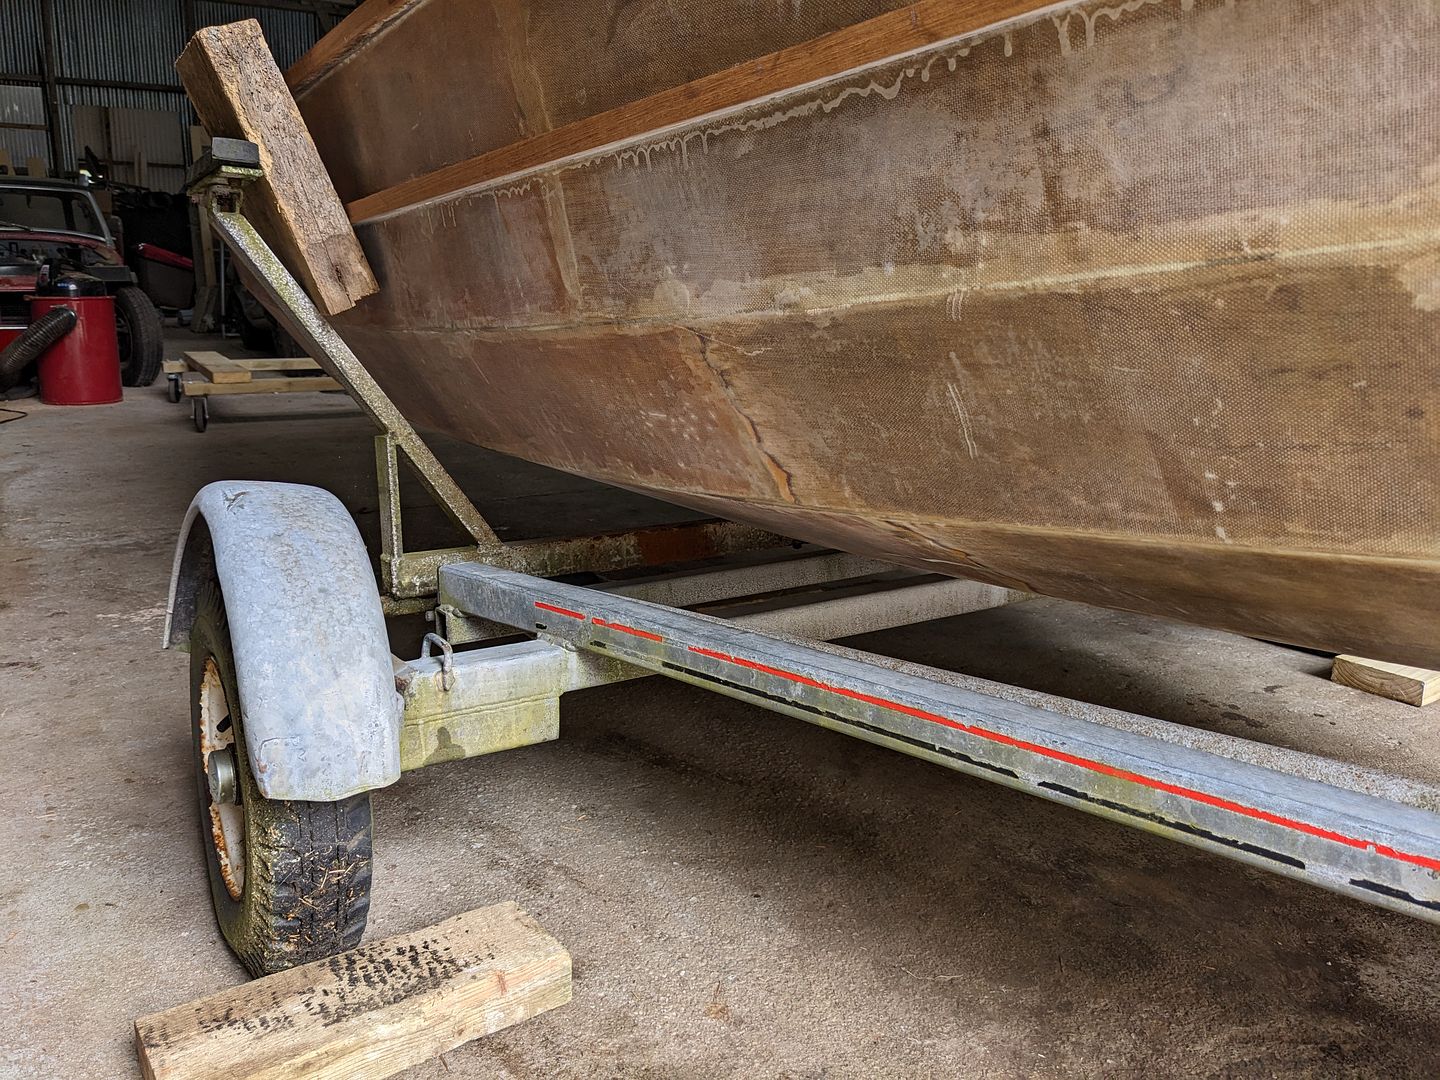
I cut and rewelded those supports to sit under the iroko rubbing strips

This will basically work.
I will weld on a post at the front of the trailer for a winch, and I will add two further supports from steel plate covered with carpet to sit under a pair of chines. This will ease getting on and off the trailer, and offload what's likely a fairly high stress on the keel from that point load. It's plenty strong enough to sit there like this, and I've taken it out for 2 miles at low speed but I don't think bouncing over a pothole at ~50mph will do the hull any long term good.
I'm confident this is going to work out just fine though.
I started by getting the bow up where I wanted it. The Apple 16 is a rather different shape compared to the GP14 which I think was on this trailer before.
That's better. Not finished, but going in the right direction.
It sits on its keel in the centre, but the GP14 was gunwale hung. I want to use these for stablity and to share some of the weight.
I cut and rewelded those supports to sit under the iroko rubbing strips
This will basically work.
I will weld on a post at the front of the trailer for a winch, and I will add two further supports from steel plate covered with carpet to sit under a pair of chines. This will ease getting on and off the trailer, and offload what's likely a fairly high stress on the keel from that point load. It's plenty strong enough to sit there like this, and I've taken it out for 2 miles at low speed but I don't think bouncing over a pothole at ~50mph will do the hull any long term good.
I'm confident this is going to work out just fine though.
Allegro_Snapon said:
Brilliant Jamie. Make sure you get to Orkney again it is my favourite place in the UK. Sail up from Aberdeen in your boat?
How life has changed since putting "CAT" badges on Ford Cougars - I met you briefly at Cougarfest in Northants - 2003 I think?
Hi, my first time at Cougarfest was 2006 I think, or possibly 2005. Changing things on other peoples' cars certainly sounds like me. For about 3 years running someone handed me a box of lowering springs, their car keys and a bottle of beer. Tony Langston from round Huntingdon sort of way would usually help. Having a car in bits seemed to act as a focal point for people to gather round How life has changed since putting "CAT" badges on Ford Cougars - I met you briefly at Cougarfest in Northants - 2003 I think?

In fact, here's me lying on the ground.

It was either lying on the floor under a car in bits which was very much my preference, or end up like this guy lying on the floor with his car inexplicably parked inside the marquee in the morning.

What was your username?
Edited by jamieduff1981 on Monday 15th May 14:56
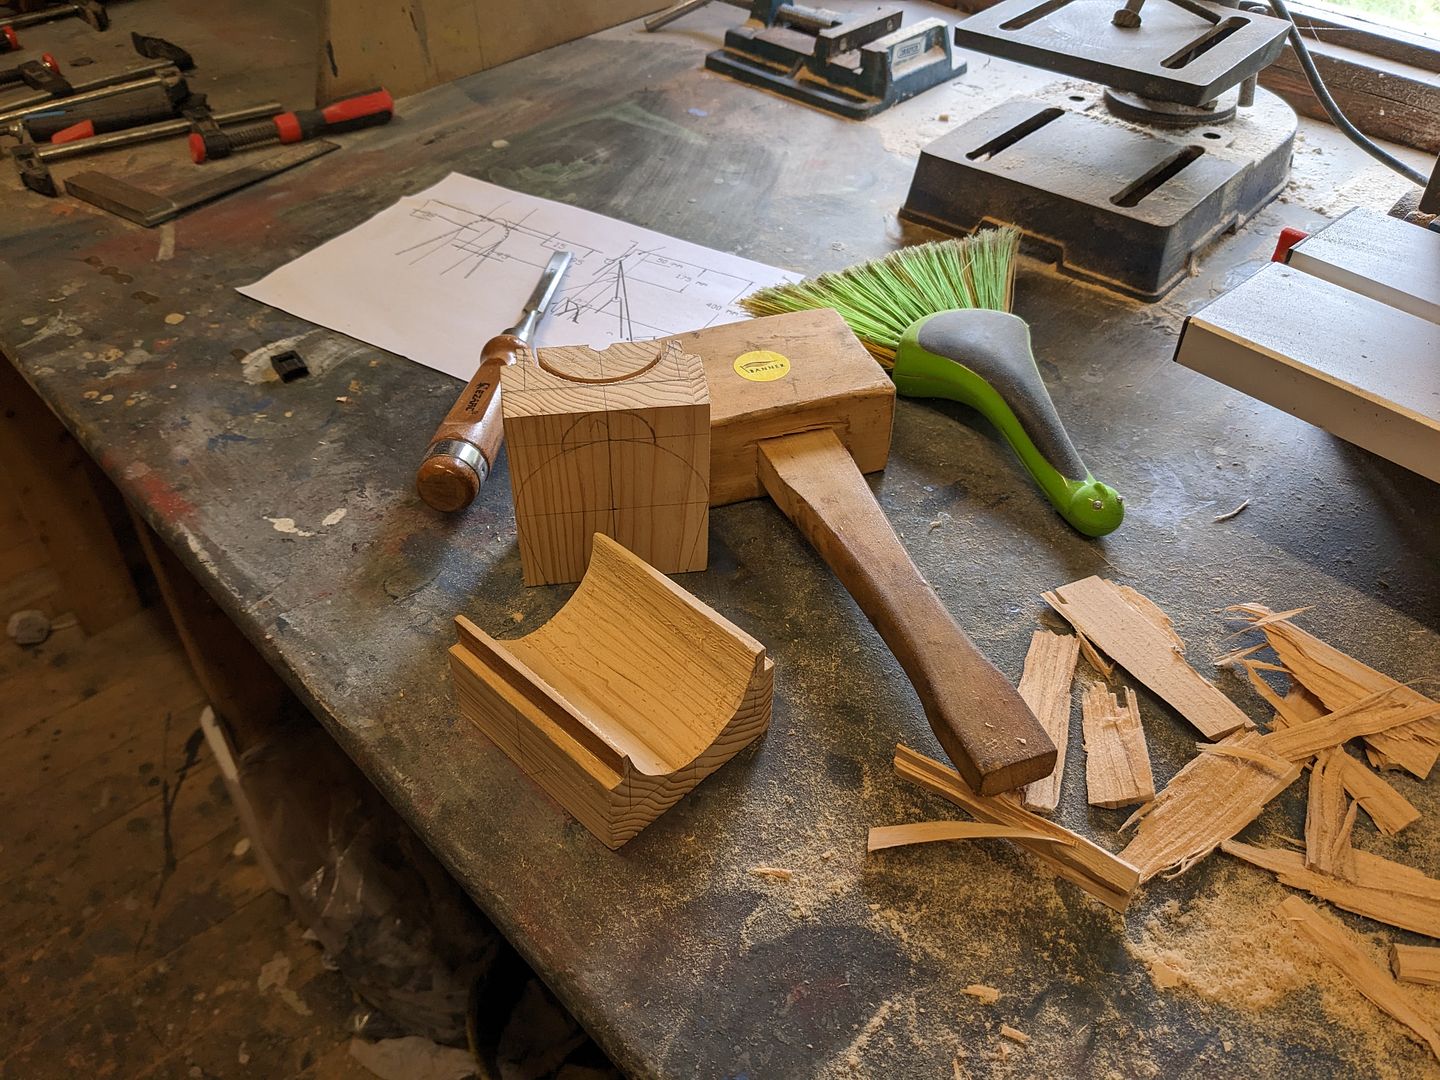
I was sitting in bed at 0700 on Sunday morning drinking coffee and scrolling through phones with my wife. She held her phone over to me and asked if I'd like a non-working wood lathe and a big pile of chisels for £50, whilst showing me a Facebook Marketplace listing from our nearest big-ish town 20 minutes away. I messaged the seller who said "the sooner the better" so we agreed to arrive there by 0800. I gave them £50 and loaded the stuff into the back of the car.
I had breakfast when we got back, and by 1000hrs the lathe was working properly. Luckily for me, the seller was not good with electrical things and it was just really bad wiring. Other than watching some wood turners on Youtube once in a blue moon, my only previous experience with wood turning was a quick go on a lathe once at school - one of those lessons where the class lines up for a quick attempt before the next kid tries it. For really basic stuff it doesn't seem too difficult though. By 1100hrs on Sunday morning I had made myself a fid.
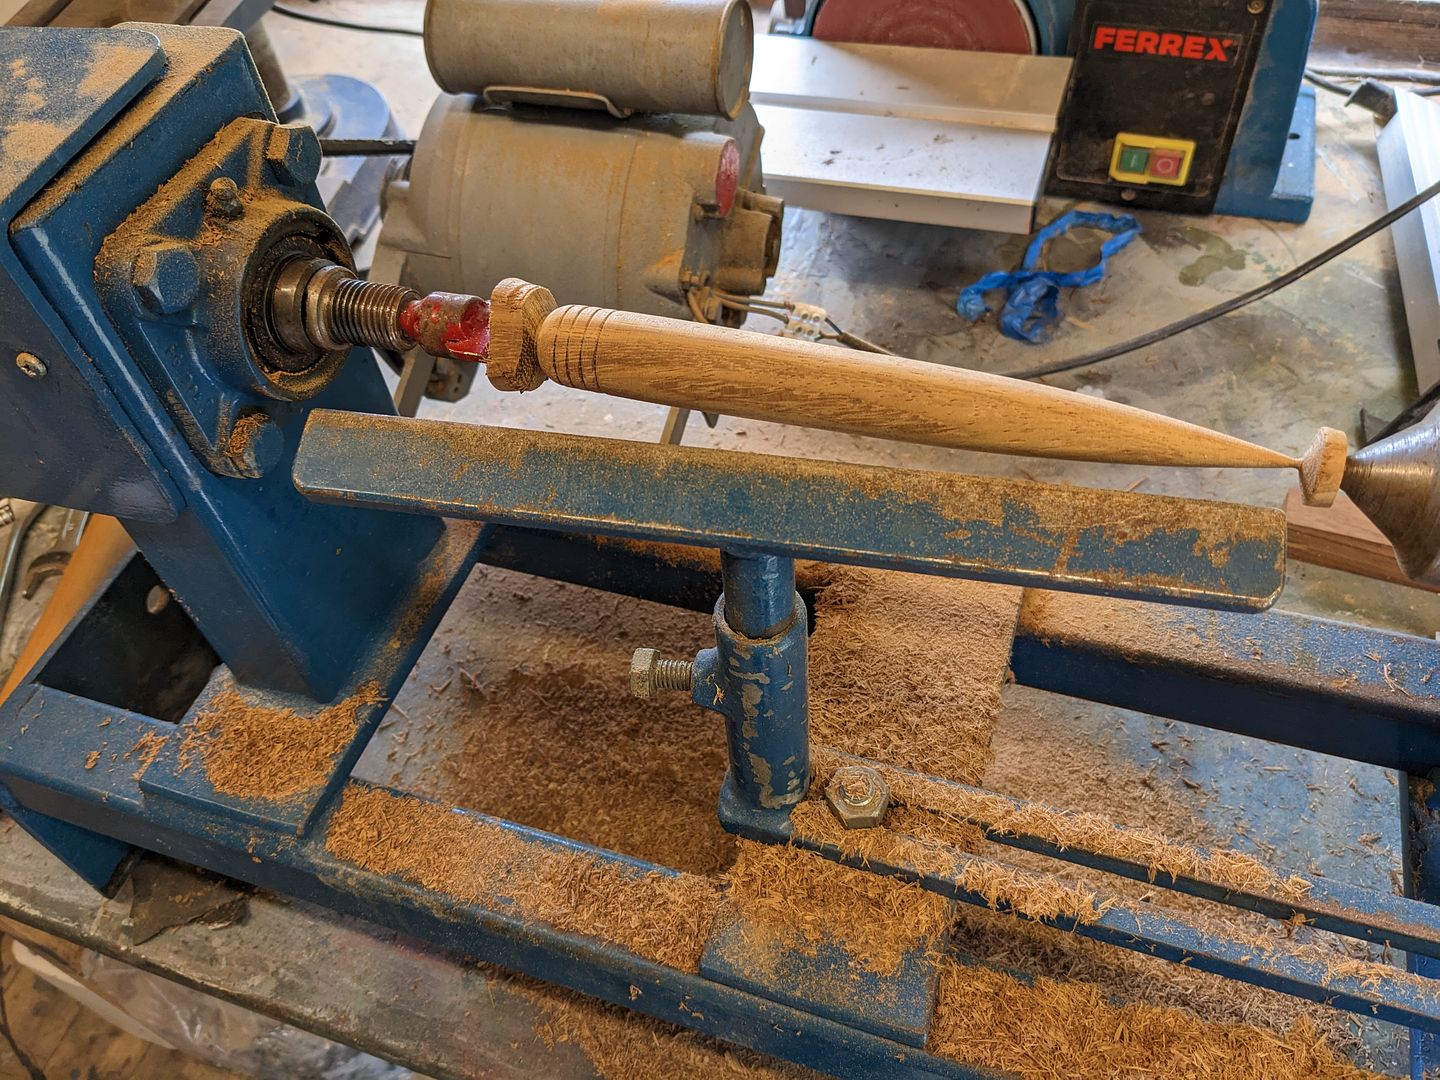
There's definitely room for improvement but for my first attempt at turning something myself I'm fairly happy with it.
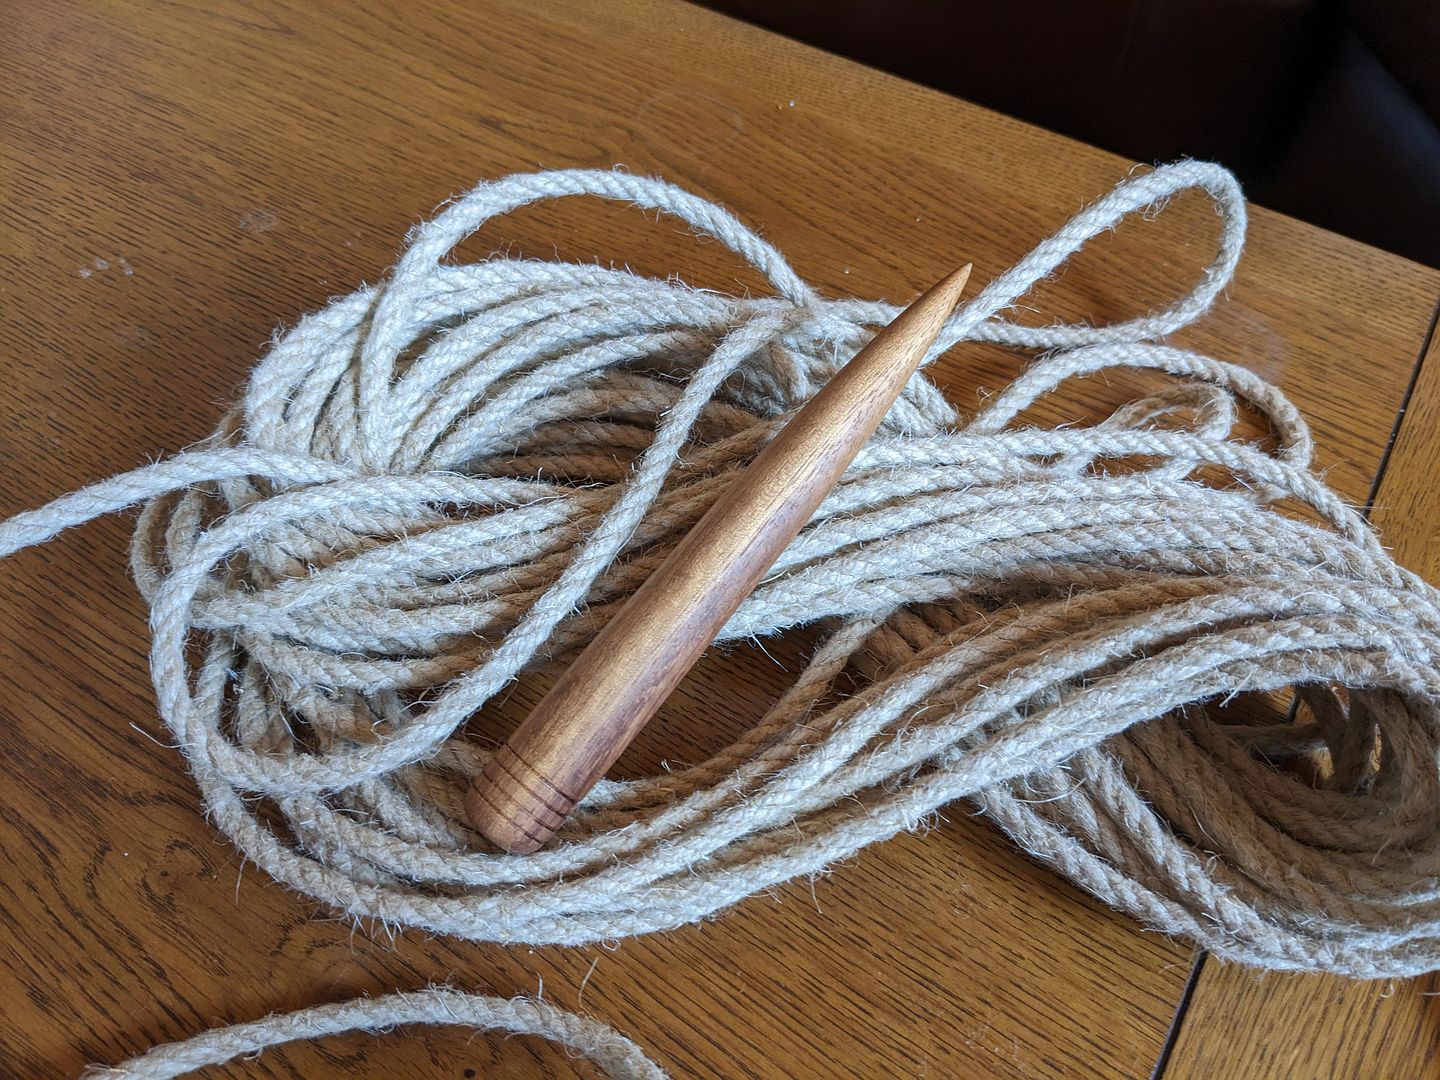
So much so that I made another

I am going to order the thimbles to go into the rope cringles of my staysail and gaff mainsail. Once they arrive, I shall make a split fid to aid installing them, as well as another for the man who ran the sail making course we're on to suit dimensions he's going to send me for the thimbles if he wants to use.
I had breakfast when we got back, and by 1000hrs the lathe was working properly. Luckily for me, the seller was not good with electrical things and it was just really bad wiring. Other than watching some wood turners on Youtube once in a blue moon, my only previous experience with wood turning was a quick go on a lathe once at school - one of those lessons where the class lines up for a quick attempt before the next kid tries it. For really basic stuff it doesn't seem too difficult though. By 1100hrs on Sunday morning I had made myself a fid.
There's definitely room for improvement but for my first attempt at turning something myself I'm fairly happy with it.
So much so that I made another
I am going to order the thimbles to go into the rope cringles of my staysail and gaff mainsail. Once they arrive, I shall make a split fid to aid installing them, as well as another for the man who ran the sail making course we're on to suit dimensions he's going to send me for the thimbles if he wants to use.
I'm almost certain I'll find uses for this along the way. I'm not exactly sure what yet, but for £50 it seemed like the obvious thing to do was to buy it! My wife observed that turning wood is considered by many to be a hobby in its own right. I think for me it'll just be a tool though. I have a thickness planer and a hydraulic press, but I doubt my hobbies will ever be "thinning down wood" or "crushing things".
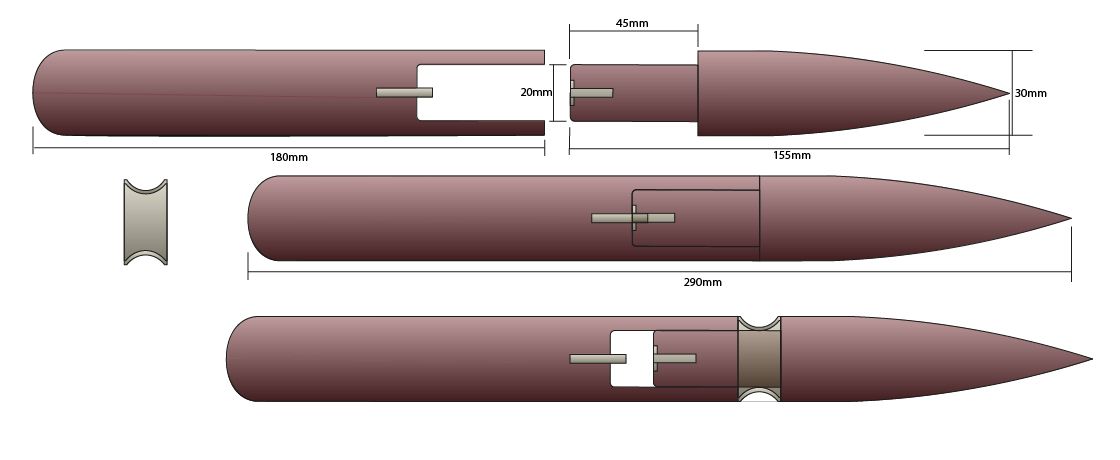
I have sketched up a split fid which started much shorter. There has been a bit of back and forth with the sail maker / course instructor Mark about how he'd want to use it so I drew it longer like this so he could clamp it between his knees and press the rope cringle down over it. It does end up more like a vampire stake though and perhaps a bit hard to stow so I'm shortening the base of it about 40mm from this sketch's proportions and I will lose some of the excess untapered length from the front to shorten by about 60mm overall. It'll screw together using a snooker cue brass connector thingie.
As our staysail and gaff main are getting rope cringles and brass thimbles too, I'm going to make one for myself first which can be a little shonky and hopefully apply any learnings to the one I make for Mark...
Gassing Station | Boats, Planes & Trains | Top of Page | What's New | My Stuff