My r52 Cooper S track day car build
Discussion


Firstly, as this is my first attempt at a build record, please forgive me if it either doesn't interest you or is boring or a bit disjointed or the pics are in the wrong place, but any feedback positive or negative is more than welcome.
Prologue.
For a few months at the back end of last year I first decided on a new challenge and eventually sold my e36 328, then sought some advice on here on a replacement within budget for the sale and the additional parts I also sold.
After a while, I decided on a Cooper S R53 type, this was mainly down to a combination of build quality, availability with LSD and availability of tuning parts & knowledge.
Fast forward another couple of months & I “accidentally” bought (another story entirely) an 06 S with all the important options (sports plus suspension, LSD, A/C, cruise, higher output engine) for the paltry sum of £1700 due to it having a few small issues & a spec that the owner knew nothing about.
Fast forward another few months & due to me preparing my house for sale I now have some time on my hands & have started my build in the last few days.
Chapter 1.
I decided to start under the bonnet with the easier parts of the build & a bit of fabrication work.
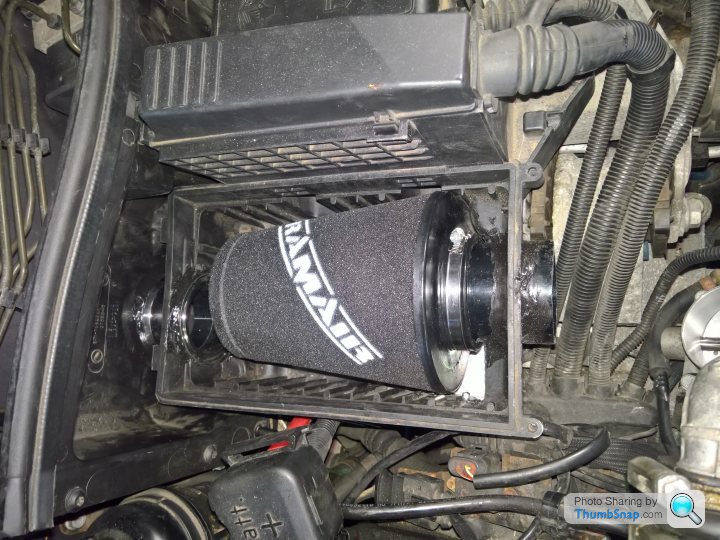
I had decided that I know much more than BMW & so I can do a much better job of the inlet for the engine, and that I wanted to use the standard airbox but fit a better cone filter.
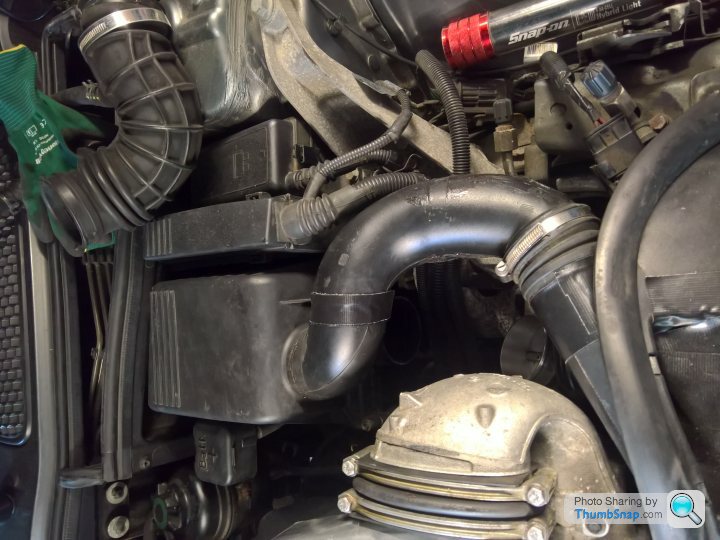
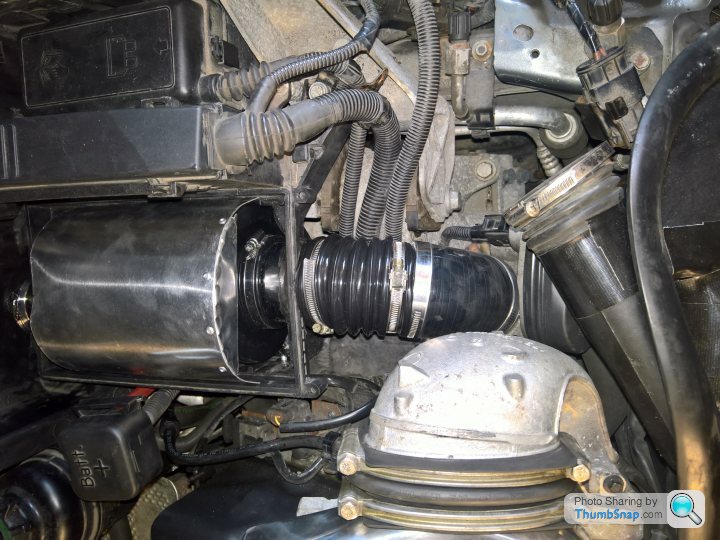
All the inlet piping & air filter housing came out, the filter housing was modified to take a Ramair cone filter in the bottom half.
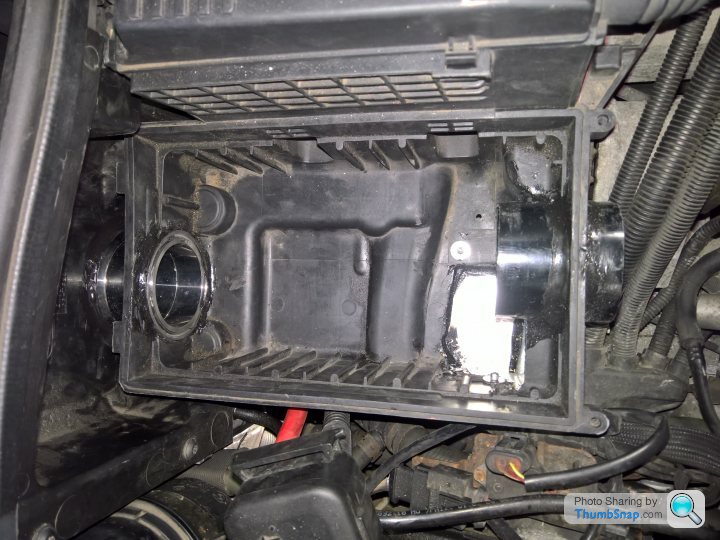
The bottom half was also modified and a corresponding hole drilled into the scuttle to allow me to fit a 70mm additional intake from the scuttle behind. This was tidied up with 2 stainless slip flanges (I think they are called) that I found lying around & joined with 70mm poly pipe.

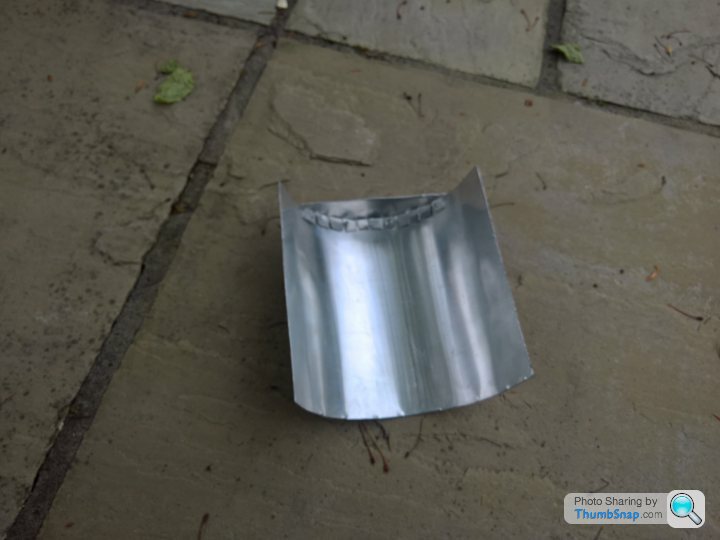
As the dirty inlet was now going to be into the top of the airbox I decided that it would be pertinent to shield the cone from the worst of any dirt coming in, so an alloy shield/cover was fabricated to keep the worst of it off the filter directly.
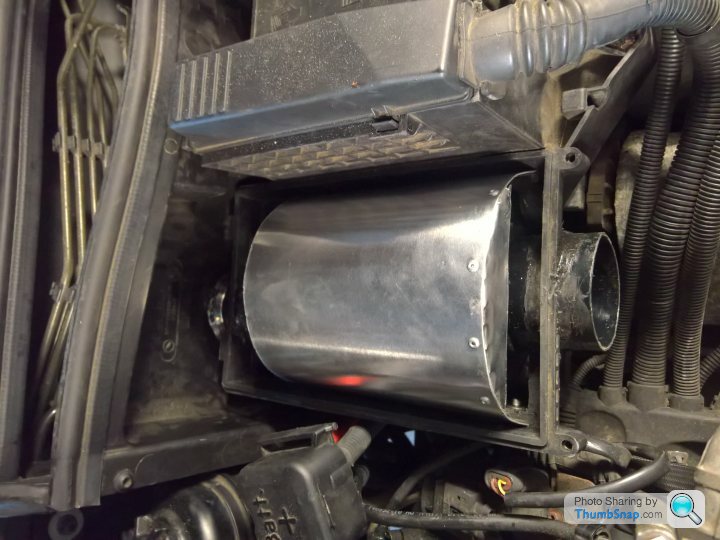
With this all in place, I managed to mock up the inlet which needed 1 x 45 degree 70mm silicone hose, which now makes the inlet into the throttle body a lot straighter, which must help. This was duly ordered along with a set of stainless jubilee type hose clips.
Whilst waiting for these I decided to mock up the dirty intake from under the bonnet lip to see what I needed to complete this.
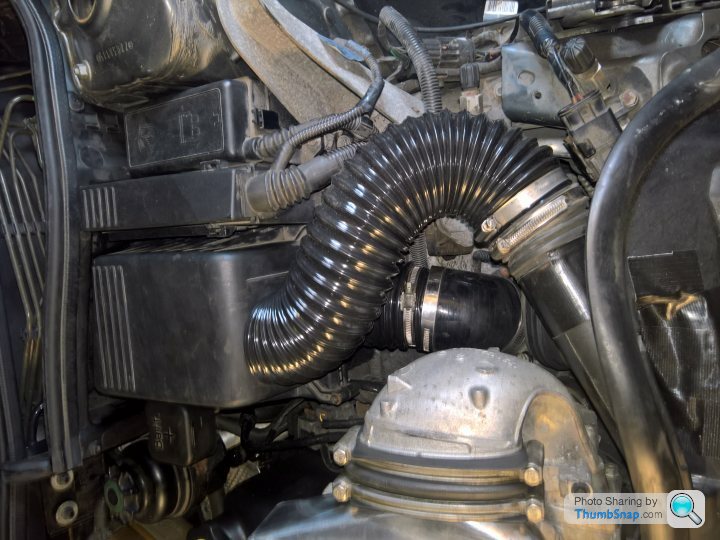
It quickly became apparent that I could pretty much use the original “snorkel” with a few mods. All the extra bits were cut odd to leave just an extended S-bend.
A few bits of my 70mm poly pipe were then used to attach the airbox end to give me something to work/measure to and it pretty much went straight in with a bit of cutting/shutting.
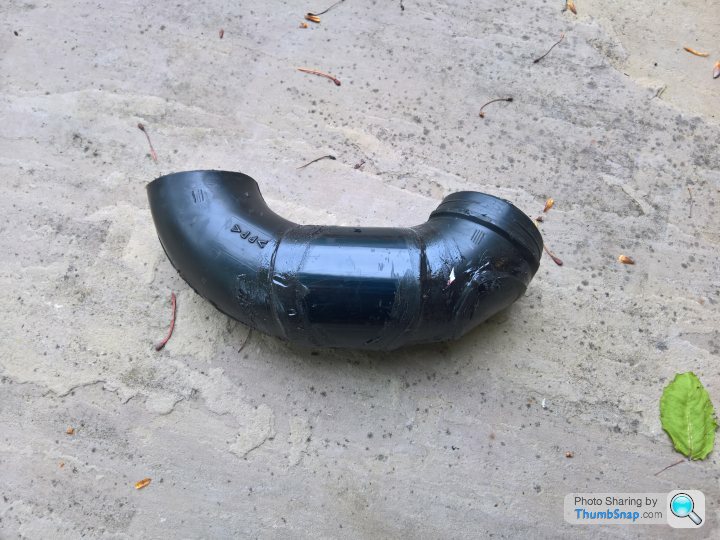
I then filled in the holes with some U-pol Tiger grip mastic/adhesive, (which should be up to the job) and a few off-cuts of poly pipe.
Thankfully this morning my 45 degree hose arrived so when that was in place with a few mods & the breather fitted I was able to confirm the position of the dirty inlet before setting it in place.
It is all in one piece, which will make air filter removal a bit fiddly with my new snorkel attached, but it does work, so no worries there.

Whilst I was in the engine bay I also fitted a Magnecor 10mm leads, MSD coil pack, cooler NGK plugs, larger (60mm core) intercooler, and a bigger (63mm IIRC) throttle body and 440cc injectors.
I quick start-up after finishing confirms that there is now the sound of strangled squirrels MUCH more audible on spool-up, so all-in-all I am pleased so far.
In next week/months episode – Front suspension/brakes.
Prologue.
For a few months at the back end of last year I first decided on a new challenge and eventually sold my e36 328, then sought some advice on here on a replacement within budget for the sale and the additional parts I also sold.
After a while, I decided on a Cooper S R53 type, this was mainly down to a combination of build quality, availability with LSD and availability of tuning parts & knowledge.
Fast forward another couple of months & I “accidentally” bought (another story entirely) an 06 S with all the important options (sports plus suspension, LSD, A/C, cruise, higher output engine) for the paltry sum of £1700 due to it having a few small issues & a spec that the owner knew nothing about.
Fast forward another few months & due to me preparing my house for sale I now have some time on my hands & have started my build in the last few days.
Chapter 1.
I decided to start under the bonnet with the easier parts of the build & a bit of fabrication work.
I had decided that I know much more than BMW & so I can do a much better job of the inlet for the engine, and that I wanted to use the standard airbox but fit a better cone filter.
All the inlet piping & air filter housing came out, the filter housing was modified to take a Ramair cone filter in the bottom half.
The bottom half was also modified and a corresponding hole drilled into the scuttle to allow me to fit a 70mm additional intake from the scuttle behind. This was tidied up with 2 stainless slip flanges (I think they are called) that I found lying around & joined with 70mm poly pipe.
As the dirty inlet was now going to be into the top of the airbox I decided that it would be pertinent to shield the cone from the worst of any dirt coming in, so an alloy shield/cover was fabricated to keep the worst of it off the filter directly.
With this all in place, I managed to mock up the inlet which needed 1 x 45 degree 70mm silicone hose, which now makes the inlet into the throttle body a lot straighter, which must help. This was duly ordered along with a set of stainless jubilee type hose clips.
Whilst waiting for these I decided to mock up the dirty intake from under the bonnet lip to see what I needed to complete this.
It quickly became apparent that I could pretty much use the original “snorkel” with a few mods. All the extra bits were cut odd to leave just an extended S-bend.
A few bits of my 70mm poly pipe were then used to attach the airbox end to give me something to work/measure to and it pretty much went straight in with a bit of cutting/shutting.
I then filled in the holes with some U-pol Tiger grip mastic/adhesive, (which should be up to the job) and a few off-cuts of poly pipe.
Thankfully this morning my 45 degree hose arrived so when that was in place with a few mods & the breather fitted I was able to confirm the position of the dirty inlet before setting it in place.
It is all in one piece, which will make air filter removal a bit fiddly with my new snorkel attached, but it does work, so no worries there.
Whilst I was in the engine bay I also fitted a Magnecor 10mm leads, MSD coil pack, cooler NGK plugs, larger (60mm core) intercooler, and a bigger (63mm IIRC) throttle body and 440cc injectors.
I quick start-up after finishing confirms that there is now the sound of strangled squirrels MUCH more audible on spool-up, so all-in-all I am pleased so far.
In next week/months episode – Front suspension/brakes.
I have a shameful admission with your ex track 328, got it home & immediately & in a day removed the aero that I wasn't a fan of & adjusted the seat to fit me better, then it sat for 7 months & untill a wk or so ago I'd not even driven it let alone tracked it since initial test drive with you!
Best get my finger out really!
Best get my finger out really!
Edited by iguana on Friday 12th May 23:20
iguana said:
I have a shameful admission with your ex track 328, got it home & immediately & in a day removed the aero that I wasn't a fan of & adjusted the seat to fit me better, then it sat for 7 months & untill a wk or so ago I'd not even driven it let alone tracked it since initial test drive with you!
Best get my finger out really!
AH ! Now everything makes sense. I didn`t realise E-BMW was the guy you picked the 328 up from Best get my finger out really!

Keep the updates coming although I suspect it might get moved into Readers' Cars .
Update time.
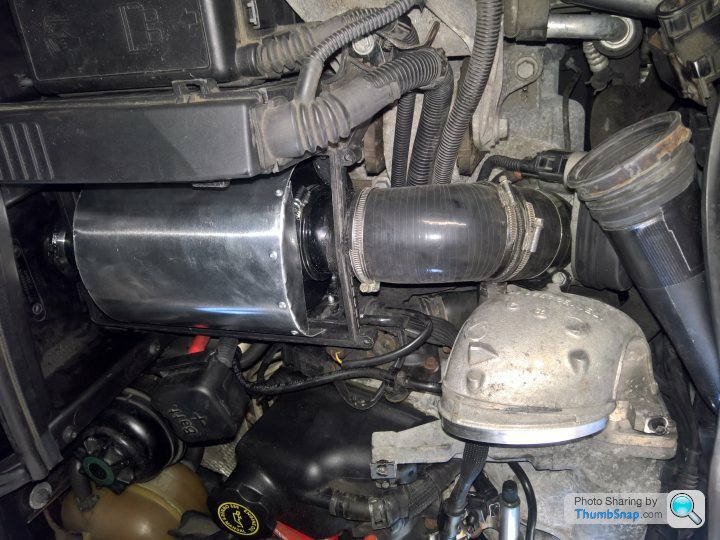
In spite of what I said about the next instalment being front suspension/brakes, after finding some concertina flexible inlet ducting that I couldn’t find last week, I decided to see if I could make it better still.
On top of this it seemed that I either hadn’t done something properly/left something loose/disturbed something as when the car was fully up to temperature the revs were surging a bit.
Off it all came, checked it all out & re-did a few bits with the concertina flexible hose, which is actually better anyway as it can’t collapse under vacuum.
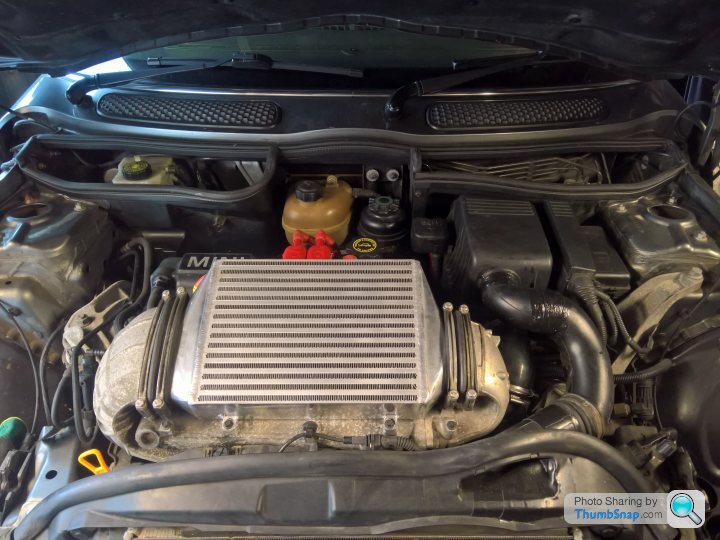
I also decided to make a “ramp” in front of the intercooler to direct as much air as possible over it rather than in front of it.

You can't really see it in the pic, but it is at quite a shallow angle to allow the air to be guided over the top of the intercooler rather than it just hitting the almost vertical front of it.
When I have more time, I suspect I will create a couple of vanes to help the air-flow to go through rather than over the intercooler, a bit like the one on the original black plastic overlay for the intercooler.
I also removed & re-routed the stick-on sponge on the under bonnet cowl to create a better “seal” around the intercooler also.
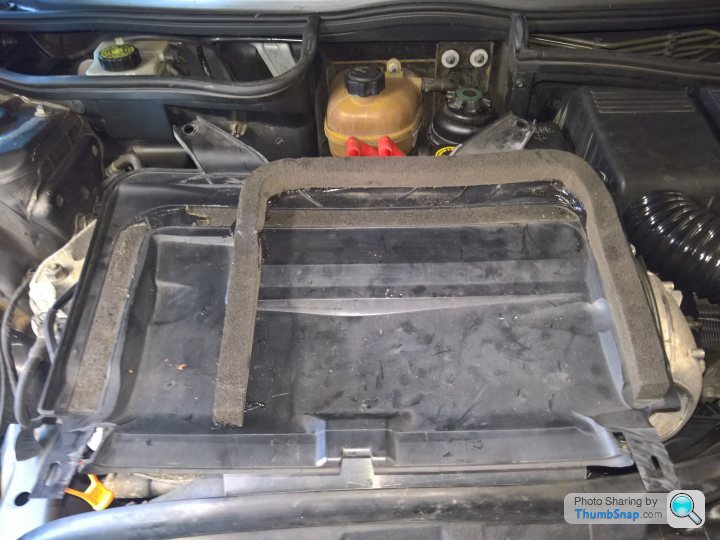
It now looks much better for air-flow looking through the letter-box.
In spite of what I said about the next instalment being front suspension/brakes, after finding some concertina flexible inlet ducting that I couldn’t find last week, I decided to see if I could make it better still.
On top of this it seemed that I either hadn’t done something properly/left something loose/disturbed something as when the car was fully up to temperature the revs were surging a bit.
Off it all came, checked it all out & re-did a few bits with the concertina flexible hose, which is actually better anyway as it can’t collapse under vacuum.
I also decided to make a “ramp” in front of the intercooler to direct as much air as possible over it rather than in front of it.
You can't really see it in the pic, but it is at quite a shallow angle to allow the air to be guided over the top of the intercooler rather than it just hitting the almost vertical front of it.
When I have more time, I suspect I will create a couple of vanes to help the air-flow to go through rather than over the intercooler, a bit like the one on the original black plastic overlay for the intercooler.
I also removed & re-routed the stick-on sponge on the under bonnet cowl to create a better “seal” around the intercooler also.
It now looks much better for air-flow looking through the letter-box.
Gassing Station | Track Days | Top of Page | What's New | My Stuff