Bit Of Help Please? (Broken thing)
Discussion
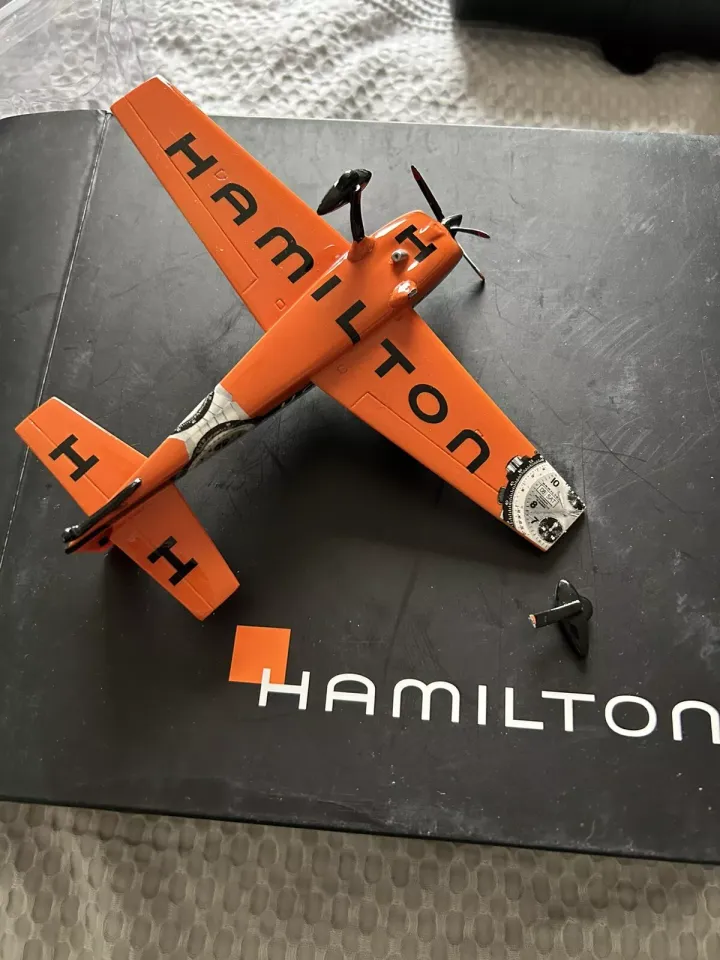
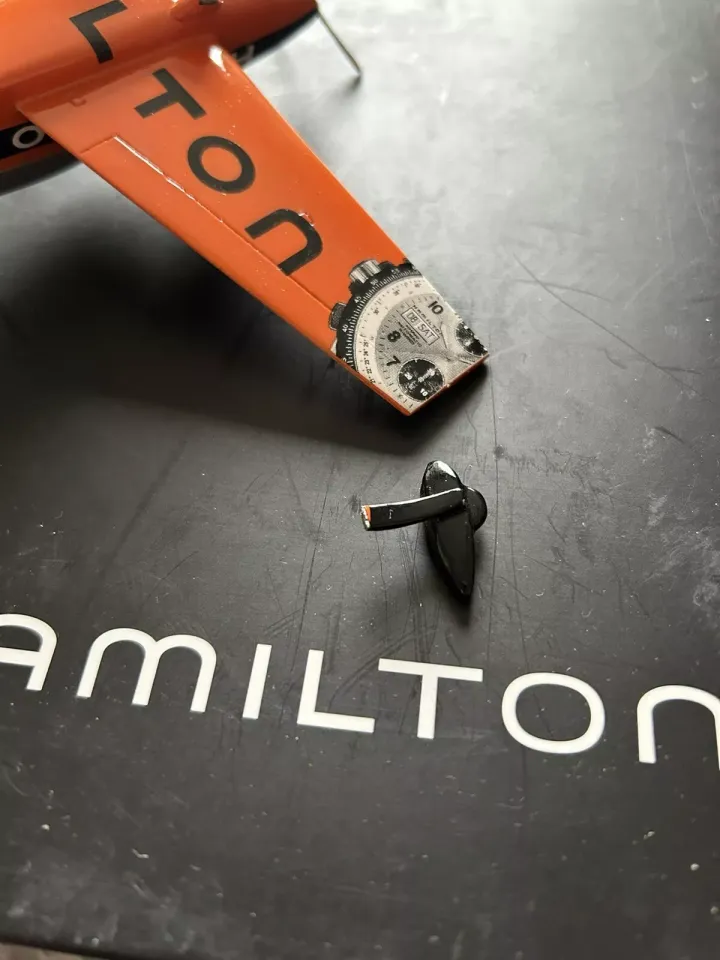
I have a small aluminium model airplane on which both of the main gear have broken off. (Yes, in the picture only one is broken, they're both broken now)
I could attempt to superglue it badly myself, but I'll probably do it squint or make a mess.


TBH, I'd be happy paying someone that would do a better job, maybe even touch up the paint around the repair if possible, someone that could do a good job of it.
Phoned a couple of local model shops this afternoon, none of them were able to help, wondered if anyone here might have any advice?
I could attempt to superglue it badly myself, but I'll probably do it squint or make a mess.
TBH, I'd be happy paying someone that would do a better job, maybe even touch up the paint around the repair if possible, someone that could do a good job of it.
Phoned a couple of local model shops this afternoon, none of them were able to help, wondered if anyone here might have any advice?
Drill and pin.
Drill a hole in the undercarriage leg and a corresponding hole in the underside of the fuselage. Insert a piece of metal rod into the hole in the undercarriage leg. Glue with supergue or epoxy glue. When dry, insert the other end of the pin into the hole in the fuselage and glue in the same way.
Drill a hole in the undercarriage leg and a corresponding hole in the underside of the fuselage. Insert a piece of metal rod into the hole in the undercarriage leg. Glue with supergue or epoxy glue. When dry, insert the other end of the pin into the hole in the fuselage and glue in the same way.
EmailAddress said:
Wife has a fascination with breaking model elephant tusks  (don't. just don't)
I've used a very thin drill to make a double snake bite. Superglued about a 1/4" of paperclip into the two pieces and held them together until they hold.
Then touched up with jb weld or a slither of filler depending on the finish.
Light sand.
Touch-up paint.
Await next weeks dusting incident.
So what, a 1mm drill? What's the diameter of a paperclip? Google reckons 0.9mm. Any particular tricks to get the 2 holes in the separate parts to line up? (don't. just don't)
I've used a very thin drill to make a double snake bite. Superglued about a 1/4" of paperclip into the two pieces and held them together until they hold.
Then touched up with jb weld or a slither of filler depending on the finish.
Light sand.
Touch-up paint.
Await next weeks dusting incident.
Eric Mc said:
Drill and pin.
Drill a hole in the undercarriage leg and a corresponding hole in the underside of the fuselage. Insert a piece of metal rod into the hole in the undercarriage leg. Glue with supergue or epoxy glue. When dry, insert the other end of the pin into the hole in the fuselage and glue in the same way.
Thanks.Drill a hole in the undercarriage leg and a corresponding hole in the underside of the fuselage. Insert a piece of metal rod into the hole in the undercarriage leg. Glue with supergue or epoxy glue. When dry, insert the other end of the pin into the hole in the fuselage and glue in the same way.
gruffgriff said:
Yeah, wot they sed.
I get through a surprising number of paperclips in a year.
Where are you?
Glasgow. Ish.I get through a surprising number of paperclips in a year.
Where are you?
A bit far to pop over, sorry! Unless you're down to leafy Berks any time..
Has/have the leg/s bent before snapping? Any cracks in the paint, does it look right when you offer it up broken face to broken face? You might get away with a glued fix and a hairline crack if all's good...wire pin very necessary regardless.
My vernier calipers confirm 0.8mm for all the paper clip wire I've got.
2 choices: A 0.8 hole and a bit of crimping of the wire out of shape might give you a really firm one-way push-fit...or..A slightly bigger hole, say 1mm, will give your chosen glue a chance to get between hole and pin. Drill and glue wire in one face, wipe away excess glue to preserve the jagged contours over the break face. Leave the pin long and trim back after setting.
Drill the receiving 1mm hole by eyeballing, first using an awl or knife tip to make a divet to prevent the drill tip from walking.
Offer up the piece that's now wired. Trim and bend the protruding wire as necessary and open out the second hole as needed until the jagged faces align and the A surfaces match. Glue again.
Filler and paint (or even black Sharpie!) may be necessary, especially if the legs bent and have to be straightened. Hope not though.
Happy to fix it for you if you trust the Post..and me of course.
gruffgriff said:
A bit far to pop over, sorry! Unless you're down to leafy Berks any time..
Has/have the leg/s bent before snapping? Any cracks in the paint, does it look right when you offer it up broken face to broken face? You might get away with a glued fix and a hairline crack if all's good...wire pin very necessary regardless.
My vernier calipers confirm 0.8mm for all the paper clip wire I've got.
2 choices: A 0.8 hole and a bit of crimping of the wire out of shape might give you a really firm one-way push-fit...or..A slightly bigger hole, say 1mm, will give your chosen glue a chance to get between hole and pin. Drill and glue wire in one face, wipe away excess glue to preserve the jagged contours over the break face. Leave the pin long and trim back after setting.
Drill the receiving 1mm hole by eyeballing, first using an awl or knife tip to make a divet to prevent the drill tip from walking.
Offer up the piece that's now wired. Trim and bend the protruding wire as necessary and open out the second hole as needed until the jagged faces align and the A surfaces match. Glue again.
Filler and paint (or even black Sharpie!) may be necessary, especially if the legs bent and have to be straightened. Hope not though.
Happy to fix it for you if you trust the Post..and me of course.
Apologies for not replying, I've been away for work, on an orange plane funnily enough, but not as cool as this one (easyjet)Has/have the leg/s bent before snapping? Any cracks in the paint, does it look right when you offer it up broken face to broken face? You might get away with a glued fix and a hairline crack if all's good...wire pin very necessary regardless.
My vernier calipers confirm 0.8mm for all the paper clip wire I've got.
2 choices: A 0.8 hole and a bit of crimping of the wire out of shape might give you a really firm one-way push-fit...or..A slightly bigger hole, say 1mm, will give your chosen glue a chance to get between hole and pin. Drill and glue wire in one face, wipe away excess glue to preserve the jagged contours over the break face. Leave the pin long and trim back after setting.
Drill the receiving 1mm hole by eyeballing, first using an awl or knife tip to make a divet to prevent the drill tip from walking.
Offer up the piece that's now wired. Trim and bend the protruding wire as necessary and open out the second hole as needed until the jagged faces align and the A surfaces match. Glue again.
Filler and paint (or even black Sharpie!) may be necessary, especially if the legs bent and have to be straightened. Hope not though.
Happy to fix it for you if you trust the Post..and me of course.
Honestly, it really sounds like something I'll f
 k up. Too fidgety and fiddly for me, i lack 'neatness', but I'd be more than happy to compensate you for your time with £££/beer/charitable donation, if you do fancy having a crack at it?
I'll try figure out how to e-mail you, I'm sure there's a way to do that here?
Thanks for all the replies everyone, much appreciated.
Gassing Station | Scale Models | Top of Page | What's New | My Stuff


