3D Printed 1:72 Blue Steel Missile Trolley
Discussion


I'm currently (very slowly) building the new Airfix Vulcan:
https://www.pistonheads.com/gassing/topic.asp?h=0&...
...and wanted to display the Blue Steel missile included in the kit separately from the model. There are a couple of trolleys / transporters available in 1:72 kit form, but I wanted the 8-wheeled version, since I kind of liked the robust look of it better than the skinny low-level loading trolleys. I assume it's compatible with the Vulcan (looking at several reference pictures), but it's really just something to put the thing on.
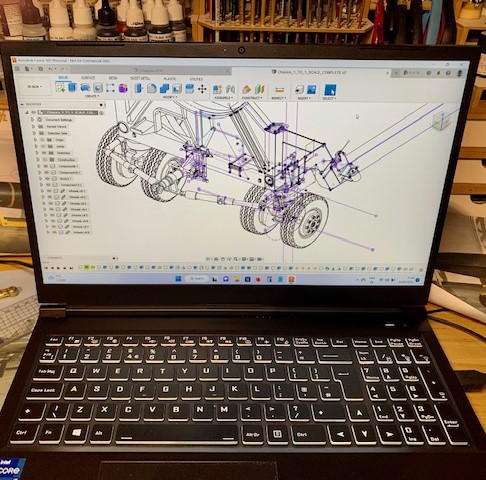
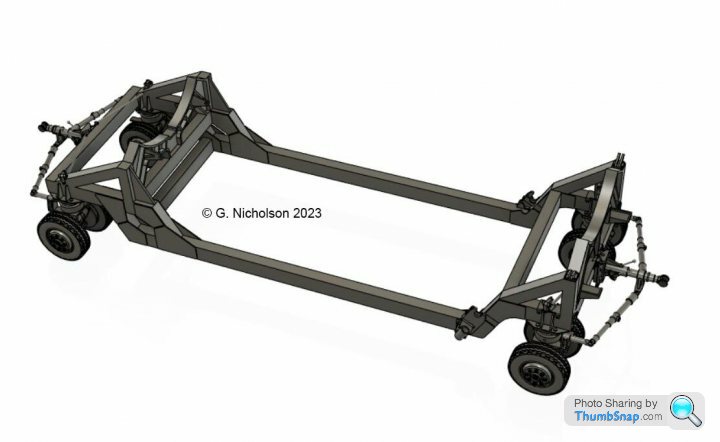
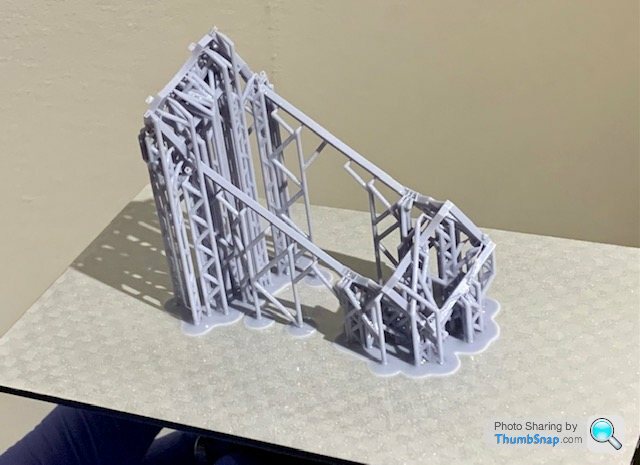
So after finding some decent online images (not easy) I contacted the RAF Scampton museum, who kindly sent me some further detail pictures with a tape measure for scale, and some measured key dimensions such as section sizes and tyre diameters. I really wanted to go and see it for myself, but at the time I had Covid, so that was that. After a few aborted attempts, I fired up the CAD package, got the rule, dividers, protractor and calculator out, and made a start:
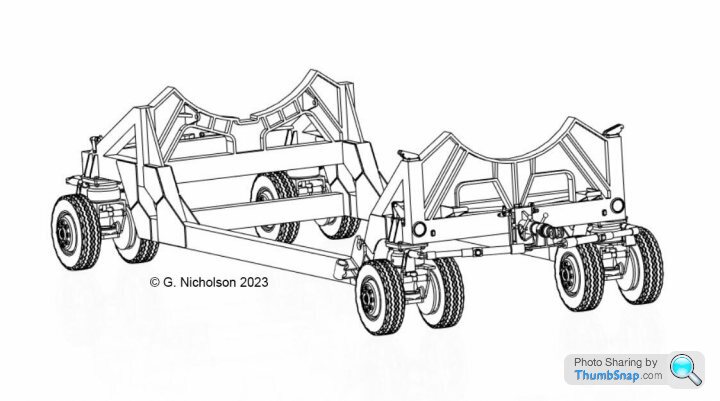
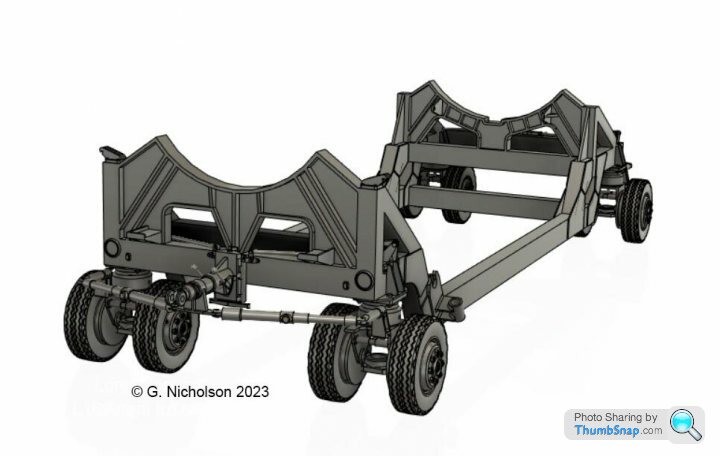
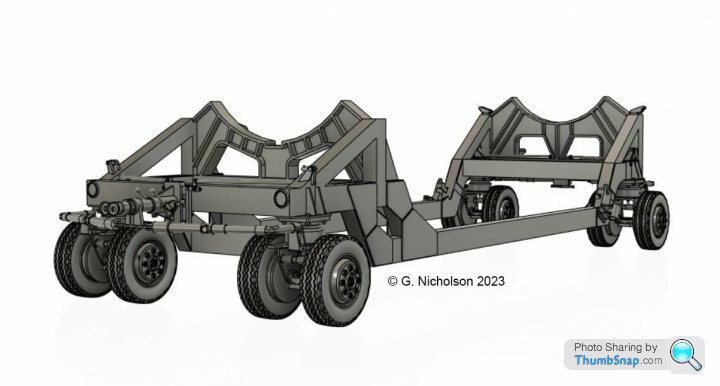
The actual cradle centre distance doesn't seem to correspond with where they should locate on the Airfix missile, at least not relative to the control surfaces. The Airfix missile is however about the right length. Anyhow, I shortened the whole thing to fit the Airfix model, and ended up with this:
Ever since seeing Caterhamnut's 1:12 Tamiya Caterham parts he made on his resin printer, I've wanted one. Like computers though, I always put off getting one becasue the "next best thing" was always around the corner. However, when I saw the Anycubic Photon Ultra (a DLP printer) I thought I'd get one for Christmas (also got the wash and cure station):
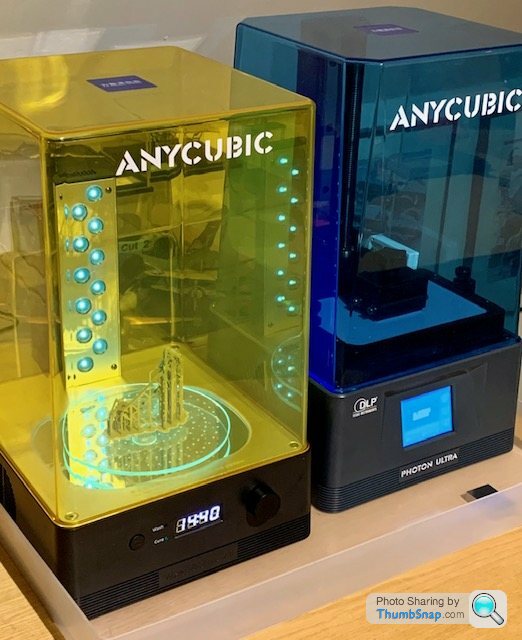
It's a small build voulme, but perfect for what I need for 1:72 aircraft parts and 1:12 car details. The resolution is amazing:
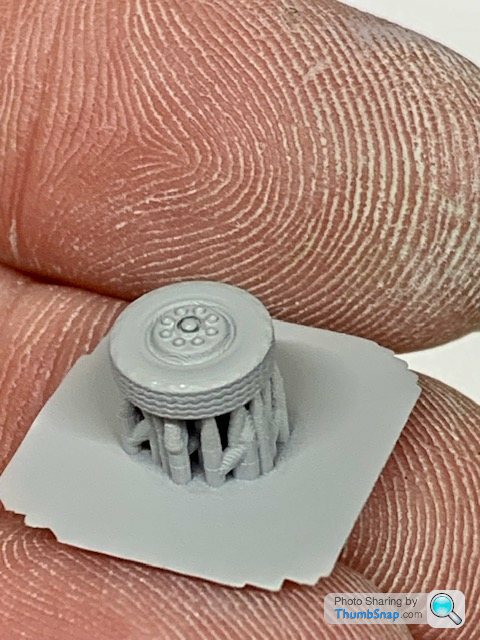
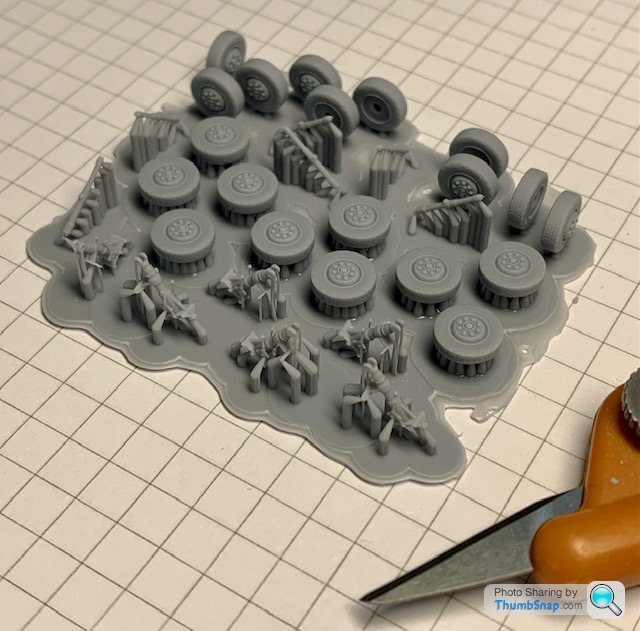
The tyres are only 7 mm in diameter, but the treads I modelled are all there:
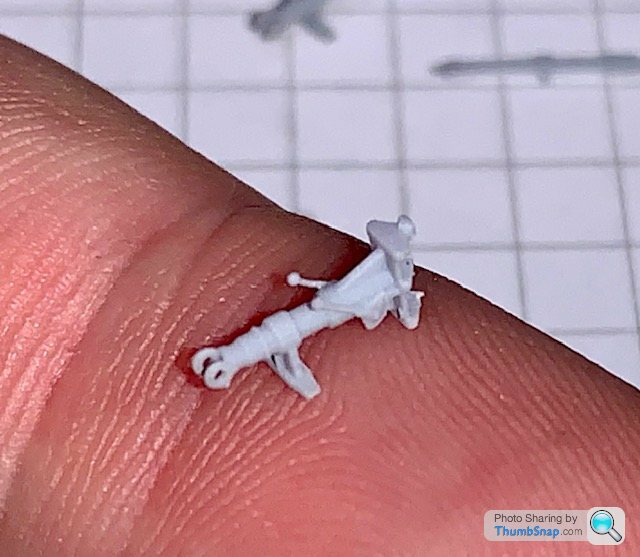
It takes some knowledge of the process to get the best results, especially in terms of build orientation and supports required for overhanging bits. I'm not pretending these are optimum, but they worked after 3 iterations:
These are the wheels and some other parts:
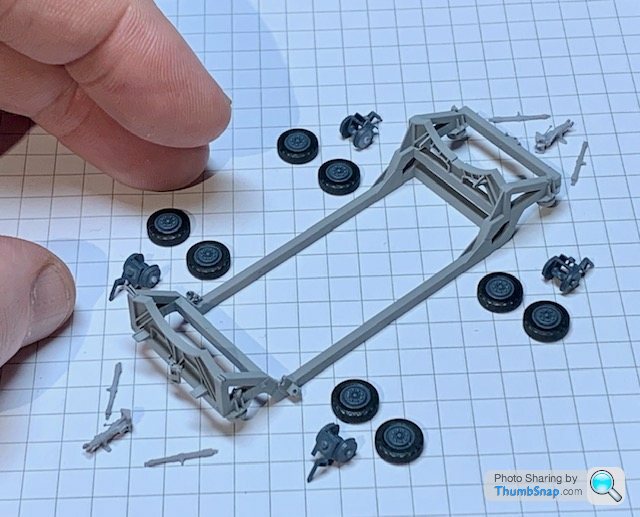
And the component parts ready for assembly:
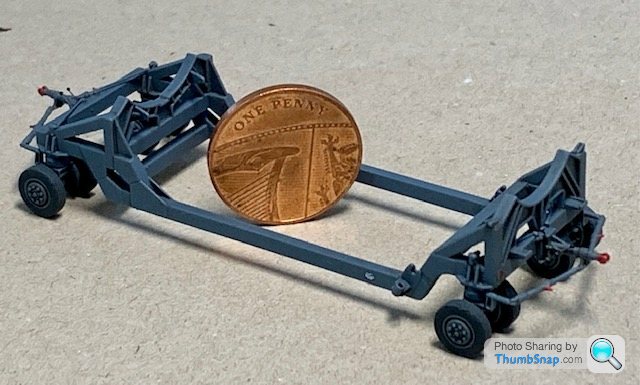
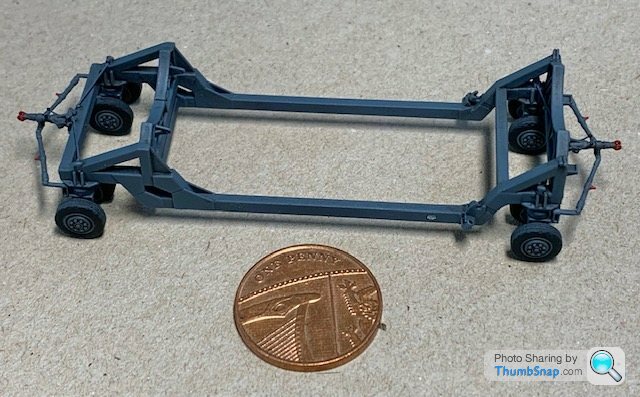
This is it after painting, weathering, addition of a data plate (actually 1:48 Luftwaffe!) and assembly. the only items not printed are the small brake actuation rods above the front and rear transvers members:
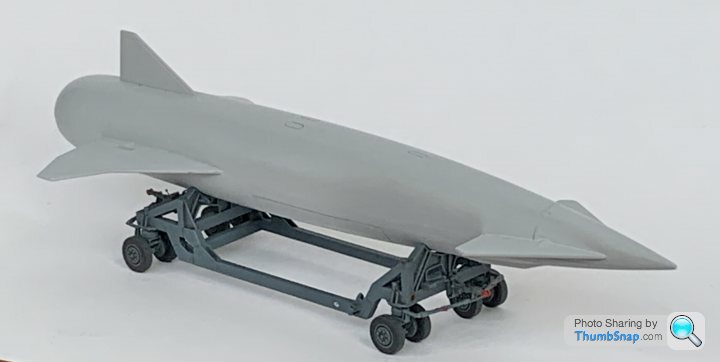
And with the Airfix missile:
It still needs the securing straps adding, and I need to refine the missile a bit to more match the detail included in the trolley, and am currently trying to find references for the top surface, where presumably there are a load of connection points for attatching to the aircraft, and electrical stuff etc.

But for now, back to trying to finish the Vulcan...
https://www.pistonheads.com/gassing/topic.asp?h=0&...
...and wanted to display the Blue Steel missile included in the kit separately from the model. There are a couple of trolleys / transporters available in 1:72 kit form, but I wanted the 8-wheeled version, since I kind of liked the robust look of it better than the skinny low-level loading trolleys. I assume it's compatible with the Vulcan (looking at several reference pictures), but it's really just something to put the thing on.
So after finding some decent online images (not easy) I contacted the RAF Scampton museum, who kindly sent me some further detail pictures with a tape measure for scale, and some measured key dimensions such as section sizes and tyre diameters. I really wanted to go and see it for myself, but at the time I had Covid, so that was that. After a few aborted attempts, I fired up the CAD package, got the rule, dividers, protractor and calculator out, and made a start:
The actual cradle centre distance doesn't seem to correspond with where they should locate on the Airfix missile, at least not relative to the control surfaces. The Airfix missile is however about the right length. Anyhow, I shortened the whole thing to fit the Airfix model, and ended up with this:
Ever since seeing Caterhamnut's 1:12 Tamiya Caterham parts he made on his resin printer, I've wanted one. Like computers though, I always put off getting one becasue the "next best thing" was always around the corner. However, when I saw the Anycubic Photon Ultra (a DLP printer) I thought I'd get one for Christmas (also got the wash and cure station):
It's a small build voulme, but perfect for what I need for 1:72 aircraft parts and 1:12 car details. The resolution is amazing:
The tyres are only 7 mm in diameter, but the treads I modelled are all there:
It takes some knowledge of the process to get the best results, especially in terms of build orientation and supports required for overhanging bits. I'm not pretending these are optimum, but they worked after 3 iterations:
These are the wheels and some other parts:
And the component parts ready for assembly:
This is it after painting, weathering, addition of a data plate (actually 1:48 Luftwaffe!) and assembly. the only items not printed are the small brake actuation rods above the front and rear transvers members:
And with the Airfix missile:
It still needs the securing straps adding, and I need to refine the missile a bit to more match the detail included in the trolley, and am currently trying to find references for the top surface, where presumably there are a load of connection points for attatching to the aircraft, and electrical stuff etc.
But for now, back to trying to finish the Vulcan...
SpunkyGlory said:
That is incredible attention to detail! You have a lot more patience (and talent) than me.
Thanks! TBH by far the most difficult part of the whole process was trying to figure out the CAD package; Fusion 360 felt really strange after using ProE/Creo for much of my working life. The result is that the CAD model is a real mess in terms of how it’s structured. Still, once it’s exported to .stl, all that’s forgotten.You should have made it so the parts didn’t fit together for the authentic Airfix experience..
Seriously. Good stuff though.
I’m thinking of getting a 3d printer myself. I appreciate yours was supplied by Father Christmas, but if one was to to go to a shop for a similar set up, how much would it cost?
Seriously. Good stuff though.
I’m thinking of getting a 3d printer myself. I appreciate yours was supplied by Father Christmas, but if one was to to go to a shop for a similar set up, how much would it cost?
robemcdonald said:
You should have made it so the parts didn’t fit together for the authentic Airfix experience..
Seriously. Good stuff though.
I’m thinking of getting a 3d printer myself. I appreciate yours was supplied by Father Christmas, but if one was to to go to a shop for a similar set up, how much would it cost?
So the Photon Ultra was c. £350, the wash and cure station was c.£100 (not strictly necessary, but saves time and mess). Resin was about £25 IIRC for a 500 ml. bottle (I’ve hardly used any so far). I believe the Ultra was discontinued recently, so I’m sure you could get it cheaper now. I think there’s a D2, which is much bigger, and apparently has even higher resolution, but at this point I think we’re approaching being able to print detail or finish that is invisible to the naked eye (at my age anyway!). If you’ve got an FDM printer, you’ll find resin a lot more messy, but that’s the compromise between simplicity and detail.Seriously. Good stuff though.
I’m thinking of getting a 3d printer myself. I appreciate yours was supplied by Father Christmas, but if one was to to go to a shop for a similar set up, how much would it cost?
What I like about designing my own parts is that you can add things to make things simpler. For example I made the wheel rims protrude a bit more than scale so that I could easily wick black paint around it to get a perfect demarcation to the wheel. At this scale it’s invisible when complete, but so much easier to paint.
alleggeria said:
I agree, really nice work done. Does it work with STL files or do you have to draw from scratch? The 3D product is only as good as its model isn't it?
Not sure what you mean?The starting point is a 3D model. In this case I built that myself from photographs.
From the model, you export an .stl file, and read it into slicing software. The software exports a data file, and that’s what the printer reads.
Of course, if an .stl is available online, you can put that into the slicer software without building your own CAD model.
You are right that you need the best quality .stl export you can get (or at least as accurate as the printer can deal with). You can manually adjust the fidelity of the .stl output from your own CAD, to include every tiny detail, this is at the expense of file size. There’s not much you can do to increase fidelity of a “stand alone” .stl file though, since you can’t add accuracy to it once exported, you can only do that in CAD by either increasing the .stl accuracy, or adding detail to the CAD if it’s not there.
For this trolley, in the 3D model, I included every nut, bolt, pin and washer I could see on the photos, assuming many would be lost during printing. In the event, pretty much everything was there on the print, albeit you can’t see the flats on some of the smaller nuts.
BTW This is the trolley:
https://www.iwm.org.uk/collections/item/object/205...
Although presumably it would be unwise to load it to a Vulcan that has a main wheel missing…
ETA I think this is a service trolley for general moving around. The loading trolley is much lower for height clearance.
https://www.iwm.org.uk/collections/item/object/205...
Although presumably it would be unwise to load it to a Vulcan that has a main wheel missing…
ETA I think this is a service trolley for general moving around. The loading trolley is much lower for height clearance.
Boatbuoy said:
Excellent work, and great to see that you don't try to print it as a fully assembled item. I think a lot of people fall into that trap and that can expose some of the limitations of 'additive manufacturing'.
What glue(s) are you using to assemble resin parts?
Thanks! Yep, assembly is often the way to go to avoid unpleasantness.What glue(s) are you using to assemble resin parts?
I used canopy PVA for assembly (as I do for most non-structural model parts). It's more than strong enough, dries clear so it's not obtrusive, and most important if you really mess up you can dunk it in water, and the asssembly will fall to pieces as if nothing had happened and you can start again.
Gassing Station | Scale Models | Top of Page | What's New | My Stuff