Customising Trainers - Corvette and Bel-Air Inspired Jordans
Discussion
So ive been doing this for some time now, some people like my customs some dont but then i dont like alot of the colourways being released, so decided to do my own.
Bare with me, im not a writer or have a way with the written word
Anyway, ive been binge watching Fast'n'Loud, Kindig Designs/b hin Rides and loving the old school muscle and retro cars they do, so much so that i thought i would do my own (as opposed to buying a ls crate engined modernised american muscle car).
So with Covid Lockdown in full swing, i 'won' these in the Nike Raffle;
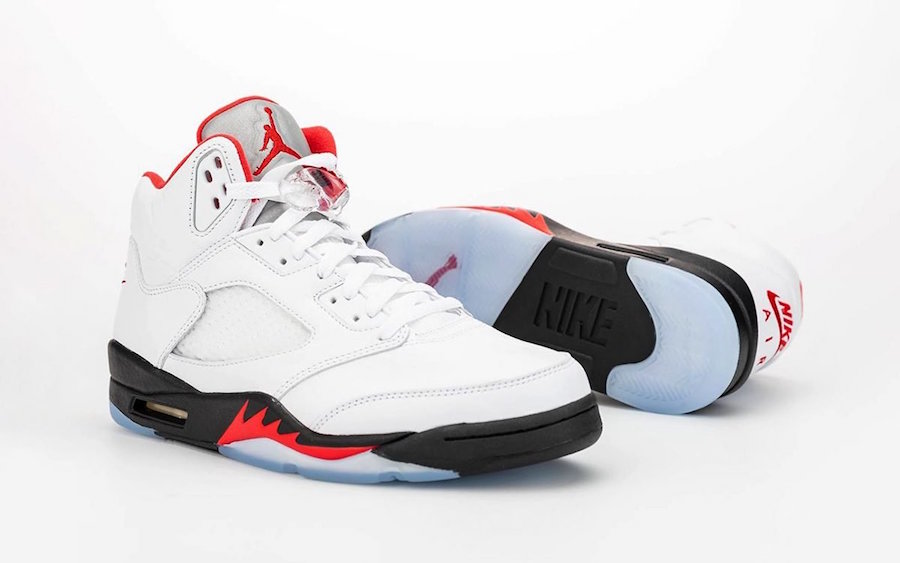
I was going to send them back as even though they are 'lovely' in hand, my daily footwear at the time was socks if i felt like treating myself so wasnt going to wear these for ages. But the long story short is that i decided to keep them for customising.
And my chosen colour was Candy Apple Red. A company does make this colour for trainers but its more of a bronze red than candy red so i moved onto powders thats used for automotive use though can be used in other applications. At the time i was using some scales to measure out 1g of powder but then found out that a 1/3 a measuring teaspoon is the equivalent;

stupidly, i never wore gloves when mixing and this stuff stains everything it touches, so it got under my finger nails, around my nails etc. so it looked like i was a drag artist in my spare time
Swiftly moving on i started reading on various scale model forums about what colour to use as the base (black/gold/silver metallics) i saw people suggesting using Spoons to get an idea on the curvatures so decided to take the quick route and hand paint it;

It really needs to be sprayed on as opposed to painting it but never mind
So after prepping the shoe;

Think i used 4 light coats here.
Then someone else in a facebook group did something similar, i asked him what his ratio was and he said it was 50% neutral (looks white, dries clear) and 50% 2-thin (thinning additive for leather paint for the spray gun). So i proceeded with this ratio;
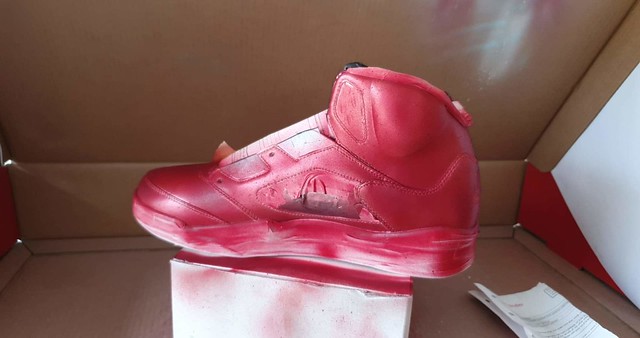
But the paint was too thin and the powder kept clumping together and looked like brown spots;

I thought id perceiver abit longer thinking another coat or two would solve the issue but it ended up looking like a bad spray tan;

Realising it was f ked and no point continuing, it was time to repair them. After trying to wet sand the dots out and failing, out come the acetone. I think i used up a 300ml bottle and 8 hours just trying to get to this stage;

Though i do like this distressed look and was tempted to leave it as is, a few more hours gave me this;

Time to reprep the shoe;
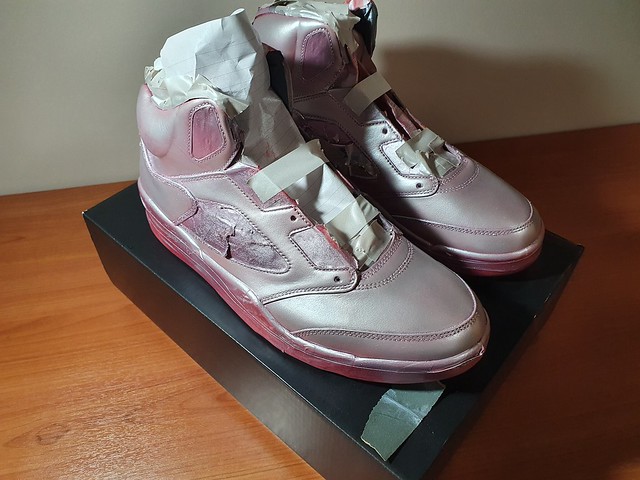
It was quite a nice rose silver but in a few areas the white had come through so on again went a few more coats of silver, then the red. By now i altered the ratio and strained it through 190 grade then 100 but the powder still clumped together slightly. So ended up doing 2 light coats, 1600 or 3000 grade wet sand, 2 more coats/sand till i got to around 6 coats

my spray booth is an old monitor box that i then enclosed to stop paint from leaking out, its also means its portable so it tended be set-up in the hotel;


unfortunately, with all the wet sanding, the red water had run into the mesh areas and onto the plastic eyelets;

Anyway, after abit more sanding, they were ready for a lacquer. Originally i wanted a patent leather look so it looked wet like a car's lacquer but the paint i wanted sold out so i spoke to liquid leather about what they'd suggest and they suggested their Top Coat T1 High Gloss sealant. They did suggest some ceramic sealant but at £90ish a bottle as opposed to £13, it was abit pricey for my needs.
Anyway, i have some spare shoes to practise on so put the LL T1 on one shoe and Angelus HIgh Gloss on the other, 2 coats later, this is how they looked;

(excuse the scruffy decking, i couldnt get paint over lock down then ended having to travel)

LL T1 won and 2 coats later;


i knew i was going to put another coat on but needed to protect the paint abit for when i tidied up the rest of the shoe.
I seem to have lost some pictures i took, but i experimented with turned part of the sole white to look like whitewall tyres but it started to look abit overkill so, acetone out and repaint black.
Next up was addressing the red on the white plastic, i tried Tamiya plastic paint at 100% and then thinned out but no joy, my leather paint = no joy then decided to say f k it, spent an hour or two masking up the shoes again and whipped out the Halfords White Primer.
However, on removing the tape (should have used frog tape as opposed to the white electrical), it pulled away some of the paint;

starting to get f ked off with my f
 k ups, out came the acetone/sand paper and tried to do a local repair. Ideally id have done it like a normal car repair and blown it in over a bigger area but just abit of hand painting of the red over existing made it darker so dont think id have been able to blend it in or definately not my skill set anyway
[url=https://flic.kr/p/2jka3Vk]
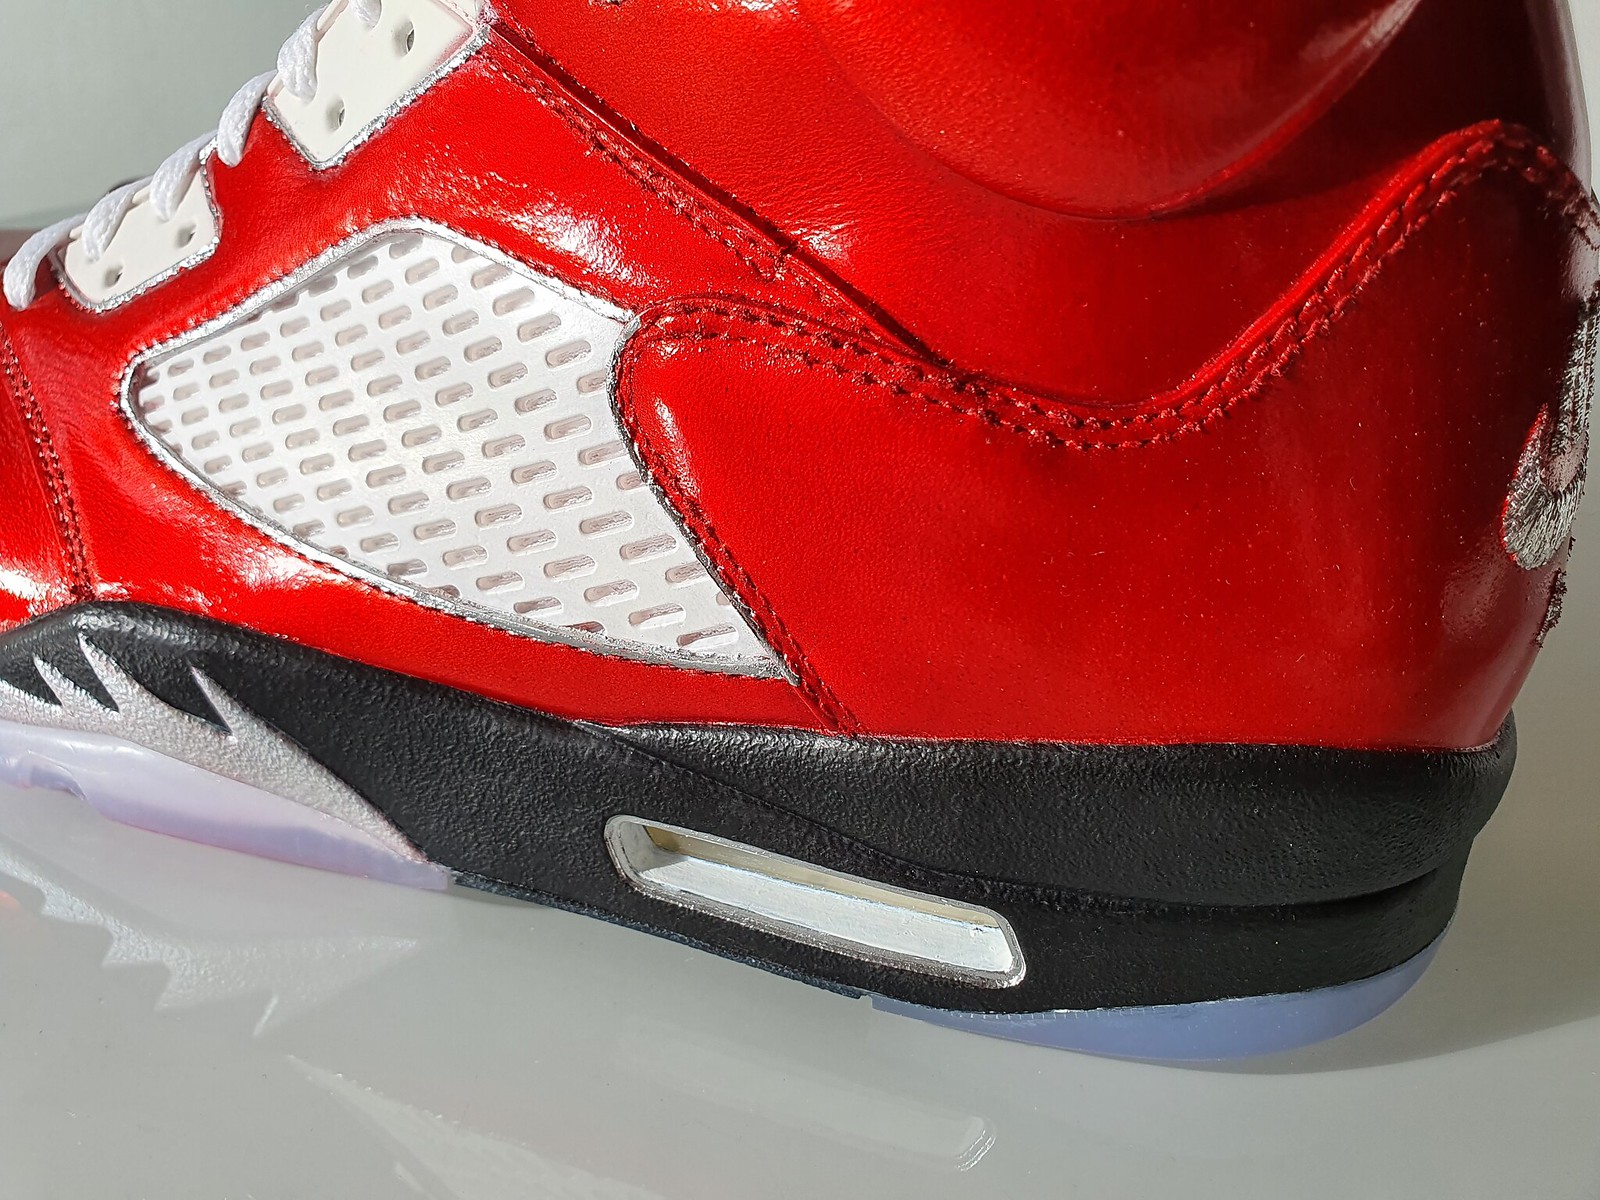
Anyway, with it all touched up and getting frustrated with myself, i decided to paint another gloss sealant coat (so 3 in total) and wait for the sun to come out in order for the shoes to pop and do the colour justice! Other photos i took in the shade, didnt do the colour justice so just had to wait but so happy i did. The last finishing touch was using the Molotow Chrome Paint Pens, using the edge of the leather and the stitching as a guide, i 'made' the chrome trim. The Nike at the bag is also in chrome but looks more like silver. Talking of which, due to sanding and the acetone, it started to frey slightly hence why it looks abit pony.
But heres the shoes in all their goodness;
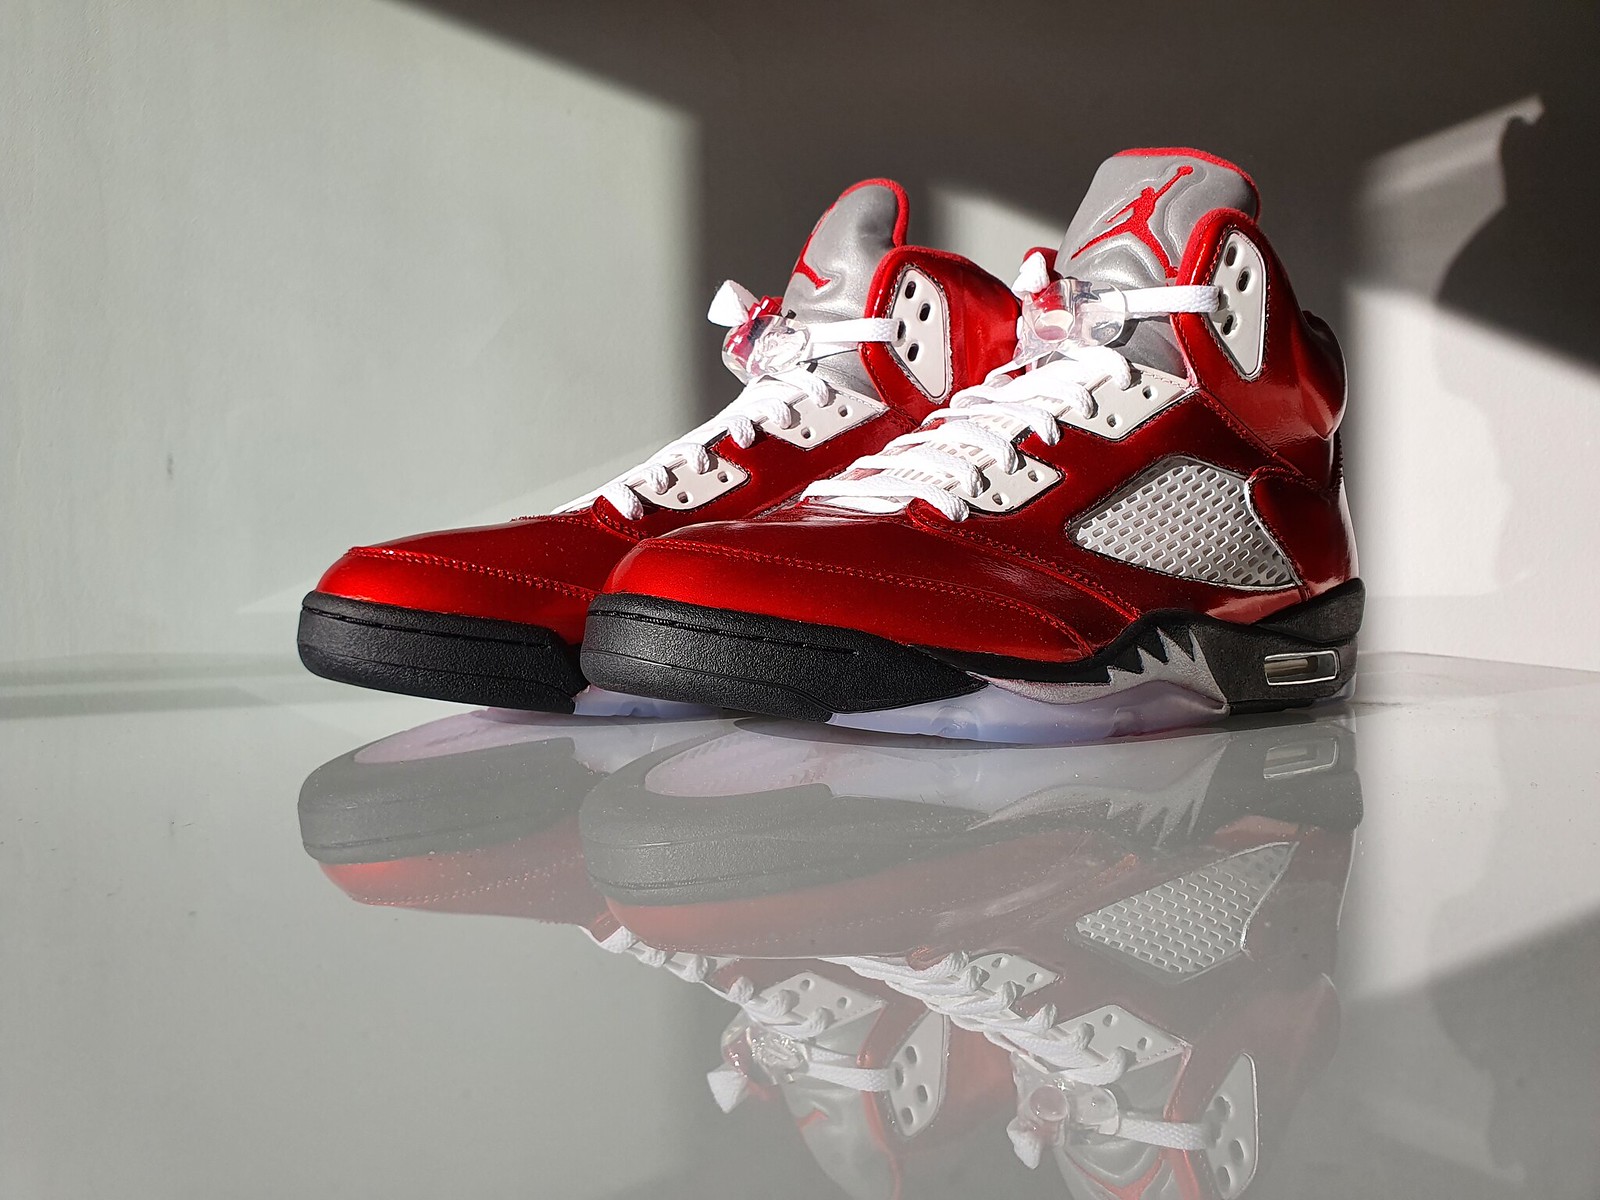


Then abit of white wall inspiration, still needs a slight tidy up but the paint on the clear bubble is just going over the oem factory black
Like i said, im not a writer but if anyone has any questions, please fire away. I think ive missed a few pics and my write-ups shocking but you get the idea
Bare with me, im not a writer or have a way with the written word
Anyway, ive been binge watching Fast'n'Loud, Kindig Designs/b
 hin Rides and loving the old school muscle and retro cars they do, so much so that i thought i would do my own (as opposed to buying a ls crate engined modernised american muscle car).
So with Covid Lockdown in full swing, i 'won' these in the Nike Raffle;

I was going to send them back as even though they are 'lovely' in hand, my daily footwear at the time was socks if i felt like treating myself so wasnt going to wear these for ages. But the long story short is that i decided to keep them for customising.
And my chosen colour was Candy Apple Red. A company does make this colour for trainers but its more of a bronze red than candy red so i moved onto powders thats used for automotive use though can be used in other applications. At the time i was using some scales to measure out 1g of powder but then found out that a 1/3 a measuring teaspoon is the equivalent;

stupidly, i never wore gloves when mixing and this stuff stains everything it touches, so it got under my finger nails, around my nails etc. so it looked like i was a drag artist in my spare time
Swiftly moving on i started reading on various scale model forums about what colour to use as the base (black/gold/silver metallics) i saw people suggesting using Spoons to get an idea on the curvatures so decided to take the quick route and hand paint it;

It really needs to be sprayed on as opposed to painting it but never mind
So after prepping the shoe;
- going over several times with Sainsburys 98% Acetone nail polish remover and using another J5's for the crease lines - 300 grade wet sand this location
- I used a mix of duct tape, white electrical tape and frog tape for masking here, i think prep work per shoe was 2-4 hours!

Think i used 4 light coats here.
Then someone else in a facebook group did something similar, i asked him what his ratio was and he said it was 50% neutral (looks white, dries clear) and 50% 2-thin (thinning additive for leather paint for the spray gun). So i proceeded with this ratio;

But the paint was too thin and the powder kept clumping together and looked like brown spots;

I thought id perceiver abit longer thinking another coat or two would solve the issue but it ended up looking like a bad spray tan;

Realising it was f
 ked and no point continuing, it was time to repair them. After trying to wet sand the dots out and failing, out come the acetone. I think i used up a 300ml bottle and 8 hours just trying to get to this stage;
Though i do like this distressed look and was tempted to leave it as is, a few more hours gave me this;

Time to reprep the shoe;

It was quite a nice rose silver but in a few areas the white had come through so on again went a few more coats of silver, then the red. By now i altered the ratio and strained it through 190 grade then 100 but the powder still clumped together slightly. So ended up doing 2 light coats, 1600 or 3000 grade wet sand, 2 more coats/sand till i got to around 6 coats

my spray booth is an old monitor box that i then enclosed to stop paint from leaking out, its also means its portable so it tended be set-up in the hotel;


unfortunately, with all the wet sanding, the red water had run into the mesh areas and onto the plastic eyelets;

Anyway, after abit more sanding, they were ready for a lacquer. Originally i wanted a patent leather look so it looked wet like a car's lacquer but the paint i wanted sold out so i spoke to liquid leather about what they'd suggest and they suggested their Top Coat T1 High Gloss sealant. They did suggest some ceramic sealant but at £90ish a bottle as opposed to £13, it was abit pricey for my needs.
Anyway, i have some spare shoes to practise on so put the LL T1 on one shoe and Angelus HIgh Gloss on the other, 2 coats later, this is how they looked;

(excuse the scruffy decking, i couldnt get paint over lock down then ended having to travel)

LL T1 won and 2 coats later;


i knew i was going to put another coat on but needed to protect the paint abit for when i tidied up the rest of the shoe.
I seem to have lost some pictures i took, but i experimented with turned part of the sole white to look like whitewall tyres but it started to look abit overkill so, acetone out and repaint black.
Next up was addressing the red on the white plastic, i tried Tamiya plastic paint at 100% and then thinned out but no joy, my leather paint = no joy then decided to say f
 k it, spent an hour or two masking up the shoes again and whipped out the Halfords White Primer.
However, on removing the tape (should have used frog tape as opposed to the white electrical), it pulled away some of the paint;

starting to get f
 ked off with my f
 k ups, out came the acetone/sand paper and tried to do a local repair. Ideally id have done it like a normal car repair and blown it in over a bigger area but just abit of hand painting of the red over existing made it darker so dont think id have been able to blend it in or definately not my skill set anyway
[url=https://flic.kr/p/2jka3Vk]

Anyway, with it all touched up and getting frustrated with myself, i decided to paint another gloss sealant coat (so 3 in total) and wait for the sun to come out in order for the shoes to pop and do the colour justice! Other photos i took in the shade, didnt do the colour justice so just had to wait but so happy i did. The last finishing touch was using the Molotow Chrome Paint Pens, using the edge of the leather and the stitching as a guide, i 'made' the chrome trim. The Nike at the bag is also in chrome but looks more like silver. Talking of which, due to sanding and the acetone, it started to frey slightly hence why it looks abit pony.
But heres the shoes in all their goodness;


Then abit of white wall inspiration, still needs a slight tidy up but the paint on the clear bubble is just going over the oem factory black

Like i said, im not a writer but if anyone has any questions, please fire away. I think ive missed a few pics and my write-ups shocking but you get the idea
tangerine_sedge said:
I read the whole lot, and found it interesting. I wouldn't want this subforum to become the "trainers forum", but I've always thought modelling is a broad church and i think we can let this one post live here for a little longer?
Thanks, i doubt this subsection will become about trainers as nobody seems to custom bar me really. I thought the processes where the same as i used some of the tricks modellers used and how its interchangeable.Someone recommended to me the molotow chrome pens which might be handy for people in this section (if they didnt know about it already). I might add my red over gold and red over black to show the different colouring schemes you can get as an idea, or not as theres not really any interraction on here about my customs, though ive got an order book for them once ive figured out labour rates and most importantly, where the paint cracks with movement.
Following some youtubers, the skills do seem interchangeable, just the medium used is different.
mcdjl said:
Will these be wearable without the paint cracking/flaking off?
Thats the plan, ill post up some pictures later of these being worn/walked about in for 3 miles.But in a synopsis;
The paint cracked and flaked off in a small location down by one of the lace eyelets. Its repairable. Another place silver can be seen is on a crease line.
With it being leather or patent leather the toe bit creased up but this can be resolved by inserting specific plastic toe decreasers though i understand that it cramps into the toe box abit.
Ive dropped an email to liquid leather over the scuffing and subsequent damage and wondering if i need to up the mixture ratio. I hand painted it on so went 50/50 with water but next time maybe ill spray it on at 100% strength and it'll stop this? I might switch to saddle lacquer if not which is meant to be tough.... but ill speak to LL first for their opinion.
They do a ceramic leather protector but its around £90 a pop for 65ml.
These are my prototypes though so i did expect such issues, bit gutted they happened but at the same time it needed to be done. Im doing some others now and so will see how they hold up but ive recently done some others in the same shape (J1 lows) using colour shifting paint and they are holding up quite well to the daily wear inc. driving about it though its a different shape.
Edited by lemmingjames on Thursday 16th July 11:58
Gassing Station | Scale Models | Top of Page | What's New | My Stuff


