Tweaking injection moulded parts
Discussion
This seems like a good place to put two questions but I'm sure the mods will oblige if necessary.
Question one is about a vacuum plated car badge, which I assume is on an injection moulded core.
I've rebadged my Vauxhall Astra as an Opel, like this...
Here's the original 'Griffin' badge coming off
.
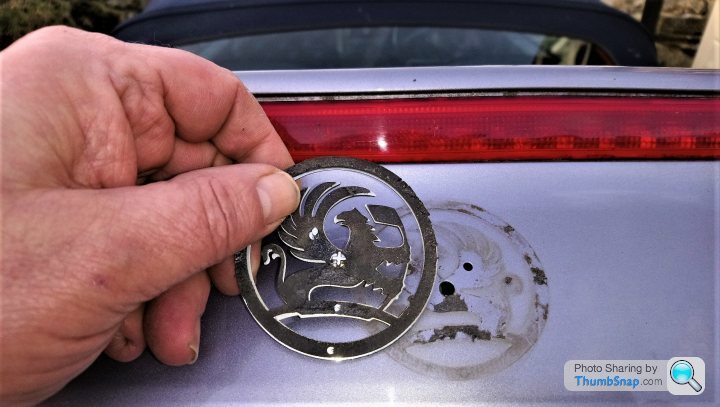
And here's its replacement going on
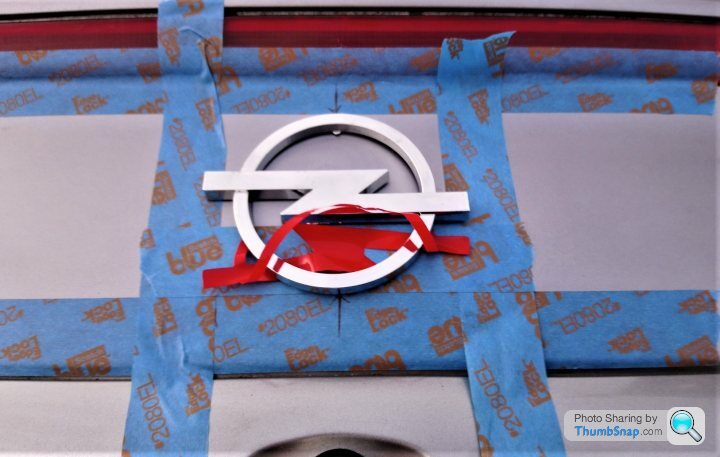
This Opel 'blitzen' badge is the one that's giving a small problem.
These badges are held on with very strong double-sided adhesive pads. The technique is to clean up the
location first so I used white spirit to remove any polish. I followed up with T-Cut to remove any old glue and debris.
The Blitzen badge is a lot thicker than the Griffin one and it's adhesive was more like tape than
a foamy pad.
The panel is also very slightly curved on the vertical axis so now, the badge, though it stuck at first,
pings off at the top and bpttom arcs while the lightning flash part is well stuck.The gaps at top and
bottom are 1mm maximum, probably much less.
I've got a 3M VHB (very high bond) pad to cut out a new backing and this is 1mm thick and seems bomb proof.
Thing is, can I slightly reshape the badge to put a mild convex curve in it vertically without (a) breaking it or (b)
cracking or messing up the plating.
I used a hairdryer to warm the badges and unglue them and they came off undamaged. So I'm thinking maybe make a little jig to support behind the lightning flash, heat the badge and press down while it cools?
One point is that as far I can tell, the plastic is very, very hard and it takes quite a bit of pressure to
make it flex.
Any thoughts or advice?
Part two is about the same principle but is more complex.
After haunting eBay, I have several model kits of the visible anatomy kind.
The big one is one of these..
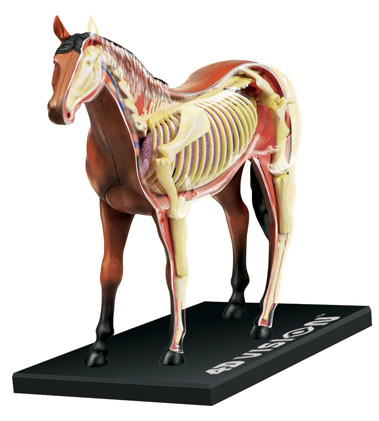
Yep, a see-thoiugh Dobbin. I also have one of these...
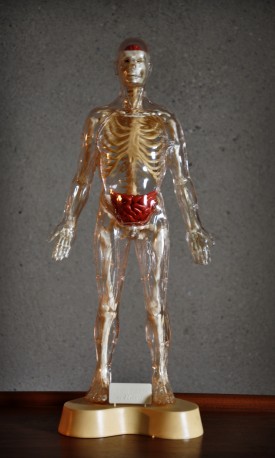
This is a classic SKilcraft Visible Man, circa '59.And I have an example of his OH
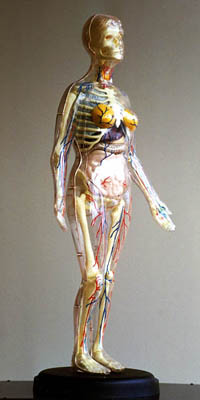
You may be ahead of me - or not - but I have a plan in mind for a diorama piece.
Each model has a transparent plastic skin, in two halves (front and rear) for the human figures
and the skeletons are articulated. The guts are usually fixed unless the kit is built as a
take apart type. The innards could be locally trimmed and neither human figure has any....er
tackle so there's nothing to get in the way there.
I'm wondering If I can make a man or woman on horseback using these kits. But how?
Broadly, the human figure would have to be bent at both the hips and knee joints.I expect
the angle between the tihghs would have to be opened to accommodate Dobbin's back.
It'd be a nice refinement to arrange the arms and hands to take scale reins.
Now admit it, this isn't something you see every day. So any ideas, experiences, thoughts
or funnies are welcome.
Question one is about a vacuum plated car badge, which I assume is on an injection moulded core.
I've rebadged my Vauxhall Astra as an Opel, like this...
Here's the original 'Griffin' badge coming off
.

And here's its replacement going on

This Opel 'blitzen' badge is the one that's giving a small problem.
These badges are held on with very strong double-sided adhesive pads. The technique is to clean up the
location first so I used white spirit to remove any polish. I followed up with T-Cut to remove any old glue and debris.
The Blitzen badge is a lot thicker than the Griffin one and it's adhesive was more like tape than
a foamy pad.
The panel is also very slightly curved on the vertical axis so now, the badge, though it stuck at first,
pings off at the top and bpttom arcs while the lightning flash part is well stuck.The gaps at top and
bottom are 1mm maximum, probably much less.
I've got a 3M VHB (very high bond) pad to cut out a new backing and this is 1mm thick and seems bomb proof.
Thing is, can I slightly reshape the badge to put a mild convex curve in it vertically without (a) breaking it or (b)
cracking or messing up the plating.
I used a hairdryer to warm the badges and unglue them and they came off undamaged. So I'm thinking maybe make a little jig to support behind the lightning flash, heat the badge and press down while it cools?
One point is that as far I can tell, the plastic is very, very hard and it takes quite a bit of pressure to
make it flex.
Any thoughts or advice?
Part two is about the same principle but is more complex.
After haunting eBay, I have several model kits of the visible anatomy kind.
The big one is one of these..

Yep, a see-thoiugh Dobbin. I also have one of these...

This is a classic SKilcraft Visible Man, circa '59.And I have an example of his OH

You may be ahead of me - or not - but I have a plan in mind for a diorama piece.
Each model has a transparent plastic skin, in two halves (front and rear) for the human figures
and the skeletons are articulated. The guts are usually fixed unless the kit is built as a
take apart type. The innards could be locally trimmed and neither human figure has any....er
tackle so there's nothing to get in the way there.
I'm wondering If I can make a man or woman on horseback using these kits. But how?
Broadly, the human figure would have to be bent at both the hips and knee joints.I expect
the angle between the tihghs would have to be opened to accommodate Dobbin's back.
It'd be a nice refinement to arrange the arms and hands to take scale reins.
Now admit it, this isn't something you see every day. So any ideas, experiences, thoughts
or funnies are welcome.
Edited by davhill on Monday 25th February 05:18
Edited by davhill on Monday 25th February 05:20
I'm resurrecting this question because I got no replies and the idea I had is still lurking at
the back of my mind.
I have one of these, a 'Visible Woman' kit, dating back to the '60s - they were offered by both
Skilcraft and Revell.

I also have one of these, another Skilcraft offering and I believe, one that's rather younger.
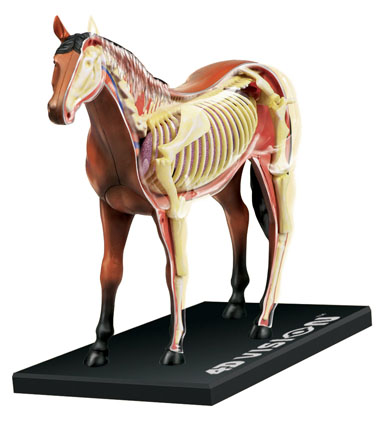
What I would like to do is make a display item with the woman seated on the horse, 'riding' it.
These images might give an idea of the challenges I would face.
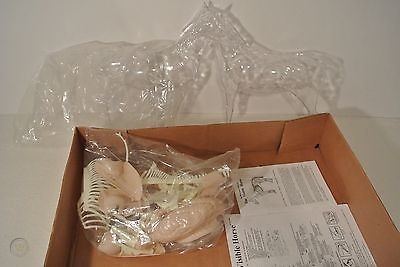
Each kit has a clear plastic shell moulding, which is in two halves, left and right side for the horse
as can be seen in the background.
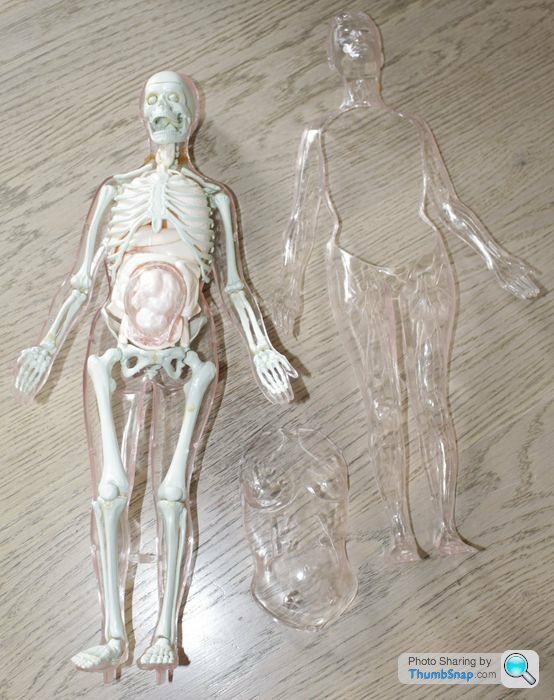
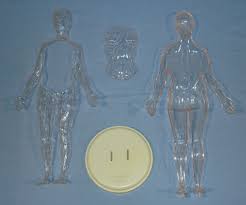
The human shell has a front and rear half, and two 'breastplate' pieces, one for building
a pregnant woman, one for normal.
The build procedure for these kits is to build the skeleton, and build the internal soft tissues, painting
as necessary. The major vein and artery tracks are moulded on the inside of the clear shell parts
and are picked out in red and blue.
It's possible to make the result more 'educational' while building. For example, cutting away half the separate
top curve of the skull makes the brain inside visible. Similarly, leaving off parts of the lungs and kidneys
shows their internal structures. these can be emphasised during painting.
The question, though, is how to put the woman into a sitting position to be mounted on the horse.
The obvious need is to make the figure bend at the hips and knees and I'd also like to reposition the arms
and hands to hold 'reins' which could be added to scale.
The skeleton won't present any major problems. It comes with I-shaped Nylon pins that allow it to
articulate at tthe knees, hips elbows, shoulders, wrists and ankles. so the complete structure could
be fitted into the pre-posed shell and the last is where the challenge lies.
The transparent shell sections are thin and not exactly tough. Were the 'bend' areas to be heated with, say,
hot air or hot water and shaped, the shell would tend to collapse inward. Similarly, if one wants to bend
steel tube, it's possible to pack the straight tube with dry sand, seal the ends with wooden plugs and
heat the steel to red heat and bend it over a former. The sand prevents kinks forming and is poured out afterwards.
So I'm trying to think of a material that would perform the same role in this context. I've been toying with
the idea of polystyrene, some sort of spongy foam, clay or even a man-made material of some kind. The material has to be strong enough to maintain the
the profile of the shell but flexible enough to accept the required shape. It also has to be removed without leaving any trace.
I also expect it could be possible to locally re-form some parts, such as putting concave sections in the horse's skin
to accommodate the rider's limbs. However, while it would be possible to temporarily aseemble the human shell, holding it with tape, the
front and rear halves would ultimately be secured with glue. And as the plastic is completely clear, cutting and shutting isn't
an option - it wouldn't be possible to disguise the joins.
So there's a challenge to throw open to the floor. Is this operation even possible? Will it work? Or is it beyond doing?
Over to you!
the back of my mind.
I have one of these, a 'Visible Woman' kit, dating back to the '60s - they were offered by both
Skilcraft and Revell.

I also have one of these, another Skilcraft offering and I believe, one that's rather younger.

What I would like to do is make a display item with the woman seated on the horse, 'riding' it.
These images might give an idea of the challenges I would face.

Each kit has a clear plastic shell moulding, which is in two halves, left and right side for the horse
as can be seen in the background.


The human shell has a front and rear half, and two 'breastplate' pieces, one for building
a pregnant woman, one for normal.
The build procedure for these kits is to build the skeleton, and build the internal soft tissues, painting
as necessary. The major vein and artery tracks are moulded on the inside of the clear shell parts
and are picked out in red and blue.
It's possible to make the result more 'educational' while building. For example, cutting away half the separate
top curve of the skull makes the brain inside visible. Similarly, leaving off parts of the lungs and kidneys
shows their internal structures. these can be emphasised during painting.
The question, though, is how to put the woman into a sitting position to be mounted on the horse.
The obvious need is to make the figure bend at the hips and knees and I'd also like to reposition the arms
and hands to hold 'reins' which could be added to scale.
The skeleton won't present any major problems. It comes with I-shaped Nylon pins that allow it to
articulate at tthe knees, hips elbows, shoulders, wrists and ankles. so the complete structure could
be fitted into the pre-posed shell and the last is where the challenge lies.
The transparent shell sections are thin and not exactly tough. Were the 'bend' areas to be heated with, say,
hot air or hot water and shaped, the shell would tend to collapse inward. Similarly, if one wants to bend
steel tube, it's possible to pack the straight tube with dry sand, seal the ends with wooden plugs and
heat the steel to red heat and bend it over a former. The sand prevents kinks forming and is poured out afterwards.
So I'm trying to think of a material that would perform the same role in this context. I've been toying with
the idea of polystyrene, some sort of spongy foam, clay or even a man-made material of some kind. The material has to be strong enough to maintain the
the profile of the shell but flexible enough to accept the required shape. It also has to be removed without leaving any trace.
I also expect it could be possible to locally re-form some parts, such as putting concave sections in the horse's skin
to accommodate the rider's limbs. However, while it would be possible to temporarily aseemble the human shell, holding it with tape, the
front and rear halves would ultimately be secured with glue. And as the plastic is completely clear, cutting and shutting isn't
an option - it wouldn't be possible to disguise the joins.
So there's a challenge to throw open to the floor. Is this operation even possible? Will it work? Or is it beyond doing?
Over to you!
Holding under hot (not too hot! - and preferably running) water for a few seconds then gently bending and holding while it cools so that it keeps the new shape, works for some plastic parts and would probably be fine for your car badge but I can't see it working for the more complex hollow shapes on those figures.
Here's a thought, why not just forget about the skin and assemble them as skeletons instead?
(With, of course, the appropriate measures to ensure the internals don't simply fall out!)
Here's a thought, why not just forget about the skin and assemble them as skeletons instead?
(With, of course, the appropriate measures to ensure the internals don't simply fall out!)
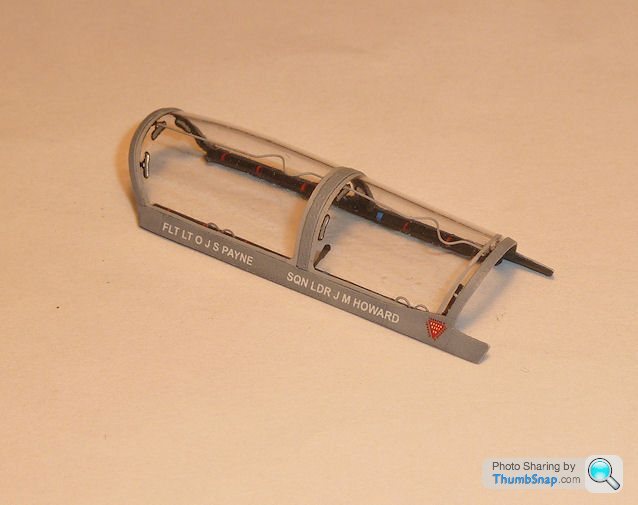
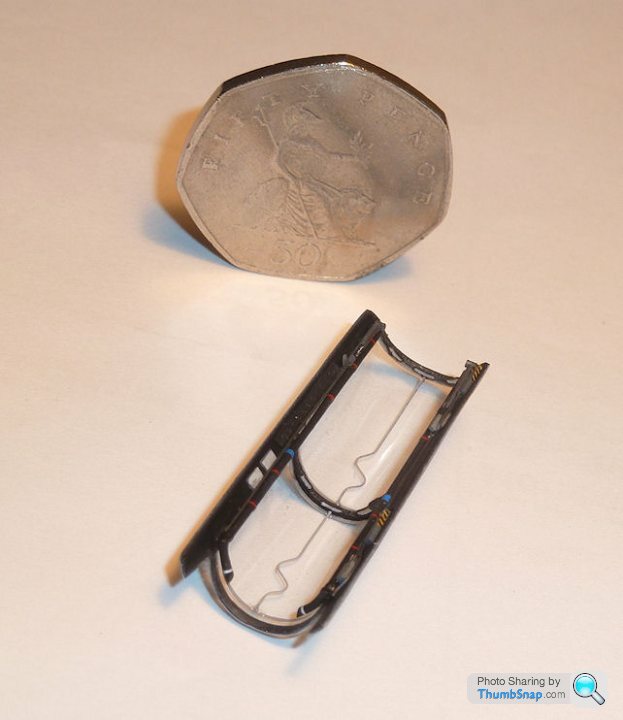
You could vac-form the transparent shells. You’d need to make moulds, and a vac-former. I made my own canopy this way for a 1:72 Tornado - the original was rubbish and I wanted an un-distorted view of my carefully detailed cockpit. The aftermarket ones didn’t fit (and weren’t that much better tbh).
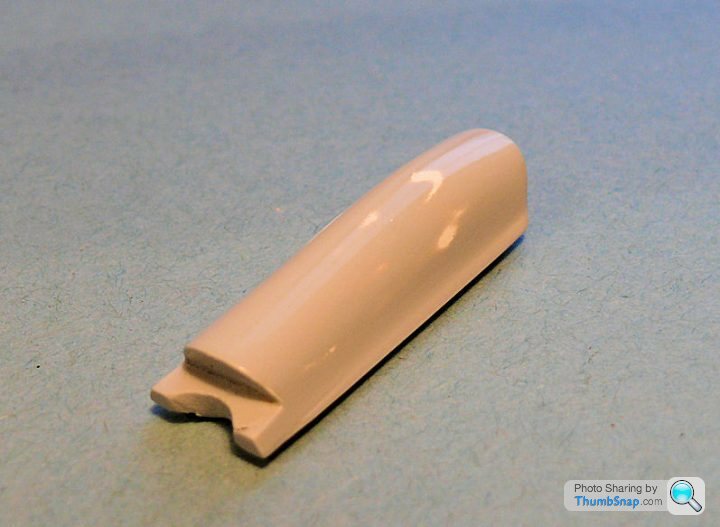
Mould was made from Milliput, primed and highly polished (any imperfection will be transferred to the plastic). You might be able to use some of the original parts to make these:
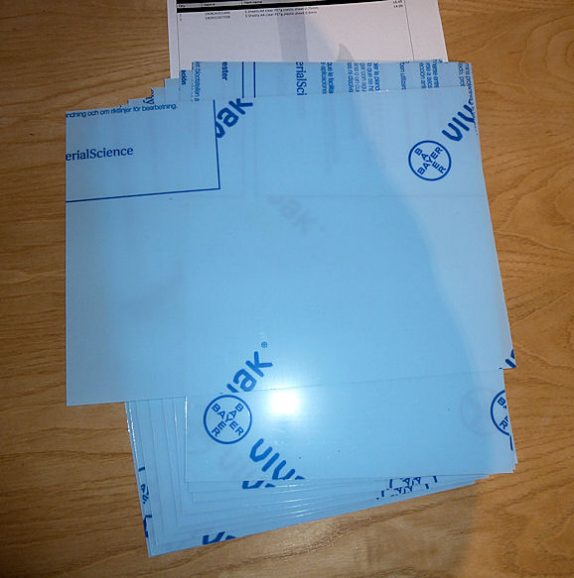
Clear sheet (EBay):
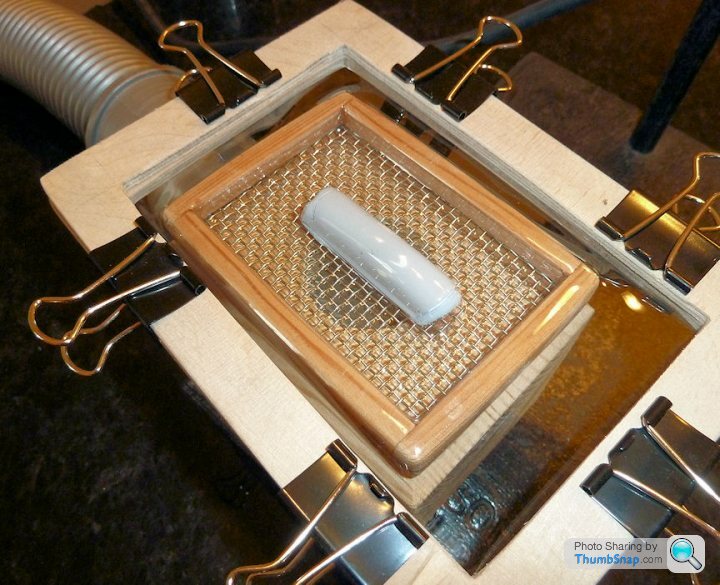
Vac-former, basically a block of wood with a 90 degree hole in it. Dyson on one end, wire mesh plate on the other. Heat the plastic sheet (mounted in a frame) in the oven, then whip it out and put it over the mould. The vacuum sucks it down:
Result - perfectly clear canopy, of the correct shape. Here it is detailed with various bits and pieces:
You could also look at 3D printing with transparent resin, but I think that might actually be harder to do in this case.
Mould was made from Milliput, primed and highly polished (any imperfection will be transferred to the plastic). You might be able to use some of the original parts to make these:

Clear sheet (EBay):

Vac-former, basically a block of wood with a 90 degree hole in it. Dyson on one end, wire mesh plate on the other. Heat the plastic sheet (mounted in a frame) in the oven, then whip it out and put it over the mould. The vacuum sucks it down:

Result - perfectly clear canopy, of the correct shape. Here it is detailed with various bits and pieces:


You could also look at 3D printing with transparent resin, but I think that might actually be harder to do in this case.
dr_gn said:
You could vac-form the transparent shells. You’d need to make moulds, and a vac-former. I made my own canopy this way for a 1:72 Tornado - the original was rubbish and I wanted an un-distorted view of my carefully detailed cockpit. The aftermarket ones didn’t fit (and weren’t that much better tbh).
Mould was made from Milliput, primed and highly polished (any imperfection will be transferred to the plastic). You might be able to use some of the original parts to make these:

Clear sheet (EBay):

Vac-former, basically a block of wood with a 90 degree hole in it. Dyson on one end, wire mesh plate on the other. Heat the plastic sheet (mounted in a frame) in the oven, then whip it out and put it over the mould. The vacuum sucks it down:

Result - perfectly clear canopy, of the correct shape. Here it is detailed with various bits and pieces:


You could also look at 3D printing with transparent resin, but I think that might actually be harder to do in this case.
Wow, I'm hugely impressed with that. I doubt it'd work for my task Mould was made from Milliput, primed and highly polished (any imperfection will be transferred to the plastic). You might be able to use some of the original parts to make these:

Clear sheet (EBay):

Vac-former, basically a block of wood with a 90 degree hole in it. Dyson on one end, wire mesh plate on the other. Heat the plastic sheet (mounted in a frame) in the oven, then whip it out and put it over the mould. The vacuum sucks it down:

Result - perfectly clear canopy, of the correct shape. Here it is detailed with various bits and pieces:


You could also look at 3D printing with transparent resin, but I think that might actually be harder to do in this case.
but congratulations are in order.
Evangelion said:
Holding under hot (not too hot! - and preferably running) water for a few seconds then gently bending and holding while it cools so that it keeps the new shape, works for some plastic parts and would probably be fine for your car badge but I can't see it working for the more complex hollow shapes on those figures.
Here's a thought, why not just forget about the skin and assemble them as skeletons instead?
(With, of course, the appropriate measures to ensure the internals don't simply fall out!)
Thanks! With the car badge, I used sme scrap soft wood the reproduce the exact profile of my car's bootlid.Here's a thought, why not just forget about the skin and assemble them as skeletons instead?
(With, of course, the appropriate measures to ensure the internals don't simply fall out!)
Then, I used some narrow ribbon to hold the badge tightly to the wood and gave the wood and badge
a dip in water at 80C for 30 seconds. This shaped the badge perfectly and it's been on my car for
a few months now.
I think that hot water or heat gun/hairdryer hot air might do the trick
for my figures. The snag is that they're collectors items now and becoming more and
more rare. Happily, I have an army of Visible Man kits and I can sacrifice one for trial purposes.
davhill said:
dr_gn said:
You could vac-form the transparent shells. You’d need to make moulds, and a vac-former. I made my own canopy this way for a 1:72 Tornado - the original was rubbish and I wanted an un-distorted view of my carefully detailed cockpit. The aftermarket ones didn’t fit (and weren’t that much better tbh).
Mould was made from Milliput, primed and highly polished (any imperfection will be transferred to the plastic). You might be able to use some of the original parts to make these:

Clear sheet (EBay):

Vac-former, basically a block of wood with a 90 degree hole in it. Dyson on one end, wire mesh plate on the other. Heat the plastic sheet (mounted in a frame) in the oven, then whip it out and put it over the mould. The vacuum sucks it down:

Result - perfectly clear canopy, of the correct shape. Here it is detailed with various bits and pieces:


You could also look at 3D printing with transparent resin, but I think that might actually be harder to do in this case.
Wow, I'm hugely impressed with that. I doubt it'd work for my task Mould was made from Milliput, primed and highly polished (any imperfection will be transferred to the plastic). You might be able to use some of the original parts to make these:

Clear sheet (EBay):

Vac-former, basically a block of wood with a 90 degree hole in it. Dyson on one end, wire mesh plate on the other. Heat the plastic sheet (mounted in a frame) in the oven, then whip it out and put it over the mould. The vacuum sucks it down:

Result - perfectly clear canopy, of the correct shape. Here it is detailed with various bits and pieces:


You could also look at 3D printing with transparent resin, but I think that might actually be harder to do in this case.
but congratulations are in order.
I guess you could in theory make the moulds by coating the originals inside with release agent, filling with modelling clay, and then removing the original, with the moulds on a flat surface. You could then bend the clay into the new shapes before it set.
With stuff like this it's always trial and error with different techniques. Good Luck!
Thanks, dr_gn .
I've been having a think about my project and learning stuff along the way.
Probably like many, I envisaged a sitting-on-a-horse pose as being something like this but upright...
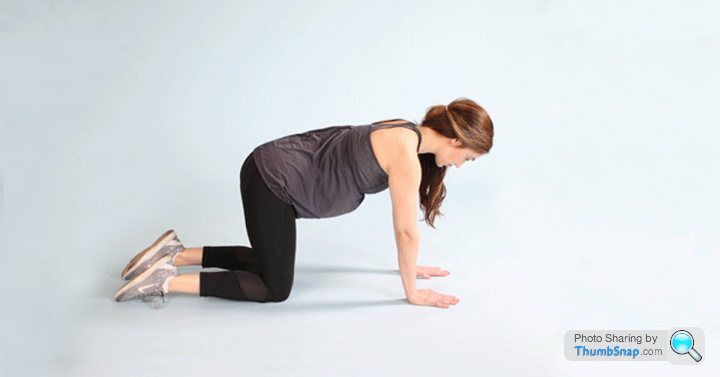
Wrong!!! This is actually the 'cow pose' in yoga and is nothing like an equestrian stance.
As I'm looking to fashion a display model, I started Googling 'rider in profile' pictures - and learned
something else. In pictures from horse trials and the like, it's clear that a saddle makes a big difference.
Riders sit very upright and the placing of the stirrups alters the leg position radically.
I want my horse/rider pairing to look natural. I won't be adding a saddle and stirrups and the horse will
be standing still, not even walking, let alone trotting or cantering.
So, I turned to Googling for bareback riders and got a ton of images of rodeo riders, with their horses scarcely
touching the ground. Err, not quite what I'm after.
I hit on the key by Goggling 'Liberty', which supplied a lot of images of saddle-less nags with riders...
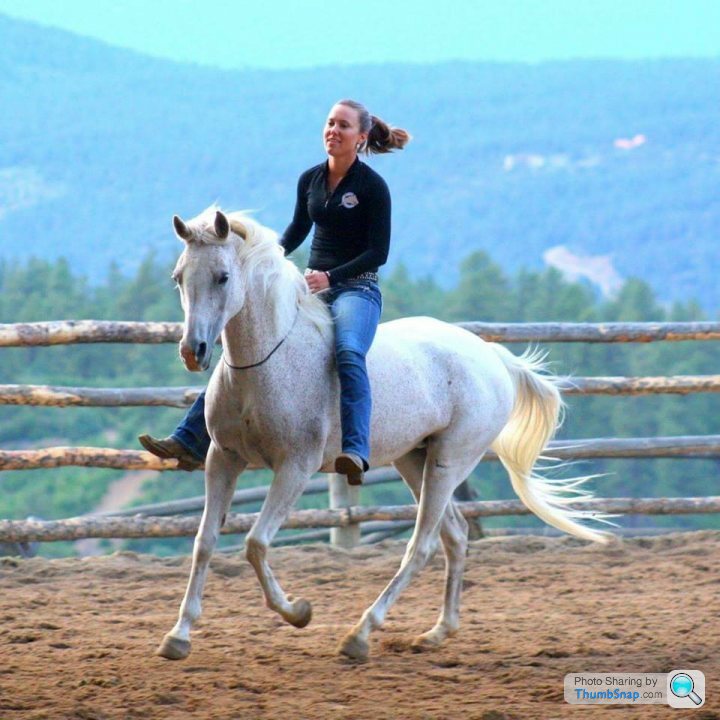
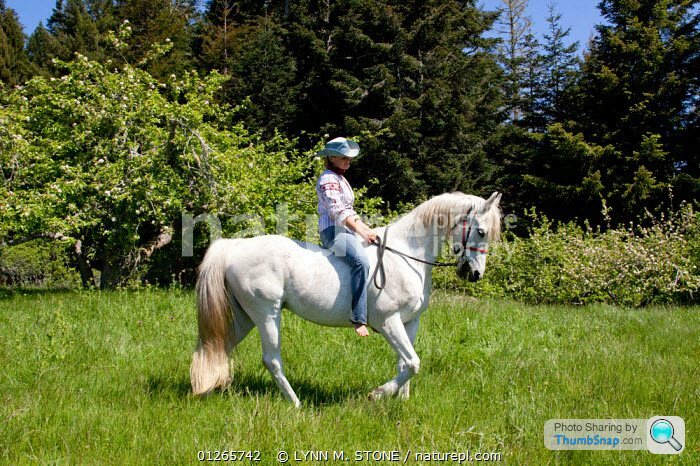
This revealed to me some salient points. Firstly, the angle between the rider's thighs and hips is far
less acute than I anticipated - the same applied to the amount by which the knee is bent.
This should make life easier for me. The original stance of the Visible Woman is standing upright.
The feet are consequently at roughly 90 degrees to the lower legs and as these images show,
the position of the foot is by no means critical. In fact, a bareback rider rides tall in the saddle as does
a cowboy, because there are no stirrups to dictate otherwise.
One last point is well illstrated by this picture...

Just like in the pictures above, this rider's legs aren't especially far apart to accommodate Dobbin. It's clearly
natural to adopt a central seat on the horse's back, while the knees grip near the root of the horse's neck. Note that the lower legs
lie naturally at the side, just aft of the horse's 'shoulder' joints.
All this got me thinking. For one thing , I think the shaping of the human figure will be much less profound than I was ainticipating.
While I'm tempted by the vacuum forming approach, I think it presents a major problem.
My woman kit has a front and a rear half and a 'breastplate'. The latter could be temporarily attached
but were the clay 'buck' to be posed as outlined, the flat surface between the two halves would be lost.
Given what I've found out, the idea of re-forming the original body mouldings seems more workable but another problem looms.
These kits date back to the 1960s. While this seems not to trouble the skeletal and soft tissue parts unduly, the transparent parts
are fragile. On some of my Visible Man kits, the tab at the base of the breastplate has come away - these are kits that have been unboxed
but never built up or messed with to the best of my knowledge. The clear plastic is around 1mm thick and it's now 60 years old! Minor
breakages occur when the material has probably hardly seen artificial light, let alone daylight.
Here, then , is Plan B Mk.l. Take the two halves of Mrs. Visible Woman, attach her breastplate temporarily
and proceed as you descibed previously, Using two clay half-body 'bucks' on which to vac form new transparent
'skins'. If this works, the original mouldings' vein and artery tracks will be reprodcued on the inside of the new half shell, ready to be
picked out in red or blue paint.
I'm thinking that the new parts would be much more amenable to being reshaped, without cracking or splitting as the originals
almost certainly will.
Do you think this is feasible? If so, I'll be asking you about materials and sources thereof!
I've been having a think about my project and learning stuff along the way.
Probably like many, I envisaged a sitting-on-a-horse pose as being something like this but upright...

Wrong!!! This is actually the 'cow pose' in yoga and is nothing like an equestrian stance.
As I'm looking to fashion a display model, I started Googling 'rider in profile' pictures - and learned
something else. In pictures from horse trials and the like, it's clear that a saddle makes a big difference.
Riders sit very upright and the placing of the stirrups alters the leg position radically.
I want my horse/rider pairing to look natural. I won't be adding a saddle and stirrups and the horse will
be standing still, not even walking, let alone trotting or cantering.
So, I turned to Googling for bareback riders and got a ton of images of rodeo riders, with their horses scarcely
touching the ground. Err, not quite what I'm after.
I hit on the key by Goggling 'Liberty', which supplied a lot of images of saddle-less nags with riders...


This revealed to me some salient points. Firstly, the angle between the rider's thighs and hips is far
less acute than I anticipated - the same applied to the amount by which the knee is bent.
This should make life easier for me. The original stance of the Visible Woman is standing upright.
The feet are consequently at roughly 90 degrees to the lower legs and as these images show,
the position of the foot is by no means critical. In fact, a bareback rider rides tall in the saddle as does
a cowboy, because there are no stirrups to dictate otherwise.
One last point is well illstrated by this picture...

Just like in the pictures above, this rider's legs aren't especially far apart to accommodate Dobbin. It's clearly
natural to adopt a central seat on the horse's back, while the knees grip near the root of the horse's neck. Note that the lower legs
lie naturally at the side, just aft of the horse's 'shoulder' joints.
All this got me thinking. For one thing , I think the shaping of the human figure will be much less profound than I was ainticipating.
While I'm tempted by the vacuum forming approach, I think it presents a major problem.
My woman kit has a front and a rear half and a 'breastplate'. The latter could be temporarily attached
but were the clay 'buck' to be posed as outlined, the flat surface between the two halves would be lost.
Given what I've found out, the idea of re-forming the original body mouldings seems more workable but another problem looms.
These kits date back to the 1960s. While this seems not to trouble the skeletal and soft tissue parts unduly, the transparent parts
are fragile. On some of my Visible Man kits, the tab at the base of the breastplate has come away - these are kits that have been unboxed
but never built up or messed with to the best of my knowledge. The clear plastic is around 1mm thick and it's now 60 years old! Minor
breakages occur when the material has probably hardly seen artificial light, let alone daylight.
Here, then , is Plan B Mk.l. Take the two halves of Mrs. Visible Woman, attach her breastplate temporarily
and proceed as you descibed previously, Using two clay half-body 'bucks' on which to vac form new transparent
'skins'. If this works, the original mouldings' vein and artery tracks will be reprodcued on the inside of the new half shell, ready to be
picked out in red or blue paint.
I'm thinking that the new parts would be much more amenable to being reshaped, without cracking or splitting as the originals
almost certainly will.
Do you think this is feasible? If so, I'll be asking you about materials and sources thereof!
Transparent plastic in injection moulded kits is pretty much always significantly more brittle than opaque plastic - even when brand new.
Ideally you'd need a flat joint line for vac-forming. I'm not sure it's possible to vac-form something that hasn't got a flat base. When you place the semi-molten sheet of plastic over the mould and initially press it down, it needs to seal pretty much simultaneously on the edges of the base in order to draw the air out - any gaps and it wont work.
Of course just to disprove my own statement, I just found this, which is exactly the kind of thing you'd need once you'd got your mould:
https://www.google.com/search?source=hp&ei=pv5...
Repeat front and back and I guess in theory there would be a common line on each part you could cut around to make a perfect joint?
Any feature (arteries etc) on the mould will be reproduced, but they would also probably show up on the outer skin at 1mm thick.
If you like tinkering with stuff - it's all good fun...
dr_gn said:
Transparent plastic in injection moulded kits is pretty much always significantly more brittle than opaque plastic - even when brand new.
Ideally you'd need a flat joint line for vac-forming. I'm not sure it's possible to vac-form something that hasn't got a flat base. When you place the semi-molten sheet of plastic over the mould and initially press it down, it needs to seal pretty much simultaneously on the edges of the base in order to draw the air out - any gaps and it wont work.
Of course just to disprove my own statement, I just found this, which is exactly the kind of thing you'd need once you'd got your mould:
https://www.google.com/search?source=hp&ei=pv5...
Repeat front and back and I guess in theory there would be a common line on each part you could cut around to make a perfect joint?
Any feature (arteries etc) on the mould will be reproduced, but they would also probably show up on the outer skin at 1mm thick.
If you like tinkering with stuff - it's all good fun...
All good stuff! I watched the video with the man and his forming machine. I got sidetracked being envious of his well-equipped workshop Ideally you'd need a flat joint line for vac-forming. I'm not sure it's possible to vac-form something that hasn't got a flat base. When you place the semi-molten sheet of plastic over the mould and initially press it down, it needs to seal pretty much simultaneously on the edges of the base in order to draw the air out - any gaps and it wont work.
Of course just to disprove my own statement, I just found this, which is exactly the kind of thing you'd need once you'd got your mould:
https://www.google.com/search?source=hp&ei=pv5...
Repeat front and back and I guess in theory there would be a common line on each part you could cut around to make a perfect joint?
Any feature (arteries etc) on the mould will be reproduced, but they would also probably show up on the outer skin at 1mm thick.
If you like tinkering with stuff - it's all good fun...
but I got the principle well enough.
For my models, a lot of the joint line is flat but not all of it...
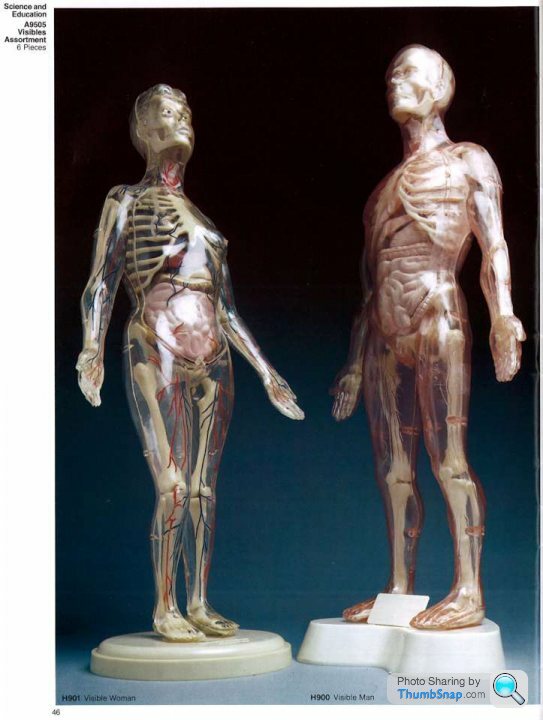
This shows clearly how both the man and the woman are posed to a degree. Both have their arms in the
classic anatomist position and she has one knee slightly forward. On the woman, you can see how the veins and arteries
are highlighted. The tracks in the mouldings are slightly raised lines, less than a mm wide that taper into
'branches' at the distal ends. They're a challenge to paint - I tend to use a 0.5mm acrylic paint pen.
This picture shows the 'skin' casing a bit more clearly...

Assuming the new plastic would fall in between the hips and forearms, I think that replicating the joint lines
would be possible.
The feet especially could be tricky. On the back shell ( left) you can see the pegs that allow the woman to stand upright
on the supplied base. The other shell shows how the insteps and toes are moulded. I imagine that making a clay buck
will be entirely possible but I can foresee diffifculties in getting the feet (with toes) to release cleanly from the shell.
Nonetheless, the planning stage continues and it's fascinating to think around the procedure.
davhill
I would have kept quiet about that., you could have been on winner!! ( no pun intended)
I understand Damian Hurst has stolen the idea, and has the horse, but he is finding a willing human a nit more tricky.
But that is a novel idea, and i do like it, hope you get is all correct. dr-gn certainly is a minefield of good info ( which i will be tapping into soon!!)
Evangelion said:
Shouldn't be riding a horse if she's pregnant surely!
Naturally. The Visible Woman kit has elements entitled 'The Miracle of Birth'. These consist of a 'pregnant' breastplate with baby bump, a two part transparent
uterus and a near full-term baby with umbilical cord. These are discarded when
making up a non pregnant version.
Edited by davhill on Wednesday 18th March 20:45
dr_gn said:
If you need to temporarily assemble the clear parts, Formula 560 canopy pva is ideal - it doesn’t melt the plastic, dries clear and any excess can be removed with a damp cloth/water. If you really screw up, wet it some more and the glue dissolves without trace.
That's a good tip, thank you.silverfoxcc said:
davhill
I would have kept quiet about that., you could have been on winner!! ( no pun intended)
I understand Damian Hurst has stolen the idea, and has the horse, but he is finding a willing human a nit more tricky.
But that is a novel idea, and i do like it, hope you get is all correct. dr-gn certainly is a minefield of good info ( which i will be tapping into soon!!)
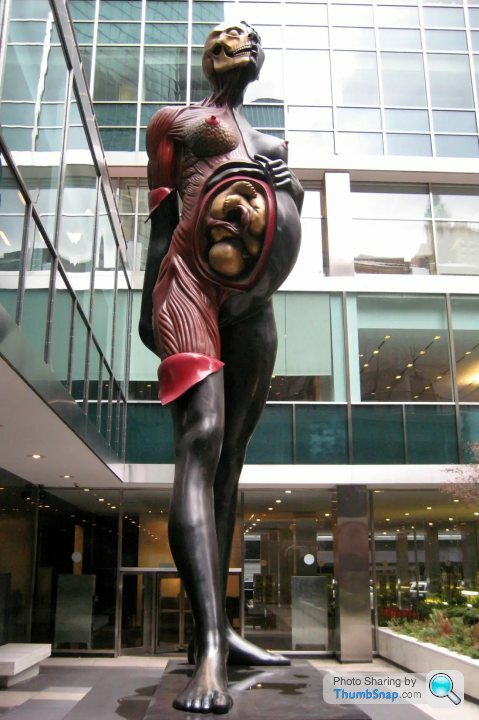
Hirst has missed the boat twice. He made a bronze statue of a pregnant woman eight years ago. Here she is, all 66 feet of her...I would have kept quiet about that., you could have been on winner!! ( no pun intended)
I understand Damian Hurst has stolen the idea, and has the horse, but he is finding a willing human a nit more tricky.
But that is a novel idea, and i do like it, hope you get is all correct. dr-gn certainly is a minefield of good info ( which i will be tapping into soon!!)
[url]
 |https://thumbsnap.com/8xUaesRN[/url
The stance was apparently inspired by a circa 1880 work by Degas but Hirst is ten years younger than me and
I suggest that he took at least some of his inspiration from the Visible kits.
But when it comes to horses and riders, Dr. Gunther von Hagens, the man behind Body Worlds, who creates
'plastinates', human bodies preserved in perpetuity, stole a march on Damien Hirst and arguably set me thinking.
Inspired by Leonardo da Vinci’s unfinished bronze sculpture 'Horse for a Nobleman', Von Hagens and his team
produced this in 2013...
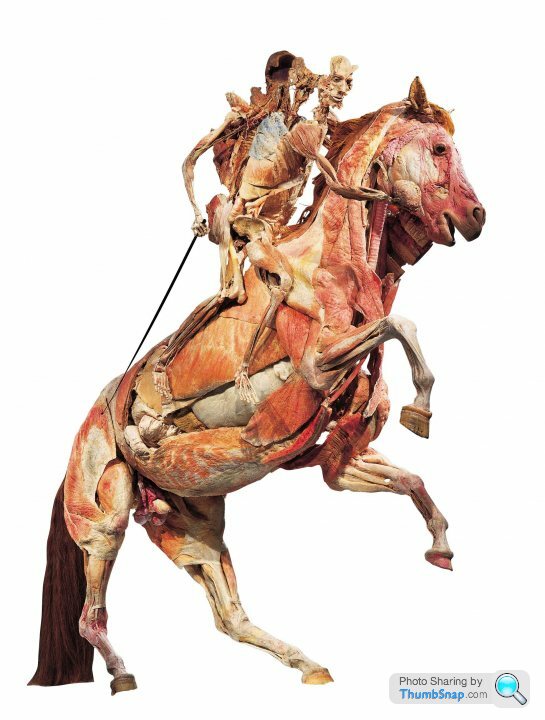
This (obviously) life size piece stands 12 feet high represents three years' work. The mounted cadaver
is that of a journalist who donated his body while the horse was privately donated when it had to
be put down after breaking a leg.
My replicating these postures would certainly be well beyond my capabilities but you get the idea.
Edited by davhill on Wednesday 18th March 20:43
Edited by davhill on Wednesday 18th March 20:46
Gassing Station | Scale Models | Top of Page | What's New | My Stuff


