Aluminium casting repair?
Discussion


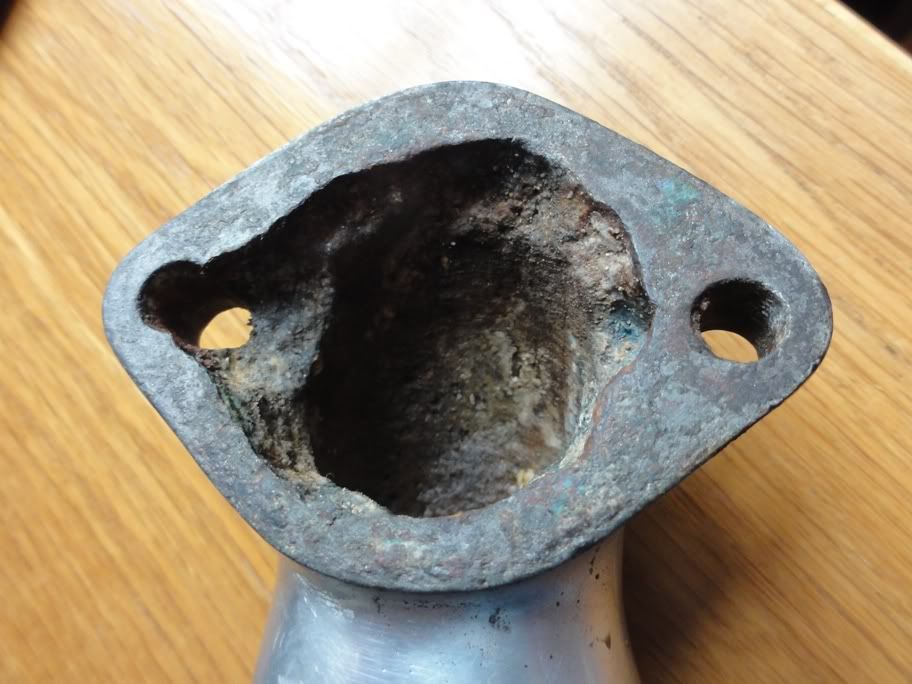
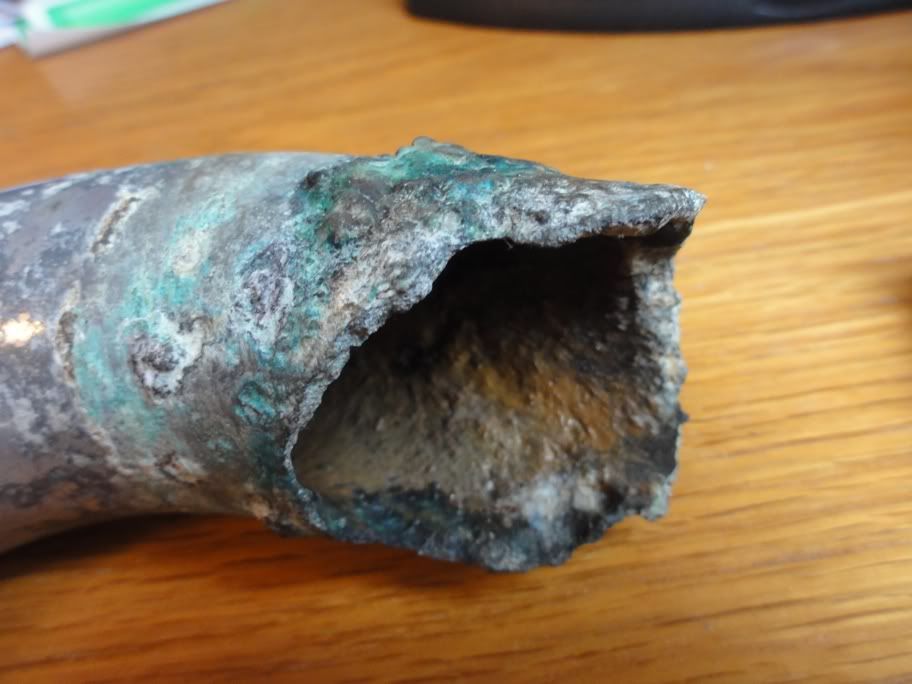
I have been suffering a steady loss of coolant from my Alvis, and tracked it down to the lower radiator hose connecting pipe. When I removed it, I was amazed it held any coolant at all -it looks like the car has been run at some time without inhibitor, and the aluminium pipe has suffered catastrophic electrolytic corrosion:

The flange has been eaten away at one end:
and the hose attachment at the other:
Can anybody suggest someone who is skilled with a TIG welder, preferably near Cambridge, who could have a go at repairing it for me?
The flange has been eaten away at one end:
and the hose attachment at the other:
Can anybody suggest someone who is skilled with a TIG welder, preferably near Cambridge, who could have a go at repairing it for me?
XJ13 said:
Looks nasty 
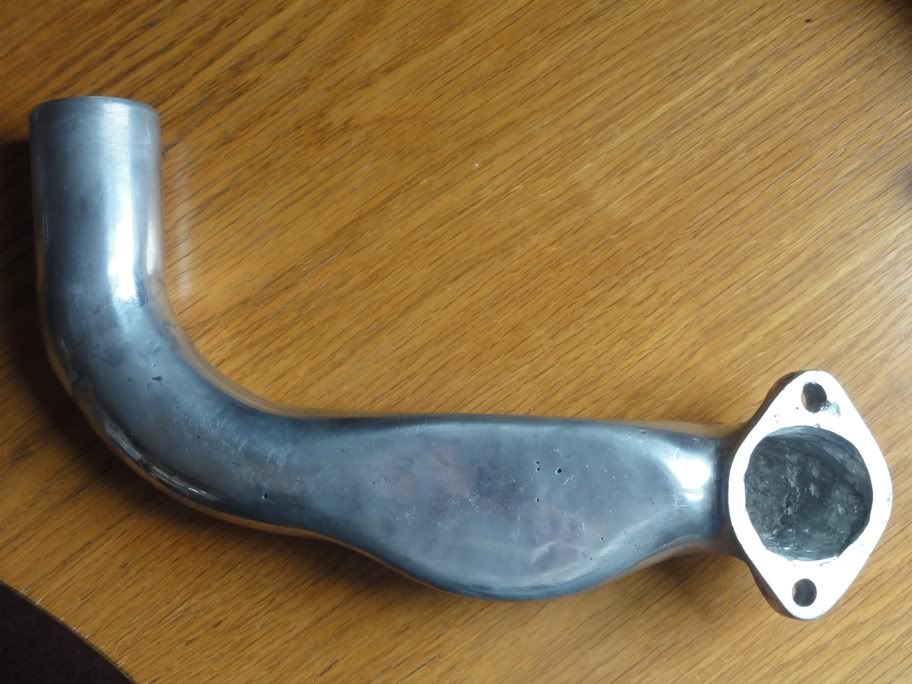
How concerned are you about originality? It seems to simply be a length of pipe with a flange at one end and a beaded end at the other for a hose. Would it not be more cost-effective and long-lasting to simply have one made up in stainless?
Not quite so simple -it fits very tight to the block, and the flattened area snakes around the dynamo drive -it would be a complex fabrication.How concerned are you about originality? It seems to simply be a length of pipe with a flange at one end and a beaded end at the other for a hose. Would it not be more cost-effective and long-lasting to simply have one made up in stainless?
I think I'd go for a new one as well. Personally I'd find the hardest part to be the sharp bend from the flange, the flattened section might not look as neat as a casting, but all do-able.
The original could be repaired at the flange end, and possibly another section welded on at the hose end, but I would always have nagging doubts about the internal section that you can't see. With heavy corrosion visible at either end, I'd be concerned that there was also pitting somewhere in the mid section, and that would let go at some suitably helpful moment - like miles from home !
Brian
You may want to have a look at this and see if anybody near you has one 
http://www.jaylenosgarage.com/extras/articles/jay-...
If you can wait a month or two, we'll have a similar set up to Leno's
http://www.jaylenosgarage.com/extras/articles/jay-...
If you can wait a month or two, we'll have a similar set up to Leno's
Mike,
http://www.redtriangle.co.uk/
http://www.alvisracing.com/index.html
Might try those people, if they don't have one they might know how to fix what you have.
http://www.redtriangle.co.uk/
http://www.alvisracing.com/index.html
Might try those people, if they don't have one they might know how to fix what you have.
If Redtriangle et al are not able to help I'd have thought for a Firefly there would be enough demand to make a batch of 10 or so castings viable.
We've got a place local to us that does a lot of boat propellors, they do their own pattern making for castings.
The cost of course would be in the pattern making rather than the casting.
Would be a nice little project.
We've got a place local to us that does a lot of boat propellors, they do their own pattern making for castings.
The cost of course would be in the pattern making rather than the casting.
Would be a nice little project.
I've tried Red Triangle; although they list the part they actually have no intention of making up a batch.
Fabrication in S-S is an option, but the shape is complex in three dimensions, so it would require quite a bit of work.
On cleaning and further investigation I think the material condition is probably too bad for welding, so my first step will be to try low temperature aluminium brazing, using HTS-2000 or similar. I'm hoping I can build up the ear at the flange end, fill the worst pits and braze on a new section of tube at the outlet end. Wish me luck!
To make a pattern and cast one would be VERY expensive, casting 10-off it would be worth it.
Repairing the one you have is a non starter; it will take some pour soul ages to fix that. All those impurities in that old aluminium, rather them than me.
I would fabricate a new one. The flanges could be water jet cut, and then it’s just bend an alloy pipe to suit. TIG it up - job done. Might be worth a pressure test as well.
Thomas Fabrications Watlington- ask for Brian - he's very good at stuff like this, used to run a jag engine-d dragster - top bloke.
We us them at work.
Well, before plunging into fabricating a new one, I thought I'd have a go at repair. I've been meaning to try out one of the "wonder" aluminium brazing products, so this seemed a good time to see if they lived up to the hype. I used HTS-2000, which allegedly requires less surface activation to form a good bond.
I used the Dremel to grind back to clean (ish) metal, and got stuck in. Not easy; although there is a 200C difference between brazing temperature and melting the aluminium it is very east to overheat and I lost most of the outlet end on the floor at the first go! So I turned up a new end on the lathe, tinned both sides thoroughly, and its turned out pretty well -not perfect, but since the cooling system is unpressurized I think it will work. At the flange end I used a bolt and penny washer to make up a mold, and filled in both ears.
The centre section seems reasonably solid.
It certainly looks a bit better than the "before" picture!
V10Mike said:
Well, before plunging into fabricating a new one, I thought I'd have a go at repair. I've been meaning to try out one of the "wonder" aluminium brazing products, so this seemed a good time to see if they lived up to the hype. I used HTS-2000, which allegedly requires less surface activation to form a good bond.
I used the Dremel to grind back to clean (ish) metal, and got stuck in. Not easy; although there is a 200C difference between brazing temperature and melting the aluminium it is very east to overheat and I lost most of the outlet end on the floor at the first go! So I turned up a new end on the lathe, tinned both sides thoroughly, and its turned out pretty well -not perfect, but since the cooling system is unpressurized I think it will work. At the flange end I used a bolt and penny washer to make up a mold, and filled in both ears.
The centre section seems reasonably solid.
It certainly looks a bit better than the "before" picture!
You should feel chuffed with yourself - nice job. I hope it holds together. Was just wondering if you could line it with some of that pour-in stuff you can use for sealing petrol tanks? POR-summut? Might limit further corrosion and help hold things together. By the way, what's your Alvis? Always fancied a TD coupe.I used the Dremel to grind back to clean (ish) metal, and got stuck in. Not easy; although there is a 200C difference between brazing temperature and melting the aluminium it is very east to overheat and I lost most of the outlet end on the floor at the first go! So I turned up a new end on the lathe, tinned both sides thoroughly, and its turned out pretty well -not perfect, but since the cooling system is unpressurized I think it will work. At the flange end I used a bolt and penny washer to make up a mold, and filled in both ears.
The centre section seems reasonably solid.
It certainly looks a bit better than the "before" picture!
dave de roxby said:
Was just wondering if you could line it with some of that pour-in stuff you can use for sealing petrol tanks? POR-summut?
POR 15
http://www.frost.co.uk/item_Detail.asp?productID=8...
AndrewW-G said:
dave de roxby said:
Was just wondering if you could line it with some of that pour-in stuff you can use for sealing petrol tanks? POR-summut?
POR 15
http://www.frost.co.uk/item_Detail.asp?productID=8...
Gassing Station | Classic Cars and Yesterday's Heroes | Top of Page | What's New | My Stuff