RESPRAYING CAR DOOR [IMAGES]
Discussion
Hi,
I had a small scratch in my car door, I sanded down and pained. However I still have these strong sanding marks even after I've applied 3 layers of basecoat. Please see the attached images. The paint is a metallic silver, which is making it very visible when a light is flashed upon it.
I am struggling because this is the second time I've taken it down and resanded. I worked from 60 to 80 to 120 to 180 to 240 to 320 to 400. From there I used primer, then sanded 400 to 600 to 800 to 1000. Finally I applied the basecoat. The door was definitely smooth before and after primer, I put my hand and felt it thoroughly, there were no deep scratched at all, nothing a finger nail could even enter. How come there's these strong visible scratches after basecoat? Once I apply clear coat and polish will this solve the issue?
Many thanks in advance for help
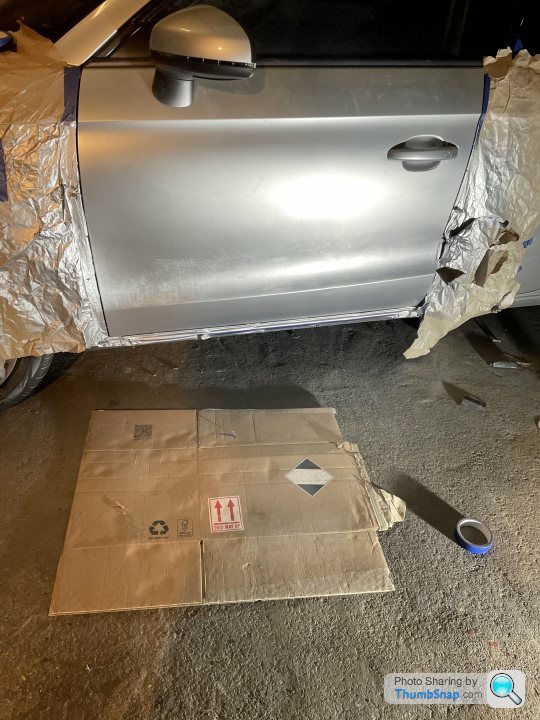
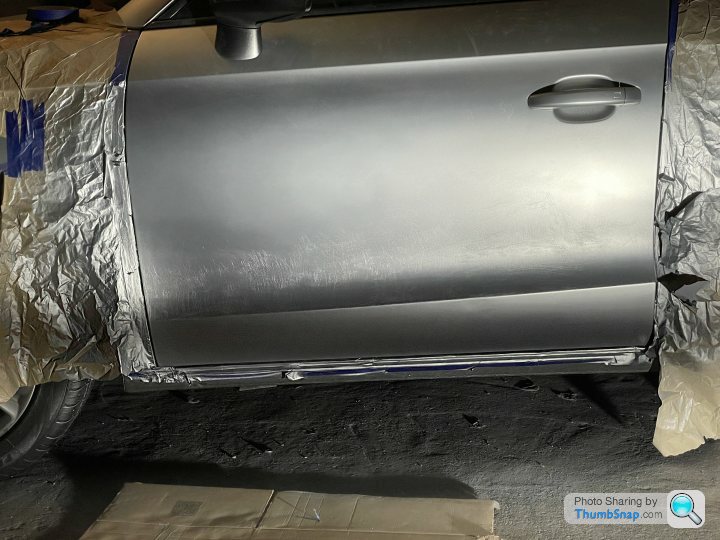
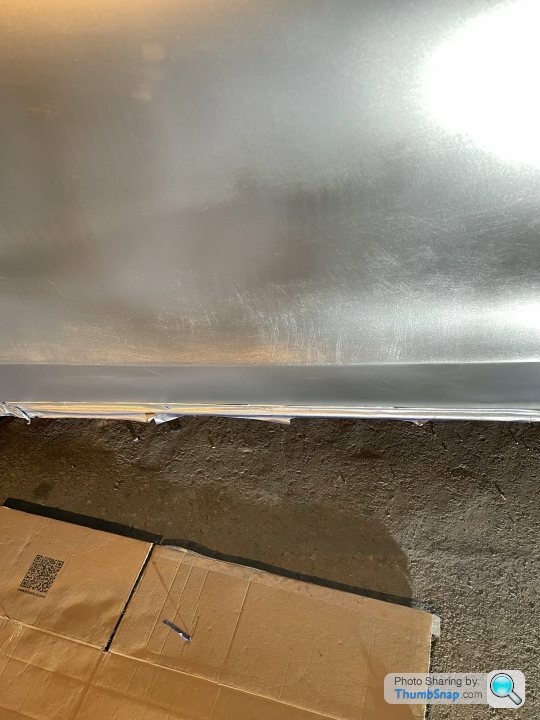


Clearcoat will make no difference to the appearance of the door.
Neither will polishing the clearcoat.
Normal to use a guide coat/guide powder as you change through the grits to ensure you have sanded out ALL the scratches from the previous grade.
Feeling it with your hand just won't do it.
If there are deep scratches then the paint will shrink into them.
You need the Technical Data Sheets (TDS) for all the paint materials you are using. These tell you exactly how to prepare the surface before applying them - incl the correct abrasive grits - and how to apply them & must be followed.
These should be available from your paint supplier & can often be found online.
The materials must all be compatible with each other to avoid reactions.
I think the next problem you will have is when you remove the masking after successfully painting the door.
Normal with pale metallics to blend into the adjacent panels or the painted panel will often be noticeably different.
I appreciate you want to DIY but I do wonder whether you would be better finding a local small bodyshop.
Edited by paintman on Tuesday 14th February 10:41
Paint is tricky and especially on a silver car where every imperfection will stand out, which with ratlle cans, limited experience and outdoor possibly cold and wet condition will make it very difficult to do nicely. Kudos to DIY but a local place with a good reputation would sort that for not a lot of cost. There are website such as fix my car where places will bid you for the work and it might just end up less than you think.
paintman said:
Clearcoat will make no difference to the appearance of the door.
Neither will polishing the clearcoat.
Normal to use a guide coat/guide powder as you change through the grits to ensure you have sanded out ALL the scratches from the previous grade.
Feeling it with your hand just won't do it.
If there are deep scratches then the paint will shrink into them.
You need the Technical Data Sheets (TDS) for all the paint materials you are using. These tell you exactly how to prepare the surface before applying them - incl the correct abrasive grits - and how to apply them & must be followed.
These should be available from your paint supplier & can often be found online.
The materials must all be compatible with each other to avoid reactions.
I think the next problem you will have is when you remove the masking after successfully painting the door.
Normal with pale metallics to blend into the adjacent panels or the painted panel will often be noticeably different.
I appreciate you want to DIY but I do wonder whether you would be better finding a local small bodyshop.
Thank you for a detailed response. This is my own project car and I want to learn the process of car painting myself instead of always outsourcing it. I do not mind trying to blend the doors, I enjoy these aspects of projects. I’ve just hit a hurdle I can’t jump over. Do you believe the issue could be with the primer I used? Would a filler primer solve my issue? I will look at the TDS thanks.Neither will polishing the clearcoat.
Normal to use a guide coat/guide powder as you change through the grits to ensure you have sanded out ALL the scratches from the previous grade.
Feeling it with your hand just won't do it.
If there are deep scratches then the paint will shrink into them.
You need the Technical Data Sheets (TDS) for all the paint materials you are using. These tell you exactly how to prepare the surface before applying them - incl the correct abrasive grits - and how to apply them & must be followed.
These should be available from your paint supplier & can often be found online.
The materials must all be compatible with each other to avoid reactions.
I think the next problem you will have is when you remove the masking after successfully painting the door.
Normal with pale metallics to blend into the adjacent panels or the painted panel will often be noticeably different.
I appreciate you want to DIY but I do wonder whether you would be better finding a local small bodyshop.
Edited by paintman on Tuesday 14th February 10:41
VeeReihenmotor6 said:
Paint is tricky and especially on a silver car where every imperfection will stand out, which with ratlle cans, limited experience and outdoor possibly cold and wet condition will make it very difficult to do nicely. Kudos to DIY but a local place with a good reputation would sort that for not a lot of cost. There are website such as fix my car where places will bid you for the work and it might just end up less than you think.
I am actually using a spray gun with compressor inside my indoor garrage. I am just bad at painting I appreciate the suggestion!mubmoh said:
Thank you for a detailed response. This is my own project car and I want to learn the process of car painting myself instead of always outsourcing it. I do not mind trying to blend the doors, I enjoy these aspects of projects. I’ve just hit a hurdle I can’t jump over. Do you believe the issue could be with the primer I used? Would a filler primer solve my issue? I will look at the TDS thanks.
Did you go back to bare metal when you started or just sand the existing paintwork?I'm going to suggest you go back to bare metal to get rid of anything that might cause issues.
Then consider an etch primer or epoxy primer (better) followed by primer (high build if required & might be your best bet as it will give you more scope to cover imperfections & if you get it orange -peely more to sand), colour as required to achieve uniform coverage & finally clear.
Guide coat before sanding as this will show imperfections.
I prefer a dry powder & you can keep applying it until you're sure the surface is right before applying the next material.
Various makers & I'm currently using 3M's 09560 - others are available!
The colour coats should not be sanded.
If you have lumps or nibs in the colour coat that do require sanding out - with very very fine paper - then it will be necessary to apply further colour coats to give a uniform appearance.
Imperative that you read & follow the TDS for each item as the finished result will only be as good as the prep.
Temperature is important - material or surface too cold will stop the droplets coalescing & flowing out & is one cause of excessive orange peel.
I'm not a fan of wet sanding & I dry sand using Mirka Abranet in appropriate grades either on a Mirka hand sanding pad or DA machine. Both connected to a Henry to remove the dust.
Edited by paintman on Tuesday 14th February 17:31
paintman said:
Did you go back to bare metal when you started or just sand the existing paintwork?
I'm going to suggest you go back to bare metal to get rid of anything that might cause issues.
Then consider an etch primer or epoxy primer (better) followed by primer (high build if required & might be your best bet as it will give you more scope to cover imperfections & if you get it orange -peely more to sand), colour as required to achieve uniform coverage & finally clear.
Guide coat before sanding as this will show imperfections.
I prefer a dry powder & you can keep applying it until you're sure the surface is right before applying the next material.
Various makers & I'm currently using 3M's 09560 - others are available!
The colour coats should not be sanded.
If you have lumps or nibs in the colour coat that do require sanding out - with very very fine paper - then it will be necessary to apply further colour coats to give a uniform appearance.
Imperative that you read & follow the TDS for each item as the finished result will only be as good as the prep.
Temperature is important - material or surface too cold will stop the droplets coalescing & flowing out & is one cause of excessive orange peel.
I'm not a fan of wet sanding & I dry sand using Mirka Abranet in appropriate grades either on a Mirka hand sanding pad or DA machine. Both connected to a Henry to remove the dust.
This is a really well written response and what I was hoping for. I appreciate the time taken.I'm going to suggest you go back to bare metal to get rid of anything that might cause issues.
Then consider an etch primer or epoxy primer (better) followed by primer (high build if required & might be your best bet as it will give you more scope to cover imperfections & if you get it orange -peely more to sand), colour as required to achieve uniform coverage & finally clear.
Guide coat before sanding as this will show imperfections.
I prefer a dry powder & you can keep applying it until you're sure the surface is right before applying the next material.
Various makers & I'm currently using 3M's 09560 - others are available!
The colour coats should not be sanded.
If you have lumps or nibs in the colour coat that do require sanding out - with very very fine paper - then it will be necessary to apply further colour coats to give a uniform appearance.
Imperative that you read & follow the TDS for each item as the finished result will only be as good as the prep.
Temperature is important - material or surface too cold will stop the droplets coalescing & flowing out & is one cause of excessive orange peel.
I'm not a fan of wet sanding & I dry sand using Mirka Abranet in appropriate grades either on a Mirka hand sanding pad or DA machine. Both connected to a Henry to remove the dust.
Edited by paintman on Tuesday 14th February 17:31
I didn't go back to bare metal but I definitely went to it as some points, I went through factory primer at some parts. I will try the primers you recommend, i hope these are the solutions. I do not mind spending time sanding as long as the finish is great afterwords. I will try the guide coats. I have a DA machine but end up hand sanding, as it feels the DA cannot reach the curvature of the door.
Im no expert but you can buy a stopper filler used for a very last fine fill.
Its great to see someone having a go rather than just opening your wallet for the easy way out.
I painted a couple of wings on my car last year and although happy with the result, its not perfect but looks fine on a 20year old 4x4. The problem I had was the paint colour is nowhere near the colour of the car. I used the factory code to get the paint mixed but in fairness the car has been blown over in the past.
I also did a small repair on another car door and had the paint colour matched and that was not quite the same, it looked perfect until the sun hit it.
Jaz2000 said:
Im no expert but you can buy a stopper filler used for a very last fine fill.
Its great to see someone having a go rather than just opening your wallet for the easy way out.
I painted a couple of wings on my car last year and although happy with the result, its not perfect but looks fine on a 20year old 4x4. The problem I had was the paint colour is nowhere near the colour of the car. I used the factory code to get the paint mixed but in fairness the car has been blown over in the past.
I also did a small repair on another car door and had the paint colour matched and that was not quite the same, it looked perfect until the sun hit it
Not unusual. Its great to see someone having a go rather than just opening your wallet for the easy way out.
I painted a couple of wings on my car last year and although happy with the result, its not perfect but looks fine on a 20year old 4x4. The problem I had was the paint colour is nowhere near the colour of the car. I used the factory code to get the paint mixed but in fairness the car has been blown over in the past.
I also did a small repair on another car door and had the paint colour matched and that was not quite the same, it looked perfect until the sun hit it
When a car manufacturer starts using a new colour they will see how well it sells.
If it does then as they get to the end of that batch of paint they will order another.
That's when the fun starts.
The next batch will almost invariably be slightly different to the first.
So the new batch is the same colour code, but when I look the formulation up on the paint system I use it will show the original plus a variant shade & how that differs from the original, e.g lighter, darker, redder, bluer, coarser, finer etc
The variant shades are not shown on the car or its build sheet.
If I'm lucky I will have a colour swatch for both.
Some colours have many variants.
If the car's had a respray then your guess is as good as mine & if none of the swatches are a good match then eye-matching or a spectrophotometer is the best option - & even then it may not be a good match.
How it's sprayed can affect how it looks - esp metallics & 'effects' paints - & the colour of the primer can be another factor.
Worst case you might need to spray the side.
dhutch said:
I've got not experience in this, but 60 grit seems very coarse. As said, are you sure you got all the previous grits scratches out each time?
Yep, I went way too coarse for poor planning reasons. Now it’s time to fix this issue. I do not think I got previous scratches out.Jaz2000 said:
Im no expert but you can buy a stopper filler used for a very last fine fill.
Its great to see someone having a go rather than just opening your wallet for the easy way out.
I painted a couple of wings on my car last year and although happy with the result, its not perfect but looks fine on a 20year old 4x4. The problem I had was the paint colour is nowhere near the colour of the car. I used the factory code to get the paint mixed but in fairness the car has been blown over in the past.
I also did a small repair on another car door and had the paint colour matched and that was not quite the same, it looked perfect until the sun hit it.
Do you have any brands/products you can recommend? Thanks for the positivity. I’m hoping I can get a good match in the end, but that’s the next step after this.Its great to see someone having a go rather than just opening your wallet for the easy way out.
I painted a couple of wings on my car last year and although happy with the result, its not perfect but looks fine on a 20year old 4x4. The problem I had was the paint colour is nowhere near the colour of the car. I used the factory code to get the paint mixed but in fairness the car has been blown over in the past.
I also did a small repair on another car door and had the paint colour matched and that was not quite the same, it looked perfect until the sun hit it.
paintman said:
Worst case you might need to spray the side.
I’m hoping, I can get away with doing half the 2 adjacent panels. Update post.
I sanded it all back down, using 80 grit, then worked back up to 400.
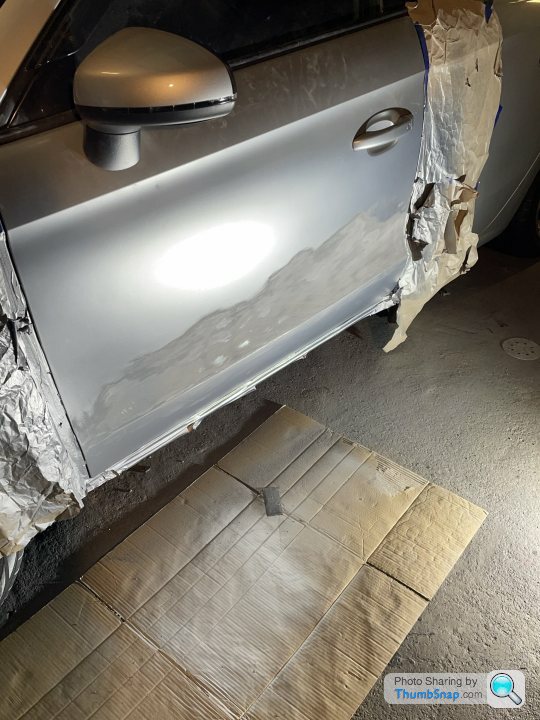
From there I applied yellow filler primer and let it dry.
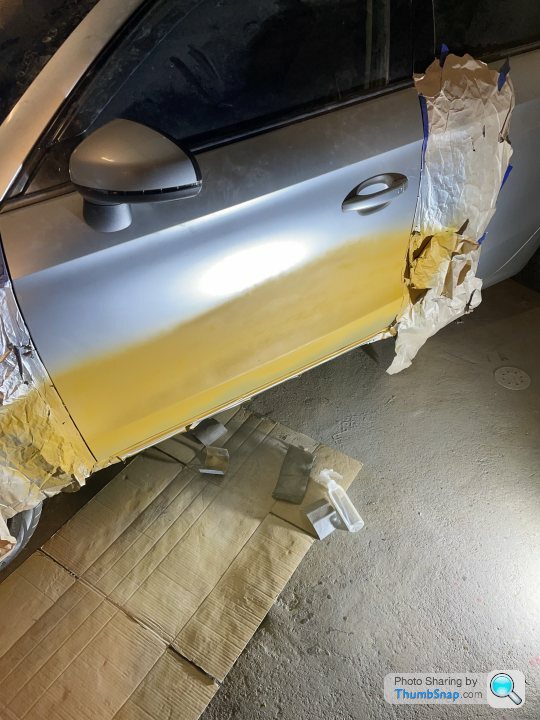
I then sprayed a guide coat using some black spray paint I had lying around.
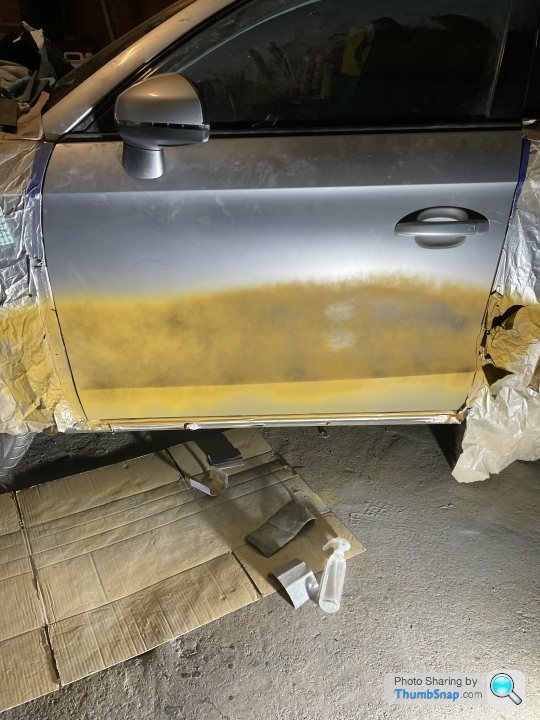
I sanded it all down to 180 making sure to remove all the 'black paint' which was visible. Once that all disappeared I focused on sanding it back to 400.
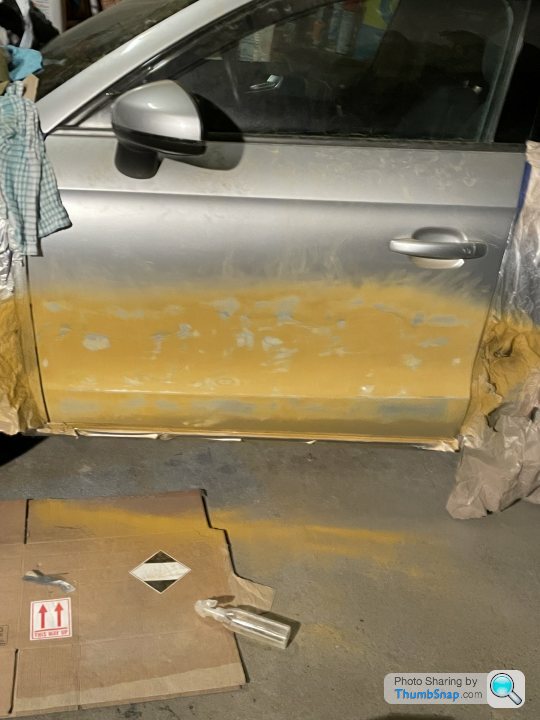
This is where I am now. To not mess up I haven't proceeded without asking for advice first! Should I reapply primer now, then sand from 320 to 600? It will then finally be ready for base coat? Also I can use my normal grey primer at this point correct?
I sanded it all back down, using 80 grit, then worked back up to 400.

From there I applied yellow filler primer and let it dry.

I then sprayed a guide coat using some black spray paint I had lying around.

I sanded it all down to 180 making sure to remove all the 'black paint' which was visible. Once that all disappeared I focused on sanding it back to 400.

This is where I am now. To not mess up I haven't proceeded without asking for advice first! Should I reapply primer now, then sand from 320 to 600? It will then finally be ready for base coat? Also I can use my normal grey primer at this point correct?
What did the TDS for the yellow stuff say about surface preparation & what to do after application?
Make & type of the yellow primer?
What do the TDS for 'your normal grey primer' say about surface preparation & what to do after application?
Make & type of the grey primer?
FWIW this the TDS for the primer I use. Note it is 2k.
Kapci 625 (grey or white depending what I'm applying over it)
https://www.flpgroup.co.uk/data-sheets/FLK625-TDS....
Don't be quite so keen to reach for the really coarse paper. Yes, it will remove stuff quickly but, as you've found, will leave big scratches which will then require more work to remove them so I don't think it's worth it.
If the yellow you've used is an etch primer you've gone through it an many areas & need to reapply - subject to the instructions in the TDS - to achieve a uniform finish.
Any of the rub throughs left in it are likely to show as 'fried eggs' in subsequent coats. To much thinner/too heavy coats in the next coats could also cause a reaction in their edges & you get to take it all off again.
Other than removal of sags, runs, orange peel or nibs I wouldn't normally sand etch primer beyond what is necessary in the TDS for the next material.
The etch primer is to promote adhesion to the substrate esp of what are 'difficult' surfaces, I do a lot of caravan work & they're mainly aluminium & need an etch primer.
Once etched the primer is applied over it & then sanded to achieve the uniform surface for the colour coats.
ETA Paint defects, causes & treatment: https://uk.ppgrefinish.com/en/paint-defects/#
Further ETA Stopper was mentioned earlier. I use this: www.ebay.co.uk/itm/174781052733
TDS for it: https://multimedia.3m.com/mws/media/889062O/tds-05...
If you had a lot of scratches then you would probably be better using a glaze - U-Pol Dolphin glaze is fine. I've got some but can't remember the last time I needed to use it. https://u-pol.com/en-us/product/fillers-putties/pu...
Edited by paintman on Thursday 16th February 12:27
Just to touch on guide coat again.
It's used during sanding of any material to show up low spots which might require additional filler.
With body filler you would sand using a backing pad until the majority of the area is flat.
Any low spots would then be further filled & the surface re-sanded with guide coat until the surface is flat & need no further bodyfiller.
This can take some time & can't be rushed.
Followed by etch primer if req'd used in accordance with its TDS & any light sanding necessary to remove sags, nibs etc & prepare the surface to receive the next material.
Followed by spray primer again in accordance with its TDS.
Guide coat & sand the primer using a backing pad so it's flat & suitably prepared for the application of the colour coats.
Then colour coats & clear coats.
Looks like you've either got a lot of dents or you've sanded without using a backing pad of suitable size - I suspect the latter.
The Mirka pad I use most is 70x198mm but for large areas I've got a two hand backing pad 70x420mm.
I buy the 70x420mm strips as it works out cheaper than buying the two sizes.
Both pads also come with a soft pad to make curved surfaces easier.
The DA has a standard pad & I also have a soft pad for that.
Edited by paintman on Thursday 16th February 15:54
paintman said:
What did the TDS for the yellow stuff say about surface preparation & what to do after application?
Make & type of the yellow primer?
What do the TDS for 'your normal grey primer' say about surface preparation & what to do after application?
Make & type of the grey primer?
FWIW this the TDS for the primer I use. Note it is 2k.
Kapci 625 (grey or white depending what I'm applying over it)
https://www.flpgroup.co.uk/data-sheets/FLK625-TDS....
Don't be quite so keen to reach for the really coarse paper. Yes, it will remove stuff quickly but, as you've found, will leave big scratches which will then require more work to remove them so I don't think it's worth it.
If the yellow you've used is an etch primer you've gone through it an many areas & need to reapply - subject to the instructions in the TDS - to achieve a uniform finish.
Any of the rub throughs left in it are likely to show as 'fried eggs' in subsequent coats. To much thinner/too heavy coats in the next coats could also cause a reaction in their edges & you get to take it all off again.
Other than removal of sags, runs, orange peel or nibs I wouldn't normally sand etch primer beyond what is necessary in the TDS for the next material.
The etch primer is to promote adhesion to the substrate esp of what are 'difficult' surfaces, I do a lot of caravan work & they're mainly aluminium & need an etch primer.
Once etched the primer is applied over it & then sanded to achieve the uniform surface for the colour coats.
ETA Paint defects, causes & treatment: https://uk.ppgrefinish.com/en/paint-defects/#
Further ETA Stopper was mentioned earlier. I use this: www.ebay.co.uk/itm/174781052733
TDS for it: https://multimedia.3m.com/mws/media/889062O/tds-05...
If you had a lot of scratches then you would probably be better using a glaze - U-Pol Dolphin glaze is fine. I've got some but can't remember the last time I needed to use it. https://u-pol.com/en-us/product/fillers-putties/pu...
I am using some poor quality materials. I bought my primer from Halfords and it doesn't come with any technical data sheet like you've provided (what you have is really clear in explanation). I should've bought better materials as the price difference is quite low. The yellow primer is a high build filler primer. https://www.halfords.com/motoring/paints-and-body-...Make & type of the yellow primer?
What do the TDS for 'your normal grey primer' say about surface preparation & what to do after application?
Make & type of the grey primer?
FWIW this the TDS for the primer I use. Note it is 2k.
Kapci 625 (grey or white depending what I'm applying over it)
https://www.flpgroup.co.uk/data-sheets/FLK625-TDS....
Don't be quite so keen to reach for the really coarse paper. Yes, it will remove stuff quickly but, as you've found, will leave big scratches which will then require more work to remove them so I don't think it's worth it.
If the yellow you've used is an etch primer you've gone through it an many areas & need to reapply - subject to the instructions in the TDS - to achieve a uniform finish.
Any of the rub throughs left in it are likely to show as 'fried eggs' in subsequent coats. To much thinner/too heavy coats in the next coats could also cause a reaction in their edges & you get to take it all off again.
Other than removal of sags, runs, orange peel or nibs I wouldn't normally sand etch primer beyond what is necessary in the TDS for the next material.
The etch primer is to promote adhesion to the substrate esp of what are 'difficult' surfaces, I do a lot of caravan work & they're mainly aluminium & need an etch primer.
Once etched the primer is applied over it & then sanded to achieve the uniform surface for the colour coats.
ETA Paint defects, causes & treatment: https://uk.ppgrefinish.com/en/paint-defects/#
Further ETA Stopper was mentioned earlier. I use this: www.ebay.co.uk/itm/174781052733
TDS for it: https://multimedia.3m.com/mws/media/889062O/tds-05...
If you had a lot of scratches then you would probably be better using a glaze - U-Pol Dolphin glaze is fine. I've got some but can't remember the last time I needed to use it. https://u-pol.com/en-us/product/fillers-putties/pu...
Edited by paintman on Thursday 16th February 12:27
My normal grey primer is hycote. They provide a TDS, states cleaning information and how to apply.
https://www.hycote.co.uk/product/grey-primer-2/
I will be avoiding the coarse stuff from now onwards!
The yellow stuff isn't an etch primer. Thanks for all the info on etch though, I will make note of it if I ever require. The door is actually in very good condition other than the paint job.
paintman said:
Just to touch on guide coat again.
It's used during sanding of any material to show up low spots which might require additional filler.
With body filler you would sand using a backing pad until the majority of the area is flat.
Any low spots would then be further filled & the surface re-sanded with guide coat until the surface is flat & need no further bodyfiller.
This can take some time & can't be rushed.
Followed by etch primer if req'd used in accordance with its TDS & any light sanding necessary to remove sags, nibs etc & prepare the surface to receive the next material.
Followed by spray primer again in accordance with its TDS.
Guide coat & sand the primer using a backing pad so it's flat & suitably prepared for the application of the colour coats.
Then colour coats & clear coats.
Looks like you've either got a lot of dents or you've sanded without using a backing pad of suitable size - I suspect the latter.
The Mirka pad I use most is 70x198mm but for large areas I've got a two hand backing pad 70x420mm.
I buy the 70x420mm strips as it works out cheaper than buying the two sizes.
Both pads also come with a soft pad to make curved surfaces easier.
The DA has a standard pad & I also have a soft pad for that.
The guide coat really highlighted the deep sanding scratches I had. It's used during sanding of any material to show up low spots which might require additional filler.
With body filler you would sand using a backing pad until the majority of the area is flat.
Any low spots would then be further filled & the surface re-sanded with guide coat until the surface is flat & need no further bodyfiller.
This can take some time & can't be rushed.
Followed by etch primer if req'd used in accordance with its TDS & any light sanding necessary to remove sags, nibs etc & prepare the surface to receive the next material.
Followed by spray primer again in accordance with its TDS.
Guide coat & sand the primer using a backing pad so it's flat & suitably prepared for the application of the colour coats.
Then colour coats & clear coats.
Looks like you've either got a lot of dents or you've sanded without using a backing pad of suitable size - I suspect the latter.
The Mirka pad I use most is 70x198mm but for large areas I've got a two hand backing pad 70x420mm.
I buy the 70x420mm strips as it works out cheaper than buying the two sizes.
Both pads also come with a soft pad to make curved surfaces easier.
The DA has a standard pad & I also have a soft pad for that.
Edited by paintman on Thursday 16th February 15:54
I sanded down quite hard in some spots to eliminate these deep scratches that's why it doesn't seem uniform anymore. You're right I am not using a suitable size backing pad.
From here I will reapply primer and guide coat again, this time to make sure everything is the same level.
Thanks for all your help. It's been so informative.
I'm a little concerned you may have made a number of shallow depressions sanding the deep scratches out.
I'd suggest guide coating & using a backing pad to see it that's the case.
If it is, you may need to consider using filler to level the surface again.
Aerosols do have some uses, but over larger areas you're handicapping yourself, although I can understand why you don't want to spend a lot of money on litre sized tins of stuff which you may never use again.
For things such as your door you'll get better uniform coverage with a full size gun.
Edited by paintman on Thursday 16th February 21:02
paintman said:
I'm a little concerned you may have made a number of shallow depressions sanding the deep scratches out.
I'd suggest guide coating & using a backing pad to see it that's the case.
If it is, you may need to consider using filler to level the surface again.
Aerosols do have some uses, but over larger areas you're handicapping yourself, although I can understand why you don't want to spend a lot of money on litre sized tins of stuff which you may never use again.
For things such as your door you'll get better uniform coverage with a full size gun.
I've just relayed the primer, going to resand it tomorrow and see how smooth it appears. I only use aerosol for the primer, I do have a spray gun with my basecoat. I do not mind buying 1L tins for around £30 when I'm spending £12 on 500ml spray cans which always feel less than they are. Lesson learned!I'd suggest guide coating & using a backing pad to see it that's the case.
If it is, you may need to consider using filler to level the surface again.
Aerosols do have some uses, but over larger areas you're handicapping yourself, although I can understand why you don't want to spend a lot of money on litre sized tins of stuff which you may never use again.
For things such as your door you'll get better uniform coverage with a full size gun.
Edited by paintman on Thursday 16th February 21:02
Just to chip in here tho agree with everything paintman has said unsurprisingly
You’re using much coarser sandpaper than we ever would. Should be 600/800 grit tops, should be ‘wet & dry’ and must be used with lots of water. Dry sanding paint work def a no go. There’s no way you’re getting a silver car to look scratch free if you’re using wood sanding grit levels!
You’re using much coarser sandpaper than we ever would. Should be 600/800 grit tops, should be ‘wet & dry’ and must be used with lots of water. Dry sanding paint work def a no go. There’s no way you’re getting a silver car to look scratch free if you’re using wood sanding grit levels!
paintman said:
Aerosols do have some uses, but over larger areas you're handicapping yourself, although I can understand why you don't want to spend a lot of money on litre sized tins of stuff which you may never use again.
I am soon to apply clearcoat and debating to purchase paint cans instead of spray cans. Is there any paint cans you recommend, I am viewing 1k and 2k products, and I do understand the difference, however I struggle to understand which is the superior product and better option to purchase.Edited by paintman on Thursday 16th February 21:02
Thanks!
Gassing Station | Bodywork & Detailing | Top of Page | What's New | My Stuff


