So it looks like FU211 (S3-1991) is going to...
Discussion


Depends upon how far you are stripping down. If only body off (or raised 200mm) to rebuild the outriggers then apart from actually lifting the body all the fixings can be undone with normal DIY tools. The body needs to lift high at the back first then backwards (or move the chassis forwards)
Are you doing this in your garage?
Are you doing this in your garage?
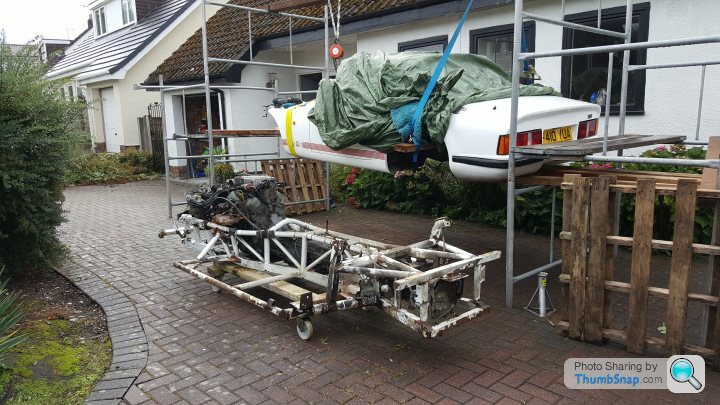
My S1 is stripped right down at present and the chassis is away getting repaired after being sandblasted. My garage has no lifting room but I have a lifting eye in my carport that I use for lifting motors in and out (and have used it for lifting my Formula Ford out of the trailer when there weren't enough bits to roll it out). An engine crane or similar would be useful as lifting the whole body with one lifting point is difficult. I took mine to bits when we were in full lock down so couldn't go and buy/borrow anything, I had to use what I had on hand. Nothing special required - socket set & spanners plus my little disc grinder for those bolts that wouldn't come undone. If you take the body right off (as I have) you need room to store it and work on the car. I made enough room by shuffling cars around and the race car went into storage in its trailer until I needed the trailer to take the chassis away to be repaired.
Dave
Dave
That's all useful and encouraging info! Thanks 
How many hours should I expect it to take to remove the body.
Of course at the moment I have all the time in the world but it's going to take 100 hours then...
Just thought of another question. How high do I need to get the chassis off the ground to remove the body.
Do I need anything more than the normal trolley jack, which I have two of?
Edited by paul.deitch on Saturday 9th May 03:09
Actually removing the body is the work of half a day if you have done it before and day if you haven't. I took a few days deliberating the idea of tackling the chassis refurbishment without removing the body and decided that was crazy given how easy it it to separate the two lumps of car.
From memory (individual cars may differ of course!):
1. Drain the coolant and remove the battery.
2. Disconnect the two pipes from the heater matrix.
3. Remove the bonnet.
4. Remove the handbrake and gear knob.
5. Disconnect the steering.
6. Pull off all the engine wiring loom connectors and the wires to the alternator. Depending on how cables are run you may need to snip the odd cable tie.
7. Then the oil pressure sensor wire and the reverse switch wires to the gearbox.
8. Disconnect the fuel tank and pump wires, and the fuel filler in the boot.
9. Disconnect the clutch and brake master cylinder pipes and bend out of the way of the body.
10. Undo the eight big bolts holding the S1 body to the chassis. Note the S2 has a couple more under the radio I believe.
11. The lift - Put a short plank of wood under the floor and start carefully jacking to get some height before slipping on the lifting slings front and rear. You can rest it on axle stands as you move around the car jacking it up.
If you keep checking for wires, pipes, bolts and cracking noises as you lift the body you can save breaking bits, and leave the targa tops in place to prevent it flopping in the middle.
With the slings in place hoist the back end first and then push the chassis forwards a few inches. Think of it as removing a shoe as the body slips into the shape of the chassis at the front.
12. Roll the chassis and engine out and open a cold one.
Refitting is a reversal of the process.
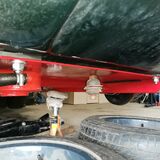
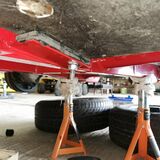
I've got a garage that sounds like it's got very similar dimensions to yours. I did a body lift last year to replace the rear beams that hold the trailing arms. Raised the whole car first by about a foot and rested it on very stable axle stands; then used trolley jacks at the front and a block and tackle for the rear to gently lift the body. It gave me about 8" above the outriggers at the front and over a foot above the training arm beams at the rear. I did loads of research first and found tons of great info and pictures on pistonheads. If you are going to have a go take your time and above all make sure it's safe. I then got a local professional welder / fabricator who works on cars to come round with his gear in a truck and do the rest.
Bercilac you forgot the seat belts. It took me a bit longer than it should have particularly the lifting due to lack of equipment. For undoing the likes of the outer seat belt and the body mounting bolts a second pair of hands would be really handy. TVR will have done something to make it more difficult. The position of the left outer body mounting bolt on my car was in such a position that I had to undo and partially remove the trailing arm bolt to get a socket on the body mount bolt.
Dave
Dave
NZDave said:
Bercilac you forgot the seat belts. It took me a bit longer than it should have particularly the lifting due to lack of equipment. For undoing the likes of the outer seat belt and the body mounting bolts a second pair of hands would be really handy. TVR will have done something to make it more difficult. The position of the left outer body mounting bolt on my car was in such a position that I had to undo and partially remove the trailing arm bolt to get a socket on the body mount bolt.
Dave
Yes! Good spot. I forgot about them, probably as they just sheared off. We ended up cutting the old outrigger mounts off and making new, thicker ones.Dave
Apologies for jumping onto this post but this should help Paul further down the line.
Just fitted the body on a new chassis and would welcome any pearls regarding what to look for when aligning, thickness of rubber packers and bolting it up particularly torque settings for the bolts?
Cheers
Just fitted the body on a new chassis and would welcome any pearls regarding what to look for when aligning, thickness of rubber packers and bolting it up particularly torque settings for the bolts?
Cheers
The new sheet of the correct rubber I bought is 7mm thick.
I didn't check the torque of the body bolts, I'm not sure it would be relevant given the sandwich of GRP body and the rubber washers I made to try to keep the elements at bay.
I also doused them with a liberal coating of Marine Silicone before installation and afterwards as I'm used to stopping water getting into my boats.
On my car I just put the same number and shape of pads back where the old ones came off. This didn't quite work as the targa was a rather sloppy fit, so in the end I added extra material to the tank cradle right at the back to squeeze the targa tangs into place.
Not an exact science but then that's what you expect with a hand made kit car :-)
Recently refitted and found the following useful.
Cut pads before you refit the body and use the old ones as templates. I supported the car on front ramps and rear axle stands with rear wheels removed.
I then took a small jack under the car and built a simple platform to lift the body slightly.
Start at the four front triangular pads pack with as little as you can get away with.
Move to the back pads - centre and side pads and adopt the same principal.
I found when I had done this the body gaps between the doors and particuarly the roof had changed. I then removed some of the centre pads and rear pads as I figured I had over done it. This worked and gave me a very acceptable fit. I then bolted down again rechecking the gaps. Slightly easier than I thought it would be!
PhilS3c said:
Recently refitted and found the following useful.
Cut pads before you refit the body and use the old ones as templates. I supported the car on front ramps and rear axle stands with rear wheels removed.
I then took a small jack under the car and built a simple platform to lift the body slightly.
Start at the four front triangular pads pack with as little as you can get away with.
Move to the back pads - centre and side pads and adopt the same principal.
I found when I had done this the body gaps between the doors and particuarly the roof had changed. I then removed some of the centre pads and rear pads as I figured I had over done it. This worked and gave me a very acceptable fit. I then bolted down again rechecking the gaps. Slightly easier than I thought it would be!
Hello there approx how many do you have visible at the tank cradle I have loads doesn’t seem right Cut pads before you refit the body and use the old ones as templates. I supported the car on front ramps and rear axle stands with rear wheels removed.
I then took a small jack under the car and built a simple platform to lift the body slightly.
Start at the four front triangular pads pack with as little as you can get away with.
Move to the back pads - centre and side pads and adopt the same principal.
I found when I had done this the body gaps between the doors and particuarly the roof had changed. I then removed some of the centre pads and rear pads as I figured I had over done it. This worked and gave me a very acceptable fit. I then bolted down again rechecking the gaps. Slightly easier than I thought it would be!
 D
D |https://thumbsnap.com/A2NbGVQ1[/url]
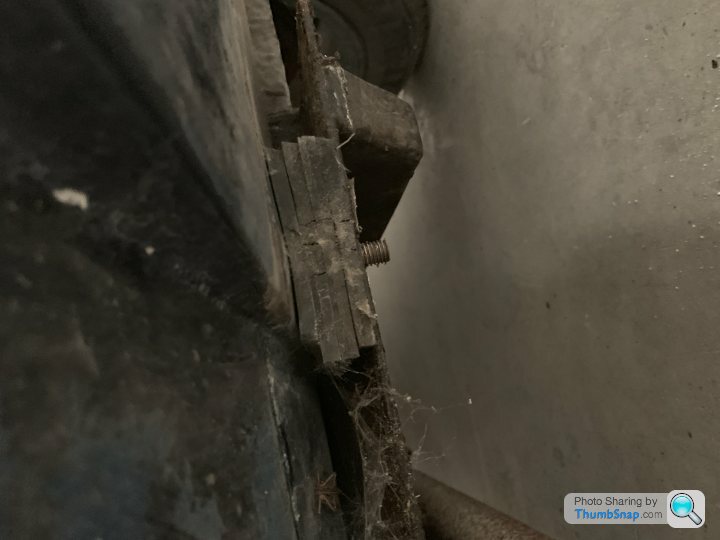

Thanks for all the advice. Body back on this morning - 2 x 7mm packers used on the front and centre fixing points and singles on the tank cradle. Needed these to pull the body away from the the top of the doors and allow the roof panels to fit. Happy with the shut lines - driver's door fouling slightly though I think this is due to worn hinges.
Edited by Jonesy07 on Saturday 16th May 15:10
Gassing Station | S Series | Top of Page | What's New | My Stuff