Extension tube help
Discussion


Hi, I'm having some trouble understanding how to get good results out of some macro extension tubes I have bought. I got some Neewer Nikon-Pro for my D5100. These apparently have all of the electrical connections to allow autofocus and aperture adjustment to work.
However I cannot get a single photo in focus with any of the tubes fitted. I have three length tubes; 12mm, 20mm and 16mm. I am using Nikon 35mm f/1.8 and Nikon 50mm f/1.8 lenses.
According to what I have read, the 35mm on the 12mm extension should give a new minimum focus distance of around 160mm (that's using the Cambridge in Colour tutorial page). However I can't get a clear photo of anything further than about 50mm away from the subject. Autofocus sort of works in that I can hear the motor but it just hunts and never settles so I manually focus.
I feel like I have fundamentally misunderstood what I am trying to do but for the life of me I can't work it out.
What I want to achieve is a 1:1 (or as close as possible representation) of a small subject a reasonable distance away (i.e. not stuck to the end of the lens!) What am I doing wrong? Do I need to adjust my calculations for my crop sensor?
To get a good working distance at 1:1 you'll need a longer focal length (and lots of extensions unless you use a dedicated macro lens).
The 160mm quoted will be the distance from the sensor to the in-focus plane, so only a small working distance from the front of the lens is left to play with.
At that sort of magnification the autofocus is unlikely to do anything useful, far better to set focus manually and move the camera till the right bit of the subject is in focus.
Edited by RedThree on Thursday 25th April 00:22
^^^^
as above.
Also, as depth of field is extremely limited when working close up, you need to avoid the wider apertures as this will leave an incredibly thin plane of sharp focus, and so it's generally a good idea to use a smaller aperture of say f11 or f16 as a starting point.
This then limits the light in addition to the extension tube also reducing the light reaching the sensor, so it is not unusual to need higher ISO and/or additional lighting/flash.
The high magnification also means that any camera shake is magnified, so driving the need for a higher shutter speed, unless working with a tripod (and a stationary subject), or flash as the main illumination.
Having used tubes initially (which do work well), I subsequently changed to Raynox lenses (DCR150 and DCR250), which simply clip on to your existing lenses.
Much easier to use, as they give more light to the sensor and can be removed/refitted instantly.
As already stated, you will find a 'macro' flash useful.
Here is my set-up used with my 70-200 f4, but can also be used with smaller focal lengths.
I bought my Raynox and Ringflash on ebay for less than £100.00 combined.
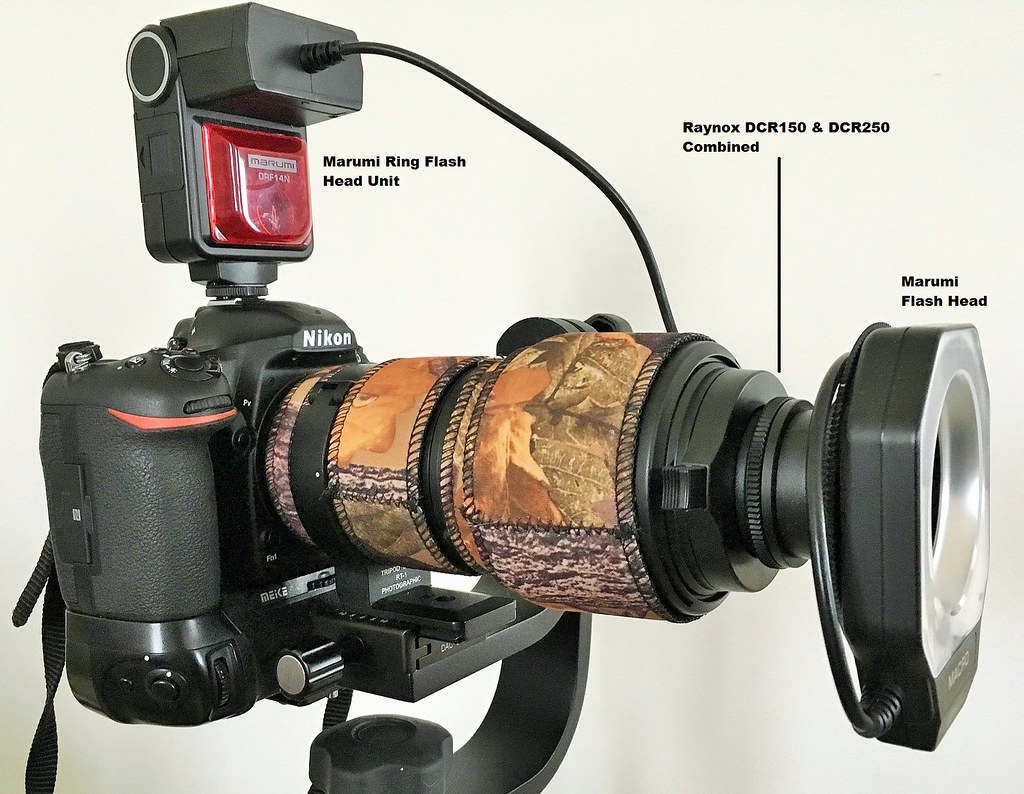 IMG_5429 by Glynn Hobbs, on Flickr
and here's the result:
 DSC_9210_00001 (6) by Glynn Hobbs, on Flickr
Much easier to use, as they give more light to the sensor and can be removed/refitted instantly.
As already stated, you will find a 'macro' flash useful.
Here is my set-up used with my 70-200 f4, but can also be used with smaller focal lengths.
I bought my Raynox and Ringflash on ebay for less than £100.00 combined.
IMG_5429 by Glynn Hobbs, on Flickrand here's the result:
DSC_9210_00001 (6) by Glynn Hobbs, on Flickrtbh, it sounds as though you just need to practice your technique first, as your current set-up, should still provide decent images.
Try a 'controlled' environment first; maybe a 'dead' insect on a flat surface, with no wind etc. Start with a tube that gives you the least magnification to start off with and then work your way up to larger magnifications. - Support yourself and the camera to minimise shake, as this will easily take the subject in and out of focus............even breathing makes a difference!
Also get as much light as possible on the subject. - Portable LED lights, or even a torch will make a difference.
Keep at it and you will get there!
_rubinho_ said:
Great tips; really useful!
I do have a Tamron 18-270 superzoom, would this work better? I'd love to buy a proper macro lens but budget doesn't allow for that right now
Yes it should, and the best thing to do is to try it!I do have a Tamron 18-270 superzoom, would this work better? I'd love to buy a proper macro lens but budget doesn't allow for that right now
Before getting a proper macro lens, I used to use extension tubes with a 120-300mm zoom which worked ok.
When you fit the extension tubes, it does strange things to the zoom/focus, in that with the zoom on its own, if something was in focus it'd stay reasonably in focus when you zoomed, with the extension tubes fitted, zooming massively changes the focus (which could be predicted as the magnification and close focus distance is changing).
Try setting the focus manually on the closest the lens will go, then set a particular zoom length (say about 150mm), and move the camera back and forth until the subject comes in focus. Longer focal length settings will give an increased distance away from the subject.
A bit of experimenting and you'll soon get the hang of it.
Example below with the 120-300mm and extension tubes (can't remember the length of tubes - I have the Kenko set of 3 and it was likely to have been a couple of them combined). The focal length was 247mm, and the photo is pretty much not cropped at all. Although not fully 1:1 macro, the combination of zoom and tubes does get you pretty close. In this case, I also needed to stay a reasonable distance away to avoid scaring the dragonfly.
 IMG_7404 by conradsphotos, on Flickr
Relating to the earlier post, this was at f4.5, so really shallow depth of field, but at 1/800 sec shutter (to try to keep movement down), and ISO 1600. The light was outside in bright summer sunshine.
This is why flash is a good idea, as it tends to freeze motion, and provides enough light for a smaller aperture, and lower ISO setting so reducing noise.
There are lots of ways to use any existing flash you may have (even the built in pop-up one on the camera, which I believe the D5100 has), without spending money on a dedicated ring flash. They basically involve a bit of Blue Peter style use of stuff like plastic milk bottles, cardboard, packing material, take away containers, tin foil, and gaffer tape, so can be a bit of fun building, and then modifying to get better results by aiming for more diffuse flash lighting.
Examples below of using a couple of external flashes (not a macro ring-light). The first is without diffusers, the second with homemade diffusers. In this case, the lens was a 100mm macro lens, but similar results should be possible with your zoom and extension tubes.
Have a scan through this thread on Talk Photography re. macro setups for some ideas!

No diffusers (harsh light/shadows).
Also notice the still limited depth of field, even at f14 or f16:
 fly by conradsphotos, on Flickr
Homemade diffusers (much softer light):
 fly_b by conradsphotos, on Flickr
ETA:
I also agree with all Vintage Racer's comments above.
Practice with a controlled test subject to start with - it doesn't even have to be an insect, dead or alive - a coin would also suffice, and shooting at different angles would give you an idea of the depth of field. Then add more extension tubes, and more light.
Good luck, and show us your results!
Edited by C&C on Friday 26th April 16:49
Gassing Station | Photography & Video | Top of Page | What's New | My Stuff